
MGR-E8-B - Dictaphone KENWOOD - Free user manual and instructions
Find the device manual for free MGR-E8-B KENWOOD in PDF.


| Product Type | Digital Voice Recorder |
| Brand | Kenwood |
| Model | MGR-E8-B |
| Dimensions (approx.) | 100 x 30 x 10 mm |
| Weight (approx.) | 50 g |
| Power Source | Built-in rechargeable lithium-ion battery |
| Recording Format | MP3 / WAV |
| Internal Storage | 8 GB (typical) |
| Recording Modes | HQ, LP, Voice Activation (VOX) |
| Microphone | Built-in stereo microphone |
| Speaker | Built-in mono speaker |
| Display | OLED screen with backlight |
| Connectivity | USB-C for data transfer and charging |
| Headphone Jack | 3.5 mm |
| Supported Languages | English, French, German, Spanish, etc. |
| Battery Life | Up to 20 hours recording (HQ mode) |
| Charging Time | Approx. 2.5 hours |
| Maintenance | Wipe with a soft, dry cloth. Do not use solvents. |
| Safety Warnings | Keep away from water and extreme temperatures. Do not disassemble. |
| Spare Parts Available | USB cable, battery (internal, service center) |
| Repairability | Battery replacement by authorized service only |
| General Information | Compact design for portable use. Includes voice activation and noise reduction. |
Frequently Asked Questions - MGR-E8-B KENWOOD
User questions about MGR-E8-B KENWOOD
0 question about this device. Answer the ones you know or ask your own.
Ask a new question about this device
Download the instructions for your Dictaphone in PDF format for free! Find your manual MGR-E8-B - KENWOOD and take your electronic device back in hand. On this page are published all the documents necessary for the use of your device. MGR-E8-B by KENWOOD.
USER MANUAL MGR-E8-B KENWOOD
Declaration of Conformity with regard to the EMC Directive 2004/108/EC
Manufacturer:
Kenwood Corporation
2967-3 Ishikawa-machi, Hachioji-shi, Tokyo, 192-8525 Japan
EU Representative's:
Kenwood Electronics Europe BV
Amsterdamseweg 37, 1422 AC UITHOORN, The Netherlands


© B60-5825-08/00 (E/X) 1AJ6P1P0109-- (XE0)
Contents
Safety precautions ....4
Unpacking 9
Read Before Use
Names and functions of parts .....10
Screen display items 14
Getting started
About the power supply 16
Switch this unit ON 16
Switch this unit OFF....16
Remaining battery power indication..... 16
Recharging from a PC connected with USB connection ....17
Operation while supplying external power....18
Preventing accidental operation
(Hold function).... 19
Defeating all control buttons 19
Defeating only the record button ..... 19
Enabling all buttons....19
Switching on for the first time 20
Connecting stereo headphones ..... 22
Selecting the ear tips 22
Inserting/ removing a microSD card.....23
Recording music
Basic recording operation ....24
Preparing for recording 24
Starting to record 25
Stop recording 26
About wind noise....26
About successive recording ....26
Control and display during recording .... 28
Folders and recorded files ....30
Name of recorded files....30
About folders 30
Switching the folder 31
Other recording operations .... 32
Recording by manually adjusting the microphone recording level ....32
Recording from an external microphone ....33
Recording from an external audio component or musical instrument connected to the line input .... 34
Changing the Recording Settings......35
Editing a recorded file
Moving a recorded file ....38
Dividing a recorded file 40
Playing music tracks
Operations and display in playback .....42 Resume function ..... 42
Playback by selecting music from the list 44
Various play modes .... 46 Setting the playback setting items .... 46 Setting A-B repeat .... 47
Varying the playback speed ....48
Searching the point to be played by specifying the time ....49
Adding to/Deleting from the Favorite ... 50 Adding to the Favorite ....50 Playing Favorite....51 Deleting from the Favorite ....51
Connection of external components.....52 Connecting to the Line outout ..... 52 Connecting to the USB connector .....53
Digital Audio Player Link 54
Deleting files
Deleting files ....56
Deleting a selected file 56
Deleting all files (Formatting) 57
MGR-E8 2


Adjusting the audio
Adjusting the audio ....58
Adjusting the volume 58
Selecting the sound effects ....58
Menu function
Common settings under the menu......60
Setting the time 62
Sleep timer and alarm timer 64
Utilizing your computer
Connecting a PC 66
Connecting a PC 66
Disconnecting this unit from the PC ..... 67
Configurations of folders and files .....68
Transferring recorded files to a PC...... 70
Capturing Music in PC/
Transferring Music from PC ....72
This unit can play the following
3 types of music files. 72
Using Windows Media Player 12 .....72
Data transfer by drag & drop 73
Deleting files 75
Deleting using the Explorer 75
Appendix
Specifications....76
Error messages ....78
Troubleshooting....80
Glossary 82




10/08/04 13:48
Safety precautions
IMPORTANT SAFETY INSTRUCTIONS
Caution:
Read this page carefully to ensure safe operation.
Read Instructions – All the safety and operating instructions should be read before the product is operated.
Retain Instructions – The safety and operating instructions should be retained for future reference.
Heed Warnings – All warnings on the product and in the operating instructions should be adhered to.
Follow Instructions – All operating and use instructions should be followed.
WARNING :
- Do not use headphones during riding/driving a vehicle or walking.
Otherwise, a traffic accident may result. Never use headphones when you ride a bicycle or driving an automobile or motorbike. If this unit is used during walking, the ambient sounds will be cut and you may have difficulties in hearing various warning sounds.
- Do not operate this unit during riding or driving a vehicle.
Do not operate this unit when you drive or ride an automobile, motorbike or bicycle. Otherwise, a traffic accident may result. Be sure to stop the vehicle in a safe place before operating this unit.
- Do not stare at the display screen during riding or driving a vehicle.
Otherwise, a traffic accident may result.
• Always use the designated AC adapter.
Otherwise, a fire or electric shock may result.
- Always plug the power plug of the AC adapter into an outlet supplying the specified voltage.
Otherwise, a fire or electric shock may result.
Precautions :
- Do not insert or drop a metallic object or an easily flammable object inside this unit through an opening. Otherwise, a fire hazard or battery leak may result.
- When connecting ancillary equipment to this unit, read the instruction for the equipment, switch this unit off and connect the equipment as instructed. Also be sure to use the specified cord for the connection. Inappropriate connection, use of a non-specified cord or extension of the cord may cause heat generation and a burn or other injuries.
MGR-E8 4


Do not use or place the product in the following locations:
- A place with high humidity, such as in a bathroom or shower room. Also do not use this unit in a place subject to water splashes. Otherwise, a fire hazard or battery leak may result.
- Do not approach this unit to heating equipment (a stove, iron, etc.). Otherwise, a fire hazard or battery leak may result.
- Do not place this unit in a place subject to soot or vapor, for example in a kitchen or near an air humidifier, or in a place subject to excessive humidity or dust. Otherwise, a fire hazard or battery leak may result.
- Do not leave this unit in a place where the temperature may rise abnormally high, for example in a closed automobile or under direct sunlight. Otherwise, this unit or its parts may deteriorate or a fire hazard or battery leak may result.
Notes on using through headphones:
- Do not start listening with too high a volume. Otherwise, sudden output of a high-volume sound may cause hearing failure, etc.
- Do not listen to the audio with an extremely high volume for long hours. Otherwise, your hearing ability may be damaged.
- Do not use headphones if an abnormality is felt on the skin. Otherwise, skin inflammations may result. Should any abnormality be felt on the skin or ears during use of headphones, immediately stop using them and see a doctor.
- A person with an ear disease is discommended to use headphones. Otherwise, the disease may worsen. Should any abnormality be felt on the skin or ears during use of headphones, immediately stop using them and see a doctor.
- Attach and detach headphones around the ears gently and slowly. Violent attaching or detaching may injure the ear.
Notes on using through car stereo :
- Do not leave the products or batteries in the car, particularly above the dashboard, for this may lead to malfunction or damage due to solar heat.
- If the unit is connected to a car stereo using an audio cord, noise may sometimes interfere.



English5


10/08/04 13:48


Safety precautions
Handling
- Do not apply an excessive force to the display part. Otherwise, it may be damaged.
- Avoid storing this unit in a bag together with a hard object. Otherwise, this unit may be damaged when the bag is pushed.
- Do not expose this unit to an insecticide or other volatile substance or bring this unit in extended contact with a rubber or vinyl material. Otherwise, discoloration or peeling of the surface finish may result.
- Do not put this unit in a pocket of trousers. Otherwise, it may be damaged due to a strong impact when you sit down, etc.
- Protect this unit against sweat and moisture.
Do not use this unit by putting it in a breast pocket for long hours in the summer or during exercise. Otherwise, penetration of moisture or sweat may cause malfunction or failure.
Operating conditions
Temperature: 5 to 35°C. (without condensation)
Caution on condensation
Condensation (of dew) may occur inside the unit when there is a great difference in temperature between this unit and the outside. This unit may not function properly if condensation occurs. In this case, leave the unit for a few hours and restart the operation after the condensation has dried up.
Be specially cautious against condensation in the following circumstances:
When this unit is carried from one place to another across a large difference in temperature, when the humidity in the room where this unit is installed increases, etc.
Maintenance of the unit
When the front panel or case becomes dirty, wipe with a soft, dry cloth.
Do not use thinner, benzine, alcohol, etc. for these agents may cause discoloration.
In regard to contact cleaner
Do not use contact cleaners because it could cause a malfunction. Be specially careful not to use contact cleaners containing oil, for they may deform the plastic component.


Note on the built-in battery
- The battery built into this unit discharges spontaneously even when this unit is not used. This means that the built-in battery may be exhausted completely when this unit is left unused for a long period. If this happens, recharge the battery before using this unit.
- The battery recharging time is variable depending on the condition of the battery and ambient temperature.
- The available playback time reduces when this unit is used under low temperatures.
- The built-in battery can be recharged for about 400 times. (This is a reference value and is not guaranteed.)
- The built-in battery is a consumable part, and the available playback time reduces gradually after repeated use. If the available playback time becomes very short even after the battery has been recharged fully, the battery may be degraded; replace it with new one.
- Kenwood will not assume any liabilities for the alteration or loss of data caused due to complete discharging of the built-in battery.
• The built-in battery is a lithium ion battery.
It is free from the memory effect of Ni-Cd and nickel-hydrogen batteries, with which the capacity decreases if the battery is charged or discharged incompletely for several times.
The built-in battery therefore accepts additional charging before it has exhausted completely.

WARNING
- For the replacement of the built-in battery, contact your dealer.
Danger of Explosion if the battery is incorrectly replaced.
- Do not heat excessively the built-in battery, open it, modify it or throw it in fire or water.
Excessive heat generation, explosion or fire ignition may cause a fire.
- Do not leave the built-in battery near fire or under direct sunlight.
A fire, explosion or excessive heat generation may result.
- Attach insulating tape on the connectors of the built-in battery.
A fire or explosion may result if the battery electrodes are short-circuited.
- Do not leave the built-in battery within the reach of children.
Injury or other accidents may result.
- If the built-in battery fluid leaks and enters your eyes, immediately rinse your eyes with fresh water and call a doctor.
If the fluid is left in your eyes, an eye injury may result.

Safety precautions
Storage and maintenance of SD card
Before storage
- Be sure to put the SD card in the case before storing it.
- Do not leave the SD card in a place with extremely high temperature (under direct sunlight, etc.) or extremely high humidity.
When the SD card gets dirty
- Wipe lightly with a soft cloth, etc.
- Do not use lacquer thinner, benzine or alcohol.
Other cautions
- Do not open or modify the SD card.
- Do not peel off the label from the SD card.
- Do not attach a label or sticker on the SD card.
- Do not touch the metallic terminals on the backside with a finger or metallic object.
Note on disposal/transfer of SD card
The "Format" and "Delete" functions of this unit or a PC simply change the file management information and do not erase the data in the SD card completely. Before disposing of or transferring the SD card, it is recommended to destroy it physically or erase the internal data completely using commercially available PC data erasing software.
It is the user's responsibility to manage the data in the SD card properly.


MGR-E8


B60-5825-08_00_MGR-E8(E)_English_1AJ6P1P0109--(XEO).indd
10/08/04 13:48


Unpacking

Recorder
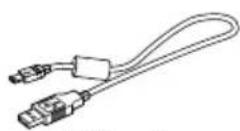
USB cable

Wind-screen


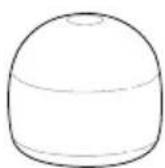
Ear tip
(L size, S size)

Instruction manual
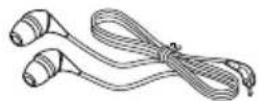
Headphones
(Ear tip: M size)
CAUTION
Excessive sound pressure from earphones or headphones can cause hearing loss.


English9

10/08/04 13:48
Read Before Use
Names and functions of parts

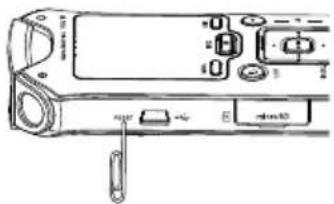
① Reset button
- If all of the buttons of this unit are defeated while [21] HOLD is set to OFF, press the RESET button to reset and switch off this unit. Press the RESET button with the tip of a clip.
CAUTION
When this unit is reset, its settings return to those of the last time it was switched on. The settings made since then are cleared.
natural_image
Line drawing of a device handle with ports and a clip, no text or symbols present② USB jack
- Connect to a PC using the provided USB cable to transfer music files or recharge the battery.
③ microSD card slot
- Insert a microSD card. (page 23)
④ Right microphone
⑤ Left microphone
⑥ Center microphone
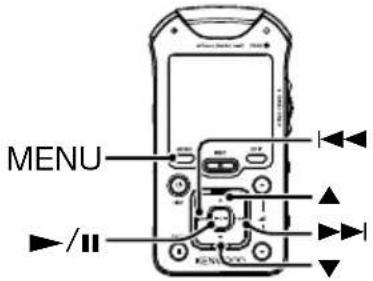
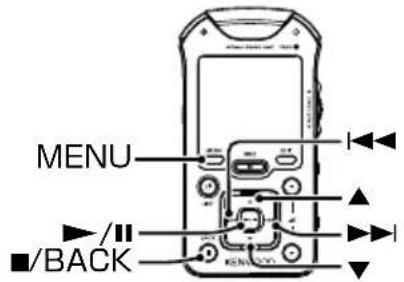
⑦ Menu button
- Press shortly to open the menu. Pressing the button again closes the menu.
MGR-E8 10


⑧ LIST Power/ List button
- Press and hold to switch the power ON/OFF.
- Press shortly during stop or play mode to open the list screen at the highest level of hierarchy.
- Press shortly while a list is displayed to return to the display during playback.
⑨ Select/ Play button
▲ Up button
- Press while the menu or list is displayed to move the cursor upward.
- Press during stop or play mode to open the list screen.
▼ Down button
- Press while the menu or list is displayed to move the cursor downward.
Left button
- Press during playback to skip to the beginning of the current track. Pressing the button at the beginning of a track skips to the beginning of the previous track.
- Press and hold to fast reverse the music.
▶▶ Right button
- Press while the menu or list is displayed to enter an item and go to the next item.
- Press during playback to skip to the beginning of the next track.
- Press and hold to fast forward the music.
▶/II Play/Pause button
- Press to play a track or let it pause.
- Press while the menu or list is displayed to enter a selected item.
⑩ ■/BACK Stop/ Back button
- Press during playback to stop it.
- Press during stop mode to switch the displayed information.
- Press during recording to stop it.
- Press shortly while the menu or list is open to return to the previous display page.
⑪ PEAK indicator
⑫ REC LEVEL knob
- During recording to adjust the recording level. (The adjustment is possible when [23] MIC REC LEVEL] is set to MANUAL.)

Continued to next page

English1
Names and functions of parts
⑬ REC button
- Press to enter recording standby mode. Press again to start recording.
- Press during recording to enter recording pause mode. Press again to resume recording.
• Rec indicated by the indicator
| Steady lighting Recording mode |
| Blink Recording standby orRecording pause mode |
| Extinguished Stop mode |
⑭ EDIT button
- Press during stop mode or while the list is displayed to open the file edit screen.
- Press during playback to add/delete favorite tracks or set A-B repeat.
- Press during recording standby to set the AUTO recording level adjustment.
- Press during recording to divide the recorded file at the point where the button is pressed.
⑮ Volume button
- Press to increase (▲) or decrease (▼) the volume. Pressing and holding a button segment varies the volume gradually.
⑯ Strap eyelet
• Pass the strap through this hole.
CAUTION
- Do not pass a metallic hook or like (a key holder, etc.) through the strap eyelet. Otherwise, this unit may be damaged.
- Do not swing around the unit by holding the strap. If the unit hits a person, an injury, malfunction or damage may result.
⑰ LINE OUT Line output
⑱ Phones jack
⑲ MIC Microphone input
⑳ LINE IN Line input
②1 HOLD switch
- ALL: Press to defeat all other buttons. This helps prevent erroneous operation of this unit when it is carried in a bag, etc. - REC: Press to defeat only the REC button. This prevents unintended recording mistake during playback of music, etc.
②2 Speaker
- When nothing is connected to [17] LINE OUT] terminal and [18]
☐] Phones jack, the speaker output the audio of the track being played.
• The speaker does not output any audio during recording.
MGR-E8 12


②3 MIC REC LEVEL Microphone recording level switch
- When the built-in microphones or an external microphone is used, set the recording level adjustment method to either MANUAL or AUTO.
⑳ MIC MODE Microphone mode switch
- When the built-in microphones are used, set the microphone mode to Monaural, 2-Microphone or 3-Microphone.
②5 PLUG IN POWER Plug-in power switch
- Set ON when using an external microphone with the plug-in power type.
②6 Tripod mount hole


10/08/04 13:48
Screen display items

flowchart
graph TD
    A["MENU"] --> B["Menu"]
    B --> C["Press for various settings."]
    A --> D["Record settings menu (page 35)"]
    A --> E["Playback settings menu (page 46)"]
    A --> F["Common settings menu (page 60)"]
    A --> G["LIST"]
    G --> H["List screen (page 44)"]
    D --> I["Rec setting"]
    E --> J["Play setting"]
    F --> K["Common setting"]
    G --> L["LIST"]
    style A fill:#f9f,stroke:#333
    style B fill:#ccf,stroke:#333
    style C fill:#cfc,stroke:#333
    style D fill:#fcc,stroke:#333
    style E fill:#cff,stroke:#333
    style F fill:#ffc,stroke:#333
    style G fill:#fcc,stroke:#333
    style H fill:#fff,stroke:#333



flowchart
graph TD
    A["Mobile Phone"] --> B["Press to edit files, etc."]
    B --> C["File edit screen"]
    C --> D["File edit screen"]
    D --> E["File edit screen"]
    E --> F["File edit screen"]
    F --> G["File edit screen"]
    G --> H["File edit screen"]
    H --> I["File edit screen"]
    I --> J["File edit screen"]
    J --> K["File edit screen"]
    K --> L["File edit screen"]
    L --> M["File edit screen"]
    M --> N["File edit screen"]
    N --> O["File edit screen"]
    O --> P["File edit screen"]
    P --> Q["File edit screen"]
    Q --> R["File edit screen"]
    R --> S["File edit screen"]
    S --> T["File edit screen"]
    T --> U["File edit screen"]
    U --> V["File edit screen"]
    V --> W["File edit screen"]
    W --> X["File edit screen"]
    X --> Y["File edit screen"]
    Y --> Z["File edit screen"]
    Z --> AA["File edit screen"]
    AA --> AB["File edit screen"]
    AB --> AC["File edit screen"]
    AC --> AD["File edit screen"]
    AD --> AE["File edit screen"]
    AE --> AF["File edit screen"]
    AF --> AG["File edit screen"]
    AG --> AH["File edit screen"]
    AH --> AI["File edit screen"]
    AI --> AJ["File edit screen"]
    AJ --> AK["File edit screen"]
    AK --> AL["File edit screen"]
    AL --> AM["File edit screen"]
    AM --> AN["File edit screen"]
    AN --> AO["File edit screen"]
    AO --> AP["File edit screen"]
    AP --> AQ["File edit screen"]
    AQ --> AR["File edit screen"]
    AR --> AS["File edit screen"]
    AS --> AT["File edit screen"]
    AT --> AU["File edit screen"]
    AU --> AV["File edit screen"]
    AV --> AW["File edit screen"]
    AW --> AX["File edit screen"]
    AX --> AY["File edit screen"]
    AY --> AZ["File edit screen"]
    AZ --> BA["File edit screen"]
    BA --> BB["File edit screen"]
    BB --> BC["File edit screen"]
    BC --> BD["File edit screen"]
    BD --> BE["File edit screen"]
    BE --> BF["File edit screen"]
    BF --> BG["File edit screen"]
    BG --> BH["File edit screen"]
    BH --> BI["File edit screen"]
    BI --> BJ["File edit screen"]
    BJ --> BK["File edit screen"]
    BK --> BL["File edit screen"]
    BL --> BM["File edit screen"]
    BM --> BN["File edit screen"]
    BN --> BO["File edit screen"]
    BO --> BP["File edit screen"]
    BP --> BQ["File edit screen"]
    BQ --> BR["File edit screen"]
    BR --> BS["File edit screen"]
    BS --> BT["File edit screen"]
    BT --> BU["File edit screen"]
    BU --> BV["File edit screen"]
    BV --> BW["File edit screen"]
    BW --> BX["File edit screen"]
    BX --> BY["File edit screen"]
    BY --> BZ["File edit screen"]
    BZ --> CA["File edit screen"]
    CA --> CB["File edit screen"]
    CB --> CC["File edit screen"]
    CC --> CD["File edit screen"]
    CD --> CE["File edit screen"]
    CE --> CF["File edit screen"]
    CF --> CG["File edit screen"]
    CG --> CH["File edit screen"]
    CH --> CI["File edit screen"]
    CI --> CJ["File edit screen"]
    CJ --> CK["File edit screen"]
    CK --> CR["File edit screen"]
    CR --> CS["File edit screen"]
    CS --> CT["File edit screen"]
    CT --> CU["File edit screen"]
    CU --> CV["File edit screen"]
    CV --> CW["File edit screen"]
    CW --> CX["File edit screen"]
    CX --> CY["File edit screen"]
    CY --> CZ["File edit screen"]


Getting started
About the power supply

Switch this unit ON
1 Cancel the HOLD function Slide [HOLD] to the "OFF" position.

2 Switch this unit ON Press [Power] until the KENWOOD logo is displayed.
Switch this unit OFF
1 Switch this unit OFF Press and hold [Power] until the display is turned off.

- This unit switches OFF automatically after it has been left in stop mode for a certain period of time (Auto Power-OFF). The time until Auto Power-OFF occurs can be changed (page 60).
Remaining battery power indication
The icon on the bottom right of the display indicates the battery power status.
| Shows the remaining power of the battery. | |
| The battery is nearly exhausted. Recharge the battery. | |
| Battery cannot be recharged. The battery should be recharged within the operating temperature range. (page 76) |
MGR-E8 16


Recharging from a PC connected with USB connection
This unit incorporates a rechargeable battery (hereafter "the battery"), which can be charged from a PC connected through a USB cable.
1 Start up the PC
2 Connect a USB cable to the USB port of the PC
3 Connect the USB cable to the USB jack of this unit

natural_image
Diagram of a device with ports and connectors, no visible text or symbols
USB cable
The battery will be recharged fully in about 2.5 hours.
The battery icon is animated during recharging. When recharging completes (about 4 hours), the icon stops in the "☐" condition.

4 Disconnecting this unit from the PC (page 67)

- For the PC system requirements, see
(page 76). - This unit is switched ON automatically at the moment it is connected to the PC.
- When the USB connection, always use a supplied USB cable.
- This unit should be connected directly to the USB port of the PC. We cannot guarantee the operation if this unit is connected via a USB hub.
- Recharging is not possible during data transfer with the PC. If software that loads files permanently from this unit is running, exit it before recharging.
Continued to next page


English17

B60-5825-08_00_MGR-E8(E)_English_1AJ6P1P0109--(XEO).indd
17
10/08/04 13:48
Turning On/Off the power
Operation while supplying external power
For long hours of recording or playback, the power can be supplied externally from the USB port of a PC.
1 Start up the PC
2 Connect a USB cable to the USB port of the PC
3 Switch this unit OFF
Press and hold [Power] until the display is turned off.
4 While holding [■/BACK], connect the USB cable to the USB jack of this unit
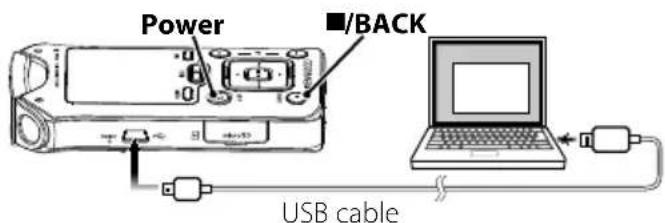
■ To finish operation
5 Switch this unit OFF
6 Disconnect the USB cable from this unit
- The following operations are unavailable during operation using the external power supply.
- Battery status indication
- Battery recharging
-
Control from PC
-
When the USB connection, always use a supplied USB cable.
- This unit should be connected directly to the USB port of the PC. We cannot guarantee the operation if this unit is connected via a USB hub.
MGR-E8 18
Preventing accidental operation (Hold function)
The HOLD function defeats all of this unit's buttons and helps prevent erroneous operation when this unit is carried in a bag, etc.
Defeating all control buttons
1 Set the hold function for all buttons of this unit Slide [HOLD] to the "ALL" position.

Defeating only the record button
1 Set the hold function for the REC button Slide [HOLD] to the "REC" position.

Enabling all buttons
1 Cancel the hold function Slide [HOLD] to the "OFF" position.


When a defeated button is pressed while either hold function is set, "Keys: ALL HOLD" or "Keys: REC HOLD" is displayed.
Switching on for the first time
When you switch this unit on for the first time after purchase, you need to set the language used in the display and the current date/time information. It is recommended to set the correct date and time because each of the recorded file will be named after the date and time of each recording session (time stamp function).
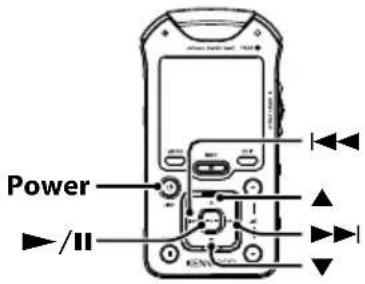
1 Switch this unit ON Press the [Power] until the KENWOOD logo is displayed.
2 Setting the menu language Press [▲]/[▼] to select language and press [▶]/[■].

3 Setting the date and time - Press [I◄◄]/[►►] to select Year, Month, Day, "24H/AM/PM", Hour and Minute. - Press [▲]/[▼] to vary the figures of date and time.
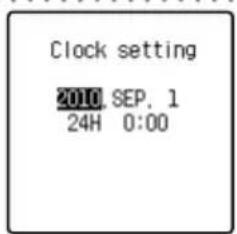
4 Enter the date and time Press [▶/■].


• The language set here will be used in the subsequent screen display.
- The language and date/time set here are held even after this unit is switched off.
- The information set here can later be modified in
- If the remaining battery power is low, connect this unit to a PC for recharging. About 10 minutes of recharging will make it possible to check the operations of this unit. (page 17)



B60-5825-08_00_MGR-E8(E)_English_1AJ6P1P0109--(XE0).indd 21
10/08/04 13:48
Connecting stereo headphones
Connect the provided stereo headphones to this unit.

Selecting the ear tips
The headphones are shipped from the factory with the M-size ear tips attached. If the M-size ear tips do not match your ears, replace them with the provided S-size or L-size ear tips.

flowchart
graph TD
    A["Power Hub"] --> B["S-size"]
    A --> C["M-size"]
    A --> D["L-size"]

• Always hold the headphone bodies when attaching or detaching headphones. Pulling a cord may result in malfunction.
- To clean the ear tips, remove them from the headphone bodies and wash with a neutral detergent solution. After washing, wipe them dry before use.
- The ear tips may deteriorate after a long period of use or storage.
MGR-E8 22
Inserting/ removing a microSD card
This unit can play music stored in a microSD card or recording music in a microSD card.
This unit accepts a microSD or microSDHC memory card. For details, see
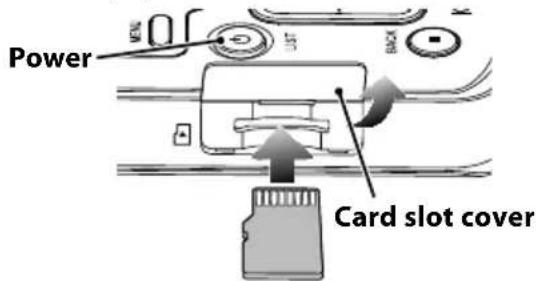
1 Press and hold [Power] until the display is turned off
2 Open the card slot cover
3 Inserting/ removing a microSD card
■ To insert a microSD card
Hold the microSD card so that the terminal pins face upward as shown in the illustration, and push insert the card straight into the card slot until it clicks.
■ To remove a microSD card
Push the microSD card until it clicks and then remove your finger from the card. The card pops up so that you can pull it out with your fingers.
4 Close the card slot cover

- A microSD or microSDHC card that has been formatted with another device, including a cell-phone, may be unusable with this unit. Be sure to format the card in this unit before use. (page 57)
- If
is set to , the files in the microSD card cannot be displayed. In this case, please update the DB. (page 60) - When the microSD card is inserted, 5D is displayed on the screen.

B60-5825-08_00_MGR-E8(E)_English_1AJ6P1P0109--(XEO).indd

English23
10/08/04 13:48
Recording music
Basic recording operation
Preparing for recording
1 Switch this unit ON Press [Power].
2 Setting the recording format
Select in
The default recording format set before this unit left the factory is "WAV 44.1kHz 16bit".
3 Select a folder for recordings
Select in
The default folder set before this unit left the factory is "MIC_A".
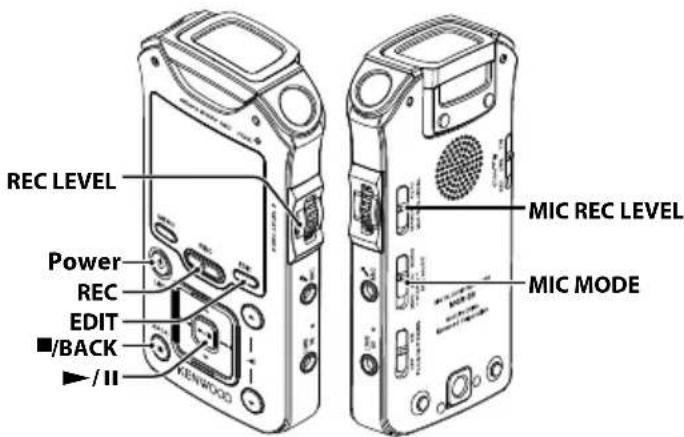
4 Setting the microphone mode Slide [MIC MODE] to select the microphone mode.
| Setting Setting overview Display | ||
| 3MIC | Stereo recording mode using the L/R (omnidirectional) and Center (unidirectional) built-in microphones. This mode can record audio with high directivity in the front direction while restricting the ambient noise. | [IMAGE] |
MGR-E8 24
| Setting Setting overview Display | ||
| 2MIC | Stereo recording mode using the L/R (omnidirectional) built-in microphones that are installed at an angle of 120°. This mode can record stereo audio with a rich feeling of expansion. |  |
| MONO | Monaural recording mode using only the Center (unidirectional) built-in microphone. This mode can record audio with high directivity in the front direction. |  |
5 Set the recording level
■ To set the recording level automatically
Slide [MIC REC LEVEL] to the "AUTO" position.
This setting records audio at as uniform as possible level and is therefore suitable for recording of a speech, etc.
■ To set the recording level manually
Slide [MIC REC LEVEL] to the "MANUAL" position. (page 32)
Starting to record
1 Enter recording standby mode Press [REC].
is displayed.
■ To set the recording level manually
Turn [REC LEVEL]. (page 32)
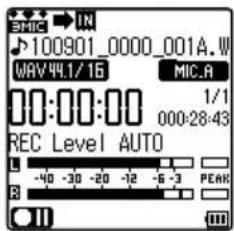
2 Starting to record
During recording standby, press [REC].
is displayed.
■ To pause recording
Press [REC]. Press it again to resume recording.
- is displayed.
Continued to next page


Basic recording operation
■ To divide a recorded file
During recording, press [EDIT].
Stop recording
1 Stop recording Press [■/BACK].
About wind noise
If the "wind noise" due to strong wind causes a problem during outdoor recording, attach the provided windscreen to this unit. It will be effective for reduction of the "wind noise".
About successive recording
Every file can record data until the file size becomes 2 GB.
When the size of a file exceeds 2 GB, it is automatically switched to another file and recording is continued in it.
The maximum recording time per file is variable depending on the recording format.
| Recording format Maximum recording time | |
| WAV 96kHz 24bit | Approx. 55 minutes |
| WAV 48kHz 24bit | Approx. 1 hour 50 minutes |
| WAV 44.1kHz 24bit | Approx. 2 hours |
| WAV 96kHz 16bit | Approx. 1 hour 20 minutes |
| WAV 48kHz 16bit | Approx. 2 hours 45 minutes |
| WAV 44.1kHz 16bit | Approx. 3 hours |
| MP3 320kbps | Approx. 13 hours 30 minutes |
| MP3 192kbps | Approx. 22 hours 30 minutes |
| MP3 128kbps | Approx. 33 hours 50 minutes |
| MP3 96kbps | Approx. 45 hours |
* Recording for the maximum recording time is impossible with certain formats. With such formats, it is required to power this unit from the external power supply. (page 18)
MGR-E8 26


• The built-in speaker does not output audio during recording.
- Use headphones to monitor the audio being recorded. The headphones volume can be adjusted by pressing [ˌʌl ①] or [ˌʌl ②]. This volume adjustment does not affect the recording level.
- During monitoring of the recorded audio through the headphones, a howling sound may be produced if the headphones are too close to the microphone. If this happens, increase the distance between the microphone and headphones or reduce the headphones monitoring volume.


B60-5825-08_00_MGR-E8(E)_English_1AJ6P1P0109--(XEO).indd 27
10/08/04 13:48
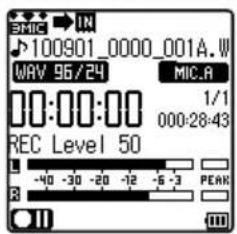
Control and display during recording

Example of display
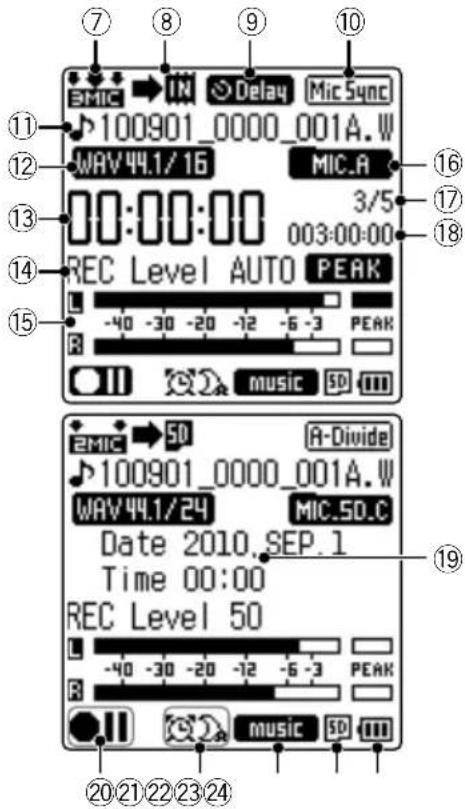


① MENU button
- Press during stop or recording standby mode to open the menu. The menu can be used in settings of recording format, etc. (page 35)
② REC button
- Press during stop mode to enter the recording standby mode.
- Press during recording standby to start recording.
- Press during recording to let it pause temporarily.
③▶/II Play/Pause button
- Press during stop mode to start playing recorded files.
④ ■/BACK Stop/Back button
- Press during recording or recording standby mode to stop recording. - Press during stop mode to switch the displayed information between the recording time and current date/time.
⑤ REC LEVEL Recording level knob
- Turn to adjust the recording level. (page 32)
⑥ EDIT button
- Press during recording standby to set the AUTO recording level adjustment. (page 32) - Press during standby to divide the recorded file.
- Press during stop mode to open the file edit screen.
⑦ Microphone mode (page 24)
⑧ Recording destination (page 35)
⑨ Delayed recording (page 36)
⑩ Sync recording/ Auto divide recording (page 36)
⑪ Recorded file name
⑫ Recording format (page 35)
⑬ Elapsed recording time
⑭ Recording level setting
⑮ Level meter
⑯ Save destination folder (page 35)
⑰ File number/ Total number of files in save destination folder
⑱ Remaining recording time
⑲ Current date/time
⑳ Recording mode
: Recording standby
: Recording
: Recording pause
:Stop
② Sleep timer/ Alarm timer (page 64)
② Recording equalizer (page 58)
②3 Presence of microSD card (page 23)
⑳ Remaining battery power (page 16)

English29

10/08/04 13:48


Folders and recorded files
Name of recorded files
The files recorded with this unit are named based on the date/time the recording is started.

① Recording start date (2 last digits of year, month and day)
② Recording start time (hour and minute)
③ File number, which is the sequential number of file in the folder. The file number varies when files are deleted, divided or moved.
④ Save folder name A, B, C or D, which represents one of "MIC_A" to "_D". "L" represents LINE.
⑤ File format

About folders
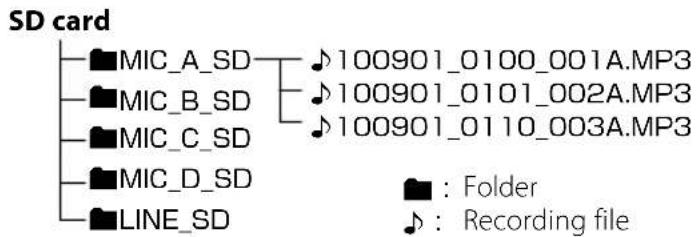
Folders MIC_A to MIC_D for microphone recording and a folder LINE for line recording are provided in each of the internal memory and the SD card.

flowchart
graph TD
    A["MIC_A"] --> B["100901_0000_001A.WAV"]
    C["MIC_B"] --> D["100901_0001_002A.WAV"]
    E["MIC_C"] --> F["100901_0010_003A.WAV"]
    G["MIC_D"] --> H[" "]
    I["LINE"] --> J[" "]
flowchart
graph TD
    A["MIC_A_SD"] --> B["100901_0100_001A.MP3"]
    C["MIC_B_SD"] --> D["100901_0101_002A.MP3"]
    E["MIC_C_SD"] --> F["100901_0110_003A.MP3"]
    G["MIC_D_SD"] --> H[" "]
    I["LINE_SD"] --> J[" "]
    style A fill:#f9f,stroke:#333
    style C fill:#f9f,stroke:#333
    style E fill:#f9f,stroke:#333
    style G fill:#f9f,stroke:#333
    style I fill:#f9f,stroke:#333
    style J fill:#f9f,stroke:#333

Each folder can accommodate up to 199 recorded files.

B60-5825-08_00_MGR-E8(E)_English_1AJ6P1P0109--(XEO).indd 30
10/08/04 13:48


Switching the folder
1 Enter MENU mode
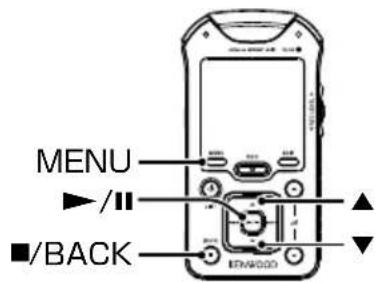
During stop and recording standby, press [MENU].
If [MENU] is pressed during recording standby, go to step 3 below.
2 Enter the Rec setting
Press [▲]/[▼] to select "Rec setting" and press [▶/■].
3 Set the recording destination
■ To set the microphone recording destination
Press [▲]/[▼] to select "MIC Rec destinat" and press [▶/■].
Press [▲]/[▼] to select "Internal memory" or "SD card" and press [▶/■].
Press [▲]/[▼] to select the folder (one of MIC_A to MIC_D) and press [▶/■].
The "✓" mark indicates the current setting.

To set the line recording destination Press [▲]/[▼] to select "LINE Rec destinat" and press [▶/■]. Press [▲]/[▼] to select "Internal memory" or "SD card" and press [▶/■].
■ Press [■/BACK] to return to the previous screen page.
4 Exit MENU mode Press [MENU].
Other recording operations

Recording by manually adjusting the microphone recording level
1 Set the MANUAL recording level adjustment Slide [MIC REC LEVEL] to the "MANUAL" position.
2 Enter the recording standby mode Press [REC].
3 Adjusting the recording level
Turn [REC LEVEL] to adjust.
While observing the level meter and PEAK indicator, adjust the recording level usually to between -6 and -12 dB.
■ To set the AUTO recording level adjustment
During recording standby, press [EDIT].
The recording level will be set according to the maximum input volume.
Press [EDIT] to complete the setting of the AUTO recording level adjustment.
If the recording level is excessive even when [REC LEVEL] is reduced
Set
■ To reduce audio distortion by automatically adjusting sudden input of high-level sound
Set
MGR-E8 32


Recording from an external microphone

1 To connect to external microphone Connect an external microphone to [MIC] jack.
To connect a plug-in power type microphone Slide [PLUG IN POWER] to the "ON" position.
2 Prepare and start recording
Start recording following the instructions in

- Do not connect anything to the line input terminal.
Continued to next page
Other recording operations
Recording from an external audio component or musical instrument connected to the line input

flowchart
graph LR
    A["Line input"] --> B["Line output"]
    B --> C["Musical instrument, etc. (Line output)"]
    C --> D["Stereo, etc."]
1 Connect the audio component
Connect the desired audio component to the [LINE IN] terminal.
2 Enter recording standby mode Press [REC].
3 Adjust the recording level
Turn [REC LEVEL] to adjust.
While observing the level meter and PEAK indicator, adjust the recording level usually to between -6 and -12 dB.
■ To set the AUTO recording level adjustment
During recording standby, press [EDIT].
The recording level will be set according to the maximum input volume.
Press [EDIT] to complete the setting of the AUTO recording level adjustment.
4 Starting to record During recording standby, press [REC].

- Do not connect anything to the microphone input terminal.
MGR-E8 34
Changing the Recording Settings
The "Rec setting" allows you to set various items according to the type of the recorded sound.
| Item Setting | Setting overview | Int. Mic | Ext. Mic | Line | ||
| Recformat | WAV 96kHz 24bit/WAV 48kHz 24bit/WAV 44.1kHz 24bit/WAV 96kHz 16bit/WAV 48kHz 16bit/WAV 44.1kHz 16bit* | Linear PCM formats with which recorded audio is not compressed.Larger figures mean higher audio quality.The 44.1 kHz sampling frequency and 16 quantization bits are most suitable for recording of a music CD, etc. | ● | ● | ● | |
| MP3 320kbps/MP3 192kbps/MP3 128kbps/MP3 96kbps | Recorded audio is compressed in the MP3 format.Larger figures mean higher audio quality.Smaller figures mean longer recording time.Select the folder for saving the file recorded using the microphone. | |||||
| MIC Rec destinat | Internalmemory | MIC_A*/B/C/D | It is convenient to select folders according to the recording contents, for example for concerts or for exercise. | ● | ● | |
| SD card | MIC_A/B/C/D_SD | |||||
| LINE Rec destinat | Internal memory* Select the fol | der for saving the file recordedusing the line input. | ● | |||
| SD card | ||||||
| Rec Equalizer | OFF*/Music/Voice/Vocal/Noise cut | Set the equalizer according to the recorded sound for reducing ambient noise, etc. | ● | ● | ||
| CENTER Mic sens. | High/Normal*/Low | When recording sound in the 3-microphone mode, select the center microphone sensitivity (i.e. the ratio of mixing). | ● | |||
| Micgain | High*/Low | Usually set to High. Set to Low when recording a loud sound. | ● | ● | ||
Continued to next page
Changing the Recording Settings
| Item Setting | Setting overview | Int. Mic | Ext. Mic | Line | |
| Mic Sync Rec | OFF*/ON | Recording starts in synchronism with the start of microphone sound input. Recording pauses when no sound has been input for 2 seconds.This item is enabled when [MIC REC LEVEL] is set to AUTO. | ● | ● | |
| Analoguelimiter | OFF*/ON | When high-level sound is input suddenly while this item is set to ON, the recording level is automatically adjusted to prevent distortion of the recorded audio.This item is enabled when [MIC REC LEVEL] is set to MANUAL. | ● | ● | |
| Low-cut filter | OFF*/ON | Set to ON to reduce noise from the air conditioner or blowing wind by cutting off the low frequencies. | ● | ● | |
| DelayRec | OFF*/5sec/10sec/30sec | Set the delay time reserved before actual recording starts after [REC] is pressed. This is convenient when preparation is required before starting recording, for example for checking the musical instruments, etc. | ● | ● | ● |
| Line auto divide | OFF*/ON | When this item is ON, recording on a new file begins when no sound has been input for 2 seconds. | ● | ||
| Auto divide level | High/Mid*/Low | Set the level for detecting the beginning of music. | ● |
(*: Factory setting)

- Since the
MGR-E8 36



1 Enter MENU mode
During stop and recording standby, press [MENU].
If [MENU] is pressed during recording standby, go to step 3 below.
2 Enter the Rec setting
Press [▲]/[▼] to select "Rec setting" and press [▶/■].
3 Set each item
Press [▲]/[▼] to select a setting item and press [▶/■].
Press [▲]/[▼] to select a setting value and press [▶]/[■].
The "✓" mark indicates the current setting.

■ Press [■/BACK] to return to the previous screen page.
4 Exit MENU mode
Press [MENU].
Editing a recorded file
Moving a recorded file
The files recorded with this unit can be moved between the internal memory and SD card. When a file is moved, the file in the original location is deleted.

1 Enter list mode Press [LIST].
2 Select the Recorded file control item
Press [▲]/[▼] to select "Recorded" and press [▶/■].
3 Select a folder
Press [▲]/[▼] to select "Internal memory" or "SD card" and press [▶/■].
Press [▲]/[▼] to select "MIC_A" to "_D" or "LINE" and press [▶/■].
4 Select the recorded file to be moved
Press [▲]/[▼] to select recorded file and press [▶/■].
5 To stop playback Press [■/BACK].
6 Enter File edit mode Press [EDIT].
7 Select the file movement operation
Press [▲]/[▼] to select "File move" and press [▶/■].
MGR-E8 38


8 Move the recorded file
Press [▲]/[▼] to select "To SD card" or "To internal memory" and press

■ Press [■/BACK] to return to the previous screen page.
9 Exit File edit mode
Press [EDIT].

- Only the files recorded with this unit can be moved.
- Recorded files can be moved between the specified folders.
Example: "Internal memory" - "MIC_A" ⇔ "SD card" - "MIC_A_SD"
- When a recorded file is moved, the file number sections in the file names are changed.


10/08/04 13:48
Dividing a recorded file
A file recorded with this unit can be divided into two files.
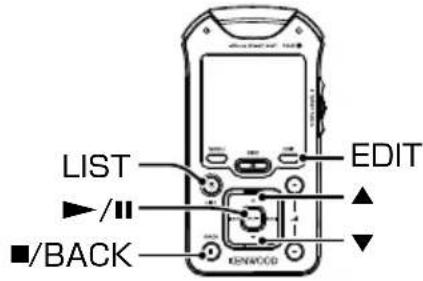
1 Enter list mode Press [LIST].
2 Select the Recorded file control item Press [▲]/[▼] to select "Recorded" and press [▶/■].
3 Select a folder Press [▲]/[▼] to select "Internal memory" or "SD card" and press [▶/■]. Press [▲]/[▼] to select "MIC_A" to "_D" or "LINE" and press [▶/■].
4 Select the recorded file to be divided Press [▲]/[▼] to select recorded file and press [▶/■].
5 Enter File edit mode Press [EDIT] at the point you want to divide the file.
6 Divide the recorded file Press [▲]/[▼] to select "File divide" and press [▶/■]. When the confirmation message is displayed, press [▲]/[▼] to select "Yes" and press [▶/■].
■ Press [■/BACK] to return to the previous screen page.
MGR-E8 40


-
Only the files recorded with this unit can be divided.
• A recorded file cannot be divided in the following cases. -
When the folder containing the file already contains 199 files.
- When the recording time of the file is short.
- When the point to divide the file is close to the end of the file.
- When the internal memory or microSD card does not have enough available space.
- When a recorded file is divided, the file number sections in the file names are changed.


Playing music tracks
Operations and display in playback
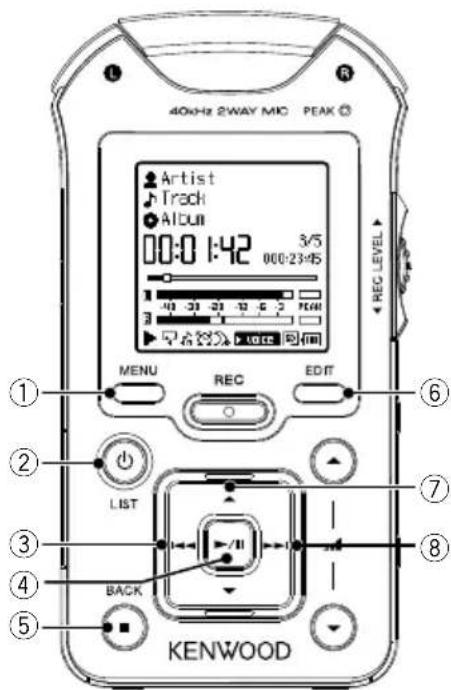
Example of display

Resume function
This unit memorizes the status immediately before it is switched off. Next time it is switched on, it enters pause mode at the position playback was last stopped.
MGR-E8 42


① MENU button
Press to open the menu. The menu can be used in settings of playing mode, etc. (page 46)
② ⬆LIST Power/List button
Press to open the list screen at the highest level of hierarchy.
③ Left button
Press to play the current or previous track from the beginning. Press and hold to fast reverse the music.
④▶/II Play/Pause button
Press during playback to let it pause temporarily. Press again to resume playback.
⑤ ■/BACK Stop/Back button
- Press during playback to stop it.
- Press during stop mode to switch the displayed information between the playing time and current date/time.
⑥EDIT button
- Press during playback to add/delete favorite tracks or set A-B repeat.
- Press during stop mode to open the file edit screen.
⑦ ▲ Up button
Press to open the list screen.
⑧ ▶▶▶ Right button
Press to play the next track from the beginning. Press and hold to fast forward the music.
⑨ Artist name
⑩ Track title
⑪ Album title
⑫ Elapsed play time
⑬ Time progress bar
⑭ Level meter
⑮ Track No./Number of selected tracks
⑯ Total play time
⑰ Current date/time
⑱Playback mode
:Play
II: Pause
▶▶: Fast forward
◀: Fast reverse
: Stop
⑲ Play mode (page 46)
⑳ Sleep timer/ Alarm timer (page 64)
②1 Sound mode (page 58)
②2 Presence of microSD card (page 23)
②3 Remaining battery power (page 16)



English43
Playback by selecting music from the list
The files recorded with this unit can be played by selecting the folder. The music files transferred from the PC can be searched based on DB classified by their tag informations. (page 72)
| Category Contents | |
| Artist | A music file transferred from the PC can be selected in order of Artist name* 3 → Album title*1 → Track title*. |
| Album | A music file transferred from the PC can be selected in order of Album title* 1 → Track title*. |
| Track | A music file transferred from the PC can be selected by Track title* 2. |
| Favorite | Music files can be selected from a list of user-registered tracks. (page 50) |
| Genre | A music file transferred from the PC can be selected in order of Genre name* 3 → Artist name* 3 → Album title*1 → Track title*. |
| Music folder | A music file can be selected by selecting the internal memory or SD card and then following the folder hierarchy. |
| Recorded | A music file recorded with this unit can be selected in order of Internal memory/SD card → Folder → Filename. |
| KWDfolder | A music file can be selected by selecting the internal memory or SD card and then following the folder hierarchy. |

- If
is set to , be sure to update the DB after transferring music files. (page 60) - With "Artist", "Album", "Track" and "Genre", music files in the MUSIC and KWD folders in both the internal memory and SD card are displayed.
- A track that does not contain tag information is classified as "No Information".
- The music tracks are played back in either order described below.
*1 Track number: Order of track numbers in the tag information. When there is no track number, the tracks are played in order of track titles or file names.
*2 Track title: Order of track titles or file names in the tag information.
*3 Album title: Order of album titles or folder names in the tag information. The files in each album are played in order of track numbers.
MGR-E8 44


1 Enter list mode
To open the list screen at the highest level of hierarchy Press [LIST].
To open the list screen at the level of the music file being played Press [▲].
2 Select the list category to be used for selecting the desired music file Press [▲]/[▼] to select category and press [▶/■].
3 Select the desired music file
Press [▲]/[▼] to select an item and press [▶/■] to enter. Repeat these operations until the desired music file is displayed.
For instance, if you selected category
If you select "All tracks", all of the tracks belonging to the selected item, such as
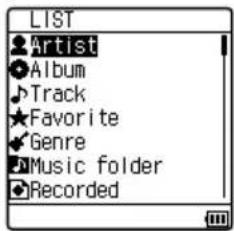
■ Press [■/BACK] to return to the previous screen page.

- If
Various play modes
The "Play setting" makes it possible to select various playback methods.
| Item Setting | Setting overview | Display | |
| Playmode | OFF Plays music in a list. | ||
| ONE Repeat | Playback of the same track repeatedly. |  | |
| ALL Repeat | Playback of all of the tracks in the list repeatedly. |  | |
| Random | Repeated playback of all of the tracks in the list in a random order. |  | |
| Play speed | 200% —100%— 50% | The playback speed can be changed. (page 48)200% — 100%: 10% step100% — 50%: 5% step | [252?] |
| [572S] | |||
| Intro play | OFF Playback of the intON | Introduction parts of all of the tracks inthe list, playing the first 10 seconds of every track. | |
 | |||
| FF/FB Speed | High/Mid/Low | The fast forward and fast reverse speed can also be variedin 3 steps. | |
| Time search | - | The desired point in a file can be specified by the playingtime information. (page 49) | |
| Property | - | Information on the music file (format, etc.) can beviewed. | |

Setting the playback setting items
1 Enter MENU mode Press [MENU].
If [MENU] is pressed during playback, go to step 3 below.
2 Enter the Play setting
Press [▲]/[▼] to select "Play setting" and press [▶/■].
MGR-E8 46


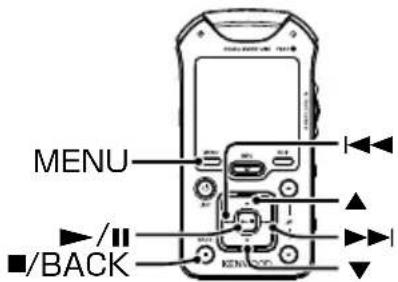
3 Set each item
Press [▲]/[▼] to select a setting item and press
[▶/II].
Press [▲]/[▼] to select a setting value and press [▶]/[■].
The “√” mark indicates the current setting.

■ Press [■/BACK] to return to the previous screen page.
4 Exit MENU mode
Press [MENU].
Setting A-B repeat
1 Set the start point (point A)
Press [EDIT] at the point you want to set as the start point of the repeated section.
2 Select A-B repeat
Press [▲]/[▼] to select "A-B repeat" and press [▶/■].
3 Set the end point (point B)
Press [EDIT].
■ To cancel A-B Repeat
Press [EDIT].
Press [▲]/[▼] to select "Cancel A-B repeat" and press [▶/■].


- The A-B repeat mode is canceled when another file is selected or the fast forward/fast reverse operation is performed.
- A-B Repeat cannot be set if points A and B are too close to each other.


English47
Varying the playback speed
The playback speed can be increased or decreased.
| Setting Setting overview Display | ||
| 200% — | Increases the playback speed in 10% increments. | 200% |
| 100% | Playback at the original speed. | 100% |
| — 50% | Decreases the playback speed in 5% decrements. | 50% |
1 Enter MENU mode Press [MENU].
If [MENU] is pressed during playback, go to step 3 below.
2 Enter the Play setting
Press [▲]/[▼] to select "Play setting" and press [▶/■].
3 Set the play speed
Press [▲]/[▼] to select "Play speed" and press [▶/■].
Press [I◄◄]/[►►I] to select the playback speed and press [►-/II].
■ Press [■/BACK] to return to the previous screen page.
4 Exit MENU mode Press [MENU].
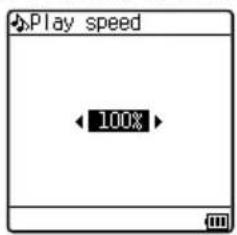

- The play speed of files recorded in the WAV 96-kHz 24/16-bit, WAV 88.2-kHz 24/16-bit or monaural format cannot be changed.
MGR-E8 48


Searching the point to be played by specifying the time
The desired point in a file can be specified by the playing time.
1 Select the desired track
Play the desired track. (page 44)
2 Enter MENU mode Press [MENU].
3 Select the time search
Press [▲]/[▼] to select "Time search" and press [▶/■].
4 Specify the time of the point you want to start playback
■ Press [◀◀]/[▶▶] to select Hour, Minute and Second.
■ Press [▲]/[▼] to vary the figures.

5 Start playback from the specified time point Press [▶/■].


Adding to/Deleting from the Favorite
Tracks you are particularly fond of can be registered in the Favorite folder for playing only the favorite tracks later.
Up to 100 tracks can be added to the Favorite folder.

Adding to the Favorite
1 Select the track to be added to the Favorite folder Play the desired file or select it in the list. (page 44)
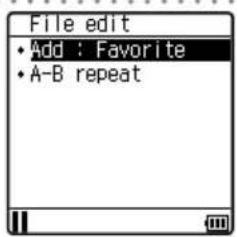
2 Enter File edit mode Press [EDIT].
3 Add the track in the Favorite folder Press [▲]/[▼] to select "Add : Favorite" and press [▶/■].
■ Press [■/BACK] to return to the previous screen page.


Playing Favorite
The tracks in the Favorite folder can be played in the order they were added to it.
1 Enter list mode Press [LIST].
2 Select the Favorite folder
Press [▲]/[▼] to select "Favorite" and press [▶/■].
3 Select a track
Press [▲]/[▼] to select a track and press [▶/■].
Deleting from the Favorite
1 Select the track to be deleted from the Favorite folder
Perform the procedure in
2 Enter File edit mode Press [EDIT].
3 Delete the track from the Favorite folder Press [▲]/[▼] to select "Delete 1 track" or "Delete All" and press [▶/■].
To select "Delete All"
When the confirmation message is displayed, press [▲]/[▼] to select "Yes" and press [▶/■].

- A track selected from the list or that being played can also be added to or deleted from the Favorite folder.
Connection of external components
The Line output can be used to connect an external component such as a speaker with built-in amplifier.
The USB connector can be used to connect an external component such as a stereo set with USB capability.
Connecting to the Line outout

flowchart
graph TD
    A["KENNWOOD"] -->|Cable with stereo mini-plugs| B["FM transmitter"]
    B --> C["AUX IN L R"]
    C --> D["Stereo amplifier"]
    D --> E["Speaker with built-in amplifier"]
    E --> F["Car stereo"]
1 Switch this unit ON
2 Connect an external component
Connect it to the [LINE OUT] terminal of this unit.

- Prepare an optimum audio cable (commercially available) according to the input terminal of the connected external component.
- When using a FM transmitter, noise may be interfered depending the installation environment, including the vehicle model, devices in the surroundings and the antenna positioning.
- Do not use or leave this unit or connected component in an automobile compartment with high temperatures. Otherwise, equipment failure may result.
- During monitoring of the recorded audio through the speaker(s) of the external component, a howling sound may be produced if the speaker(s) is too close to the microphone. If this happens, increase the distance between the microphone and speaker(s) or reduce the speaker monitoring volume.
MGR-E8 52
Connecting to the USB connector
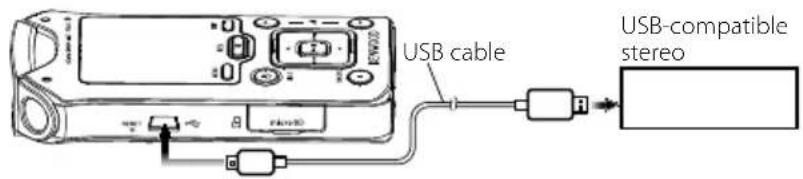
1 Connect a USB cable to the USB jack of this unit

- For the operating procedure and the playable files, read the instruction manual for the connected stereo set.
- Do not use or leave this unit or connected component in an automobile compartment with high temperatures. Otherwise, equipment failure may result.
- When the temperature of this unit exceeds the operation temperature range, the protection circuit is activated, which makes recharging impossible. (page 76
) - The internal memory and the SD card are recognized as separate drives. If a drive cannot be selected from USB-compatible stereo component, change the "Prioritized Drive" setting. (page 60)
- When
is set to (page 60), the USB connection is canceled and this unit updates the database when the stereo set is switched off, its input selector is switched or the USB cable is disconnected. If you want to reconnect the USB cable to the stereo set, wait until the database updating completes.
Digital Audio Player Link
When this unit is connected to a Kenwood audio component with the Digital Audio Player Link compatibility, playback of this unit can be controlled from the external audio component.

1 Switch this unit ON
2 Connect a stereo
Connect it to the [LINE OUT] terminal of this unit.
3 Set the input selector of the connected stereo set to "Digital Audio" This unit's operations including "Play/Pause" and "Skip Up/Down" can be controlled from the main unit and remote control unit of the connected stereo.

• Examples of Digital Audio Player Link-compatible stereo models: AX-7, C-313, C-515BT, C-616DV, C-707I, K-323, K-501USB, K-511USB, K-521, K-711, K-821DV, R-K1, R-K1000 (as of September 2010)
- For details and operating method of the Digital Audio Player Link, refer to the instruction manual for a Digital Audio Player Link-compatible audio component.
- With the "folder skip" operation, the album is changed when a track is selected from an album.
MGR-E8 54


Deleting files
Deletingfiles
Deleting a selected file

1 Enter stop mode Press [■/BACK].
2 Enter list mode Press [LIST].
3 Select the file to be deleted
Press [▲]/[▼] to select an item and press [▶/■] to enter. Repeat these operations until the desired music file is displayed.
Press [▲]/[▼] to move the cursor on the file to be deleted.
If the music starts to play, press [■/BACK] to stop it.
4 Enter File edit mode Press [EDIT].
5 Delete the selected file
Press [▲]/[▼] to select "File delete" and press [▶/■]. When the confirmation message is displayed, press [▲]/[▼] to select "Yes" and press [▶/■]. Press [■/BACK] to return to the previous screen page.

- If
MGR-E8 56
Deleting all files (Formatting)
Caution
- Formatting deletes all of the files in this unit.
- Once formatted, the memory cannot be restored to the previous condition.
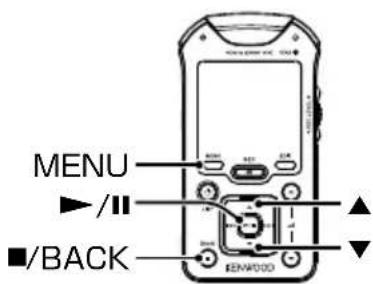
1 Enter stop mode Press [■/BACK].
2 Enter MENU mode Press [MENU].
3 Select the common setting and then the formatting operation Press [▲]/[▼] to select "Common setting" and press [▶/■]. Press [▲]/[▼] to select "Format" and press [▶/■].
4 Select either Internal memory or SD card
Press [▲]/[▼] to select "Internal memory" or "SD card" and press [▶/■]. When the confirmation message is displayed, press [▲]/[▼] to select "Yes" and press [▶/■].
■ Press [■/BACK] to return to the previous screen page.
5 Exit MENU mode Press [MENU].
Adjusting the audio
Adjusting the audio
Adjusting the volume
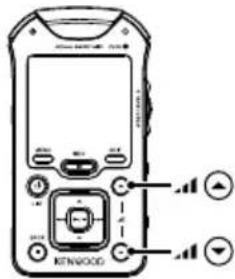
1 Adjusting the volume
Press [.] or [].

Pressing and holding a button segment varies the volume gradually.
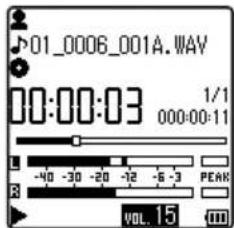

- If the headphone volume is increased too much, you will be unable to hear the sounds from outside. Be careful not to increase the volume too much.
- The adjustment range of the built-in speaker is different from that of the headphones output.
- If headphones are connected after playing audio at a high volume through the built-in speaker, the headphone volume may become very high. Be sure to decrease the speaker volume before connecting headphones.
Selecting the sound effects
Select one of the 8 modes.
| Setting Setting overview Display | ||
| OFF* | Playback in normal tone. | |
| Bass/ Pops/Rock/Jazz/ Dance/ Voice | Playback in a tone matching the genre of music. | ▶bass▶pops▶rock▶jazz▶dance▶voice |
| Custom | Desired tone can be set using a 5-band custom equalizer. | ▶custom |
MGR-E8 58


1 Enter MENU mode During playback, press [MENU].
2 Select the sound mode setting under the play setting Press [▲]/[▼] to select "Play setting" and press [▶/■]. Press [▲]/[▼] to select "Sound mode" and press [▶/■].
3 Select the Sound mode Press [▲]/[▼] to select the Sound mode and press [▶]/[■]. The "√" mark indicates the current setting.

To select "Custom"
4 Set the equalizer
■ Press [◀◀]/[▶▶] to select a frequency band.
■ Press [▲]/[▼] to vary its level.

5 Enter the equalizer setting Press [▶/■].
6 Exit MENU mode Press [MENU].


English59


10/08/04 13:49
Menu function
Common settings under the menu
Some function items of this unit including the display brightness and auto power OFF function can be set as desired.
| Item Setting Setting overview | ||
| Clock setting | - Set the date and time. | (page 62) |
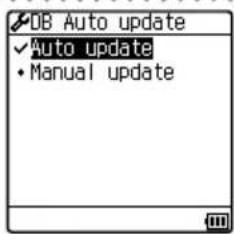
| DB Auto update | Auto update* | The DB is updated automatically when this unit is switched ON, a file is edited or the microSD card is inserted or removed. |
| Manual update | The DB is not updated automatically. The DB can be updated by selecting. This setting is to be selected for example when you want to start recording immediately after switching this unit on. | |
| DB update now | No/Yes | The DB is updated immediately. This item is to be executed when there is an unplayable file. |
| Indicator | OFF/ON* Sets whether the REC and PEAK indicators are displayed. | |
| Backlight dimmer | High/Mid*/Low Selects the display brightness. | |
| Lighting time | OFF/5 sec/10 sec*/30 sec/60 sec/Continuous | Selects the time after which the display backlight is turned off when no operation has been performed. |
| LCD Contrast | Level 1 — 5*— 10 | Adjusts the display contrast. |
| Auto power off | 3 min/5 min*/10 min/30 min | Select the time until this unit is switched OFF when no operation including recording or playback is performed. |
| Beep | OFF*/ON | Select whether or not a beep is generated when a button is pressed. |
| Prioritizeddrive | Internal memory*/SD card | Sets the prioritized drive for USB connection. |
| Timer setting | OFF*/Sleep timer/Alarm timer | The sleep timer makes it possible to switch this unit OFF after the set period of time. The alarm timer makes it possible to generate an alarm (beep tone) after the set period of time. (page 64) |
| Language | 日本語/ENGLISH | Select the language used for the displayed menus, etc. |
| Format | Cancel/Internalmemory/SD card | Formats either the internal memory or SD card. (page 57) |
| Setting reset | No/Yes | Resets the settings of this unit to the default settings made at the factory. It does not delete the music data, etc. |
MGR-E8 60


| Item Setting Setting overview | ||
| System info. | - | Displays the system information of this unit (model ID, firmware version, available memory capacity, total memory capacity). |
(*: Factory setting)

1 Enter stop mode Press [■/BACK].
2 Enter MENU mode Press [MENU].
3 Enter the common setting
Press [▲]/[▼] to select "Common setting" and press [▶/■].
4 Select the item to be set
Press [▲]/[▼] to select a setting item and press [▶/■].
5 Vary the setting value
Press [▲]/[▼] to select a setting value and press [▶]/[■].
The “√” mark indicates the current setting.
■ Press [■/BACK] to return to the previous screen page.
6 Exit MENU mode Press [MENU].

English61
Setting the time
Adjust the date and time of this unit.
The date/time information is required for naming the recorded files.
It is recommended to set the accurate date and time.
1 Enter stop mode Press [■ /BACK].
2 Enter MENU mode Press [MENU].
3 Enter the common setting
Press [▲]/[▼] to select "Common setting" and press [▶/■].
4 Select the clock setting
Press [▲]/[▼] to select "Clock setting" and press [▶/■].
5 Set the date and time
■ Press [i◄◄]/[►►] to select Year, Month, Day, "24H/AM/PM", Hour and Minute.
■ Press [▲]/[▼] to vary the date and time.
■ Press [■/BACK] to return to the previous screen page.
6 Enter the date and time Press [▶/■].

MGR-E8 62

natural_image
Pure geometric lines forming L-shapes and a circle with crosshairs (no text or symbols)7 Exit MENU mode Press [MENU].

natural_image
Pure geometric lines forming two symmetrical crosshair-like shapes without any text, numbers, or symbols
B60-5825-08_00_MGR-E8(E)_English_1AJ6P1P0109--(XEO).indd 63
10/08/04 13:49
Sleep timer and alarm timer
| Item Contents Display | ||
| OFF | Both the sleep timer and alarm timer are switched off. | |
| Sleep timer | This unit can be switched off after the set period of time. |  |
| Alarm timer | An alarm tone (beep) can be generated after the set period of time. | |

1 Enter stop mode Press [■/BACK].
2 Enter MENU mode Press [MENU].
3 Select the common setting and then the timer setting
Press [▲]/[▼] to select "Common setting" and press [▶/■]. Press [▲]/[▼] to select "Timer setting" and press [▶/■].
4 Select the sleep timer or alarm timer
Press [▲]/[▼] to select the timer to be set and press [▶/■].
5 Specify the timer period
■ To set the sleep timer
Press [I◄◄]/[►►I] to select the time until the sleep timer is activated.
To switch only the sleep timer off, select "OFF".

MGR-E8 64


■ To set the alarm timer
Press [▲]/[▼] to select "ON" and press [▶/■].
To switch only the alarm timer off, select "OFF".
Press [I◄◄]/[►►I] to select the hour or minute.
Press [▲]/[▼] to vary the figure.
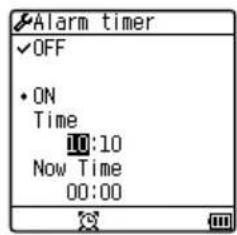
■ Press [■/BACK] to return to the previous screen page.
6 Enter the timer setting Press [▶/■].
7 Exit MENU mode Press [MENU].
![KENWOOD MGR-E8-B - ■ Press [■/BACK] to return to the previous screen page. - 1](/content/2026/05/1028393/images/6c47b9134c02b2775cf90d4ca2c24e2a36d627a8c389a0fabfa534403aead7da.jpg)
- The alarm timer is generated for about 30 seconds. The beep stops when any button is pressed during generation.
• The alarm timer setting is canceled at the moment the alarm timer is activated. - The alarm timer setting is maintained even after this unit is switched off.
- The alarm timer is not activated during recording or USB connection. If the set time period is reached in the middle of recording or USB connection, the alarm timer setting is canceled.
- The sleep timer setting is canceled when this unit is switched off.
![KENWOOD MGR-E8-B - ■ Press [■/BACK] to return to the previous screen page. - 2](/content/2026/05/1028393/images/9b94bbd61abe4ab25479c7a39a349002b3352549d40048d69b6b43186c94f377.jpg)
![KENWOOD MGR-E8-B - ■ Press [■/BACK] to return to the previous screen page. - 3](/content/2026/05/1028393/images/b9063919f6298245cd4734b4b92a866cb7076dd51cc365715a15bddf3c2464df.jpg)
![KENWOOD MGR-E8-B - ■ Press [■/BACK] to return to the previous screen page. - 4](/content/2026/05/1028393/images/9befe129d2d9fea87c953f86f69fa190db4a986ac8f1fefa2f0e2926e307f193.jpg)
English65
![KENWOOD MGR-E8-B - ■ Press [■/BACK] to return to the previous screen page. - 5](/content/2026/05/1028393/images/5b16b51dc25351f4ccf31355612d5d44c129105bd561756c0c89d1757e1bde7e.jpg)
![KENWOOD MGR-E8-B - ■ Press [■/BACK] to return to the previous screen page. - 6](/content/2026/05/1028393/images/5e9114c82bb7a441b4f302f5cca184e5d0686c72ff0e7ec6931f32b0442a71b4.jpg)
10/08/04 13:49
Utilizing your computer
Connecting a PC
Connecting a PC
1 Start up the PC
2 Connect a USB cable to the USB port of the PC
3 Connect the USB cable to the USB jack of this unit
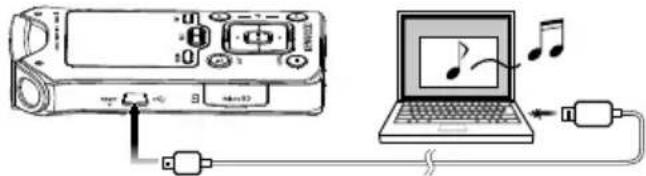
USB cable
This unit is connected to the PC with the USB mass storage class connection.
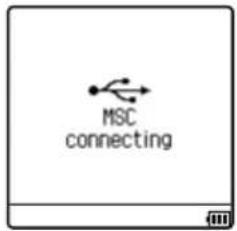

- For the PC system requirements, see
(page 76). - This unit is switched ON automatically at the moment it is connected to the PC.
- When the USB connection, always use a supplied USB cable.
- This unit should be connected directly to the USB port of the PC. We cannot guarantee the operation if this unit is connected via a USB hub.
MGR-E8 66

Disconnecting this unit from the PC
1 Click the [Safe To Remove Hardware] icon Display the indicator on the task tray if it is not displayed.
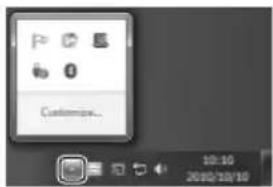

Windows 7/ Vista
Windows XP
2 Click [Safely remove USB Mass Storage Device]
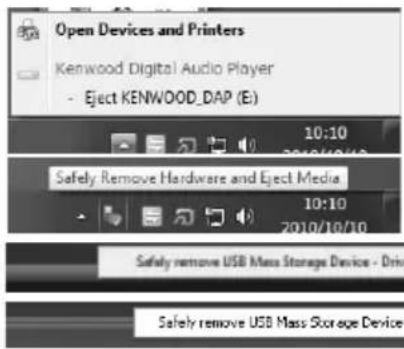
Windows 7
Windows Vista
Windows XP
3 When a message is displayed indicating that the USB device can be removed safely, disconnect the USB cable from this unit
Caution
- Do not disconnect the USB cable during data transfer from the PC. Otherwise, the data in the memory may be destroyed.
- Be sure to perform the USB removal operation on the PC before disconnecting the USB cable from this unit.


Configurations of folders and files
This unit creates the following folders in the internal memory and SD card and saves files in the folders.
When transferring files from a PC to this unit, the files should be written in accordance with the following folder configuration.
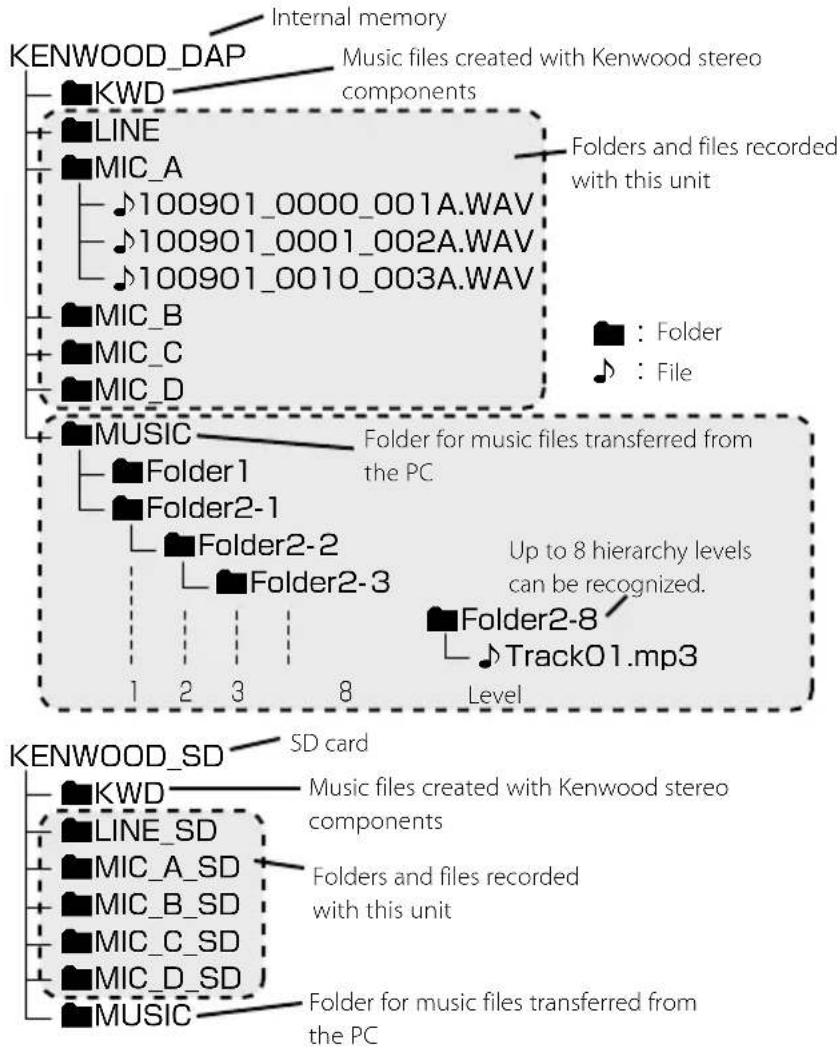
flowchart
graph TD
    A["Internal memory"] --> B["KENWOOD_DAP"]
    B --> C["KWD"]
    B --> D["LINE"]
    B --> E["MIC_A"]
    E --> F["100901_0000_001A.WAV"]
    E --> G["100901_0001_002A.WAV"]
    E --> H["100901_0010_003A.WAV"]
    B --> I["MIC_B"]
    B --> J["MIC_C"]
    B --> K["MIC_D"]
    B --> L["MUSIC"]
    L --> M["Folder 1"]
    L --> N["Folder 2-1"]
    L --> O["Folder 2-2"]
    L --> P["Folder 2-3"]
    L --> Q["Folder 2-8"]
    Q --> R["Track01.mp3"]
    R --> S["Up to 8 hierarchy levels can be recognized."]
    S --> T["5-level"]
    T --> U["Level"]
    V["Music files created with Kenwood stereo components"] --> W["Folders and files recorded with this unit"]
    X["Folder and files recorded from the PC"] --> Y["Folder for music files transferred from the PC"]




- About the files and folders in the MUSIC and KWD folders
- Up to 3,000 folders can be recognized including the MUSIC and KWD folders in the internal memory and SD card.
- Up to 7,000 files can be recognized in the MUSIC and KWD folders in the internal memory and SD card.
- Up to 8 hierarchy levels can be recognized.
- About the files in the MIC_A to _D and LINE folders
- Up to 199 files can be recognized in each folder.
- If the filename created by this unit is altered, the file cannot be played back on this unit. To prevent this, the recorded files with modified names should be moved to the MUSIC folder.



Transferring recorded files to a PC
The files recorded with this unit can be stored in a PC.
1 Connect this unit to a PC (page 66)
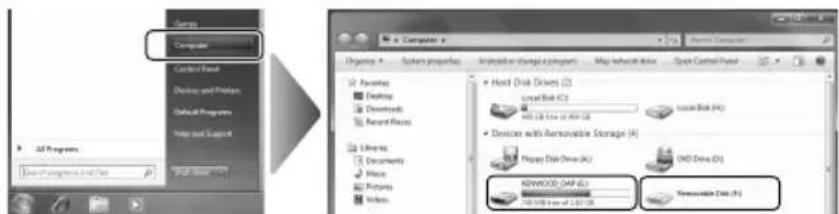
2 Open the removable disk
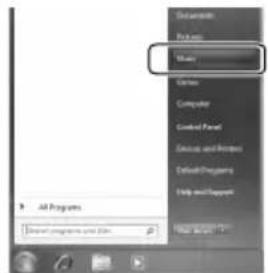
Click [Start] – [Computer].
Double click [KENWOOD_DAP] (internal memory) or [removable disk]/[KENWOOD_SD] (SD card).

3 Open the desired folder of this unit Double click one of folder names "MIC_A" to "MIC_D" and "LINE."
4 Open the save destination folder of the PC Click [Start] – [Music]. This is an example for saving the file in the [Music] folder.
MGR-E8 70


5 Drag & drop or copy & paste the desired files from this unit into the PC

6 Disconnecting this unit from the PC (page 67)

If the filename created by this unit is altered, the file cannot be played back on this unit. To prevent this, the recorded files with modified names should be moved to the MUSIC folder.

Capturing Music in PC/ Transferring Music from PC
To play music files as tracks of this Player, first rip music files in the PC. The obtained music files can then be transferred to this unit.
This unit can play the following 3 types of music files.
• MP3 (*.mp3): MPEG-1 Audio Layer-3
| Sampling frequency 8/11.025/12/16/22.05/24/32/44.1/48 kHz | |
| Transfer bit rate 32k – 320 kbps | |
| Variable Bit Rate (VBR) 32k – 320 kbps | |
| ID3 tag Ver. 1.0/1.1/2.2/2.3/2.4 | |
• WMA (*.wma) : Windows Media Audio
| Sampling frequency 22.05/32/44.1/48 kHz | |
| Transfer bit rate 32k – 320 kbps | |
| Variable Bit Rate (VBR) 32k – 320 kbps |
- WAV (*.wav) : WAVE file (Linear PCM)
| Sampling frequency 44.1/ 48/ 88.2/ 96 kHz | |
| Bit count 16 bit/ 24 bit |
First capture music in the PC using ripping software such as the Windows Media Player.
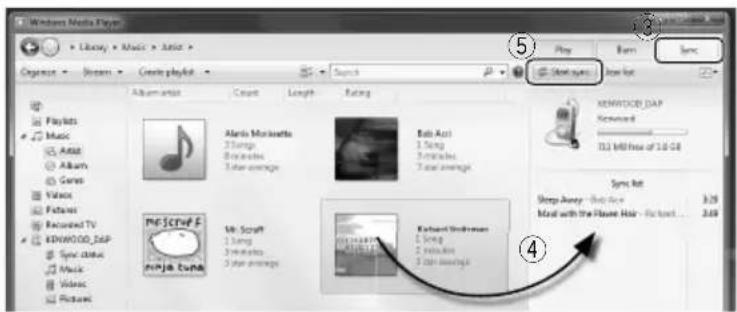
Using Windows Media Player 12
The following is an example of procedure using the Windows Media Player 12.
1 Connect this unit to a PC (page 66)
2 Launch the Windows Media Player
3 Click the [Sync] button on the top
4 Add the music files to be transferred in the Sync List
5 Click the [Start sync] button
MGR-E8 72
6 Close the Windows Media Player
7 Disconnecting this unit from the PC (page 67)
Data transfer by drag & drop
Open the Windows Explorer and drag & drop the desired file from the PC's hard disk drive to this Player. Copy & paste can also be used for data transfer.
1 Connect this unit to a PC (page 66)
2 Open the removable disk
Click [Start] - [Computer].
Double click [KENWOOD_DAP] (internal memory) or [removable disk]/[KENWOOD_SD] (SD card).
Continued to next page



10/08/04 13:49
Capturing Music in PC/Transferring Music from PC
3 Open the "Music" folder
Double click [Music] folder.
The music files transferred to this unit must always be saved in the MUSIC folder. For details, see
4 Open the folder storing the desired music file Click [Start] – [Music].
Select the music file to be transferred or the folder saving it.

5 Drag & drop the music file into the removable disk

6 Disconnecting this unit from the PC (page 67)

If
MGR-E8 74


Deleting files
The music files transferred from the PC to this unit can be deleted from this unit.
Deleting using the Explorer
1 Connect this unit to a PC (page 66)
2 Open the removable disk
Click [Start] - [Computer].
Double click [KENWOOD_DAP] (internal memory) or [removable disk]/[KENWOOD_SD] (SD card).
3 Open the folder saving the music file(s) to be deleted
4 Drag & drop the desired music file(s) in the recycle bin
5 Disconnecting this unit from the PC (page 67)

- If
Appendix
Specifications
Built-in flash memory *^1
:2GB
Headphone output
Maximum number of folders
: 3,000 (internal memory and SD card together)
Maximum number of files
: 7,000 (internal memory and SD card together)
Maximum number of hierarchy levels
: 8 level (MUSIC and KWD folders)
Max. recording tracks *^2
: Approx. 500 tracks (Internal memory)
Main unit dimensions (W × H × D)
:52.8 mm×100.2 mm×20.8 mm
(2-1/6×3-15/16×13/16 inch)
Weight (Net)
: Approx. 87 g (Approx. 0.19 lbs)
Operational Temperature Range
: 5 °C - +35 °C (without condensation)
Battery type
: Built-in Li-ion rechargeable battery
Recharging time
: Approx. 2.5 hours
Battery operation time \* 3
Continuous play time
WAV (44.1 kHz) : Approx. 31 hours
MP3 (128 kbps) : Approx. 35 hours
WMA (128 kbps) : Approx. 29 hours
(Playback of music files in the internal memory)
Recording time
WAV (96 kHz, 24 bit) : Approx. 16 hours
WAV (44.1 kHz, 16 bit) : Approx. 28 hours
WMA (128 kbps) : Approx. 32 hours
(Built-in microphones & internal memory)
Recording format
: WAV (44.1/48/96 kHz, 16/24 bit, Stereo)
: MP3 (44.1 kHz, 96/128/196/320 kbps, Stereo/Monaural)
Maximum recording time (without other types of file)
Internal memory/
microSD card (2 GB)
WAV (96 kHz, 24 bit) : Approx. 50 minutes
WAV (48 kHz, 24 bit) : Approx. 1 hour 50 minutes
WAV (44.1 kHz, 24 bit) : Approx. 2 hours
WAV (96 kHz, 16 bit) : Approx. 1 hour 20 minutes
WAV (48 kHz, 16 bit) : Approx. 2 hours 40 minutes
WAV (44.1 kHz, 16 bit) : Approx. 3 hours
MP3 (320 kbps) : Approx. 13 hours 30 minutes
MP3 (192 kbps) : Approx. 22 hours 30 minutes
MP3 (128 kbps) : Approx. 33 hours 50 minutes
MP3 (96 kbps) : Approx. 45 hours
microSDHC card (8 GB)
WAV (96 kHz, 24 bit) : Approx. 3 hours 40 minutes
WAV (48 kHz, 24 bit) : Approx. 7 hours 20 minutes
WAV (44.1 kHz, 24 bit) : Approx. 8 hours 10 minutes
WAV (96 kHz, 16 bit) : Approx. 5 hours 30 minutes
WAV (48 kHz, 16 bit) : Approx. 11 hours 20 minutes
MGR-E8 76
WAV (44.1 kHz, 16 bit): Approx. 12 hours 20 minutes
MP3 (320 kbps) : Approx. 55 hours
MP3 (192 kbps) : Approx. 92 hours
MP3 (128 kbps) : Approx. 138 hours
MP3 (96 kbps) : Approx. 184 hours
* The figure shown are standard values of stereo recording.
* During continuous recording, the file is divided every 2 GB.
Playbackformat
MP3
Extension: .mp3
Sampling rate: 8/11.025/12/16/22.05/24/32/44.1/48 kHz
Bit rate: 32 - 320 kbps
Variable bit rate *4: 32 - 320 kbps
ID3 tag: ver. 1.0/1.1/2.2/2.3/2.4
WMA (DRM9 compatible)
Extension: .wma
Sampling rate: 22.05/32/44.1/48 kHz
Bit rate: 32 - 320 kbps
Variable bit rate *4: 32 - 320 kbps
(Not supported by Professional, Lossless, or Voice.)
WAV (Linear PCM)
Extension: .wav
Sampling rate: 44.1/48/88.2/96 kHz
Bit count: 16/24 bit
SD card \*5
Compatible SD card
: microSDHC™ card (≤ 16 GB)
microSD™ card (≤ 2 GB)
(Data recorded in the SD audio format cannot be played back.)
PC system configuration requirements *6
OS
: Microsoft® Windows® 7/Vista/XP
USB connector
: Compliant to USB 1.1/2.0 standard
- Kenwood follows a policy of continuous advancements in development. For this reason specifications may be changed without notice.
*1 The actual available space may be smaller than specified due to the presence of the system file area.
*2 Assuming that each tracks is in the 128 kbps MP3/WMA format with playback time of about 4 min.
*3 The continuous play time value is the standard value when the provided headphones are used, the indicator is "OFF", the lighting time is "OFF". Note that it is not the guaranteed value. The actual time may be shortened depending on the ambient temperature and other operating conditions. The battery operation time may be shortened with certain SD cards.
*4 Audio data with variable bit rate (VBR) may sometimes go beyond the bit rate range of this unit. In this case, this unit cannot play the audio data.
*5 This unit is capable of recording/playback of SD/SDHC memory cards complying with the SD or SDHC standard.
*6 All of the above specified PC environment does not guarantee full operation of this unit. Use a PC in which either OS mentioned above is preinstalled. Operation is not guaranteed on a PC running an upgraded OS or a PC assembled by yourself.
English77
Error messages
| Message Remedy | |
| Can't play The file being displayed does not exist actually.→ Ifis set to, be sure to executeafter deleting a file or removing the SD card (page 60). | |
| A WMA file with DRM was transferred using the Explorer.→ WMA files of the DRM9 format should be transferred using provided Windows Media Player (it is not compatible with the DRM10 format). | |
| Memory FullNo Free space | These messages are displayed when the available memory space is insufficient.→ Delete files to increase the available space. |
| File fullCan't create anymore files | The maximum number of manageable files has been reached.→ Delete unnecessary files. For the maximum number of manageable files, see(page 30) or(page 76). |
| Updating Song listUpdating File name | The file information in the memory is being updated.Wait until the updating finishes.Updating may take time if there are large number of files. |
| Please insert microSD cardCan't identify microSD cardPlease insert again | The microSD card is not inserted properly.→ Switch this unit off and re-insert the microSD card correctly. |
| The microSD card is formatted with a file system incompatible with this unit.→ Format the microSD card in this unit (page 57). | |
| Writing speed is slow This message is displayed when the available space in the internal memory or microSD card is fragmented into small spaces.→ Format the internal memory or microSD card (page 57). | |
| Low batteryPlease charge | The battery has no remaining capacity.→ Recharge the battery (page 17).→ Supply external power from the USB port of a PC (page 18). |

MGR-E8 78
| Message Remedy | |
| Please check the connection of line input Please check the connection of external microphone | The connection cord was disconnected during recording.→ Check the cord connection and reconnect it as required. |

Troubleshooting
In the case of a trouble such as the impossibility of switching this unit ON, spontaneous power shutdown or erroneous display, press the Reset button (page 8).
For details, refer to the support information in our website by visiting:
http://www.kenwood.com/
| Symptom Remedy | |
| Power cannot be switched ON or pressing a button does not start an operation. | The hold function is set to “ALL.”Cancel the HOLD function with the HOLD switch on this unit (page 19). |
| The battery is nearly exhausted.Recharge it if it is rechargeable or replace it if it is an alkaline battery. (page 17) | |
| This unit is being connected to the PC.This unit is inoperable when it is connected to the PC in the storage mode. | |
| The remaining battery power drops soon after recharging. | The rechargeable battery is degraded.Replace it with a brand-new rechargeable battery.For the battery replacement, contact your nearest Kenwood service agent. |
| Audio is not heard. Headphones are connected improperly. Connect headphones correctly to this unit. | |
| Battery cannot be recharged. USB cable is connected improperly. Check the connections on both this unit and PC sides. | |
| PC does not recognize this unit. USB cable is defective.Purchase and use another USB cable. | |
| Recording standby cannot be entered.Recording is impossible. | The hold function is set to “REC.”Cancel the HOLD function with the HOLD switch on this unit(page 19). |
| If the music starts to play, press [■/BACK] to stop it.[REC] button:Press during stop mode to enter the recording standby mode.Press during recording standby to start recording. | |
| Recording from a line input is impossible. | A plug is connected to the microphone input.Do not connect anything to the microphone input terminal.(page 34) |
| Recording from an external microphone is impossible. | The PLUG IN POWER switch is set to OFF.A condenser microphone with the plug-in power compatibility needs an external power supply. Set the PLUG IN POWER switch to ON when using such a microphone. (page 33) |
| A plug is connected to the line input.Do not connect anything to the line input terminal. (page 33) | |
| Recording from the built-in microphones is impossible. | A plug is connected to the line input or microphone input.Do not connect anything to the line input and microphone input terminals. |
| Only the left (Lch) audio of the external microphone can be recorded. | A monaural microphone is connected.When a monaural microphone is connected, the audio is recorded only in the Left channel. |
Glossary
DB (Database):
Function for creating tag information of music files and basic information on their filenames so that they can be selected from the list screen.
DRM (Digital Rights Management):
Technology for protecting the copyright of digital audio and video data by limiting the number of duplications.
microSD card:
This memory card has a size of about 1/4 the SD card and retains the compliance to the SD card standard.
microSDHC card:
This memory card complies with the upper standard of the microSD card and has capacity of 4 GB or more.
MP3:
An international data compression standard of MPEG, which is a working group in ISO (International Standardization Organization). It offers compression rates between about 1/10 and 1/12.
MSC (Mass Storage Class):
USB device type that is classified as a large-capacity storage device, the examples of which include a hard disk drive and CD drive. When an MSC device is connected to a PC, the PC recognizes the device just like a removable disk, with which files can be exchanged easily using the standard drag & drop operation.
USB:
This is a standard for connection between a PC and the peripherals. This unit is compliant to the USB 1.1 and 2.0 standards.
Tag data:
Information on each audio file, including the music title, artist name, album name and genre name.
WMA (Windows Media Audio):
An audio compressed encoding format developed by Microsoft Corporation. Also the extension used with audio files created using WMA.
MGR-E8 82
Trademark Information
- "Microsoft" and "Windows Media" are trademarks or registered trademarks of Microsoft Corporation in the USA and other countries.
- microSDHC logo is a trademark.
Other system names and product names are also trademarks or registered trademarks of their respective developers. Note that the "TM" and "®" markings are omitted in the text of this manual.
Information on Disposal of Old Electrical and Electronic Equipment and Batteries (applicable for EU countries that have adopted separate waste collection systems)
Products and batteries with the symbol (crossed-out wheeled bin) cannot be disposed as household waste.
Old electrical and electronic equipment and batteries should be recycled at a facility capable of handling these items and their waste byproducts.

Contact your local authority for details in locating a recycle facility nearest to you.
Proper recycling and waste disposal will help conserve resources whilst preventing detrimental effects on our health and the environment.
Notice: The sign "Pb" below the symbol for batteries indicates that this battery contains lead.


KENWOOD


- Manufacturer:
- EU Representative's:
- Contents
- Read Before Use
- Getting started
- Recording music
- Editing a recorded file
- Playing music tracks
- Deleting files
- Adjusting the audio
- Menu function
- Utilizing your computer
- Appendix
- Safety precautions
- IMPORTANT SAFETY INSTRUCTIONS
- Caution:
- WARNING :
- Precautions :
- Do not use or place the product in the following locations:
- Notes on using through headphones:
- Notes on using through car stereo :
- Handling
- Operating conditions
- Caution on condensation
- Maintenance of the unit
- In regard to contact cleaner
- Note on the built-in battery
- WARNING
- Storage and maintenance of SD card
- Before storage
- When the SD card gets dirty
- Other cautions
- Note on disposal/transfer of SD card
- Unpacking
- CAUTION
- Names and functions of parts
- ① Reset button
- ② USB jack
- ③ microSD card slot
- ④ Right microphone
- ⑤ Left microphone
- ⑥ Center microphone
- ⑦ Menu button
- ⑧ LIST Power/ List button
- ⑨ Select/ Play button
- ▲ Up button
- ▼ Down button
- Left button
- ▶▶ Right button
- ▶/II Play/Pause button
- ⑩ ■/BACK Stop/ Back button
- ⑪ PEAK indicator
- ⑫ REC LEVEL knob
- ⑬ REC button
- ⑭ EDIT button
- ⑮ Volume button
- ⑯ Strap eyelet
- ⑰ LINE OUT Line output
- ⑱ Phones jack
- ⑲ MIC Microphone input
- ⑳ LINE IN Line input
- ②1 HOLD switch
- ②2 Speaker
- ②3 MIC REC LEVEL Microphone recording level switch
- ⑳ MIC MODE Microphone mode switch
- ②5 PLUG IN POWER Plug-in power switch
- ②6 Tripod mount hole
- About the power supply
- Switch this unit ON
- Switch this unit OFF
- Remaining battery power indication
- Recharging from a PC connected with USB connection
- Turning On/Off the power
- Operation while supplying external power
- ■ To finish operation
- Preventing accidental operation (Hold function)
- Defeating all control buttons
- Defeating only the record button
- Enabling all buttons
- Switching on for the first time
- Connecting stereo headphones
- Selecting the ear tips
- Inserting/ removing a microSD card
- Basic recording operation
- Preparing for recording
- Set the recording level
- ■ To set the recording level automatically
- ■ To set the recording level manually
- Starting to record
- Starting to record
- ■ To pause recording
- Stop recording
- About wind noise
- About successive recording
- ① MENU button
- ② REC button
- ③▶/II Play/Pause button
- ④ ■/BACK Stop/Back button
- ⑤ REC LEVEL Recording level knob
- ⑥ EDIT button
- Folders and recorded files
- Name of recorded files
- About folders
- Switching the folder
- Other recording operations
- Recording by manually adjusting the microphone recording level
- Recording from an external audio component or musical instrument connected to the line input
- Changing the Recording Settings
- Moving a recorded file
- Dividing a recorded file
- Operations and display in playback
- Resume function
- ② ⬆LIST Power/List button
- ③ Left button
- ④▶/II Play/Pause button
- ⑤ ■/BACK Stop/Back button
- ⑥EDIT button
- ⑦ ▲ Up button
- ⑧ ▶▶▶ Right button
- ⑨ Artist name
- ⑩ Track title
- ⑪ Album title
- ⑫ Elapsed play time
- ⑬ Time progress bar
- ⑭ Level meter
- ⑮ Track No./Number of selected tracks
- ⑯ Total play time
- ⑰ Current date/time
- ⑱Playback mode
- Playback by selecting music from the list
- Various play modes
- Setting the playback setting items
- Set each item
- ■ Press [■/BACK] to return to the previous screen page.
- Exit MENU mode
- Setting A-B repeat
- ■ To cancel A-B Repeat
- Varying the playback speed
- Searching the point to be played by specifying the time
- Adding to/Deleting from the Favorite
- Adding to the Favorite
- Playing Favorite
- Deleting from the Favorite
- Connection of external components
- Connecting to the USB connector
- Connect a USB cable to the USB jack of this unit
- Digital Audio Player Link
- Deletingfiles
- Deleting all files (Formatting)
- Adjusting the volume
- Adjusting the volume
- Selecting the sound effects
- Common settings under the menu
- Setting the time
- Sleep timer and alarm timer
- ■ To set the alarm timer
- Connecting a PC
- Disconnecting this unit from the PC
- Configurations of folders and files
- Transferring recorded files to a PC
- Capturing Music in PC/ Transferring Music from PC
- This unit can play the following 3 types of music files.
- Using Windows Media Player 12
- Data transfer by drag & drop
- Capturing Music in PC/Transferring Music from PC
- Open the "Music" folder
- Open the folder storing the desired music file Click [Start] – [Music].
- Drag & drop the music file into the removable disk
- Disconnecting this unit from the PC (page 67)
- Deleting using the Explorer
- Specifications
- Built-in flash memory *1
- Headphone output
- Maximum number of folders
- Maximum number of files
- Maximum number of hierarchy levels
- Max. recording tracks *2
- Main unit dimensions (W × H × D)
- Weight (Net)
- Operational Temperature Range
- Battery type
- Recharging time
- Battery operation time \* 3
- Continuous play time
- Recording time
- Recording format
- Maximum recording time (without other types of file)
- Internal memory/
- microSD card (2 GB)
- microSDHC card (8 GB)
- Playbackformat
- MP3
- WMA (DRM9 compatible)
- WAV (Linear PCM)
- SD card \*5
- PC system configuration requirements *6
- OS
- USB connector
- Troubleshooting
- Glossary
- DB (Database):
- DRM (Digital Rights Management):
- microSD card:
- microSDHC card:
- MP3:
- MSC (Mass Storage Class):
- USB:
- Tag data:
- WMA (Windows Media Audio):
- Trademark Information
- Information on Disposal of Old Electrical and Electronic Equipment and Batteries (applicable for EU countries that have adopted separate waste collection systems)
- KENWOOD
Brand : KENWOOD
Model : MGR-E8-B
Category : Dictaphone