MA-600 - Treadmills StrengthMaster - Free user manual and instructions
Find the device manual for free MA-600 StrengthMaster in PDF.


| Product Type | Treadmill |
| Brand | StrengthMaster |
| Model | MA-600 |
| Dimensions (L x W x H) | 70 x 34 x 55 inches |
| Running Surface | 20 x 60 inches |
| Product Weight | 250 lbs |
| Maximum User Weight | 300 lbs |
| Motor Power | 2.5 HP Continuous Duty |
| Speed Range | 0.5 - 12 mph |
| Incline Range | 0 - 12% |
| Display Type | LCD |
| Display Metrics | Time, Distance, Speed, Calories, Pulse |
| Heart Rate Monitoring | Hand pulse sensors |
| Safety Key | Included |
| Folding Design | Yes, with hydraulic assist |
| Power Supply | 120V AC, 60Hz |
| Warranty (Frame) | 2 years |
| Warranty (Parts) | 1 year |
| Maintenance Interval | Lubricate belt every 3 months |
| Cleaning Instructions | Wipe with damp cloth |
| Spare Parts Availability | Available from StrengthMaster |
Frequently Asked Questions - MA-600 StrengthMaster
User questions about MA-600 StrengthMaster
0 question about this device. Answer the ones you know or ask your own.
Ask a new question about this device
Download the instructions for your Treadmills in PDF format for free! Find your manual MA-600 - StrengthMaster and take your electronic device back in hand. On this page are published all the documents necessary for the use of your device. MA-600 by StrengthMaster.
USER MANUAL MA-600 StrengthMaster
natural_image
Line drawing of a treadmill with a standard treadmill, labeled MA400 (no text or symbols on the device itself)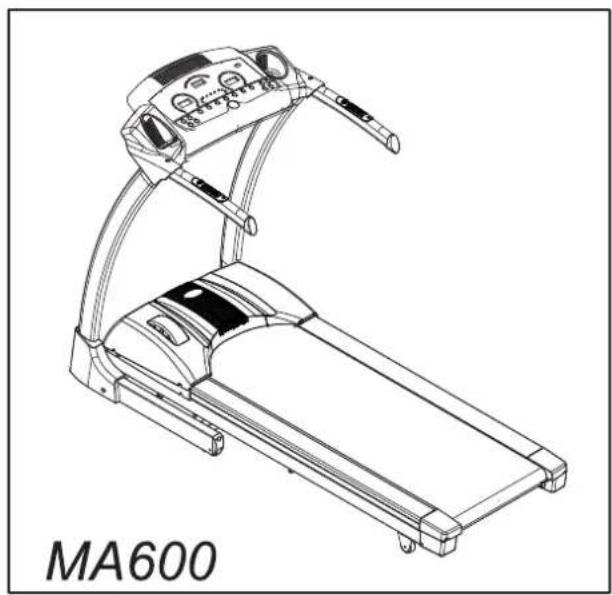
natural_image
Line drawing of a treadmill with control panel and mode dial (no text or symbols on the device itself)Congratulations on the purchase of your new motorized treadmill. To help ensure the enjoyable and trouble-free operation of your new treadmill, we strongly suggest you read this manual carefully and follow its recommendations.
■ Important Safety Instruction......1
■ Assembly Instruction
MA400/600 ....2
■ ELECTRONICS OVERVIEW
MA400/600 ....4
■ Preset Program
MA600....5
MA400....7
■ Utilization......12
■ Care....13
IMPORTANT SAFETY INSTRUCTIONS
DANGER
To reduce the risk of electric shock
Always unplug this appliance from the electrical outlet immediately after using and before cleaning.
◆ Use this appliance only for its intended ues as described in this manual. Do not use attachment not recommended by the manufacture.
◆ To disconnect, turn all controls to the off position, than remove plug from outlet.
◆ Connect this appliance to properly grounded outlet only. See Grounding Instructions.
◆ The appliance is intended for household use.
When you are not going to use your treadmill, or when finishing. please remove the safety key from the console then always position the safety key where the children can not take.
◆ Do not use outdoors.
◆ Always unplug the treadmill from the electrical outlet immediately after using and before cleaning, assembling or servicing.
◆ Never leave the treadmill unattended when plugged in.Disconnect by turning off the master power switch and unplugging form outlet.
◆ Never operate this treadmill if it has a damaged cord or plug, is not working properly, if it has been dropped or damaged or if it has been exposed to water.
Do not operate where aerosol products are being used or where oxygen is being administered.
- Don't pull the treadmill by its power cord or use the cord as a handle.
◆ Keep close supervision if this treadmill is used by, or near children, persons with disabilities or pets.
◆ Keep dry. Do not operate this treadmill in wet or moist conditions.
◆ Never insert any object into any opening.
◆ Before using the treadmill, always warm up your muscles to prevent the exercise injury.
◆ Please unplug the electrical cord from the electrical outlet, and always prevent the children from danger because of careless touching
◆ Keep electric cord away from heated surfaces.
◆ Keep hands clear of all moving parts. Never place hands or feet under the treadmill.
Before each use, check that the running belt is aligned and centered on the treadmill bed and all visible fasteners on the treadmill are sufficiently tightened and secure.
◆ Keep the treadmill on a solid, level surface with sides at least two feet from any walls. Be sure the area around the treadmill remains clear during use and has adequate clearance.
NOTE:
Failure to follow these instructions may lead to personal injury and cause damage to the treadmill. To reduce the risk of burns, fire, electric shock, please keep the following in mind:
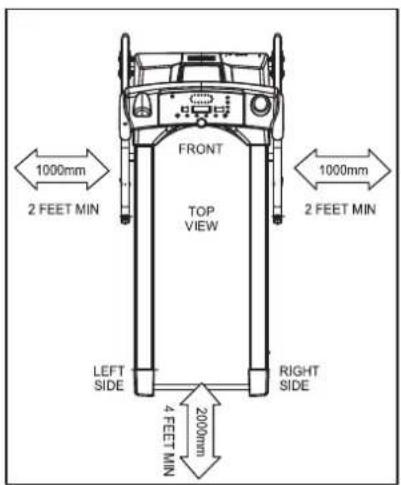
ELECTRICAL GROUNDING INSTRUCTIONS
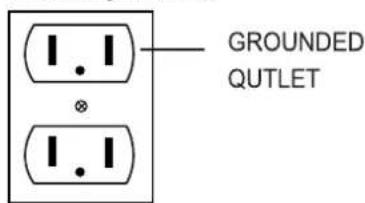
This product must be grounded. If it should malfunction or break down, grounding provides a path of least resistance for electric current to reduce the risk of electricshock. This treadmill is equipped with a cord having equipment grounding connector and a grounding plug. the glug must be plugged into an appropriate outlet that is properly installed and grounded in accordance with all local coades and ordinances.
Danger
Improper connection of the treadmill grounding connector can result in the risk of electric shock. Check with a qualified electrician, if you are in doubt as to whether the product is properly grounded. Don't modify the plug provided with the treadmill. If it won't fit your outlet, have a properly grounded outlet installed by a qualified electrician
Warning
Never use extension cords between the treadmill and wall outlet.
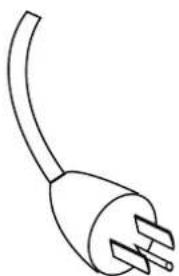
natural_image
Line drawing of an electrical outlet with a curved cable (no text or symbols)GROUNDING
PIN
Figure
Grounding methods
MA600/MA400
ASSEMBLY INSTRUCTION
Since your treadmill is a heavy piece of equipment, we recommend that after taking off the top portion of the box, you slit the corners of the lower carton and fold down the sides. This will eliminate the need for you to pick up the treadmill over the sides of the box.
Prior to starting the assembly process take all of the parts out of the box, remove all plastic bags, and lay them out on the floor to become familiar with the components. Make sure that you remove all parts packaged underneath the readmill. You may need to slightly pick up the back of the treadmill to get better access to the parts on the bottom. You will notice that the treadmill is completely assembled except for the handlebars and the display window.
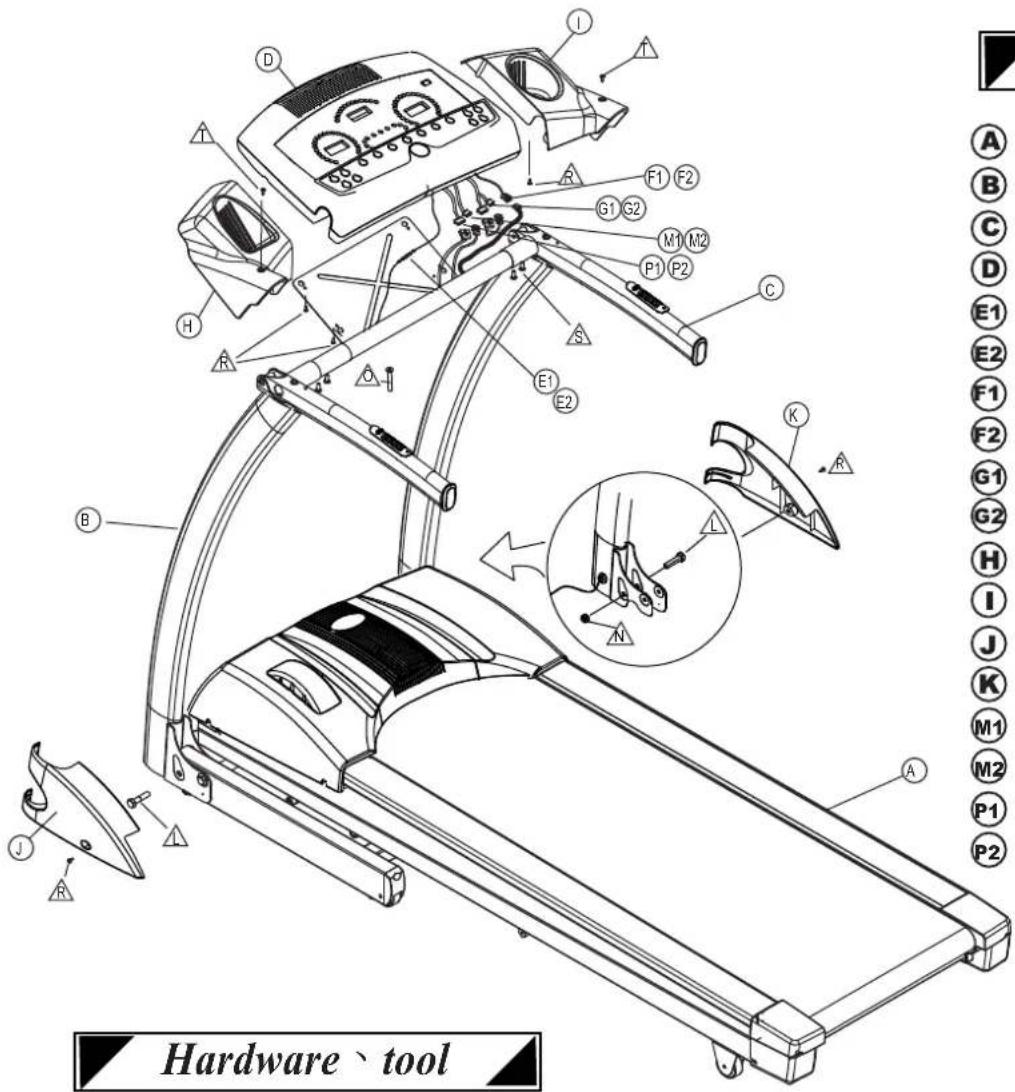
Parts
A Frame
B Support Handle
© Handlebar
D Console
E1 Ground Wire (Only for MA600)
E2 Ground Wire (Only for MA600)
F1 Wire Harness
F2 Wire Harness
G1 Hand Pulse Cable
G2 Hand Pulse Cable
H Left Rack
Right Rack
J Left Cover
Right Cover
M1 Speed Control Harness
M2 Speed Control Harness
P1 Incline Control Harness
P2 Incline Control Harness
Hardware \`tool
Screws Already in Place the Treadmill
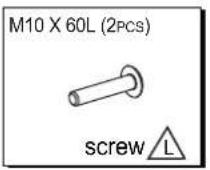
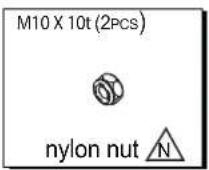
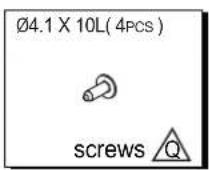
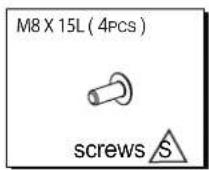
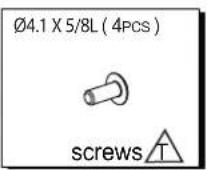
Screws in the Plastic Bag
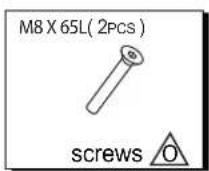
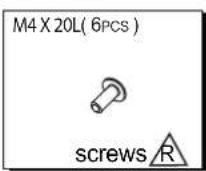
TOOL
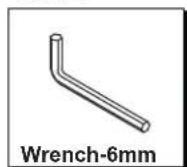
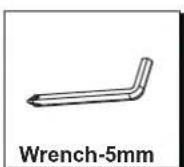
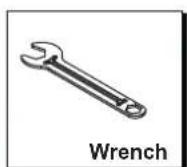
MA600/MA400
ASSEMBLY INSTRUCTION
STEP 1: HANDLEBAR SUPPORT POST ASSEMBLY
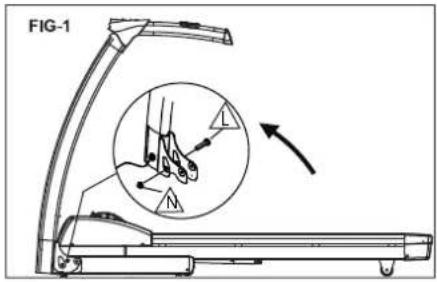
- Remove screw, and nut from both right/left sides of base frame.
- Stand up the support post and handle bar. (FIG-1)
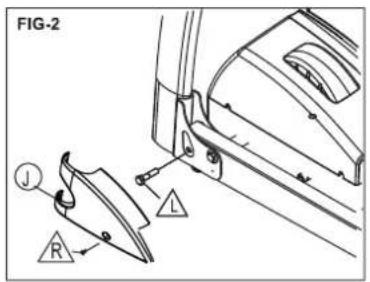
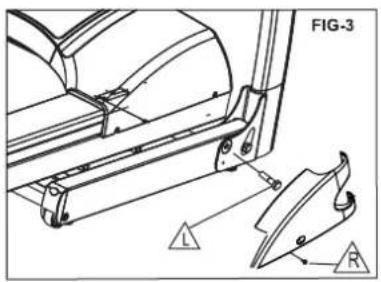
- Attach screw, and nut back to both right/left sides of base frame and tighten the screws.
- Attach right base cover on base frame and tighten with screw R. Repeat the same step on the left side.
STEP 2: HANDLEBAR ASSEMBLY
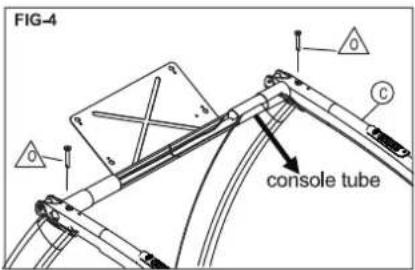
- Adjust the handlebars so they are positioned on the handlebar posts. Secure the right/left handle bar on the support post by tightening the screws ⬤ .(FIG-4)
- Rotate the console tube so the console bracket is positioned as shown in Figure 4.
STEP 3: CONSOLE ASSEMBLY
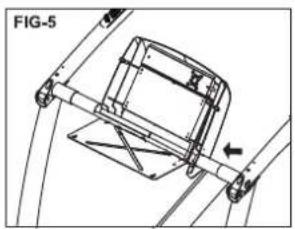
natural_image
Technical line drawing of a mechanical assembly with no visible text or symbols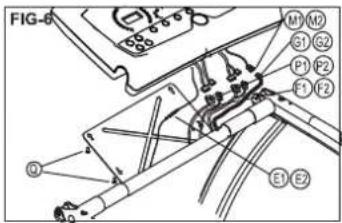
- Hold console on the console tube as shown in Figure 5.
- Connect ground wires E1 E2.(FIG-6)(Only for MA600)
- Connect wire harness①②.(FIG-6)
- Connect hand pulse cables G1G2.(FIG-6)
Note: Insert excess wire harness into right side of console tube. - Fix console on the bracket by tightening 4 screws
- Connect the Speed Control Harness M1M2.(FIG-6)
- Connect Incline Control Harness (P1) (P2). (FIG-6)
Warning:
Make sure all the cables/wires are not pinched when the console screws are tightened.
STEP 4: CUP HOLDER ASSEMBLY
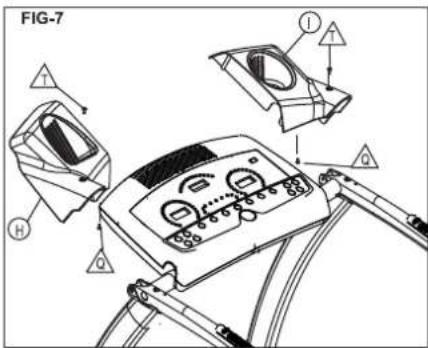
- Attach the right cup holder to the console tube and the right handlebar. Rotate the console tube if necessary to make sure the cup holder fits snugly on the handle bar.
- Attach screw from the top of the cup holder onto the handlebar and tighten.
- Attach screw from the bottom of the cup holder to the console.
- Repeat the above steps to fix the left cup holder on handle bar.(FIG-7)
STEP 5: COMPLETE ASSEMBLY
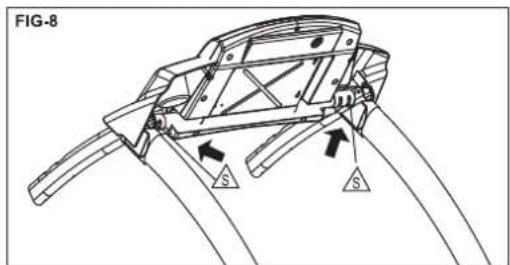
Make sure the console and the cup holders are aligned and then tighten the 4 screws under both sides of console tube.(FIG-8)
MA600/MA400
ELECTRONICS OVERVIEW
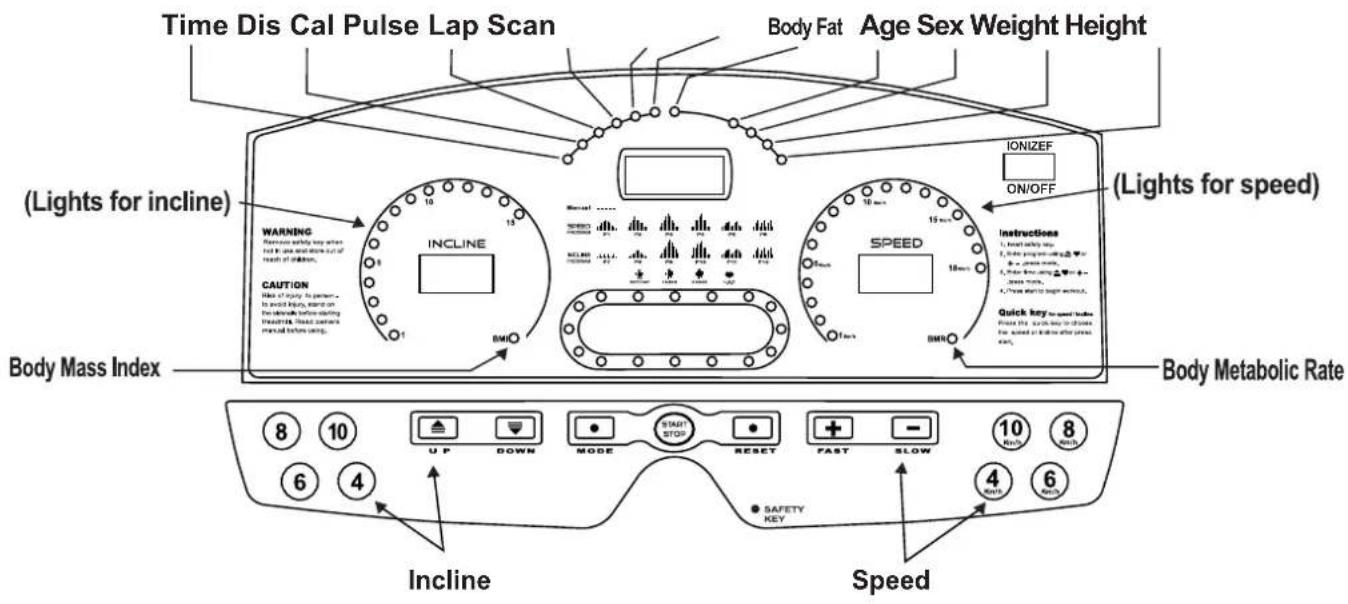
Display Functions
MA600
MA400
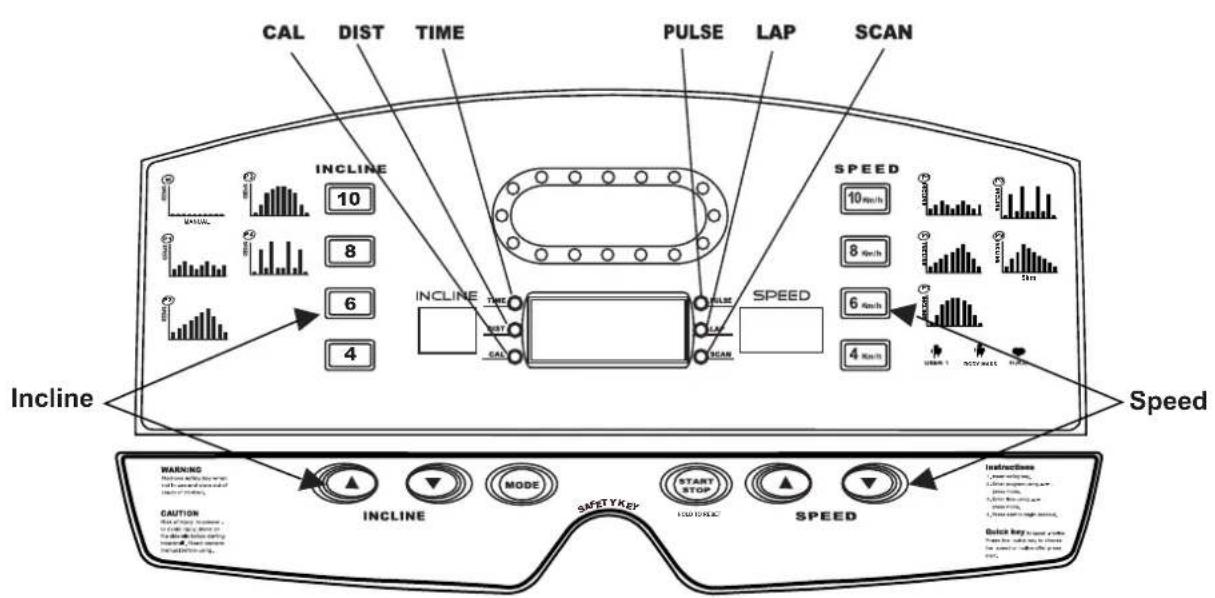
MA600\MA400 EXERCISE PROGRAMS
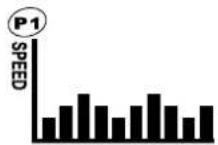
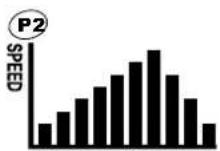
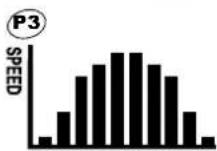
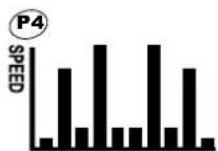
MA600 Speed Programs- programs P1-P6 automatically change the speed of the treadmill throughout the workout. Each program starts at a minimum speed of 2 km/h and depending upon the program, can go up to a maximum speed to 10 km/h. The incline can be manually set by the user in any of the speed programs and this incline will remain throughout the workout unless modified by the user. The speed can also be modified, but changes to the speed will only last until the end of each specific program segment. Profiles for the speed programs are shown below:

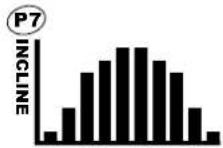
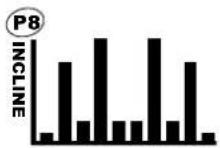
MA600 Incline Programs- programs P7-P12 automatically modify the level of incline for the treadmill belt. In an incline program, the user sets the speed to a desired level and the program modifies the incline. The user can override the incline for any segment within the workout but at the end of each workout segment the program will override any adjustments made to the incline. The range of incline in programs P7-P12 is from 0 to 11 level. Profiles for the incline programs are shown below:

bar
INCLINE PROGRAM | Category | Value | |---|---| | P7 | 1.1 | | P8 | 1.3 | | P9 | 2.5 | | P10 | 2.6 | | P11 | 1.4 | | P12 | 1.6 |MA400 Speed Programs- programs P1-P4 automatically change the speed of the treadmill throughout the workout. Each program starts depending upon the program. The incline can be manually set by the user in any of the speed programs and this incline will remain throughout the workout unless modified by the user. The speed can also be modified, but changes to the speed will only last until the end of each specific program segment. Profiles for the speed programs are shown below:

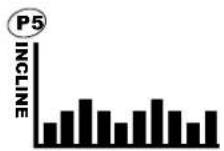
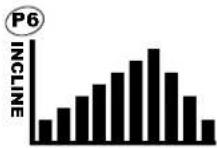
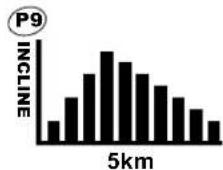
MA400 Incline Programs- programs P5-P8 automatically modify the level of incline for the treadmill belt. In an incline program, the user sets the speed to a desired level and the program modifies the incline. The user can override the incline for any segment within the workout but at the end of each workout segment the program will override any adjustments made to the incline. The range of incline in programs P5-P9 is from 1 to 11 level. Profiles for the incline programs are shown below:

MA400 5km distance program- Program P9 automatically change the level of incline for the treadmill belt. The user sets the speed to a desired level and the program modifies the incline. The user can override the incline for any segment within the workout but at the end of each workout segment the program will override any adjustments made to the incline.
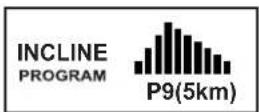
MA600\MA400 EXERCISE PROGRAMS
User Setup Programs- (MA600:2users, MA400:1user): provide the ability to establish customized workout programs specific to a users workout requirements. For each user set up program, the workout time is set and then 10 unique workout segments are set up by the user. For each segment the user can preset the speed and incline of the segment by using the up and down arrow buttons and then pushing the mode button to set each program. Once a program is set up the user simply scrolls to the User1 or User2 program and pushes the start button. To modify the program after it is established, select the program and then push the mode button.
.TARGET HEART RATE PROGRAM: This program automatically modifies the speed to maintain a preset target heart rate. This target is established in the setup process. The chart on this owners manual should be used to determine the appropriate target heart rate. To set up the target heart rate program, you will need to enter the workout time, your age, and your target heart rate.
TARGET HEART RATE CHART
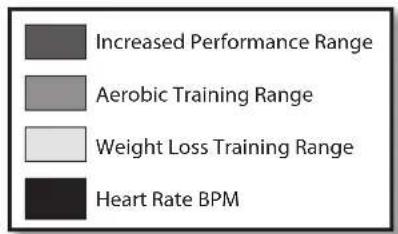
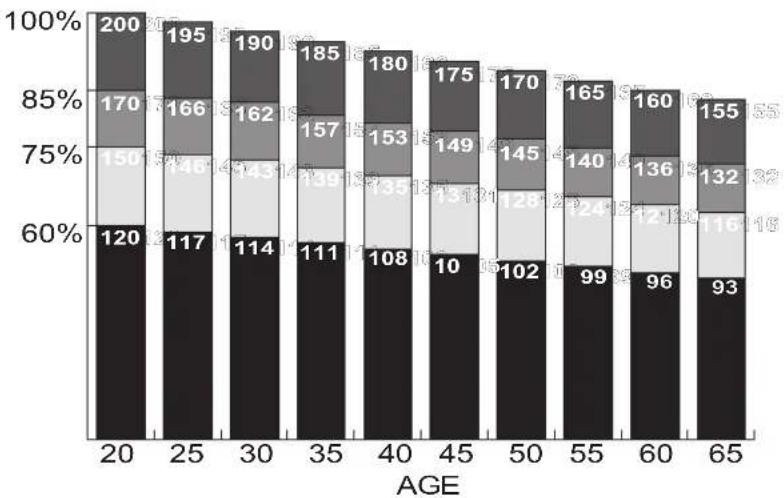
bar_stacked
| AGE | 100% | 85% | 75% | 60% | |---|---|---|---|---| | 20 | 200 | 170 | 150 | 120 | | 25 | 195 | 166 | 146 | 117 | | 30 | 190 | 162 | 143 | 114 | | 35 | 185 | 157 | 139 | 111 | | 40 | 180 | 153 | 135 | 108 | | 45 | 175 | 149 | 131 | 10 | | 50 | 170 | 145 | 128 | 102 | | 55 | 165 | 140 | 124 | 99 | | 60 | 160 | 136 | 121 | 96 | | 65 | 155 | 132 | 116 | 93 |WIRELESS HEART RATE CHEST STRAP(Optional): The most accurate way to read your heart rate is by using a wireless heart rate transmitter. Prior to wearing the strap, moisten the two contact pads with several drops of water and spread the water over the pads with your finger. When you put on the strap, centre the transmitter strap just below the breast or pectoral muscles, directly over your sternum. Adjust the elastic strap so the belt fits snugly and stays in place.
BODY MASS - Body Composition the MA600 comes with 3 different body composition measures. These are Body Mass Percentage, Body Mass Index, and Basal Metabolic Rate. None of these measures are perfect and all of them should be used only as a relative gauge. The MA400 only comes with Body Mass Index. These three measures are briefly described below:
- Body Mass Percentage (only for MA600) is calculated using a technique called Bioelectrical Impedance Analysis (BIA). This is a simple and easy way to determine body fat by sending a signal from one hand to another while the users hands are placed on the heart rate sensors. The faster the signal travels the higher the muscle density. The results are based on the fact that muscle tissue conducts electricity faster than fat because muscle is about 70% water and fat and fat contains almost no water.
MA600 EXERCISE PROGRAMS
BMP: (Only for MA600)
| Age | Female Range Male Range | |||||
| Excellent Good Poor Excellent Good Poor | ||||||
| 19-24 | 18.9%~25.0% | 25.0%~29.6% | 29.6%UP | 10.8%~19.0% | 19.0%~23.3% | 23.3%UP |
| 25-29 | 18.9%~25.4% | 25.4%~29.8% | 29.8%UP | 12.8%~20.3% | 20.3%~24.4% | 24.4%UP |
| 30-34 | 19.7%~26.4% | 26.4%~30.5% | 30.5%UP | 14.5%~21.5% | 21.5%~25.2% | 25.2%UP |
| 35-39 | 21.0%~27.7% | 27.7%~31.5% | 31.5%UP | 16.1%~22.6% | 22.6%~26.1% | 26.1%UP |
| 40-44 | 22.6%~29.3% | 29.3%~32.8% | 32.8%UP | 17.5%~23.6% | 23.6%~26.9% | 26.9%UP |
| 45-49 | 24.3%~30.9% | 30.9%~34.1% | 34.1%UP | 18.6%~24.5% | 24.5%~27.6% | 27.6%UP |
| 50-54 | 26.6%~31.1% | 33.1%~36.2% | 36.2%UP | 19.8%~25.6% | 25.6%~28.7% | 28.7%UP |
| 55-59 | 27.4%~34.0% | 34.0%~37.3% | 37.3%UP | 20.2%~26.2% | 26.2%~29.3% | 29.3%UP |
| 60+ | 27.6%~34.4% | 34.4%~38.0% | 38.0%UP | 20.3%~26.7% | 26.7%~29.8% | 29.8%UP |
- Body Mass Index (For MA600\MA400) BMI: is a scientific measure that uses a ratio of height and weight. It is a general measure of health risk, but does not take into account lean body mass. As a result, a healthy muscular individual with very low body mass can be classified as over weight. The following are general ranges of BMI measurements:
| Below 18 | Lean - if you are not an athlete you should consider gaining weight through good diet and exercise |
| Between 18 and 24 | Ideal - indicates a healthy amount of body fat and the lowest incidence of serious illness |
| Between 25 and 29 | Sightly Overweight - increased risk for a variety of illnesses. You should find ways to reduce your weight through diet and exercise. |
| Over 30 | Overweight - indicates an unhealthy condition with a higher risk of heart disease, diabetes, high blood pressure, gall bladder disease and some cancers. You should focus on losing weight by changing your diet and increasing levels of exercise. |
- Basal Metabolic Rate (only for MA600) BMR: is the number of calories used by the body when it's at rest. It is calculated using age, sex, height, and weight, The BMR number shown on the display is a three digit number. You will need to add a "0" to the end of the number to get your actual BMR.
MA600/MA400 TREADMILL OPERATIONS
Before starting your treadmill the following actions will need to be properly completed:
- Be certain that your treadmill sits stable on the floor. It is also recommended that you locate your treadmill in a pleasant area that gives you something to look at while working out, such as a window or television.
Maintaining an exercise program with a treadmill located in a poorly litbasement room is more difficult than when your tredmill is located in an active and pleasant location.
-
Make sure that your treadmill is plugged into a properly grounded outlet as described in the grounding section if this document.
-
Turn the On/Off switch, which is located in the front of your treadmill, to the On position.
-
Insert the magnetic safety key in the round area centered at the bottom of your display. If the safety key is not inserted properly you will see lines across the middle of each LED display.
Quick Start
- Attach the "Safety Key" to your clothing. This key will immediately shut off your treadmill if removed and is strongly recommended for your safety.
- Quick Start - The quickest and easiest way to start your treadmill is to push the Quick Start button. This will cause the display to count down for 3 seconds and then begin in the "Manual Program" at 1km Per Hour.
- Speed Adjustment - can be increased and decreased in 3 different ways:
Display Console - "FAST/SLOW" Each time you depress the "Fast" button on the display console the speed will increase by 0.1 km Per Hour.
Handlebar Speed Control - the heart rate sensor on the right side of the handlebars includes an incline control switch. Pushing the switch on the right side increases the speed by 0.1 km and pushing the button on the right side decreases the speed by 0.1 km.
Quick Buttons - the display console includes buttons that immediately set the speed to 4, 6, 8, and 10 km/h without having to scroll through the speeds.
- Incline - like the speed settings, incline can be adjusted 3 different ways:
Display Console - "UP/DOWN" Each time you depress the "Up" or "Down" button on the display console the incline will increase or decrease by 1 level.
Handlebar Incline Control - the heart rate sensor on the left side of the handlebars includes an incline control switch. Pushing the switch on the left side increases the incline by 1 level and pushing the button on the right side decreases the incline by 1 level.
Quik Bettons - the display console includes buttons that immediately set the incline to 4, 6, 8, and 10 level without having to scroll through the incline levels.
- Display Readouts - Besides "Speed" and "Incline" the center LED window will display Time, Dis, Cal, Heart Rate and Laps around the track. By pressing the MODE button, you can select the function that you want displayed on the center LED window, or you can go to the Scan mode to scan through all functions. In the "Quik Start" mode, time will start to count up from 0:00.
MA600/MA400
TREADMILL OPERATIONS
Programs Setup and Selection - (MA600 P1 - P12, MA400 P1 - P9)
- Select Program: To Start a program simply select the desired program by pressing on either the "UP" and "DOWN" or "FAST" and "SLOW" buttons and then pressing the "MODE" button.
- Select Level: Select the desired level (L1\~L3) by pressing on either the "UP" and "DOWN" or "FAST" and "SLOW" buttons and then pressing the "MODE" button.
- Set Time: Now chose how long you would like to workout by pressing either set of "UP" and "DOWN" or Fast/Slow arrows. Each time you push the up down or Fast/Slow button the workout time will change by one minute. You can also hold these buttons down to quickly scroll through the time. The shortest preset program time is 10 minutes and the longest is 99 minutes.
- Press Start: Once the desired time is selected, push the "Quik Start" button to begin your workout.
User Setup Programs (MA600:2 users, MA400:1 user)
- Select Program: Use either set of "up" and "down" arrows to scroll through the programs until you reach U1 or U2 and press the "Mode" button.
- Set Time: Chose how long you would like to workout by pressing either set of "up" and "down" and press the "Mode" button.
3.Enter Segment Speed and Incline: each program is divided into 10 equal segments. Select the desired speed for each segment by pressing on the "Fast" and "Slow" buttons. Then select the desired incline for each segment by pressing on the "Up" and "Down" arrows. After selecting the incline and speed for the segment press the "Mode" button and make the selection for the next segment until all 10 segments are completed. Press the "Start" button to begin the workout. - Editing a User Setup Program: To edit the program, scroll to either "U1" or "U2" programs and press the "Mode" button. Make the desired changes to the program and press "Mode" at the end of each segment. Press the "Start" button once completed.
Note: After a user program has been set, to select that program for subsequent workouts, use th up and down arrows to scroll to "U1" or "U2" and press the "START" button.
Target Heart Rate Program Setup
- Select Program: Use either "up" or "down" arrows to scroll through the programs until "H1" is shown on the center display. Then press the "Mode" button.
- Select Age: Use either "up" or "down" arrows to enter the user age. Then press the "Mode" button.
- Set Target Heart Rate: Use either "up" or "down" arrows to set the target heart rate. Then press "Mode". After a warm-up period, the program will automatically adjust the speed to maintain the Target Heart Rate (Range From 60\~180 bpm).
4.Enter program Time: Use either "up" or "down" arrows to enter the program workout time. Then press the "Start" button. - Set Target Max Speed: Use either "up" or "down" arrows to set the target max. speed. The speed will not increase over than max. speed even though pulse is not reach target heart rate yet.
MA600/MA400 TREADMILL OPERATIONS
Body Composition Analysis
- Select Program: Use either set of "up" and "down" arrows to scroll through the programs until you reach the "Body mass" composition program and press the "Mode" button.
2.Enter Height: Use either set of "up" and "down" arrows to select your height and press the "Mode" button (The range from 110cm\~220cm).
3.Enter Weight: Use either set of "up" and "down" arrows to select your weight and press the "Mode" button (10\~200kg).
- Select Sex: Press the mode button for a "Girl" selection or press either set of "up" or "down" buttons to scroll to the "Boy" selection and then press the "Mode" button. Because of the limitations of the LED display these selections are shwon as "girl" and "boy" on the display console.
5.Enter Age:10\~70 years old.
- Press Start: After all selections are made, press the start button and place both hands over the heart rate sensors on the handlebars. It will take several seconds for the system to calculate each readout. If after waiting for 10 seconds the system doesn't show your readouts, it is not getting a good reading from the heart rate sensors. This can generally be solved by walking on the treadmill at an average speed for 3-4 minutes to increase your heart rate and improve the signal pickup from the heart rate sensors.
Pause Function
Pause the treadmill at any time during the operation by pressing the "Stop" button once. To resume operations, press the "Start" button.
Reset Button
Pressing the "Reset" button will reset the console to the beginning of the program setup process.
PRESET PROGRAM
Under preset programs, the preset workout time is 30 minutes. You can adjust the workout time while in set program mode.
MA600
speed program
incline program
| P1 | P2 | P3 | P4 | P5 | P6 | P7 | P8 | P9 | P10 | P11 | P12 | ||
| Interval1 | 2 | 2 | 2 | 2 | 2 | 2 | 0 | 0 | 1 | 2 | 2 | 2 | |
| Interval2 | 3 | 4 | 4 | 2 | 3 | 4 | 2 | 1 | 3 | 6 | 3 | 4 | |
| Interval3 | 4 | 6 | 6 | 6 | 4 | 6 | 0 | 2 | 5 | 6 | 4 | 6 | |
| Interval4 | 5 | 8 | 8 | 6 | 5 | 2 | 2 | 3 | 7 | 8 | 5 | 2 | |
| Interval5 | 6 | 6 | 10 | 8 | 2 | 4 | 0 | 4 | 9 | 8 | 2 | 4 | |
| Interval6 | 5 | 6 | 8 | 10 | 3 | 6 | 2 | 4 | 11 | 10 | 3 | 6 | |
| Interval7 | 4 | 4 | 6 | 6 | 4 | 2 | 0 | 3 | 9 | 6 | 4 | 2 | |
| Interval8 | 3 | 4 | 4 | 6 | 5 | 4 | 0 | 2 | 7 | 6 | 5 | 4 | |
| Interval9 | 2 | 2 | 2 | 2 | 3 | 6 | 2 | 1 | 5 | 2 | 4 | 6 | |
| Interval10 | 1 | 2 | 2 | 2 | 2 | 2 | 0 | 0 | 3 | 2 | 3 | 2 |


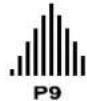
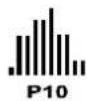


MA400
speed program
incline program
| P1 | P2 | P3 | P4 | P5 | P6 | P7 P8 | P9(5km) | ||||||||||||||||||||
| L1 | L2 | L3 | L1 | L2 | L3 | L1 | L2 | L3 | L1 | L2 | L3 | L1 | L2 | L3 | L1 | L2 | L3 | L1 | L2 | L3 | L1 | L2 | L3 | L1 | L2 | L3 | |
| Interval1 | 2 | 3 | 4 | 2 | 3 | 4 | 1 | 2 | 3 | 1 | 2 | 3 | 2 | 3 | 4 | 2 | 3 | 4 | 1 | 2 | 3 | 1 | 2 | 3 | 2 | 3 | 4 |
| Interval2 | 3 | 4 | 5 | 3 | 4 | 5 | 3 | 4 | 5 | 7 | 8 | 9 | 3 | 4 | 5 | 3 | 4 | 5 | 3 | 4 | 5 | 7 | 8 | 9 | 4 | 5 | 6 |
| Interval3 | 4 | 5 | 6 | 4 | 5 | 6 | 6 | 7 | 8 | 2 | 2 | 2 | 4 | 5 | 6 | 4 | 5 | 6 | 6 | 7 | 8 | 2 | 2 | 2 | 6 | 7 | 8 |
| Interval4 | 3 | 4 | 5 | 5 | 6 | 7 | 7 | 8 | 9 | 9 | 10 | 11 | 3 | 4 | 5 | 5 | 6 | 7 | 7 | 8 | 9 | 9 | 10 | 11 | 8 | 9 | 10 |
| Interval5 | 2 | 3 | 4 | 6 | 7 | 8 | 8 | 9 | 10 | 2 | 3 | 4 | 2 | 3 | 4 | 6 | 7 | 8 | 8 | 9 | 10 | 2 | 3 | 4 | 7 | 8 | 9 |
| Interval6 | 3 | 4 | 5 | 7 | 8 | 9 | 8 | 9 | 10 | 2 | 3 | 4 | 3 | 4 | 5 | 7 | 8 | 9 | 8 | 9 | 10 | 2 | 3 | 4 | 6 | 7 | 8 |
| Interval7 | 4 | 5 | 6 | 8 | 9 | 10 | 7 | 8 | 9 | 9 | 10 | 11 | 4 | 5 | 6 | 8 | 9 | 10 | 7 | 8 | 9 | 9 | 10 | 11 | 5 | 6 | 7 |
| Interval8 | 3 | 4 | 5 | 6 | 7 | 8 | 6 | 7 | 8 | 2 | 2 | 2 | 3 | 4 | 5 | 6 | 7 | 8 | 6 | 7 | 8 | 2 | 2 | 2 | 4 | 5 | 6 |
| Interval9 | 2 | 3 | 4 | 4 | 5 | 6 | 3 | 4 | 5 | 7 | 8 | 9 | 2 | 3 | 4 | 4 | 5 | 6 | 3 | 4 | 5 | 7 | 8 | 9 | 3 | 4 | 5 |
| Interval10 | 3 | 4 | 5 | 2 | 3 | 4 | 1 | 2 | 3 | 1 | 2 | 3 | 3 | 4 | 5 | 2 | 3 | 4 | 1 | 2 | 3 | 1 | 2 | 3 | 2 | 3 | 4 |
Read carefully the following before using your treadmill
◆ Always stretch your muscles before exercise program. Warm up slowly by walking at a slow speed. Increase workout intensity gradually until you reach your desired workout pace. gradually to an easy walk, allowing your heart rate to decrease to normal situation.
When start the treadmill, always stand with both feet on the step-on side rails.
When finishing, allow the running belt to slow and come to a complete stop before stepping off.
◆ Wear comfortable, nonrestrictive clothing when using the treadmill. Never wear anything loose, such as baggy sweat pants, neckies, loose socks, or jewelry. Never drape towels on or around the treadmill during use.
◆ Always use the handrail when stepping on or off the treadmill and when changing incline or speed.
This treadmill is equipped with a safety key - Always clip the cord attached to the safety key to a part of your clothing so the safety key will properly detach from the computer console, therefore stopping the treadmill.
◆ Wear running or walking shoes with high- traction soles. To avoid injury and unnecessary wear on your treadmill, be sure your shoes are free of any debris such as gravel and small rocks.
Warning
If you feel dizzy, nausea, chest pin, or other abnormal symptoms, stop immediately. Consult a physician before continuing use.
Before completing an exercise session always
- Allow time to slow your pace, cool down, reducing your heart rate to a normal level before completing your workout.
- Grasp the handlebars and press the SLOW Speed button. Slow your pace to an easy walk.
- Ensure the running belt has come to a complete stop before exiting the treadmill.
Warning
Turn off and unplug the treadmill before proceeding with any maintenance or visual inspections. Failure to do so may result in serious injury. Note: Failure to perform the required periodic and preventative maintenance can void your warranty.
At the end of every exercise session always
- Remove the Safety Key from the computer console.
- Use the master power switch to turn the treadmill off. The master power switch is located at the right side of frame next to the electrical cord.
- Always position and store the electrical cord where is clear from all pathways.
- Unplug the electrical cord from the electrical outlet. This is especially important if you are not going to use your treadmill for extended periods.
- Wipe all treadmill surfaces with a dry cloth or towel especially perspiration on the handlebars, control panel, running belt or other treadmill components.
MAINTENANCE
General Cleaning
- Before proceeding, ensure that the treadmill power is off and that is unplugged from the electrical outlet.
- To remove dust, use a small vacuum nozzle to carefully vacuum around all visible components.
- To remove film or dirt use a slightly damp rag with a mild cleaning agent sprayed onto the rag only.
- Be careful not to immerse any treadmill component with any liquids.
Cleaning and inspecting the running belt
Turn off the power and unplug from electrical outlet. Carefully position the treadmill on its side. Use a damp cloth to wipe off the inside of the running belt. Carefully rotate the running belt by hand to clean the entire inside face. Return treadmill to its upright position. If running belt edges are frayed, check the running belt alignment. If seams are splitting, call your retailer or nearest authorized service center.
Aligning the Running Belt
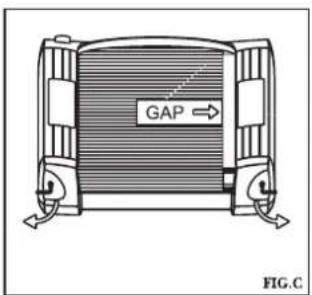
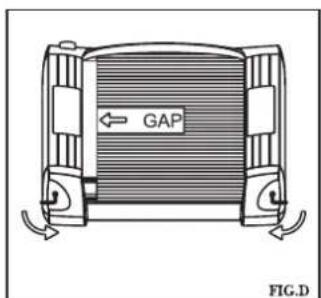
Ensure the running belt is centered on your treadmill at all times. Running style and a non-level surface are two instances that may cause the belt to drift off center. Minor adjustments to the two bolts at the rear of the treadmill are necessary when the belt has drifted off center.
- Press "START" to begin running belt, then increase the treadmill's speed to 5 Km/hr (3 M/hr).
- Stand at the rear of the treadmill to determine which direction the belt is drifting.
- If the belt drifts to the left, turn the left adjustment bolt with wrench # 6 one-quarter of a turn clockwise. (See FIG.C)
- If the belt drifts to the right, turn the right adjustment bolt with wrench # 6 one-quarter of a turn clockwise. (See FIG.D)
- Observe the tracking of the belt for about 30 seconds. Repeat step 3, 4 and 5 as needed.
Inspecting Fasteners and Cable
Check that all fasteners are properly tightened and all cables are securely in place. To avoid damaging fasteners, do not over tighten.
Storage
Store your treadmill in a clean and dry environment. Ensure the master power switch is off and is unplugged from the electrical outlet.
Moving
The treadmill has been designed and equipped with wheels for easy mobility. Before moving, ensure the master power switch is in the "OFF" position and the power cord is unplugged from the electrical outlet. Lift the base frame of the treadmill and then roll the treadmill to the desired position.
Running Belt Lubrication
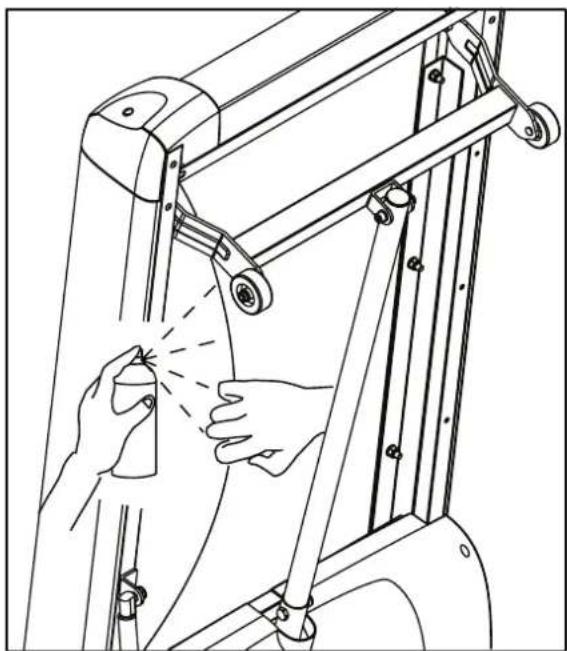
When you feel the noise of running belt is louder, please use silicone fluid spray on running belt. It is easy and quick. Before proceeding, ensure the treadmill power is off and unplugged. Fold up the treadmill to upright position. Loosen the running belt and then spray silicone on the inner side of running belt from both sides. Ensure spray entire running belt. Please see illustration. After spraying, please align the running belt and adjust the running belt tension.
natural_image
Line drawing of a person using a spray gun to spray or spray from a mechanical device (no text or symbols)MAINTENANCE
Folding/unfolding (Soft Drop Function)
natural_image
Technical line drawing of a mechanical device with an inset showing a circular component labeled ① and ② (no text or symbols beyond labels)Fold up
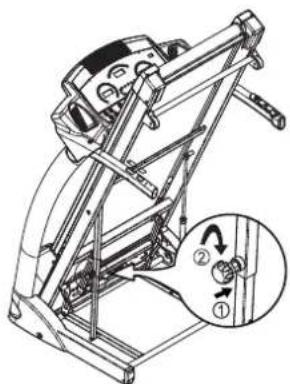
After the workout session, you can fold the treadmill to the upright position.
- Lift up the treadmill and the pop-pin will lock automatically on fold up position.
2.Then turn the knob to secure lock.
Release
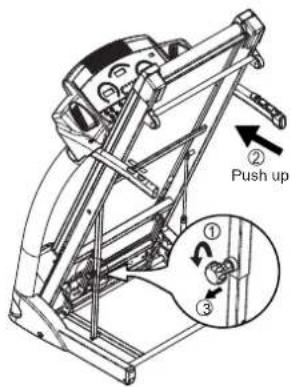
Please follow the steps:
- Turn to loose the knob.
- Push up the treadmill a little bit by right hand.
- Pull up the knob to unlock the locking tube.
- Lower down the treadmill.
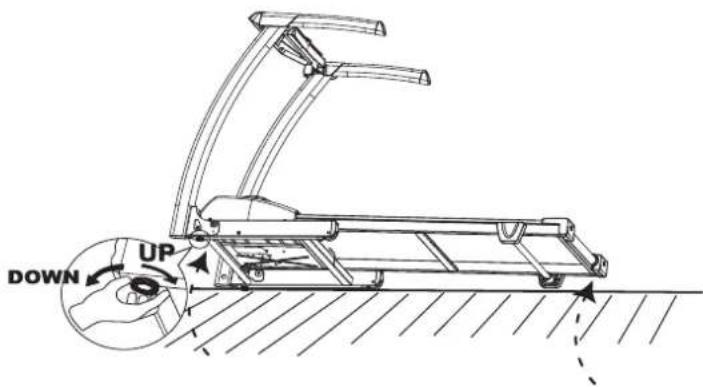
Horizontal Adjustment
To fit machine on floor stable, you can adjust the 2 screws located under the front of base frame.
- Lift the machine on one side and then turn the screw under the front of base frame.
- Turn the screw clockwise to make the screw up.
- Turn the screw counterclockwise to make the screw down.
Trouble shooting with Error codes
Electronics continuously runs a self check. If it finds an irregularity, the electronic console will display an error code and stop normal operation for safety.
| Error Code | MODEL | Trouble shooting |
| E1: | MA600 MA400 | When E1 is displayed, remove safety key and insert it again to restart treadmill. If E1 is still shown on display, please check the following:1. Please check all cable connection is well connected.2. Please contact for service to check speed sensor and MCB. |
| E3: | MA600 MA400 | Under Body Mass program, heart rate is not read during continuous 8 sec.1. Please reset or remove safety key. Then run body mass program again. |
| E6: | MA600 | When E6 is displayed, remove safety key and insert it again to restart treadmill. If E6 is still shown on display, please call for service and check the following1. Please check red/white incline cables are well connected on MCB or not.2. Please call for service to replace part if needed. |
| E6\E7: | MA400 | When E6\E7 is displayed remove safety key and insert it again to restart treadmill If E6\E7 is still shown on display, please check the following or call for service1. Reset incline value.1. Press "Mode" + "Slow" buttons together.2. Press "Mode" + "Up" buttons together.3. Press "Mode" + "Down" buttons together.Then press "START" to see if E6/E7 goes away.2. Please check red/white incline cables are well connected on MCB or not.3. If the above steps can not reset incline, please contact stores for service. |
| E8: | MA600 | IC chip defective.1. Please contact retailer shop to replace new controller. |
- IMPORTANT SAFETY INSTRUCTIONS
- DANGER
- NOTE:
- ELECTRICAL GROUNDING INSTRUCTIONS
- Warning
- MA600/MA400
- ASSEMBLY INSTRUCTION
- Parts
- Hardware \`tool
- STEP 1: HANDLEBAR SUPPORT POST ASSEMBLY
- STEP 2: HANDLEBAR ASSEMBLY
- STEP 3: CONSOLE ASSEMBLY
- Warning:
- STEP 4: CUP HOLDER ASSEMBLY
- STEP 5: COMPLETE ASSEMBLY
- ELECTRONICS OVERVIEW
- Display Functions
- MA600\MA400 EXERCISE PROGRAMS
- TARGET HEART RATE CHART
- MA600 EXERCISE PROGRAMS
- MA600/MA400 TREADMILL OPERATIONS
- Before starting your treadmill the following actions will need to be properly completed:
- Quick Start
- TREADMILL OPERATIONS
- Programs Setup and Selection - (MA600 P1 - P12, MA400 P1 - P9)
- User Setup Programs (MA600:2 users, MA400:1 user)
- Target Heart Rate Program Setup
- Body Composition Analysis
- Pause Function
- Reset Button
- PRESET PROGRAM
- MA600
- MA400
- Read carefully the following before using your treadmill
- Before completing an exercise session always
- At the end of every exercise session always
- MAINTENANCE
- General Cleaning
- Cleaning and inspecting the running belt
- Aligning the Running Belt
- Inspecting Fasteners and Cable
- Storage
- Moving
- Running Belt Lubrication
- Folding/unfolding (Soft Drop Function)
- Fold up
- Release
- Horizontal Adjustment
- Trouble shooting with Error codes
Brand : StrengthMaster
Model : MA-600
Category : Treadmills