
SDP94DTWB - DVD player TOSHIBA - Free user manual and instructions
Find the device manual for free SDP94DTWB TOSHIBA in PDF.


| Product Type | Portable DVD Player with DVB-T Tuner |
| Brand | Toshiba |
| Model | SDP94DTWB |
| Dimensions (W x H x D) | 260 x 35 x 191 mm |
| Weight | Approx. 1.2 kg |
| Power Supply | DC 12 V (AC adapter 100-240 V, 50/60 Hz) or rechargeable lithium-ion battery pack |
| Battery Life (Playback) | Up to approx. 4 hours |
| Charging Time | Approx. 4 hours |
| Display | 9-inch TFT LCD (640 x 234 pixels) |
| Playable Discs | DVD-Video, DVD-R/RW (VR/DVD-Video format), Video CD, Audio CD, CD-R/RW (MP3, JPEG, DivX) |
| Memory Card Slot | SD/SDHC (MP3, JPEG) |
| TV Tuner | DVB-T (digital terrestrial) with teletext and EPG |
| Connections | AV out (3.5mm), AV in (3.5mm), headphone jacks (2x), antenna input |
| Region Code | 2 (Europe) |
| Remote Control | Included (CR2025 battery) |
| Accessories Included | AC adapter, battery pack, vehicle adapter, headphones, carrying case, outdoor aerial, audio/video cable |
| Safety Certifications | CE, Class 1 Laser Product |
| Cleaning Instructions | Use a soft, dry cloth. Do not use solvents. |
| Operating Temperature | 5°C to 35°C |
| Storage Temperature | -10°C to 50°C |
Frequently Asked Questions - SDP94DTWB TOSHIBA
User questions about SDP94DTWB TOSHIBA
0 question about this device. Answer the ones you know or ask your own.
Ask a new question about this device
Download the instructions for your DVD player in PDF format for free! Find your manual SDP94DTWB - TOSHIBA and take your electronic device back in hand. On this page are published all the documents necessary for the use of your device. SDP94DTWB by TOSHIBA.
USER MANUAL SDP94DTWB TOSHIBA
Leading Innovation >>>
PORTABLE DVD PLAYER
SDP94DTWB
OWNER'S MANUAL

VIDEO

DIGITAL VIDEO

DIGITAL AUDIO

DIGITAL


Introduction
Preparations
TV viewing
Playback
Function Settings
Connections
Other
① PX1D00006760
SAFETY PRECAUTIONS
WARNING: TO REDUCE THE RISK OF FIRE OR ELECTRIC SHOCK, DO NOT EXPOSE THIS APPLIANCE TO RAIN OR MOISTURE. DANGEROUS HIGH VOLTAGES ARE PRESENT INSIDE THE ENCLOSURE. DO NOT OPEN THE CABINET. REFER SERVICING TO QUALIFIED PERSONNEL ONLY.
CAUTION: This equipment employs a Laser System.
To ensure proper use of this product, please read this owner's manual carefully and retain for future reference. Should the unit require maintenance, contact an authorised service location - see service procedure.
Use of controls or adjustments or performance of procedures other than those specified herein may result in hazardous radiation exposure.
To prevent direct exposure to laser beam, do not try to open the enclosure.
Visible and invisible laser radiation when open and interlocks defeated.
DO NOT STARE INTO BEAM.
This equipment is categorized as "Class 1 Laser Product" in EN60825, the European common laser standard.
CLASS 1
LASER PRODUCT
In the spaces provided below, record the Model and Serial No. located on the bottom of your DVD player.
Model No. Serial No.
Retain this information for future reference.
About disposal
The cold cathode fluorescent lamp in the LCD panel contains a small amount of mercury. Please follow local ordinances or regulations when you dispose of the product.
EU Conformity Statement
CE
"This product is marked with "CE" and complies therefore with the applicable harmonized European standards listed under the Low Voltage Directive 2006/95/EC and the EMC Directive 2004/108/EC, ErP Directive 2009/125/EC."
Responsible for CE-marking is TOSHIBA INFORMATION SYSTEMS (U.K.) LTD, Toshiba Court, Weybridge Business Park, Addlestone Road, Weybridge, Surrey, KT15 2UL, United Kingdom
Manufacturer:
Toshiba Corporation, 1-1 Shibaura 1-chome, Minato-ku, Tokyo, 105-8001, Japan
SAFETY PRECAUTIONS
Location of the required label
The rating plate and the safety caution are on the bottom of the unit.
In Conformity with the EEE Regulation
Following information is only for EU-member states:

The use of the symbol indicates that this product may not be treated as household waste. By ensuring this product is disposed of correctly, you will help prevent potential negative consequences for the environment and human health, which could otherwise be caused by inappropriate waste handling of this product. For more detailed information about recycling of this product, please contact your local city office, your household waste disposal service or the shop where you purchased the product.
Disposal of batteries and/or accumulators
Following Information is only valid for EU-member States:

The crossed out wheeled dust bin symbol indicates that batteries and/or accumulators must be collected and disposed of separately from household waste.
If the battery or accumulator contains more than the specified values of lead (Pb), mercury (Hg), and/or cadmium (Cd) defined in the Battery Directive (2006/66/EC), then the chemical symbols for lead (Pb), mercury (Hg) and/or cadmium (Cd) will appear below the crossed out wheeled dust bin symbol.

By participating in separate collection of batteries, you will help to assure the proper disposal of products and batteries and thus help to prevent potential negative consequences for the environment and human health.
For more detailed information about the collection and recycling programmes available in your country, please contact your local city office or the shop where you purchased the product.
IMPORTANT SAFETY INSTRUCTIONS
CAUTION: PLEASE READ AND OBSERVE ALL WARNINGS AND INSTRUCTIONS GIVEN IN THIS OWNER'S MANUAL AND THOSE MARKED ON THE UNIT. RETAIN THIS BOOKLET FOR FUTURE REFERENCE.
This unit is fully transistorized and does not contain any parts that can be repaired by the user. DO NOT REMOVE THE CABINET COVER, OR YOU MAY BE EXPOSED TO DANGEROUS VOLTAGE. REFER SERVICING TO QUALIFIED SERVICE PERSONNEL ONLY.
- Read these instructions.
- Keep these instructions.
- Heed all warnings.
- Follow all instructions.
- Do not use this apparatus near water.
- Clean only with dry cloth.
- Do not install near any heat sources such as radiators, heat registers, stoves, or other apparatus (including amplifiers) that produce heat.
- Do not insert any foreign objects into the disc holder or the memory card slot. Heat build-up or fire may result.
-
Protect the power cord from being walked on or pinched particularly at plugs, convenience receptacles, and the point where they exit from the apparatus.
-
Only use attachments/accessories specified by the manufacturer.
- Unplug this apparatus during lightning storms or when unused for long periods of time.
However, while it is thundering or lightning, do not touch the apparatus and any connected cable and/or equipment. This will prevent you from receiving the electric shock by an electric surge. - Refer all servicing to qualified service personnel. Servicing is required when the apparatus has been damaged in any way, such as power-supply cord or plug is damaged, liquid has been spilled or objects have fallen into the apparatus, the apparatus has been exposed to rain or moisture, does not operate normally, or has been dropped.
IMPORTANT SAFETY INSTRUCTIONS
ADDITIONAL SAFETY INSTRUCTIONS
- When you use headphones, keep the volume at a moderate level. If you use the headphones continuously with high volume sound, it may cause hearing damaged.
- Do not overload wall outlets; extension cords, or integral convenience receptacles as this can result in a risk of fire or electric shock.
- Apparatus shall not be exposed to dripping or splashing and no objects filled with liquids, such as vases, shall be placed on the apparatus and/or around it.
- Be careful not to catch your fingers in the disc holder when closing the lid. It may cause personal injury.
- Do not put a vessel containing liquid such as a vase, or a metal object on the apparatus. If liquid or a foreign metal object is let into the apparatus, it may cause fires or electric shock.
-
Do not use a cracked, deformed, or repaired disc. These discs are easily broken and may cause serious personal injury and apparatus malfunction.
-
Do not touch a spinning disc. When you open the disc holder, the disc may have not stopped spinning. Touching a spinning disc may cause personal injury or damage to the product.
- Do not rest the product on your lap or other parts of body. The product may become warm during use. Even low temperatures may cause personal injury when exposed to your skin for prolonged periods.
- Use the supplied AC adapter to operate the product. Substitute devices not specified by the manufacturer may result in fire or product malfunction. Do not cover the AC adapter with a blanket or place it near heating or on electric carpet when it is in use.
- When you use this product in an airplane, follow the instructions of the airline. Disregarding them may cause harmful interference to radio communication.
- Do not stare at the pick-up lens or look at the laser beam. Doing so may cause damage to eyesight.
- Do not use this product while walking or driving. Neglecting this may cause a traffic accident.

-
CAUTION: If the DVD player is dropped and the cabinet or enclosure surface has been damaged or the DVD player does not operate normally, take the following precautions:
-
ALWAYS turn off the DVD player and unplug the AC adapter to avoid possible electric shock or fire.
- NEVER allow your body to come in contact with any broken glass or liquid from the damaged DVD player. The LCD panel inside the DVD player contains glass and a toxic liquid. If the liquid comes in contact with your mouth or eyes, or your skin is cut by broken glass, rinse the affected area thoroughly with water and consult your doctor.
- ALWAYS contact a service technician to inspect the DVD player any time it has been damaged or dropped.
- Use the player in a location that facilitates the immediate removal of the plug if there is a malfunction or failure.
-
Do not allow children to scratch, lick or put the memory card into their mouth. Keep the memory card out of the reach of children. Injury to the child or malfunction may result.
-
Should you ever notice a strange odor, smoke, or excessive heat coming from the player, remove the battery pack and AC adapter. Continued use in this state might cause fire, electric shock, or burns. Take care not to burn yourself if the battery gets hot. For details on repair, consult Toshiba Customer Service.
-
Battery Pack (Lithium ion battery pack)
a) WARNING: Do not use a battery pack other than the one specified as it can result in a fire or damage to the unit.
b) Never throw the battery pack into a fire, as that could cause the battery pack to explode. Never heat the battery pack, as that could cause leakage of alkaline solution or other electrolytic substance.
c) Never disassemble the battery pack, as that could cause leakage of alkaline solution or other electrolytic substance.
d) Never short-circuit the battery pack by either accidentally or intentionally bringing the terminals in contact with another metal object. This could cause personal injury or a fire, and could also damage the battery pack.
IMPORTANT SAFETY INSTRUCTIONS
Introduction
e) Never drive a nail into the battery pack.
Never strike the battery pack with a hammer.
Never step or tread on the battery pack.
f) Keep the battery pack away from heat or fire.
g) Never dispose of used battery packs with other ordinary solid wastes, since they contain toxic substances. Always dispose of used battery packs in accordance with community regulations that apply to the disposal of batteries. Cover the metal terminals with insulating tape, in order to prevent accidental short-circuiting.
h) Always confirm that the battery pack is compatible with your player, before attaching the battery pack to the player.
i) Never expose the terminals of the battery pack to any other metal object. Wrap the battery or place it in a protective plastic bag, whenever transporting it.
j) Always confirm that the temperature is between 5 and 35^ (41°F and 95°F) before you charge the battery. Leakage, excessive heat, or deterioration of the battery pack may occur if this caution is not heeded.
k) Never immerse the battery pack in any liquid.
I) Never expose the battery pack to direct sunlight. Never store or use the battery pack in a locked and unventilated vehicle. (where excessive internal temperatures may be encountered.)
m) Always keep the battery pack out of reach of infants or small children.
n) Never shock the battery pack by dropping or throwing it.
o) If the liquid contained within the battery pack leaks, use a large amount of water and immediately wash off any liquid which may accidentally contact any part of the body. Remove any liquid that has contacted your clothing by washing it immediately with a detergent.
p) Always confirm that a "click" sound has resulted, when attaching the battery pack to the player. This sound confirms that the battery pack has been properly attached.
- Coin-shaped Battery
a) Keep coin-shaped batteries out of children's reach. Be careful not to ingest internally, especially by children, as doing so may cause poisoning.
b) Do not load a battery into the remote control with the wrong side out.
c) Do not charge, heat, open, or short-circuit the batteries. Do not throw the batteries into a fire.
d) Do not leave a dead or exhausted battery in the remote control.
e) If you do not use the remote control for a long period of time, remove the battery to avoid possible damage from battery corrosion.
31. After unpacking coin-shaped batteries, store them in poly bags, etc. separately one by one when unused. If you leave them unwrapped, they may be short-circuited by contact with metal objects, resulting in battery leakage, heat or bursting. This may cause burns or injury.
The batteries must be completely discharged when they are deposited in collection containers for old batteries. If a charge remains, countermeasures to prevent short circuits must be taken.
32. To reduce the risk of fire or electric shock, do not expose this apparatus to rain or moisture.
33. Following mark means "CAUTION - RISK OF ELECTRIC SHOCK - DO NOT OPEN".

- Vehicle adapter and operation in a car
a) NEVER operate the apparatus or view a DVD Video while operating an automobile or other vehicle. Note: doing so is illegal in many jurisdictions.
NEVER place an apparatus within the eyesight of a driver while he/she is driving an automobile/vehicle. Note: an apparatus located in the front seating section of a vehicle is illegal in many jurisdictions.
Failure to observe the above instructions could result in the driver's inattention to and/or distraction from road hazards.
b) NEVER place an apparatus in a location where it could interfere with the proper deployment and/or performance of an air bag.
Failure to observe this instruction could result in the prevention of an air bag to properly and/or effectively deploy.
c) Do not use a vehicle adapter other than the model supplied, to power the apparatus. Do not use the supplied vehicle adapter to power an apparatus other than this apparatus. Neglecting these may cause smoke, fire or electrical shock to human body.
IMPORTANT SAFETY INSTRUCTIONS
Introduction
d) This adapter is intended for exclusive use in automobiles/vehicles with a DC 12V negative ground electrical system.
NEVER use this adapter with a DC 24V configured or a DC 12V positive ground electrical system automobile/vehicle.
Consult your vehicle owner's manual before using this adapter.
e) When handling, using or storing the adapter power cord NEVER:
- Place or locate near any apparatus that produces heat.
- Disassemble, splice or extend the cord.
- Pull, force or place any heavy objects on the cord.
- Bend, twist or bind the cord.
f) Keep away from the driving device (such as brake pedal, etc.) and the moving equipment (such as a seat rail, car windows, door, etc.).
g) NEVER disassemble or alter this adapter in any manner.
h) ALWAYS use caution when touching the adapter, cigarette lighter socket or power port. The adapter, lighter socket and power port may become heated after prolonged use.
i) ALWAYS remove the adapter from the cigarette lighter socket or power port when not in use.
j) Do not charge the battery pack which is attached to the apparatus by the adapter. Doing so may cause smoke, fire or electrical shock to human body. Whenever you use the adapter, be sure to remove the battery pack from the apparatus to prevent it from being charged by the adapter.
k) Some cars may not have a compatible socket. NEVER modify this adapter to fit an incompatible cigarette lighter socket and/or power port. NEVER modify an incompatible cigarette lighter socket and/or power port to accept this adapter.
Failure to observe the above warnings could cause smoke, fire, burns and/or electric shock.
I) ALWAYS locate the apparatus on a level and secure surface. If placed on an uneven, shaky, unsecured or unstable surface, apparatus may fall.
Failure to observe the above caution could result in the apparatus striking a person.
m) When using the adapter, insert the plug of the adapter into the cigarette lighter socket or power port fully.
The incomplete insertion will cause smoke or fire.
n) Do not touch the adapter with wet hands. Do not expose the adapter to water of liquid.

- The mains plug of the AC adapter is used as the disconnect device. Therefore use the AC adapter near the wall outlet so that the mains plug can be access easily at all times.


Introduction


SDP84DTWII_F_01 56.indd 11

11
2010/05/03 9:30:35

Precautions
Notes on handling
■ Do not shock the LCD monitor. It may cause unit damage and malfunction.
■ Do not use the player in a place subject to vibration. Neglecting this may cause malfunction of the player or damage to the disc.
When transporting the player, the original shipping carton and packing materials come in handy. For maximum protection, repack the unit as it was originally packaged at the factory.
Do not use volatile liquids, such as insect spray, near the player. Do not leave rubber or plastic products in contact with the player for a long time. They will leave marks on the finish.
■ The player may become warm after a long period of use. This is not a malfunction.
■ When the player is not in use, be sure to remove the disc and turn off the power.
If you do not use the player for a long period, the unit may not function properly in the future. Turn on and use the player occasionally.
Notes on use in a vehicle
■ Do not use this product while driving. Neglecting this may cause a traffic accident.
■ Never operate the player in a moving vehicle. Vibration may prevent proper playback of the player or cause damage to the disc.
■ Do not leave the player in a vehicle. Rise or drop in temperature may result in malfunction of the player.
Notes on locating
When you place this player near a TV, radio, or VTR, the playback picture may become poor and the sound may be distorted. In this case, move the player away from the TV, radio, or VTR.
Notes on cleaning
■ Use a soft, dry cloth for cleaning.
Do not use any type of solvent, such as thinner and benzine, as they may damage the surface of the player.
■ When cleaning the LCD monitor, use a soft, dry cloth.
Notes on moisture condensation
Moisture condensation damages the player. Please read the following carefully.
Moisture condensation occurs, for example, when you pour a cold drink into a glass on a warm day. Drops of water form on the outside of the glass. In the same way, moisture may condense on the optical pick-up lens inside this unit, one of the most crucial internal parts of the player.
■ Moisture condensation occurs during the following cases.
- When you transport the player directly from a cold place to a warm place.
- When you use the player in a room where you just turned on the heater, or a place where the cold air from the air conditioner directly hits the unit.
- In summer, when you use the player in a hot and humid place just after you move the unit from an air conditioned room.
● When you use the player in a humid place.
■ Do not use the player when moisture condensation may occur.
If you use the player in such a situation, it may damage discs and internal parts. Remove the disc, connect the AC adapter, turn on the player, and leave it for two or three hours. After two or three hours, the player will have warmed up and evaporated any moisture.
Notes on products incorporated laser system
- This product incorporates laser system. For proper and safety use of this product, read this owner's manual carefully, and keep near at hand for future reference.
When you need any repair of this product, consult your dealer where you purchased this product.
● Never disassemble or modify this product. Changes or modifications may result in exposure to laser radiation.
Precautions (continued)
About this owner's manual
This owner's manual explains the basic instructions of this player. Some DVD video discs are produced in a manner that allows specific or limited operation during playback. As such, the player may not respond to all operating commands. This is not a defect in the player. Refer to Instruction notes of discs.
“∅” may appear on the screen during operation. A “∅” means that the operation is not permitted by the player or the disc.
Notes on region numbers
The region number of this player is 2. Region numbers, corresponding to specific geographical playback area, are printed on your DVD video disc. If you do not find or disc playback will not be allowed by the player. (In this case, the player will display a message on-screen.)
MPEG Layer-3 audio coding technology licensed from Fraunhofer IIS and Thomson.
Manufactured under license from Dolby Laboratories. Dolby and the double-D symbol are trademarks of Dolby Laboratories. Confidential Unpublished Works. ©1992-1997 Dolby Laboratories, Inc. All rights reserved.
DivX, DivX Certified, and associated logos are trademarks of DivX, Inc. and are used under license. Covered by one or more of the following U.S. Patents: 7,295,673; 7,460,688; 7,519,274; 7,515,710;
Table of contents
Introduction
SAFETY PRECAUTIONS....2
IMPORTANT SAFETY INSTRUCTIONS .... 5
Precautions 12
Identification of controls 18
Accessories 22
Notes and Information 23
Playable discs 23
Preparations
Preparation of the remote control .... 30
Power connection 31
Using the battery pack 32
To turn the LCD monitor 35
Powering on/off 36
Changing modes 37
Adjusting the volume of the speakers or
the connected headphones 38
Connecting to headphones ....38
General adjustments 39
Adjusting the picture 39
Using "QUICK MENU" 40
TV viewing
Antenna connection 42
Initial settings 43
Operation 44
Selecting channels 44
Zooming a picture 45
Viewing information 45
Accessing Interactive TV service (MHEG-5
application) 45
Using teletext 46
Selecting subtitle 46
Selecting audio language 46
Table of contents (continued)
To operate EPG (Electronic Programme Guide) ...46
To customize channel lineup 47
Channel search options ....50
TV function settings ....51
Playback
Loading a disc 58
Playing a disc 59
Pausing playback (Still mode) 60
Using the top menu 60
Changing playback speed 62
Playing in fast reverse or fast forward 62
Playing frame by frame 62
Playing in slow-motion 62
Playing a desired scene 63
Skipping chapters or tracks 63
Locating by entering numbers 63
Bookmark function 64
Playing in random order 65
Playing repeatedly 65
Repeating a specific segment 65
Repeating a title, chapter or track 66
Playing in a favorite order 67
Zooming a picture....68
Changing the camera angle 69
Selecting subtitles 69
Selecting audio formats 70
Selecting enhancement modes 71
On-screen display mode 71
Playing audio/video/picture files 72
Function Settings
Customizing function settings 78

Connections
Viewing on a connected TV 86
Viewing pictures from connected video equipment 87
Connecting to an audio system equipped with analog audio inputs 88
Using the automobile/vehicle adapter or power port 89
Other
Before calling service 94
Specifications 97
Customer Helpline 99


Identification of controls
Instructions and actual buttons
Most instructions are based on remote control operation, unless otherwise noted. You can use the buttons on the remote control and those on the main unit as well when they have the same function. Some functions are available only from the remote control.
Main unit
See page in for details.
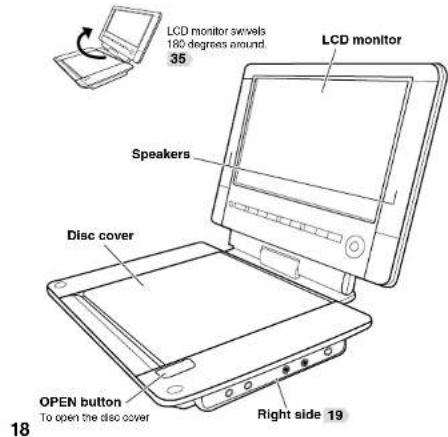

① Remote sensor 30
Point the remote control here
② POWER button 36
To turn the player on end off
Illuminates the indicator when
the power is on
③ ■ (STOP) button 59
To stop playback
④ ▶ (PLAY) button 59
To start playback
⑤ II/ID (PAUSE/STEP) button 60 62
To pause playbet
⑥ MODE button 37
To display the mode menu
⑦ MENU button
To display a disc menu
⑧ QUICK button 40
To display "QUICK MENU"
⑨ Direction button 40 60
To select a content or position to enter
⑨ Vol (Volume) buttons (+/-) 38
To adjust the volume
⑩ (ENTER) button 40 60
To enter a selected content
⑪ ◀◀/▶◀ (SKIP) buttons 63
To locate a title, chapter or track
⑪ P buttons 44
To change TV channels
SDPS4DTWII_F_01 56.indd 18
2010/05/03 9:30:35


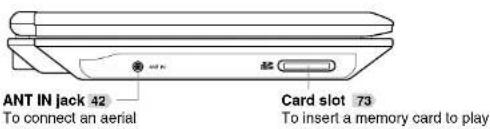


Important
- Magnets are incorporated inside the player to lock the LCD when closed. To avoid trouble, keep magnetized objects (e.g. watches, magnetic cards) away from the player.
19

SDP84DTWIL F_01 56.indd 19
2010/05/03 9:30:35

Introduction
Identification of controls (continued)
Remote control See page in ▶ for details.
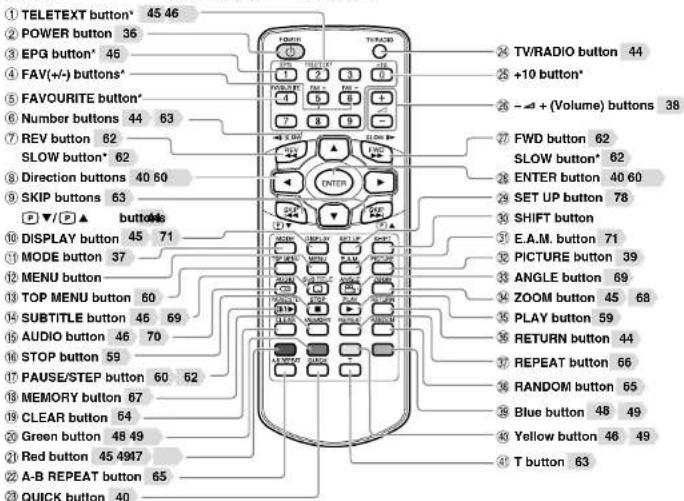
20
SDP94DTWII_F_01 56.indd 20
“” buttons: Operate these buttons while simultaneously pressing the SHIFT button.
2010/06/08 16:04:32
Function
| 1 | TELETEXT To display teletext / To access interactive TV services (MHEG-5 application) | |
| 2 | POWER To turn on/off the power | |
| 3 | EPG To display the current EPG (Electronic Programme Guide) | |
| 4 | FAV(+/-) This model does not use these buttons. | |
| 5 | FAVOURITE This model does not use this button. | |
| 6 | Number To enter numbers buttons | |
| 7 | REV Fast reverse playback | |
| 7 | SLOW Slow motion playback | |
| 8 | Direction To select a content or position to enter buttons | |
| 9 | SKIP To locate a title, chapter or track | |
| 9 | P To change TV channels | |
| 10 | DISPLAY To display operation information | |
| 11 | MODE To display the mode menu | |
| 12 | MENU To display a disc menu | |
| 13 | TOP MENU To display a top menu | |
| 14 | SUBTITLE To select subtitles | |
| 15 | AUDIO To select the sound | |
| 16 | STOP To stop playback | |
| 17 | PAUSE/STEP To pause playback | |
| 18 | MEMORY To play in a favourite order | |
| 19 | CLEAR To clear entered information | |
| 20 | Green* | |
| 21 | Red* To access interactive TV services (MHEG-5 application) | |
Function
| 22 A-B REPEAT Repeat play of a specific segment | |
| 23 QUICK To display "QUICK MENU" | |
| 24 TV/RADIO To switch TV channels and radio channels | |
| 25 +10 button To enter numbers for ten places | |
| 26 - △ + (Volume) To adjust the volume | |
| 27 FWD Fast forward playback | |
| 28 SLOW Slow motion playback | |
| 29 ENTER To enter a selected content | |
| 30 SET UP To display the setup menu | |
| 31 SHIFT To change functions | |
| 32 E.A.M. To select the sound enhancement | |
| 33 PICTURE To adjust a picture quality or size | |
| 34 ANGLE To select a camera angle | |
| 35 ZOOM To zoom a picture | |
| 36 PLAY To start playback | |
| 37 RETURN To return to previous screen | |
| 38 REPEAT Repeat play | |
| 39 RANDOM To play in random order | |
| 40 Blue* | |
| 41 Yellow* | |
| 42 T To display a preferred scene |

Operate these buttons while simultaneously pressing the SHIFT button.
^ To operate menus and EPG.
The function depends on the actual displays.

Accessories
Supplied accessories.
| Remote control (SE-R0353) Coin-shaped battery (CR2025) | Audio/video cable AC adapter | EADP-18SB D)* | Battery pack (SD-PBP94E)* |
| Headphones Carrying case | Use this for carrying, etc. of the player. | Vehicle adapter (MEDC01AX)* | Outdoor aerial (RF adapter x1) |
| Owner's manual | Do not use an AC adapter, a battery pack and a vehicle adapter other than one specified. Also, do not use these supplied accessories with any device other than this player. | ||
Notes and Information
playable discs
This player can play the following discs.
| Disc Disc | Disc Mark | Disc Size | Contents | |
| DVD Video disc |  | [IMAGE] | 12cm/8cm | Video(moving pictures)+Audio |
| DVD-RW |  ---- ---- | 12cm | Video+Audio (DVD VR format (compatible with CPRM)/DVD video format)*Finalized discs only.Audio (MP3 files) • Movie(DivX) • Photograph(JPEG files) | |
| DVD-R |  ---- ---- | 12cm | Video+Audio (DVD VR format (compatible with CPRM)/DVD video format)*Finalized discs only.Audio (MP3 files) • Movie(DivX) • Photograph(JPEG files) | |
| VIDEO CDs |  | 12cm/8cm | Video(moving pictures)+Audio | |
| Audio CDs |  | 12cm/8cm(CD single) | Audio | |
| CD-ROM |  | 12cm | Audio (MP3 files)Movie(DivX)Photograph(JPEG files) | |
| CD-R/RW |  | [72x6] | 12cm | Audio (CD-DA, MP3 files)Movie(DivX)Photograph(JPEG files)*CD-R/RW discs of VIDEO CD format can also be played. Some of these discs may be incompatible. |

is a trademark of DVD Format/Logo Licensing Corporation.

Notes and Information (continued)
Notes
- You cannot play discs other than those listed above.
- You cannot play DVD-RAM discs or non-standardized discs, etc., even if they may be labeled as above.
- The colour system of DVD video disc this player supports is PAL/NTSC, and the player cannot play DVD video discs recorded in any other colour system (SECAM, etc.).
- Depending on the data recording method or the disc status, playback on this player may not be possible, even if the disc is labeled as above. Toshiba cannot assure that all discs bearing the DVD or CD logos will operate as expected.
- Because of problems and errors that can occur during the creation of DVD and CD software and/or the manufacture of DVD and CD discs, Toshiba cannot assure that this player will successfully play every disc bearing the DVD and CD logos. If you happen to experience any difficulty playing a DVD and/or CD disc on this player, please contact Toshiba Customer Service.
■ On VIDEO CDs
This player supports VIDEO CDs equipped with the PBC (Version 2.0) function. (PBC is an abbreviation for Playback Control.)
You can enjoy two playback variations depending on types of discs.
• VIDEO CD not equipped with PBC function (Version 1.1)
Sound and movie can be played on this player in the same way as an audio CD.
• VIDEO CD equipped with PBC function (Version 2.0)
In addition to operation of a VIDEO CD not equipped with the PBC function, you can enjoy playback of interactive software with search function by using the menu displayed on the screen (Menu Playback). Some functions described in this owner's manual may not work with all discs.

Introduction
On handling discs
- Do not touch the playback side of the disc.
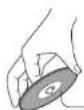
Playback side
- Do not attach paper or tape to discs.
On cleaning discs
● Fingerprints and dust on the disc may cause picture and sound deterioration. Wipe the disc from the centre outwards with a soft cloth. Always keep the disc clean.
- Do not use any type of solvent such as thinner, benzine, commercially available cleaners or antistatic spray for vinyl LPs. It may damage the disc.
On storing discs
- Do not store discs in a place subject to direct sunlight or near heat sources.
- Do not store discs in places subject to moisture and dust such as a bathroom or near a humidifier.
- Store discs vertically in a case. Stacking or placing objects on discs outside of their case may cause warping.
Notes on copyright
The unauthorized recording, use, distribution, or revision of copyrighted materials including, without limitation, television programs, videotapes, and DVDs, is prohibited under the Copyright Laws of the United States and other countries, and may subject you to civil and criminal liability.
This product incorporates copyright protection technology that is protected by method claims of certain U.S. patents and other intellectual property rights owned by Rovi Corporation and other rights owners. Use of this copyright protection technology must be authorized by Rovi Corporation, and is intended for home and other limited viewing uses only unless otherwise authorized by Rovi Corporation. Reverse engineering or disassembly is prohibited.
Notes and Information (continued)
playable memory cards
| Card Card Mark Contents | ||
| SD Memory Card | • Audio (MP3)• Photograph (JPEG) | |
| SDHC Memory Card | ||
• SD is a trademark.
• SDHC is a trademark.
- SDXC Memory Card is not supported.
Notes on memory cards
Some memory cards may not be played back due to its capacity and/or manufacturer, etc.
Do not insert any memory card other than those memory cards referred to left. Failure to follow this instruction may cause a malfunction of the player and/or card.
Saving data
- It is recommended that you back up your memory card data. Toshiba is not liable for any damage caused by the use of any memory card with this player. Toshiba will not compensate for any lost data or recording(s) caused by the use of such cards.
- For instructions on using your memory card, refer to the owner's manual for your memory card.
- Failure to take proper care of a memory card may prevent the display of pictures from the card. Such damage is not covered by your Toshiba Warranty.


Introduction
■ Notices for use
- Ensure that you insert the memory card correctly into this player.
- Do not eject the memory card while it is in use. If ejected while in use, information on the memory card may be lost.
● This memory card is a precision electrical instrument. Do not bend, drop or apply strong pressure to it. - Do not use or store the memory card in an environment of high static electricity or electrical interference.
● Avoid using or storing in areas of high temperature and humidity. - Be careful not to touch with your fingers, nor allow foreign objects to come in contact with, nor dirt to accumulate on the metal area (gold-coloured area) of the memory card. Wipe off any dirt with a soft, dry cloth.
- When carrying or storing the memory card always place it inside of its antistatic case to avoid any effects from static electricity.
- When ejecting the memory card after extended use it may feel warm to the touch. This is normal. The memory card is not malfunctioning.
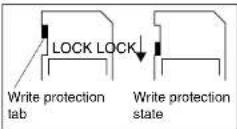
■ Write Protection of SD Memory Card
- Switch the write protect tab at the side of the card to "LOCK".

SDPS4DTW1_F_01 56.indl 28
Preparations
Preparations before using.
● Preparation of the remote control
● Power connection
● Using the battery pack
● To turn the LCD monitor
● Powering on/off
● Changing modes
- Adjusting the volume of the speakers or the connected headphones
● General adjustments
Preparation of the remote control
Insert the specified battery to the remote control. See page 8 for safe use of coin-shaped batteries.
Gently insert a fingernail in groove ① and pull out the holder in direction ②.

Take care not to break your fingernail.
2 Place a coin-shaped battery (CR2025) with the side up on the holder.
Keep the holder horizontal so that the battery does not fall through.
CAUTION: Danger of explosion if battery is incorrectly replaced. Replace only with the same or equivalent type.
3 Insert the holder into the remote control.
The remote control battery contains Perchlorate Material - special handling may apply.
Operating with the remote control
Point the remote control at the remote sensor and press the buttons.
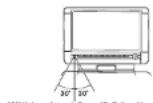

Distance: About 3 m (9.9 feet) from the front of the remote sensor
Angle: About 30° in each direction of the front of the remote sensor
Do not expose the remote sensor of the player to a strong light source such as direct sunlight or other illumination. If you do so, you may not be able to operate the player via the remote control.
- Do not drop or give the remote control a shock.
- Do not leave the remote control near an extremely hot or humid place.
- Do not spill water or put anything wet on the remote control.
- Do not disassemble the remote control.
- If the remote control does not function correctly or if the operating range becomes reduced, replace the battery with new one.
- Inserting a battery other than the specified one or an object may damage the remote control.
Power connection
Connect the supplied AC adapter to wall outlet as below.
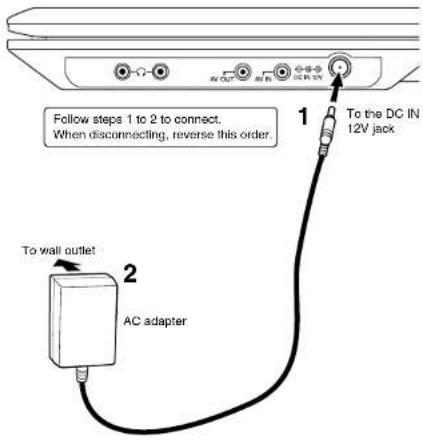
CAUTION
- Do not connect the power plug to a power outlet other than that indicated on the label, as this can result in a risk of fire or electric shock.
- Do not connect or disconnect the power plug with wet hands. Doing so may cause electric shock.
- Do not use an AC adapter other than one specified, as it can cause a fire or damage to the player.
- When the AC adapter is in use, its temperature may increase. This is normal. Make sure that the AC adapter is disconnected and the temperature decreases before carrying it.
Note
- Do not use the supplied AC adapter with any device other than this player.
Using the battery pack
The supplied battery pack (lithium lon battery pack) can power where AC adapter is unavailable.
WARNING
Préparations
- Do not use a battery pack other than one specified as it can result in a fire or damage to the unit.
- Do not heat, open, or short-circuit the battery pack. Do not throw the battery pack into a fire. Doing so may cause an explosion or a fire.
- Attach the battery pack properly following the explanation below. Make sure that the battery pack is attached firmly to the player when using it. Otherwise, the battery pack may become detached and cause personal injury.
■ Attaching the battery pack
1 Turn the player off.
2 Disconnect all cables and cords from the player.
3 Turn the player upside down.
4 Remove the connector cover on the bottom of the player.

Remove the connector
cover.
(Be sure to attach it whenever the better
whenever the battery pack is not attached.)
5 Turn the battery pack over and insert four catches into the player's corresponding holes ①.
Then, slide the battery pack in the direction of the arrow ② until a "click" is heard.

32
SDP84DTWII_F_01 56.indd 32
2010/05/03 9:30:38
Important
- Detach the battery pack from the player after being used.
Notes
- It is possible to leave the battery pack attached while powering the player with the AC adapter.
■ Charging the battery pack
The battery pack needs to be charged before use. (The battery indicator is shown on the screen when the power in the battery pack is running low.) Perform a full charge before the first use.
1 Turn off the player.
The battery pack cannot be charged when the player is on. Be sure to turn off the player before charging the battery pack.
2 Attach the battery pack to the player.
3 Connect the supplied AC adapter only to the player and plug in.
Charging starts, and the POWER indicator illuminates in orange.
When the charging is completed, the POWER indicator turns off.
- Even if you try to charge the battery, the charging will not start and the POWER indicator does not illuminate when the battery is near full charge.
Notes
- Charge the battery pack with a surrounding temperature of +10°C to +30°C (+50°F to +86°F).
- While the charge is in progress, do not disconnect the AC adapter until the POWER indicator turns off.
- The attached battery pack may get warm when you are charging it or operating the player. This is not a defect.
Charging time of a battery pack Approximately 4 hours
- This value is for reference only. Charging time may vary depending on battery pack status and environment.
Continuous playback time while using the battery pack Up to approximately 4 hours
- This value is for reference purpose only, it is not guaranteed. (Conditions: 25°C, output from the headphones, DVD playback, new battery pack in use.)
- Continuous playback time may vary depending on battery pack status, operational status and environment conditions.
- Low temperature will shorten the playback time.

Using the battery pack (continued)
Preparations
■ Detaching the battery pack
1 Turn the player off.
2 Disconnect all cables and cords from the player.
3 Turn the player upside down.
4 While holding the lock switch, slide the battery pack in the direction of the arrow.
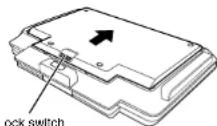
5 Attach the connector cover on the bottom of the player.
Important
- After detaching the battery pack, be sure to attach the battery cover in order to avoid a short-circuiting which may be caused by contact with metal objects to the connector.
- Do not detach the battery pack while the POWER indicator illuminates in green or orange.
■ About battery pack life
Battery pack has a limited service life. The length of service life varies depending on product use and user settings. If you use the battery pack beyond its service life, you may notice that playback time becomes remarkably shorter, even if the battery pack is fully charged. If you notice that playback time has become remarkably shorter, even when the battery pack is fully charged, it is recommended that you replace the battery pack with battery pack model number SD-PBP94E.
To turn the LCD monitor
You can turn the LCD monitor 180 degrees.
■ To turn the LCD monitor
1 Put the player on a level place.
2 Open up the LCD monitor vertically.
3 While holding the lower side of the player, turn the LCD monitor slowly 180 degrees to the direction of "TURN" until it clicks.

4 Adjust the angle of the LCD monitor.
The LCD monitor can be laid flat.
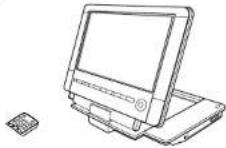
■ To put back the LCD monitor
1 Open up the LCD monitor vertically.
2 While holding the lower side of the player, turn the LCD monitor slowly 180 degrees to the direction of "REVERSE" until it clicks.
Notes
- The LCD monitor does not turn over 180 degrees or to the opposite direction. Do not force the LCD monitor to turn over 180 degrees or to the opposite direction. It may damage the LCD monitor.
- Do not store the player or attach/detach the battery pack with the screen side up. Otherwise, the LCD monitor will get dust on the screen or be damaged by an unexpected shock.
- The LCD monitor does not turn over 180 degrees or to the opposite direction. Do not force the LCD monitor to turn over 180 degrees or to the opposite direction. It may damage the LCD monitor.
- Do not store the player or attach/detach the battery pack with the screen side up. Otherwise, the LCD monitor will get dust on the screen or be damaged by an unexpected shock.

Powering on/off
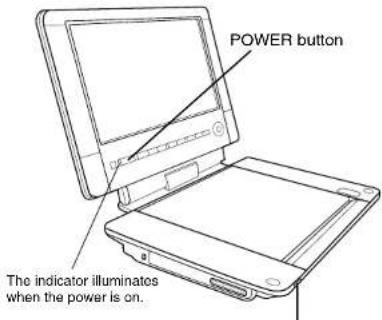
Press POWER.
The POWER button and the POWER indicator illuminate.
To turn off the power, press POWER again.
Preparations
POWER indicator
Important
- When you use this player for the first time, before powering, be sure to open the disc cover by pressing the OPEN button on the main unit and remove the protective sheet.
| POWER indicator | Condition |
| Green On | |
| Off Off | |
| Orange Charging |
Changing modes
You can enjoy various contents of discs, the digital TV and other external equipment by changing the mode. Change it depending on your needs.
1 Press MODE.
2 Press ◀ ▶ select the mode.
| TV/SD-V | Select when you want to watch the digital TV broadcasting. |
| DVD/CD | Select when you want to view the picture of a disc on the LCD monitor of this player. |
| SDCARD | Select when you want to play a memory card. |
| AV IN | Select when you want to view the picture played using a VTR or other external equipment on the LCD monitor of this player. |
3 Press ENTER.
The player enters the selected mode.
Notes
- Make sure that DVD/CD is selected when you play a disc. Cannot be played any discs other than DVD/CD mode.
- This operation is not available when the AV OUT jack is connected.
Preparations

Adjusting the volume of the speakers or the connected headphones
1 Press and hold Vol (+/-) on the main unit.
or
Press (press and hold) +/- on the remote control.
Vol +: Increase volume.
Vol –: Decrease volume.
Connecting to headphones
You can connect headphones to the headphone jack using a stereo mini plug.

Maximum output voltage ≤ 150mV
- Before connecting, temporarily turn down the volume. Readjust to your preference when playback starts.
- Turn off the player before you connect or disconnect the headphone cable. Possible shakes produced by plug connecting/disconnecting may cause damage to the disc
- You can connect up to 2 headphones.
- Connecting to the headphone jack disables output from the speakers.
CAUTION
- Connect your headphones ONLY to (headphones jack) of the player. Neglecting this may cause hearing damage.
- When you use headphones, keep the volume at a moderate level. If you use the headphones continuously with high volume sound, it may cause hearing damage.
General adjustments
Adjusting the picture
This function operates on the LCD of this player only. Cannot affect connected external equipment.
1 Press PICTURE.
A picture adjustment menu appears.
e.g.
| PICTURE | |
| PICTURE MENU | STANDARD |
| BRIGHTNESS | 50 |
| CONTRAST | 50 |
| BACK LIGHT | HIGH |
| COLOR | 00 |
| TINT | 00 |
| SHARPNESS | 00 |
| PICTURE SIZE | AUTO |
| RESET | |
2 Set the details.
Refer to the table on the right.
3 When complete, press PICTURE to turn off the menu.
| ▲ / ▼o select Parameter / to change ◀ ▶ | ||
| PICTURE MENU | STANDARD | To apply standard settings. (Only PICTURE SIZE can be changed.) |
| MEMORY | To adjust the picture using the items listed below. | |
| BRIGHTNESS 0 - 100 Darker ↔ Lighter | ||
| CONTRAST 0 - 100 Lower Highter ↔ | ||
| BACK LIGHT LOW / MIDDLE / HIGH | ||
| COLOR -50 - +50 | Paler | ↔ Deeper |
| TINT | -50 - +50 | Reddish ↔ Greenish |
| SHARPNESS | -7 - +7 | Softer ↔ Sharper |
| PICTURE SIZE | AUTO | Displays its originally formatted proportion. |
| 16:9 | Displays in full screen.16:9 pictures keep their proportion.4:3 pictures are expanded horizontally. | |
| 4:3 | Displays in 4:3 picture size.4:3 pictures keep their proportion, with black bars at the left and right.16:9 pictures keep their proportion, with black bars at the top and bottom. | |
| RESET | To reset all adjustment items to the factory settings, press ENTER. | |
Preparations
General adjustments (continued)
Using "QUICK MENU"
When you want to change settings, open "QUICK MENU", a list of functions which are available in the current mode. It can be operated in the same manner in any mode.
1 Press QUICK.
"QUICK MENU" appears.
The contents may vary depending on the mode.

2 Press ▲ / ▼ to select an item, then press ENTER.
3 Set the details.
40
SDP94DTW1 F 01 56.indd 40

TV viewing
You can view TV programmes on this player.
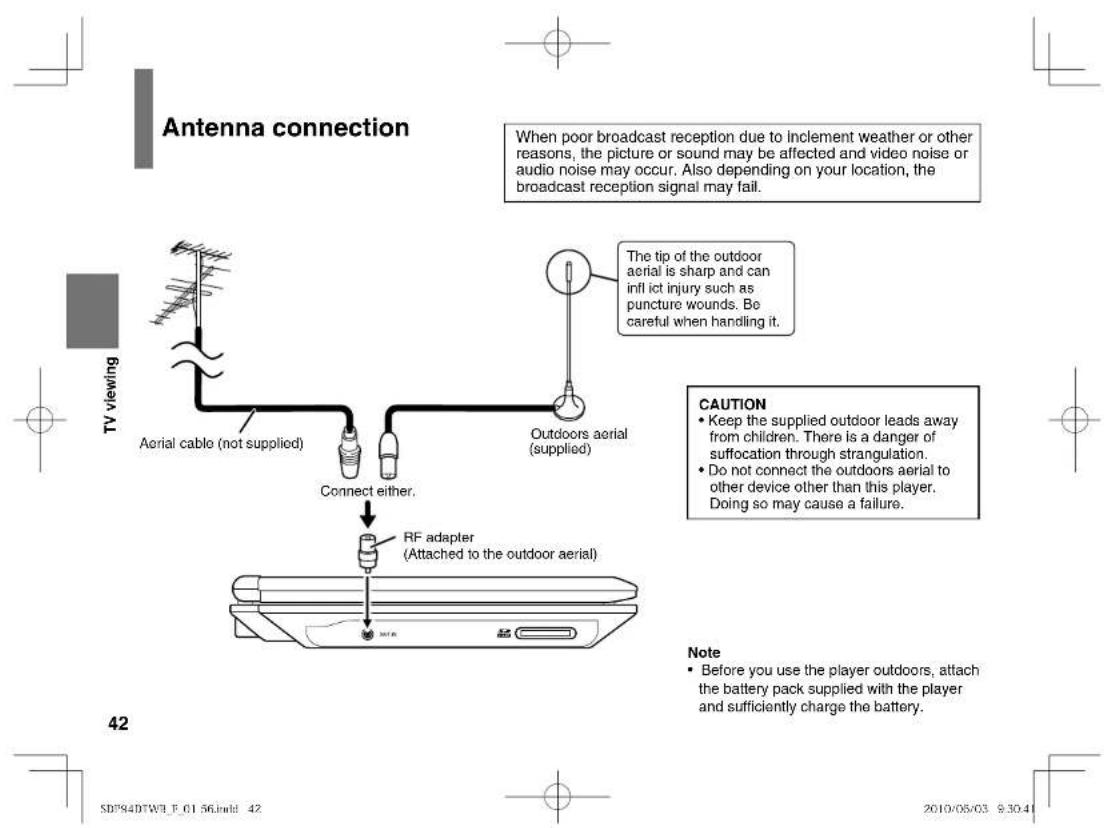
- Antenna connection
- Initial settings
Operation
Initial settings
When you first turn on this player the following menu appears. From this menu, make the initial settings.

1 Press ▶ and ▲/▼ to select a language for on-screen displays, then press ENTER.
2 Press ▼
3 Press ▶ and ▲/▼ to select your country/area, then press ENTER.
4 Press ENTER.
A confirming message appears.
5 Press◀ to select "Yes", then press ENTER.
Channel search starts.
To cancel the process, press RETURN.
When complete, a current TV programme appears.
Go to "Selecting channels" 44.

TV viewing

Operation
■ Preparation
Follow the steps on page 37 to select TV/SD-V mode.
The player enters TV/SD-V mode.
Whenever you view TV on this player, select this
mode.

Selecting channels
1 Press TV/RADIO to switch TV channels and radio channels.
2 Select channels.
3 ways are available.
- Press the number buttons and ENTER.
- Press P ▼ P ▲
- Press ENTER to display "QUICK SELECT".
e.g.

Select the group by ◀ and a station by
then press ENTER.
To turn off the "QUICK SELECT" menu, press MENU
or RETURN.
▲/▼.
Note
- If you press RETURN while viewing TV in full screen, you
can return to the previous channel.
44
SDP84DTWIL F_01 56.indd 44
2010/06/08 16:08:50
■ Help information
While you are using an on-screen display (e.g. "QUICK SELECT" menu), you can access help information by pressing DISPLAY.
e.q.

To turn off, press MENU or RETURN.
Note
- Some on-screen displays may not permit this operation.
Zooming a picture
1 Press ZOOM.
2 Select the zoom point and magnification level.
• Magnification level:

- Zoom point:

3 To cancel, press ZOOM or RETURN.
Viewing Information
1 Press DISPLAY repeatedly.
Information changes in the following order.
Channel name and programme name (Disappears in the specific seconds 52.)→ More detailed information→ Off
Accessing interactive TV service (MHEG-5 application)
1 Press the red button or TELETEXT while holding SHIFT.
2 Operate the colour buttons in line with the instructions displayed on-screen.
3 Perform step 1 to exit.
Functions of the following buttons also exits the mode. MENU / DISPLAY / EPG

TV viewing

Operation (continued)
Using teletext
If the selected TV channel has teletext features, you can access them.
1 Press TELETEXT while pressing SHIFT.
2 Enter 3 digits of a page number. or Press ▲/▼ (◀▶ to change by one hundred).
3 To close, press TELETEXT while pressing SHIFT.
Selecting subtitle
1 Press SUBTITLE.
2 Press ◀ ▶ to select "ON".
3 Press ▲/▼ to select a language, then press ENTER.
[Non-Text]
Selecting audio language
1 Press AUDIO.
2 Press ▲/ ▼ /▲ to select a language, then press ENTER.
To operate EPG (Electronic Programme Guide)
1 Press EPG while pressing SHIFT.
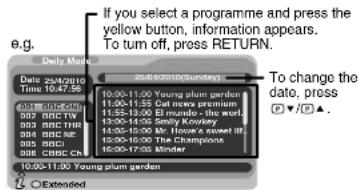
To turn off, press RETURN.
To customize channel lineup
Once channel search 43 is finished, you can change channel lineup to your preference.
Open the necessary menu in the following procedure.
1 In TV/SD-V mode, press MENU.
2 On "Main Menu", press ▲ / ▼ to select "Channel Manager", then press ENTER.
"Channel Manager" menu appears.
3 Press ▲ / ▼ to select "Channel Organizer", then press ENTER.
"Channel Organizer" menu appears.
"Channel Manager" menu

flowchart
graph TD
    A["Channel Organizer"] --> B["Channel sorting"]
    B --> C["Channel Grouping"]
    C --> D["Edit Channels"]
    D --> E["Delete All"]
    E --> F["47"]
    E --> G["48"]
    E --> H["48"]
    E --> I["49"]
    E --> J["49"]
"Channel Organizer" menu
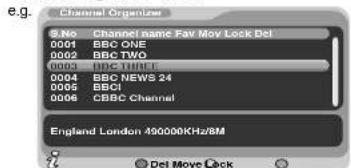
When complete your setting, press MENU repeatedly until the menus disappear.
■ Changing the channel order
1) On "Channel Organizer" menu, press ▲/ ▼ to select a channel.
2) Press the yellow button.
3) Press ▲ / ▼ to select a place.
4) Press ENTER.
The channel is moved.

TV viewing
Operation (continued)
■ Locking the channel
1) On "Channel Organizer" menu, press ▲ ▼ to select a channel.
2) Press the blue button.
3) Enter your 4-digit password (0000 for the first time).
A mark "appears.
To unlock the channel, put out the mark by pressing the blue button at step 2).
■ Deleting the channel
1) On "Channel Organizer" menu, press ▲ ▼
select a channel.
2) Press the green button.
A mark "×appears.
The channel is deleted.
■ Sorting channels
1) On "Channel Manager" menu, select "Channel Sorting", then press ENTER.
2) Press ▶ and ▲, ▼ to select the area, then press ENTER.
3) Press ▼.
4) Set "Second Option" and "Third Option" in the same manner as steps 2) and 3).
5) Press ENTER.
A confirming message appears.
6) Select "Yes" by ◀, then press ENTER.
■ Grouping channels
1) On "Channel Manager" menu, select "Channel Grouping", then press ENTER.
2) Select a channel by ▲ /▼ then choose a group number (1-8) by the number buttons.
A mark appears.
"QUICK SELECT" 44 will show the channel name within the selected group.


■ Saving a channel as a new one
1) On "Channel Manager" menu, select "Edit Channels", then press ENTER.
2) Select a channel by ▲/▼
3) Press the red button.
4) Change the details, if necessary.
Area Name: Press an▶ / , then ▼ENTER.
Carrier: Press ◀/▶
Channel Name: Press ◀/▶Enter a new name.
Number buttons: To input a letter.
Red: To switch number and
alphabet.
Green: To switch capital and
small letters.
Yellow: To insert a space.
Blue: To delete the letter.
RETURN: To discard input.
Audio PID / Video PID / PCR PID: Press the number buttons.
5) Press ENTER.
■ Editing a channel
1) On "Channel Manager" menu, select "Edit Channels", then press ENTER.
2) Select a channel by ▲ .▼
3) Press the yellow button.
4) Change the details.
See "Saving a channel as a new one", step 4).
"Area Name" and "Carrier" cannot be changed.
5) Press ENTER.
■ Deleting channels
1) On "Channel Manager" menu, select "Delete All", then press ENTER.
2) Press ▲ /▼to select "All TV Channels" or "All Radio Channels", then press ENTER.
3) Press ◀ to select "Yes", then press ENTER.

TV viewing
Operation (continued)
Channel search options
Redo channel search in the following procedures whenever you need.
1 In TV/SD-V mode, press MENU.
2 Press ▲/▼ to select "Installation", then press ENTER.
3 Confirm "Area Search" is selected, press ENTER.
Channel search starts.
To cancel the process, press RETURN.
4 Press MENU repeatedly until the menus disappears.
50
SDP94DTWR F 01 56.indd 50
■ Searching a specific channel
If you know the frequency of a channel you need, you can save the searching time by specifying the frequency.
1) Perform steps 1 to 2.
2) Press ▲ /▼to select "Manual Search" or "Auto Search", then press ENTER.
Manual Search: To specify the frequency.
Auto Search: To specify the frequency range.
3) Set the channel data.

flowchart
graph TD
    A["Manual Search"] --> B["Freq(KHz)"]
    B --> C["42500"]
    C --> D["7MBandWidth"]
    E["Auto Search"] --> F["Start Freq(KHz)"]
    E --> G["End Freq(KHz)"]
    F --> H["42500"]
    G --> I["474000"]
    H --> J["7MBandWidth"]
    I --> J
4) Press ENTER.
Channel search starts. When complete, "Installation" menu returns.
2010/06/08 16:17:0
TV function settings
1 In TV/SD-V mode, press MENU.
2 Press ▲/▼ to select "Configuration", then press ENTER.
3 Press ▲ /▼ to select the category, then press ENTER.
4 Press ▲ /▼ to select the item.
5 Change the selection by ▲/▼/◄o► other buttons, by referring to the corresponding pages ( 52 -), then press ENTER.
6 Press MENU repeatedly until the menus disappear.

- Setting in TV/SD-V mode are all reset. Enter your 4-digit password. Select "Yes", then press ENTER. - FW version will be displayed. Press ENTER. To close, press MENU or RETURN.
OSD On-screen display details and sound preference TV Picture adjustment in TV/SD-V mode
System Setup Sound effects, area selection and parental control level
Time Clock setting
Parental Lock Password setting

Operation (continued)
OSD
OSD
Theme colour of on-screen displays
Theme1 / Theme2 / Theme3 / Theme4 / Theme5
Press ◀ ▶
OSD Timeout
Time length of on-screen displays
1/2/3/4/5/6 (second):
Press ◀.▶
OSD Trans
Transparency of on-screen displays
0% / 10% / 20% / 30% / 40% / 50% / 60%
Press ◀.
OSD Language
Language for on-screen displays
English / Gaelic / Welsh
1 Press▶ and ▲ .▼
2 Press ENTER.
Audio Language
Language for TV sounds
English / Gaelic / Welsh
1 Press▶and ▲.▼
2 Press ENTER.
Subtitle Language
Language for TV subtitle
English / Gaelic / Welsh
1 Press▶and ▲.▼
2 Press ENTER.
52
SDP84DTWIL F 01 56.indd 52
2010/06/08 16:17:0
TV
Brightness
Brightness of pictures in TV/SD-V mode
0% / 10% / 20% / 30% / 40% / 50% / 60% / 70% /
80% / 90% / 100%
1 Press▶ and ▲ .▼
2 Press ENTER
Contrast
Contrast of pictures in TV/SD-V mode
0% / 10% / 20% / 30% / 40% / 50% / 60% / 70% /
80% / 90% / 100%
1 Press▶ and ▲ . ▼
2 Press ENTER.
HUE
Hue of pictures in TV/SD-V mode
-6/-5/-4/-3/-2/-1/0/1/2/3/4/5/6
1 Press▶ and ▲ .▼
2 Press ENTER.
Saturation
Saturation of pictures in TV/SD-V mode
0/1/2/3/4/5/6/7/8/9/10/11/12
1 Press▶ and ▲ .▼
2 Press ENTER.

TV viewing

53
2010/06/08 16:29:54
SDP84DTWII_F_01 56.indd 53
Operation (continued)
System Setup
EQ Setup
Sound effect to audio in TV/SD-V mode Standard / Classic / Rock / Jazz / POP
Press ◀.
Surround
Surround effect to audio in TV/SD-V mode OFF / Concert / Church / Passive / Live
Press ◀.
Note
- You cannot set both "EQ Setup" and "Surround". Selecting the effect of one disables the other's.
LCN
Channel searching/sorting by LCN data OFF / ON
Press ◀.
54
SDP94DTWR F 01 56.indt 54
Area
Country/area where this player receives TV broadcast
England
Parental Rating
Parental control level of TV channels OFF / 4 - 18 (Parental control level)
1 Press the number buttons to enter your password (0000 for the first time).
2 Press▶ and ▲▼
3 Press ENTER.

2010/06/08 16:17:07
Time
Timer Mode
Timer setting method
Auto / Manual
Press ◀.▶
Date (If "Timer Mode" is set to "Manual")
1 Press ◀ / ▶ to open a calendar.
2 Press ▲ / ▼ ↗ t▶ select a day
3 Press ENTER.
Time (If "Timer Mode" is set to "Manual")
Press the number buttons to set a time.
GMT Offset (If "Timer Mode" Is set to "Auto")
-12:00 - +12:00 / Auto
1 Press▶ and ▲ .▼
2 Press ENTER.
Summer Time (If "GMT Offset" is not set to "Auto")
OFF: No clock adjustment for summer time.
ON: One hour advances in summer months.
Press ◀ /▶

TV viewing


Operation (continued)


■ Parental Lock

Set your password, which enables you to unlock TV channel restriction and system reset to default.
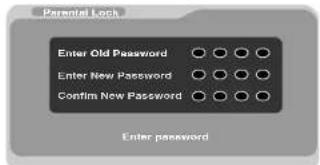
1 Press the number buttons to enter your old password ("0000" for the first time).
2 Press the number buttons to enter your new 4-digit password.
3 Press the number buttons to enter the same digits again.
56

SDP84DTWII_F_01 56.indd 56
2010/05/03 9:30:44

Playback
Play your favorite disc.
- Loading a disc
● Playing a disc
● Changing playback speed
● Playing a desired scene
● Playing in random order
● Playing repeatedly
● Playing in a favorite order -
Zooming a picture
● Changing the camera angle -
Selecting subtitles
- Selecting audio formats
- Selecting enhancement modes
● On-screen display mode
● Playing audio/video/picture files
Loading a disc
For disc compatibility information, see page 23.
1 Open the LCD monitor.

Playback
2 Press OPEN on the main unit.
The disc cover opens.
Before using the player for the first time, remove the protective sheet beneath the disc cover.
3 Set a disc.
Place a disc with the playback side down, and push gently on the centre of the disc to affix it to the spindle.
The player will be unable to recognize or correctly play the disc if it is not affixed to the spindle properly.
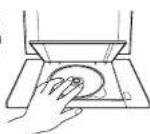
58
SDP84DTWII_F_57 100Hold 58
4 Close the disc cover.
Press CLOSE.
■ To remove the disc
Press OPEN on the main unit to open the disc cover and remove the disc from under the rim while gently pressing down on its centre.
CAUTION
- Keep your fingers clear of the disc as it is spinning.
- Be careful not to catch your fingers in the disc holder.
- Do not use a cracked, deformed, or repaired disc
- Do not tilt, shake or move the main unit while playing. It may damage the dice.
• Do not put any discs or any objects in the disc holder.
- Do not put any disces of any objects in the disc other than those disc types listed on page 23
- Do not touch the spindle immediately after prolonged play.
as it may have become hot.
Be careful loading/removing a disc.

2010/05/03 9:32:1
Playing a disc


The following icons are used in this manual to indicate features and/or functions that are applicable to each disc.

DVD Video disc

VIDEO CD

: Audio CD
■ Preparations
• Turn on the power of the player.
- Place a disc to the player.
1 Follow the steps on page 37 to select DVD/CD mode.
2 Press PLAY.
Playback starts.
- If you select a DVD video disc that contains a top menu, or select a PBC (Playback Control)-featured VIDEO CD, a menu may appear. See "Using the top menu" 60 .
- You may need to press the TOP MENU or MENU button to display the disc menu (depending on the actual DVD video disc.)
- When you play an audio CD, a menu appears. See "Playing audio/video/picture files" about the operation.
About Resume playback function
The player memorizes the location where playback is stopped and resumes playback from the location where you stopped.
If you press PLAY after stopping playback, playback starts from the location where you stopped.
- The player memorizes the information for resume playback up to 5 discs. The oldest memory is deleted if 6th disc is inserted.
- If you want to return to the beginning of a DVD video disc, press STOP twice.
Notes
- The player's memory is cleared when you use a PBC-featured VIDEO CD while "PBC" is set to "On". (Refer to "Function Settings".)
- There may be a difference in the location where playback resumes depending on the disc.

3 Press STOP to stop playback.
Playing a disc (continued)
Pausing playback (Still mode)
Press PAUSE/STEP during playback.
The picture gets still and sound is muted.
To resume normal playback, press PLAY.

Note
- In many instances, a menu screen will appear after playback of a movie is completed. If you have connected the DVD player to a television, and depending on the type of television that you have, prolonged display of an on-screen menu may result in the on-screen menu becoming permanently ingrained in the screen. This type of damage is not covered by your Toshiba Warranty. To avoid this, be sure to press the STOP button once the movie is completed.
60
SDP94DTW1_F_57 100.indd 60
Using the top menu
DVD-V


1 Press TOP MENU.
The top menu appears.
2 Press ▲▼/◄to► select the title you want.
If the titles in the top menu are assigned a number, you can select the title by pressing the number buttons.
3 Press ENTER.
Playback starts from chapter 1 of the selected title.
e.g.
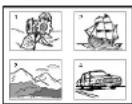
Notes
- This method of locating a title is available only on a disc that contains a top menu.
- Instruction notes of discs may refer to the button that displays the top menu as TITLE button.
- The instructions above describe basic procedures which may vary depending on the contents of the DVD video disc. If different instructions appear on the screen, follow those instructions.
2010/05/03 9:32:11


■ About the screen saver
If 20 minutes elapse while the power is on and there is no disc in the player or while the disc is stopped, the screen saver is automatically displayed (when "Screen saver" (refer to "Function Settings") is set to "On"). To turn off the screen saver, press any button on the main unit or remote control.
■ Automatic power off function
If the player is stopped or the screen saver is engaged for approximately 20 minutes, the LCD power automatically turned off. To restore, turn on the power of the player.
■ About the LCD
- The LCD panel contained in this product is manufactured using an extremely high level of precision technology; however, there may be an occasional pixel (dot of light) that does not operate properly (does not light, remains constantly lit, etc.). This is a structural property of LCD technology, is not a sign of malfunction, and is not covered under your warranty. Such pixels are not visible when the picture is viewed from a normal viewing distance.
- The brightness of the LCD monitor differs slightly depending on the viewing angles. Adjust the LCD monitor angle to obtain the best viewing. (The recommended viewing angle is 90 degrees to the monitor.)
SDP84DTWR_F_57 100Hold 61
2010/05/03 9:32:12

Changing playback speed
Playing in fast reverse or fast forward
DVD-V VCD CD
Press REV or FWD on the remote control during playback.
REV ← Fast reverse playback
FWD▶▶ : Fast forward playback
Each time you press the REV or FWD button, the playback speed changes.
Press PLAY to resume normal playback.
- Also, playback changes to fast reverse or fast forward when you press and hold SKIP on the main unit.
Notes
- The player mutes sound and omits subtitles during reverse and forward scan of DVD video discs.
- The playback speed may differ depending on the disc.
- This equipment supports playback of DVD-RW (VR mode) discs. However, playback or fast-forward/rewind may not function properly depending on how the disc was created, the status of titles on the disc or the condition of the disc itself.
62
SDP94DTWR_F_57 100.indd 62
Playing frame by frame
DVD-V VCD CD
Press PAUSE/STEP repeatedly during playback.
The sound is muted during frame by frame playback.
Press PLAY to resume normal playback.
Playing in slow-motion
DVD-V VCD CD
Press SLOW (◀◀/▶▶) while pressing SHIFT during playback.
If you press SLOW (◀◀) during playback, you can view the picture in reverse slow-motion. (Only when using a DVD video disc.)
Each time you press SLOW (◀◀ /▶) the slow-motion speed changes.
The sound is muted during slow-motion playback.
Press PLAY to resume normal playback.
Note
• The playback speed may differ depending on the disc.

2010/05/03 9:32:12
Playing a desired scene
DVD-V VCD CD
Skipping chapters or tracks
1 Press SKIP (◄◄◄ / ►) repeatedly to locate the chapter or track you want.
Playback starts from the selected chapter or track.
▶▶1: Playback starts from the beginning of the next chapter or track.
◀◀: Playback starts from the beginning of the current chapter or track.
When you press twice, playback starts from the beginning of the preceding chapter or track.
Locating by entering numbers
1 Press T several times to display "Search".
The display changes each time this button is pressed.
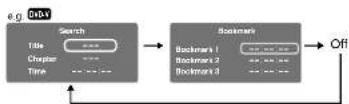
2 Press ▲ / ▼ to select the category you want to search.
| Category To | search by specifying: |
| Title* Title number | |
| Chapter* Chapter number | |
| Track Track number | |
| Time Elapsed time of the current track | |
| Disc Time Elapsed time in the entire disc | |
*: Not available in CD playback.
3 Press the number buttons to enter a number.
• e.g. To enter 25:
2→6
• e.g. To enter the time 1 hour 25 minutes 30 seconds:
1→2→5→3 0
4 Press PLAY or ENTER.
Playback starts from the selected section.
Playing a desired scene (continued)
Notes
- Pressing the CLEAR button resets the numbers.
• Some discs may not respond to this process. - Some scenes may not be located precisely as you specified.
Bookmark function
First register a bookmark referring to "To register a bookmark" of the next paragraph, then operate these steps below.
1 During playback, press T repeatedly to display "Bookmark".
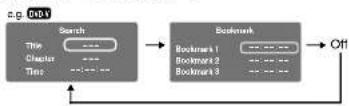
2 Press ▲ to select a bookmark, then press ENTER.
Playback starts from the selected point.
■ To register a bookmark
You can register up to 3 bookmarks.
1 At a scene where you want to register a bookmark, press PAUSE/STEP to pause.
2 Press T repeatedly to display "Bookmark".
3 Press ▲ / ▼ to select a bookmark (1, 2, 3) to register, then press ENTER.
To cancel the procedure, press T to turn the display off.
4 If you select a bookmark already registered, press CLEAR to erase the digits.
5 Press ENTER.
The scene is registered to the bookmark.
Notes
- Bookmarks may not be able to be registered for some discs or scenes.
- A registered bookmark information is cleared if another disc is inserted or the power of the player is turned off.
Playing in random order
DVD-V
VCD
CD
Playing repeatedly
DVD-V
VCD
CD
1 During playback, press RANDOM to display "Shuffle On" on the screen.
Each time you press the button, the random mode "Shuffle On" and "Shuffle off" alternate.
The mode on the screen will disappear in a few seconds if not operated.
If you display "Shuffle On", random playback starts after finishing the current chapter or track.
■ To resume normal playback
Press RANDOM repeatedly until "Shuffle off" appears.
Notes
- Some discs may not permit random playback.
- The random mode will be cancelled when you:
- turn off the power.
– open the disc cover. - If you press STOP twice, the random mode ends and playback stops.
Repeating a specific segment
1 Press A-B REPEAT at the beginning of the segment (point A) you want to play repeatedly.
"Rep A-" appears.
2 Press A-B REPEAT again at the end of the segment (point B).
The player automatically returns to point A and starts playback of the selected segment (A-B).
■ To resume normal playback
Press A-B REPEAT repeatedly until "RepAB Off" appears.
Notes
- If you press STOP twice, the A-B repeat function ends and playback stops.
- You can specify a segment only within the current title or track.
- There may be a slight difference between point A and the location where playback starts actually resumes depending on the disc.
- Functions other than STOP and A-B may not be available during A-B repeat playback.

Playing repeatedly (continued)
Repeating a title, chapter or track
1 During playback, press REPEAT repeatedly to select the repeat mode.
Each time you press the button, the repeat mode changes on the screen.
The mode on the screen will disappear in a few seconds if not operated.
Repeat playback starts after finishing the current chapter or track.
| Disc Mode Repeating range | ||
| DVD-V | Repeat Chapter | Current chapter |
| DVD-V | Repeat Title Current title | |
| VCD CD | Repeat single Current track | |
| VCD CD | Repeat all Whole disc | |
| DVD-V | Repeat off Returns to normal playback. | |
| VCD CD | ||
Notes
- Some discs may not permit repeat playback.
• The repeat mode will be cancelled when you:
- turn off the power.
- open the disc cover
- If you press STOP twice, the repeat mode ends and playback stops.
Playback
66
SDP94DTWIL F 57 100. build 66
2010/05/03 9:32:12
Playing in a favorite order


1 During stop, press MEMORY.
The programming display appears.

Enter a track number when using a VIDEO CD.
2 Setting the title, chapter or track in the order you wish to play.
1) Press ▲▼ select “--” under “T” (Title), then enter a title number using the number buttons.
2) Press ▶ to select “-- -” under “C” (Chapter), then enter a chapter number using the number buttons.
If no chapter number is entered, the title number you entered at step 1) will return to “-- -”.
3) Repeat steps 1) and 2) to program an order you want.
3 Press▶ to select ▶ Play" then press ENTER.
The player starts memory playback.
■ To cancel the programmed selections
- Select a number to cancel, then press CLEAR.
- Select "Clear program" on the screen and press ENTER.
All of the programmed selections are cleared.
■ To stop memory playback
Press STOP twice.
(The programmed selection is cleared.)
Notes
- Some discs may not permit memory playback operation.
- The programmed selection will be cleared when you:
- display a disc menu.
- turn off the power.
- open the disc cover.
- Memory playback pauses if you press MEMORY while being executed.
Zooming a picture
DVD-V
VCD
CD
1 Press ZOOM during playback.
The zoom icon appears.
This operation is available also during slow, still, fast forward or fast reverse playback.
2 Select the zoom point and magnification level.
- Magnification level: Press ZOOM repeatedly.
The magnification level changes as follows:
“Q X2” (Twice the size)
“Q X3” (Three times the size)
“Q X4” (Four times the size)
"Off" (Normal size)
- Zoom point: Press ▲/▼ ↕▶ repeatedly.
68
SDP94DTWII_F_57 100.indd 68
■ To resume normal playback
Press ZOOM repeatedly until "Off" appears.
Notes
- Some discs may not respond to zoom feature.
- Depending on scenes, the buttons may not work as described.
- Zooming does not work on characters selected on menus.
- Zoom playback will be cancelled when you:
- turn off the power.
- open the disc cover.

2010/05/03 9:32:13
Changing the camera angle Selecting subtitles
DVD-V
VCD
CDD
The image is too blurry to recognize any text content.
VCD
CD
1 Press ANGLE while playing a scene recorded with multiple camera angles.
The angle icon ( ) appears on the screen.

This display does not appear if the disc includes no scenes recorded with multiple angles.
If you press ANGLE while playing a scene not recorded with multiple angles, the angle selection is not possible.
2 Press ANGLE to select the camera angle.
Each time you press the button, the camera angle changes.
Notes
• After selecting angle, it will take a few moments to change the camera angle of the scene you are viewing.
- If you pause a picture immediately after changing a camera angle, the resumed playback picture may not display the new camera angle.
1 Press SUBTITLE during playback.
The current subtitle setting is displayed.
2 Press SUBTITLE while the subtitle setting is displayed on the screen.
Each time you press the SUBTITLE button, you can select a subtitle language from those included on the DVD video disc.
Notes
- When you select a subtitle language which is not included on the disc, the player plays a prior language programmed on the disc.
- Depending on scenes, the subtitles may not appear immediately after you change the subtitle language.
- Some discs may not include any subtitle languages.
■ To turn subtitles on or off
Press SUBTITLE several times during playback until "Off" is displayed.
Notes
- Some discs display subtitles automatically, and you cannot turn them off even if you set the subtitle function to off.
- Some discs will allow you to make subtitle selections and turn subtitles on or off only via the disc menu.
69

Selecting audio formats
DVD-V
VCD
CD
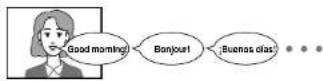
1 Press AUDIO during playback.
The current audio setting is displayed.
e.g.
1/3 D#12.1 Ch Eng
Sound recording Audio language system
2 Press AUDIO while the audio setting is displayed on the screen.
Each time you press the button, you can select a preferred sound from those included on the DVD video disc.
■ Selecting sound channels of VIDEO CDs
During playback, press AUDIO repeatedly to select the sound channel.
Notes
- Some discs allow you to change audio selections only via the disc menu. In such a case, press MENU and choose the appropriate language from the selections on the disc menu.
- If you select a sound track which is not included on the disc, the player plays a prior sound track programmed on the disc.

70
SDP84DTWR F 57 100. hold 70
2010/05/03 9:32:13
Selecting enhancement modes


On-screen display mode


1 Press E.A.M.\*
The current sound enhancement setting appears.
* E.A.M. = Enhanced Audio Mode
2 Press E.A.M. repeatedly.
• 3D Off
Normal sound.
• 3D On
To obtain expansive virtual surround sound effects from just two speakers.
Note
• Actual effects to sounds may vary depending on the disc.
1 Press DISPLAY during playback.
The current instructional information appears.
e.g.: DVD video disc
Elapsed time of the current title
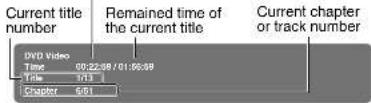

Playback
2 Press DISPLAY again.
Contents of the information change.

3 To turn off the display, further press DISPLAY.
71
SDP94DTWIL F 57 100.Indd 71
2010/05/03 9:32:13
Playing audio/video/picture files
You can play audio CDs, MP3 (audio), DivX ^® (video) or JPEG (picture) files on this player.
■ MP3 or DivX® compatibility
| Playable media (MP3) | CD-ROM, CD-R, CD-RW, DVD-R, DVD-RW, SD Memory Card, SDHC Memory Card |
| Playable media (DivX) | CD-ROM, CD-R, CD-RW, DVD-R, DVD-RW |
| Sampling Frequency 32 Hz, 44.1 kHz, 48 kHz | |
| Bit rate MP3: 32 kbps - 320 kbps (CBR) | |
| DivX: Less than 8 Mbps | |
| CD physical format Mode 1 | |
| File system | MP3: ISO9660, UDF without interleave DivX: ISO14496 |
| File name File names are limited to eight characters or less and must incorporate "MP3" or "DivX" extension.e.g. *****.mp3", *****.avl", *****.divx*File names cannot contain special characters such as "?>++"[1@]:*/.," etc. | |
| Total number of tiles Less than 650 | |
| DivX codec version 3, 4, 5, 6 (Plays all versions of DivX 3 video (including DivX® 6) with standard playback of DivX® media files) | |
| DivX resolution 720 × 575 (Less or equal) | |
| This player requires discs/recordings to meet certain technical standards in order to achieve optimal playback quality. There are many different types of recordable disc formats (including CD-R containing MP3 files). Not all recordable discs will operate or produce optimal playback quality. The technical criteria set forth in this owner's manual are meant only as a guide. Use of CD-RW for MP3 files is not recommended. You must obtain any required permission from copyright owners to download or use copyrighted content. Toshiba cannot and does not grant such permission. |
■ JPEG compatibility
| Playable media | CD-ROM, CD-R, CD-RW, DVD-R, DVD-RW, SD Memory Card, SDHC Memory Card |
| File system ISO9660, UDF without interleave | |
| File name File names are limited to eight characters or less and must incorporate "JPG" extension. e.g. "********".jpg" File names cannot contain special characters such as "?>-<+";[".(@);Y./," etc. | |
| Total number of files Less than 650 | |
| File size | Unrestricted |
| File format | BASELINE, PROGRESSIVE |
| Resolution | Baseline JPG: 5760 x 4320 Progressive JPG 5760 x 4320 |
Note
- Some media and/or files may not be played back due to its capacity and/or manufacturer, etc.
How to use a memory card
1 Insert a memory card into the slot.
2 Follow the steps on page 37 to select "SDCARD" mode.

To load Insert until a "click" Is heard.

To eject Push inside then pull it out.

Note
- Do not eject the memory card while it is in use. If ejected while in use, information on the memory card may be lost.
1 Insert a media you want to play.
The menu appears.

■ To select the category of file
1 Select "Filter" using ▲/▼ their press ENTER.
The screen appears as below.
The check mark (✔) appears next to the category currently selected.


2 Select the track/file you want to play using ▲ / ▼ then press ENTER or PLAY.
Playback starts.
A slide show begins when playing JPEG file.
2 Select the category using ▲ then press ENTER to add/remove the check mark.
3 When complete, press ◀ to return to the previous screen.
The setting will be saved.
3 Press STOP to stop playback.
Note
- When using a commercially available audio CD, this function cannot be used.
Playing audio/video/picture files (continued)
■ Playing repeatedly
Select "Repeat" on the screen using ▲/▼/◄►
during playback then press ENTER.
Each time you press ENTER, the repeat mode
changes.
Off: Resumes to normal playback.
↓
Sing
AII
Folder
Repeats current track.
Repeats all tracks in order. (Audio CD)
Repeats current folder. (MP3)
■ Playing in Random/Intro order
Select "Mode" on the screen using ▲ ↗/◀ ▶
during playback then press ENTER.
Each time you press ENTER, the playback mode changes.
Normal: Resumes to normal playback.
Shu
公告文
Music Intro
Plays only music intro in order.
(Effective only in playback of audio CDs and MP3 files.)
74
SDP84DTWIL F_57 100Hold 74
Notes
- Some media may not permit repeat, or random playback.
- Some functions such as REPEAT, RANDOM and SKIP
(◀◀ / ▶) can be operated from the remote control directly.
■ Rotating a picture (JPEG files)
Press ▲/▼/◄/► while a picture is played.
The picture will be rotated toward the designated
direction.
Note
- Rotation does not start immediately after a direction button is pressed.

2010/05/03 9:32:14


■ Playing in a favorite order
You can combine your favorite track/file and play in the order you determine.
1 Select "Edit mode" on the screen using ▲/▼ ↗ then press ENTER.
2 Position the cursor using ◀ to the screen displayed track/file.
3 Select track/file you want to play using ▲ / ▼ then press ENTER.
The check mark ( )appears next to the selected track/file.
4 Select "Add to program" using ▲ /▼/ ◀ then press ENTER.
The player memorizes the selected track/file.
5 Select "Program view" on the screen using ▲/▼ ◀▶ then press ENTER.
Programmed selections appear.
6 Press PLAY.
Playback starts in the order you programmed.
■ To display recorded track/file
Select "Browser view" on the screen then press ENTER.
The track/file list of the media appears.
■ To cancel the programmed selections
1 While "Edit mode" is selected, press STOP twice to stop playback.
2 Position the cursor using ◀ to the screen displayed track/file.
3 Select track/file you want to cancel then press ENTER.
The check mark (▼appears next to the selected track/file.
4 Select "Clear program" using ▲ / ▼ telepress ENTER.
Program selections are cleared.
Note
- Some media may not permit this function.
SDP94DTWII_F_57 100. hold 76
Function Settings
You can change the default settings to customize to your preferences.
- Customizing function settings
Customizing function settings
DVD-V VCD CD
1 During stop, press SET UP.
The setting menu appears.
2 Press ▲ / ▼ to select the icon of the setting (listed below) to change, then press ▶.
3 Press ▲ / ▼ to select the setting you want to change, then press ENTER.
4 Change the selection by ▲ / ▼ or other buttons, by referring to the corresponding pages 80, then press ENTER.
To change other settings, press , then repeat steps 2 to 4.
5 Press SET UP.
The setting menu disappears, and the procedure finishes.
Function Settings
| Icon | Setting Disc Details | ||
| Language | OSD Menu | DVD-V VCD CD | To select a preferred language for on-screen displays. |
| Subtitle | DVD-V VCD CD | To select a preferred language for subtitles. | |
| Audio | DVD-V VCD CD | To select a preferred language for the sound track. | |
| DVD menu | DVD-V VCD CD | To select a preferred language for disc menus. | |
| DivX subtitle — To select the font for subtitles of the DivX file. | |||
78
SDP94DTWR_F_57 100.indd 78
2010/05/03 9:32:15
Video Aspect Ratio | DVD-V VCD CD | To select a picture size according to the aspect ratio of your TV, when connected to this player to monitor playback picture. | |
| View Mode | DVD-V VCD CD | To select a picture size of the LCD. | |
Audio | E.A.M. | DVD-V VCD CD | You can easily switch to a preferred audio enhancement. (E.A.M. = Enhanced Audio Mode) |
| D.R.C. | DVD-V VCD CD | To turn on or off a function that makes faint sounds easier to hear even if you lower the volume during late hours playback. (D.R.C. = Dynamic Range Control) | |
Rating | Parental control | DVD-V VCD CD | To set the level of the parental lock. |
| PBC | DVD-V VCD CD | To use the menu screen when playing a PBC-controllable VIDEO CD. | |
| Screen saver | DVD-V VCD CD | To turn the screen saver on or off. | |
Default | Default | — | To restore all settings to the factory set. |
| DivX Registration | — | To display information about DivX. |
Function Settings
Customizing function settings (continued)
Language
OSD Menu DVD-V VCD CD
English: To view on-screen displays in English. Français: To view on-screen displays in French. Español: To view on-screen displays in Spanish. Deutsch: To view on-screen displays in German. Nederlands: To view on-screen displays in Dutch. Svenska: To view on-screen displays in Swedish. Türkçe: To view on-screen displays in Turkish. Ελληνικά: To view on-screen displays in Greek. Italiano: To view on-screen displays in Italian.
Subtitle DVD-V VCD CD
Function Settings
Preferred language for subtitles.
English : French : Spanish
Off: To display no subtitles.
Notes
Some DVD video discs may be set to display subtitles in a different language than you selected. A prior subtitle language may be programmed on the disc. Some DVD video discs allow you to change subtitle selections only via the disc menu. If this is the case, press the MENU button and choose the appropriate subtitle language from the selection on the disc menu.
80
SDP94DTW1 F 57 100. hold 80
Audio DVD-V VCD CD
Preferred language for the sound track.
English : French : Spanish
Note
- Some DVD video discs may be played in a different language than you selected. A prior language may be programmed on the disc.
DVD menu DVD-V VCD CD
Preferred language for disc menus.
English : French : Spanish
Note
- Some DVD video discs may not include your preselected language. In this case, the player automatically displays disc menus consistent with the disc's initial language setting.
2010/05/03 9:32:16
DivX subtitle
Select the appropriate language so that DivX subtitles are displayed properly.
ASCII : Unicode : Western European : Turkish : Central European : Greek
Notes
- Depending on the contents, DivX subtitles may not be displayed properly in the language your selected.
- Some DVD video discs may be set to display subtitles in a different language than you selected. A prior subtitle language may be programmed on the disc.
- Some DVD video discs allow you to change subtitle selections only via the disc menu. If this is the case, press the MENU button and choose the appropriate subtitle language from the selection on the disc menu.
Video
Aspect Ratio DVD-V VCD CD
4:3 : Select when a standard 4:3 TV is connected.
16:9 : Select when a 16:9 wide TV is connected.
Notes
- The displayable picture size is preset on the DVD video disc. Therefore, the playback picture of some DVD video discs may not conform to the picture size you select.
- When you play DVD video discs recorded in the 4:3 picture size only, the playback picture always appears in the 4:3 picture size regardless of the TV shape setting.
- If you select "16:9" and you own a 4:3 TV set, the DVD playback picture will be horizontally distorted during playback. Images will appear to be horizontally compressed. Always be sure that your TV shape conforms to the actual TV in use.
View Mode DVD-V VCD CD
FIII: Pictures are expanded horizontally and vertically to fit the shape of the screen. No picture cropping.
Original: Pictures are displayed in their original aspect ratios.
Auto Fit: Aspect ratios are automatically adjusted. Masking bars may appear on the top and bottom or left and right of picture.
Pan Scan: Pictures are cropped horizontally or vertically to fit the shape of the screen.
Note
- Actual views may depend on disc content or the TV. You may occasionally change the setting to your preference.
Customizing function settings (continued)
Audio
E.A.M. DVD-V VCD CD
Normal:
Normal sound.
3D:
To obtain expansive virtual surround sound effects from just two speakers.
Note
- Pressing the E.A.M. button on the remote control also allows you to achieve the same setup.
D.R.C. DVD-V VCD CD
Function Settings
On:
Dynamic range is reduced.
Off:
Full dynamic range is maintained.
Notes
- This function works only during playback of Dolby Digital recorded discs. - The level of Dynamic Range Control may differ depending on the DVD disc.
8
SDP84DTW1F_57 100Hold 82
Rating
Parental control DVD-V
VCD CD
DVD video discs equipped with the parental lock function are rated according to their content. The contents allowed by a parental lock level and the way a DVD video disc can be controlled may vary from disc to disc. For example, if the disc allowed you could edit out violent scenes unsuitable for children and replace them with more suitable scenes, or lock out playback of the disc altogether.
Some DVD video discs may or may not respond to the parental lock settings. This is not a defect in the player. Make sure this function works with your DVD video discs.
■ To set a security code
First you need to set a security code. Follow this procedure also when you change the code later.
1 Press ▲ / ▼ to select "Set Password", then press ENTER.
2 Press the number buttons to enter a personal 5-digit security code (99999 when using the player for the first time), then press ENTER.
2010/05/03 9:32:16

3 Confirm "Set Password" is selected, and press ENTER.
Another input area appears.
4 Press the number buttons to enter a new code, then press ENTER.
5 Enter the same code again, then press ENTER. The new security code is set.
Note
- If you have forgotten your security code, enter 99999 at step 2 and set a new security code.
■ To set the parental level
1 Press ▲ / ▼/ 🔍 to select "Parental control" and then press ENTER. The password setting display appears.
2 Press the number buttons to enter the 5-digit security code you have set, then press ENTER. Now the parental lock level can be changed.
3 Press
ENTER while selecting "Parent"
4 P r e▲s / to select the parental level to set and then press ENTER.
8: Adult 7: NC-17 6: R
5:PG-R 4:PG-13 3:PG
2:G 1:Kid Safe
■ To change the parental lock level
Follow the step "To set the parental level" to change the parental level.

On:
To use the menu when playing a PBC-featured VIDEO CD.
Off:
When playing a VIDEO CD without using the menu.

On:
The screen saver operates.
The screen saver is disengaged.
Function Settings
83
Customizing function settings (continued)
Default
Default
No:
To not restore the function settings to their default settings.
Yes:
To restore the function settings to their default settings.
DivX Registration
The DivX information appears.
Return to "Default" if you press ENTER while it is displayed.
Function Settings
84
SDP84DTWII_F_57 100Hold 84
Connections
You can connect the player to a TV or audio system.
- Viewing on a connected TV
● Viewing pictures from connected video equipment - Connecting to an audio system equipped with analog audio inputs
● Using the automobile/vehicle adapter or power port
Viewing on a connected TV
1 Follow the steps on page 37 to select a mode.
(Except for TV/SD-V. Pictures In TV/SD-V mode cannot be output to connected equipment.)
2 Connect a TV to the AV OUT Jack of this player.

flowchart
graph TD
    A["To AV OUT Connection to this jack disables the LCD of the player."] --> B["Audio/video cable (supplied)"]
    B --> C["To video input"]
    C --> D["TV"]
    C --> E["Yellow (Video)"]
    C --> F["White (Left)"]
    C --> G["Audio (L)"]
    C --> H["Red (Right)"]
    C --> I["To analog audio inputs"]
Notes
- Refer to the owner's manual of the connected TV as well.
- When you connect the player to your TV, be sure to turn off the power and unplug both units from the wall outlet before making any connections.
- Connect the player directly to your TV. If you connect the player to a VTR, TV/VTR combination or video selector, the playback picture may be distorted as DVD video discs are copy protected.
- Mode selection is not available when the AV OUT jack is connected.
86
SDP94DTW1 F 57 100. hold 86
2010/06/08 16:32:20
Viewing pictures from connected video equipment
You can use the LCD of this player to monitor pictures of connected video equipment.
1 Connect video equipment to the AV IN jack of this player.
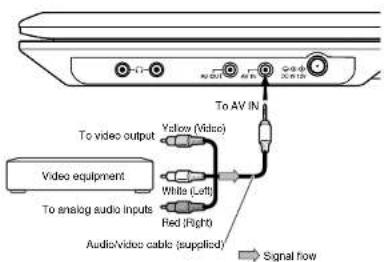
2 Follow the steps on page 37 to select AV IN mode.
The player is ready to display pictures of the connected equipment on the LCD. (AV input mode)
Notes
• Signals input from the AV IN jack may not be displayed in their original picture sizes on the LCD of this player.
- When supplying non-standard signals such as playback images from a video deck or images from a game player, some images may be displayed incorrectly.
For example, shooting games, which shoots at a target on the screen with a light gun, may not work because of the LCD Colour monitor properties.
- In the external AV input mode (AV IN appears on the screen), screen saver function/auto power OFF function becomes ineffective.
Connections
Connecting to an audio system equipped with analog audio inputs
1 Follow the steps on page 37 to select a mode.
(Except for TV/SD-V. Pictures in TV/SD-V mode cannot be output to connected equipment.)
2 Connect an audio system equipment to the AV OUT jack of this player.
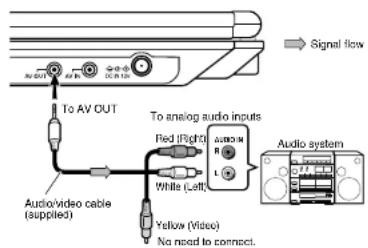
Caution
- When you connect the player to other equipment, be sure to turn off the power and unplug all of the equipment from the wall outlet before making any connections.
- Turn off the amplifier before you connect or disconnect the player's AC adapter. If you leave the amplifier power on, the speakers may be damaged.
- The output sound of the player has a wide dynamic range. Be sure to adjust the receiver's volume to a moderate listening level. Otherwise, the speakers may be damaged by a sudden high volume sound.
Notes
- Refer to the owner's manual of the connected equipment as well.
- If you place the player near a tuner or radio, the radio broadcast sound might be distorted. In this case, place the player away from the tuner and radio.
- Mode selection is not available when the AV OUT jack is connected.
Using the automobile/vehicle adapter or power port
For use of the DVD player in a car, this adapter can power the DVD player from the cigarette lighter socket.
WARNING
- NEVER place a DVD player within the eyesight of a driver while he/she is driving an automobile/vehicle. Note: A DVD player located in the front seating section of a vehicle is illegal in many jurisdictions.
Failure to observe the above instructions could result in the
- NEVER place a DVD player in a location where it could interfere with the proper deployment and/or performance of an air bag.
Failure to observe this instruction could result in the prevention of an air bag to properly and/or effectively deploy. - Do not use an adapter other than the model supplied, to power the player. Do not use the supplied vehicle adapter to power an apparatus other than this player. Neglecting these may cause smoke, fire or electrical shock to human body.
- This adapter is intended for exclusive use in automobiles/vehicles with a DC 12V negative ground electrical system. NEVER use this adapter with a DC 24V configured or a DC 12V positive ground electrical system automobile/vehicle. Consult your vehicle owner's manual before using this adapter.
-
ALWAYS use caution when touching the adapter, cigarette lighter socket or power port. The adapter, lighter socket and power port may become heated after prolonged use.
-
Do not charge the battery pack which is attached to the DVD player by the adapter. Doing so may cause smoke, fire or electrical shock to human body. Whenever you use the adapter, be sure to remove the battery pack from the DVD player to prevent it being charged by the adapter.
- Do not touch the adapter with wet hands. Do not get liquid on the adapter.

Connections

(Continued)
89
Using the automobile/vehicle adapter or power port (continued)
1 Be sure to turn off the DVD player then remove the battery pack from the player.
(Note: Charging the battery pack with the vehicle adapter may cause smoke, fire or electrical shock to human body. ALWAYS remove the battery pack before using the vehicle adapter.)
2 Turn on the vehicle engine so that the cigarette lighter socket or power port is powered. In some vehicles the cigarette lighter socket or power port is powered even when the vehicle's engine is not running. It is important that the vehicle owner's manual be consulted.
3 Insert the plug of the adapter into the cigarette lighter socket or power port fully.
4 Insert the pin plug of the adapter into the DC IN 12V jack of the DVD player.
5 Turn on the DVD player.
6 When disconnecting the DVD player, first turn off the DVD player, then remove the adapter pin plug from the DVD player and then the power plug from the cigarette lighter socket or power port.
7 Before turning off the vehicle engine or leaving the vehicle, be sure to turn off the player then remove the adapter pin plug from the DVD player.
Specification
Operating temperature: 5 \~ 35°C (41 \~ 95°F)
Operating humidity: 30 \~ 80%
Storage temperature: -10 \~ 50°C (14 \~ 122°F)
Storage humidity: 20 \~ 80%
Notes
- Before turning on the vehicle engine, remove the power plug of the adapter from the cigarette lighter socket or power port. Neglecting this may cause malfunction of the DVD player.
- If the cigarette lighter socket or power port is dirty, be sure to clean it before connecting the power plug of the adapter. Dusts or stains of the cigarette lighter socket or power port may heat the connected plug while operating, and may damage the adapter.
- Do not leave the adapter in an unoccupied vehicle to avoid exposing it to unusually high ambient temperatures.
- Before turning off the vehicle engine, first turn off the DVD player then remove the plug of the adapter from the cigarette lighter socket or power port. Turning off the vehicle engine while the DVD player is powered via the adapter may cause damage to the DVD player.
- When the DVD player is not in use be sure to remove the adapter power plug from the cigarette lighter socket or power port and the pin plug from the DVD player.
- Do not force the adapter into an incompatible lighter socket or power port.


- Avoid dropping the adapter or placing heavy objects on it. Never use the damaged adapter.
- Do not pull the adapter power cord when removing it from a socket or power port.
Always grasp and pull the body. Failure to do so could cause damage to and malfunction of the adaptor. - Do not operate the DVD player using the adapter for a prolonged period with the car engine off. The car battery may be too exhausted to turn the engine on.
- Depending on the vehicle model or the location of the cigarette lighter socket, this adapter may not be applied.
- In some vehicles the cigarette lighter socket is powered even when the vehicle's engine is not running. Using the cigarette lighter socket for power when the engine is not running will drain the car's battery.
- Never add any devices to the cigarette lighter socket or power port to apply the adapter. These may damage the DVD player or themselves or may cause fire.
- If noises are heard while operating the car radio, etc, remove the power plug of the adapter from the cigarette lighter socket or power port.
- If playback pictures are distorted while operating, move the DVD player away from the adapter.
Connections

91
2010/05/03 9:32:17
SDP94DTWR_F_57 100.indd 91


SDP84DTWII_F_57 100Hold 92
Other
Useful Information.
● Before calling service
- Specifications
- Customer Helpline
Before calling service
Check the following guide for the possible cause of a problem before contacting service.
| Symptom Cause Correction | ||
| No power. • The AC adapter is | disconnected. • Connect the AC adapter securely. | |
| • The battery pack has been removed. • Install the battery pack. | ||
| • Battery empty. • Re-charge the battery. | ||
| The battery cannot be charged. | • The battery is near full charge. • Retry charging after using the battery power. | |
| The LCD turned off by itself. • The automatic LCD off function turned the LCD off. | • Turn on the player again. | |
| No TV channels. • The aerial is not connected. • Connect the aerial properly. | ||
| No TV channels after moving. • Channel search is not finished. • Redo channel search. | ||
| Picture noises and distortion. | • Interference by wave reflection or poor aerial connection. | • Change the position and direction of the aerial. |
| Dots on picture. | • Reception is disturbed by vibration. | • Move the aerial away from the cause of the interference. |
| Stripes on picture. | • Interference by other electric apparatuses. | • Move the aerial away from the cause of the interference. |
| No picture on the LCD monitor. | • The AV OUT jack is connected. | • When you use the LCD of the player, unplug the AV OUT jack. |
| No picture. (Other than built-in LCD monitor) | • The connected TV is not set to receive DVD signal output. | • Select the appropriate video input mode on the TV so the picture from the player appears on the TV screen. |
| No picture or Sound (When using the TV tuner.) | • The aerial connection is Improperly positioned. | • Connect the aerial properly. |
| • The channel search is not set to channels available in your area. | • Set by scanning. | |
| No sound. | • The equipment connected via the audio/video cable is not set to receive DVD signal output. | • Select the correct input mode of the audio receiver so you can listen to the sound from the player. |
| • The volume is too low. | • Adjust the volume. | |
| • The audio receiver or TV is turned off. | • Turn on the equipment connected with the audio/video cable. | |
Other
94
SDP84DTWII F 57 100 hold 94
2010/05/03 9:32:17
| Symptom Cause Correction | ||
| The playback picture has occasional distortion. | • The disc is dirty. • Eject the disc and clean it. | |
| • Player is in fast forward or fast reverse mode. | • Sometimes a small amount of picture distortion may appear. This is not a malfunction. | |
| • The player was moved or given a shock. | • Vibrating or shaking the player during playback may produce distortion. This is not a malfunction. If not restored to usual status, stop playback and start again. | |
| • The disc is not set firmly. • Remove the disc and set it again. | ||
| Brightness is unstable or noises are present in the playback pictures. (Other than built-in LCD monitor) | • The effect of copy protection. If you connect the player to a VTR, TV/VTR combination or video selector, the playback picture may be distorted as DVD video discs are copy protected. | • Connect the player directly to the TV. Avoid connecting the player to a VTR or TV/VTR combination. |
| The player does not start playback. | • No disc is inserted. • Insert a disc. | |
| • An unplayable disc is inserted. • Insert a playable disc. (Check the disc type, colour system and region number.) | ||
| • The disc is inserted upside down. • Insert the disc with the playback side down. | ||
| • The disc is not inserted securely. • Insert the disc securely in the disc holder. | ||
| • The disc is dirty. • Clean the disc. | ||
| • The parental lock function is set. • Change the parental lock level. | ||
| • The player is set to the external input mode (AV IN). | • Set the mode to “DVD/CD” or “SDCARD”. | |
| Playback does not follow the course of the disc’s program. | • It is in the repeat playback mode, memory playback, etc. | • These operations may prevent a proper progression of the contents. |
Other

95
2010/05/03 9:32:18
Before calling service (continued)
| Symptom Cause Correction | ||
| Buttons do not work, • Power supply fluctuations or other abnormalities such as static electricity may interrupt correct operation. | • Turn the power off then turn it on. Or disconnect the AC adapter and insert it into the wall outlet again. | |
| The remote control does not work properly. | • The remote control is not pointed at the remote sensor of the player. | • Point the remote control at the remote sensor of the player. |
| • The remote control is too far from the player. | • Operate the remote control within about 3 m (9.9 feet). | |
| • The batteries in the remote control are exhausted. | • Replace the batteries with new ones. | |
| • The player's remote sensor is exposed to a strong light source such as direct sunlight or other illumination. | • Avoid the player from being exposed to a strong light source. | |
Other
96
SDPS4DTW1_F_57 100.Indd 96
2010/05/03 9:32:18
Specifications
Player
| Power supplyDC 12 V (Rated current : 1.5 A (Maximum: during battery pack charging))100 – 240 V AC, 50/60 Hz (with the supplied AC adapter) |
| Mass |
| Approximately 1.2 kg |
| External dimensions (envelope) |
| 260 × 35 × 191 mm (W/H/D) |
| Signal system |
| PAL/3.58NTSC |
| Laser |
| Semiconductor laser, wavelength 650 nm / 795 nm |
| Operating conditions |
| Temperature: 5°C to 35°C (41°F to 95°F) |
| Operation status: Horizontal |
Connectors
| AV output (AV OUT)ø3.5mm mini jack × 1Video: 1.0 V (p-p), 75Ω, negative sync.,Audio: 2.0 V (rms), 100Ω |
| AV input (AV IN)ø3.5mm mini jack × 1Video: 1.0 V (p-p), 75Ω, negative sync.,Audio: 2.0 V (rms), 10kΩ |
| Headphone terminalø3.5mm stereo mini jack × 2 |
| Antenna input75Ω IEC connector |
| Card driveCard slot × 1 |

97
2010/05/03 9:32:18

Specifications (continued)
■ Liquid crystal display
| Panel size22.71 cm (9 inches diagonally measured) |
| Projection systemTN colour transmission |
| Driving systemAmorphous silicon TFT active matrix |
| Resolution640 (H) × 234 (V) pixels (effective pixel rate: more than 99.99%) |
■ Supplied accessories
| Audio/video cable | 1 |
| Remote control (SE-R0353) | 1 |
| Coin-shaped battery (CR2025) | 1 |
| AC adapter (EADP-18SB D) | 1 |
| Battery pack (SD-PBP94E) | 1 |
| Vehicle adapter (MEDC01AX) | 1 |
| Headphones | 1 |
| Outdoors aerial (RF adapter x1) | 1 |
| Carrying case | 1 |
| Owner's manual | 1 |
• This model complies with the specifications.
- Designs and specifications are subject to change without notice.
- This model may not be compatible with features and/or specifications that may be added in the future.
Other
98
SDP94DTWR_F_57 100.indd 98
2010/05/03 9:32:18

Customer Helpline (This is only for U.K. customers.)
Should you experience any problems during the installation of this product or within the first 12 months of purchase* please call the Toshiba Customer Helpline on 08448560730.
To assist the Helpline when contacting them please have available.
• The Owners manual supplied with the Product,
• The Model Number,
• The Serial Number (generally on the bottom of the unit),
- A pen.
* Should you experience any problems after 12 months from date of purchase contact your original supplying dealer.

Other
2010/05/03 9:32:18


© 2010 Toshiba Corporation
TOSHIBA
Printed in China

SDPS4DTWR_F_57 100. hold 100

2010/05/03 9:32:18


- SDP94DTWB
- SAFETY PRECAUTIONS
- About disposal
- EU Conformity Statement
- CE
- IMPORTANT SAFETY INSTRUCTIONS
- ADDITIONAL SAFETY INSTRUCTIONS
- Introduction
- Precautions
- Notes on handling
- Notes on use in a vehicle
- Notes on locating
- Notes on cleaning
- Notes on moisture condensation
- Notes on products incorporated laser system
- Precautions (continued)
- About this owner's manual
- Notes on region numbers
- Table of contents
- Preparations
- TV viewing
- Table of contents (continued)
- Playback
- Function Settings
- Connections
- Other
- Identification of controls
- Instructions and actual buttons
- Important
- Accessories
- Notes and Information
- Notes and Information (continued)
- Notes
- ■ On VIDEO CDs
- On handling discs
- On cleaning discs
- On storing discs
- Notes on copyright
- Notes on memory cards
- Saving data
- ■ Notices for use
- ■ Write Protection of SD Memory Card
- Preparation of the remote control
- Power connection
- CAUTION
- Note
- Using the battery pack
- WARNING
- Préparations
- ■ Attaching the battery pack
- 32
- ■ Charging the battery pack
- Turn off the player.
- Attach the battery pack to the player.
- Connect the supplied AC adapter only to the player and plug in.
- ■ Detaching the battery pack
- ■ About battery pack life
- To turn the LCD monitor
- ■ To turn the LCD monitor
- ■ To put back the LCD monitor
- Powering on/off
- Changing modes
- Press MODE.
- Press ◀ ▶ select the mode.
- Press ENTER.
- Adjusting the volume of the speakers or the connected headphones
- Press and hold Vol (+/-) on the main unit.
- Connecting to headphones
- General adjustments
- Adjusting the picture
- Press PICTURE.
- Set the details.
- When complete, press PICTURE to turn off the menu.
- Using "QUICK MENU"
- Press QUICK.
- Press ▲ / ▼ to select an item, then press ENTER.
- Set the details.
- Initial settings
- Operation
- ■ Preparation
- Selecting channels
- 44
- ■ Help information
- Zooming a picture
- Press ZOOM.
- Select the zoom point and magnification level.
- To cancel, press ZOOM or RETURN.
- Viewing Information
- Press DISPLAY repeatedly.
- Accessing interactive TV service (MHEG-5 application)
- Press the red button or TELETEXT while holding SHIFT.
- Operate the colour buttons in line with the instructions displayed on-screen.
- Perform step 1 to exit.
- Using teletext
- Selecting subtitle
- Selecting audio language
- To operate EPG (Electronic Programme Guide)
- To customize channel lineup
- ■ Changing the channel order
- ■ Locking the channel
- ■ Deleting the channel
- ■ Sorting channels
- ■ Grouping channels
- ■ Saving a channel as a new one
- ■ Editing a channel
- ■ Deleting channels
- Channel search options
- ■ Searching a specific channel
- TV function settings
- OSD
- OSD Timeout
- OSD Trans
- OSD Language
- Audio Language
- Subtitle Language
- TV
- Brightness
- Contrast
- HUE
- Saturation
- 53
- System Setup
- EQ Setup
- Surround
- LCN
- Area
- Parental Rating
- Timer Mode
- GMT Offset (If "Timer Mode" Is set to "Auto")
- ■ Parental Lock
- 56
- Loading a disc
- Playing a disc
- ■ Preparations
- Follow the steps on page 37 to select DVD/CD mode.
- Press PLAY.
- About Resume playback function
- Press STOP to stop playback.
- Pausing playback (Still mode)
- 60
- Using the top menu
- DVD-V
- ■ About the screen saver
- ■ Automatic power off function
- ■ About the LCD
- Changing playback speed
- Playing in fast reverse or fast forward
- DVD-V VCD CD
- 62
- Playing frame by frame
- Playing in slow-motion
- Playing a desired scene
- Skipping chapters or tracks
- Locating by entering numbers
- Playing a desired scene (continued)
- Bookmark function
- During playback, press T repeatedly to display "Bookmark".
- Press ▲ to select a bookmark, then press ENTER.
- ■ To register a bookmark
- Playing in random order
- Playing repeatedly
- During playback, press RANDOM to display "Shuffle On" on the screen.
- ■ To resume normal playback
- Repeating a specific segment
- Press A-B REPEAT at the beginning of the segment (point A) you want to play repeatedly.
- Press A-B REPEAT again at the end of the segment (point B).
- Repeating a title, chapter or track
- During playback, press REPEAT repeatedly to select the repeat mode.
- Playing in a favorite order
- During stop, press MEMORY.
- Setting the title, chapter or track in the order you wish to play.
- Press▶ to select ▶ Play" then press ENTER.
- ■ To cancel the programmed selections
- ■ To stop memory playback
- Press ZOOM during playback.
- Changing the camera angle Selecting subtitles
- Press ANGLE while playing a scene recorded with multiple camera angles.
- Press ANGLE to select the camera angle.
- Press SUBTITLE during playback.
- Press SUBTITLE while the subtitle setting is displayed on the screen.
- ■ To turn subtitles on or off
- Selecting audio formats
- Press AUDIO during playback.
- Press AUDIO while the audio setting is displayed on the screen.
- ■ Selecting sound channels of VIDEO CDs
- Selecting enhancement modes
- On-screen display mode
- Press E.A.M.\*
- Press E.A.M. repeatedly.
- Press DISPLAY during playback.
- Press DISPLAY again.
- To turn off the display, further press DISPLAY.
- Playing audio/video/picture files
- How to use a memory card
- Insert a media you want to play.
- ■ To select the category of file
- Select the track/file you want to play using ▲ / ▼ then press ENTER or PLAY.
- Playing audio/video/picture files (continued)
- ■ Playing repeatedly
- ■ Playing in Random/Intro order
- ■ Rotating a picture (JPEG files)
- ■ Playing in a favorite order
- ■ To display recorded track/file
- Customizing function settings
- Language
- OSD Menu DVD-V VCD CD
- Subtitle DVD-V VCD CD
- English : French : Spanish
- 80
- Audio DVD-V VCD CD
- DVD menu DVD-V VCD CD
- DivX subtitle
- ASCII : Unicode : Western European : Turkish : Central European : Greek
- Video
- Aspect Ratio DVD-V VCD CD
- View Mode DVD-V VCD CD
- Audio
- E.A.M. DVD-V VCD CD
- Normal:
- D.R.C. DVD-V VCD CD
- 8
- Rating
- Parental control DVD-V
- ■ To set a security code
- ■ To set the parental level
- ■ To change the parental lock level
- Default
- No:
- Yes:
- DivX Registration
- Viewing on a connected TV
- Viewing pictures from connected video equipment
- Connecting to an audio system equipped with analog audio inputs
- Follow the steps on page 37 to select a mode.
- Connect an audio system equipment to the AV OUT jack of this player.
- Using the automobile/vehicle adapter or power port
- Specification
- Before calling service
- Specifications
- Player
- Connectors
- Specifications (continued)
- Customer Helpline (This is only for U.K. customers.)
- TOSHIBA
Brand : TOSHIBA
Model : SDP94DTWB
Category : DVD player