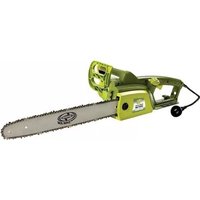
Saw SWJ701E - Saw Snow Joe - Free user manual and instructions
Find the device manual for free Saw SWJ701E Snow Joe in PDF.


| Product Type | Electric Circular Saw |
| Brand | Snow Joe |
| Model | SWJ701E |
| Power Source | Corded Electric |
| Voltage / Frequency | 120 V / 60 Hz |
| Amperage | 15 A |
| Motor Type | Brushed |
| Blade Diameter | 7-1/4 in (184 mm) |
| Arbor Size | 5/8 in (16 mm) |
| No Load Speed | 5,500 RPM |
| Cutting Depth at 90° | 2-1/2 in (63.5 mm) |
| Cutting Depth at 45° | 1-7/8 in (47.6 mm) |
| Bevel Range | 0° – 50° |
| Weight | 10.5 lb (4.8 kg) |
| Cord Length | 8 ft (2.4 m) |
| Included Accessories | Blade, wrench, rip fence, blade guard |
| Safety Features | Double insulation, lock-off switch, electric brake |
| Dust Collection | Dust port for vacuum attachment |
| Warranty | 2 years limited |
| Maintenance | Lubricate gears, replace carbon brushes, clean regularly |
| Recommended Use | Cutting wood, plywood, MDF, plastic, and metal with appropriate blade |
Frequently Asked Questions - Saw SWJ701E Snow Joe
User questions about Saw SWJ701E Snow Joe
0 question about this device. Answer the ones you know or ask your own.
Ask a new question about this device
Download the instructions for your Saw in PDF format for free! Find your manual Saw SWJ701E - Snow Joe and take your electronic device back in hand. On this page are published all the documents necessary for the use of your device. Saw SWJ701E by Snow Joe.
USER MANUAL Saw SWJ701E Snow Joe
All Operators Must Read These Instructions Before Use
General Power Tool Safety Warnings ⚠ WARNING!
Read all safety warnings and
instructions. All users of this chain saw must first carefully read this maintenance and operating manual and familiarize themselves fully with all of the controls for its correct operation.
Safety Rules
- Replacement parts – When servicing, use only identical replacement parts.
- Polarized plugs – To reduce the risk of electrical shock, this tool has a polarized plug (one blade is wider than the other). The plug will fit into a polarized outlet only one way. If the plug does not fit fully into the outlet, reverse the plug. If it still does not fit, contact a qualified electrician to install the proper outlet. Do not change the plug in any way.
- Keep the work area clean – Cluttered areas invite injuries. Do not start cutting until you have a clear work area, secure footing, and a planned retreat path from falling tree limbs.
-
Consider the work area environment – Use extreme caution when cutting small size brush and saplings because the slender material may catch the saw chain and be whipped toward you or pull you off balance.
-
Do not operate the chain saw in a tree unless you are specifically trained to do so.
- When cutting a limb that is under tension, be cautious of spring back so that you will not be struck when the tension in the wood fibers is released.
- Do not expose the chain saw to rain.
- Do not use the chain saw in damp or wet locations.
-
Do not use the chain saw in the presence of flammable liquids or gases.
-
Guard against electric shock – Avoid body contact with grounded surfaces, such as metal pipes and wire fences.
- Keep children and bystanders away – Do not let children, pets, or other bystanders contact the chain saw or extension cord. All spectators should be kept a safe distance away from the work area.
- Store idle chain saw – When not in use, chain saws should be stored in a dry and high or locked-up place out of the reach of children. When storing the chain saw, use a scabbard or carrying case.
- Do not force chain saw – It will do the job better and with less likelihood of injury if it is used at the rate for which it was intended.
- Use the right tool – Cut wood only. Do not use the chain saw for purposes other than those for which it is intended. For example, do not cut plastic, masonry, or non-wood building materials.
- Dress properly – Do not wear loose clothing or jewelry. They can get caught in moving parts. Rubber gloves and non-skid footwear are recommended when working outdoors. Wear protective hair covering to contain long hair.
- Use safety glasses – Also use safety footwear, snug-fitting clothing, protective gloves, hearing and head protection.
- Carry the saw properly – Carry the chain saw by the front handle with the saw stopped, finger off the switch, and the guide bar and saw chain pointed toward the rear.
-
Maintain the chain saw with care – Inspect the chain saw cord periodically and, if damaged is found, have it repaired by an authorized service facility.
-
Keep the cord clear of the saw chain and operator at all times. Never carry the chain saw by the cord or pull the cord to disconnect it from the receptacle. Keep the cord away from oil and sharp edges.
- Inspect extension cords periodically and replace them if damaged.
- Keep tools sharp and clean for better and safer performance.
- Follow instructions for lubricating and changing accessories.
-
Keep handles dry, clean, and free from oil and grease.
-
Disconnect the chain saw – Disconnect the chain saw when not in use, before servicing, and when changing accessories and attachments, such as the saw chain and guard.
-
Outdoor use extension cords – Use only extension cords that are marked and intended for outdoor use.
-
Stay alert – Watch what you are doing. Use common sense. Do not operate the chain saw when you are tired. Keep all parts of the body away from the saw chain when the motor is operating.
Before you start the saw, make sure the saw chain is not contacting anything.
-
Check for damaged parts – Before further use of the chain saw, a guard or other part that is damaged should be carefully checked to determine that it will operate properly and perform its intended function. Check for alignment of moving parts, binding of moving parts, breakage of parts, mounting, and any other conditions that may affect its operation. A guard or other part that is damaged should be properly repaired or replaced by an authorized service center unless otherwise indicated in this instruction manual. Have defective switches replaced by an authorized service center. Do not use the chain saw if the switch does not turn it on and off. Do not operate a chain saw that is damaged, improperly adjusted, or is not completely and securely assembled. Make sure that the saw chain stops moving when the trigger is released.
-
Guard against kickback - ⚠WARNING! KICKBACK may occur when the nose or tip of the guide bar touches an object, or when the wood closes in and pinches the saw chain in the cut. Tip contact in some cases may cause a lightning fast reverse reaction, kicking the guide bar up and back towards the operator. Pinching the saw chain along the top of the guide bar may push the guide bar rapidly back towards the operator. Either of these reactions may cause you to lose control of the saw, which could result in serious injury to the user. The following precautions should be followed to minimize kickback:
a. Grip the tool firmly. When the motor is running, hold the chain saw firmly by the front and rear handle using both hands. Use a tight grip with thumbs and fingers encircling the chain saw handles. NOTE: If a manual oil-regulator control is provided, additional or modified instructions regarding its use are to be provided.
b. Do not overreach.
c. Keep proper footing and balance at all times.
d. Do not let the nose of the guide bar contact a log, branch, ground or other obstruction.
e. Do not cut above shoulder height.
f. Use devices such as low kickback chain, guide bar nose guard, chain brakes and special guide bars to reduce the risks associated with kickback.
g. Only use replacement bars and chains specified by the manufacturer or the equivalent.
-
Power supply - Connect the chain saw to the correct voltage (i.e. make sure that the voltage supplied is the same as that specified on the name plate of the tool).
-
Intended/not intended use – This chain saw is only designed for the cutting of brushes, trunks or timber beams up to a diameter according to the guide bar length. It is only allowed to cut wood. This machine is not intended to be used for any other purpose. Furthermore, using this machine for professional tree cutting services is strictly forbidden. During operation of the chain saw, the user must wear personal protective equipment as instructed in the manual and follow the warning labels on the chain saw. Intended use of the chain saw is detailed in the manual. Please follow safety warnings. Everyone who either uses the chain saw or performs maintenance on it must be familiar with the instruction manual. Use only manufacturer's original or approved spare parts (e.g. guide bar, saw chain) and use only the allowed combinations of guide bar/saw chain specified in this manual.
The user, not the manufacturer, is completely liable for every accident that results from non-intended use of the tool or for injuries sustained as a result of an impermissible alteration of the machine.
The chain saw is only intended for outdoor use.
Residual Risks – Intended/Not Intended Use
Even when using the machine in accordance with its prescribed intended use, there always remains a residual risk, which cannot be prevented. According to the type and construction of the appliance, the following potential hazards may apply:
- Contact with exposed saw teeth of the saw chain (cutting hazards).
- Access to the rotating saw chain (cutting hazards).
- Unforeseen, abrupt movement of the guide bar (cutting hazards).
- Flung/dispersed parts from the work piece.
- Skin contact with the oil.
- Loss of hearing, if required ear protection is not used during work.
- There may be health risks caused by breathing in the wood dust, especially during the sawing of oak, beech and medium density fireboard.
Extension Cords
- Make sure your extension cord is in good condition. When using an extension cord, make sure to use one heavy enough to carry the current your product will draw. An undersized cord will cause a drop in line voltage, resulting in loss of power and overheating. Table 1 shows the correct size of cord to use depending on cord length and nameplate ampere rating. If in doubt, use the next heavier gauge. The smaller the gauge number, the heavier the cord.
- Ground Fault Circuit Interrupter (GFCI) protection should be provided on the circuits or outlets to be used for this electric chain saw. Receptacles are available having built-in GFCI protection and may be used for this measure of safety.
- Use only UL listed extension cords. Inspect extension cord before use and never use damaged or altered extension cords. Follow extension cord manufacturer safety instructions.
- To reduce the risk of the appliance cord disconnecting from the extension cord during operation, use the plug-receptacle retaining straps provided or make a knot with the two cords as shown in Table 2.
- Do not abuse the cord. Never use the cord to carry the tools or pull the plug from the outlet.
- Keep cord away from heat, oil, sharp edges, or moving parts. Replace damaged cords immediately. Damaged cords increase the risk of electrical shock.
Table 1. Minimum Recommended Extension Cord Gauge (AWG) Chart
| Volts | Total length of cord in feet | |||
| 120V | 25 | 50 | 100 | 150 |
| Ampere Rating | AWG(Extension Cord Gauge) | |||
| 1-5 | 18 | 16 | 16 | 14 |
| 6-10 | 18 | 16 | 14 | 12 |
| 10-12 | 14 | 14 | 14 | 12 |
| 12-16 | 14 | 12 | Not Recommended | |
Table 2. Method of Securing Extension Cord

(B) Connect plug and receptacle
General Safety Instructions for Chain Saw User
- It is important that this tool be protected by the use of a residual current device.
- Cluttered areas and benches can cause accidents.
- Read the following safety instruction manual before attempting to operate this device. Be aware of the tool's operation range and limitations as well as its dangers.
- When not in use, power tools must be stored in a dry place and locked up securely, out of the reach of children and unauthorized persons.
- When not in use, when transporting between work locations, or when carrying out any form of maintenance, the tool must be disconnected from the mains power and the saw guard must be fitted.
- Never allow the chain saw near your body or your clothing.
- When switching on the chain saw, make sure the chain is not touching anything.
- Do not start up or use the chain saw near people, animals, or obstructions.
- During operation, keep the tool a safe distance (at least 10 m) away from the above hazards.
- Always use both hands to operate the chain saw; place the right hand on the rear handle and the left hand on the front handle (see page 6 – Know Your Electric Chain Saw).
⚠ WARNING! Never attempt to operate 'left-handed' as serious personal injury may result.
- Stand in a safe and comfortable position with both feet firmly planted on a level and secure surface.
- Never carry the chain saw by the cable.
-
Keep the cable away from heat sources, oils, or sharp edges.
-
When sawing, do not use the chain saw above shoulder height.
- The operator is responsible for any accidents or hazards that may occur to other person or their belongings.
- Before starting the tool, verify that both the power cord and extension cord are clear of the cutting zone.
- Damaged cables must be replaced by an authorized service center before continuing work.
Lubrication System
• The chain is automatically lubricated.
- Use only new chain oil specifically formulated for chain saws.
⚠ WARNING! Never use wasted oil, low quality oil, or insufficient oil. This could damage the pump, the bar and the chain, and may result in serious personal injury.
- Check the oil level before each work session; refill if less than 14 full (12 ml).
- If the lubrication system does not work properly, check that the oil filter and oil-ways are clean and free from obstructions. If it is still not working, contact an authorized service center.
Safety Chain Brake
Kickback
Kickback is a phenomenon in which the tip of the saw flies quickly and uncontrollably upwards towards the operator. It happens with little or no warning and can occur when cutting with the blade tip, when the saw gets pinched in its cut, or when the saw contacts debris. The risk of kickback can never be completely eliminated, but it can be reduced by:
- Ensuring the work area is free of debris.
- Not allowing the chain to get pinched.
- Not cutting with the danger area at the tip of the saw (Fig. 1).
Fig. 1

In the event that kickback occur, use your left hand to apply the chain brake by moving the safety chain brake lever to position '0' (Fig. 2). This will immediately stop the chain.
The operation of the chain brake must be checked prior to each use.
⚠ WARNING! To reset the chain brake, disconnect the tool from the mains and snap the chain brake backwards (towards the operator) into position '1' (Fig. 2). Recheck the chain tension before restarting.
Fig. 2

Safety Symbols
The following table depicts and describes safety symbols that may appear on this product. Read, understand, and follow all instructions on the machine before attempting to assemble and operate.
| Symbol Symbol | |
 | SAFETY ALERT – Indicates a precaution, a warning or a danger. |
 | READ THE OPERATOR'S MANUAL(S) Read, understand and follow all instructions in the manual(s) before attempting to assemble and operate. |
 | WARNING! Keep out of rain and away from wet areas. |
 | For protection against injury, wear safety goggles and ear protection. |
  | Wear protective gloves and non-slip footwear when using the machine and handling debris. |
  | DANGER! ROTATING BLADES – Keep hands and feet from openings while the saw is running. |
 | SWITCH OFF! Remove plug from outlet immediately if the cord is damaged or cut. |
 | SWITCH OFF! Remove plug from outlet before cleaning or performing maintenance. |
  | Avoid contacting the guide bar tip with any object. Tip contact may cause the guide bar to move suddenly upward and backwards, which may cause serious injury to the user. |
  | Two hands are always to be used when operating the chain saw. |
 | Keep bystanders at a safe distance away from the work area. |
 | DOUBLE INSULATION – When servicing, use only identical replacement parts. |
Know Your Electric Chain Saw
Due to modern mass production techniques and product testing, it is unlikely that your power tool is faulty or that a part is missing. If you find a defect with the product, do not operate the tool until the parts have been replaced or the fault has been rectified. Failure to do so could result in serious personal injury.
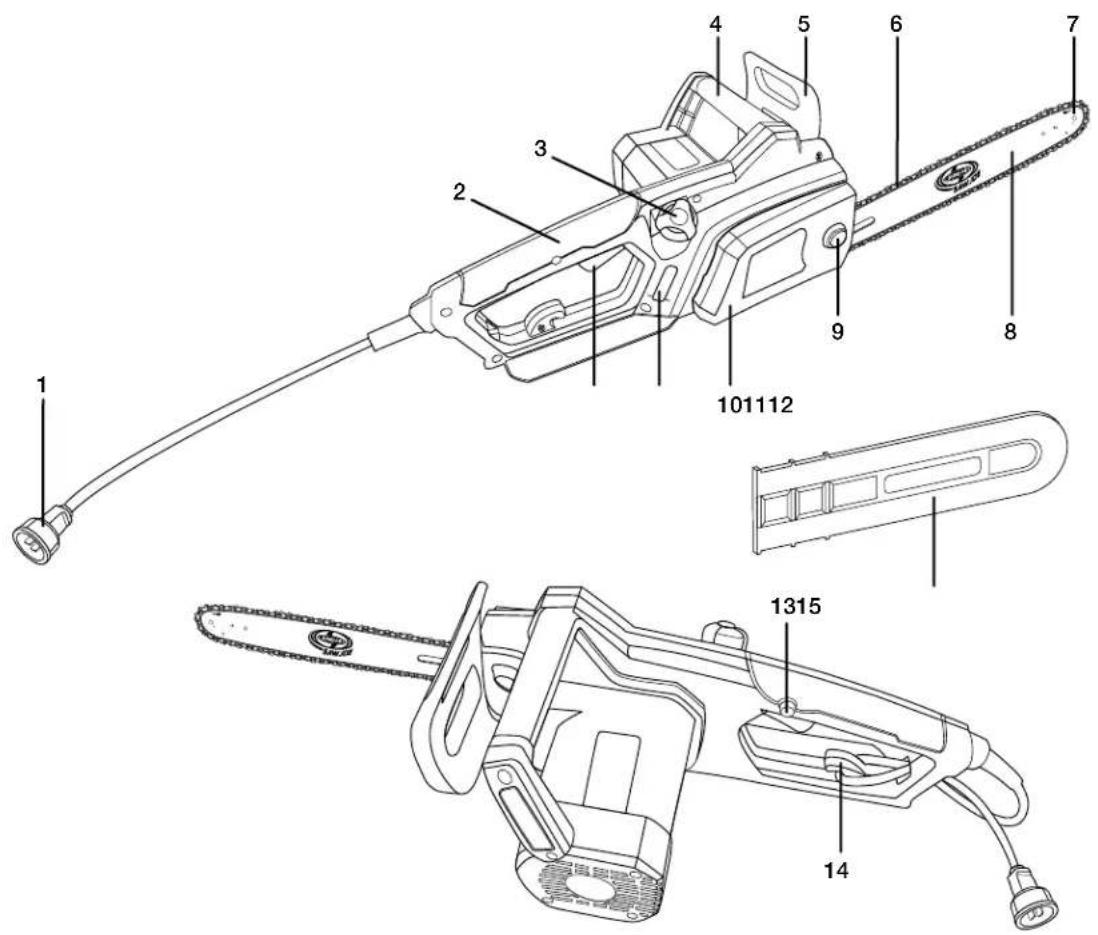
- Cable + Plug
- Rear handle
- Chain oil cap
- Front handle
-
Safety chain brake lever
-
Chain
- Nose sprocket
- Chain guide bar
- Lock knob
-
Chain cover plate
-
Oil outlet
- Main switch
- Instant safety lock-off button
- Cable hook
- Plastic blade guard
Technical Data
Rated Voltage 120 V \~ 60 Hz
Rated Power 14 amp
Bar Chain Length 18 in. (45.7 cm)
No Load Speed 8,000 rpm
Max. Cutting Thinkness 17 in. (43 cm)
LPA 79 dB(A)
LWA 109 dB(A)
Vibration Level 110 m/s
Oil Tank Capacity 90 ml
Weight 9.7 lbs (4.4 kg)
Bar and Chain Assembly
- Place the chain in the groove of the chain guide bar. Make sure to the correct placement and running direction as shown on the chain guide bar. (If chain is placed in the wrong direction it will not cut.)
- Place the chain around the drive socket and fit the fastening bolt into the opening slot on the chain guide bar. The chain tensioning peg fits into the hole on the chain guide bar. If needed, adjust the chain tensioning screw to bring the tensioning peg into alignment with the hole on the chain bar.
- Check that all parts are installed properly and are in alignment.
- Install the chain cover plate and tighten the locking knob.
Switch ON and OFF
- Connect the tool to an approved extension cord and outlet.
- Depress the safety lock-off button (13) while squeezing the main switch (12) shown on page 6.
- When you release the safety lock-off button, the tool will run continuously.
- Release the main switch to stop the tool.
Tensioning the Chain
- Using a screwdriver, adjust the tension of the chain by turning the tensioning peg screw clockwise or counterclockwise to achieve the proper tension.
- The correct tension is achieved when the chain in the middle of the bar can only be lifted approximately 3 - 4 mm.
General Cutting Suggestion
• FELLING
Felling is a term for cutting down a tree. Small trees up to 6 – 7 inches (15.2 – 17.8 cm) in diameter can usually be cut in a single cut. Large trees require notch cuts. Notch cuts determine the direction the tree will fall.
⚠ WARNING! An escape path (A) should be planned and cleared as necessary. The path should extend back and diagonally to the rear of the expected line of fall (Fig. 3).
⚠️CAUTION! If felling a tree on a sloping ground, the chain saw operator should remain on the uphill side of the terrain, as the tree is likely to roll or slide downhill after it is felled.
NOTE: The direction of fall (B) is controlled by the notching cut. Before any cuts are made, consider the location of the larger branches and the natural lean of the tree to determine the best direction in which the tree should be felled.
Fig. 3

⚠ WARNING! Do not cut down a tree during high winds or if there is a risk of property damage. Consult a tree-cutting service professional. Do not cut a tree if there is a risk of striking power or telephone cable lines.
Normally, felling consists of 2 main cutting operations: notching (C) and making the felling cut (D) as shown in Fig. 4. Start making the upper notch cut (C) on the tree facing the felling direction (E). Make sure you do not make the lower cut too deep into the trunk.
The notch (C) should be deep enough to create a hinge (F) of sufficient width and strength. The notch should be wide enough to direct the fall of the tree for as long as possible.
⚠ WARNING! Never walk in front of a tree that has been notched.
Make the felling cut (D) from the other side of the tree and 1.5 – 2.0 inches (3.8 – 5 cm) above the edge of the notch (C).
Fig. 4
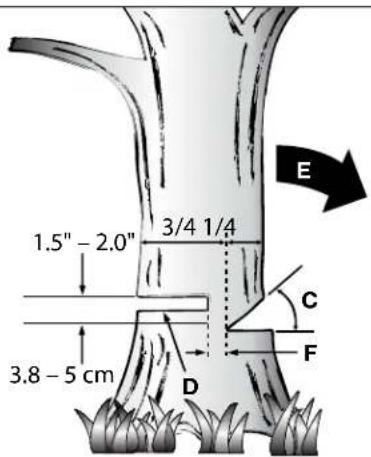
Never saw completely through the trunk. Always leave a hinge (F). The hinge guides the tree. If the trunk is completely cut through, control over the felling direction is lost. Insert a wedge or felling lever in the cut (D) well before the tree becomes unstable and starts to move. This will prevent the guide bar from binding in the felling cut if you have misjudged the fall direction. Make sure no bystanders have entered the range of the falling tree before you push it over.
⚠ WARNING! Before making the final cut, always recheck the area for bystanders, animals, and/or obstacles.
- Use wooden or plastic wedges (A) to prevent binding the bar or chain (B) in the cut (Fig. 5).
Fig. 5

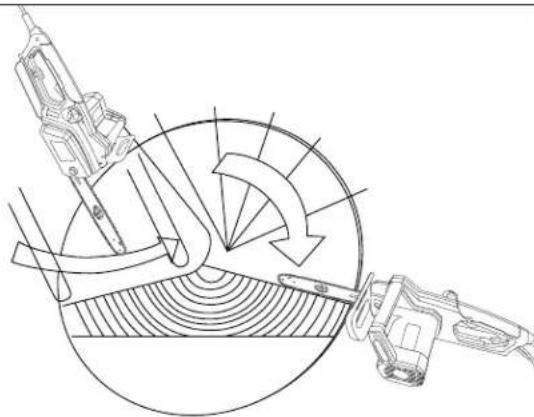
- When the diameter of the wood to be cut is greater than the bar length, make 2 cuts as shown (Fig. 6).
Fig. 6
natural_image
Technical line drawing of a mechanical device with rotating components and a circular base (no text or symbols)⚠ WARNING! As the felling cut (D) gets close to the hinge (F), the tree should begin to fall. Remove the saw from the cut, stop the engine, put the chain saw down, and leave the area by way of the retreat path (Fig. 4).
Limbing
Limbing a tree is the process of removing the branches from a fallen tree. Do not remove supporting limbs (Fig. 7). Branches under tension should be cut from the bottom up to avoid binding the chain saw.
⚠ WARNING! Never cut tree limbs while standing on the tree trunk.
Fig. 7

natural_image
Diagram of tree branches with arrows indicating movement or force, labeled 'A' at bottom (no text or symbols on main structure)Bucking
Bucking is the term used to cut a fallen log into lengths. Make sure that you have a good footing and stand uphill of the log when cutting on sloping ground. If possible, the log should be supported so that the end to be cut off is not resting on the ground. If the log is supported at both ends and you must cut in the middle, make a downward cut halfway through the log and then make the undercut. This will prevent the log from pinching the bar and chain. Make sure that the chain does not cut into the ground when bucking as this causes rapid dulling of the chain.
- Log supported along entire length: cut from the bottom (underbuck); be careful to avoid cutting into the ground (Fig. 8).
- Log supported on one end: proceed as if using a sawhorse. First, cut from the bottom (underbuck) 1/3 diameter of log to avoid splintering. Second, cut from above (overbuck) to meet the first cut and avoid pinching.
- Log supported on both ends: First, overbuck 1/3 diameter of log to avoid splintering. Second, underbuck to meet the first cut and avoid pinching (Fig. 9).
Fig. 8

natural_image
Diagram of a wooden log being cut with an arrow indicating the direction (no text or symbols present)Fig. 9

NOTE: The best way to hold a log while bucking is to use a sawhorse. When this is not possible, the log should be raised and supported by limb stumps or by using supporting logs. Make sure the log to be cut is securely supported.
Bucking Using a Sawhorse (Fig. 10)
a. Hold the saw firmly with both hands and keep the saw to the right of your body while cutting.
b. Keep your left arm as straight as possible.
c. Keep your weight on both feet.

Maintenance
The following suggestions pertain to the daily maintenance of the chain saw. In the event of tool failure, contact an authorized service center.
- Ensure that the electric power cord is not damaged.
- Ensure that the motor and cooling slots are unobstructed.
- If there is a reduction in motor power, the carbon brushes may need to be replaced.
- Check that there is sufficient oil.
- Clean the chain brake and ensure that it works properly.
-
Check the bar wears.
-
Ensure that the oil-ways are unobstructed.
- Clean the chain guide on the bar.
- Check the chain tension, sharpen the blades, and check their condition.
- Check the guide bar sprocket.
- Ensure that the oil reservoir and the oil filter are clean. This chain saw meets all legislation requirements. In order to avoid injuries, all repairs are to be done by qualified staff at an authorized service facility.
Chain Sharpening
It is highly recommended to replace the chain once it loses its ability to cut cleanly and safely. It is possible, however, to sharpen the existing chain if the sharpening is carefully performed. To sharpen the chain, refer to Fig. 11 below and proceed as follows:
- Disconnect the tool from the mains supply.
- Don protective gloves.
- Ensure that the chain has sufficient tension.
- Engage the chain brake to lock the chain on the bar.
- Use a round file whose diameter is 1.1 times the cutting tooth depth.
- File at an angle perpendicular to the bar and 38irc to the direction of travel.
- File each tooth from the inside towards the outside only.
- Sharpen each tooth equally by using the same number of strokes.
- Check the safety depth gauge height every 5-chain sharpenings.
- If the depth gauges are also trimmed, it is essential that the original profile be restored.
- Use a depth gauge measuring instrument to check the height of the depth gauge. Depth gauge measuring jigs are available from most reputable tool merchants.

Troubleshooting
| Problem Suggested Remedy | Cause | |
| Motor does not run | No electricity | Check socket, cables, and plugs Damaged cable: have it repaired by an authorized service agent Do not patch cables with insulation tape Damaged switch: have it repaired by an authorized service agent See section on chain brake |
| Worn carbon brushes | Carbon brushes need replacing | |
| Chain does not move | Chain brake | Check the chain brake and release if necessary |
| Poor cutting performance | Blunt saw chain | Sharpen or replace the saw chain |
| Chain tension | Check chain tension | |
| Saw chain fitted incorrectly | Check saw chain | |
| Chain jumps off guide bar | Chain tension | Check chain tension |
| Chain works with difficulty | Chain tension | Check chain tension |
| Chain becomes hot | Chain lubricant | Check oil level. Check chain lubrication |
Service and Support
If your electric chain saw requires service or maintenance, please call 1-866-766-9563 for assistance.
Model and Serial Numbers
When contacting the company or reordering parts, you will need to provide the model and serial numbers of your product. These are found at the bottom of your electric chain saw. Copy these numbers into the space provided below.

NOTES

A Two-Year Full Warranty for residential use in the United States and Canada

General Conditions:
Snow Joe ® , LLC warrants this product to the original purchaser for two years against defects in material or workmanship when used for normal residential purposes. Snow Joe ® , LLC will repair any defect in material or workmanship, and repair or replace any defective part, subject to the conditions, limitations, and exclusions set forth herein. Such repair or parts replacement will be free from charge to the original purchaser except noted below.
The duration of the warranty applies only if the product is put to personal use around the household or residence. If the product is put to any business use, commercial or industrial, then the duration of this warranty is 90 days from the date of original purchase. If any product is rented or leased, the duration of the warranty is 90 days from the date of original purchase.
It is the owner's responsibility to perform correctly all maintenance, and minor adjustments explained in the owner's manual.
Electric Products:
To obtain a replacement electric powered unit or repair the existing electric powered unit, you must return the complete unit and postage prepaid to: Snow Joe Return Center, 86 Executive Avenue, Edison, NJ 08817.
Gasoline / Battery Products:
Limitations
- Batteries are warranted only for the period of 12 months after the date of purchase on a prorated basis. Rechargeable batteries will be replaced free from charge during the first 90 days. After the initial 90 days, batteries will be replaced at a prorated cost to the customer.
- Idlers, cables, and electrical components are warranted to the original purchaser for use at household or residence for a period of two years.
Exclusions
- Snow Joe® brand engines are covered under this warranty. All other engines and engine accessories are covered only by the engine manufacturer's warranty and are not covered by this warranty.
- Parts used that are not genuine Snow Joe® parts are not covered by this warranty.
- Damages resulting from misuse, alteration, improper assembly, improper adjustment, neglect, or accident which requires repair is not covered under this warranty.
- Belts, augers, and tines are not covered under warranty – belts, augers, and tines wear out and can be purchased at www.snowjoe.com or by calling 1-866-766-9563.
Snow Joe ® , LLC may from time to time change the design of its products. Nothing contained in this warranty shall be construed as obligating Snow Joe ® , LLC to incorporate such design changes into previously manufactured products, nor shall such changes be construed as an admission that previous designs were defective.
This warranty is intended to cover product defects only. Snow Joe ® , LLC is not liable for indirect, incidental, or consequential damages in connection with the use of the Snow Joe ® Products covered by this warranty. This warranty does not cover any cost or expense incurred by the purchaser in providing substitute equipment or service during reasonable periods of malfunction or non-use of this product, while waiting for completion of repairs under this warranty. Some states do not allow exclusions of incidental or consequential damages, so the above exclusions may not apply in all states. This warranty may give you specific legal rights in your state.
If you wish to contact Snow Joe ® , please direct inquiries to the:
Customer Service Department
Snow Joe Center
86 Executive Avenue
Edison, NJ 08817
Customers who have purchased Snow Joe ® products exported from the United States and Canada should contact their Snow Joe ® Distributor (Dealer) to obtain information applicable for your country, province, or state. If for any reason, you are not satisfied with the distributor's service, or if you have difficulty obtaining warranty information, contact your Snow Joe ® seller. If in the event your efforts are unsatisfactory, please write to the Snow Joe ® Center at the above address.
If you have any questions about your product warranty, please call 1-866-SNOW-JOE or visit us online at www.snowjoe.com.

- All Operators Must Read These Instructions Before Use
- General Power Tool Safety Warnings ⚠ WARNING!
- Read all safety warnings and
- Safety Rules
- Residual Risks – Intended/Not Intended Use
- Extension Cords
- General Safety Instructions for Chain Saw User
- Lubrication System
- Safety Chain Brake
- Kickback
- Safety Symbols
- Know Your Electric Chain Saw
- Technical Data
- Bar and Chain Assembly
- Switch ON and OFF
- Tensioning the Chain
- General Cutting Suggestion
- Limbing
- Bucking
- Bucking Using a Sawhorse (Fig. 10)
- Maintenance
- Chain Sharpening
- Service and Support
- Model and Serial Numbers
- NOTES
- A Two-Year Full Warranty for residential use in the United States and Canada
- General Conditions:
- Electric Products:
- Gasoline / Battery Products:
- Limitations
- Exclusions
Brand : Snow Joe
Model : Saw SWJ701E
Category : Saw