
SpeechExec 7 - Speech Recognition Software PHILIPS - Free user manual and instructions
Find the device manual for free SpeechExec 7 PHILIPS in PDF.


| Product Type | Speech Recognition Software |
| Brand | Philips |
| Model | SpeechExec 7 |
| Version | 7.0 |
| Compatible Operating Systems | Windows 10, Windows 11 |
| Main Functions | Dictation, transcription, voice commands, speech-to-text, vocabulary customization |
| Supported Languages | Multiple languages including English, German, French, Spanish, Dutch |
| Installation Method | Download or CD-ROM |
| Storage Space Required | Approximately 1 GB free hard disk space |
| RAM Requirement | Minimum 2 GB RAM |
| Processor Requirement | Intel Core i3 or equivalent |
| Microphone Compatibility | Supports Philips microphones and other USB microphones |
| Integration | Compatible with Microsoft Word, Outlook, and other applications |
| Maintenance & Cleaning | Regularly update the software and vocabulary database for best accuracy |
| Safety | Standard software safety; ensure downloads from official sources |
| Spare Parts & Repairability | Not applicable (software); license key can be retrieved from account |
| General Information | Digital download; user manual included |
Frequently Asked Questions - SpeechExec 7 PHILIPS
User questions about SpeechExec 7 PHILIPS
0 question about this device. Answer the ones you know or ask your own.
Ask a new question about this device
Download the instructions for your Speech Recognition Software in PDF format for free! Find your manual SpeechExec 7 - PHILIPS and take your electronic device back in hand. On this page are published all the documents necessary for the use of your device. SpeechExec 7 by PHILIPS.
USER MANUAL SpeechExec 7 PHILIPS
2.2 Overview SpeechExec recorder and player window (expanded mode) 8
3 Get started 10
3.1 System requirements 10
3.2 Install the software 10
3.3 Start SpeechExec dictation software 10
3.3.1 Create a SpeechExec user profile 10
3.3.2 SpeechExec help 11
4 Use SpeechExec 12
4.1 Download recordings from a dictation recorder 12
4.2 PRO Create a recording 12
4.3 Playback a recorded file 13
4.3.1 Playback using the SpeechMike or Pocket Memo 13
4.3.2 Playback in the recorder window 14
4.3.3 Playback in the worklist window 14
4.4 PRO Edit a previously recorded file 14
4.5 PRO Finish, suspend or cancel a recording 14
4.6 PRO Record an instruction 15
4.6.1 PRO Record a spoken instruction 15
4.6.2 PRO Record a special instruction 15
4.7 Delete 15
4.7.1 PRO Delete part of a dictation file 15
4.7.2 Delete a dictation file 16
5 Use more of SpeechExec 17
5.1 Settings menu 17
5.2 Pocket Memo Configuration Wizard 17
5.3 Configure the download process from the Pocket Memo 17
5.4 PRO SpeechMike Configuration Wizard 18
5.5 PRO Speech recognition functions 18
5.5.1 PRO System requirements for speech recognition 18
5.5.2 PRO Setting up speech recognition 18
5.5.3 PRO Using speech recognition 19
5.5.4 PRO Playback and correction of transcribed recordings 20
5.6 Send dictation files by email or to an FTP server 20
5.6.1 Set up an email profile 21
5.6.2 Set up an FTP profile 21
5.6.3 Manually send dictation files via email or to an FTP server 21
5.6.4 Automatically send dictation files via email or to an FTP server 21
5.6.5 Send and receive automatically 22
6 Frequently asked questions 23
1 Important
This manual covers the basic installation of the SpeechExec software and its related use with the SpeechMike and Digital Pocket Memo dictation hardware.
Not all devices mentioned in this manual are necessarily part of the package contents. Descriptions of devices and accessories are for information only and do not require Philips to deliver any of these accessories with this package.

Note
If a topic begins with this icon PRO, the described feature is available to users of SpeechExec Pro Dictate only.

Tip
For more information about using the SpeechExec software, see the help function (press F1 on the keyboard).
Philips reserves the right to change products at any time without being obliged to adjust earlier supplies accordingly.
The material in this manual is believed adequate for the intended use of the system. If the product, or its individual modules or procedures, are used for purposes other than those specified herein, confirmation of their validity and suitability must be obtained.
Safety
- To avoid a short circuit, do not expose the product to rain or water.
- Do not expose the device to excessive heat caused by heating equipment or direct sunlight.
- Protect the cables from being pinched, particularly at plugs and the point where they exit from the unit.
• All wireless devices may be susceptible to
interference, which could affect performance.
- Back up your files. Philips is not responsible for any loss of data.
Hearing safety
Observe the following guidelines when using your headphones:
- Listen at reasonable volumes for reasonable periods of time.
- Be careful not to adjust the volume higher as your hearing adapts.
- Do not turn up the volume so high that you can't hear what's around you.
- You should use caution or temporarily discontinue use in potentially hazardous situations.
- Do not use headphones while operating a motorized vehicle, cycling, or skateboarding, etc. It may create a traffic hazard and is illegal in many areas.
Important (for models supplied with headphones):
Philips guarantees compliance with the maximum sound power of its audio players as determined by relevant regulatory bodies, but only with the original model of provided headphones. If these headphones need replacement, we recommend that you contact your retailer to order a Philips model identical to that of the original.
Small children
Your device and its enhancements may contain small parts. Keep them out of the reach of small children.
Cleaning and disinfection
• Unplug the device before cleaning.
- Use a soft cloth, if necessary dampened with a minimum amount of water or diluted mild soap, to clean the product.
- Products for disinfection of surfaces in clinical areas and patient care equipment, such as
surface disinfectant wipes, can be used to clean the device.
• Do not use harsh chemicals or strong detergents.
- Do not rub or strike the surface with anything hard as this may scratch or damage the surface permanently.
Disposal of your old product

- Your product is designed and manufactured with high quality materials and components that can be recycled and re-used.
- When this crossed-out wheeled bin symbol is attached to a product, it indicates that the product is covered by the European Directive 2002/96/EC.
- Become informed about your local separate collection system for electrical and electronic products.
- Act according to your local rules and do not dispose of old products with normal household waste. The correct disposal of old products will help prevent potential negative consequences for the environment and human health.
- Batteries (including built-in rechargeable batteries) contain substances that may pollute the environment. All batteries should be disposed of at an official collection point.
2 Your SpeechExec dictation software
Congratulations on your purchase and welcome to Philips!
To fully benefit from the service that Philips offers, visit our Website for support information such as user manuals, software downloads, warranty information and more: www.philips.com/dictation.
2.1 Overview SpeechExec work list window
The work list allows you to manage the dictation file list, define dictation properties and change various settings.
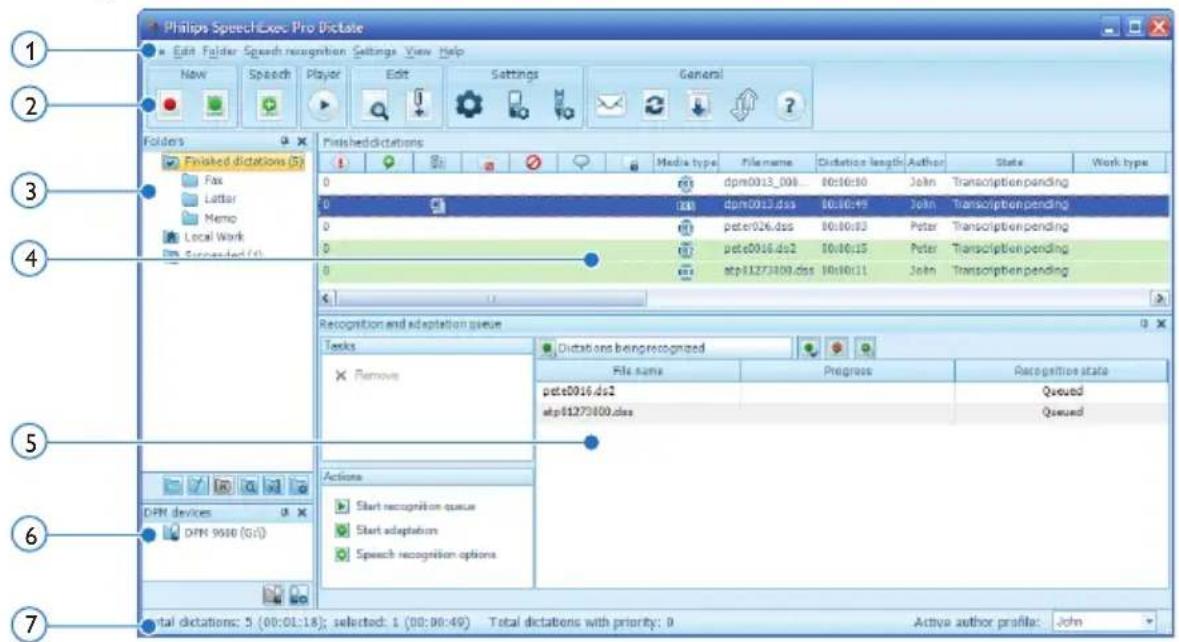
① The menu bar across the top organizes commands under menus.
② The toolbar contains tools for creating, playing and editing dictation files. Related tools are grouped together.
PRO Create a new dictation file
PRO Create a new dictation file for speech recognition
PRO Add to speech recognition queue
Open the selected dictation file in the SpeechExec player window
Start/stop playback of the selected dictation file
Displays the dictation properties of a file
PRO Attach a document
Display the General settings window
Display the settings window for a connected Philips Pocket Memo digital recorder
PRO Display the settings window for a connected Philips SpeechMike microphone
Create a new email message with the selected dictation file attached
2 Refresh the information displayed in the work list
Start downloading from a connected Philips Pocket Memo digital recorder to a PC
PRO Send and receive emails with dictations via a connected email system
Send emails with dictations via a connected email system
? Open the help function
Note
To customize the toobar, click Settings > General Settings on the menu bar and select Worklist > Toolbar. Select the icon you wish to add from the left column and click the Add item button.
③ The folder list displays the folder structure. The structure depends on personal or pre-configured settings. Click the plus sign at the left of a folder to expand the tree and display a folder's sub-folders.
④ The dictation file list displays information about the dictation files stored in the selected folder. The columns display the properties of the dictation files. Change the focus between the tree view and the dictation list view by clicking inside each pane.
⑤ PRO The recognition and adaptation queue panel displays information about dictation files submitted for offline speech recognition. See 5.5 Speech recognition functions on page 18 for more information.
⑥ Digital Pocket Memo device display: The Digital Pocket Memo display appears when a Digital Pocket Memo is connected. It allows users to display and play back dictation files stored on the Digital Pocket Memo, and to configure settings on the connected device.
⑦ The status bar at the bottom of the window displays information on dictation management such as the number of dictation files in the selected folder, the number of dictation files with priority status assigned, and the name and role of the current user.
Paul ▼ PRO Active author profile: Select the author profile from the drop-down list
2.2 Overview SpeechExec recorder and player window (expanded mode)
The recorder/player module is a desktop window that allows the user to record and playback sound files.
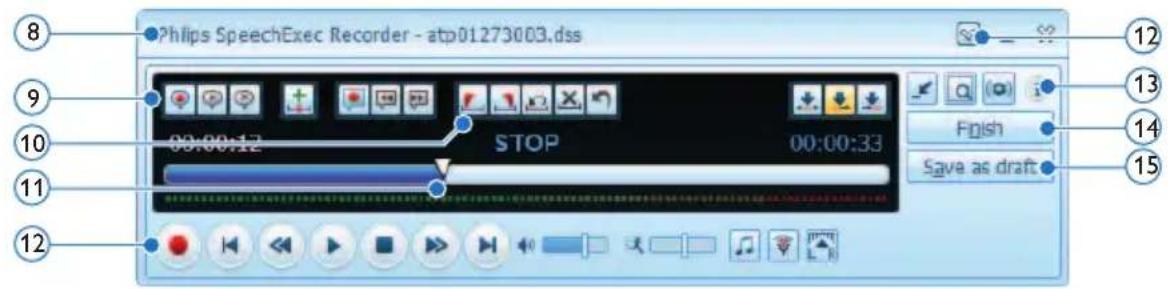
⑧ The title bar displays the file name.
⑨ Instructions are recorded comments by the author that are directed to the person transcribing the dictation file. See 4.6 Record an instruction on page 15 for more information.
PRO Record a special instruction
PRO Play back special instruction
PRO Delete a special instruction
+ PRO Insert an index mark
PRO Record a spoken instruction
Jump to the previous spoken instruction
Jump to the next spoken instruction
10 Control and positioning buttons:
PRO Mark the beginning of a section to be deleted
PRO Mark the end of a section to be deleted
PRO Remove the deletion marks
X PRO Delete a marked section
PRO Undo the last deletion
PRO Switches between Insert, Overwrite and Append modes
⑪ Position slider: Displays file information such as file length and the current position in the sound file during recording or playback. The length of the recording is displayed in HH:MM:SS (hours:minutes:seconds) above the slider.
12 Audio toolbar:
PRO Start/stop recording
Start/pause playback
Stop the current action (recording, playback)
Jump to the beginning of the dictation
Fast rewind
Fast forward
Jump to the end of the dictation
Adjusts playback volume
Adjusts playback speed
Adjusts the playback tone
PRO Adjusts the record volume Adjusts the playback balance
12 Show/hide the menu bar
13 Switch player window between compact and expanded mode
Displays the dictation properties dialog Displays the audio settings dialog Opens the help function
14 √ PRO Finish: Close the dictation file and mark it as finished. The dictation file is moved to the Finished dictations folder.
15 PRO Save as draft: Close the dictation file and mark it as suspended, meaning that work on the dictation file is interrupted temporarily and will be continued at a later time. The dictation file is saved in the Suspended folder.
3 Get started
3.1 System requirements
- Pentium III, 500MHz and 512 MB RAM; Recommended: Pentium IV or similar, 1 GHz and 1 GB RAM
• 100 MB hard disk space for SpeechExec, 250 MB for Microsoft .NET Framework
• One free USB port - Recommended minimum transfer rate for LAN: 100 Mbit/s
• Windows 7, Windows Vista, Windows XP

Note
For all operating systems, it is recommended that the latest service pack available be installed before installing SpeechExec.
3.2 Install the software

Important
- Administrator rights are required to install the software. For more help, contact your administrator.
- For installation of SpeechExec, a license key is required. The license key can be found on the DVD envelope.
1 Turn on the computer.
2 Insert the installation DVD in the DVD-ROM drive. The set-up program should start automatically. If it does not, open the DVD contents in Windows Explorer and double-click the autorun.exe file.
3 Click the Install button.
4 Follow the on-screen instructions of the set-up program.
3.3 Start SpeechExec dictation software If the option to start SpeechExec automatically was selected in the settings menu, open the program by clicking the 🔊 icon in the notification area of the Windows task bar. To manually start the program, open the Windows start menu in Windows and select Programs > SpeechExec (Pro) Dictate.
3.3.1 Create a SpeechExec user profile
When using SpeechExec for the first time, a wizard guides you through the step-by-step configuration process to create a new user profile and configure your initial key settings.
Follow the on-screen instructions to:
- specify an author name that will be used to identify your dictations
• define the name and the (network) path where your finished dictations will be stored - set the default Work type (letter, memo, fax or report) assigned to new dictations.
- start another wizard to configure a Digital Pocket Memo. See 5.2 Pocket Memo Configuration Wizard on page 17 for more information.
Important
If you wish to use the speech recognition features of SpeechExec and have already created a user profile in Dragon NaturallySpeaking, use the same name for your SpeechExec author name. See 5.5 Speech recognition functions on page 18 for more information.

Note
It is possible to change these settings later using the Settings menu. See 5.1 Settings menu on page 17 for more information.

Tip
If working in a network, select a folder on a mapped network drive to store finished dictations. Transcriptionists will then be able to access the folder and map their pending folders to your finished dictations folder.
3.3.2 SpeechExec help
For detailed information about using the SpeechExec software, see the help function. To start the help function:
- Press F1 on the keyboard
- Click the? button on the toolbar in the worklist or recorder window.
4 Use SpeechExec
Philips hardware devices are designed for compatibility with SpeechExec and can also be used to control the SpeechExec program. For detailed information, refer to the documentation delivered with the device.
4.1 Download recordings from a dictation recorder
Use Philips SpeechExec software for automatic download, conversion and routing of files recorded with a Pocket Memo dictation recorder.
1 Make a recording with the dictation recorder.
2 Start SpeechExec.
3 Connect the Pocket Memo recorder to the PC using the USB cable or the optional USB docking station.
4 By default, the recordings on the recorder will be downloaded automatically to the PC and moved to the Finished dictations folder of the work list.

Tip
How and which files are downloaded after a recorder is connected can be configured in the settings menu of SpeechExec or with the Configuration Wizard. See 5.3 Configure the download process from the Pocket Memo on page 17 for more information.

Note
When the recorder is connected to the PC for the first time, Windows detects the new hardware and automatically installs the required drivers. When the installation is complete, Windows may prompt you to restart the PC.
4.2 PRO Create a recording
SpeechExec can be controlled during recording using a Philips SpeechMike dictation microphone, a Philips Pocket Memo dictation recorder, or by clicking the toolbar buttons.
1 Start SpeechExec dictation software.
When using a SpeechMike with push buttons:
2 Press the RECORD key to create a new recording and enter Record standby mode.
• The recorder window is displayed.
- The record indicator light flashes red (in overwrite mode) or green (in insert and append mode).
3 Press the ▶ II key and start speaking.
The record indicator light glows in red (in overwrite mode) or green (in insert and append mode) while recording.
4 For short pauses, press the ▶ ll key. To continue recording, press the ▶ ll key again.
5 To stop recording, press the RECORD key.
When using a SpeechMike or Pocket Memo with slide switch (Rec, Stop, Play, Rewind):
2 Move the slide switch to the REC position to create a new recording and start speaking.
• The recorder window is displayed.
- The record indicator light glows in red (in overwrite mode) or green (in insert and append mode) while recording.
3 To stop recording, move the slide switch to the STOP position.
When using a SpeechMike or Pocket Memo with slide switch (Forward, Stop, Play, Rewind):
2 Press the RECORD key to create a new recording and enter Record standby mode.
• The recorder window is displayed.
- The record indicator light flashes red (in overwrite mode) or green (in insert and append mode).
3 Move the slide switch to the PLAY position and start speaking.
The record indicator light glows in red (in overwrite mode) or green (in insert and append mode) while recording.
4 For short pauses, move the slide switch to the STOP position. To continue recording, move the slide switch back into the PLAY position.
5 To stop recording, move the slide switch to the STOP position and press the RECORD key.
6 Press the EOL/• PRIO key to mark the recording as finished.
- The dictation file is moved to the Finished dictations folder.
- The recorder window closes and the work list window is displayed.
7 To assign priority status to the recording, press the • EOL/• • PRIO key again within half a second.

Note
- For best results, speak clearly and keep the microphone about 10 to 15 centimeters (4 to 6 inches) away from your mouth.
- During recording, the on-screen view remains on the recorder window, while the SpeechExec window may be visible in the background. The SpeechExec window does not accept user input until recording is finished, canceled or suspended.

Tip
- Click the button on in the recorder window to adjust the recording volume.
- Use 'Push-To-Dictate' recording to start recording immediately when pressing the RECORD key on the SpeechMike. When releasing the RECORD key, recording will stop. 'Push-To-Dictate' can be enabled in the Settings menu of the SpeechExec Recorder window (under Audio Settings > Recording).
4.3 Playback a recorded file
Various playback functions can be controlled by the SpeechMike, the Pocket Memo or the toolbar buttons in the recorder window or worklist window.
4.3.1 Playback using the SpeechMike or Pocket Memo
1 Double-click the dictation file in the work list or select a dictation file. The dictation file is opened in the recorder window.
When using a SpeechMike with push buttons:
2 To rewind, press and hold the ◀ key on the SpeechMike. When rewinding reaches the desired position, release the ◀ key.
3 To fast forward, press and hold the ▶ key on the SpeechMike. When forwarding reaches the desired position, release the ▶ key.
4 To start playback, press the ▶ II key on the SpeechMike. To stop playback, press the ▶ II key again.
When using a SpeechMike or Pocket Memo with slide switch (Rec, Stop, Play, Rewind):
2 To rewind, move the slide switch to the ◀ position. When rewinding reaches the desired position, move the slide switch to the PLAY position.
3 To fast forward, move the slide switch to the ▶ position. When forwarding reaches the desired position, move the slide switch to the STOP position.
4 To start playback, move the slide switch to the PLAY position. To stop playback, move the slide switch to the STOP position.
When using a SpeechMike or Pocket Memo with slide switch (Forward, Stop, Play, Rewind):
2 To rewind, move the slide switch to the ◀ position. When rewinding reaches the desired position, move the slide switch to the PLAY position.
3 To fast forward, press and hold the ▶ or FORWARD key. When forwarding reaches the desired position, release the ▶/ FORWARD key.
4 To start playback, move the slide switch to the PLAY position. To stop playback, move the slide switch to the STOP position.
4.3.2 Playback in the recorder window
1 Double-click the dictation file in the work list.
The dictation file is opened in the recorder window.
2 To rewind, click the button on the player toolbar. When rewinding reaches the desired position, click the PLAY/PAUSE button on the player toolbar.
3 To fast forward, click the button on the player toolbar. When forwarding reaches the desired position, click the PLAY/PAUSE button on the player toolbar.
4 To start playback, click the ▶ PLAY/PAUSE button on the player toolbar. To stop playback, click again the ▶ PLAY/PAUSE button on the player toolbar.
4.3.3 Playback in the worklist window
1 Select a dictation file and click the PLAY/PAUSE button on the worklist toolbar to start/stop playback.
4.4 PRO Edit a previously recorded file
A previously recorded file can be edited if transcription has not begun. You can edit a file by inserting an additional portion, overwriting part of the recording or appending a recording at the end of the file.
1 Double-click the dictation file in the work list or select a dictation file.
The dictation file is opened in the recorder window.
2 Set the desired edit mode (insert or overwrite) before starting recording. To switch between insert and overwrite modes, press the INS/OVR key on the SpeechMike or Pocket Memo while stopped or click on the ↓ button on the toolbar in the recorder window.
3 Play, forward or rewind to the position where the insertion should be made.
4 Start recording. See 4.2PRO Create a recording on page 12 for more information about recording.
4.5 PRO Finish, suspend or cancel a recording
To mark a recording as finished, press the • EOL/• • PRIO key on the SpeechMike or click on the √ FINISH button in the recorder window. The dictation file is moved to the Finished dictations folder. SpeechExec offers additional options for finished dictations, such as conversion to a pre-defined format, sending via email, uploading to an FTP server or copying to the backup folder.
Alternatively, a recording can be marked as suspended by clicking on the SAVE AS DRAFT button in the recorder window. Mark a recording as suspended to temporarily interrupt recording and finish it later. The recording is saved in the Suspended folder.
Clicking the ✗ CLOSE button in the recorder window cancels the recording without saving it.
4.6 PRO Record an instruction
Instructions are recorded comments by the author that are directed to the person transcribing the dictation. SpeechExec supports two types of instructions:
- Spoken instructions are stored within the dictation sound file at the position where the instruction was actually recorded. (Examples of spoken instructions might include the correct spelling of a name or technical term or instructions to insert a new paragraph.)
- Special instructions are usually recorded at the start of a dictation with special information relating to the dictation. Special instructions are stored in a separate sound file. (Examples of special instructions might include document formatting instructions, names of individuals to receive copies, or delivery instructions.)
4.6.1 PRO Record a spoken instruction
1 The current dictation status must be RECORD.
2 To add a spoken instruction:
- Click the button in the SpeechExec recorder window.
- Press and hold the -i-key on the SpeechMike with slide switch operation.
- Press and hold the ANS/OVR key on the SpeechMike with push button operation.
- Press the right SMART BUTTON on the Pocket Memo.
3 Dictate the instruction. The instruction will be recorded into the dictation file without overwriting your dictation.
4 Click the button again or release the button on the SpeechMike when the spoken instruction is complete. The spoken instruction is displayed as a white bar in the position slider.

5 Continue or stop recording.
Note
A spoken instruction can be deleted just like any other part of a dictation file by deleting the section of the recording that includes one or more spoken instructions (see 4.7.1 Delete part of a dictation file on page 15 for more information) or by recording over the spoken instruction (see 4.4 PRO Edit a previously recorded file on page 14 for more information about the overwrite recording mode).
4.6.2 PRO Record a special instruction
1 Click the button in the recorder window.
2 Dictate the special instruction. Special instructions are stored in a separate sound file and attached to the dictation.
3 Click the button again in the recorder window when the special instruction is complete.
4 Click the button in the recorder window to play back the special instruction.
5 Click the ✗ button in the recorder window to delete the special instruction.
4.7 Delete
4.7.1 PRO Delete part of a dictation file
Follow these steps to delete a section from a dictation file:
1 Navigate to the beginning of the section to be deleted by playback or fast forward/fast rewind.
2 Click the button in the recorder window.
3 Navigate to the end of the section to be deleted.
4 Click the button in the recorder window. The section is marked with a red frame in the position slider.
5 Click the ✗ button in the recorder window to delete the section or click the 🔍 button to remove the deletion marks (the red frame) without deleting the section.
6 Click the button to undo the last deletion.
4.7.2 Delete a dictation file
Follow these steps to delete a dictation file entirely:
1 Select the dictation files to be deleted in the work list. To select more than one file, press and hold SHIFT on the keyboard and click on the files to be selected.
2 Click on Edit > Delete on the menu bar or press the DELETE key on the keyboard to delete the selected dictation files.
5 Use more of SpeechExec
5.1 Settings menu
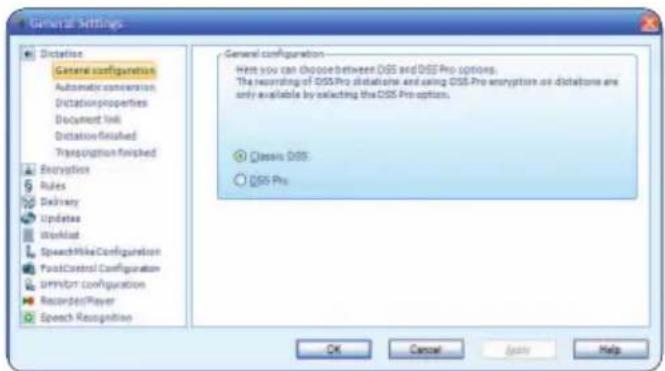
The General Settings dialog allows personalization of a variety of application settings such as dictation options, encryption, user profiles, delivery rules, software updates and work list options. It also allows the configuration of a SpeechMike as well as a foot control, Digital Pocket Memo or Digital Desktop and recorder/player settings.
1 Click Settings > General Settings on the menu bar to open the settings menu. The left pane contains the list of the available settings.
2 Select an option in the list to display the associated options on the right pane.
3 Click Apply to save the changes or click OK to save the settings and close the dialog.
Important
All or some of the settings can be pre-configured and locked by your system administrator. Locked settings are read-only.
5.2 Pocket Memo Configuration Wizard
The Pocket Memo Configuration Wizard guides users through the device configurations and settings of their Pocket Memo. The wizard assists users in configuring the time format, sound feedback, voice-activated recording, display appearance (standard or advanced display mode), the recording format, microphone sensitivity, author names, and settings for file download to the PC.
1 Connect the Pocket Memo to the PC using a USB cable.
2 Start Philips SpeechExec Dictate software.
3 Click Settings > General Settings on the menu bar of SpeechExec to open the settings menu and select DPM/DT Configuration > DPM Wizard from the list on the left side.
4 Click the Start Wizard... button to open the wizard. Follow the on-screen instructions to customize the Pocket Memo.
5 Click the Finish button to close the wizard and confirm the transfer of the new settings to the Pocket Memo.
5.3 Configure the download process from the Pocket Memo
How and which files are downloaded after a Pocket Memo is connected can be configured in the settings menu or the Configuration Wizard.
1 Connect the Digital Pocket Memo to the PC using the USB cable.
2 Click Settings > General Settings on the menu bar, select DPM/DT Configuration > DPM Settings from the list on the left side.
3 Click the Start... button. The DPM configuration dialog is displayed in a new window.
4 Select Download in the left pane.
5 Select which files will be downloaded (download file type):
- All files
• EOL (recordings marked as finished/end-of-letter)
- File selection (SpeechExec prompts the selection of specific files to be downloaded)
- File with keyword 1 (specify a keyword)
6 The download settings also allow the user to specify if files will be deleted on the Pocket Memo after they are downloaded.
7 ClickOK to save the settings and confirm the transfer of the new settings to the Pocket Memo.
5.4 PRO SpeechMike Configuration Wizard
The SpeechMike Configuration Wizard guides users through the device configurations and settings of their SpeechMike.
1 Connect the SpeechMike to the PC.
2 Start Philips SpeechExec Dictate software.
3 Click Settings > General Settings on the menu bar of SpeechExec to open the settings menu and select SpeechMike Configuration > Configuration Wizard from the list on the left side.
4 Click the Start Wizard... button to open the wizard. Follow the on-screen instructions to customize the SpeechMike.
5 Click the Finish button to close the wizard and save the new settings.
5.5 PRO Speech recognition functions
SpeechExec Pro handles the complete dictation and transcription workflow including the integration of Dragon NaturallySpeaking speech recognition, allowing the user to control the entire process from dictation, speech recognition and correction to the final text document in SpeechExec.
Important
To activate the speech recognition functions, an additional SpeechExec license is required. For more information about upgrading, contact your local Philips dealer.
If you have already purchased a speech recognition license for SpeechExec, click on Help > License information on the menu bar to activate the license.
5.5.1 PRO System requirements for speech recognition
• Dragon Naturally Speaking Professional (Service Pack 1 and higher)
• Intel Pentium4 or later or AMD Athlon 64 1 GHz. Recommended: 2.4 GHz (1.6 GHz dual
core) or equivalent AMD processor. SSE2 instruction set required. 512 KB L2 Cache. Recommended: 1 MB.
- 512 MB RAM (1 GB for Windows Vista, and 2 GB for Windows 7). Recommended: 1 GB (2 GB for Windows 7 32-bit, and 4 GB for Windows 7 64-bit)
• 1 GB free hard disk space (2 GB for localized non-English versions)
• Windows Server 2003, Windows XP (SP2 and SP3, 32-bit) Windows Vista (SP1 and SP2, 32-bit and 64-bit), Windows 7 (32-bit and 64-bit)
• DVD-ROM drive required for installation
• Creative Labs Sound Blaster 16 or equivalent sound card supporting 16-bit recording
• Philips SpeechMike dictation microphone or Philips Pocket Memo dictation recorder
5.5.2 PRO Setting up speech recognition
SpeechExec Pro installs only the necessary files and components to access the recognition application functionalities. The Dragon Naturally-Speaking speech recognition application must be purchased and installed separately. For information on the installation, configuration, training, and adaptation of Dragon NaturallySpeaking, see the Dragon NaturallySpeaking user manual.
To use Dragon NaturallySpeaking for speech recognition, a Dragon user profile with a valid user name and and dictation source is required. User profiles can be installed on the local hard drive (C:), or can live on a server and can be accessed through a network connection (roaming profiles). When using a Philips SpeechMike microphone, use the USB microphone setting in Dragon NaturallySpeaking. It is recommended to perform training when creating a Dragon user profile to enhance your initial recognition accuracy.
Before using the speech recognition feature, the following settings must be made:
- Enable the speech recognition functions in the SpeechExec settings menu under Settings > General settings > Speech recognition >
Speech recognition settings.
- Select your Dragon user profile and train it, if not yet done, through the Train button. The Dragon user profile and the dictation source must be set up separately in Dragon NaturallySpeaking.
The following settings are optional:
- Enable the use of roaming user profiles under Settings > General settings > Speech recognition > Speech recognition settings.
- Enable the use of templates under Settings > General settings > Speech recognition > Templates if you want the text to be inserted into a predefined text document.
- Enable the automatic start of the recognition queue under Settings > General settings
Speech recognition > Recognition & adaptation to process dictation files newly added to the recognition queue automatically.
- Enable the automatic collection of corrected dictation files for adaptation under Settings > General settings > Speech recognition > Recognition & adaptation to make adaptations on Dragon user profiles based on the corrected speech-recognized documents.
- Activate the option Send files for speech recognition after DPM download under Settings > General Settings > DPM/DT Configuration > Speech recognition to have dictation files automatically processed with speech recognition when they are downloaded from the Pocket Memo recorder.
Note
If this option is activated, the conversion, encryption and delivery after download options are disabled.
5.5.3 PRO Using speech recognition
SpeechExec supports two types of speech recognition. Your words are transcribed onto your screen as you dictate (online speech recognition) or files that where previously recorded (e.g. on a handheld recorder) are transcribed when they are downloaded to your computer (offline speech recognition).
Online speech recognition:
1 Create a speech-recognizable dictation file in SpeechExec by selecting ☐ New with speech recognition from the toolbar or the File menu.
The SpeechExec Speech Recognition Recorder window opens.
2 Start recording. See 4.2 ^PRO Create a recording on page 12 for more information about recording.
As you talk, your words are transcribed onto your screen. Corrections to the transcribed text can be made during recording or when recording is complete.
3 To mark the previous or the next word for editing or correcting, press the ◀ or ▶ key on the SpeechMike briefly. Press the • EOL/• • PRIO key repeatedly to mark one or more words previous to the cursor. To display the correction or spell dialog of Dragon NaturallySpeaking, select the word recognized incorrectly and press the INS/OVR key on the SpeechMike. If no text is selected, the word or phrase previous to the cursor is taken into account.
Define the dialog to be displayed when the INS/OVR key is pressed under Settings > General Settings > Speech Recognition > Recording settings.
4 When the recording is complete, select one of the following options from the toolbar or the File menu:
- Finish and archive: The dictation file is moved to the Archive folder and the status is set to Transcription finished. A Text document (.rtf) containing the transcribed text is attached to the dictation file.
- Send for correction: The dictation file is moved to the Finished dictations folder and the status is set to Correction pending. A Text document (.rtf) containing the transcribed text is attached to the dictation file.
- Save as draft: Mark a recording as suspended to temporarily interrupt recording and finish it later. The recording
Tip
is saved in the Suspended folder.
Offline speech recognition:
1 Download a previously recorded file from a dictation recorder (see 4.1 Download recordings from a dictation recorder on page 12 for more information) or create a new dictation file in SpeechExec by selecting New from the toolbar or the File menu (see 4.2 PRO Create a recording on page 12 for more information).
2 Select one or more dictation files from the work list.
3 Click the Add to speech recognition queue button on the toolbar to queue the selected files for speech recognition in the recognition and adaptation queue panel.
4 Click the ▶ Start recognition queue button in the recognition and adaptation queue panel to start the speech recognition process.
When the speech recognition process is finished, the dictation file is moved to the Finished dictations folder and the status is set to Correction pending. A Text document (.rtf) containing the transcribed text is attached to the dictation file.
Important
- If you wish to use offline speech recognition, the name of the user profile in Dragon NaturallySpeaking must be identical to your SpeechExec author name and the author name used for recordings on a handheld dictation recorder.
-
Speech recognition is not supported for dictation files with the following recording formats:
-
.wav files with a sampling rate of less than 11kHz.
- .dss files recorded in Long Play or Long Play mobile format.
5.5.4 PRO Playback and correction of transcribed recordings
1 Double-click the dictation file in the work list.
The dictation file is opened in the correction window.
2 Use the buttons on the toolbar of the correction window, the SpeechMike or the Pocket Memo to rewind, forward and start playback. See 4.3 Playback a recorded file on page 13 for more information.
Each segment of the sound file is bookmarked in the text document with the relevant time position and length. The transcribed text is simultaneously highlighted during playback, forwarding and rewinding.
Note
- If too much editing or correction is made on the transcribed text or the entire flow of the document is changed, highlighting may not work properly.
- If parts of the transcribed text are deleted, the related sound parts will remain in the sound file.
- Dictation files with the status Transcription finished can be opened only for playback. Editing or correction is not possible.
- For making corrections in the transcribed document in the correction window, the installation of Dragon NaturallySpeaking is not required.
5.6 Send dictation files by email or to an FTP server
SpeechExec allows dictation files to be transferred via email or uploaded to an FTP server directly to the transcriptionist or any other recipient.
5.6.1 Set up an email profile

Note
When no email profile has been set up, emails are sent via the default email application of the PC (e.g. Microsoft Outlook).
To transfer dictation files directly by SpeechExec without using the PC's default email application set up an email profile:
1 Click Settings > General Settings on the menu bar to open the settings menu and select Delivery > Email from the list on the left side.
2 Deselect the option Use your default emailing program to send dictations (QuickSend).
3 Click the Add... button to add a new profile. Select a type of profile, enter a profile name and click the OK button. The settings window for the selected profile is displayed.
4 Enter the settings for the selected profile and click the OK button.
5.6.2 Set up an FTP profile
An FTP profile must be created before the FTP upload function can be used.
1 Click Settings > General Settings on the menu bar to open the settings menu and select Delivery > FTP from the list on the left side.
2 Click the Add... button to add a new profile.
3 Enter a profile name and fill in the settings for the FTP server.
4 Click the OK button to save the settings.
5.6.3 Manually send dictation files via email or to an FTP server
Sending dictation files by email or to an FTP server can be done manually or automatically.
To transfer dictation files manually:
1 Select one or more dictation files from the work list.
2 Click the ✉ Submit for email button on the
toolbar to create a new email message with the selected dictation file attached:
- When no email profile has been set up, the email message is created with the PC's default email application.
- When an email profile has been configured, an email message is created with the selected dictation file attached. Enter recipients, body text and additional attachments and click the OK button to save the message in SpeechExec's Outbox folder.
3 Click File > Submit for FTP upload on the menu bar to copy the selected dictation file(s) to SpeechExec's Outbox folder.
4 Click the 📋 Send and Receive button on the toolbar to transfer all dictation files in the Outbox. See 5.6.5 Send and receive automatically on page 22 for more information about sending dictation files in the Outbox automatically.
5.6.4 Automatically send dictation files via email or to an FTP server
Dictation files can be sent by email or to an FTP server automatically when a recording is finished or when files are downloaded from a Pocket Memo digital recorder.
1 Click Settings > General Settings on the menu bar to open the settings menu.
2 Select Dictation > Dictation finished from the list on the left side to set up automatic sending when a dictation file is finished. Activate the Email and/or the FTP option.
3 Select DPM/DT Configuration > Delivery after download from the list on the left side to set up automatic sending after a dictation file is downloaded from a Digital Pocket Memo. Activate the Email and/or the FTP option.
4 Click the Configure button to set up default contents for emails (recipients, subject, body text, attachments).
5 Click the OK button to save the settings. Dictation files are now copied automatically
to the Outbox folder when a recording is finished or when files are downloaded from a Digital Pocket Memo.
6 Click the 📂 Send and Receive button on the toolbar to transfer all dictation files in the Outbox. See 5.6.5 Send and receive automatically on page 22 for more information about sending dictation files in the Outbox automatically.

Notes
- The Outbox folder is hidden by default. To display the Outbox folder in the Folder tree, click on Settings > General Settings on the menu bar and select Work list > Folders from the list on the left side. Select Outbox and change the Visible option to Yes
- A separate email is created for every dictation file.
5.6.5 Send and receive automatically
By default, dictation files in the Outbox folder are transferred only after clicking the 📄 Send and Receive button on the toolbar. To transfer dictations automatically:
1 Click Settings > General Settings on the menu bar to open the settings menu and select Delivery > Send/Receive from the list on the left side.
2 Activate the option Send/Receive automatically and set a time interval.
3 Click the OK button to save the settings.
6 Frequently asked questions
The operating system stops responding after restart
Using the Philips SpeechMike together with certain USB hubs may cause the operating system to stop responding when the computer is started.
Unplug the SpeechMike before starting the PC and reconnect it afterwards. We recommend replacing the USB hub or connecting your SpeechMike directly to the USB port of the computer.
The SpeechMike is completely without function
Some computer providers limit the output power of USB ports to 100mA.
These ports may not provide enough power for the SpeechMike to function properly.
Use the AC charger.
Connect the SpeechMike via the self-powered hub.
The SpeechMike is connected to the computer but sound will play on the computer's speaker only
Windows XP can support only one playback device at a time and may require setting the playback device back to "SpeechMike" if another playback device was enabled after the SpeechMike was installed.
- Set via Start > Control Panel > Sound and Audio Devices > Audio (tab)
- Or, right-click the speaker icon if it's in the toolbar and select Adjust Audio Properties
Windows Vista can support more than one playback device at a time, but if you disable the device for playback it is also disabled for recording. You may need to right-click and select “Show disabled devices” to change the setting.
- Set via Start > Control Panel > Sound > Playback (tab)
- Or, right-click the speaker icon if it's in your toolbar and select playback devices
Drive letter conflict with the Digital Pocket Memo
When installing the Digital Pocket Memo on a PC with Windows, the operating system automatically assigns a drive for the Digital Pocket Memo. This drive appears as a “removable disk” in Windows Explorer. Sometimes the drive letter assignment for the Digital Pocket Memo conflicts with an existing drive letter mapping; this is why the Digital Pocket Memo cannot be seen in Windows Explorer and SpeechExec displays the status as “DPM (disconnected).”
Map all network drives starting with drive letters Z, Y, X (in reverse alphabetical order).

Specifications are subject to change without notice.
Trademarks are the property of Royal Philips Electronics or their respective owners.
© 2010 Royal Philips Electronics. All rights reserved.
Document Version 1.0, 07/12/2010.
- Get started 10
- Use SpeechExec 12
- Use more of SpeechExec 17
- Send dictation files by email or to an FTP server 20
- Frequently asked questions 23
- Important
- Note
- Tip
- Safety
- Hearing safety
- Important (for models supplied with headphones):
- Small children
- Cleaning and disinfection
- Disposal of your old product
- Your SpeechExec dictation software
- Overview SpeechExec work list window
- Overview SpeechExec recorder and player window (expanded mode)
- Get started
- System requirements
- Install the software
- Important
- Create a SpeechExec user profile
- SpeechExec help
- Use SpeechExec
- Download recordings from a dictation recorder
- PRO Create a recording
- When using a SpeechMike with push buttons:
- When using a SpeechMike or Pocket Memo with slide switch (Rec, Stop, Play, Rewind):
- When using a SpeechMike or Pocket Memo with slide switch (Forward, Stop, Play, Rewind):
- Playback a recorded file
- Playback using the SpeechMike or Pocket Memo
- Playback in the recorder window
- Playback in the worklist window
- PRO Edit a previously recorded file
- PRO Finish, suspend or cancel a recording
- PRO Record an instruction
- PRO Record a spoken instruction
- PRO Record a special instruction
- Delete
- PRO Delete part of a dictation file
- Delete a dictation file
- Use more of SpeechExec
- Settings menu
- Pocket Memo Configuration Wizard
- Configure the download process from the Pocket Memo
- PRO SpeechMike Configuration Wizard
- PRO Speech recognition functions
- PRO System requirements for speech recognition
- PRO Setting up speech recognition
- Speech recognition settings.
- PRO Using speech recognition
- Online speech recognition:
- Offline speech recognition:
- PRO Playback and correction of transcribed recordings
- Send dictation files by email or to an FTP server
- Set up an email profile
- Set up an FTP profile
- Manually send dictation files via email or to an FTP server
- Automatically send dictation files via email or to an FTP server
- Notes
- Send and receive automatically
- Frequently asked questions
- The operating system stops responding after restart
- The SpeechMike is completely without function
- The SpeechMike is connected to the computer but sound will play on the computer's speaker only
- Drive letter conflict with the Digital Pocket Memo
Brand : PHILIPS
Model : SpeechExec 7
Category : Speech Recognition Software