
Wireless LAN Router NAS - Router HAMA - Free user manual and instructions
Find the device manual for free Wireless LAN Router NAS HAMA in PDF.


| Product Type | Wireless LAN Router with NAS functionality |
| Brand | Hama |
| Model | Wireless LAN Router NAS |
| Wireless Standard | 802.11b/g/n |
| Frequency Band | 2.4 GHz |
| Max Wireless Data Rate | 300 Mbps |
| LAN Ports | 4 x 10/100/1000 Mbps Gigabit Ethernet |
| WAN Port | 1 x 10/100/1000 Mbps Gigabit Ethernet |
| USB Ports | 1 x USB 2.0 for NAS storage |
| Antenna | 2 x external detachable antennas |
| Dimensions (W x D x H) | 180 x 130 x 30 mm |
| Weight | 350 g |
| Power Supply | 12 V DC, 1 A |
| Power Consumption | 10 W (max) |
| Security | WEP, WPA/WPA2-PSK, WPA2-Enterprise |
| VPN Support | PPTP, L2TP, IPsec pass-through |
| NAS Features | File sharing, FTP server, media server |
| Management | Web-based interface, DHCP server |
| Operating Temperature | 0°C to 40°C |
| Storage Temperature | -20°C to 60°C |
| Humidity | 10% to 90% non-condensing |
| Certifications | CE, RoHS |
| Package Contents | Router, power adapter, Ethernet cable, manual |
Frequently Asked Questions - Wireless LAN Router NAS HAMA
User questions about Wireless LAN Router NAS HAMA
0 question about this device. Answer the ones you know or ask your own.
Ask a new question about this device
Download the instructions for your Router in PDF format for free! Find your manual Wireless LAN Router NAS - HAMA and take your electronic device back in hand. On this page are published all the documents necessary for the use of your device. Wireless LAN Router NAS by HAMA.
USER MANUAL Wireless LAN Router NAS HAMA
natural_image
Pure grayscale gradient background with no visible text, symbols, or identifiable objectshama®
Hama GmbH & Co KG
D-86651 Monheim/Germany
www.hama.com
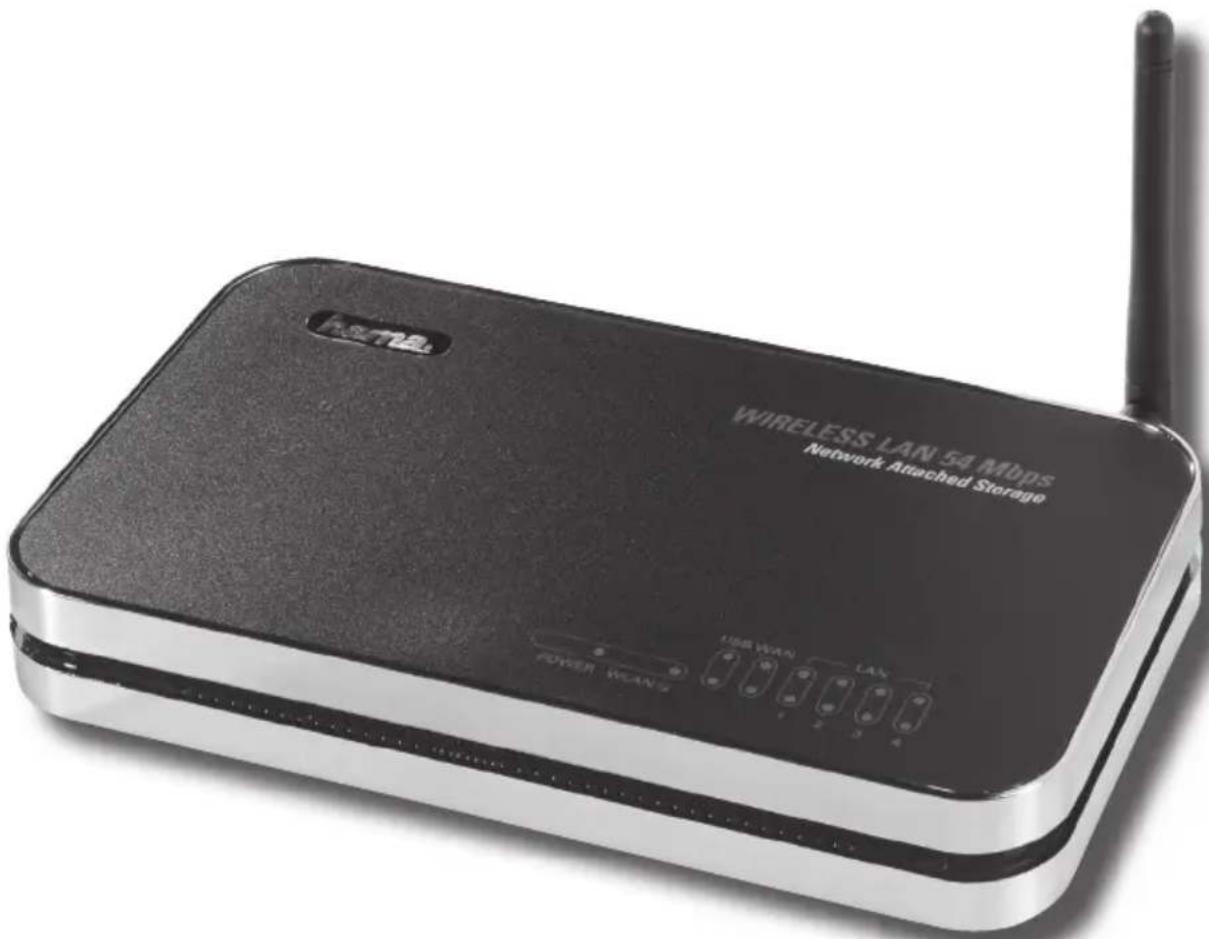
WLAN Router »NAS« 54 Mbps
Contents:
- Connecting the Wireless LAN Router...... Page 03
- Configuring the operating system and computer Page 04
- Configuring the Wireless LAN Router Page 05
3.1 Configuring the Internet Connection using the Wizard ...... Page 05
3.2 Configuring the Wireless LAN Page 06
3.2.1 Basic Settings for Wireless Networks Page 06
3.2.1.1 Operation as an Access Point (AP) Page 07
3.2.1.2 Operation as an AP Bridge Point to Point Page 07
3.2.1.3 Operation as an AP Bridge Point to Multi-Point..... Page 08
3.2.1.4 Operation as an AP Bridge WDS Page 08
3.2.2 Setting the Encryption for AP.... Page 08
3.2.2.1 WEP Encryption Page 09
3.2.2.2 WPA/WPA2 encryption...... Page 09
3.2.3 Setting the Encryption for AP Bridge-Point to Point, Point to Multi-Point and WDS ...... Page 10
3.2.3.1 WEP Encryption Page 11
3.2.3.2 WPA/WPA2 Encryption.... Page 11
3.3 Changing the Log-in Data Page 12
3.4 LAN Settings Page 12
4. Connecting a USB printer to the network...... Page 12
4.1 Configuring the router Page 13
4.2 Installing a new printer on your PC...... Page 13
5. Connecting a USB storage medium to the network...... Page 14
5.1 Configuring the router Page 14
5.1.1 Formatting the storage medium.... Page 14
5.1.2 Creating/changing/deleting user accounts ...... Page 14
5.1.3 Sharing a network drive (File Server/Samba Server)...... Page 15
5.1.3.1 Network settings ...... Page 15
5.1.3.2 Adding/changing/deleting shared folders...... Page 15
5.1.3.3 Installing the share on your PC....Page 15
5.1.4 Sharing files via an FTP server...... Page 16
5.1.4.1 Adding/changing/deleting FTP folders ...... Page 16
5.1.4.2 Accessing the FTP folder.... Page 17
- Tools...... Page 17
6.1 Configuration Tools...... Page 17
6.2 Firmware Update...... Page 17
6.3 Re-starting the Router...... Page 17 - Status Information Page 18
- Support and Contact Information...... Page 18
Packet contents:
1x Hama Wireless LAN Router NAS, 54 Mbps
1x 12V power supply
1x printed operating instructions
1x confi guration cable
Remark concerning the positioning:
The connection quality depends strongly on the place or surroundings where you put up the WLAN device. Please ensure that the device or its antennae are neither covered nor built in. We advise you against putting it up near metallic objects or other electric or radiant devices. In case of reception fluctuations or connection interruptions we recommend you to move interference sources such as DECT telephones, mobile phones, Bluetooth devices or other WLAN networks out of the way. If this is not possible, it may also be helpful to change the cable.
System requirements:
- Operating system with TCP/IP protocol installed
- Java-capable web browser such as Mozilla Firefox or Microsoft Internet Explorer
Safety instructions:
Do not use the device in moist or extremely dusty areas, on radiators or in the vicinity of heat sources. This device is not designed for use outdoors. Protect the device from pressure and impact. The device may not be opened or moved during operation.
Caution! Use the router with the enclosed power supply unit only. Using other power supply units can cause irreparable damage to the product.
Note! The "Connect as required" setting is recommended for volume or timed rates, so that the internet connection is disconnected automatically after the period set in the "Idle time" option. Connection costs may be high if permanently connected. Please also note that closing the browser does not automatically disconnect from the internet. Many programs send queries to the internet or receive data from it without this being clearly visible. For the router, these queries are just as valid as opening a browser, for example. If you want to ensure that there is no active connection to the internet, you should switch off the device or disconnect it from the modem.
1. Connecting the Wireless LAN Router
- Connect the computers and other network devices such as hubs/switches to sockets 1-4. Use a crossover or CAT5 patch cable (max. 100m). The integrated switch automatically identifies the connection speed of 10 or 100Mbps, half/full duplex transfer mode and the type of cable used.
- Connect the Ethernet port of your modem to the WAN connection on the router. A 1:1 or crossover cable is required depending on the modem. In most cases, the existing connection cable can be used.
- Plug the power unit supplied into an empty socket and connect it to the router. Caution: Unsuitable power supply units can cause damage!
Checking Installation
There are various status indicating LEDs on the top of the device:
| LED Condition Status | ||
| Power | Illuminated | Power unit is connected and supplying electricity |
| Off | No power unit connected, device not being supplied with electricity | |
| WLAN-G | Flashing | Wireless LAN is activated / data is being sent |
| Off | Wireless LAN is deactivated | |
| WAN | Illuminated | The WAN port has generated a correct network connection |
| Flashing | Data transfer via WAN port | |
| Off | No connection | |
| LAN1-4 Illuminated The corresponding LAN port has generated a correct network connection | ||
| Flashing | Data transfer via respective LAN port | |
| Off | No connection | |
| USB | Illuminated | USB device is connected |
| Off | No connection | |
2. Confi guring the operating system and computer
The TCP/IP protocol must be installed on all PCs that will be using the Internet. By default, the IP address 192.168.2.1 and an activated DHCP server are configured for the router. This means that the connected PCs are automatically given appropriate addresses and other settings. We recommend using these settings.
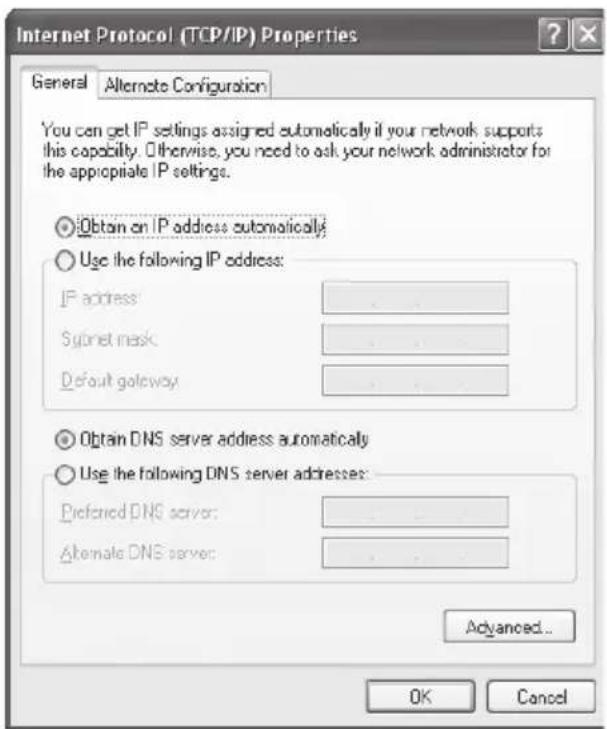
Proceed as follows to check the settings on your PC: Start -> Settings -> Control panel -> Network connections Select the connection (network adapter) via which your PC is connected to the router, e.g. "LAN connection". When you right-click the corresponding connection, a menu is displayed in which you select Properties.
Select the Internet Protocol (TCP/IP) entry in the list and click Properties.

Select Optain an IP address automatically and Optain DNS server address automatically! Confirm by clicking OK, and again in the subsequent window.
Your PC is now configured such that the router assigns the IP address automatically. You can then configure the router using the web browser.
The browser must be Java-capable and the Java function must be activated (e.g. Internet Explorer 6.0 or better, or Mozilla Firefox).
3. Confi guring the Wireless LAN Router
To start the configuration process, open your browser and enter "http://192.168.2.1" as the address.
The login window is then displayed. By default, the user name is set to admin and the password is 1234. After entering these, click OK to log on to the router.
You can configure the router via the integrated Setup Wizard or manually. After configuration using the Setup Wizard, the device is set so that the connected computers can access the internet.
Note! For security reasons, you must change your user name and password. The standard settings are identical for many devices and can allow others to access the router configuration. See Page 12 for information.
3.1 Configuring the Internet Connection using the Setup Wizard
Please start the Setup Wizard after logging in by clicking Quick Setup.
Time Zone
For Set Time Zone choose the appropriate time zone, e.g. GMT sGreenwich Mean Time: Dublin, Edinburgh, Lisbon, London for England. The remaining settings can be left as they are. Click => Next to continue.
Broadband Type
Next, you are prompted to specify the WAN connection type. Your service provider will provide you with user-specific information. There is a brief description of the various connection types on the overview page. Due to the widespread use of DSL via PPPoE, the remainder of the description will refer to this type of connection.
For the PPPoE connection type, click PPPoE xDSL
IP Address Info
You must enter the access data for your provider in the next window. See your documents or contact the provider directly for this information.
Please enter the following details:
User Name
Password
Service Name (this must not always be entered)

In addition to the access data, you can make the following entries:
MTU stands for Maximal Transfer Unit and specifies the maximum packet size to be transferred. If you are not sure about this setting, we recommend leaving the standard value set. Values between 512 and 1492 can be set. The Connection Type entry sets the dial-in action of your router. You can then select either:
Continuous: The router is always connected to the internet. This connection type is recommended if you have a flat-rate with no time limit, for example.
Connect on demand: With this connection type, the router does not dial in until it receives a request from a connected computer, e.g. if you open the internet browser on a computer. The connection is maintained until the period set under Idle Time Out has passed without activity.
Manual: If you choose the Manual connection type, you can make the connection by clicking Connect, and close it by clicking Disconnect.
Note! The "Connect as required" setting is recommended for volume or timed rates, so that the internet connection is disconnected automatically after the period set in the „idle time" option. Connection costs may be high if permanently connected. Please also note that closing the browser does not automatically disconnect from the internet. Many programs send queries to the internet or receive data from it without this being clearly visible. For the router, these queries are just as valid as opening a browser, for example. If you want to ensure that there is no active connection to the internet, you should switch off the device or disconnect it from the modem.
Idle Time Out: Enter the length of time you want to wait before internet connection is cut off when inactive. Values between 1 and 1000 can be set.
Click OK to confirm your entries. You must then restart the router for the settings to take effect. Click Apply in the next window to save the settings. The router takes approx. 30 seconds to restart. After the restart the router is configured so that you can access the internet via the connected computers. You can also edit these settings manually, by clicking WAN in the menu on the left and then selecting the corresponding connection type.
3.2 Configuring the Wireless LAN
Wireless LAN is deactivated by default for security reasons. To activate this function, from the start view which can be accessed by clicking Home, select General Setup and then Wireless in the menu on the left. Note that activating Wireless LAN without also setting encryption results in a security risk. Select Enable and then click Apply. Read Basic Settings for Wireless Networks for further instructions!
3.2.1 Basic Settings for Wireless Networks (WLAN)
Select Basic Settings in the menu on the left.
The Mode setting allows you can select the task the router is to perform in the network.
Select the AP (3.2.1.1) access point function if the device is the only access point in your network or if no bridge level connection is to be made to other access points.
Select AP Bridge-Point to Point (3.2.1.2) if you want to connect this access point wirelessly to a second access point. In this mode, clients cannot log-in via a wireless connection.
Select AP Bridge-Point to Multi-Point (3.2.1.3) if you want to connect this access point wirelessly to several other access points. In this mode, clients cannot log-in via a wireless connection.
Select AP Bridge WDS (3.2.1.4), if you want to connect this access point to one or more other access points wirelessly and clients are to be allowed to log in wirelessly.
Continue configuration as required.
3.2.1.1 Operation as an Access Point (AP)
Selecting this under Band allows you to specify whether the device runs ion the 2.4 Ghz band in accordance with the 802.11b (11Mbps), 802.11g (54Mbps) standards or works in combination with 802.11b and 802.11g. Then set the ESSID. The ESSID can contain up to 32 characters and must be identical for all devices in the network. Channel Number allows you to select the channel in which the data is to be transferred. 13 channels are available.
Example of an ESSID: "WLAN_Router_54Mbps"
Click Apply to save your settings!
To set the encryption for your wireless network, click Continue in the next window and then Security Settings in the menu on the left. Continue reading on page 08 for instructions on setting Wireless LAN encryption.

Click Apply in the next window if you want to operate a wireless network without encryption. The router is then restarted. The wireless network is available after you restart.
3.2.1.2 Operation as an AP Bridge Point to Point
Selecting this under Band allows you to specify whether the device runs ion the 2.4 Ghz band in accordance with the 802.11b (11Mbps), 802.11g (54Mbps) standards or works in combination with 802.11b and 802.11g. Channel Number allows you to select the channel in which the data is to be transferred. 13 channels are available. Enter the address of the access point to which the bridge connection is to be made in MAC address 1. To set the encryption for your wireless network, click the Set Security button.
Continue reading on page 10 for instructions on setting Wireless LAN encryption.
Click Apply in the next window, and again in the window after that if you want to operate a wireless network without encryption. The router is then restarted. The wireless network is available after you restart.

3.2.1.3 Operation as an AP Bridge Point to Multi-Point
The difference to the AP Bridge Point to Point operation is that you can enter the MAC addresses of several access points in this mode. Bridge connections can be established to a maximum of 6 other access points. Selecting this under Band allows you to specify whether the device runs ion the 2.4 Ghz band in accordance with the 802.11b (11Mbps), 802.11g (54Mbps) standards or works in combination with 802.11b and 802.11g. Channel Number allows you to select the channel in which the data is to be transferred. 13 channels are available. Enter the addresses of the access points to which the bridge connection is to be made in MAC address 1 to MAC address 4.
To set the encryption for your wireless network, click the Set Security button.
Continue reading on page 10 for instructions on setting Wireless LAN encryption.

Click Apply in the next window, and again in the window after that if you want to operate a wireless network without encryption. The router is then restarted. The wireless network is available after you restart.
3.2.1.4 Operation as an AP Bridge WDS
What is WDS? Wireless Distribution System is the name for wireless connections between multiple access points, and also allows clients to log-in, which is not permitted by other bridge modes. The bandwidth of the network is halved for each additional access point as the packets have to be sent twice.
This makes it a combination of the previous modes.
Selecting this under Band allows you to specify whether the device runs ion the 2.4 Ghz band in accordance with the 802.11b (11Mbps), 802.11g (54Mbps) standards or works in combination with 802.11b and 802.11g. The ESSID is required for the client network. It acts as identification in the network and must therefore be identical for all users in the client network. The ESSID can be up to 32 characters long.
Channel Number allows you to select the channel in which the data is to be transferred. 13 channels are available. Enter the addresses of the access points to which the bridge connection is to be made in MAC address 1 to MAC address 4. To set the encryption for your wireless network, click the Set Security button.
Continue reading on page 10 for instructions on setting Wireless LAN encryption.

Click Apply in the next window, and again in the window after that if you want to operate a wireless network without encryption. The router is then restarted. The wireless network is available after you restart.
3.2.2 Setting the Encryption for AP
First, it is important to understand a range of terms. The next section will explain the main terms used here:
Authentication: Authentication is a process in which the identity, e.g. of a person is determined based on a certain characteristic. This can be done by fingerprint, password or any other proof of authorisation.
Authentication: Authentication is a process in which the identity, e.g. of a person is determined based on a certain characteristic. This can be done by fingerprint, password or any other proof of authorisation.
Encryption: Encryption is a process in which plain text is transformed into a coded text via an encryption process (algorithm). One or more codes can be used for this. It must also be mentioned that each individual encryption process offers one or more authentication options.
The following encryption types are available for this mode:
• 64 Bit and 128 Bit WEP encryption
• WPA and WPA2 encryption
You can make the settings under Wireless/Security Settings in the menu on the left for the AP mode.
Encryption is deactivated by default. However, for security reasons, we recommend that you always use encryption.
3.2.2.1 WEP encryption
Wired Equivalent Privacy (WEP) is a standard encryption algorithm for WLAN. It both controls the access to the network and guarantees the integrity of the data. This method is considered vulnerable due to a range of weaknesses.
First select whether you want to use 64 bit or 128 bit encryption. 128 bit encryption offers greater security. Then select either Hex (characters from 0-9 and a-f) or ASCII (any character) for the Key Format. This also determines the length of the key.
Default Tx Key allows you to select one of four preset keys. Select Key 1, for example, and enter your key of choice with the required length.
Examples:
64 bit Hex (10 characters) = 231074a6ef
64 bit ASCII (5 characters) = j31n.
128 bit Hex (26 characters) =
231074a6b9773ce43f91a5bef3
128 bit ASCII (13 characters) = urlaub2006.+0
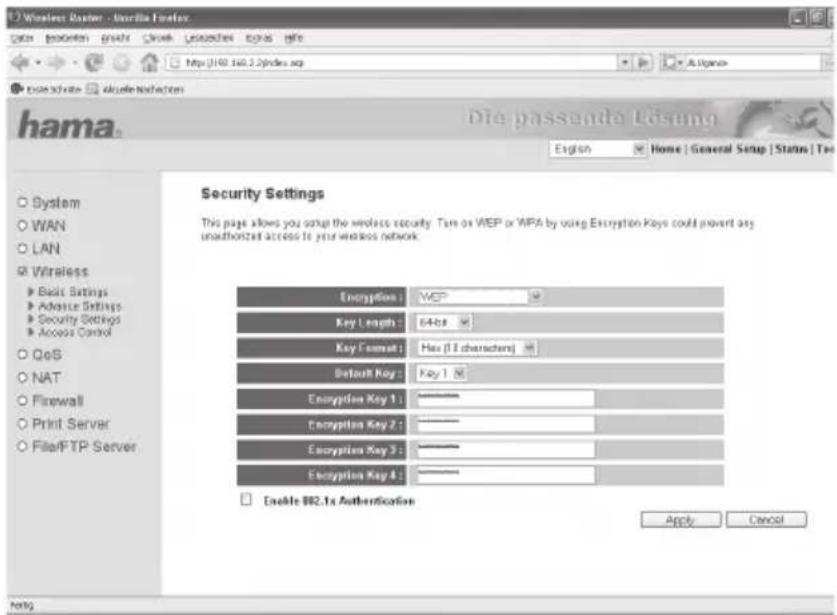
Click Apply to save your settings. You must then restart the router for the settings to take effect. To do so, click Apply in the next window. The wireless network with encryption is available after you restart.
3.2.2.2 WPA/WPA2 Encryption
Wi-Fi Protected Access (WPA) is an encryption method for WLAN. WPA contains the WEP architecture, but offers additional protection via dynamic codes, which are based on the Temporal Key Integrity Protocol (TKIP), and also offers pre-shared keys (PSK) or extensible authentication protocol (EAP) for user authentication. However, a radius server is required for this. WPA2 is a development of WPA and uses a different encryption algorithm, advanced encryption standard (AES).
WPA offers two types of authentication, either pre-shared key or authentication via special authentication protocols, which are generally variations of EAP (Extensible Authentication Protocol). An authentication server (RADIUS server) is used for the latter authentication method, which is rarely used for private applications. Your administrator can give you the information you require to confi gure this authentication method.
WPA pre-shared-key (recommended for most users)
First select whether you want to use WPA with TKIP encryption algorithm, WPA2 with AES encryption algorithm or the WPA Mixed mode. The mixed mode allows clients using WPA or WPA2 to access the access point. The mixture is very practical as presently few XP clients are WPA2 compatible. If the mixed mode is switched off, the AP only allows WPA2 clients, and the large number of WPA (TKIP) devices cannot connect.
Then you must select the key format (Pre-shared Key Format). Select either Pass phrase for a key with a length of at least 8 and max. 63 characters, whereby letters (A-Z), numbers and punctuation marks can be used, or Hex for a 64 character key, in which only numbers from 0-9 and letters from a-f can be used.
The next step is entering a key, called a pre-shared-key (PSK). All clients which are to access the access point must know this character string.

Click Apply to save your settings. You must then restart the router for the settings to take effect. To do so, click Apply in the next window. The wireless network with encryption is available after you restart.
WPA RADIUS (requires a special authentication server)
First select whether you want to use WPA with TKIP encryption algorithm, WPA2 with AES encryption algorithm or the WPA Mixed mode. The mixed mode allows clients using WPA or WPA2 to access the access point. The mixture is very practical as presently few XP clients are WPA2 compatible.
Select WPA2 (AES) only. The AP only allows WPA2 clients, and the large number of WPA (TKIP) devices cannot connect.
Next enter the RADIUS server IP address. The RADIUS Server Port is preset to 1812. Enter the password for the RADIUS Server.
Click Apply to save your settings. You must then restart the router for the settings to take effect. To do so, click Apply in the next window. The wireless network with encryption is available after you restart.
3.2.3 Setting the Encryption for Bridge-Point to Point, Bridge Point to Multi-Point and Bridge WDS
First, it is important to understand a range of terms. The next section will explain the main terms used here:
Authentication: Authentication is a process in which the identity, e.g. of a person is determined based on a certain characteristic. This can be done by fingerprint, password or any other proof of authorisation.
Encryption: Encryption is a process in which plain text is transformed into a coded text via an encryption process (algorithm). One or more codes can be used for this. It must also be mentioned that each individual encryption process offers one or more authentication options.
The following encryption types are available for the various modes:
• 64 Bit and 128 Bit WEP encryption
• WPA (TKIP) and WPA2 (AES) encryption
Click the Set Security button to make the settings for the Bridge-Point to Point, Bridge-Point to Multi-Point and Bridge WDS modes after setting the mode. For the Bridge WDS mode, encryption must be set for the access point under Wireless/Security Settings in the menu on the left. This is the only encryption available for WDS.
For WDS, the encryption must be adjusted before, in the menu on the left, under Wireless/Security Settings.
You can choose either WEP encryption with 64 Bit and 128 Bit, WPA with TKIP encryption algorithm and WPA2 with AES encryption algorithm.
3.2.3.1 WEP Encryption
Wired Equivalent Privacy (WEP) is a standard encryption algorithm for WLAN. It both controls the access to the network and guarantees the integrity of the data. This method is considered vulnerable due to a range of weaknesses.
First select whether you want to use 64 bit or 128 bit encryption. 128 bit encryption offers greater security. Then select either Hex (characters from 0-9 and a-f) or ASCII (any character) for the Key Format. This also determines the length of the key.
Default Tx Key allows you to select one of four preset keys. Select Key 1, for example, and enter your key of choice with the required length.
Examples:
64 bit Hex (10 characters) = 231074a6ef
64 bit ASCII (5 characters) = j31n.
128 bit Hex (26 characters) =
231074a6b9773ce43f91a5bef3
128 bit ASCII (13 characters) = urlaub2006.+0
Click Apply to save your settings. You must then restart the router for the settings to take effect. To do so, click Apply in the next window. The wireless network with encryption is available after you restart.

3.2.3.2 WPA/WPA2 Encryption
Wi-Fi Protected Access (WPA) is an encryption method for WLAN. WPA contains the WEP architecture, but offers additional protection via dynamic codes, which are based on the Temporal Key Integrity Protocol (TKIP), and also offers pre-shared keys (PSK) or extensible authentication protocol (EAP) for user authentication. However, a radius server is required for this. WPA2 is a development of WPA and uses a different encryption algorithm, advanced encryption standard (AES).
Select WPA Pre-shared Key under Encryption. Then, under WPA Unicast Cipher Suite, select WPA (TKIP) or WPA2 (AES).
Then you must select the Pre-shared Key Format. Select either Pass phrase for a key with a length of at least 8 and max. 63 characters, whereby letters (A-Z), numbers and punctuation marks can be used, or Hex for a 64 character key, in which only numbers from 0-9 and letters from a-f can be used. The next step is entering a key, called
a pre-shared-key (PSK). All clients which are to access the access point must know this character string.
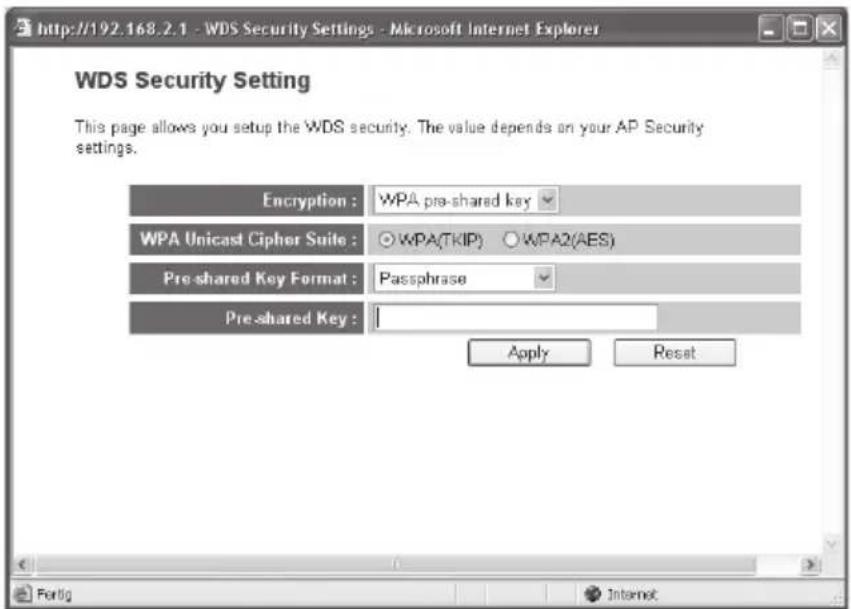
Click Apply to save your settings. You must then restart the router for the settings to take effect. To do so, click Apply in the next window. The wireless network with encryption is available after you restart.
3.3 Changing the Log-in Data
From the start view which can be accessed by clicking Home, select General Setup and then System => Password Settings in the menu on the left.
This page allows you to enter a new password for the router. To assign a new password, you must first enter the current password in the Current Password field. Enter the new password in the New Password field and again in the Confirmed Password field to confirm that it was typed correctly. Click Apply to confirm your entries. You must then restart the router for the settings to take effect. To do so, click Apply in the next window. The new password applies after restarting.
3.4 LAN Settings
From the start view which can be accessed by clicking Home, select General Setup and then LAN in the menu on the left.
This allows you to change the standard LAN settings of the router.
LAN IP: The router is preset to the IP address 192.168.2.1. If you want to use a different address for the router, you can change it in this entry fi eld. The corresponding Subnet Mask is entered in the fi eld directly below this.
DHCP Server:
The integrated DHCP server allows IP addresses to be assigned to connected clients automatically. Select Disabled if you assign the IP addresses manually in your network, and therefore do not need a DHCP server. Select Enabled if you want to use the DHCP server the Lease Time setting specifies how long the assigned IP address is to apply for the client.
The IP address range from which the DHCP server can assign IP address to the clients is restricted by the Start-IP Address and the End-IP Address.
Click Apply to confirm your entries. You must then restart the router for the settings to take effect. To do so, click Apply in the next window.

Warning! The new LAN configuration is valid after restarting. Therefore, you have to use the new IP address to open the web interface in the browser.
4. Connecting a USB printer to the network
First, connect the USB port of the printer to a USB port on the router. If you wish to connect a hard drive to the network in addition to the printer, we recommend using USB port 2 for the printer.
4.1. Configuring the router
From the start page which can be accessed by clicking Home, select General Setup and then Print Server in the menu on the left.
The Print Server application is deactivated by default. Check the box Enable Print Server to activate it.
The IPP and LPR protocols are supported. Click Enable for the Protocol you wish to activate. If you are not sure, activate both protocols.
It should be possible to connect a printer to both of the router's USB ports. In Printer Server Conf i guration, you can enter a name for the printer connected to the respective port. By default, lpt1 is entered for USB port 1 and lpt2 for USB port 2. You will need the name entered here when you install the printer on your PC later.
Set the Enable Internet printing check box to enable printing from the internet.

4.2 Installing a new printer on your PC
Once the printer has been connected, it has to be installed on the PC before it can be used. To do this, select Start and then Printers and Faxes in the menu. Select Add a Printer. Click Next to confirm.
In this window select Local printer. The check box for Plug and Play printer should not be set. Then click on Next.
In the next window, select Create a new port and then Standard TCP/IP Port for the type of port. Then click on Next. This will now open the Add Standard TCP/IP Printer Port Wizard. Click Next to confirm. In the following window, enter your router's IP address in the Printer Name or IP Address fi eld. By default, this is 192.168.2.1 Then click on Next.
Select User-defined under device type and click Settings afterwards. Select LPR in the new window. Under LPR settings, you have to enter – in the fi eld Queue Name - the name of the device port to which the printer is connected. You have to use the same name as in the router confi guration under Home/Installation/Printer Server/Confi guration of the printer server. The following names are normally given away:
USB-Port 1 = lpt 1
USB-Port 2 = lpt 2
Click Finish to close the wizard. Installation of the printer port is now complete.


If you have not already done so, you must now install the driver for the connected printer. To do this, open the Add Printer Wizard once installation of the printer port is complete. Follow the wizard's instructions or install the printer driver on your PC according to the manufacturer's instructions. Once the installation has been completed successfully, you will find the printer installed in the Printers and Faxes window.
5. Connecting a USB storage medium to the network
This device allows you to make a USB storage medium available to the entire network. First, connect the USB storage medium to a USB port on the router. We recommend using USB port 1 for the storage medium. Next connect the router and, if necessary, the storage medium to the mains.
5.1. Configuring the router
From the start page, which can be accessed by clicking Home, select General Setup and then File/FTP Server in the menu on the left.
An overview of connected storage media can be found by choosing the Storage Status menu item. Here you can view information, such as size, file system and used and free storage space. If the connected storage medium is not listed in this table, it was not correctly identified. Check whether the storage medium is connected properly. The file system being used could be another reason. Once the storage medium has been connected, it has to be formatted to the FAT file system before it can be used.
5.1.1 Formatting the storage medium
Warning! Formatting causes all existing data on the storage medium to be lost.
Select the Storage Tools menu item. This page allows you to format the USB storage medium, which is connected to USB port 1. Select the desired file system in the Tool column and click Format.
If there no storage medium is displayed in the table, click on Auto Partition & Format to format the storage medium.
5.1.2 Creating/changing/deleting user accounts
To access the connected storage medium, you must enter a user name and password. You must create a user account for every person that should have access. To do so, switch to the User Setup menu item.
Here, you can create, change or delete user accounts. Click Add to create a new user.
User Name: Enter the desired user name with a maximum of 20 characters. Letters, numbers and underscores are allowed. Description: Additional description of the user (optional).
Password: Password with a maximum of 20 characters to access the shared storage medium. Letters, numbers, spaces and underscores are allowed.
Confi rm Password: Confi rm/retype password.
Click Save to save your entries.
To make changes to an existing user account, select it in the Select column and click Edit.
To delete a user account, select the user in the Select column and click Delete Selected, or click Delete All to delete all user accounts.

5.1.3 Sharing a network drive (File Server/Samba Server)
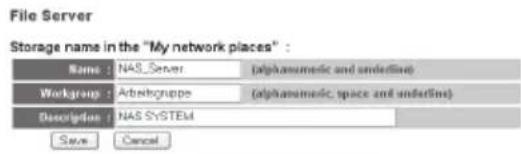
Select the File Server Setup menu item.
5.1.3.1 Network settings
Name: The device will be displayed in My Network Places with the name entered here. Letters, numbers and underscores are allowed. Workgroup: Enter the workgroup name here. Letters, numbers, spaces and underscores are allowed. If you don't know the workgroup name, go to the desktop. Right-click on My Computer and select on Properties from the menu. The System Properties will now be displayed. Switch to the Computer Name tab. You can see the workgroup name here. Description: Additional description (optional)
5.1.3.2 Adding/changing/deleting shared folders
Shared folders on the storage medium are listed in the Shared Folders table.
Click ADD to share a new folder.
Folder Name: Name of the share folder, such as „Music“. Letters, numbers and underscores are allowed. You must remember this name in order access this share on your PC.
Shared Folder's Path: Click Browse. The window displayed at the top right appears. Click on the USB icon in the left column. All partitions will now be displayed in the window, such as C:. Click the desired partition. All existing folders in this partition will now be displayed. Click on the desired folder, or on New Folder to create a new folder. Then click on Submit.
User: All users you have created are listed in the window on the left. Select the desired user from the list and click Add to add it. Authority: Select whether the user is allowed to both read and write to the share or only read it. Description: Additional description (optional).
Click Save to save your settings and to enter them in the table. To make changes to the settings of a shared folder, select it from the Select column and click Edit.
To remove a share, select the folder from the Select column and click Delete Selected, or delete all shared folders by clicking on Delete All.
![Add/Edit Shared Folder Folder Name: [alphannanic and underline] Shared folder's Path: Browse... Share all folders in storage User System Users User_1 User_2 User_3 Add>> Add All>> << Delete << Delete All Share Users Authoring: Read Only Read & Write Description: Save Reset Cancel](/content/2026/05/1023455/images/18b018028fc0a5fec7a138adb1c42723137e2c8403dacf8ed1e3ab97eef8d8b2.jpg)
![http://192.161.2.2 - NIS Download - Mozilla Firefox Path: [USB1]C\ Submit USB1 Return New Folder Film Music Cancel Help](/content/2026/05/1023455/images/b1e43e503d52fa3314204dd50289a5607589d7f391e72d1a4f473ace9dcf4f77.jpg)
5.1.3.3 Installing the share on your PC
Open My Computer or Windows Explorer on your PC. From the Tools menu, choose Map Network Drive.
Drive: Select a drive letter that the network drive should be mapped to. Folder: Enter the path to the desired folder, such as: „\Router's IP address\name you entered under Folder Name”
Example: „\192.168.2.1\Music“

You can also choose whether to reconnect the share after you restart or log on again. Click Finish. You must now enter the user name and password. If the entry is correct, the selected folder will open and you can add, copy or delete files, depending on your authorisation. If an error message appears that informs you that the folder could not be found or the connection could not be established, check that the path, user name and password that you entered are correct. Open My Computer to find the drive again later. The entry will be displayed there under Network Drives.
5.1.4 Sharing fi les via an FTP server
Select the FTP Server Setup menu item.
5.1.4.1 Adding/changing/deleting FTP folders
All FTP folders created on your storage medium are listed in the FTP Folders table.
Click Add to add a new folder.

User: Select a user that you created earlier in User Setup. Every user can be assigned to an FTP folder.
Add/Edit FTP Folder

Shared folder's Path: Click Browse. The window displayed at the top right appears. Click on the USB icon in the left column. All partitions will now be displayed in the window, such as C:. Click the desired partition. All existing folders from this partition will now be displayed. Click on the desired folder, or on New Folder to create a new folder. Then click on Submit.
Authority: Select whether the user is allowed to both read and write to the share or only read it.
Click Save to save your settings and to enter them in the table. To make changes to the settings of a shared folder, select it from the Select column and click Edit.
To remove a share, select the folder from the Select column and click Delete Selected, or delete all shared folders by clicking on Delete All.
Under Advanced Settings, you can enter additional settings that apply to all FTP folders created.
![http://192.161.2.2 - NIS Download - Mozilla Firefox Path: [USB1]C\ Submit USB1 Return New Folder False Mock Cancel Portg](/content/2026/05/1023455/images/f8cc89d1c7cd5c955391450958f4b2384c3de7d9f7fa5b0fa81495fa86a1083c.jpg)
Max Users: Maximum number of users allowed to access an FTP folder at any one time.
Idel Time: After the time entered here has run out, the user will be disconnected and will have to login again, if necessary. Internet Accessible: Activate this check box to enable access from the Internet.
Click Save to apply the settings.
5.1.4.2 Accessing the FTP folder
Open the browser and enter the following in the address bar: „ftp://IP_address_of_the_router/”.
For example (default): "ftp://192.168.2.1/"
You must now enter your user data in the window that appears. Depending on the user data entered, the FTP folder created for that user will open.
You can add, copy or delete fi les, depending on your authorisation.
If an error message appears that informs you that the folder could not be found or the connection could not be established, check that the path, user name and password you entered are correct.
In order to be able to find the folder again later, we recommend you save it under favourites in your browser.
6. Tools
The Hama Wireless LAN router provides you with various tools to help you configure and use the device.
6.1 Configuration Tools
From the start view which can be accessed by clicking Home, select Tools in the menu at the top right, and then Configuration Tools in the menu on the left.
This page allows you to save all confi guration options of the router. Click Save to do so. Then select the target folder. You should also set a fi le name which allows you to identify the fi le clearly. Click Save after your selection. The settings are now saved. If you want to restore the saved settings at a later time, click Browse and then select the confi guration fi le required. Click Upload to load the fi le. The router takes a few seconds to load the fi le and then to restart. The selected LAN confi guration is valid after restarting. To reset the router to the default set- tings, click Reset (Restore to Factory Default). Click OK at the next prompt. All settings are reset to the default settings.

6.2 Firmware Update
From the start view which can be accessed by clicking Home, select Tools in the menu at the top right, and then Firmware Upgrade in the menu on the left. To do so, click Next in the next window.
Click Browse to select the new firmware file in the next window. Click Apply after you select the file The new firmware is loaded and the router is restarted.
Warning! Earlier settings are lost when new fi rmware is loaded.
6.3 Re-starting the Router
From the start view which can be accessed by clicking Home, select Tools in the menu at the top right and then Reset in the menu on the left.
The router is restarted when you click Apply in this window and confirm the subsequent prompt by clicking OK. Settings you have made are not lost.
7. Status Information
From the start view which can be accessed by clicking Home, select Status in the menu at the top right.
The menu on the left contains various sub-menus via which you can view detailed information, such as Internet Connection, Device Status or Active DHCP Clients. The Statistics menu item also provides a packet counter.
8. Support and Contact Information
If products are defective:
Please contact your dealer or Hama Product Consulting if you have any product claims.
Internet / World Wide Web:
Product support, new drivers or product information can be found at www.hama.com
Support Hotline – Hama Product Consulting:
Tel. +49 (0) 9091 / 502-115
Fax +49 (0) 9091 / 502-272
E-mail: produktberatung@hama.de
Note:
This product may only be used in Germany, Austria, Switzerland, France, England, Belgium, Spain, Holland, Denmark, Hungary, Poland, Sweden, Luxembourg, Ireland, Greece, the Czech Republic, Slovakia and Finland.
See www.hama.com for the declaration of conformity with R&TTE Directive 99/5/EC.

natural_image
Pure grayscale gradient background with no visible text, symbols, or identifiable objects
- hama®
- WLAN Router »NAS« 54 Mbps
- Contents:
- Packet contents:
- Remark concerning the positioning:
- System requirements:
- Safety instructions:
- Connecting the Wireless LAN Router
- Checking Installation
- Confi guring the operating system and computer
- Confi guring the Wireless LAN Router
- Configuring the Internet Connection using the Setup Wizard
- Time Zone
- Broadband Type
- IP Address Info
- User Name
- Password
- Configuring the Wireless LAN
- Basic Settings for Wireless Networks (WLAN)
- Operation as an Access Point (AP)
- Operation as an AP Bridge Point to Point
- Operation as an AP Bridge Point to Multi-Point
- Operation as an AP Bridge WDS
- Setting the Encryption for AP
- WEP encryption
- Examples:
- WPA/WPA2 Encryption
- WPA pre-shared-key (recommended for most users)
- WPA RADIUS (requires a special authentication server)
- Setting the Encryption for Bridge-Point to Point, Bridge Point to Multi-Point and Bridge WDS
- WEP Encryption
- WPA/WPA2 Encryption
- Changing the Log-in Data
- LAN Settings
- DHCP Server:
- Connecting a USB printer to the network
- Configuring the router
- Installing a new printer on your PC
- Connecting a USB storage medium to the network
- Configuring the router
- Formatting the storage medium
- Warning! Formatting causes all existing data on the storage medium to be lost.
- Creating/changing/deleting user accounts
- Sharing a network drive (File Server/Samba Server)
- Network settings
- Adding/changing/deleting shared folders
- Installing the share on your PC
- Sharing fi les via an FTP server
- Adding/changing/deleting FTP folders
- Accessing the FTP folder
- Tools
- Configuration Tools
- Firmware Update
- Re-starting the Router
- Status Information
- Support and Contact Information
- If products are defective:
- Internet / World Wide Web:
- Support Hotline – Hama Product Consulting:
- Note:
Brand : HAMA
Model : Wireless LAN Router NAS
Category : Router