
EMP-1717 - Projector EPSON - Free user manual and instructions
Find the device manual for free EMP-1717 EPSON in PDF.


| Product Type | Video Projector |
| Brand | Epson |
| Model | EMP-1717 |
| Display Technology | 3LCD (0.55 inch) |
| Native Resolution | XGA (1024 x 768) |
| Brightness (ANSI Lumens) | 2600 |
| Contrast Ratio | 500:1 |
| Lamp Life | 2000 hours (Normal mode) |
| Weight | 2.8 kg (approx) |
| Dimensions (W x D x H) | 327 x 244 x 77 mm |
| Power Consumption | 260W (Normal) |
| Input Ports | VGA x 1, S-Video x 1, Composite Video x 1, Audio x 1 |
| Output Ports | Monitor Out x 1, USB (Service) x 1 |
| Built-in Speaker | 1W (Mono) |
| Remote Control | Yes (included) |
| Keystone Correction | Vertical +30°/-30° |
| Zoom Ratio | 1.2x manual |
| Noise Level | 35 dB (Normal) |
| Image Size (Diagonal) | 30 - 300 inches |
| Maintenance | Clean air filter periodically |
Frequently Asked Questions - EMP-1717 EPSON
User questions about EMP-1717 EPSON
0 question about this device. Answer the ones you know or ask your own.
Ask a new question about this device
Download the instructions for your Projector in PDF format for free! Find your manual EMP-1717 - EPSON and take your electronic device back in hand. On this page are published all the documents necessary for the use of your device. EMP-1717 by EPSON.
USER MANUAL EMP-1717 EPSON
EasyMP Monitor Operation Guide
Ver.4.31

Notations Used in This Guide
The following table shows the symbols used in this manual, along with descriptions of what they mean.
| Attention | Indicates procedures which may result in damage or injury if sufficient care is not taken. |
| Indicates additional information and points which may be useful to know regarding a topic. | |
| Indicates a page where detailed information regarding a topic can be found. | |
| Procedure | Indicates operating methods and the order of operations.The procedure indicated should be carried out in the order of the numbered steps. |
| [(Name)] | Indicates the name of the buttons on the projector's remote control or the control panel.Example: [Esc] button |
| "(Name)"Timer (Boldface) | Indicates the name of the buttons on the EasyMP Monitor or OS screens.Example:Select "Timer" - "Timer Settings".Select Timer - Timer Settings. |
Contents

Notations Used in This Guide.... 2
Meanings of Grouping view icons....
Using the icons in Grouping view....
Monitoring using Detaillistview....
Meanings of Detail list view icons....
Selecting display items....
Sorting lists....23
e•a r c h i n g f o r d e s i r e d i c o n s (P r o j e c t o r l i s t)....
M monitoring using the system tray....
Displaying projectors with problem or warning statuses in a list. 24
Checking properties in detail....
Displaying Group properties....
'Dis'playing Projector properties ....
Displaying and deleting logs....
'Di's'p Paying Log 28
Deleting Log....28
EasyMP Monitor Features
Tasks that can be done using EasyMP Monitor.
Operating environment
Compatible computers
Supported language...
Installing EasyMP Monitor
Limitations imposed by a Windows Vista environment
Before starting operations
Using the control functions.... 29
Carrying out control using control buttons......
. Carrying button control using a web browser (Web control).
Carrying out control using timersettings
Procedures for new timer settings
Mail notification function settings.... 33
Using EasyMP Monitor
Registering and deleting projectors for monitoring
Starting EasyMP Monitor
Registering projectors using automatic search (Searching for and registering
projectors that are located in the same segment)
Procedures for automatic search
Procedures for registration
Setting the range of addresses to do an automatic search and registration.....13
Procedures for automatic search
Procedures for registration
Registration by specifying an IP address (Manual registers, W, t, e, p, n, a, p, c, l, a, p, c, d) Applicatio n Fock between enabled and disab
Registering several projectors to a monitoring group Enabling the application lock
If the projector name or IP address changes after registers, Pst , θ , ning , the application lock
For projectors that have been registered manually...Setting a password for cancelling application lock
For projectors that have been registered using automatic search....18
Cancelling projector registrations (Delete)....18
Monitoring window la y o u t.... 19
Types of monitoring windows and switching method
Types of monitoring windows
How to switch views
Monitoring using Grouping view
Appendix
Troubleshooting....19 39
Projectors cannot be monitored or controlled
A ne-mail message is not sent when a problem occurs with
Contents

General Notice.... 40
Trademarks 40

EasyMP Monitor Features
Tasks that can be done using EasyMP Monitor

EasyMP Monitor lets you carry out operations such as checking the statuses of multiple EPSON projectors that are connected to a network at a computer monitor, and controlling the projectors from the computer.
Following are brief descriptions of the monitoring and control functions that can be carried out using EasyMP Monitor.
- Registering projectors for monitoring and control
Projectors on the network can be searched for automatically, and you can then select projectors to be registered from the projectors that are detected.
You can enter the IP addresses for target projectors to register them.
- Registered projectors can also be assigned to groups so that they can be monitored and controlled in groups.
• Monitoring the statuses of registered projectors
The power status (ON/OFF) for projectors and problems or warnings requiring attention can be checked visually by means of icons. You can select groups of projectors or a single projector that you are interested in, and then check the cumulative lamp operating time or the details of information such as input sources, problems, and warnings for these projectors.
• Controlling registered projectors
Projectors can be selected in groups or as single projectors, and you can then carry out operations for the selected projectors such as turning the power on and off and switching their input sources.
Web control functions can be used to change the settings in the projector's configuration menu.
If there are certain control actions which are carried out regularly at particular times or on particular days, you can use Timer Settings to register timer settings.
- Mail notification function settings
You can set e-mail addresses to which notifications are sent if a status requiring attention, such as a problem, occurs with a projector that has been registered.
![graph TD A["Person"] --> B["Computer"] B --> C["LAN"] C --> D["Server 1"] C --> E["Server 2"] C --> F["Server 3"] C --> G["Server 4"] C --> H["Server 5"]](/content/2026/05/1023378/images/e58ec10fd7a9d15b69ad176a1f1842543c28c6d830b063d7fcbda42d45d694db.jpg)

To enable projectors to be monitored and controlled even when they are in standby mode make the following settings at the projectors. The settings that need to be made will vary depending on the projector you are using. Projector's User's Guide
- Set Network Monitoring to On.
- Set Standby Mode to Network On.
* When the projector's ⏻ indicator is lit orange.
Compatible computers
This software is compatible with computers that comply with the following requirements.
| OS | Windows 98 Second Edition SP1Windows MeWindows NT4.0 SP6Windows 2000 Professional SP4The following 32-bit operating systems:Windows XP Home Edition SP2 or laterWindows XP Professional SP2 or laterWindows Vista(All editions except Starter Edition)Windows Vista SP1(All editions except Starter Edition)• Internet Explorer Ver. 5.0 or later must be installed. |
| CPU | Pentium MMX 166 MHz or higher (Pentium II 233 MHz or higher recommended) |
| Memory capacity | 64 MB or more (128 MB or more recommended) |
| Free hard disk space | 50 MB or more |
| Display | SVGA (800 x 600) or higher resolution, 32 bit or higher display colour |
• Macintosh computers cannot be used.
- Operations carried out at the computer may become slow depending on the number of projectors being managed. If this happens, use a computer with higher specifications.
- EasyMP Monitor cannot be used in environments which do not allow pings to be transmitted.
Supported language
EasyMP Monitor supports the following languages.
日本語, English, Français, Deutsch, Italiano, Español, Català, Português, 한국어, 中文(简体), 中文(繁体), Nederlands, Dansk, Polski, Magyar, Česky, Română, Slovenščina, Norsk, Svenska, Suomi, Русский, Українська*1, Елліникі, Türkçe, «العربية»*2, Malaysia, Bahasa Indonesia, Hrvatski, Slovenčina, Български език, بھاس، ملايو, tiếng Việt, Channel*2
*1 If your OS is Windows Vista, you must update to Windows Vista SP1 to use the Ukrainian version of EasyMP Monitor.
*2 Windows NT4.0 does not support Arabic and Hebrew versions.
Installing EasyMP Monitor
When you are using the following OS, you must have administrator authority in order to install EasyMP Monitor.
- Windows 2000 • Windows NT4.0
- Windows XP • Windows Vista
When your OS language is supported by EasyMP Monitor, the software is installed in the same language as your OS automatically.
However, the following cases are exceptions.
- When using Windows NT4.0: Since Arabic and Heblew are not supported, English is selected for the installation.
- When using Windows Vista: You must update to Windows Vista SP1 to use the Ukrainian version.
When the language selected for the EasyMP Monitor installation varies from that of the OS being used, the screens may not be displayed correctly.
Procedure

Turn the computer on.
To prevent problems from occurring during the installation, we recommend that you terminate all resident applications that can be ended.

Load the supplied Projector Software CD-ROM in your computer.
The installer automatically starts up.

From here, continue with the installation by following the on-screen messages.

The software name has been changed.
Before: EMP Monitor → After: EasyMP Monitor
If you are already using EMP Monitor, you can replace with this software. To update software, uninstall EMP Monitor first, and then install this software.
Limitations imposed by a Windows Vista environment
When using EasyMP Monitor under Windows Vista, note the following limitations.
- You must have administrator authority in order to use Register at startup on the Environment setup screen of EasyMP Monitor. - "Monitoring using the system tray" p.24
- Even after EasyMP Monitor has been uninstalled, the settings and log information will remain on the hard disk. If this information is no longer required, you may delete the EasyMP Monitor Ver.4.31 folder. Provided the default settings were used at installation, this folder can be found at: "C:\Users Name \AppData\Local\VirtualStore\Program Files\EPSON Projector\EasyMP Monitor Ver.4.31"
Before starting operations
Check the following points before starting up EasyMP Monitor.
- EasyMP Monitor must be installed on the computer to be used for monitoring and control.
- The computer and the projectors must be connected to the network.
- If using Windows 2000/Windows NT4.0/Windows XP/Windows Vista, the computer must be started up in Administrator mode.
- Depending on the projector model, a commercially-available serial ↔ TCP/IP conversion adapter and a connection cable are required in order to use EasyMP Monitor Projector's User's Guide "Standby Mode"
Make the settings for the serial→TCP/IP conversion adapter before connecting to the projector.

Using EasyMP Monitor
Registering and deleting projectors for monitoring

This operation is carried out when starting EasyMP Monitor for the first time after it has been installed and when you would like to add projectors. Once a projector has been registered, the status for the projector will be displayed automatically each time EasyMP Monitor is started from that point onwards.
The operations to register projectors vary as followings depending on where the projectors are connected to in the network.
- When registering a projector that is located in the same segment as the computer in which EasyMP Monitor is installed. "Registering projectors using automatic search (Searching for and registering projectors that are located in the same segment)" p.10
- When registering projectors that are in multiple segments of the network. "Setting the range of addresses to do an automatic search and registration" p.13
Starting EasyMP Monitor
Procedure

Click "Start" - "Programs" (or "All Programs") - "EPSON
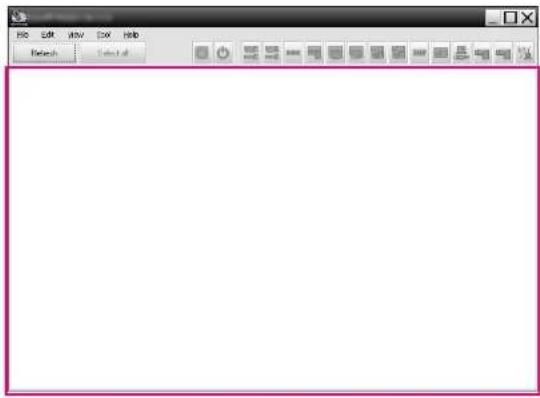
Projector" - "EasyMP Monitor Ver.4.31" in that order to start Procedures for automatic search EasyMP Monitor.

The main window will be displayed.
The red box area described in the screen below is referred to as Grouping view.
Registering projectors using automatic search (Searching for and registering projectors that are located in the same segment)
Procedure

Right-click in Grouping view and select "New" - "Projector (automatic search)".
The following Create new projector (automatic registration) window will be displayed.
If Detail list view is displayed, select New - Projector (automatic search) from the Edit menu.
Registering and deleting projectors for monitoring


Click "Search".
Automatic searching will be carried out, and the names of the projectors that have been detected will be displayed.
If a projector does not appear in the list, use "Registration by specifying an IP address (Manual registration)" p.15


- You can also carry out this operation by selecting New - Projector (automatic search) from the Edit menu.
- Projectors that are using a serial ↔ TCP/IP conversion adapter cannot be detected.
Procedures for registration
Procedure

Select the projector(s) to be registered from the displayed list, and then click "Edit".
The following window will be displayed.
Registering and deleting projectors for monitoring

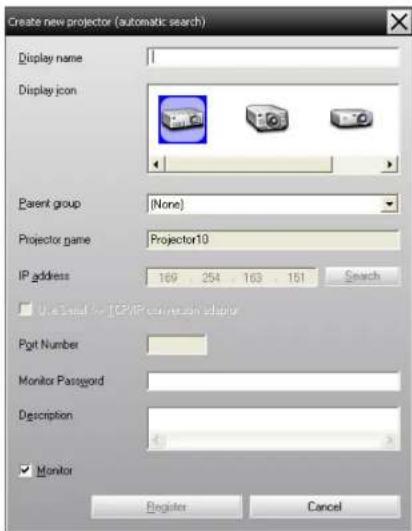
Make the necessary settings while referring to the following table.
| Display name | Enter the name of the projector(s) to be displayed in Grouping view or Detail list view.Up to a maximum of 32 bytes can be entered. A space cannot be used as the first character. |
| Display icon | Select the icon(s) to be displayed in Grouping view or Detail list view. |
| Parent group | Select when registering a projector in a group.If no groups have been created, this cannot be selected."Registering several projectors to a monitoring group all at once" p.16 |
| Projector name | This shows the name that has been registered on the projector. |
| IP address | This shows the IP address for the registered projector. |
| Use Serial ↔ TCP/IP conversion adaptor. | This cannot be selected when registering projectors using automatic search. |
| Port Number | This cannot be selected when registering projectors using automatic search. |
| Monitor Password | If a Monitor Password has been set for the projector, be sure to enter the Monitor Password that has been set. If the correct password is not entered at this time, it will not be possible to monitor and control the projector even though it is registered. |
| Description | You can enter some kind of memo about the projector. The details you enter here will be displayed at the projector properties.Up to a maximum of 60 bytes can be entered. |
| Monitor | Select this when you want monitoring to start. |

After entering the details, click "Register" to start the registration. When the message is displayed, click "OK".
To continue registering other projector(s), repeat Steps 1 and 2.

Projectors that have been registered using automatic search are searched for again by projector name each time EasyMP Monitor is started.
Registering and deleting projectors for monitoring


To end the registration operation, click in the top-right corner of the window or click "Cancel".
The icon(s) of the projector(s) you registered will be displayed in Grouping view or Detail list view.
Refer to "Monitoring window layout" p.19 for details on using the Grouping view and Detail list view.
Setting the range of addresses to do an automatic search and registration

Projectors that are using a serial ↔ TCP/IP conversion adapter cannot be detected.
Procedures for automatic search
Procedure

Right-click in Grouping view and select "New" - "Projector (automatic search)".
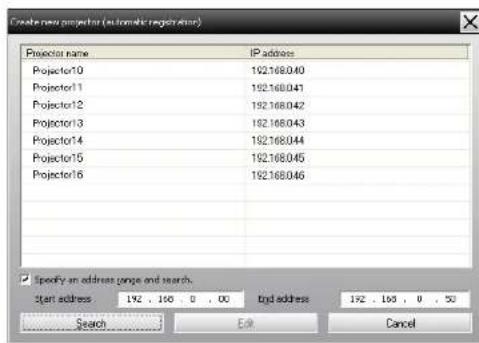
The Create new projector (automatic registration) window will be displayed.
If Detail list view is displayed, select New - Projector (automatic search) from the Edit menu.

Select the "Specify an address range and search." check box and then enter "Start address" and "End address" in the range.


Click "Search".
Automatic searching will be carried out, and the names of the projectors that have been detected will be displayed.
Registering and deleting projectors for monitoring

Procedures for registration
Procedure

Select the projector(s) to be registered from the displayed list, and then click "Edit".
The following window will be displayed.

Make the necessary settings while referring to the following table.
| Display name | Enter the name of the projector(s) to be displayed in Grouping view or Detail list view.Up to a maximum of 32 bytes can be entered. A space cannot be used as the first character. |
| Display icon | Select the icon(s) to be displayed in Grouping view or Detail list view. |
| Parent group | Select when registering a projector in a group.If no groups have been created, this cannot be selected."Registering several projectors to a monitoring group all at once" p.16 |
| Projector name | This shows the name that has been registered on the projector. |
| IP address | This shows the IP address for the registered projector. |
| Use Serial ↔ TCP/IP conversion adaptor. | This cannot be selected when registering projectors using automatic search. |
| Port Number | This cannot be selected when registering projectors using automatic search. |
| Monitor Password | If a Monitor Password has been set for the projector, be sure to enter the Monitor Password that has been set. If the correct password is not entered at this time, it will not be possible to monitor and control the projector even though it is registered. |
| Description | You can enter some kind of memo about the projector.The details you enter here will be displayed at the projector properties.Up to a maximum of 60 bytes can be entered. |
| Monitor | Select this when you want monitoring to start. |

After entering the details, click "Register" to start the registration. When the message is displayed, click "OK".
To continue registering other projector(s), repeat Steps 1 and 2.
Registering and deleting projectors for monitoring


To end the registration operation, click in the top-right corner of the window or click "Cancel".
The icon(s) of the projector(s) you registered will be displayed in Grouping view or Detail list view.
Refer to "Monitoring window layout" p.19 for details on using the Grouping view and Detail list view.
Registration by specifying an IP address (Manual registration)
Procedure

Right-click in Grouping view and select "New" - "Projector (manual registration)".
The following window will be displayed. If Detail list view is displayed, select New - Projector (manual registration) from the Edit menu.
![Create new projector (manual registration) Display name Display icon Parent group [None] Projector name IP address Search Use Serial <> ICP/IP conversion adaptor Port Number Monitor Password Description Monitor Registers Cancel](/content/2026/05/1023378/images/5d6de866262dc778853b892a67ec7b57903278b5df9494e5151a3bdfe0e30fa0.jpg)

You can also carry out this operation by selecting New - Projector (manual registration) from the Edit menu.

Enter the IP address of the projector to be registered in the "IP address" box and then click "Search". When the message is displayed, click "OK".
If using a serial↔ TCP/IP conversion adapter and cable to connect the projector, select Use Serial↔ TCP/IP conversion adaptor., enter the port number in Port Number, and then click Search.

After searching is complete, enter the information for the projector to be registered while referring to the table below.
| Display name | Enter the name of the projector(s) to be displayed in Grouping view or Detail list view. Up to a maximum of 32 bytes can be entered. A space cannot be used as the first character. |
| Display icon | Select the icon(s) to be displayed in Grouping view or Detail list view. |
| Parent group | Select when registering a projector in a group. If no groups have been created, this cannot be selected. ➡ "Registering several projectors to a monitoring group all at once" p.16 |
| Projector name | This shows the name that has been registered on the projector. |
| IP address | This shows the IP address that you entered in step 2. |
| Use Serial ↔ TCP/IP conversion adaptor. | Select this if using a serial ↔ TCP/IP conversion adapter to connect the projector. |
| Port Number | If using a serial ↔ TCP/IP conversion adapter to connect the projector, enter the port number. |
| Monitor Password | If a Monitor Password has been set for the projector, be sure to enter the Monitor Password that has been set. If the correct password is not entered at this time, it will not be possible to monitor and control the projector even though it is registered. If using a serial ↔ TCP/IP conversion adapter to connect the projector, the Monitor Password security function cannot be used. |
| Description | You can enter some kind of memo about the projector. 'The details you enter here will be displayed at the projector properties.Up to a maximum of 60 bytes can be entered. |
| Monitor | Select this when you want monitoring to start. |

After entering the details, click "Register" to start the registration. When the message is displayed, click "OK".
The icon(s) of the projector(s) you registered will be displayed in Grouping view or Detail list view.
Registering several projectors to a monitoring group all at once
Projectors that have been registered can then be registered together into different groups so that they can be monitored and controlled together.
Furthermore, if you select one of the registered groups as the Parent group, monitoring and control operations can be carried out for all projectors in that Parent group.
A Parent group can be set for other parent groups, so that a hierarchical group arrangement can be created.
First, create the registration groups, and then register projectors into the groups that have been created.
Procedure

Right-click in Grouping view and select "New" - "Group".
The following window will be displayed.
Make the necessary settings while referring to the table below.
If Detail list view is displayed, select New - Group from the Edit menu.
Registering and deleting projectors for monitoring

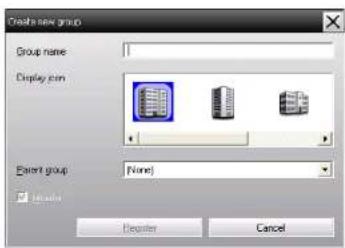
| Group name | Enter the name of the group to be displayed in Grouping view or Detail list view.Up to a maximum of 32 bytes can be entered. A space cannot be used as the first character. |
| Display icon | Select the icon(s) to be displayed in Grouping view or Detail list view. |
| Parent group | This selects the parent group. If no groups have been created, this cannot be selected. |
| Monitor | Select this to monitor all projectors that have been registered in the group. If this is not selected, the settings made when the individual projectors were registered will be used.It cannot be set when creating a new group. |

You can also carry out this operation by selecting New - Group from the Edit menu.

When the setup is complete, click "Register" to start the registration. When the message is displayed, click "OK".
The icon(s) of the projector(s) you registered will be displayed in Grouping view or Detail list view.

Right-click the projector icon(s) to register to the group you have created in Grouping view or Detail list view, and select "Edit".

You can also carry out this operation by selecting Edit in the Edit menu.

In the Edit projector window, select the group name to use for registering in Parent group and then click "Change".
The status of the group registration will be displayed as an icon in Grouping view or Detail list view.

The registration details can also be checked using Projector list in the View menu.
If the projector name or IP address changes after registration
For projectors that have been registered manually
Procedure

Right-click on a projector icon in Grouping view or Detail list view and select "Monitoring disabled". Then right-click the projector icon again and select "Edit".
Registering and deleting projectors for monitoring


You can also carry out these operations by using the Edit menu.

If only the projector name has been changed, click "Search" in the Edit projector window that is displayed. If the IP address has been changed, enter the new IP address in the "IP address" box and then click "Search". When the message is displayed, click "OK".

When the display returns to the Edit projector window, click "Change".
For projectors that have been registered using automatic search
Procedure

Delete the projector(s) whose name or IP address has been changed in Grouping view or Detail list view. p.18

Carry out automatic search to re-register the projector(s). p.10
Cancelling projector registrations (Delete)
The registrations for projectors can be deleted if they are no longer required for monitoring or control using EasyMP Monitor.
Procedure
Right-click the icon for the projector or group that is to be deleted in Grouping view or Detail list view and select "Delete". When the message is displayed, click "OK".
More than one projector can be selected for deleting by selecting in Grouping view or Detail list view.
The methods of selecting more than one projector at the same time are as follow.
- If you select a Group icon in Grouping view, all projectors that have been registered in that group will be deleted at the same time.
- Hold down the Ctrl key on the keyboard while clicking on the desired icons.
- Use drag and drop to select a range of desired icons.

You can also carry out this operation by selecting Delete in the Edit menu.
Types of monitoring windows and switching method
Types of monitoring windows
There are two types of monitoring windows. Select a desired window.
- Grouping view
This view lets you check the status of group registrations in a hierarchical diagram.
![graph TD A["系统"] --> B["模块1"] A --> C["模块2"] A --> D["模块3"] B --> E["子模块1"] C --> F["子模块2"] D --> G["子模块3"]](/content/2026/05/1023378/images/1b03cf516a3cb935c7f2102413a548e2ba99b234e6d8629e279cc7765a797a0c.jpg)
Grouping view
• Detail list view
This view lets you display the status of each projector as a list so that the projectors can be checked in detail. You can also display specific items as a list, and sort display items using a specific row as a sort key.

Grouping view and Detail list view are switched as follows.
Procedure
Click the View menu, and select "Grouping view" or "Detail list view".
Monitoring using Grouping view
Meanings of Grouping view icons
In Grouping view, the patterns on the icons indicate the statuses of the projectors. If the group icons are round in shape, it indicates that there is another level below them p.20
![graph TD A["Showbox"] --> B["Conversion Net"] A --> C["Line"] B --> D["Showbox A"] B --> E["Showbox B"] D --> F["No1"] D --> G["No2"] D --> H["No3"] I["Bench C"] --> J["Search B"] I --> K["Bench C"]](/content/2026/05/1023378/images/e6eea766e02ebd26c61cb56d45c9ee8d1d5f530e9829706049ccacac15a76263.jpg)
Monitoring window layout

The icon patterns and their meanings are explained below.
| Group | |
| No warnings or problemsAll projectors in the group are normal. | |
| Warning or problemA projector in the group has a warning or problem status. | |
| NotificationA projector requiring immediate attention has been detected within the group. | |
| Monitoring disabledThe projector is not being monitored. If you right-click the icon and select Monitoring enabled, the projector will be added to the projectors that are being monitored. | |
| Data being updated | |
| Projector | |
| No warnings or problems x1 | |
| Warning or problem | |
| Notification | |
| Monitoring disabled | |
| Data being updated | |
| Network error (Monitor Password authentication error)No Monitor Password was entered when the projector was registered, or an incorrect Monitor Password was entered. p.11, p.14, p.15 | |
| Projector | |
| Network error (TCP connection error 2 ) | |
| Network error (ESC/VP.net communication error 3 ) | |
*1 When Temperature level display group view is set to On at Environment setup in the Tool menu, an icon indicating the internal temperature of the projector will be displayed on top of the projector icon. The default setting is Off. As you can get an idea of how the temperature inside the projector is increasing when Temperature level is displayed, you can make improvements to the projector's operating environment before a high internal temperature error or high-temperature warning occur p.24
*2 Check the following items. - Check that the projector's power is turned on.
- Check that the LAN cable is connected.
- Check that Network Monitoring is set to On or Standby Mode is set to Network On in the projector's configuration menu.
*3 Check that the projector has been correctly connected to the network.

The projector information that is generated when a problem is detected is stored until EasyMP Monitor is closed. EasyMP Monitor displays will not be updated automatically even if the projector status returns to normal. Click "Refresh" in the main window to update the status.
Using the icons in Grouping view
The following icon operations can be carried out in Grouping view.
Monitoring window layout

- Expanding and collapsing icons
Each time you double-click a group icon, the icons for the projector that have been registered in that group are displayed or hidden.
- Moving icons
To change the position of an icon within Grouping view, simply drag and drop the icon to be moved.
Monitoring using Detail list view
Meanings of Detail list view icons
The status of registered projectors is displayed as a list in Detail list view regardless of which Group the projectors belong to.
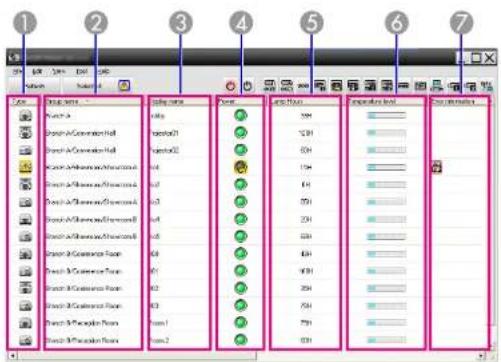
The icon patterns and their meanings are explained below.
1 Type
Displays the projector status.
No warnings or problems
Warning or problem
An error has occurred on the projector.
Notification
The projector requires immediate attention.
Monitoring disabled
The projector is not being monitored. If you right-click the icon and select Monitoring enabled, the projector will be added to the projectors that are being monitored.
Data being updated
Network error (Monitor Password authentication error)
No Monitor Password was entered when the projector was registered, or an incorrect Monitor Password was entered. p.11, p.14, p.15
Network error (TCP connection error)
Network error (ESC/VP.net communication error)
② Group name
When projectors are registered to a group, the name of the group that the projector belongs to is displayed.
③ Display name
Shows the display name.
4 Power
Shows the power on status for the projector.
Power on and normal status Power off and normal status
Power on and abnormal status Power off and abnormal status
⑤ Lamp Hours
Shows the lamp operating time for the projector. If the projector has 2 lamps, it shows the lamp operating time for both lamp 1 and lamp 2.
6 Temperature level
The following five icons display the differing internal temperature status of the projector.
Monitoring window layout


7 Error information
Shows a notification or warning/problem status using the following icons.
Clean Air Filter Notice Replace Lamp
1 Replace Lamp (Lamp 1) Replace Lamp (Lamp 2)
Lamp error (Lamp 1) Lamp error (Lamp 2)
Lamp failure at power on (Lamp 1) Lamp failure at power on (Lamp 2)
High-temperature warning Replace Air Filter
No Air Filter Low Air Flow
Air Flow Sensor Err. Supply System Error (Ballast 1)
Supply System Error (Ballast Cinema filter warning 2)
Shutter warning Lamp Cover Open
Lamp Error Lamp Error (Lamp1)
2 Lamp Error (Lamp 2) Lamp failure at power on
Lamp failure at power on (Lamp 1) Lamp failure at power on (Lamp 2)
High internal temperature error Low air flow error
Air filter air flow sensor error Internal Error
Fan error Sensor error
Supply System Error (Ballast) Supply System Error (Ballast 1)
Supply System Error (Ballast Auto Iris Error 2)
Cinema filter error Shutter error
Cooling system error (Peltier element) Cooling system error (pump)
Other error
*1 When Temperature level display group view is set to On at Environment setup in the Tool menu, an icon indicating the internal temperature of the projector will be displayed on top of the projector icon. The default setting is Off.
*2 Check the following items.
- Check that the projector's power is turned on.
- Check that the LAN cable is connected.
- Check that Network Monitoring is set to On or Standby Mode is set to Network On in the projector's configuration menu.
*3 Check that the projector has been correctly connected to the network.
*4 You can display Replace Lamp at any time preset at Environment setup in the Tool menu.

- The projector information that is generated when a problem is detected is stored until EasyMP Monitor is closed. EasyMP Monitor displays will not be updated automatically even if the projector status returns to normal. Click "Refresh" in the main window to update the status.
- Detectable error information differs with the projector you are using.
Selecting display items
You can select only the required items to be displayed in Detail list view.
Procedure

Select "Option" from the View menu. The Option window will be displayed.
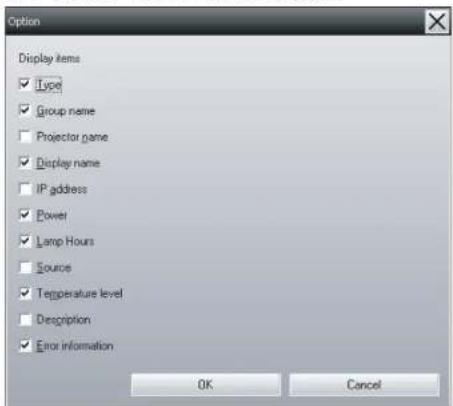

Select the check box of the item you want to display.

Click "OK".

When all of the details of the item cannot be displayed in Detail list view, drag the boundary line on the right of the item name so that the view is extended to the desired width.
Sorting lists
You can sort detailed lists by using a specific row as a sort key, such as projector name order or IP address order.
Procedure
Click the item name of the row you want to use as the sort key.
Searching for desired icons (Projector list)
The Projector list feature is useful for searching in lists when many groups and projectors are registered and the icon you are looking for is not displayed on screen.
Procedure
Select "Projector list" from the View menu.
The following window will be displayed.
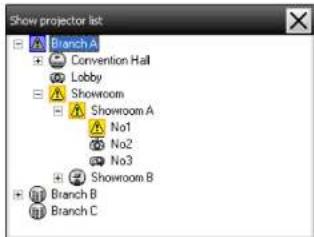
With Projector list, temperature level icons are not displayed regardless of the setting of Temperature level display group view at Environment setup.
The Projector list lets you check the registration details for groups in a hierarchical diagram. When you click on an icon, Grouping view and Detail list view are scrolled so that the selected icon is displayed in the window.
Monitoring using the system tray
The projector statuses are always displayed as icons in the system tray, even when Grouping view or Detail list view is not always displayed, and the statuses can be checked by the icon patterns.
When the configuration menus are set using the following operations, an icon appears in the system tray and the status can be monitored by means of the icon's pattern.

The icon patterns are explained below.

No problem Problem
Procedure

Select "Environment setup" from the Tool menu.
The Environment setup window will be displayed.

Select "Resident in the task tray".


Click "OK".

- Right-click the icon in the system tray to open a pop-up menu to select the Open the main screen or Exit.
- If Register at startup in the Environment setup is selected, EasyMP Monitor starts automatically when the computer's power is turned on. When using EasyMP Monitor under Windows Vista, you must have administrator authority in order to use this function.
Displaying projectors with problem or warning statuses in a list
You can display a list of only the projectors which have a problem or warning status.
Procedure
Select "Warning and Error Projector list" from the View menu.
The following Warning and Error Projector list window will be displayed.
If you move the mouse pointer over the icon of the Error information, details of the error and the remedy will be displayed. If you double-click in a line, the properties for that projector will be displayed.
p.27

The icon patterns and their meanings are explained below.
① Type
Shows the group or projector status.

No warnings or problems

Warning or problem
An error has occurred on the projector.

Notification
The projector requires immediate attention.

Monitoring disabled
The projector is not being monitored. If you right-click the icon and select Monitoring enabled, the projector will be added to the projectors that are being monitored.

Data being updated

Network error (Monitor Password authentication error) No Monitor Password was entered when the projector was registered, or an incorrect Monitor Password was entered. p.11, p.14, p.15

Network error (TCP connection error)

Network error (ESC/VP.net communication error) 4
② Display name
Shows the display name.
Power
Shows the power on status for the projector.

Power on and normal status Power off and normal status

Power on and abnormal status Power off and abnormal status
4 Lamp Hours
Shows the lamp operating time for the projector.
5 Source
Shows the input source that has been selected for the projector.

Computer or Computer1


BNC S-Video


Video (RCA) Video

∴ m = 3/11

DVI-D1 or HDMI1, DVI-D, HDMI 4


D-Video EasyMP


USB Display USB or


Monitoring window layout


USB2 LAN

6 Temperature level
The following five icons display the differing internal temperature status of the projector.
Internal temperature normal
Internal temperature normal
High-temperature warning
High-temperature warning
Internal temperature error
⑦ Error information
Shows a warning/problem status using the following icons.
Replace Lamp 6
Replace Lamp (Lamp 1)
2 Replace Lamp (Lamp 2) Lamp Error (Lamp 1)
2 Lamp error (Lamp 2) Lamp failure at power on (Lamp 1)
Lamp failure at power on (Lamp 2) High-temperature warning
Replace Air Filter No Air Filter
Low Air Flow Air Flow Sensor Err.
Supply System Error (Ballast 1) Supply System Error (Ballast 2)
Cinema filter warning Shutter warning
Lamp Cover Open Lamp Error
1 Lamp Error (Lamp 1) Lamp 2 or (Lamp 2)
Lamp failure at power on Lamp failure at power on (Lamp 1)
Lamp failure at power on (Lamp 2) High internal temperature error
Low air flow error Air filter air-flow sensor error
Internal Error Fan error
Sensor error
Supply System Error (Ballast 1)
Auto Iris Error
Shutter error
Cooling system error (pump) Other error
*1 When Temperature level display group view is set to On at Environment setup in the Tool menu, an icon indicating the internal temperature of the projector will be displayed on top of the projector icon. The default setting is Off.
*2 Check the following items.
- Check that the projector's power is turned on.
- Check that the LAN cable is connected.
- Check that Network Monitoring is set to On or Standby Mode is set to Network On in the projector's configuration menu.
*3 Check that the projector has been correctly connected to the network.
*4 It describes DVI-D if the projector is equipped with both DVI-D and HDMI input terminal.
*5 It describes HDMI if the projector is equipped with both DVI-D and HDMI input terminal.
*6 You can display Replace Lamp at any time preset at Environment setup in the Tool menu.

Detectable error information differs with the projector you are using.
Checking properties in detail
You can check the properties of Group and projectors in detail.
Displaying Group properties
Procedure
You can use either of the following methods to display the properties.
- Displaying the properties for all groups in Grouping view Right-click in Grouping view and select Property.
- Displaying the specified group properties Right-click an icon in Grouping view and then select Property.
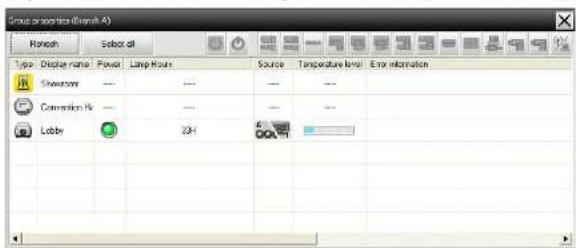
If you double-click in a line, the properties for that group or projector will be displayed.
Displaying Projector properties
Right-click on a projector icon in Grouping view or Detail list view and select Property.
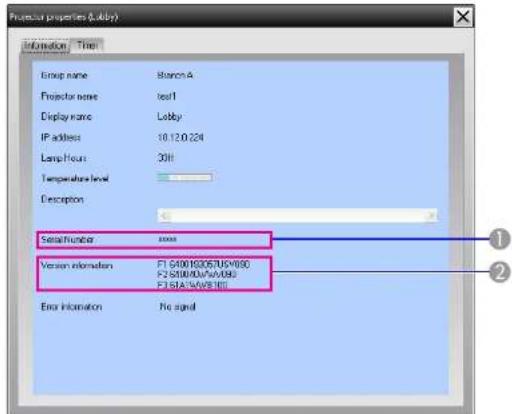
① Shows the projector's serial number. If hyphens are displayed, confirm the serial number on the label of the projector.
② Displays the projector firmware version.
Displaying and deleting logs
In your web browser, you can check a transmission log of content such as what has been controlled by EasyMP Monitor, projector errors. You can delete logs once you have checked them.

When Log output is set to On at Environment setup in the Tool menu, transmission logs are stored. The default setting is Off.
Monitoring window layout

Displaying Log
Procedure
Select "Log" - "View" from the View menu.
The web browser will open and the communication logs up until that time will be displayed.
Deleting Log
Procedure
Select "Log" - "Delete" from the View menu. When the confirmation message is displayed, click "OK".
All logs will be deleted and details of EMP Monitor control operations and details of projector errors from that point onward will be recorded in a new log.
Carrying out control using control buttons
Click the icon of a projector to be controlled in Grouping view or Detail list view, and click a control button to enable control of only that selected projector.
You can also enable control of all selected projectors by selecting more than one projector in Grouping view or Detail list view and clicking control button. The methods of selecting more than one projector at the same time are as follow.
- If you select a group icon in Grouping view, all projectors that have been registered in that group and that are set to be monitored can be controlled at the same time.
- Hold down the Ctrl key on the keyboard while clicking on the desired icons.
- Use drag and drop to select a range of desired icons.
![graph TD A["Shockwave"] --> B["Shockwave A"] A --> C["Shockwave B"] B --> D["Shockwave A"] B --> E["Shockwave B"] C --> F["Shockwave A"] C --> G["Shockwave B"] D --> H["No1"] D --> I["No2"] D --> J["No3"] E --> K["Switch B"] E --> L["Switch C"]](/content/2026/05/1023378/images/edf8d5b1e64a09423a59756d138742e597339f6dd386f8301d2988e8ee7023ec.jpg)
The following table shows the meanings of the control buttons.
| Power On | Turns the projector power on. | |
| Power Off | Turns the projector power off. | |
| Switch source Computer1 | Switches the video input source to the Computer1 port or Computer port. | |
| Switch source Computer 2 | Switches the video input source to the Computer2 port. | |
| Switch source BNC | Switches the video input source to the BNC port. | |
| Switch source S-Video | Switches the video input source to the S-Video port. | |
| Switch source Video (RCA) | Switches the video input source to the Video port or video2 port. | |
| Switch source Video (BNC) | Switches the video input source to the Video1 port. | |
| Switch source DVI-D, HDMI 1 | Switches the video input source to the DVI-D1 port or HDMI1 port.If the projector is equipped with ether DVI-D port or HDMI port, use this button to switch the input signal.If the projector is equipped with both DVI-D port and HDMI port, use this button to select DVI-D as an input source. | |
| Switch source DVI-D, HDMI 2 | Switches the video input source to the DVI-D2 port or HDMI2 port.If the projector is equipped with both DVI-D port and HDMI port, use this button to select HDMI as an input source. | |
| Switch source D-Video | Switches the video input source to the D4 port | |
| Switch source EasyMP | Switches the input source to EasyMP or EasyMP.net. | |
| Switch source USB Display* | Switches the input source to USB Display. | |
| Switch source USB1* | Switches the video input source to the extern equipment connected via a USB (Type A) port or USB1. | |
| Switch source USB2* | Switches the video input source to the extern equipment connected via a USB2 port. | |
| Switch source LAN* | Switches the video input source to the image projected by the computer via a network. |
* If the button does not function, you can switch the input source using the MP button.

- Some connected projectors may not be equipped with all of the above ports or functions. If you click a button for a port or function that is not available, nothing will happen.
- You can select objects to be controlled and use the control buttons to carry out control operations even when the following are being displayed.
Group properties p.27
Projector properties p.27
Warning and Error Projector list
(Control operations can only be carried out for projectors with a warning status.) p.24
Carrying out control using a web browser (Web control)
You can use the computer's web browser to change the configuration menu settings for projectors.
Procedure

Right-click on the icon of a projector to be controlled in Grouping view or Detail list view and select "Web control".

The web browser will open and the Web control window will be displayed.
Web control lets you set the same details as the configuration menu for the projector. Projector's User's Guide

You can select projectors and right-click on them to select Web control even when the following are being displayed. Group properties p.27
Warning and Error Projector list (Control operations can only be carried out for projectors with a warning status.) p.24
Carrying out control using timer settings
This is useful for carrying out certain control operations such as turning a projector's power on and off at specified times every day or every week.
Timer settings can be carried out either for a single projector only, or all at once for all projectors in a group.
Procedure
Select "Timer" - "Timer Settings" from the Tool menu.
The following window will be displayed and you can then check the timer setting status.
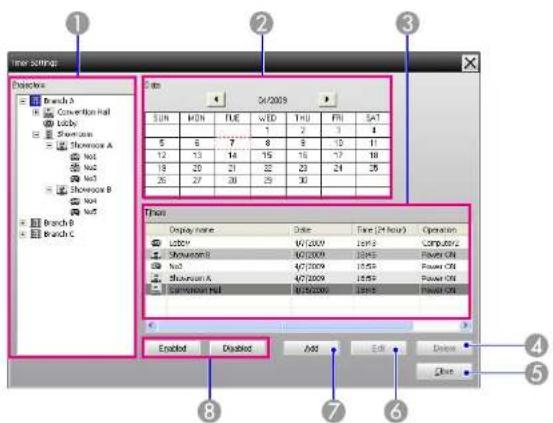
The details that can be checked and operations that can be carried out at this time are given below.
① Projectors
Selects a group or projector to check the status of.
When a group is selected, the timer setting statuses for all projectors in that group are displayed.
② Date
Shows the current day in a red box.
Days for which timer settings have been made are shown in bold.
Click ↕ or ↗ switch to the calendar for the previous or next month.
3 Timers
Shows a list of the timer settings.
The line colors in the Timers list have the following meanings:

Current day's timer setting

When some of the projectors in the group have timer setting enabled and others have it disabled for the current day's timer setting

When the current day's timer setting is a disabled setting

Timer setting for a day other than the current day
④ Delete

Lets you delete timer settings that have been selected from the timer list.
5 Close

Closes the Timer Settings window.
6 Edit

Lets you change the timer settings that have been selected from the timer list. If a group has been selected for status checking, the settings cannot be changed.
⑦ Add

Registers new timer settings. "Procedures for new timer settings" p.31
8 Enabled/disabled

Switches the timer settings that have been selected from the timer list between enabled and disabled.

Procedures for new timer settings
Procedure

Click "Add" on the Timer Settings window. The following window is displayed and the new timer settings are applied.
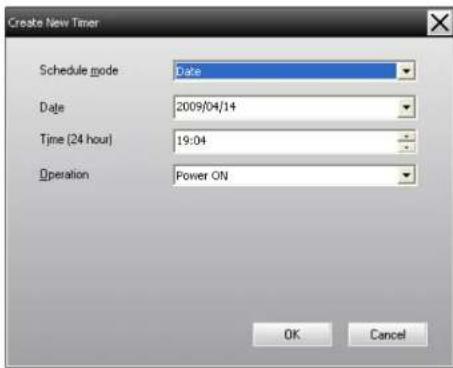
At Operation, you can carry out the operations of turning the power on and off and switching the input sources, similarly for the control buttons on the main window. If you set the input source switching, the projector's power will turn on at the timer start time even if it is not on at the time. Because of this, it is not necessary to make two separate timer settings for turning the power on and switching the input source.

After completing the timer settings, click "OK".
The timer settings that have been made will be registered and they can be checked in the displayed timer list.

You can enable and disable all of the timer settings that have been registered. Select Timer - Enable or Disable from the Tool menu.
Mail notification function settings

The mail notification function can be used to send corresponding notification messages to a preset e-mail address when a projector that is connected to the network assumes a certain status, or if it experiences a problem or warning. By using this function, the operator can be notified of a projector's status or problems even when the operator is in a different location from the projectors.

- Up to three addressees (destinations) can be registered and messages can be sent to all of them at once.
- If a critical problem develops with a projector which causes it to suddenly stop working, it may not be possible for the projector to send a message notifying an operator of the problem.
- If Standby Mode is set to Network On or Network Monitoring is set to On in the projector configuration menus, you can monitor the projector even when it is in standby mode (when it power is turned off). Projector's User's Guide
- On some projectors, the mail notification function can be set in the configuration menu. When notification messages are set to be sent in the projector's configuration menu, both the settings in the configuration menu and settings made on EasyMP Monitor are functional.
- Detectable status with the mail notification function differs with the projector you are using.
Procedure

Select "Mail notification function" from the Tool menu.

The Set mail notification function window will be displayed.
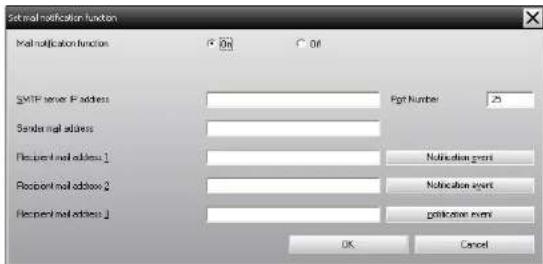
Make the necessary settings while referring to the table below.
| Mail notification function | Set to On to use the mail notification function. |
| SMTP server IP address | Enter the IP address of the SMTP server. Up to a maximum of 255 bytes can be entered.When you change a port number of the SMTP server, specify this port number. The default value is "25".You can enter a valid number from 1 to 65535. |
| Sender mail address | Enter the sender's e-mail address. Up to a maximum of 255 bytes can be entered. |
| Recipient mail address 1 | Specify the destination addresses for the notification e-mail. Up to three destinations can be set. Up to a maximum of 255 bytes can be entered. |
| Recipient mail address 2 | |
| Recipient mail address 3 |

Click "Notification event" and check the items for mail notification in the window that appears.
Mail notification function settings


Click "OK".
The Set mail notification function window appears again.
Repeat Steps 3 and 4 to set the notification events to be notified.

When the setup is complete, click "OK".
An e-mail notifying the operator of a problem/warning/status is issued

If the projector experiences a problem or enters a status requiring attention, an e-mail like that shown below is sent to the address specified for Recipient mail address.
If there is more than one problem, warning, or status, the corresponding messages are output to separate lines.
| Item Details shown | |
| E-mail subject [Display name displayed in Grouping view or Detail list view] Projector status notification | |
| Bodyhas entered the following status. | has entered the following status.has entered the following status. |
The details contained in the e-mail message can consist of the following.
| Message Remedy | |
| Internal Error Refer to | Reading the indicators. ● Projector's User's Guide |
| Fan error | |
| Sensor error | |
| Lamp Cover Open | |
| Lamp failure at power on* | |
| Lamp Error* | |
| Supply System Error (Ballast)* | |
| High internal temperature error | |
| Low air flow error | |
| Air filter air flow sensor error | |
| Cinema filter error |
| Message Remedy | |
| Shutter error | |
| Cooling system error (Peltier element) | |
| Cooling system error (pump) | |
| High-temperature warning | |
| Replace Lamp | |
| Lamp error | |
| Lamp failure at power on * | |
| Supply System Error (Ballast) * | |
| Replace Air Filter | |
| No Air Filter | |
| Low Air Flow | |
| Air Flow Sensor Err. | |
| Cinema filter warning | |
| Shutter warning | |
| Clean Air Filter Notice | |
| No signal No image signals are being received by the projector. Check the connection status and check that the power for the connected equipment is turned on. | |
| Other error Stop using the projector, disconnect the power cable from the electrical outlet, and contact your local dealer or the nearest address provided in the Support and Service Guide supplied with the projector. | |
| Auto Iris Error | |
An e-mail notifying the operator of a problem/warning/status is issued

| Message Remedy | |
| Network error (TCP connection error) | Check that the projector's power is turned on and the LAN cable is connected, and also check that Network Monitoring is set to On and Standby Mode is set to Network On. ➕ Projector's User's Guide |
| Network error (ESC/VP.net communication error) | Check that the projector has been correctly connected to the network. ➕ Projector's User's Guide |
| Network error (Monitor Password authentication error) | Check the projector's Monitor Password. |
* When the projector has 2 lamps, the additional information, such as (Lamp 1) or (Ballast 1), is displayed after the message so that you can know witch lamp has problems/warnings.
Messages to inform that the projector has recovered from the error or warning statuses are sent.
Application lock function

You can use the application lock to prevent third parties from operating the projectors using EasyMP Monitor and from changing settings without authority. Opening and closing EasyMP Monitor and status monitoring can still be carried out even when the application lock is applied.
In addition, when a password has been set, the password must be entered in order to cancel the application lock. This ensures that the application lock can not be easily cancelled, and thus improves system security.
Switching Application lock between enabled and disabled
Enabling the application lock
Procedure
Select "Application lock" from the Tool menu.
The application lock will be enabled and no operations will be possible other than opening and closing EasyMP Monitor and disabling the application lock.
Disabling the application lock
Procedure

Select "Application unlock" from the Tool menu.

The password entry window will be displayed, so enter the set password and then click "OK".
If no password has been set (default setting), click OK without entering a password. It is recommended that you enter a password in order to strengthen security.
The application lock will be cancelled and operations can be carried out as normal.
Setting a password for cancelling application lock
Carry out the following operations while application lock is cancelled.
Procedure

Select "Environment setup" from the Tool menu.
The Environment setup window will be displayed.

Select "Change the application lock password".

Enter the password in both the "New password" and "New password (confirm)" boxes and then click "OK".
The password can be up to 16 bytes in length. Single-byte alphanumeric characters can be used.

Appendix
Projectors cannot be monitored or controlled
| Cause Remedy | |
| Is the projector connected to the network correctly? | Check that the network cable has been connected correctly. If the cable is not connected correctly, reconnect it. |
| Has the projector been set up correctly for connection to the network? | Check the settings for the Network configuration menu command. ➕ Projector's User's Guide |
| Has EasyMP Monitor been installed on the computer correctly? | Uninstall EMP Monitor and then re-install it. ➕ p.7 |
| Are all the projectors that you want to control or monitor registered? | Register the projectors. ➕ p.10 |
| Is the projector's Network Monitoring or Standby Mode configuration menu set to On or Network On? | In order to use EasyMP Monitor to monitor and control the projector when it is in standby mode, the projector's Network Monitoring or Standby Mode configuration menu must be set to On or Network On. ➕ Projector's User's Guide |
An e-mail message is not sent when a problem occurs with a projector
| Cause Remedy | |
| Is the projector connected to the network correctly? | Check that the network cable has been connected correctly. If the cable is not connected correctly, reconnect it. |
| Has the projector been set up correctly for connection to the network? | Check the settings for the Network configuration menu command. ➕ Projector's User's Guide |
| Cause Remedy | |
| Have the SMTP server IP address, Port Number and Recipient mail address all been set correctly? | Check the setting details. |
| Is the projector's Network Monitoring or Standby Mode configuration menu set to On or Network On? | In order to use the mail notification function when the projector is in standby mode, the projector's Network Monitoring or Standby Mode configuration menu must be set to On or Network On. ➕ Projector's User's Guide |
| Has a critical problem developed causing the projector to momentarily stop working? | When the projector has momentarily stopped working, it cannot send e-mail messages. If the projector cannot be reset even after it has been checked, contact your dealer or the nearest address provided in the Support and Service Guide supplied with the projector. |
| Is power being supplied to the projector? | Check if the power supply to the location where the projector is set up has been interrupted, or if the circuit breaker for the electrical outlet that the projector is connected to has been tripped. |
General Notice

All rights reserved. No part of this publication may be reproduced, stored in a retrieval system, or transmitted in any form or by any means, electronic, mechanical, photocopying, recording, or otherwise, without the prior written permission of Seiko Epson Corporation. No patent liability is assumed with respect to the use of the information contained herein. Neither is any liability assumed for damages resulting from the use of the information contained herein.
Neither Seiko Epson Corporation nor its affiliates shall be liable to the purchaser of this product or third parties for damages, losses, costs, or expenses incurred by the purchaser or third parties as a result of: accident, misuse, or abuse of this product or unauthorized modifications, repairs, or alterations to this product, or (excluding the U.S.) failure to strictly comply with Seiko Epson Corporation's operating and maintenance instructions.
Seiko Epson Corporation shall not be liable against any damages or problems arising from the use of any options or any consumable products other than those designated as Original Epson Products or Epson Approved Products by Seiko Epson Corporation.
The contents of this guide may be changed or updated without further notice.
Illustrations in this guide and the actual projector may differ.
©SEIKO EPSON CORPORATION 2009. All rights reserved.
411710800EN
Trademarks
Windows logo and Windows Vista are trademarks of Microsoft Corporation in the United States of America and other related companies. Windows and Windows NT are trademarks of Microsoft Corporation in the United States of America and other countries. Macintosh is a registered trademark of Apple Computer, Inc. Pentium is a registered trademark of Intel Corporation. EasyMP and EasyMP.net are trademarks of Seiko Epson Corporation. Other product names used herein are also for identification purposes only and may be trademarks of their respective owners. Epson disclaims any and all rights in those marks.


- EASYMP MONITOR OPERATION GUIDE
- VER.4.31
- NOTATIONS USED IN THIS GUIDE
- CONTENTS
- NOTATIONS USED IN THIS GUIDE.... 2
- EASYMP MONITOR FEATURES
- TASKS THAT CAN BE DONE USING EASYMP MONITOR
- OPERATING ENVIRONMENT
- USING THE CONTROL FUNCTIONS.... 29
- MAIL NOTIFICATION FUNCTION SETTINGS.... 33
- USING EASYMP MONITOR
- REGISTERING AND DELETING PROJECTORS FOR MONITORING
- MONITORING WINDOW LA Y O U T.... 19
- APPENDIX
- TROUBLESHOOTING....19 39
- COMPATIBLE COMPUTERS
- SUPPORTED LANGUAGE
- INSTALLING EASYMP MONITOR
- PROCEDURE
- TURN THE COMPUTER ON
- LOAD THE SUPPLIED PROJECTOR SOFTWARE CD-ROM IN YOUR COMPUTER
- FROM HERE, CONTINUE WITH THE INSTALLATION BY FOLLOWING THE ON-SCREEN MESSAGES
- LIMITATIONS IMPOSED BY A WINDOWS VISTA ENVIRONMENT
- BEFORE STARTING OPERATIONS
- STARTING EASYMP MONITOR
- REGISTERING PROJECTORS USING AUTOMATIC SEARCH (SEARCHING FOR AND REGISTERING PROJECTORS THAT ARE LOCATED IN THE SAME SEGMENT)
- CLICK "SEARCH
- PROCEDURES FOR REGISTRATION
- SETTING THE RANGE OF ADDRESSES TO DO AN AUTOMATIC SEARCH AND REGISTRATION
- PROCEDURES FOR AUTOMATIC SEARCH
- REGISTRATION BY SPECIFYING AN IP ADDRESS (MANUAL REGISTRATION)
- REGISTERING SEVERAL PROJECTORS TO A MONITORING GROUP ALL AT ONCE
- IF THE PROJECTOR NAME OR IP ADDRESS CHANGES AFTER REGISTRATION
- CANCELLING PROJECTOR REGISTRATIONS (DELETE)
- TYPES OF MONITORING WINDOWS AND SWITCHING METHOD
- TYPES OF MONITORING WINDOWS
- MONITORING USING GROUPING VIEW
- MEANINGS OF GROUPING VIEW ICONS
- MONITORING WINDOW LAYOUT
- USING THE ICONS IN GROUPING VIEW
- MONITORING USING DETAIL LIST VIEW
- MEANINGS OF DETAIL LIST VIEW ICONS
- 7 ERROR INFORMATION
- SELECTING DISPLAY ITEMS
- SORTING LISTS
- SEARCHING FOR DESIRED ICONS (PROJECTOR LIST)
- MONITORING USING THE SYSTEM TRAY
- DISPLAYING PROJECTORS WITH PROBLEM OR WARNING STATUSES IN A LIST
- 6 TEMPERATURE LEVEL
- ⑦ ERROR INFORMATION
- CHECKING PROPERTIES IN DETAIL
- DISPLAYING GROUP PROPERTIES
- DISPLAYING PROJECTOR PROPERTIES
- DISPLAYING AND DELETING LOGS
- DISPLAYING LOG
- DELETING LOG
- CARRYING OUT CONTROL USING CONTROL BUTTONS
- CARRYING OUT CONTROL USING A WEB BROWSER (WEB CONTROL)
- CARRYING OUT CONTROL USING TIMER SETTINGS
- PROCEDURES FOR NEW TIMER SETTINGS
- MAIL NOTIFICATION FUNCTION SETTINGS
- CLICK "OK
- AN E-MAIL NOTIFYING THE OPERATOR OF A PROBLEM/WARNING/STATUS IS ISSUED
- APPLICATION LOCK FUNCTION
- SWITCHING APPLICATION LOCK BETWEEN ENABLED AND DISABLED
- SETTING A PASSWORD FOR CANCELLING APPLICATION LOCK
- GENERAL NOTICE
- TRADEMARKS
Brand : EPSON
Model : EMP-1717
Category : Projector