
@TV Plus - Digital decoder BELKIN - Free user manual and instructions
Find the device manual for free @TV Plus BELKIN in PDF.


| Product Type | Digital Decoder |
| Brand | Belkin |
| Model | @TV Plus (G1V1000) |
| Compatible With | Cable and satellite set-top boxes |
| Video Inputs | Composite (RCA) and Component (YPbPr) |
| Audio Inputs | Stereo RCA (left/right) |
| Network Connectivity | Ethernet (10/100) and Wi-Fi (802.11 b/g/n) |
| Wireless Security | WEP, WPA, WPA2 |
| IR Control | IR blasters for set-top box control |
| Maximum Concurrent Streams (In-home) | Up to 8 devices |
| Out-of-home Streaming | Yes (single stream) |
| Video Pass-through | Yes (component) |
| Port Forwarding | Required for remote access (ports 56123 UDP/TCP, 49177 TCP) |
| Setup Software | PC/Mac available at belkin.com/mytveverywhere |
| Power Supply | Included power adapter (indoor use only) |
| Regulatory Compliance | CE, FCC Class B |
| Warranty | 2-year limited |
| Care and Cleaning | Wipe with a soft, dry cloth; do not use liquid cleaners |
| Safety | Indoor use only; use supplied adapter; maintain 20cm distance for RF exposure |
| Operating Environment | Indoor, dry location |
Frequently Asked Questions - @TV Plus BELKIN
User questions about @TV Plus BELKIN
0 question about this device. Answer the ones you know or ask your own.
Ask a new question about this device
Download the instructions for your Digital decoder in PDF format for free! Find your manual @TV Plus - BELKIN and take your electronic device back in hand. On this page are published all the documents necessary for the use of your device. @TV Plus by BELKIN.
USER MANUAL @TV Plus BELKIN
WATCH LIVE AND RECORDED TV ON YOUR MOBILE DEVICES—ANYWHERE.
@TVplus
User Manual
belkin
G1V1000 • 8820ed01176uk Rev. A00
TABLE OF CONTENTS
SETUP AND INSTALLATION....1
Connecting to your cable or satellite set-top box .... 3
Installing and Setting up the Adapter.... 4
Connecting to your cable or satellite set-top box 5
Tech support, Regulatory and Warranty 14
1. Getting @TV connected to your home network
The @TV setup software for PC and Mac is the best way to configure @TV. Visit http://www.belkin.com/mytveverywhere to download the software.
a.Wired
i. Direct connection via an Ethernet cable will provide the best possible performance for your @TV product. Simply connect the cable to one of the open ports on your broadband-connected network router and then to the Ethernet port on your @TV.
ii. If you have trouble getting your @TV to connect with your router, first make sure that the network cables are attached properly to both devices. Then try restarting your router or cable/DSL modem: unplug the devices for 30 seconds, plug them back in, and they should find one another.
b.Wireless
i. In order to get your @TV onto your home wireless network, follow the directions in the setup software.
ii. If your router is WPS (Wi-Fi Protected Setup) enabled, you can also follow your router's instructions for how to connect devices to it using that feature; this will not always work for all router/@TV combinations, but should work for most. The red @TV WPS button is located on the right side of the product as you face it, just next to the USB service port.

c. Advanced network connections
@TV will use UPnP to configure our network connection. In some cases you will need to use your router's setup pages to change a few settings.
i. Apple using 3G/4G
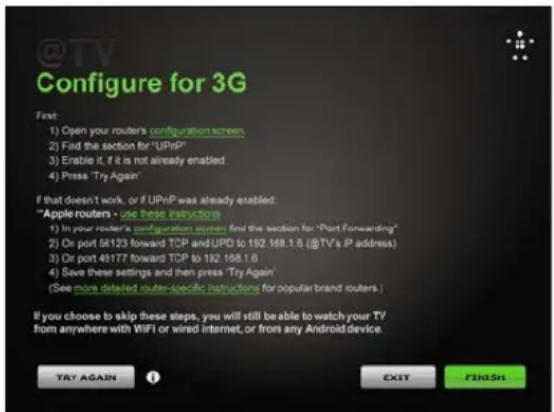
- In order to access @TV on a 3G or 4G network using an Apple product like an iPhone, you may need to modify your Port Forwarding settings. These settings allow your @TV app and your @TV box to connect through your router by opening specific ports (you can think of these as doorways linking your @TV and your @TV apps). The following section explains how to make those changes.
ii. Manual Port Forwarding settings
- Open your router settings page and find the "Port Forwarding" or "Virtual Servers" section (Belkin routers call this "Virtual Servers"; most brands use the term "Port Forwarding").
- Make the following setting changes on this page: a. First open port 56123 for both UDP and TCP traffic b. Then, open port 49177 to TCP traffic
- Save the settings. Once these settings are saved in your router, you should have access to @TV on iOS devices over a 3G or 4G connection.
iii. More complex networks (NAT/firewall issues)
- In some cases your @TV may be behind more than one router: apartment complexes with shared Internet services or homes with Wi-Fi extenders or Wi-Fi bridges would fall into this category. In these situations, you will need to also configure the second router or firewall device with the same Port Forwarding settings as above.
2. Connecting to your cable or satellite set-top box
a. Connections
i. Video inputs from your set-top box to your @TV: You can connect your @TV to your cable or satellite box via composite or component cables; we recommend component because they provide better overall video quality.
ii. Audio inputs: your @TV has a traditional RCA-style composite input available for both the right and left channels of audio from your cable or satellite box.
iii. IR blasters (infrared) to control your set-top box: your @TV comes with a set of IR blasters. These plug into the back of the @TV and allow it to send IR commands to your cable or satellite box, just like your home remote control. Identifying where your cable or satellite box receives the commands from its remote control will help you place them in the optimal location.
b. Video pass-through
i. This feature is useful only if you currently have your cable box connected to your home TV with the same connections that you would like to use for your @TV; it allows you to directly pass the input video from your cable or satellite box through the @TV to your home TV. If you have your TV connected to your cable or satellite box via HDMI and have free component or composite connections, you have no need to use the video out connections.
c. Other issues
i. HDMI syncing In rare cases, certain cable or satellite boxes automatically disable analog outputs like the ones @TV uses whenever an HDMI enabled device (like an HDTV) is connected to them; this is because that particular cable or satellite box manufacturer has chosen to enable advanced content protection protocols that are triggered by your TV/STB combination. The best workaround is to utilize @TV's HD pass-through feature and take the 1080i component cable signal from your cable or satellite box and pass it through to your television. This will enable you to enjoy @TV and also watch your cable or satellite on your HDTV in 1080i quality.
ii. Audio troubleshooting. If you are experiencing distortion or another audio issue, please check to make sure that the cables connecting your cable or satellite box to your @TV are attached correctly. Turning on your TV to listen to the audio and switching to other channels will help you pinpoint whether it is an issue with the broadcast or something else. something else.
d. Advanced settings tab
i. Video
1. Input
a. Component vs. Composite
i. Allows you to select which input on your @TV you would like to use. We recommend using component as it provides the highest video quality.
ii. It is possible to attach two separate devices to @TV and toggle between these inputs in your App.
However, as there is only one audio input, you would need to either listen in mono (dedicate the left channel to one device and the right to the other device) or purchase an audio splitter separately.
b. Hue, saturation, brightness, contrast
i. Various settings to help you optimize the look of your @TV's video
c. Default
i. Automatically resets the picture optimization settings to their initial settings

2. Device/STB
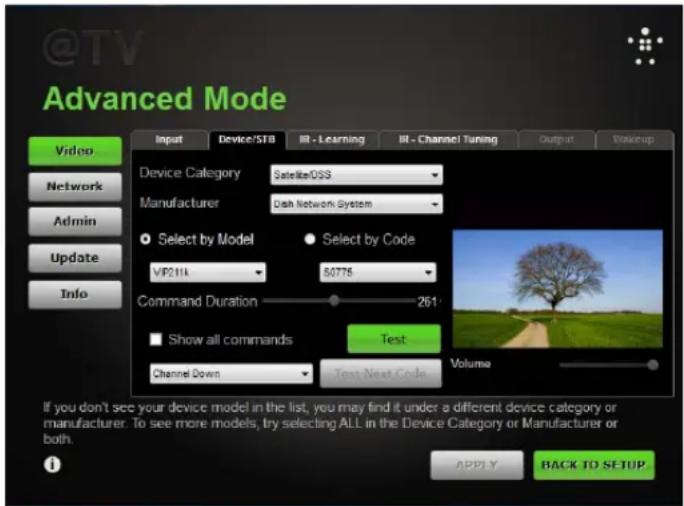
This section is used to manually configure your remote control settings so that your @TV can control your set-top box. We recommend that you use the @TV setup software to configure your @TV box, but these tools are available for expert users.
a. Device category
i. Remote codes are grouped into various categories based on standard industry practices. This can be somewhat confusing as a device category like "VCR" can also refer to a set-top box that is a Digital Video Recorder (DVR). Use "Digital Video Disk" only if you are attaching an @TV to a DVD player or other similar product.
b. Manufacturer
i. Once you've identified the device category, your set-top box manufacturer should be found in this list.
c. Select by model
i. Manually select the model number here.
d. Select by code
i. If you happen to know your product's IR code set, this setting allows you to manually select it.
e. Command duration
i. This setting allows you to adjust the speed at which the @ TV sends IR commands to your set-top box. For instance, if you are trying to switch to channel 425 and continue to arrive at channel 42, then channel 5, you should experiment with shortening the duration of remote commands.
f. Show all commands/test
i. This button allows you to test remote commands to make sure that you have the proper settings in place. We recommend that you select the "Show all commands" box and test multiple commands to ensure your setup is perfect.
3. IR-Learning
In this section you can help your @TV "learn" remote commands. This is particularly useful if you have a cable or satellite box not currently supported by @TV. The steps are as follows:
a. Select the appropriate device you are trying to control from the "Command Mapping" list.
b. From the list below, select the command that you are trying to capture and then click "Learn."
c. Follow the onscreen instructions and repeat until you capture all of the remote commands you will need to control your cable or satellite box.
d. When you are done, click "Save."


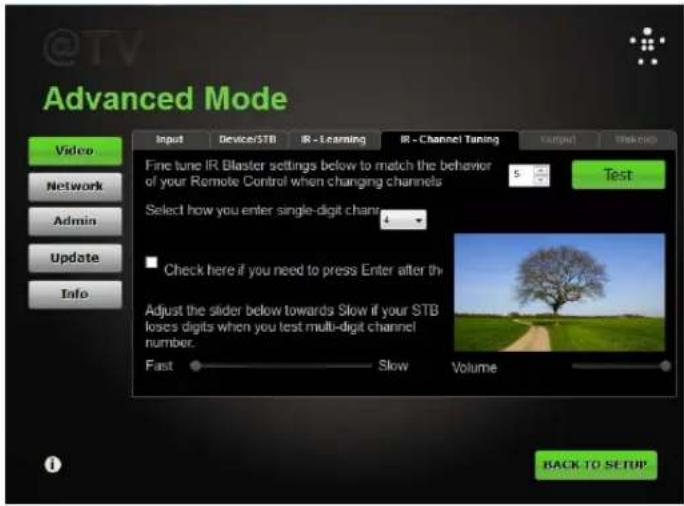
4. IR-Channel Tuning
a. Cable and set-top boxes vary in what they require when you enter a channel. For instance, on some boxes going to channel 42 requires just that you enter 42 while on another you must enter 042 or 0042. This section allows you to manually configure your @ TV so that it works well with your set-top box.
5. Wake-up
a. Some boxes require a "wake-up" command; in this section you can automatically set that command when you start streaming from your set-top box to your @TV app. For most cable or satellite boxes, these commands are automatically configured when you select that code set. However, in some cases you may want to adjust the settings. If this section is not available for adjustment, it means that the code set for the box you have selected indicates that a wake-up command is not necessary.

ii. Network
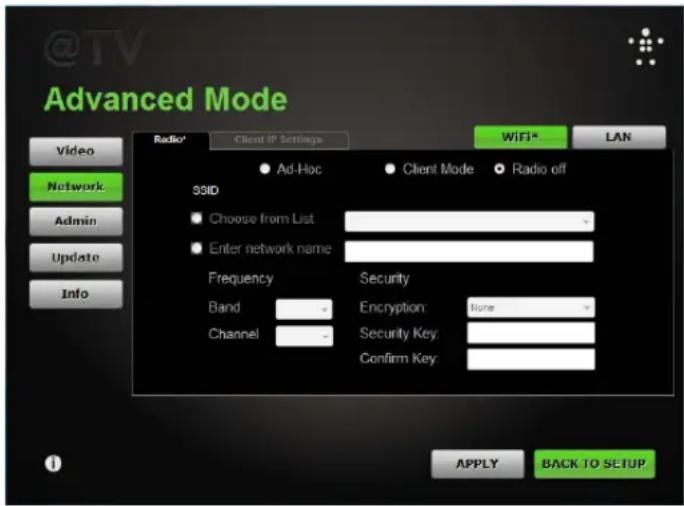
This section allows you to manually configure how your @TV interacts with your home network.
1. Radio
Here you can adjust how your @TV uses its Wi-Fi capabilities.
a. Ad-Hoc vs. Client Mode vs. Radio Off
i. Select the mode appropriate to your network setup; Radio Off means Wi-Fi is turned off
ii. Most setups will only use Client Mode
b.SSID
i. You can either choose your network from the dropdown list or manually enter your network name.
ii. Frequency
- Band and Channel: this allows you to select the frequency ban and Wi-Fi channel used to talk to your router or access point.
- Encryption Type: select the type of security your network uses; if you don't have a password, select "none."
- Security Key/Confirm Key: enter your network's password here and confirm it again.
2. Client IP Settings - Manual Configuration
This is for advanced network users to give your @TV a specific IP address and/or DNS server address.
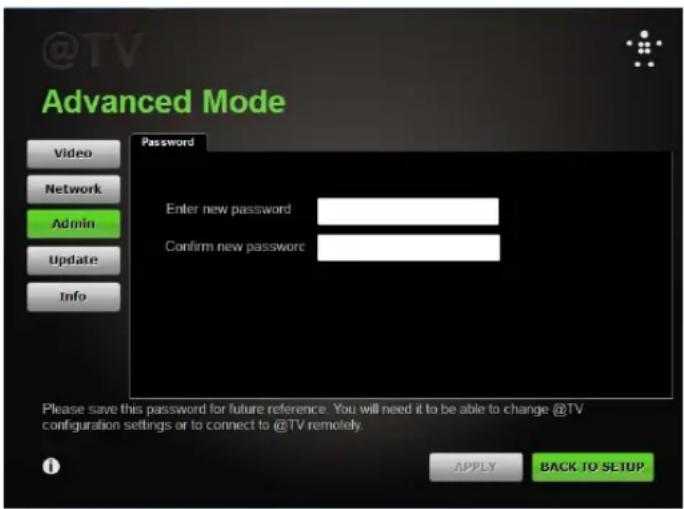
iii. Admin
- Password change: allows you to change your @TV's password

iv. Update
1. Software
a. Use the version of your @TV setup software for troubleshooting and also automatically update it to the latest version.
2. Firmware
a. Firmware is the software code that runs inside your @TV box. We recommend that you allow it to automatically check for updates every day. You can also manually update it by downloading the firmware from the @TV support website and using the "manually select" feature.


v. Info
1. Summary of your current @TV setup.
This information is useful for any troubleshooting that is necessary as it provides key info about your configuration. All of the sections except the "Ports" tab are for information only.
2. Ports
a. Allows you to test to see whether your Port Forwarding settings are correct and working properly.
b. UPnP is an automated approach to configuring your router; most routers allow @TV to automatically configure your router ports using this feature.
c. For routers that do not have UPnP compatibility, you will have to manually configure the ports. You can test to see whether your manually configured ports are working correctly by clicking the "Test" button.


i. Simply put, @TV takes the video and audio signals from your cable or satellite box and sends them over the Internet to your phone, tablet, or computer.
b. Out of home
i. When you access @TV from outside your home network (like from a Wi-Fi hotspot or from a 3G or 4G phone), that stream is the only stream available. Any additional users trying to access your @TV box—either from out of the home or in the home—will see a message stating that someone else is using @TV.
c. In home
i. You can have up to eight devices accessing @TV within your home network at a time. However, video performance will be dependent on your router's capability to handle large amounts of streaming content, so as you add additional users you will likely see reduced picture and audio quality.
ii. @TV optimizes the video and audio stream it sends based on the types of devices that are receiving the stream. In the case of multiple streams in your home, the device that has the lowest resolution and lowest available bandwidth will determine the video feeds all of the other devices will receive. For instance, if you have five tablets but one is at the edge of your Wi-Fi network (and thus able to receive less video and audio data), all of the streaming devices will see the picture quality adjusted downward to support the device that is on the edge of the network. Likewise, if you have a mix of devices, such as tablets and phones, you will see the overall resolution reduced to match what the smallest device can receive.
d. Other issues: who controls the TV?
i. When you use @TV you will be taking control of your living-room cable of satellite box. If someone else is watching and you change the channel, he or she will be watching right along with you.
TECH SUPPORT, REGULATORY AND WARRANTY
Technical Support
US
http://www.belkin.com/support
UK
http://www.belkin.com/uk/support
Australia
http://www.belkin.com/au/support
New Zealand
http://www.belkin.com/au/support
Singapore
1800 622 1130
Europe
http://www.belkin.com/uk/support
You can find technical-support information on our website, www.belkin.com, by navigating to the tech-support section.
If you want to contact technical support by phone, please call the number you need from this list*:
*Local rates apply.
COUNTRY NUMBER INTERNET ADRESS
| AUSTRIA 0820 200766 www.belkin.com/de/networking/ | ||
| BELGIUM 07 07 00 073 | www.belkin.com/nl/networking/www.belkin.com/fr/networking/ | |
| CZECH REPUBLIC 239 000 406 www.belkin.com/uk/networking/ | ||
| DENMARK 701 22 403 www.belkin.com/uk/networking/ | ||
| FINLAND 0972519123 www.belkin.com/uk/networking/ | ||
| FRANCE 08 - 25 54 00 26 www.belkin.com/fr/networking/ | ||
| GERMANY 0180 - 500 57 09 www.belkin.com/de/networking/ | ||
| GREECE | 00800 - 44 14 23 90 | www.belkin.com/uk/networking/ |
| HUNGARY | 06 - 17 77 49 06 | www.belkin.com/uk/networking/ |
| ICELAND | 800 8534 | www.belkin.com/uk/networking/ |
| IRELAND | 0818 55 50 06 | www.belkin.com/uk/networking/ |
| ITALY | 02 - 69 43 02 51 | www.belkin.com/it/networking/ |
| LUXEMBOURG | 34 20 80 85 60 | www.belkin.com/uk/networking/ |
| NETHERLANDS | 0900 - 040 07 90 C0.10 per minute | www.belkin.com/nl/networking/ |
| NORWAY 81 50 0287 www.belkin.com/uk/networking/ | ||
| POLAND | 00800 - 441 17 37 | www.belkin.com/uk/networking/ |
| PORTUGAL | 707 200 676 | www.belkin.com/uk/networking/ |
| RUSSIA | 8-800-555-0231 | www.belkin.com/networking/ |
| SLOVAKIA | 08000 04614 | www.belkin.com/networking/ |
| SLOVENIA | 0800 80510 | www.belkin.com/networking/ |
| SOUTH AFRICA | 0800 - 99 15 21 | www.belkin.com/uk/networking/ |
| SPAIN | 902 - 02 43 66 | www.belkin.com/es/networking/ |
| SWEDEN 07 - 71 40 04 53 www.belkin.com/uk/networking/ | ||
| SWITZERLAND | 08 - 48 00 02 19 | www.belkin.com/de/networking/www.belkin.com/fr/networking/ |
| UNITED KINGDOM | 0845 - 607 77 87 | www.belkin.com/uk/networking/ |
| OTHER COUNTRIES +44 - 1933 35 20 00 | ||
Belkin International, Inc., Limited 2-Year Product Warranty
What this warranty covers.
Belkin International, Inc. ("Belkin") warrants to the original purchaser of this Belkin product that the product shall be free of defects in design, assembly, material, or workmanship.
What the period of coverage is.
Belkin warrants the Belkin product for two years.
What will we do to correct problems?
Product Warranty.
Belkin will repair or replace, at its option, any defective product free of charge (except for shipping charges for the product). Belkin reserves the right to discontinue any of its products without notice, and disclaims any limited warranty to repair or replace any such discontinued products. In the event that Belkin is unable to repair or replace the product (for example, because it has been discontinued), Belkin will offer either a refund or a credit toward the purchase of another product from Belkin.com in an amount equal to the purchase price of the product as evidenced on the original purchase receipt as discounted by its natural use.
What is not covered by this warranty?
All above warranties are null and void if the Belkin product is not provided to Belkin for inspection upon Belkin's request at the sole expense of the purchaser, or if Belkin determines that the Belkin product has been improperly installed, altered in any way, or tampered with. The Belkin Product Warranty does not protect against acts of God such as flood, lightning, earthquake, war, vandalism, theft, normal-use wear and tear, erosion, depletion, obsolescence, abuse, damage due to low voltage disturbances (i.e. brownouts or sags), non-authorized program, or system equipment modification or alteration.
How to get service.
To get service for your Belkin product you must take the following steps:
- Contact Belkin Tech Support at the number listed on page 14, within 15 days of the Occurrence. Be prepared to provide the following information:
a. The part number of the Belkin product.
b. Where you purchased the product.
c. When you purchased the product.
d. Copy of original receipt.
- Your Belkin Customer Service Representative will then instruct you on how to forward your receipt and Belkin product and how to proceed with your claim.
Belkin reserves the right to review the damaged Belkin product. All costs of shipping the Belkin product to Belkin for inspection shall be borne solely by the purchaser. If Belkin determines, in its sole discretion, that it is impractical to ship the damaged equipment to Belkin, Belkin may designate, in its sole discretion, an equipment repair facility to inspect and estimate the cost to repair such equipment. The cost, if any, of shipping the equipment to and from such repair facility and of such estimate shall be borne solely by the purchaser. Damaged equipment must remain available for inspection until the claim is finalized. Whenever claims are settled, Belkin reserves the right to be subrogated under any existing insurance policies the purchaser may have.
How state law relates to the warranty.
THIS WARRANTY CONTAINS THE SOLE WARRANTY OF BELKIN. THERE ARE NO OTHER WARRANTIES, EXPRESSED OR, EXCEPT AS REQUIRED BY LAW, IMPLIED, INCLUDING THE IMPLIED WARRANTY OR CONDITION OF QUALITY, MERCHANTABILITY OR FITNESS FOR A PARTICULAR PURPOSE, AND SUCH IMPLIED WARRANTIES, IF ANY, ARE LIMITED IN DURATION TO THE TERM OF THIS WARRANTY.
Some states do not allow limitations on how long an implied warranty lasts, so the above limitations may not apply to you.
IN NO EVENT SHALL BELKIN BE LIABLE FOR INCIDENTAL, SPECIAL, DIRECT, INDIRECT, CONSEQUENTIAL OR MULTIPLE DAMAGES SUCH AS, BUT NOT LIMITED TO, LOST BUSINESS OR PROFITS ARISING OUT OF THE SALE OR USE OF ANY BELKIN PRODUCT, EVEN IF ADVISED OF THE POSSIBILITY OF SUCH DAMAGES.
This warranty gives you specific legal rights, and you may also have other rights, which may vary from state to state. Some states do not allow the exclusion or limitation of incidental, consequential, or other damages, so the above limitations may not apply to you.
Regulatory and Safety Information
DECLARATION OF CONFORMITY WITH ELECTROMAGNETIC COMPATIBILITY AND ELECTROMAGNETIC INTERFERENCE
We, Belkin International, Inc., of Schiphol-Rijk, Netherlands, declare under our sole responsibility that the device, G1V1000, complies with Directives stated in our EU declaration which can be obtained from our website given below.
Caution: Exposure to Radio Frequency Radiation.
This equipment complies with radiation exposure limits set forth for an uncontrolled environment. This equipment should be installed and operated with a minimum distance of 20cm between the radiator and your body.
CISPR 22 Interference Notice
This equipment has been tested and found to comply with the limits for a Class B digital device, pursuant to the requirements of EN 55022 and EN 55024. These limits are designed to provide reasonable protection against harmful interference in a residential installation.
This equipment generates, uses, and can radiate radio frequency energy, and if not installed and used in accordance with the instructions, may cause harmful interference to radio communications. However, there is no guarantee that interference will not occur in a particular installation. If this equipment does cause harmful interference to radio or television reception, which can be determined by turning the equipment off and on, the user is encouraged to try and correct the interference by one or more of the following measures:
- Reorient or relocate the receiving antenna.
- Increase the distance between the equipment and the receiver.
- Connect the equipment to an outlet on a circuit different from that to which the receiver is connected.
- Consult the dealer or an experienced radio/TV technician for help.
Caution: Any changes or modifications not expressly approved by the party responsible for compliance could void the user's authority to operate this equipment. This device and its antenna(s) must not be co-located or operating in conjunction with any other antenna or transmitter.
Europe – EU Declaration of Conformity
This device complies with the essential requirements of the R&TTE Directive 1999/5/EC, the EMC Directive 2004/108/EC, and the low-voltage Directive 2006/95/EC. A copy of the European Union CE marking "Declaration of Conformity" may be obtained at the website: www.belkin.com/doc
For information on product disposal please refer to http://environmental.belkin.com
General Safety Information:
- For indoor installation only
- For installation with supplied power adapter only
- The supplied power adapter is the product's switch-off device. The base socket must be near the product and easily accessible.
belkin.com
© 2012 Belkin International, Inc. All rights reserved. All trade names are registered trademarks of respective manufacturers listed.
Belkin Ltd.
Express Business Park
Shipton Way, Rushden
NN10 6GL, United Kingdom
Belkin SAS
130 rue de Silly
92100 Boulogne-Billancourt,
France
Belkin GmbH
Otto-Hahn-Straße 20
85609 Aschheim
Germany
Belkin Iberia
Avda de Barajas, 24, Edificio Gamma,
4 ^a pta, 28108 Alcobendas
Madrid - Spain
Belkin Italy & Greece
Via Nino Bonnet, 4/6
Milan 20154
Italy
Belkin B.V.
Tupolevlaan 1
1119 NW Schiphol-Rijk,
Netherlands
- TABLE OF CONTENTS
- Getting @TV connected to your home network
- a.Wired
- b.Wireless
- c. Advanced network connections
- i. Apple using 3G/4G
- ii. Manual Port Forwarding settings
- iii. More complex networks (NAT/firewall issues)
- Connecting to your cable or satellite set-top box
- a. Connections
- b. Video pass-through
- c. Other issues
- d. Advanced settings tab
- Input
- a. Component vs. Composite
- b. Hue, saturation, brightness, contrast
- c. Default
- Device/STB
- a. Device category
- b. Manufacturer
- c. Select by model
- d. Select by code
- e. Command duration
- f. Show all commands/test
- IR-Learning
- IR-Channel Tuning
- Wake-up
- ii. Network
- Radio
- Client IP Settings - Manual Configuration
- iv. Update
- Software
- Firmware
- Summary of your current @TV setup.
- Ports
- b. Out of home
- c. In home
- d. Other issues: who controls the TV?
- TECH SUPPORT, REGULATORY AND WARRANTY
- Technical Support
- US
- UK
- Australia
- New Zealand
- Singapore
- Europe
- Belkin International, Inc., Limited 2-Year Product Warranty
- What this warranty covers.
- What the period of coverage is.
- What will we do to correct problems?
- What is not covered by this warranty?
- How to get service.
- How state law relates to the warranty.
- Regulatory and Safety Information
- DECLARATION OF CONFORMITY WITH ELECTROMAGNETIC COMPATIBILITY AND ELECTROMAGNETIC INTERFERENCE
- Caution: Exposure to Radio Frequency Radiation.
- CISPR 22 Interference Notice
- Europe – EU Declaration of Conformity
- General Safety Information:
- belkin.com
Brand : BELKIN
Model : @TV Plus
Category : Digital decoder