
GeForce GTX 560Ti Battlefield 3 Limited Edition - Graphic card CLUB3D - Free user manual and instructions
Find the device manual for free GeForce GTX 560Ti Battlefield 3 Limited Edition CLUB3D in PDF.


| Product Type | Graphics Card |
| Brand | CLUB3D |
| Model | GeForce GTX 560Ti Battlefield 3 Limited Edition |
| GPU | NVIDIA GeForce GTX 560 Ti |
| CUDA Cores | 384 |
| Core Clock | 822 MHz |
| Shader Clock | 1645 MHz |
| Memory | 1 GB GDDR5 |
| Memory Clock | 4008 MHz |
| Memory Interface | 192-bit |
| Memory Bandwidth | 96.2 GB/s |
| Interface | PCI Express 2.0 x16 |
| Outputs | 2x DVI, 1x mini HDMI, 1x DisplayPort |
| Max Resolution | 2560x1600 |
| Power Connectors | 2x 6-pin PCIe |
| Recommended PSU | 500 W |
| Power Consumption | 170 W |
| Cooling | Dual-slot active fan |
| Dimensions (L x H) | 10.5 in x 4.5 in (267 mm x 114 mm) |
| Weight | ~1.2 kg (2.6 lbs) |
| Special Features | Battlefield 3 Limited Edition, custom design |
| DirectX Support | DirectX 11 |
| OpenGL Support | OpenGL 4.1 |
Frequently Asked Questions - GeForce GTX 560Ti Battlefield 3 Limited Edition CLUB3D
User questions about GeForce GTX 560Ti Battlefield 3 Limited Edition CLUB3D
0 question about this device. Answer the ones you know or ask your own.
Ask a new question about this device
Download the instructions for your Graphic card in PDF format for free! Find your manual GeForce GTX 560Ti Battlefield 3 Limited Edition - CLUB3D and take your electronic device back in hand. On this page are published all the documents necessary for the use of your device. GeForce GTX 560Ti Battlefield 3 Limited Edition by CLUB3D.
USER MANUAL GeForce GTX 560Ti Battlefield 3 Limited Edition CLUB3D
How do I setup 3D Vision Surround?
Follow these steps to set up 3D Vision Surround:
- Open the NVIDIA Control Panel (Figure 10) through the Windows Control Panel or by right-clicking on the desktop.
- From the NVIDIA Control Panel navigation tree pane, under 3D Settings, select Configure SLI, PhysX, Surround to open the associated page.
- Select Span displays with Surround, and then click the Configure button to launch the wizard.
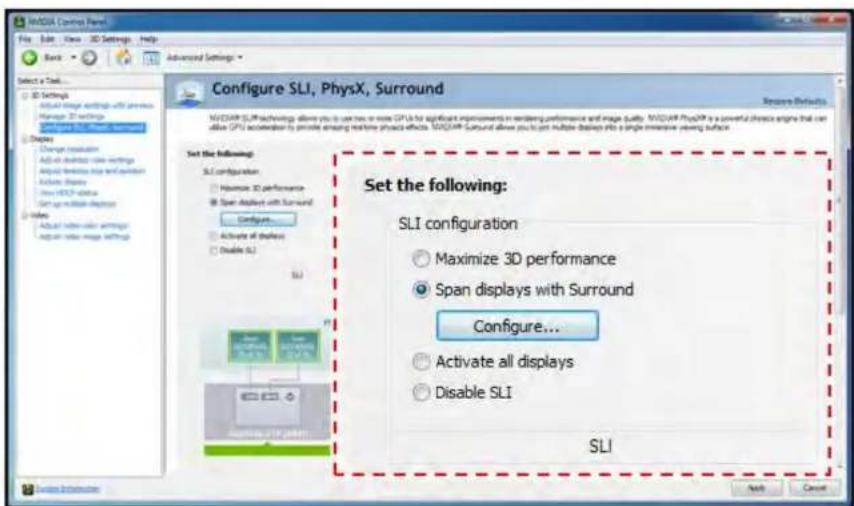
Figure 1: Select Span displays with Surround to start the configuration process.
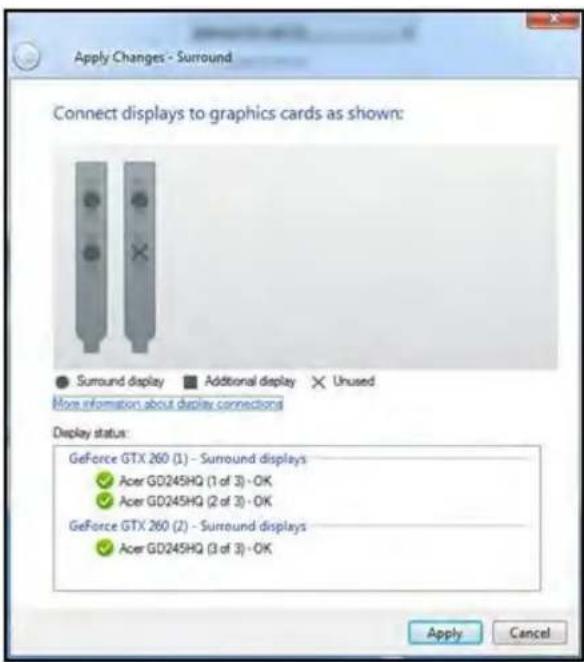
- The Display status dialog (Figure 2) checks the connectors on the cards to determine if the displays are connected properly.
- If the displays need to be moved, do it at this time. The interface will automatically detect the change and show it on this screen.
- Once all three displays are connected properly, press the Apply button to continue the setup procedure.
Figure 2: Connect the displays to the graphic cards using the diagram in this dialog. The Display status shows if a display is properly connected to the GPUs.
- In the Arrange displays dialog (Figure3), select the Orientation of the displays (either Landscape or Portrait). Please note if you intend to run 3D Vision Surround, Portrait mode is only supported with 3D Vision Projectors. 3D Vision LCDs do not support Portrait mode.

Figure 3: Click the Identify button to determine the correct numbered order for your displays.
- Click the Identify button to determine the number order of the displays.
- You should see numbers appear on all three screens as shown in Figure 3.

Figure 4: You will see numbers appear on all three displays when the Identify button is pressed. This is the numbered arrangement you need to make your desktop work correctly.
- Arrange the Surround display order to match your displays by dragging the icons to match the numbers on displays.
FOR EXAMPLE: Figure 3 shows the screens using a 3 1 2 configuration. Grab the icon with the 1 and move it in-between icons 3 and 2 (as shown in Figure 4).
NOTE: The display numbering used here is not the same numbering used in the Windows panel.
Figure 5: Grab the numbered icon with your mouse and drag it into position to match the numbered orientation displayed on your screens.

- After the icons are arranged to match the numbers on the displays, click the Next button.
- NVIDIA 3D Vision Surround includes controls that allow for the adjustment of the displays to compensate for monitor bezel gaps, allowing for a more realistic viewing of full-screen games.
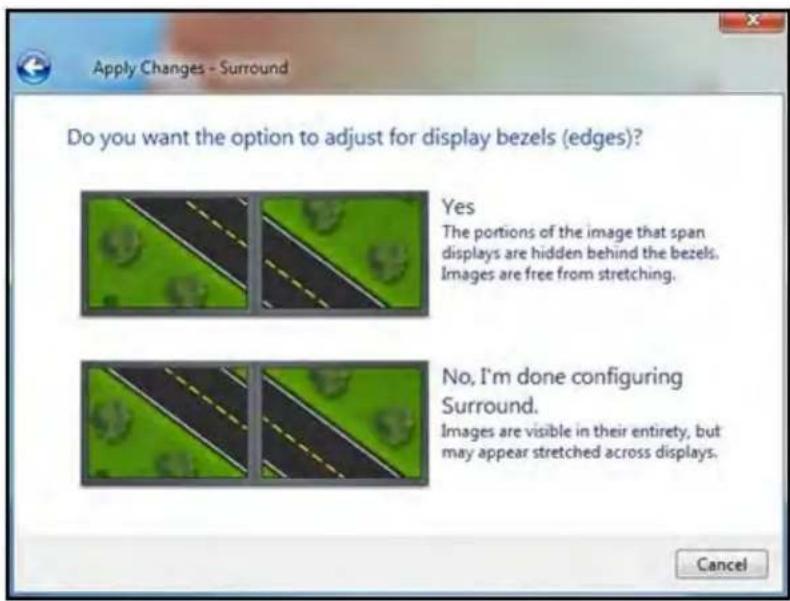
Figure 6: Use this dialog to select whether you want to adjust bezel correction or not.
- Adjust the width of the pixels between the displays until the image spans the displays so that it looks correct (not stretched).

Figure 7: This is where you select which bezel to adjust the width for, and how much it should be adjusted.
- The bezel correction image of the road will look like Figure 8 as it is adjusted.

Figure 8: The two halves of the road image will move up and down as the pixel width is adjusted in the dialog. Be sure to align the images on both sides of the center display to ensure bezel correction is properly configured.
- A new resolution will be created if Bezel Correction is adjusted. Select this new resolution inside games to take advantage of the new settings.
FOR EXAMPLE: If you take a 5760x1080 resolution and add 114 pixels of bezel correction in-between the two end displays, you get 5988x1080 (The math is 1920+114+1920+114+1920). The software renders the extra amount of pixels virtually behind the bezels so the image appears contiguous between the displays

Figure 9: When you enable bezel correction, a bezel-corrected version of each 3-wide display resolution is added to the list of available resolutions - both within games as well as within the NVIDIA Control Panel. In the game settings above, the bezel corrected resolution would be the larger 5838x1080 resolution.
- If you do not use bezel correction and wish to remove the extra resolutions to simplify the list, run the Surround wizard and select No at the "Do you want to correct for display bezels?" screen.
Note: if you intend to only run Surround (2D) mode, please skips steps 17-18.
- To enable 3D Vision mode now browse to the NVIDIA Control Panel > Stereoscopic 3D > Set up Stereoscopic 3D control panel and click the button "Enable Stereoscopic 3D"

Figure 10: Set up Stereoscopic 3D control panel
- Follow the instructions in the 3D Vision setup wizard to configure 3D Vision Surround mode.
- Start your games and change the in-game resolution to either a standard 3D Vision Surround resolution or a bezel corrected resolution.
- Have fun!
Brand : CLUB3D
Model : GeForce GTX 560Ti Battlefield 3 Limited Edition
Category : Graphic card