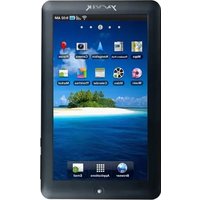
GoTab 7 (TAB210) - Tablet Yarvik - Free user manual and instructions
Find the device manual for free GoTab 7 (TAB210) Yarvik in PDF.


| Product Type | Tablet |
| Brand | Yarvik |
| Model | GoTab 7 (TAB210) |
| Display | 7.0" TFT LCD touchscreen, 800 x 480 pixels, 16M colors |
| Processor | RK2818B ARM600MHz + DSP550MHz Dual Core |
| Operating System | Android 2.1 (Eclair) |
| RAM | 256 MB DDRII |
| Internal Storage | 2 GB to 16 GB flash memory (varies by configuration) |
| External Storage | microSD slot, supports up to 16 GB |
| Wi-Fi | IEEE 802.11b/g, Samsung SWL-2480 chipset |
| Battery | Built-in rechargeable 3.7V 4000mAh Li-ion, up to 6 hours playback |
| Power Supply | AC adapter 100-240V input, DC 5V 2A output |
| Audio Formats | MP3, WMA, OGG, APE, FLAC, AAC, WAV |
| Video Formats | MKV, AVI, RM, RMVB, MP4, MOV, VOB, DAT, FLV, 3GP (up to 720p) |
| Image Formats | JPG, JPEG, BMP, GIF |
| E-book Formats | TXT, LRC, PDF, HTML, HTM, EPUB |
| Connectivity | Mini USB 2.0, USB Host port, 3.5mm headphone jack, microSD slot |
| Sensors | G-sensor for auto-rotation |
| Camera | Optional pixel camera |
| Microphone | Built-in (optional for recording) |
| Dimensions (approx) | 190 x 120 x 12 mm |
| Weight (approx) | 300 g |
| Cleaning | Wipe with dry soft cloth; do not use chemicals or detergents |
| Safety | Keep away from magnetic fields, moisture, and high temperatures; not waterproof |
| Repair | Only qualified personnel should repair; use original accessories |
Frequently Asked Questions - GoTab 7 (TAB210) Yarvik
User questions about GoTab 7 (TAB210) Yarvik
0 question about this device. Answer the ones you know or ask your own.
Ask a new question about this device
Download the instructions for your Tablet in PDF format for free! Find your manual GoTab 7 (TAB210) - Yarvik and take your electronic device back in hand. On this page are published all the documents necessary for the use of your device. GoTab 7 (TAB210) by Yarvik.
USER MANUAL GoTab 7 (TAB210) Yarvik
1 Preface
2 Safety Notices
3 Getting ready to use your device
3.1 Instructions on Keys
3.2 Features Overview
3.3 Technical Specifications
4 Quick Guides
4.1 Touch Panel Calibration
4.2 On/Off switch
4.3 Battery management and charging
4.4 Definitions of the Functions icons
4.5 WIFI Setting
4.6 USB HOST Function
4.7 microSD™ Storage
4.8 APK Installer
5 Operation details
5.1 Desktop System 1 (Multimedia
Music/Video/Picture/Recording)
5.1.1 Audio
5.1.2 Video
5.1.3 Picture Browsing
5.1.4 Recording function
5.1.5 Explorer
5.2 System desktop 2 (E-Book)
5.2.1 E-Book Reader
5.3 Desktop System (Web applications)
5.3.1 IE Browser
5.3.2 E-mail
5.3.3 Online Chat
5.4 Desktop System 4 (Game function)
5.5 Desktop System 5 (other functions)
5.5.1 Calendar
5.5.2 Calculator
5.5.3 Alarm Clock
5.5.4 APK Installer
5.5.5 Setup
5.5.5.1 Wireless and Network Settings
5.5.5.2 Voice and Display Settings
5.5.5.3 Location and Security Settings
5.5.5.4 Application Settings
5.5.5.5 microSD™ card & device storage settings
5.5.5.6 Language Keyboard Settings
5.5.5.7 Date & Time Setting
5.5.5.8 Touch Panel Calibration
5.5.5.9 About the Device
5.6 Desktop Function Icon Setting
5.6.1 Add & Remove Desktop Function Icon
5.6.2 Wallpaper Setting
5.6.3 Tap icon shortcut to search engine
5.6.4 Shortcut Notification
5.6.5 Shortcut Setting
5.6.6 Add, Move or Delete Desktop Icon
6 Firmware Update
7 Troubleshooting
Preface
Dear Customer,
Thank you for purchasing our product!
This device is a built-in high performance Wi-Fi receiver module, which uses broadband wireless networks, breaking through the restraint of network cable; it will bring you into the portable media player world and fulfill your entertainment needs. It also supports picture browsing, E-book reader, games, online chatting and other functions. Various settings will fully demonstrate your individuality.
To operate this player easily, please first read the User Manual attached with the player. From this you will gain knowledge about the production introduction and operation method. Before operating this player, please carefully read all data we provide about the player, so that you will have a better understanding of the product and will be able to operate it much better.
The Company cannot be held responsible for any loss of personal data and damage caused by incorrect operation of
Software/Hardware, accidental damage, replacement of batteries or any other accident. To avoid loss of your data, please backup your data to your computer on a regular basis.
Since we can not control any dispute from users' misunderstanding or incorrect operation from the manual, the Company cannot be held responsible for any accidental loss potentially occurring when using this manual.
The functional information of this manual is subject to the product itself; we will keep developing new functions. The information in this manual is subject to change without any prior notice.
This manual is protected by copyright and no part of this manual may be copied or reproduced in any way without prior written permission of the Company.
The Company reserves the all rights with regard to this manual, the warranty and related information.
(Note: When compiling this manual, every care has been taken to provide you with completely reliable information. However, in the
event of any error or oversight, we would be pleased to welcome any advice or comments on these. If any problem occurs whilst operating this product, please contact your local seller).
We thank you for your support; please also look out for our other products.
Safety notices
1) Please keep the device away from any strong magnetic field so as to avoid the damage to the product.
2) Please do not let the device fall or rub or press against hard objects during use, this may cause surface scratches, loosening of the battery, data loss and/or damages of other hardware.
3) Never let this product be exposed to a humid environment or rain, otherwise water leakage into will disable it beyond the extent of repair.
4) Never clean the device with any chemicals or detergent, these will damage the product surface and corrode the spray paint.
5) You are recommended not to use the headset continuously at high volume; please adjust the volume to the level of appropriate safety and control the time using to avoid damage to your hearing. Excessive volume will cause permanent hearing damage.
6) Please do not switch off power during software update and download, this may cause loss of data and system error.
7) Over-voltage, power cable strain, bending or squeezing by heavy objects should be prevented, so as to avoid overheating or fire..
8) In order to eliminate the risk of electric shock, do not touch the cable power plug with wet hands.
9) Some movie, music and pictures are copyright protected and unauthorized usage is deemed as an infringement to the laws of copyright.
10) Please do not turn on the device in locations where the wireless equipment is forbidden or when the usage of the device will cause interference and danger.
11) All wireless equipment may possibly be subject to interference and this may influence the performance.
12) Please comply with any related restrictions and regulations, wireless equipment may influence airplane flight; please consult the airline company if you intend to use the device in the plane.
13) Please do not use the device in gas station, nearby the fuel and chemicals.
14) Please comply with any related restrictions and regulations; do not use the device where blasting operations are in progress.
15) Only qualified maintenance personnel may install or repair the device.
16) Please use the original accessories and battery, do not use incompatible products.
17) The device is not waterproof, please keep it dry.
18) For the sake of data safety, please backup the important information of the tablet or keep a handwritten record.
19) When connecting with another device, please read the user manual for detail safety instructions, please do not connect it with any incompatible product.
20) If the actual settings and operation method of the product are inconsistent with the user manual for the losing of firmware, please use the firmware from our website and refer to the manual instructions to re-update the software.
3 Getting ready to use your device
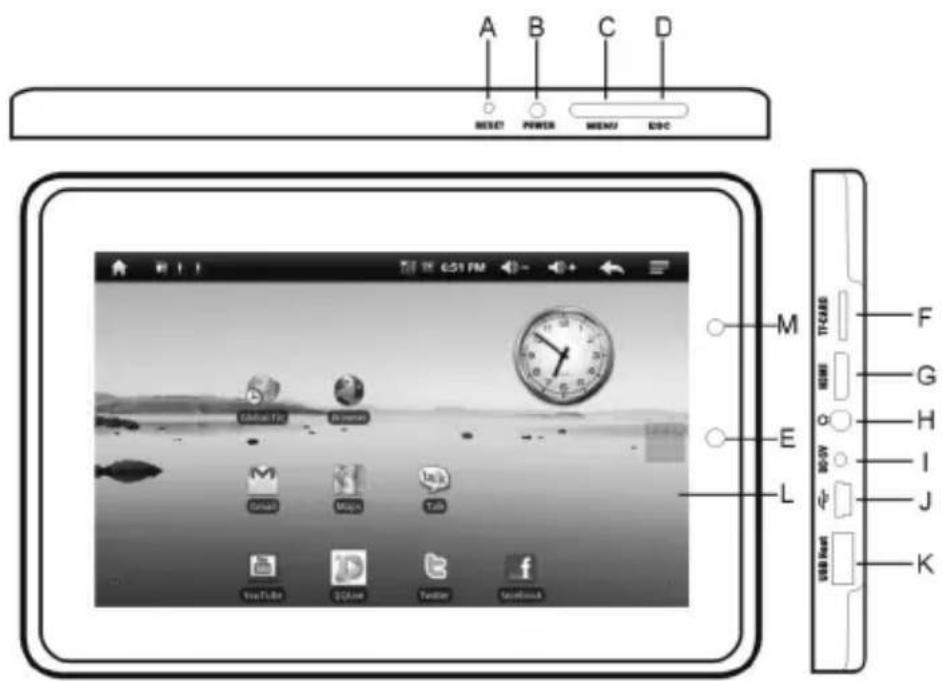
3.1 Instructions on Keys
| Name | Description |
| RESET | Press this button briefly to reset the system when the device has stopped |
| POWER | Press this button briefly to enter sleeping/wake up mode, press longer to switch ON/OFF |
| MENU | Press this button briefly to enter the submenu |
| ESC | Press briefly to return, press longer for the touch screen calibration |
| Track Ball Navigation/Indicating light (optional) | Tracking navigation button, OK key, indicating light |
| microSDTM Slot | microSDTM Slot |
| Stereo Earpieces Jack | Stereo Earpieces Jack |
| DC Socket | Connect with 5V DC charger |
| MINI USB Port | MINI_5 PIN USB Port |
| USB Host Port | Port for external USB Driver, 3G Dongle, Mouse, keyboard, etc |
| Display | HD Display area |
3.2 Features Overview
■ Adopt the RK2818B as the main chip, ARM embedded Dual CPU Structure (ARM600MHZ+DSP550MHZ), ANDROID 2.1 operation system
■ 7" high resolution microSD™ touch panel LCD display, 800 x 480 pixel resolution
■ Supports 2\~16GB built-in Flash Memory, support 128MB-16GB external microSD™
■ Supports HD 720P MKV, AVI, RM, RMVB, MP4, MOV, VOB, DAT, FLV, 3GP, H.246 etc formats, support Max resolution 1280*720
■ Supports JPG, JPEG, BMP, GIF etc. picture formats
■ Supports MP3, WMA, OGG, APE, FLAC, AAC, WAV audio formats, multi EQ modes
■ Supports TXT, LRC, PDF, Html, Htm, EPUB file formats, supports auto-browse, zoom, bookmarks, flip over functions
■ Built-in Wi-Fi, you can connect with the internet and operate various software in the ANDROID 2.1 OS, the system supports software from the third parties like Office (Open Office version), Google browser (IE), IM (MSN/QQ), Web TV, Online MP3, online novel, network games, E-book, etc
■ Supports built-in microphone record function (Optional)
■ Supports USB-HOST and external U-disk, MP3, MP4, Mouse, keyboard, etc
■ pixel camera (optional)
■ Supports tilt-sensor screen rotation function
■ Supports Stereo Earpieces and speaker
■ Supports multiple languages
■ Can be used as USB portable hard disk, driver not needed for WIN2000 or above
3.3 Technical Specifications
| D Display | Size | 7.0" touch panel LCD display, 160k color |
| Resolution | 800*480 | |
| PC interface | High speed USB2.0 (FS) | |
| Built-in Flash | Flash Memory :2GB~16GB | |
| Built-in RAM | RAM: DDRII 256MB | |
| Capacity Expansion | Supports microSDTM, capacity 128MB~16GB | |
| Power Supply | Battery: built-in 3.7V@4000mAh Lithium rechargeable batteryAC charger: Input: AC110V~240V,Output: DC 5V@2A | |
| Max. 6h playing time (factory default) | ||
| Audio Function | Format | MP3, WMA, OGG,APE, FLAC, AAC,WAV |
| Headset max. output | (L) 5mW + (R) 5mW(32Ohm) | |
| MP3 Bit rate | 8Kbps ~ 392 Kbps | |
| WMA, WMV, Bit rate supported | 5Kbps ~ 192 Kbps | |
| Frequency response | 20Hz to 20KHz | |
| SN ratio | 90dB | |
| Distortion | <0.05% | |
| Play format | MKV, AVI, RM, RMVB,MP4, MOV, VOB,DAT, FLV, 3GP, etc | |
| Play format | MKV, AVI, RM, RMVB, MP4, MOV, VOB, DAT, FLV, 3GP, etc | |
| Max resolutions supported | 1280*720 | |
| Ratio | 4:3, 16:9, full screen for optional | |
| Photo browse | JPG, JPEG, BMP, GIF supported | |
| E-book Function | Format Supported | TXT, LRC, PDF, Html, Htm, EPUB, etc |
| Max. capacity | 20M | |
| WI-FI Function | Main chip set | Samsung SWL-2480, 802.11b/g |
| Transmission rate | Max54Mbps | |
| Transmission Distance | Max100m | |
| Work Frequency | 2.4GHz | |
| HDMI Function (optional) | Main chip set | ANX7150 (Optional) |
| Resolution | 576P, 720P | |
| Recording function | Format supported | WAV Format |
| Working temperature | -5 ~ 40 ☐ | |
| Languages | Simplified Chinese, Traditional Chinese, English, Japanese, French, German, Spanish, | |
4 Quick Guides
4.1 Touch Panel Calibration
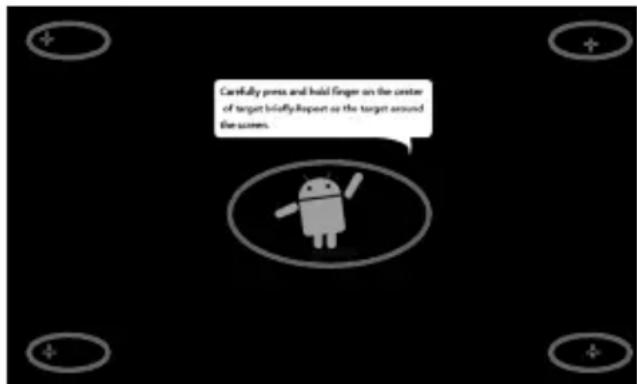
When these are off and invalid when tapping on the touch panel, please press the "ESC" key for 3 seconds to log into the interface of the Touch Panel Calibration. Tap just once on the centre of the "Cross" indicated by the red circle, the screen will display the "Calibration Successful" message when it is OK; see the illustration below.
4.2 On/Off Switch
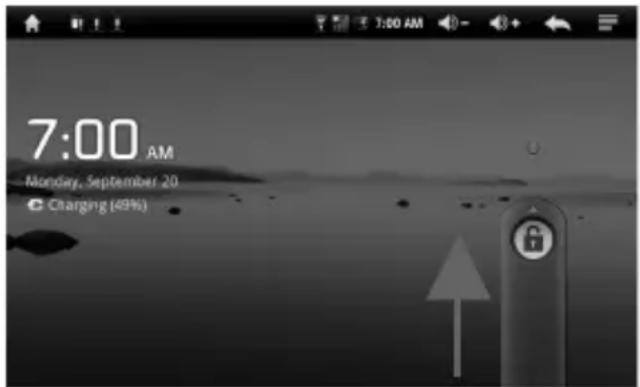
Switch On and Unlock: When the device is in the OFF mode, press and hold "Power" key for 3 seconds to enter the Android start-up progress bar. It takes about 40 seconds to enter to the system desktop, when the LCD is under locked mode, please press and drag the icon to the green point. The LCD will then automatically unlock - see the illustration below.
Power Save Modes and lock screen: Press the “POWER” key briefly after starting up, system enter to power save and lock mode. Press the “POWER” key or tap the touch screen; the system will return to bright in 1 second.
Note: The primary operation of the device will not stop under the power save mode, only the LCD is shut off and with a black screen. For example: playing music, movies, etc.
Switch OFF: When the device is in the OFF mode, press and hold the "POWER" key for 3 seconds. The screen will display the power off interface, then choose the power off item to confirm, the system will shut down automatically.
[Note] When the device battery is low, it will sound a continuous alarm and shut down automatically without charging. If the device does not start up please check if the battery is low, and try again after the battery has been charged.
4.3 Battery management and charging
a. Charge the battery for about 8-12 hours in order to ensure the battery is fully charged for the first time.
b. Insert the micro port of the battery adaptor into DC slot on the device, and connect the other side with the power socket. The Power indication lamp of the device then has a bright light blue colour (with some models -a red light), the desktop icon of the
battery keeps rolling, which shows it is charging. Please wait until the battery is fully charged, do not disconnect the power when charging. Once the battery is fully charged, the indication lamp will change to dark blue and the Icon on the desktop will stop rolling.
[Note] In order to keep the battery working in the best condition, pleasenote the following:
- Please do not charge the power in a high temperature.
- There is no need to release the power for this Li-battery, you can charge the power even there is still some power in the battery, i.e. there is no need to wait until it completely runs down.
- In order to keep the battery in good condition, please make sure that you charge the power once every two weeks, especially if you do not use this device for a long time.
4.4 Definition of the Functions icons
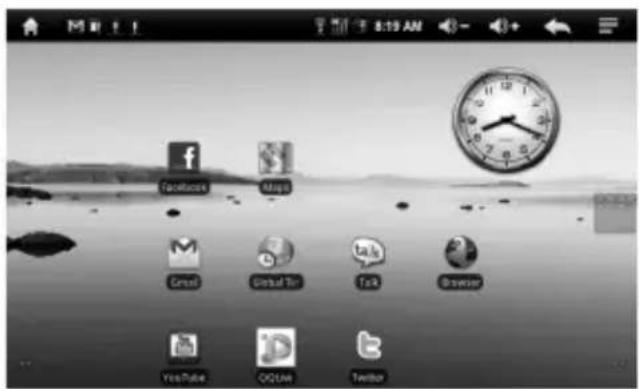
| Icon | Function instruction | Icon | Function instruction |
 | Back to main menu |  | Note when the system finds new devices. |
 | Show current |  | Set the alert time |
| power status | |||
 | The current system time |  | Reduce the volume |
 | back |  | Increase the volume |
 | menu |  | Menu for Function Block. |
 | Google search |  | Switch the interface |
 | System clock |  | WIFI on/off |
 | Music playing tool bar |  | Update icon for Music/audio inventory |
 | new mail |
4.5 WIFI Setting
a. Turn on the WIFI setting: Tap the module icon, enter into function menu list; press "setting", enter into the setting interface; press "wireless and network" to setup, then just select the WIFI as indicated below:

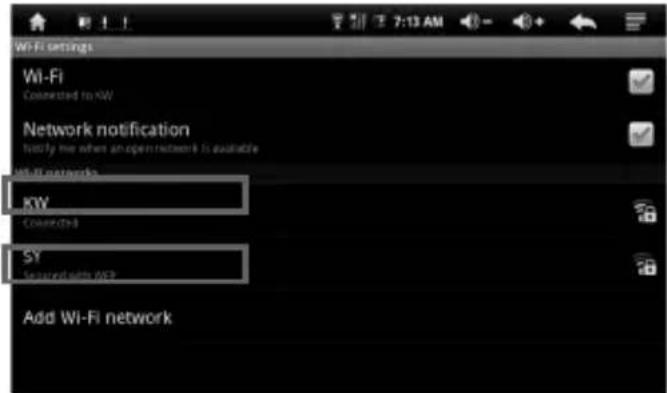
b. Set the WIFI and connect to the network: Press "Wi-Fi setting" to enter into the Wi-Fi, the system will find the WIFI name automatically. Please refer to the picture below, here it illustrates that it has found two WIFI network names:
c. IP address setting and connection: There are two methods for setting the IP address.
1. Distribute IP Address automatically:
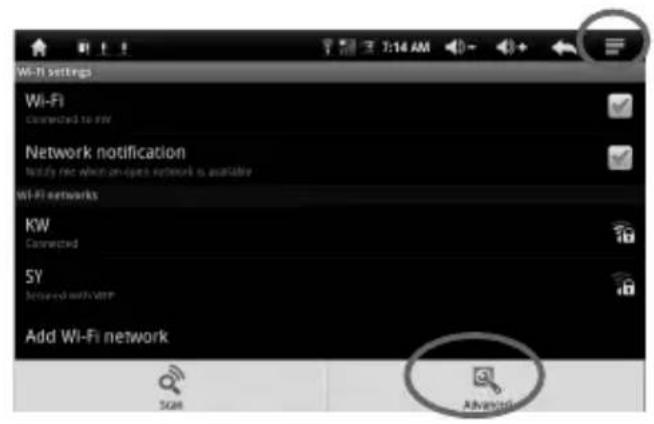
Whether it distributes the IP address automatically or not is dependant on the WIFI Router's setting. If it distributes the IP address automatically, just press the top right corner of the screen "☐ to enter into “advanced” setting in order to cancel selection of the “Use static IP”.


Press the right top menu “☐” on the screen and press “save”. For this setting is complete, refer to the illustration below:

Press back when saving is complete, press the WIDI network name, For example, double press "KW", it will then enter into an interface and ask you input the code. Then enter the correct code, press "finish". The system will then connect and distribute IP address automatically. It will show "connected" once the system has completed connection. You can see the network connection status accordingly when you press the network name, see the illustration below:

2. Manual setup IP address:
Whether Using manual setup IP address or not, depends on the WIFI Router's setting. If distributing the network name this way, just press the top right corner of the screen "Enter into "advanced" setting and select the "Use static IP", then set the IP address as it is from the Router. See the illustration below.

Press the ☐ the top right of the screen; to press "save", see the illustration below:
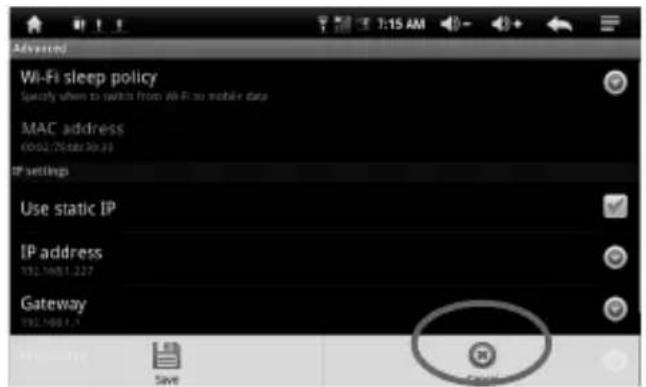
Go back to press the WIFI network name when saving is complete. For example: press "KW".
It will then have an interface, asking for the code input, enter the right code, and then press “finish”. The system will then be connected and will distribute the IP address automatically. It will show “connected” once the system has completed connection. You can see the network connection status accordingly when you press the network name. A WIFI icon “will appear - see the illustration below:

4.6 USB HOST Function
a. Turn on The USB-HOST:
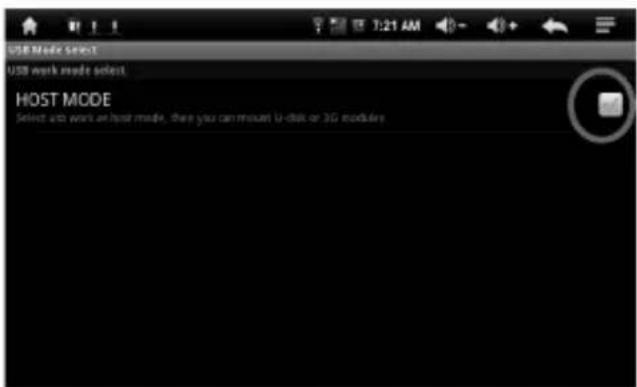
Press menu icon , enter into the function list, press “setting” to enter into setting interface, press “USB Mode select” to select the “HOST MODE” and it will appear in the red circle as shown below:

b. Read U-disk:
Insert the U-disk into the HOST port, press the "Resource manager" in the desktop, press "USB" enter into u-disk- see the illustration below:

4.7 MicroSD™ Storage
There is a microSD ^TM slot in this device. It supports reading files in a microSD ^TM . Insert the microSD ^TM into the card slot in the correct way. To take it out, just push the microSD ^TM towards to the inside, then the slot will release the microSD ^TM and the microSD ^TM will pop out automatically. You can then remove it.
a. Please insert the microSD™ into the card slot in the right side of the device.
b. Do not pull out the card when operating (reading, copying), otherwise this may cause date error.
c. Do not use the microSD ^TM under high temperature conditions.
d. Keep the microSD™ away from liquids and corrosive materials.
4.8 APK Installer
This device supports the third part application (apk format) based on Android. Many applications may be obtained from the internet. These can just by copied into the flash of this device or microSD™ card, or you may download directly using this device, and then proceed to install and use.
- Press the APK installer “” and the APK installer interfaces will popup: Install, Manage, Exit.
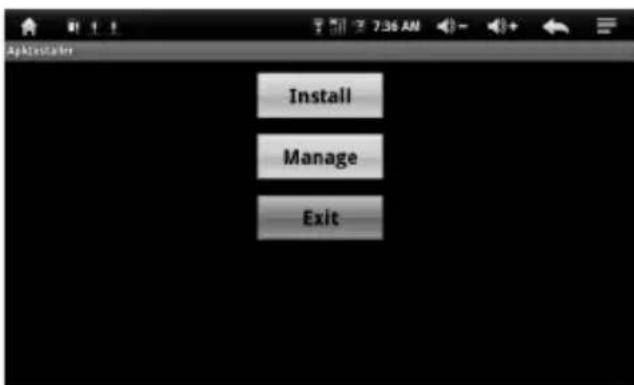
• Install: Press install, enter into the APK installer interface.
Internal Memory means built-in flash.
After entering, select the APK format setting program on the right hand side, tap to install, go back to the main interface when this operation is complete. It will then finish the installation, and there will be an accordingly relevant software menu.

- Manage: Tap manage and enter into the third part software interface.

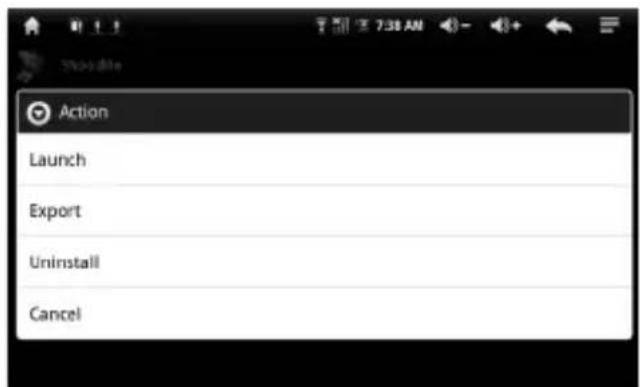
- Startup: run the software.
- Export: export the software to the microSD ^TM .
- Uninstall: uninstall the software.
-
Search: search for the software in the software shops.
-
Cancel: cancel the operation.
- Back: back to the main interface.
5 Operation details
5.1 Desktop System 1 (Multimedia
Music/Video/Picture/Recording)

5.1.1 Audio
Enter the audio player: In the programs interface, tap the icon to enter the main interface of Audio player, Double-click the favourite in the list to play music as shown in the following illustration:
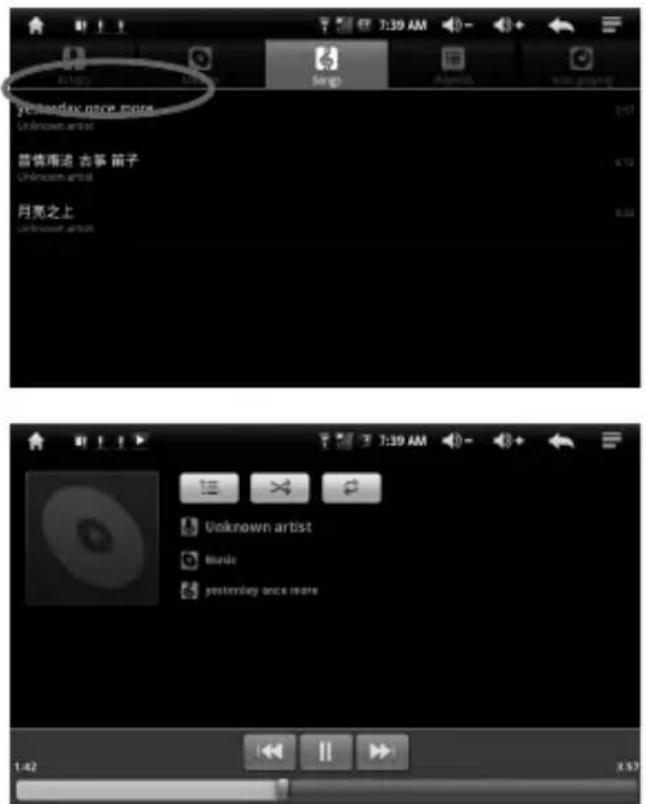
Drag the playing progress bar to adjust the playing process.

Instructions on the buttons in the Music player.
| Button | Instruction | button | Instruction |
 | Artist |  | Album |
 | song |  | Playing Music list |
 | Random Play |  | Loop playback |
 | Play the last song |  | Play the next song |
 | Pause |  | play |
Audio player
In the main menu or desktop, click the icon to play the audio
- When there are no music files in the audio player playlist, the system will automatically load the music files from the card to the audio player playlist after turning on the audio player (the device supports audio file format: mp3, wav, midi, wma). The playlist is shown in the above illustration.
- If there are many songs in the Music playlist area, slide up/down on the touch screen to page up/down.
- Double-click the favourite in the list to play music as shown in the following illustration.

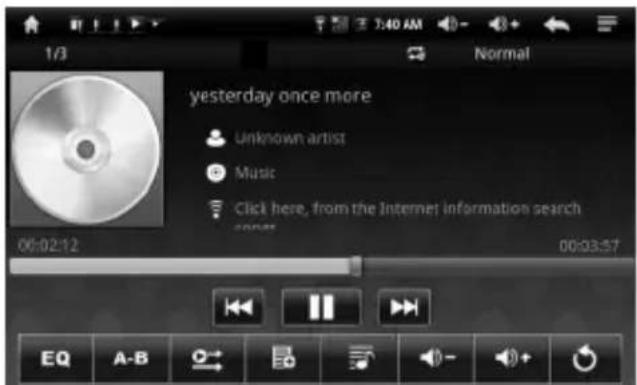
- In the music playing interface, tap to enter the audio playing list.
- Drag the playback progress bar to adjust audio playback progress
● Audio player buttons description .


| button | description | button | description | ||
 | Browse the playlist |  | online music searching | ||
 | artist |  | album | ||
 | other audio |  | to view the music files on disc | ||
 | New Playlist |  | switch to audio playing | ||
 | quit |  | EQ (normal, rock, classical, popular, heavy bass, jazz, custom EQ) | ||
 | A-B repeat |  | Playing order mode | ||
 | add audio to the playlist |  | pause an audio | ||
 | increase volume |  | decrease volume | ||
 | go to previous song |  | skip to next song | ||
 | play audio | ||||
Note: Audio player can play WAV record files.
5.1.2 Video
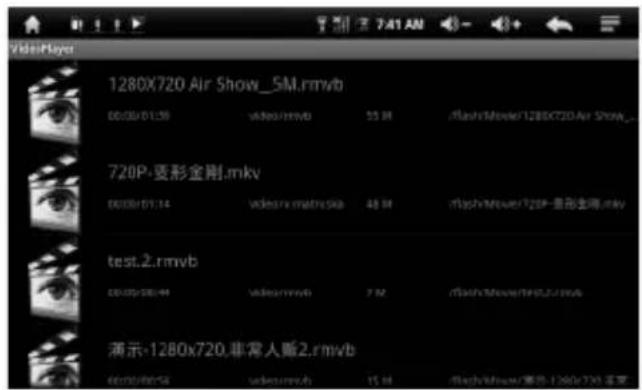
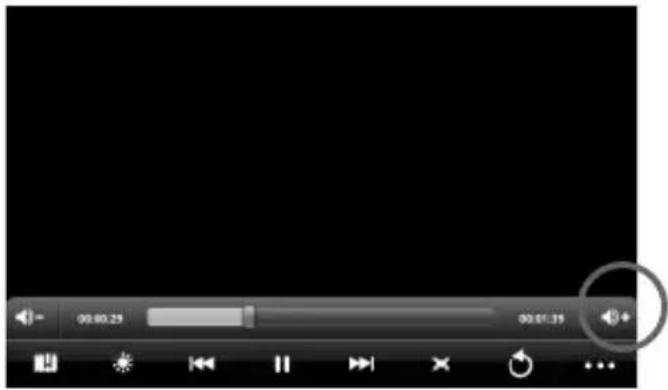
- In the main menu or desktop, tap the icon 📄 to enter the video player interface and then open the video files. Double-click the favourite in the list to play as shown in the following illustrations.
- The device supports audio file format: MKV, AVI, RM, RMVB, MP4, MOV, VOB, DAT, FLV, 3GP.
- When there are no video files in the video player playlist, the system will automatically load the video files from the card to the video player playlist after turning on video player.
- Drag the playback progress bar to adjust video playback progress.
● Video player buttons description:
| button | description | button | description |
 | Adding video bookmarks |  | Brightness Adjustment |
 | go to previous chapter |  | skip to next chapter |
 | Play and pause video |  | Video format 16:9 /4:3 |
 | Exit |  | menu |
 | increase volume |  | decrease volume |
- Click this button to get up delete bookmark, play mode, TV-Out, HDMI etc. See the illustration below.
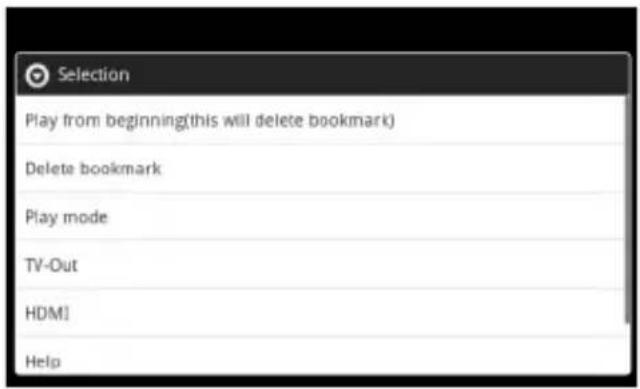
a. Tap play mode to select one of play modes: single, repeat one, repeat all, or tap back to return to A menu.

5.1.3 Picture Browsing
- In the main menu or desktop, tap the picture browsing icon to enter the viewing interface.


natural_image
Black-and-white close-up of a butterfly with detailed wing venation, resting on a flower (no text or symbols visible)Picture Browser button description:
| button | description | button | description |
| [2HTD] | Previous image |  | Zoom in |
| [3YDH] | Next image | [2KKT] | Zoom out |
 | Brightness adjustment |  | Enter the Image Slide mode |
| [2260] | Rotate the image 90 deg. clockwise | [7C50] | Rotate image 90 degree counter clockwise |
 | Image settings |  | Exit the interface of Image Browser |
- Adding image (supports the picture formats: BMP, JPG, JPEG, PNG, GIF)
When there are no files in the photo list, the system will automatically load the image files from the card to the photo browsing list after opening the photo browser.
Open the corresponding folder, find the image file and add the picture you want.
- Tap photo setting button, the photo can be set as wallpaper
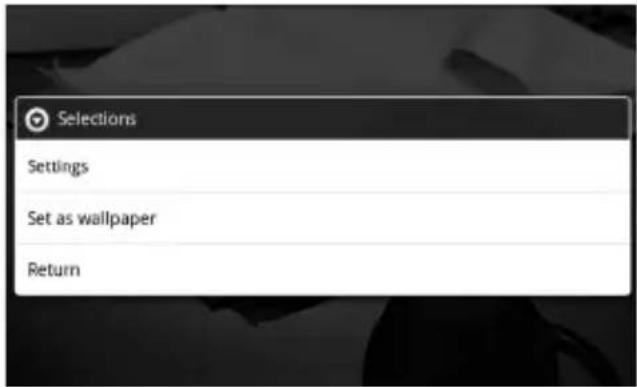
5.1.4 Recording function
In the main menu or desktop, tap the record icon to enter the record interface, tap record button to start recording, tap this button to stop recording. The system will remind you to use this recording or give up, please select manually.
Playing a recording: please select audio player to play the recording; firstly select the record files from the explorer, then click on this and play. For further details please refer to 5.1.1 (audio player).

5.1.5 Explorer
In the main menu or desktop, tap the explorer icon to enter the Management Interface, tap [microSD Card], [Internal Memory] and [USB] to open their root directory folders in order to add, copy, paste, delete etc.. Press the file or folder for several seconds in order to select copy, delete, paste, remove and rename operation options, then tap previous/next folder or A menu to finish the copy, delete, paste, remove and rename to the correct directory.

5.2 System desktop 2 (E-Book)
Supports E-Book formats: TXT, LRC, PDF, Html, Htm, EPUB etc., Supports automatic browsing, zooming, bookmarks, page etc.

5.2.1 E-Book Reader
- In the main menu or desktop, tap E-Book application icon to read the e-book.
- Open the folder and select the text file;
- Double tap E-Book files to read, tap the left/right side of touch screen to flip over;


- Zoom the font: click Zoom button → to zoom the font, the available font sizes: S, M, L, XL, XXL.
- Jump Set: tap the jump button and Pop-up dialog box, enter the number of pages you want then click confirm so that it automatically jumps to the specified page.
● Bookmark setting: tap bookmark icon to add/ delete display
the Bookmarks.
- Outline: tap the outline icon to view the outline of book.
● Book info: tap book info icon 📄 to view the book name and information about the author.
5.3 Desktop System (Web applications)

5.3.1 IE Browser
When the WIFI connection is in normal mode (for details refer to chapter 4.5 WIFI Setting), tap the main menu or desktop's IE Browser icon to enter to the IE interface, click the address bar and enter website; then click Go to enter a corresponding web page. You can view the corresponding website information.

Note: The IE Explorer uses the popular third-party IE Explorer software. Please follow the IE Explorer's standard operating mode to operate.
5.3.2 E-mail
When the WIFI connection is in normal mode (for details refer to chapter 4.5 WIFI SETTIN), tap the Gmail icon in main menu or desktop to enter Google account, click

Enter e-mail interface:
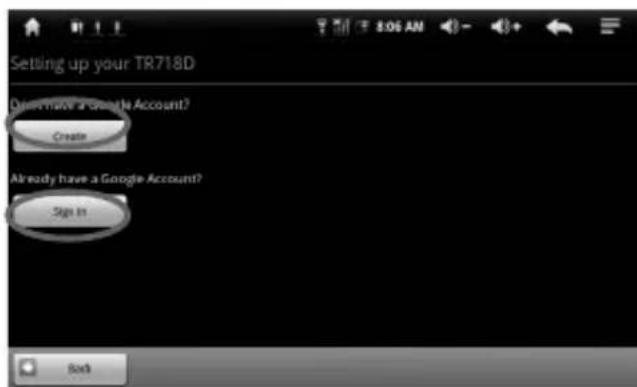
If you have a Google mailbox account, please direct tap enter user name and password.
If you do not have a Google mailbox account, tap , add Google account.
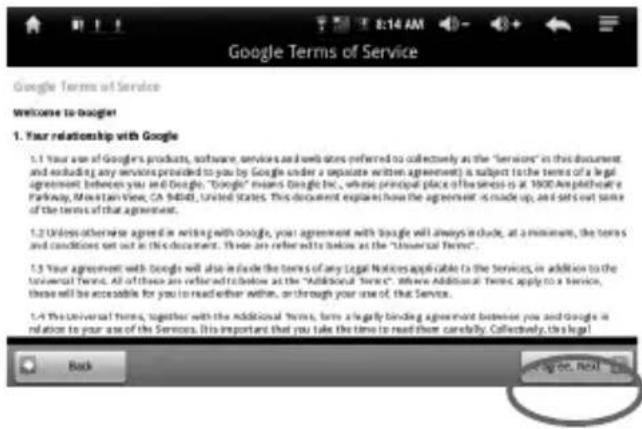
Tap, pop up interface as below; Tap E-mail Address, Code Editor Separately, pop up fingerboard, enter matching information; Tap to agree to Google mail agreement.

Enter your mail password, and Re-enter this to confirm, tap to answer the system questions.


Tap Google mail agreement; complete the new account mail application.
Inbox
Auto enter inbox interface:
This interface displays received E-mails. Double click each E-mail, to check, reply to sender, reply to all, etc.
![Get Gmail on your mobile phone - [image: Access Gmail on your mobile phone] Th... » Gmail Team 8:17am Import your contacts and old email - You can import your contacts and mail from ... » Gmail Team 8:17am Customize Gmail with colors and themes - To spice up your inbox with colors and t... » Gmail Team 8:17am](/content/2026/05/1023092/images/58bc37eb74b24fb73e1fcd5aaa6540928a957e088858b8862e8f8c320ee63139.jpg)

| Button | Description | Button | Description |
 | Refresh |  | New Email |
 | Account |  | Check label |
 | Search |  | Setting |
Edit E-mail
Tap taskbar pop up toolbar, and tap to enter E-mail writing interface.
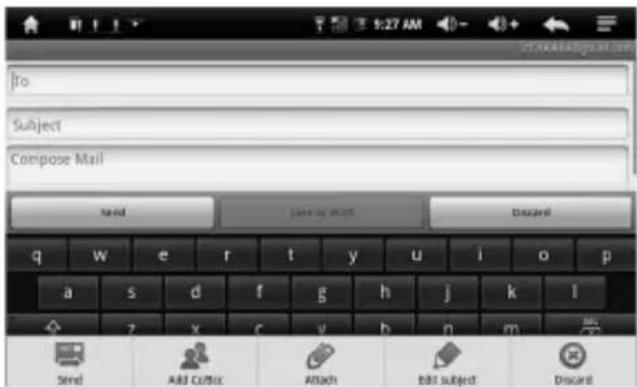
Tap add address Add Cc/Bcc icon to add E-mail Cc/Bcc header; or tap it again to delete.
Tap Attach icon to add E-mail attachment.
Tap Edit Subject icon to enter subject line and edit directly;
Tap Discard icon to exit writing E-mail;
Input receiver address & relevant information, Tap Send icon to send E-mail;
Sent
Tap icon 📋 to choose sent e-mails, pop up interface as shown below:
This interface displays sent E-mails. Double click each E-mail, to check, reply to sender, reply to all, etc.

Settings
Tap Desktop icon pop up toolbar; Tap setting icon to enter interface as below:

Signature: Append text to messages you send;
Confirm delete: Show a dialog whenever you delete a conversation;
Batch Operations: Allow label operations on more than one conversation;
Clear Search History: Remove all the searches you have performed;
Labels: Select which labels are synchronized;
Email Notifications: Notification in status bar when email arrives;
Select Ring tone: Select ring tone indicating when email arrives; Vibrate: You can also select vibrate for when email arrives.
5.3.3 Online Chat
- Google talk is an online chatting application. Everyone can use desktop browser to enter Gmail, and make contact with you via Google talk. So it will seem that you have more Gtalk "friends" than it looks. (If you do not have an account password, select to register an account when you enter the application)
Tap on the desktop to enter Google Talk.

- Mobile QQ
Tap to enter mobile QQ, enter your account and password to chat online.

5.4 Desktop System 4 (Game Function)
This desktop shows game icons, Red Heart 21 Point, Tractor, QQ Farm Assistant, Fat Mouse, Spiderman, etc. You can install games as you desire.
Tap the relevant game icon on the menu or desktop. Enter the game interface, you can then play the game by following the instructions on the screen; We hope you will enjoy this.

5.5 Desktop System 5 (other functions)

5.5.1 Calendar
Tap Calendar icon , enter calendar interface:
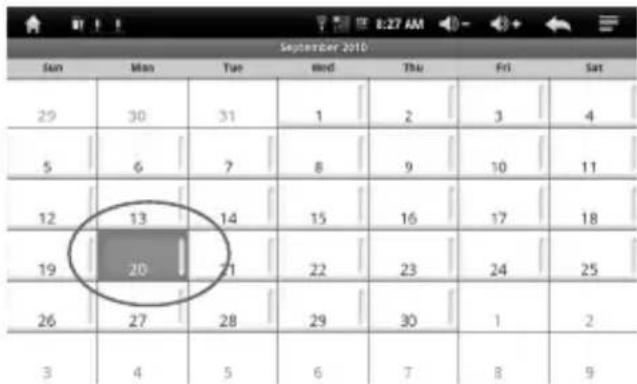
- In calendar mode, press and pull up/down the screen to go backwards/forwards with the Months; or to turn the pages.
● Auto adjusts Years when the month goes beyond December or January. - Enter interface, the number in the orange form is the intraday date. You can change the date in setting function; details are as for the setting section.
- Tap to return to main menu.
5.5.2 Calculator
Click Calculator icon on the desktop to open calculator:

5.5.3 Alarm Clock
Tap Alarm Clock icon to enter setting interface. You can select the √ behind the clock time to set three clocks simultaneously, details as below:
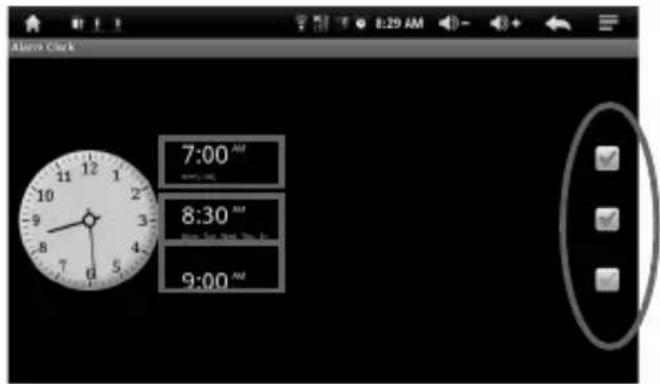
tap any of above clock times to set up: time, alarm bell, vibration, repeat and label.
- Everyday: Set alarm bell repeat at the same time everyday
- Monday to Sunday: you can choose the days and same time on each day
- No: to set up the alarm bell for one time, with no repeat
- Pattern: to choose the bell pattern
5.5.4 APK Installer
tap APK installer icon on main menu or desktop enter installing interface, to get details from 4.9 APK chapter.
5.5.5 Setup
Tap 📄n main menu or desktop to set wireless and network, sound and backlight, location and safety, application and so on, slide on screen to page up/down.
5.5.5.1 Wireless and Network Settings
For details please refer to WIFI setting in Chapter4.5.
5.5.5.2 Voice and Display Settings
- Tap [sound&display] enter to settings interface.

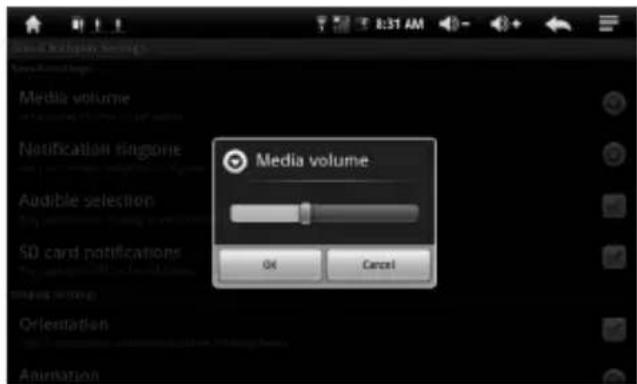
a Media volume settings:
tap [media volume] to enter setting interface, then to set up music and video volume.
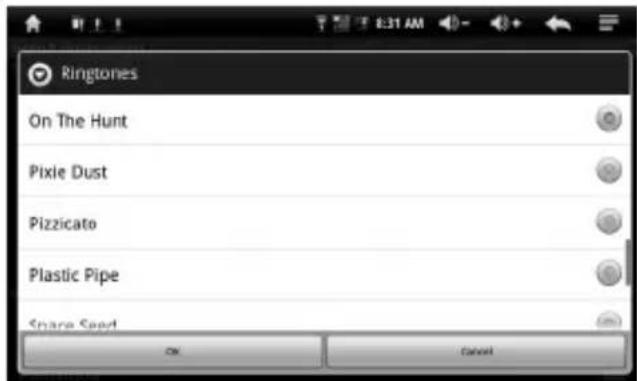
b Ringtones settings
to choose any of the default ringtones:
c. Set operating sound (screen choice) and n card notifications as optional, tap and tick ti

TM
highlight is displayed.
- Display settings:
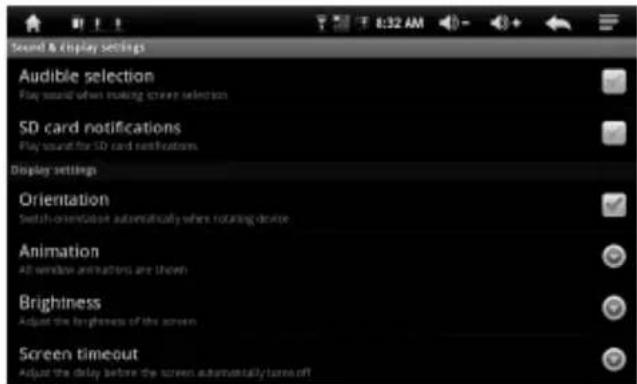
a [Orientation]
The display screen will change the direction automatically when it rotates.
b [Animation]
Displays all animation in all windows.

c [Brightness]
Drag to adjust brightness, tap "OK" and "back".

d [Screen timeout]

5.5.5.3 Location and Security Settings
Tap 'Location and Security" to enter the setting interface:
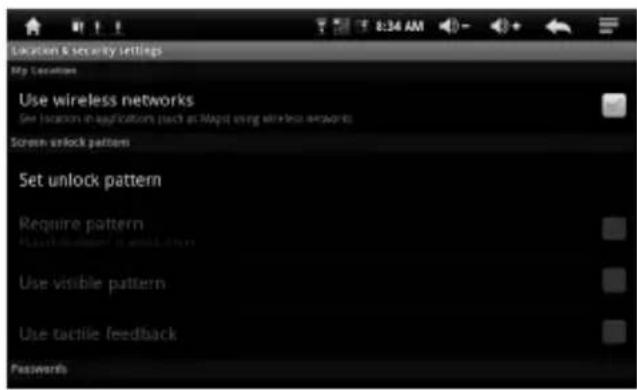
Set unlock pattern
Tap "set unlock pattern", then tap
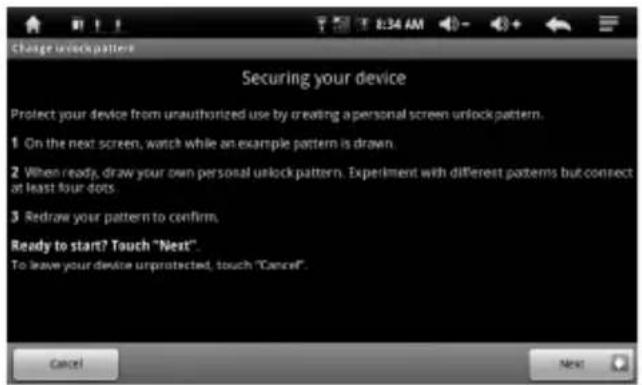

Draw the unlock pattern, to connect at least 4 points, tap "next", then finish.
5.5.5.4 Application Settings

- Running service settings:
Tap [Running service] to see and control the running service.
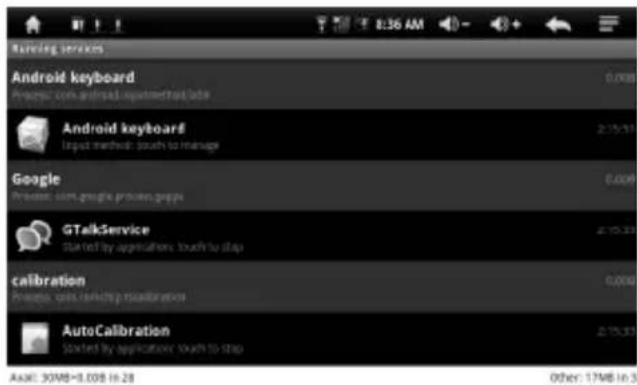
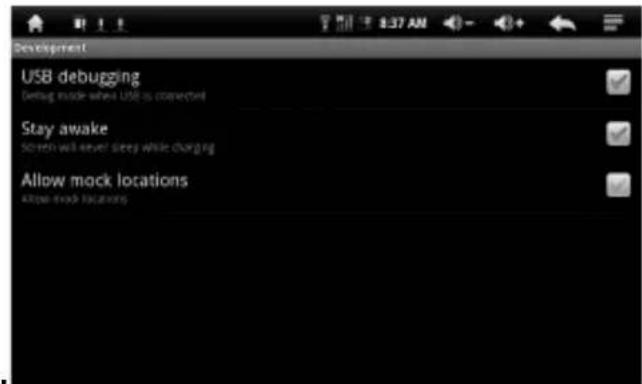
● Development setting: it is advised to use factory defaults., Any change may make some functions unavailable
5.5.5.5 microSD card & device storage settings
Tap microSD card & device storage to enter the following in order to check total space, available space, format MICROSD card, etc.

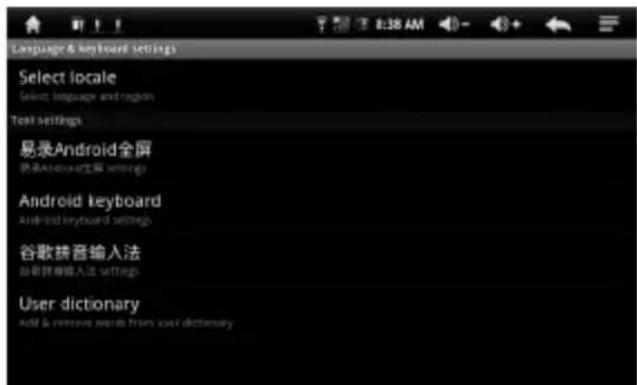
5.5.5.6 Language Keyboard Settings
Tap [Language Keyboard] to enter setting interface.
- Language Setting:
The device supports multiple languages. You can select operation interface for different languages according to your needs. To select matching language option, tap confirm and back.

● Input Method setting, Android Full Screen:
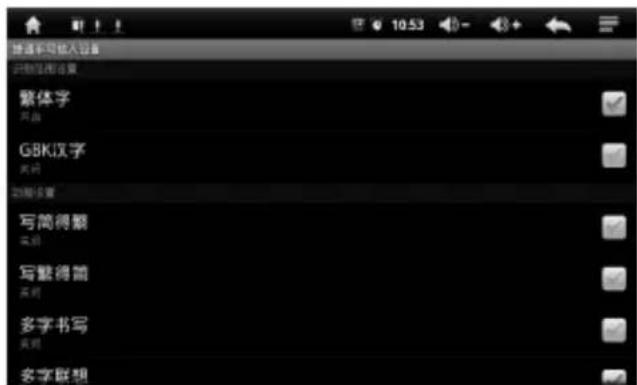
● Android Keyboard setting:

- Google Input method setting:

Select Setting Menu > Date and Time in setting interface, select the √ behind the Automatic option to modify the Date, Time Zone & Time.
- Date Setting:
Tap + to select Day, Month & Year, and tap icon to confirm OK.


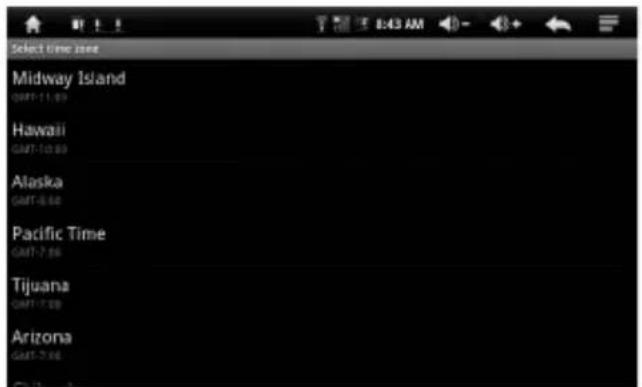
- Time Zone Setting:
Select the time zone you are in and tap:
- Time Setting:
Tap + to select hours & minutes, e.g.: 10:50, and tap icon to confirm OK.
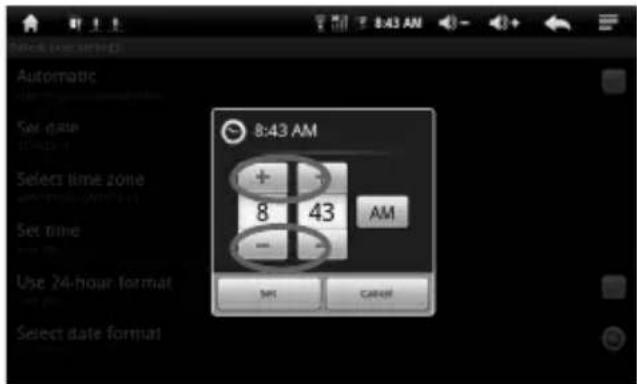
● Date Format Setting:

5.5.5.8 Touch Panel Calibration
For details refer to 4.1 Touch Panel Calibration Section
5.5.5.9 About the Device
- Check power consumption, legal information, device state & software version, etc.

5.6 Desktop Function Icon Setting
5.6.1 Add & Remove Desktop Function Icon
Tap icon 📄 top-left corner of main interface, go to desktop setting interface. Here you can select wallpaper and add widget, etc.
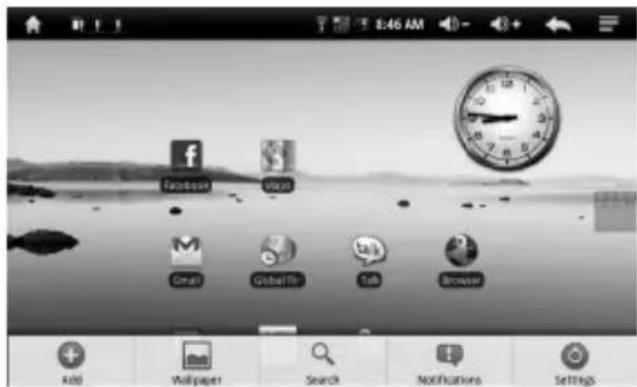
Shortcut Icon:

Tap icon into desktop widget interface as follows:
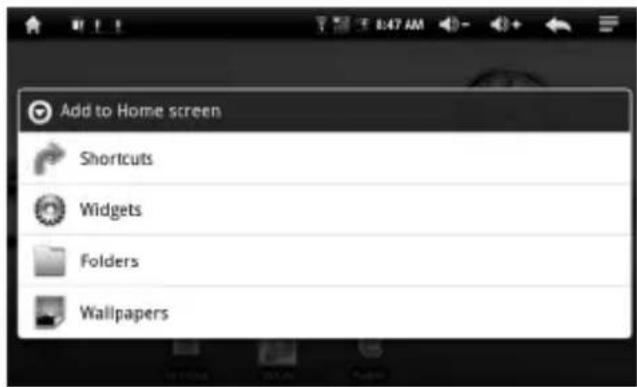
Select shortcut icon to add to main interface, tap the matching option to add.

Select desktop widget to add to main interface, tap Search, Calendar, etc to add:

5.6.2 Wallpaper Setting
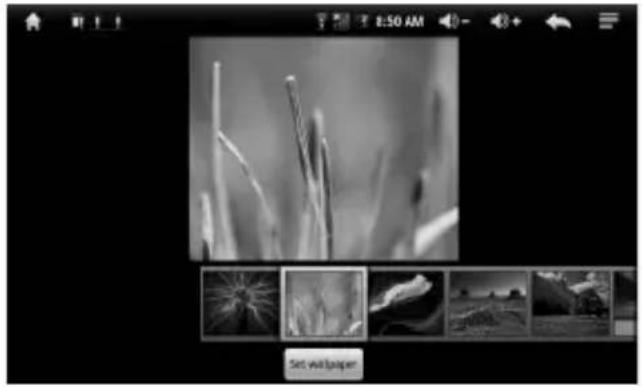
Tap icon , to change the wallpaper and select the desired picture. Tap : wallpaper setting to finalize.
natural_image
Black-and-white photo of tall grass blades with a small inset image showing a landscape scene (no text or symbols)5.6.3 Tap icon shortcut to search engine

5.6.4 Shortcut Notification
Tap icon to check the current notification status:

5.6.5 Shortcut Setting
Tap into setting interface, details as in chapter 5.10.
5.6.6 Add, Move or Delete Desktop Icon
Tap icon at the main interface, into function menu list, display all the application icons by pages. Press and drag the application icon to copy to current desktop i.e. set the shortcut on the desktop.
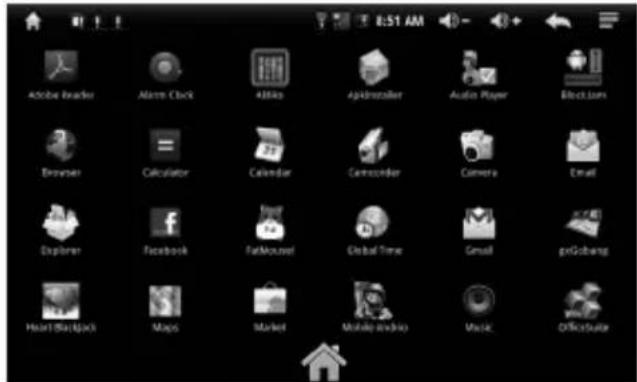

Press the application icon on the desktop for a few seconds, enter into editing status and you can move the icon. When you drag the icon to , it changes to the delete function; release the icon and you can then delete it.

6. Firmware Update
Please turn off the power or shut off the built-in battery, open the upgrade tool "RKAndroidTool.exe", select the √ in front of the "Loader" & "Backup" options in the pop-up window; Press and hold "ESC" button for firmware update (do not release it) until the tool bar displays "Discover a RK Android Loader Rock USB Device"; Click execute to start upgrading; Upgrading status is showed on the right side of the information bar. When prompted, "execute successfully" and the upgrade is then finished, rerun the system to use.

Troubleshooting
- Cannot turn on the device.
You cannot turn on the device when the battery is below the critical level. Please charge the battery: connect to the computer via USB cable or charge via AC charger, try to turn on again while ensuring quantity of electricity.
◆ Press the RESET button on the top of the device and check if the restart is normal or not.
◆ Check if the charger is properly connected.
2 · The stand-by time of the tablet is too short.
◆ The duration of the lithium battery varies with ambient temperature changes and the service conditions. If the ambient temperature is too low or too high, the duration of the battery will be affected. It is recommended to use this device at normal room temperature!
In using the device, a larger screen on the device uses more electricity. In addition, this is also affected by volume increase, sound field special effects, and other factors such as frequent operation. The actual duration may differ to some extent from that specified..
3 · No sound via earphone.
◆ Check if the volume setting is 0.
◆ Check whether the audio file is broken, and try to play other audio files to confirm. If the audio file is broken, it may cause severe noise or staccato.
- Cannot copy files.
◆ Check if the device is connected to the computer correctly.
◆ Check if the memory space is full.
◆ Check if the USB cable is broken.
Get the most out of your Yarvik Tablet
We've included some useful Apps on the Yarvik Tablet:
- Alarm clock
- APK installer
- Audio Player
- Browser
- Calculator
- Explorer
- Photo Browser
- Shelves
- Sound recorder
- Video Player
But you can find many more Android Apps on the internet. To help you with this we would like to recommend you to check out some of the websites listed below. It gives you access to a wide range of fun and useful freeware apps.
www.androidpit.com
www.slidesleme.org
www.androidgear.com
All Apps are downloaded at user's own risk.
Please note: Due to licensing regulations on Android based mobile devices, the Yarvik Tablet is able to access the official Android Market Place, but you will not be able to download apps.



- Desktop System 5 (other functions)
- Desktop Function Icon Setting
- Preface
- Safety notices
- Getting ready to use your device
- Features Overview
- Quick Guides
- Touch Panel Calibration
- On/Off Switch
- Battery management and charging
- Definition of the Functions icons
- WIFI Setting
- Distribute IP Address automatically:
- Manual setup IP address:
- USB HOST Function
- a. Turn on The USB-HOST:
- b. Read U-disk:
- MicroSD™ Storage
- APK Installer
- Operation details
- Desktop System 1 (Multimedia
- Music/Video/Picture/Recording)
- Audio
- Audio player
- Video
- Picture Browsing
- Recording function
- Explorer
- System desktop 2 (E-Book)
- E-Book Reader
- Desktop System (Web applications)
- IE Browser
- Inbox
- Edit E-mail
- Sent
- Settings
- Online Chat
- - Mobile QQ
- Desktop System 4 (Game Function)
- Calendar
- Calculator
- Alarm Clock
- APK Installer
- Setup
- Wireless and Network Settings
- Voice and Display Settings
- a Media volume settings:
- b Ringtones settings
- Location and Security Settings
- Set unlock pattern
- Application Settings
- - Running service settings:
- microSD card & device storage settings
- Language Keyboard Settings
- - Language Setting:
- Touch Panel Calibration
- About the Device
- Add & Remove Desktop Function Icon
- Wallpaper Setting
- Tap icon shortcut to search engine
- Shortcut Notification
- Shortcut Setting
- Add, Move or Delete Desktop Icon
- Firmware Update
- Troubleshooting
- Get the most out of your Yarvik Tablet
Brand : Yarvik
Model : GoTab 7 (TAB210)
Category : Tablet