
Virb Elite Watersport Bundle - Camcorder GARMIN - Free user manual and instructions
Find the device manual for free Virb Elite Watersport Bundle GARMIN in PDF.


| Product Type | Watersport Action Camcorder Bundle |
| Brand | Garmin |
| Model | Virb Elite Watersport Bundle |
| Dimensions (camera only) | 54 x 48 x 23 mm |
| Weight (camera only) | 88 g |
| Battery Life | Up to 3 hours (1080p recording) |
| Battery Type | Rechargeable Li-ion, 2000 mAh |
| Storage | microSD card (up to 32 GB, Class 10 required) |
| Video Resolution | 1080p at 30fps, 720p at 60fps, 960p at 30fps |
| Photo Resolution | 12 MP (4032x3024) |
| Waterproof Rating | With included housing: 50 m (164 ft) |
| Connectivity | Wi-Fi (2.4 GHz), Bluetooth, GPS, GLONASS |
| Sensors | Accelerometer, gyroscope, altimeter |
| Mounting | Includes waterproof housing, handlebar mount, adhesive mounts, and helmet mount |
| Display | No built-in display; compatible with Garmin remote or smartphone app via Wi-Fi |
| Cleaning | Clean lens with soft microfiber cloth; rinse housing with fresh water after use in salt water |
| Spare Parts Availability | Replacement waterproof seals, mounting accessories, batteries available from Garmin |
| Repairability | Battery and memory card user-replaceable; other repairs by authorized service center |
| Warranty | 1 year limited warranty (check local regulations) |
Frequently Asked Questions - Virb Elite Watersport Bundle GARMIN
User questions about Virb Elite Watersport Bundle GARMIN
0 question about this device. Answer the ones you know or ask your own.
Ask a new question about this device
Download the instructions for your Camcorder in PDF format for free! Find your manual Virb Elite Watersport Bundle - GARMIN and take your electronic device back in hand. On this page are published all the documents necessary for the use of your device. Virb Elite Watersport Bundle by GARMIN.
USER MANUAL Virb Elite Watersport Bundle GARMIN
All rights reserved. Under the copyright laws, this manual may not be copied, in whole or in part, without the written consent of Garmin. Garmin reserves the right to change or improve its products and to make changes in the content of this manual without obligation to notify any person or organization of such changes or improvements. Go to www.garmin.com for current updates and supplemental information concerning the use of this product.
Garmin® and the Garmin logo are trademarks of Garmin Ltd. or its subsidiaries, registered in the USA and other countries. ANT™, ANT+™, BaseCamp™, fēnix™, Garmin Connect™, tempe™, and VIRB™, are trademarks of Garmin Ltd. or its subsidiaries. These trademarks may not be used without the express permission of Garmin.
microSD™ and the microSDXC logo are trademarks of SD-3C, LLC. Mac® is a trademark of Apple Inc. Microsoft® and Windows® are registered trademarks of Microsoft Corporation in the United States and other countries. HDMI® is a registered trademark of HDMI Licensing, LLC. Wi-Fi® is a registered mark of Wi-Fi Alliance Corporation. Other trademarks and trade names are those of their respective owners.
This product is ANT+TM certified. Visit www.thisisant.com/directory for a list of compatible products and apps.
Table of Contents
Introduction.... 1
Installing a Memory Card.... 1
Installing the Battery Pack.... 1
Charging the Lithium-Ion Battery Pack.... 1
Keys....2
Mounting the Device.... 2
Turning On the Device.... 2
Modes.... 3
Viewfinder.... 3
Leveling the Device.... 3
Status Page.... 3
Video.... 3
Recording a Video.... 3
Video Settings......4
Advanced Recording Settings.... 4
Recording Video Automatically.... 4
Recording a Time-Lapse Video.... 4
Recording a Video Loop.... 5
Connecting an External Microphone or Audio Source...... 5
Photos....5
Taking a Photo....5
Photo Settings....5
Taking a Delayed Photo.... 5
Taking Repeated Photos.... 5
Playback....5
Viewing Photos and Videos.... 5
Viewing Video Over HDMI® 6
Connecting Headphones.... 6
Outputting Composite Video.... 6
Deleting Photos and Videos.... 6
Tracks....6
Recorded Track Log Data....6
Dashboards......7
Viewing the Dashboards....7
Pairing Your ANT+ Sensors....7
Remote Control....8
Controlling the Device Remotely....8
Controlling Multiple VIRB Devices Remotely.... 8
Operating the Device Using Your Mobile Device....8
Troubleshooting....8
My device does not turn on....8
My device display is hard to see....8
Some information is missing from the dashboards...... 8
My video recordings do not look smooth.... 8
My device turns off when I stop recording video....8
Device Information......8
System Settings....8
Erasing Your Memory Card....9
Extending the Battery Life....9
Device Care....9
File Types....9
Connecting the Device to Your Computer.... 9
Support and Updates.... 9
Specifications....9
Getting More Information....9
Index....10
Introduction
WARNING
See the Important Safety and Product Information guide in the product box for product warnings and other important information.
It is your responsibility to use the device in a safe manner. Garmin® will not be responsible for any property damage, injuries or deaths resulting from any use of this device in any activities.
Installing a Memory Card
You must install a microSD ^™ memory card up to 64GB to use your device. For optimal performance, use a class 10 or better memory card.
1 Turn the D-ring counter-clockwise, and pull up to remove the cover.
2 If necessary, remove the battery pack.
3 In the battery compartment, slide the card holder ① toward the lens, and lift up.
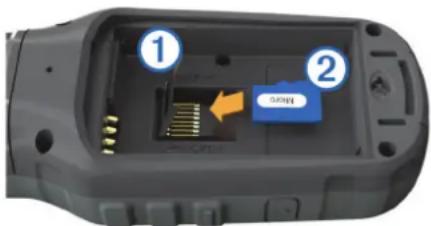
4 Place the memory card ② with the gold contacts facing down.
5 Close the card holder.
6 Slide the card holder away from the lens to lock it.
7 Replace the battery pack.
8 Replace the battery cover, and turn the D-ring clockwise.
Installing the Battery Pack
WARNING
This product contains a lithium-ion battery. To prevent the possibility of personal injury or product damage caused by battery exposure to extreme heat, store the device out of direct sunlight.
1 Turn the D-ring counter-clockwise, and pull up to remove the cover.
2 Locate the metal contacts on the end of the lithium-ion battery.
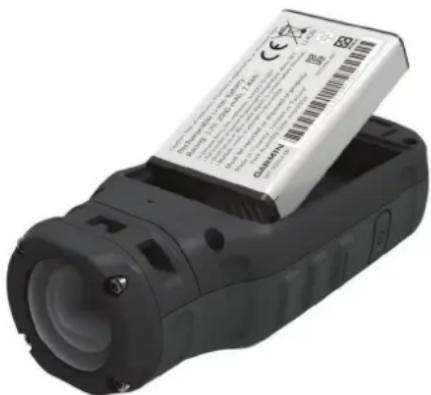
3 Insert the battery into the compartment, contacts first.
natural_image
Close-up of a black handheld device with a white card partially inserted, showing no visible text or symbols on the device body.4 Press the battery into place.
5 Replace the battery cover, and turn the D-ring clockwise.
Charging the Lithium-Ion Battery Pack
NOTICE
To prevent corrosion, thoroughly dry the mini-USB port, the weather cap, and the surrounding area before charging or connecting to a computer.
Do not attempt to use the device to charge a battery that was not provided by Garmin. Attempting to charge a battery that was not provided by Garmin can damage the device and void the warranty.
NOTE: The battery will not charge when outside the temperature range of 32 to 114°F (0 to 45°C).
You can charge the battery using a standard wall outlet or a USB port on your computer. You can also use an optional battery charger accessory. Go to www.garmin.com/outdoor for more information.
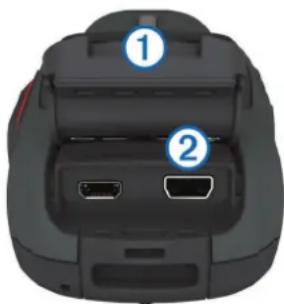
1 Pull up the weather cap ① from the mini-USB port ②.
natural_image
Top-down view of a black electronic device casing with labeled ports (no text or symbols beyond numbered annotations)2 Plug the small end of the USB cable into the mini-USB port.
3 Plug the USB end of the cable into the AC adapter or a computer USB port.
4 Plug the AC adapter into a standard wall outlet. When you connect the device to a power source, the device turns on. The LED is orange while the battery is charging.
5 Charge the battery completely.
The LED turns green when the battery is fully charged.
6 Remove the USB cable and fully close the weather cap.
Battery Status
| Critically low battery power or missing battery | |
| Low battery power | |
| Remaining battery power | |
| Charging | |
| Fully charged |
Saving Energy While Charging the Device
You can turn off the device display and all other features while charging.
1 Connect your device to an external power source. The remaining battery capacity appears.
2 If the device is off, hold ⬆ to turn on the device.
3 Hold for 4 to 5 seconds.
The display turns off, and the device goes into a low power, battery charging mode.
4 Charge the device completely.
Keys
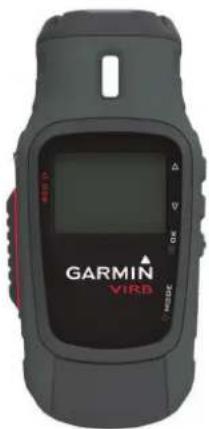
| Select to scroll through menus and settings. | |
| Select to scroll through menus and settings. | |
| OK Select to choose menu options or to take a photo. | |
| MODE Select to scroll through modes.Hold to turn the device on and off. | |
| REC Slide toward the lens to record video. | |
Mounting the Device
NOTICE
To prevent product loss or damage, do not use the adhesive mounting base when the temperature is below 5^ F (-15°C).
The permanent mounting adhesive is extremely difficult to remove after it is installed.
Before you can install the adhesive mounting base onto a surface, the ambient temperature must be from 70° to 100°F (from 21° to 38°C).
Your device includes an assortment of mounting bases and arms, which can be used in many configurations. These instructions provide an example of one possible configuration. You can also purchase additional mounts for your device, such as wearable mounts, vehicle mounts, or a tripod mount. Go to www.garmin.com/outdoor for more information.
NOTE: By default, the camera should be mounted with the screen facing up to record correctly oriented video. You can adjust the settings to record with the screen facing down (Advanced Recording Settings).
1 Thoroughly clean the mounting surface using water or alcohol. The mounting surface must be free of dirt, debris, wax, or coatings.
2 Remove the film from the adhesive mounting base ①, and press the base firmly onto the mounting surface. You can use either the flat base or the curved base, depending on the contour of the mounting surface.
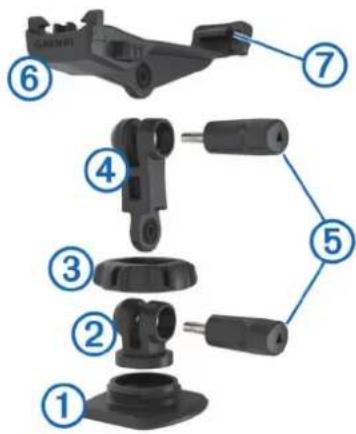
3 Allow the base to bond to the mounting surface for at least 24 hours.
4 Place the coupler ② into the base.
5 Place the threaded ring ③ over the coupler, and tighten it onto the base.
6 Snap the mounting arm ④ into the coupler.
7 Insert a thumbscrew ⑤ into the larger opening of the joint, and tighten the thumbscrew to lock the angle of the joint.
8 Snap the camera mount ⑥ into the top of the mounting arm.
9 Insert a thumbscrew into the larger opening of the joint, and tighten the thumbscrew to lock the angle of the joint.
10 Place the tab ⑦ on the back of the camera mount into the slot in the back of the camera.
11 Squeeze the buttons ⑧ on the sides of the mount, press the front of the camera ⑨ down, and release the buttons.
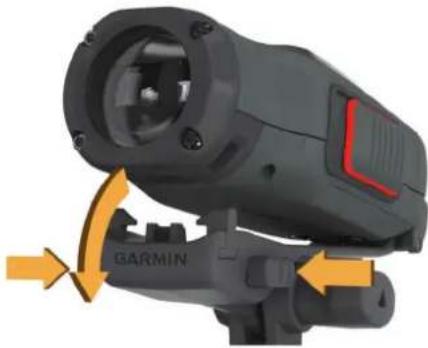
natural_image
Close-up of a Garmin flight simulator with orange directional arrows indicating motion (no text or symbols on the device itself)The camera should be held tightly and should not move in the mount when properly secured.
12 If the camera feels loose in the mount, press the front of the camera into the mount until it clicks.
Turning On the Device
Select
Turning Off the Device
NOTICE
To prevent loss of data, always turn off the device before removing the battery.
NOTE: You cannot turn off the device while recording video.
1 If necessary, slide REC away from the lens.
2 Hold
appears on the screen while the device saves track log data and turns off.
If you need to remove the battery, wait until the screen turns off before removing the battery.
Turning the Device On and Off Using REC
You can use REC to turn the device on and off in recording mode. This feature allows you to start recording quickly, while automatically turning off the device to conserve battery power when you are not recording.
NOTE: The device does not turn off using REC unless you use REC to turn on the device.
1 With the device turned off, slide REC toward the lens.
The device turns on and starts recording video.
2 When you are finished recording, slide REC away from the lens.
The device stops recording and turns off.
Modes
You can operate your device in several modes.
VIEWFINDER: Displays the camera viewfinder and status information.
PLAYBACK: Allows you to view recorded videos and photos.
DASHBOARD: Displays sensor data in charts and data fields (VIRB Elite only).
SETUP: Allows you to change camera settings.
Changing Modes
1 Select MODE to cycle through the available modes.
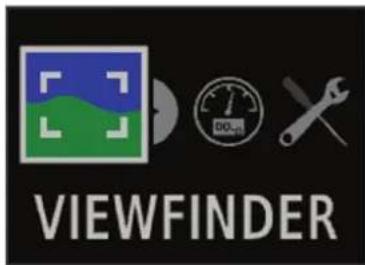
The modes cycle from left to right. The icon for the selected mode appears larger, and the name of the selected mode appears at the bottom of the screen.
2 Stop selecting MODE when the desired mode appears.
Viewfinder
You can use the viewfinder to set up shots, view status information, and level the camera (VIRB Elite only).
Select MODE > VIEWFINDER.
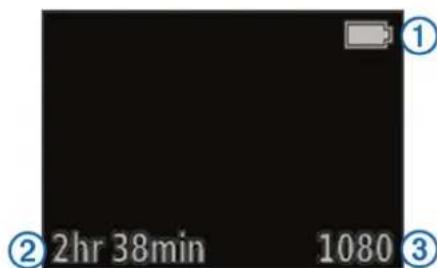
| 1 | Battery status |
| 2 | Recording time remaining on the memory card |
| 3 | Current video mode |
| △ | Select to view the level (Leveling the Device). |
| ▽ | Select to view the status page (Status Page). |
Leveling the Device
NOTE: This feature is available for VIRB Elite only.
You can use the on-screen level when you mount the device to ensure your videos and photos are perfectly level.
1 Select MODE > VIEWFINDER > △
The level appears.
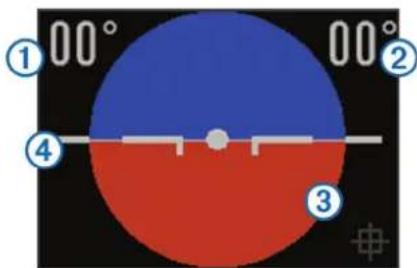
2 Adjust the device until the degree of roll ① and degree of pitch ② are both 00°, and the brown section of the level ③ is even with the horizon line ④.
Calibrating the Level
You can calibrate the level if it does not seem accurate. It may be necessary to calibrate the level when using the device in extreme temperatures.
1 Select MODE > VIEWFINDER > △
2 Place the device flat on a level surface, with the screen facing up.
3 Select OK.
Status Page
The status page provides at-a-glance details about the current settings of your device.
Select MODE > VIEWFINDER > ▽
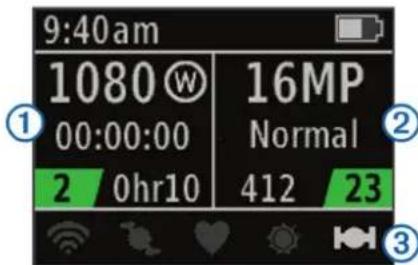
| 1 | Displays the video mode, field of view, elapsed time, interval or loop setting (if set), number of stored videos, and time remaining on the memory card. |
| 2 | Displays the photo resolution, camera mode, timer count (if set), photos remaining, and number of stored photos. |
| 3 | Displays the sensors being used (VIRB Elite only) including Wi-Fi®, cadence, heart rate, tempeTM, and GPS. The sensor icons are gray when disabled, flashing when searching for a signal, and white when enabled or connected. |
Video
Recording a Video
NOTE: If the battery power becomes very low while recording video, the device automatically stops recording, saves the video, and safely turns off.
1 Slide REC toward the lens to start recording video.
If the device is off, it turns on automatically. The device starts recording video, and the viewfinder appears.
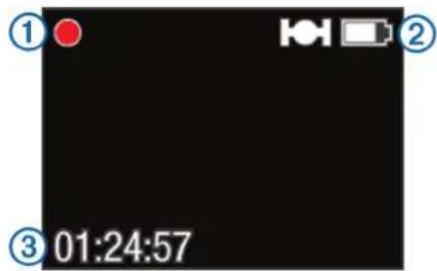
The viewfinder displays the recording status ①, the GPS and battery status ②, and the elapsed recording time ③.
2 Record video.
3 When you are finished recording video, slide REC away from the lens.
The video is saved on the memory card as an MP4 file, and the track log for the video is saved on the memory card as a GPX file.
Video Settings
Select MODE > SETUP > VIDEO.
Mode: Sets the resolution, aspect ratio, and frame rate.
Field of View: Sets the zoom level.
Loop: Enables loop recording and sets the number of minutes of video to store when recording a video loop.
Auto Record: Enables automatic recording (VIRB Elite only).
Microphone: Enables the microphone.
NOTE: This setting is not available when the device is connected to an external microphone.
TIP: If wind noise is an issue when recording video, you can disable the microphone.
Video Modes
You can change the video mode to change the resolution, aspect ratio, frame rate, and speed of recorded video. The resolution is the width and height of the video, in pixels. The aspect ratio is the ratio of the video width to the video height. Standard widescreen televisions use a 16:9 aspect ratio, and standard full screen televisions use a 4:3 aspect ratio. The frame rate is expressed in frames per second (fps). The speed indicates the speed of action in the video compared to real time.
1080p: Use this mode when you need high-resolution widescreen shots. 1080p works well as a default setting.
Tall HD: Use this mode when you need a large, vertical viewing area. Tall HD is particularly useful for close-up action shots and when using a helmet mount.
Fast HD: Use this widescreen mode to capture high-speed action shots.
Economy HD: Use this widescreen mode when you need a longer recording time. Economy HD uses less space on your memory card.
Slow Mo HD: Use this widescreen mode to capture handheld shots with slow-motion playback.
Super Slow Mo: Use this mode when you need super slow-motion playback in standard definition.
Time Lapse: Use this high-resolution widescreen mode to capture slow-moving or long-term action.
Video Mode Specifications
| Mode Resolution (pixels) | Aspect Ratio | Frame Rate (fps) | Speed |
| 1080p 1920×1080 16:9 30 Normal | |||
| Tall HD 1280×960 4:3 48 Normal | |||
| Fast HD 1280×720 16:9 60 Normal |
| Mode Resolution (pixels) | Aspect Ratio | Frame Rate (fps) | Speed |
| Economy HD 1280x720 16:9 30 Normal | |||
| Slow Mo HD 1280x720 16:9 60 1/2 speed | |||
| Super Slow Mo 848x480 16:9 120 1/4 speed | |||
| Time Lapse 1920x1080 16:9 30 Varies | |||
Field of View Settings
You can change the field of view when Lens Correct is set to Off. Field of view is only available for the 1080p video mode.
Select MODE > SETUP > VIDEO > Field of View.
Wide: Captures a wide view of your surroundings. Use this mode for open areas, close-range video, and when you want to capture as much of your viewing area as possible.
Zoom (2x): Captures a tighter view. Use this mode for medium-range video.
Ultra-Zoom (4x): Captures a very focused view. Use this mode for long-range video and closed or covered surroundings.
Advanced Recording Settings
Select MODE > SETUP > ADVANCED.
Lens Correct: Corrects wide-angle barrel distortion and reduces the field of view. Automatically sets Field of View to Ultra-Zoom in the video settings.
Stabilize: Turns on image stabilization to reduce shaky video. Automatically enables Lens Correct.
Flip Camera: Sets the camera to capture video and images with the screen facing up or down. This Side Down captures correctly oriented video and photos with the screen facing downward.
Inverting the Camera Orientation
You can change the camera orientation of your device to easily access REC during an activity. If you are mounting the device above your head, you can invert the camera orientation to aid visibility of the recording light or display.
1 Select MODE > SETUP > ADVANCED > Flip Camera.
2 Select an option:
- To use the device with the screen facing upward, select This Side Up.
- To use the device with the screen facing downward, select This Side Down.
Recording Video Automatically
NOTE: This feature is available for VIRB Elite only.
You can set the device to record video automatically based on your activity. This feature allows you to conserve space on your memory card by recording only the important parts of your activity.
1 Select MODE > SETUP > VIDEO > Auto Record.
2 Select an option:
- To record video automatically when the device is moving, select When Moving.
The device records video when you are moving and stops recording when you are still.
• To record video automatically when you are skiing, select Ski Mode.
The device records video when you are moving downhill and stops recording when you board the chairlift.
This feature automatically enables GPS in the system settings.
Recording a Time-Lapse Video
Time-lapse mode captures individual video frames at longer intervals and creates a video that plays much faster than real
time. You can use time lapse to record movements, changes, or events that take place over a long period of time.
Time-lapse videos play at 30 frames per second. The length of the video depends on the amount of time between video frames. For example, if frames are recorded at a one-second interval, each second of video covers 30 seconds of real time. If frames are recorded at a 60-second interval, each second of video covers 30 minutes of real time.
1 Select MODE > SETUP > VIDEO > Mode > Time Lapse.
2 Select a time interval.
3 For the best results, mount the device so that it will not move while recording.
4 Record a video.
Recording a Video Loop
Loop mode allows you to record video continuously but save only the most recent video footage. You can select the number of minutes of video to save. This enables you to save storage space when you want to capture key moments but do not want to save all footage of an activity. This feature is useful when using the device as a driving recorder.
The saved video loop is split into multiple files of equal length. This allows you to delete unwanted portions of the video easily.
1 Select MODE > SETUP > VIDEO > Mode > Loop.
2 Select the number of minutes of video to save.
3 Start recording video.
4 When finished, stop recording.
The most recent footage is saved on the memory card, up to the number of minutes selected in step 2.
Connecting an External Microphone or Audio Source
Before you can connect an external microphone, you must purchase a Garmin VIRB accessory cable with audio or microphone input. Go to www.garmin.com/outdoor. You must also have an external microphone or audio source with a 3.5 mm connector.
When you connect an external microphone, the device records audio from the external microphone instead of the built-in microphone.
1 Pull up the weather cap from the mini-USB port.
2 Connect mini-USB plug on the accessory cable to the mini-USB port on the device.
3 If necessary, when prompted to output video, select No.
4 If necessary, when prompted to use an external microphone, select Yes.
5 Connect the microphone to the MIC IN connector on the accessory cable.
To stop using the external microphone, you must disconnect the accessory cable from the device.
Photos
Taking a Photo
Your device provides several methods for taking a photo.
- Select MODE > VIEWFINDER, aim the camera using the viewfinder, and select 🔒
- From anywhere in the user interface, hold .
- While recording a video, select to capture a photo at the same resolution as the video recording. Photos taken while recording a video always use normal photo mode. Burst mode is ignored while recording video.
Photo Settings
Select MODE > SETUP > Photos.
Resolution: Sets the photo resolution to 16 MP (4:3), 12 MP (16:9), or 8 MP (4:3).
Mode: Sets the shooting mode.
Self Timer: Sets the timer to delay taking a photo. Repeat On automatically repeats the time interval and captures a photo until you press again.
Date Stamp: Adds a date stamp to your photo.
Photo Modes
Select MODE > SETUP > Photos > Mode.
Normal: Takes a single photo using automatic exposure.
Burst: Rapidly takes three 16 MP images, five 12 MP images, or ten 8 MP images in one second. Burst mode is ideal for capturing photos of people or objects in motion.
Taking a Delayed Photo
You can delay taking a photo using the self timer. This allows you to join or adjust a shot before the photo is taken.
1 Select MODE > SETUP > Photos > Self Timer.
2 Select a delay time.
3 Select Repeat Off.
Repeat Off is not an option when Burst mode is enabled.
4 Select MODE > VIEWFINDER.
5 Select
The countdown timer displays the remaining time until the photo is taken, in seconds.
Taking Repeated Photos
You can use the self timer to take repeated photos at a set time interval. This enables you to take several photos of a subject or to take a series of time-lapse photos.
1 Select MODE > SETUP > Photos > Self Timer.
2 Select a time interval between photos.
3 Select Repeat On.
4 Select MODE > VIEWFINDER.
5 Select
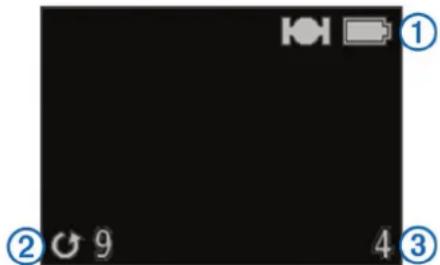
The device takes repeated photos at the selected interval. The viewfinder displays the GPS and battery status ①, the time in seconds until the next photo is taken ②, and the number of repeated photos the device has taken ③.
6 Select □ stop taking photos.
Playback
Viewing Photos and Videos
You can view your photos and recorded videos on the device screen.
1 Select MODE > PLAYBACK.
2 Select an option:
- To select a photo or video, select or . △
• To quickly scroll through the list, hold △.
Videos are indicated with ▶Videos and photos are sorted by date and time with the most recent item listed first.
3 Select OK.
You can control video playback using the on-screen controls.
Viewing Video Over HDMI®
You can connect your device to an external display using an HDMI-to-micro-HDMI cable (not included).
1 If necessary, turn on the device.
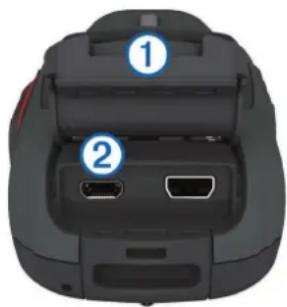
2 Pull up the weather cap ① from the micro-HDMI port ②.
natural_image
Top-down view of a black robotic device with labeled ports (no text or symbols beyond numbered annotations)3 Plug the small end of the HDMI cable into the micro-HDMI port.
4 Plug the large end of the cable into an available HDMI port on the external display.
The device enters playback mode. You cannot exit playback mode until you disconnect the cable.
5 Select △ and to select a video.
6 Select OK.
The video plays on the external display.
Connecting Headphones
Before you can connect headphones to your device, you must purchase the VIRB audio-video cable accessory. Go to www.garmin.com/outdoor.
Using headphones, you can monitor the audio when recording a video and listen to your recorded video in PLAYBACK on the device.
1 Pull up the weather cap from the mini-USB port.
2 Connect the mini-USB plug on the audio-video cable to the mini-USB port on the device.
3 On the device, when prompted to output video, select No.
4 On the device, when prompted to use an external microphone, select No.
5 Connect the headphones to the 3.5 mm AUDIO OUT connector on the audio-video cable.
To stop using the headphones, you must disconnect the audio-video cable from the device.
Adjusting the Volume
When headphones are connected to your device, you can adjust the volume.
1 Select MODE > SETUP > SYSTEM > Audio Out.
2 Select and to change the volume level.
3 Select OK.
Outputting Composite Video
Before you can output composite video, you must purchase the VIRB audio-video cable accessory. Go to www.garmin.com/VIRB. You must also have an RCA composite video cable and a 3.5 mm stereo audio cable.
You can play video on an external display using composite video and stereo audio.
1 Pull up the weather cap from the mini-USB port.
2 Connect mini-USB plug on the audio-video cable to the mini-USB port on the device.
3 On the device, when prompted to output video, select Yes. The device enters playback mode. You cannot exit playback mode until you disconnect the cable.
4 Connect an RCA composite video cable to the composite video output connector of the audio-video cable and to an available port on your external display.
5 Connect a 3.5 mm audio cable to the AUDIO OUT connector on the audio-video cable and to an available port on your external display.
TIP: If your external display requires RCA audio input, you can use a 3.5 mm-to-RCA adaptor cable.
Deleting Photos and Videos
1 Select MODE > PLAYBACK.
2 Select ▽ and to select a photo or video.
3 Select OK > ☒
Tracks
NOTE: This feature is available for VIRB Elite only.
A track is a recording of your path. The track log contains information about points along the recorded path, such as time, location, and elevation for each point. If you have paired ANT+ ^™ sensors with your device, data from connected sensors is included in the track log.
The device records a continuous track log while it is on. This track is saved as a .fit file on the memory card each time you turn off the device. The device also records a separate track log for each video recording. Video track logs are saved as .gpx files on the memory card each time you stop recording video. The track logs include track point data at one-second intervals.
You can view .gpx and .fit track logs on your computer using the BaseCamp™ application. Go to www.garmin.com/basecamp for more information. You can also view and upload .fit track logs to Garmin Connect™. Go to http://connect.garmin.com for more information.
Recorded Track Log Data
Each point in the track log records your GPS location and data from available sensors. The device can record these categories of data in the track log.
- GPS location
- Speed
• Distance from the starting point
• Time - Elevation
• G-force
• Heart rate (when connected to a compatible heart rate monitor)
- Cadence (when connected to a compatible bicycle cadence sensor)
- Temperature (when connected to a compatible temperature sensor
Dashboards
NOTE: This feature is available for VIRB Elite only.
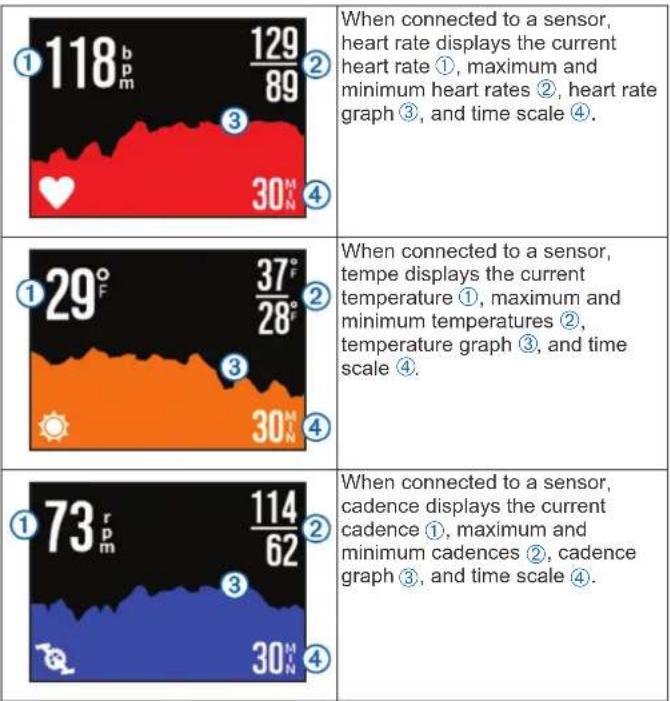
A dashboard is a grouping of data fields, charts, or graphs of data from the device sensors and connected ANT+ sensors. The dashboards provide real-time and historical views of the sensor data recorded to the track log.
NOTE: All minimum, maximum, and average dashboard data resets after you turn off the device.
| Compass displays the current heading and partial compass ring. You must be moving to use the compass. | |
| Time displays the time since the device was turned on 1, time of day 2, and time of sunset or sunrise 3. | |
| Distance displays the total distance 1, total descent 2, and total ascent 3. | |
| Speed displays the current speed 1, average speed 2, and maximum speed 3. | |
| Elevation displays the current elevation 1, maximum and minimum elevations 2, elevation graph 3, and time scale 4. | |
| G-force displays the current g-force acceleration 1 and maximum g-force acceleration 2. |
 |
Viewing the Dashboards
1 Select MODE > DASHBOARD.
2 Select △ or to scroll through the dashboards.
Pairing Your ANT+ Sensors
When you pair a compatible ANT+ sensor with your device, the sensor data is included in the track log, and you can view dashboards for the sensor data.
1 Turn on the sensor, and bring the device and sensor within 10 ft. (3 m) of each other.
2 On the device, select MODE > SETUP > SENSORS.
3 On the device, select the type of sensor to pair.
The icon for the sensor blinks. When the icon turns solid, the sensor is paired and connected.
Tips for Pairing ANT+ Accessories with Your Garmin Device
- Verify that the ANT+ accessory is compatible with your Garmin device.
- Before you pair the ANT+ accessory with your Garmin device, move 10 m (32.9 ft.) away from other ANT+ accessories.
- Bring the Garmin device within range 3 m (10 ft.) of the ANT+ accessory.
• After you pair the first time, your Garmin device automatically recognizes the ANT+ accessory each time it is activated. This process occurs automatically when you turn on the Garmin device and only takes a few seconds when the accessories are activated and functioning correctly. - When paired, your Garmin device receives data from only your accessory, and you can go near other accessories.
Forgetting Paired ANT+ Sensors
After you pair an ANT+ sensor, your device will not accept data from another sensor of the same type. To pair a new sensor of the same type, you must forget paired sensors.
Select MODE > SETUP > SENSORS > Forget All.
Remote Control
You can start recording, stop recording, and take pictures on your VIRB device using another compatible Garmin device with ANT+ wireless technology, such as the VIRB remote control accessory or the fēnix™ watch. You can also use your VIRB device to control other VIRB devices.
Controlling the Device Remotely
1 On your VIRB device, select MODE > SETUP > Remote.
2 Select VIRB Type > Main VIRB.
3 Select an option:
- On the remote control device, launch the VIRB app or feature. See the owner's manual for the device for more information.
- On the remote control accessory, follow the pairing instructions in the accessory manual.
Controlling Multiple VIRB Devices Remotely
When controlling multiple VIRB devices, you must choose a main VIRB device. This device controls all your other VIRB devices.
If you are using a remote control device with multiple VIRB devices, the remote control device controls only the main VIRB device. The main VIRB device passes commands received from the remote control device to the other VIRB devices.
1 On all of your VIRB devices, select MODE > SETUP > Remote.
2 On your main VIRB device, select VIRB Type > Main VIRB.
3 On each of your other VIRB devices, select VIRB Type > Extended VIRB.
REC on your main VIRB device starts and stops recording video on all your VIRB devices. In your main VIRB device takes a photo from all your VIRB devices.
4 If you are using a remote control device, select an option:
- On the remote control device, launch the VIRB app or feature. See the owner's manual for the device for more information.
- On the remote control accessory, follow the pairing instructions in the accessory manual.
Operating the Device Using Your Mobile Device
NOTE: This feature is available for VIRB Elite only.
You can remotely view and control photo and video recording using a compatible mobile device running the free Garmin VIRB app. The app connects using a direct Wi-Fi connection between your VIRB device and your compatible mobile device. Go to www.garmin.com/VIRB or the application store for your mobile device for compatibility information.
1 If necessary, install the Garmin VIRB app from the application store on your mobile device.
2 On your VIRB device, select MODE > SETUP > WIFI > WIFI.
The VIRB device enters wireless host mode, and the SSID and password appear on the device screen.
3 On your mobile device, go to the wireless settings and connect to the wireless network that matches the SSID on the VIRB device screen.
See the owner's manual for your mobile device for more information.
4 On your mobile device, enter the password that appears on the VIRB device screen.
5 On your mobile device, start the Garmin VIRB app.
Advanced Wireless Settings
You can change the wireless host settings for your device. Select MODE > SETUP > WIFI > Advanced.
SSID: Sets the SSID, which identifies your VIRB device on other devices.
Password: Sets the password used to connect to your VIRB device.
Troubleshooting
My device does not turn on
- Install a memory card (Installing a Memory Card). The device does not boot if a memory card is not installed.
- Verify the battery is installed correctly (Installing the Battery Pack).
- Fully charge the battery (Charging the Lithium-Ion Battery Pack).
My device display is hard to see
The device has a reflective display that maximizes battery life and is readable in direct sunlight. The display does not have a backlight and requires ambient light for visibility. If the display looks dark or hard to see, you should increase the ambient light or go to a brighter area.
Some information is missing from the dashboards
Dashboards are available only for VIRB Elite devices (Dashboards). Some dashboard information requires you to enable or pair sensors.
- Enable GPS (System Settings), and go to an area with a clear view of the sky. Location, speed, distance, and altitude information requires a GPS signal.
- Connect additional ANT+ sensors (Pairing Your ANT+ Sensors). Some dashboards are available only when a compatible ANT+ sensor is connected.
My video recordings do not look smooth
- If video recordings appear shaky, select MODE > SETUP > ADVANCED > Stabilize to enable image stabilization.
- If video recordings stutter or skip frames, install a class 10 or better microSD memory card (Installing a Memory Card). The device requires a class 10 or better memory card to record smooth high-definition video.
My device turns off when I stop recording video
If you turn on the device by sliding REC toward the lens, the device turns off when you slide REC away from the lens. This allows you to maximize battery life by turning off the device when it is not recording.
Device Information
System Settings
Select MODE > SETUP > SYSTEM.
GPS: Enables the device to receive GPS satellite signals. When Recording enables GPS reception only when the camera is recording video (VIRB Elite only).
NOTE: GPS must be set to On to enable Auto Record.
Record Light: Turns the recording light on or off.
Tones: Turns audible tones on or off.
Power Save: Turns off the device automatically when the device has not been used for five minutes.
Time/Date: Sets the time and date formats.
Units: Sets the units of measure.
Language: Sets the on-screen text language.
Reset Settings: Restores the default device settings.
About: Displays important software information and your unit ID.
Time and Date Settings
Select MODE > SETUP > SYSTEM > Time/Date.
Time: Sets the time.
NOTE: VIRB Elite devices set the time automatically when you enable GPS.
Time Format: Sets the device to show time in a 12-hour or a 24-hour format.
Date: Sets the date.
NOTE: VIRB Elite devices set the date automatically when you enable GPS.
Date Format: Sets the device to show dates in a MM/DD/YY or a DD/MM/YY format.
Time Zone: Sets the time zone for the device. Automatic sets the time zone automatically based on your GPS position (VIRB Elite only).
Erasing Your Memory Card
NOTICE
Erased data cannot be restored.
You can erase all photos, videos, and other data on the memory card installed in your device.
Select MODE > SETUP > CARD > Erase > OK.
Extending the Battery Life
NOTE: Using GPS and ANT ^™ does not significantly affect battery life.
- Disable Wi-Fi.
- Enable Power Save in the system settings (System Settings).
- Turn the device on and off using REC (Turning the Device On and Off Using REC).
- Use automatic recording (Video Settings).
Device Care
NOTICE
Avoid chemical cleaners, solvents, and insect repellents that can damage plastic components and finishes.
Do not store the device where prolonged exposure to extreme temperatures can occur, because it can cause permanent damage.
The device is water resistant to IEC Standard 60529 IPX7. It can withstand immersion in 1 meter of water for 30 minutes. Prolonged submersion can cause damage to the device. After submersion, be certain to wipe dry and air dry the device before using or charging.
Cleaning the Device
NOTICE
Do not use a dry cloth to clean the lens. Use of a dry cloth may damage the fog resistant coating on the lens.
Wipe the device with a soft, non-scratch cloth dampened with water or alcohol.
File Types
The device supports these file types.
• .gpx track files (output only).
- .jpeg photo files.
- .mp4 video files.
- .fit files for exporting to Garmin Connect (output only).
Connecting the Device to Your Computer
NOTICE
To prevent corrosion, thoroughly dry the mini-USB port, the weather cap, and the surrounding area before charging or connecting to a computer.
Before you can connect the straight connector of the USB cable to your device, you may have to remove optional mount accessories.
1 Pull up the weather cap from the mini-USB port.
2 Plug the small end of the USB cable into the mini-USB port.
3 Plug the large end of the USB cable into a computer USB port.
Your device and memory card (optional) appear as removable drives in My Computer on Windows ^® computers and as mounted volumes on Mac ^® computers.
Support and Updates
The Garmin VIRB application provides easy access to these tools and services for your device.
- Reviewing and editing recorded videos
- Reviewing track logs
- Linking track logs to your recorded videos
- Software and feature updates
The Garmin VIRB application is available for Windows and Mac computers. Go to www.garmin.com/VIRB for more information.
Specifications
| Battery type Rechargeable Lithium-ion battery | |
| Battery life Up to 3 hours | |
| Water resistance Water resistant to IEC 60529 IPX7 | |
| Operating temperature range | From 5^ to 140^ (from -15^ to 60^ ) |
| Charging temperature range | From 32^ to 113^ ( 0^ to 45^ ) |
| Radio frequency/protocol | 2.4 GHz ANT+ wireless communications protocolWi-Fi IEEE 802.11 b/g at 2.4 GHz |
Getting More Information
You can find more information about this product on the Garmin website.
- Go to www.garmin.com/outdoor.
- Go to www.garmin.com/learningcenter.
- Go to http://buy.garmin.com, or contact your Garmin dealer for information about optional accessories and replacement parts.
Index
A
accessories 7, 9
ANT+ sensors 3
forgetting 7
pairing 7
B
battery 1, 8, 9
charging 1
installing 1
life 9
C
cadence 6
camera
field of view 4
level 3
modes 3
orientation 4
self timer 5
settings 3,5
viewfinder 3
charging 1
cleaning the device 9
computer, connecting 9
D
dashboards 7,8
data, transferring 9
deleting
all user data 9
pictures 6
videos 6
device, keys 2
E
elevation 6
F
files, transferring 9
G
GPS 6
settings 3,8
H
HDMI output 6
headphones, connecting 6
heart rate 6
K
keys 2
L
language 8
M
memory card 1
microphone, connecting 5
microSD card. See memory card
mounting the device 2
mounts, optional 2
P
pairing, ANT+ sensors 7
photos
settings 4, 5
taking 5
viewing 5
power key 2,3
R
remote control 8
S
settings 9
software
updating 9
version 8
specifications 9
speed 6
storing data 9
system settings 8
T
temperature 6,9
time
settings 9
zones and formats 9
tones 8
tracks 6,9
transferring, files 9
troubleshooting 8,9
U
unit ID 8
USB
mass storage mode 9
transferring files 9
V
video
editing 9
loop 5
output 6
playing 5
recording 3–5
settings 3,4
time lapse 4
volume, adjusting 6
W
water resistance 9
Wi-Fi 3,8
connecting 8
www.garmin.com/support

+43 (0) 820 220230 + 32 2 67


0800 770 4960 1-866-429-92


+385 1 5508 272
+385 1 5508 271

+420 221 985466
+420 221 985465

+45 4810 5050 +358 9 6937


+33155693399+390236


(+52) 001-855-792-7671 080


+47 815 69 555

00800 4412 454
+44 2380 662 915

(+35) 1214 447 460 +386 4 2


0861 GARMIN (427 646)
+27 (0)11 251 9999

+34 93 275 44 97

+46 7744 52020 +886 2 264.


0808 238 0000
+44 (0) 870 8501242

+49 (0)180 6 427646
20 ct./Anruf. a. d.
deutschen Festnetz,
ICASA TA-2013/1091 APPROVED

- Table of Contents
- Introduction
- WARNING
- Installing a Memory Card
- Installing the Battery Pack
- Charging the Lithium-Ion Battery Pack
- NOTICE
- Saving Energy While Charging the Device
- Keys
- Mounting the Device
- Turning On the Device
- Turning Off the Device
- Turning the Device On and Off Using REC
- Modes
- Changing Modes
- Viewfinder
- Leveling the Device
- Calibrating the Level
- Status Page
- Video
- Recording a Video
- Video Settings
- Video Modes
- Field of View Settings
- Advanced Recording Settings
- Inverting the Camera Orientation
- Recording Video Automatically
- Recording a Time-Lapse Video
- Recording a Video Loop
- Connecting an External Microphone or Audio Source
- Photos
- Taking a Photo
- Photo Settings
- Photo Modes
- Taking a Delayed Photo
- Taking Repeated Photos
- Playback
- Viewing Photos and Videos
- Viewing Video Over HDMI®
- Connecting Headphones
- Adjusting the Volume
- Outputting Composite Video
- Deleting Photos and Videos
- Tracks
- Recorded Track Log Data
- Dashboards
- Viewing the Dashboards
- Pairing Your ANT+ Sensors
- Tips for Pairing ANT+ Accessories with Your Garmin Device
- Forgetting Paired ANT+ Sensors
- Remote Control
- Controlling the Device Remotely
- Controlling Multiple VIRB Devices Remotely
- Operating the Device Using Your Mobile Device
- Advanced Wireless Settings
- Troubleshooting
- My device does not turn on
- My device display is hard to see
- Some information is missing from the dashboards
- My video recordings do not look smooth
- My device turns off when I stop recording video
- Device Information
- System Settings
- Time and Date Settings
- Erasing Your Memory Card
- Extending the Battery Life
- Device Care
- Cleaning the Device
- File Types
- Connecting the Device to Your Computer
- Support and Updates
- Getting More Information
- Index
- A
- B
- C
- D
- E
- F
- G
- H
- K
- L
- M
- P
- R
- S
- T
- U
- V
- W
- www.garmin.com/support
Brand : GARMIN
Model : Virb Elite Watersport Bundle
Category : Camcorder