
SharperBlade SB601E - Lawn mower Snow Joe - Free user manual and instructions
Find the device manual for free SharperBlade SB601E Snow Joe in PDF.


| Product Type | Electric Lawn Mower |
| Model | SharperBlade SB601E |
| Brand | Snow Joe |
| Power Source | 120V, 60Hz, 14 Amps |
| Cutting Width | 20 inches (51 cm) |
| Cutting Height Range | 1.5 - 3.5 inches (38 - 89 mm) |
| Number of Height Positions | 7 |
| Deck Material | Steel |
| Collector Bag Capacity | 50 Liters (13.2 Gallons) |
| Mulching Capability | Yes, included mulching plug |
| Side Discharge | Yes, with chute |
| Handle Type | Folding, ergonomic soft grip |
| Wheel Size | Front 7 in (18 cm), Rear 8 in (20 cm) |
| Self-Propelled | No, push mower |
| Weight | 35 lbs (15.9 kg) |
| Dimensions (L x W x H) | 57 x 22 x 42 in (145 x 56 x 107 cm) |
| Safety Features | Blade brake, dead man's switch, safety key |
| Maintenance | Sharpen blade annually, clean deck after use |
| Spare Parts Availability | Blades, belts, wheels, battery (if cordless) |
| Warranty | 2-year limited, 1-year battery (if applicable) |
| Certifications | ETL, UL listed |
Frequently Asked Questions - SharperBlade SB601E Snow Joe
User questions about SharperBlade SB601E Snow Joe
0 question about this device. Answer the ones you know or ask your own.
Ask a new question about this device
Download the instructions for your Lawn mower in PDF format for free! Find your manual SharperBlade SB601E - Snow Joe and take your electronic device back in hand. On this page are published all the documents necessary for the use of your device. SharperBlade SB601E by Snow Joe.
USER MANUAL SharperBlade SB601E Snow Joe
Before using this electric tool, carefully read and observe the safety rules and instructions listed below. Before starting work, make sure that you know how to stop the machine in case of an emergency, The incorrect use of this machine could cause serious injury. Keep these instructions in a safe place and on hand so that they can be consulted when required.
CAUTION!
The grass trimmer should only be used for cutting lawns and along the borders of flower beds. Other uses of the trimmer, not in these instructions, could damage the trimmer or seriously injure the operator.
Safety Rules
⚠ WARNING: When using electric gardening tools, basic safety precautions should always be followed to reduce the risk of fire, electric shock, and personal injury, including the following:
Read All Instruction
a) FOR ALL DOUBLE - INSULATED APPLIANCES
1) Replacement parts - When servicing, use only identical replacement parts.
2) Polarized Appliance Connections - To reduce the risk of electric shock, this appliance has polarized plug (one blade is wider than the other) and will require the use of a polarized extension cord. The appliance plug will fit into a polarized extension cord only one way. If the plug does not fit fully into the extension cord, reverse the plug. If the plug still does not fit, obtain a correct polarized extension cord. This plug will fit into the polarized wall outlet only one way. If the plug still does not fit fully into wall outlet, reverse the plug. If the plug still does not fit, contact a qualified electrician to install proper wall outlet. Do not change the equipment plug, extension cord receptacle, or extension cord plug in any way.
b) FOR ALL APPLIANCES
1) Avoid dangerous environment - Don't use appliances in damp or wet locations. Don't use in rain.
2) Children and all visitors should be kept at a distance within 50 feet (15 meters) away from work area; the grass which is cut and dispersed may contain stones and debris. You and others can be blinded/injured.
3) Dress properly - Always wear suitable clothing when using the trimmer to prevent head, hand, or feet injuries.
4) Wear safety glasses, high boots, (or sturdy shoes and trousers) for leg protection and work gloves. Always use
face or dust mask if operation is dusty. Keep body parts clear of rotating line.
5) Use the right tools - Do not use tools for any job except that for which it is intended.
6) Ground fault circuit interrupter (GFCI) protection should be provided on the circuit(s) or outlet to be used for the gardening appliances. Receptacles are available having built-in GFCI protection and may be used for this measure for safety.
7) ⚠️WARNING: To reduce the risk of electric shock, use only with an extension cord intended for outdoor use, such as an extension cord of cord type SW-A, SOW-A, STW-A, STOW-A, SJW-A, SJOW-A, SJTW-A, or SJTOW-A.
8) Extension cord - Make sure your extension cord is in good condition. When using an extension cord, be sure to use one heavy enough to carry the current your product will draw. An under sized extension cord will cause a drop in line voltage resulting in loss of power and overheating. Table 1 shows the correct size to use depending on cord length and nameplate ampere rating. If in doubt, use the next heavier gauge. The smaller the gauge number, the heavier the cord. To reduce the risk of disconnection of the appliance cord from the extension cord during operating:
Method of securing extension cord

(A) Tie cord as shown
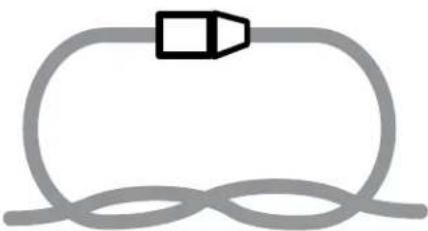
(B) Connect plug and receptacle
Figure 2
i) Make a knob as shown in figure 2; or
ii) Use one of the plug-receptacle retaining straps or connectors described in this manual.
SAVE THESE INSTRUCTIONS
Table 1 Minimum Gauge for Extension Cords
| Volts Total Length of Cord | in Feet | |||
| 120V 25 50 100 150 | ||||
| 240V 50 100 200 300 | ||||
| Ampere RatingMore Than Not more Than | AWG | |||
| 0-6 18 16 16 12 | ||||
| 6-10 18 16 14 12 | ||||
| 10-12 16 16 14 12 | ||||
| 12-16 14 12 Not Recommended | ||||
| NOTE - Only the applicable parts of the Table need to be included. For instance, a 120-volt product need not include the 240-volt heading. | ||||
9) Avoid unintentional starting - Don't carry plugged-in tool with finger, be sure switch is off when plugging in.
10) Don't abuse cord - Never carry tool by cord or yank it to disconnect from receptacle. Keep cord from heat, oil, and sharp edges.
11) Don't grasp the exposed cutting blades or cutting edges when picking up or holding the appliance. (For grass shears and similar tools only).
12) Don't force tool - It will do the job better and with less likelihood of a risk of injury at the rate for which it was designed.
13) Don't overreach - Keep proper footing and balance at all times.
14) Stay alert - Watch what you are doing. Use common sense. Do not operate trimmer when you are tired.
15) Disconnect tool - Turn the trimmer off and disconnect the plug when: the trimmer is not being used; it is left unattended; it is being examined because it is not working correctly; the power supply cable is damaged; the blade is being removed or changed or when the trimmer is being moved from one place to another.
16) Store idle tools indoors - When not in use, tools should be stored indoors in dry, and high or docked-up place - out of reach of children.
17) Maintain tools with cares - Keep cutting edge sharp and clean for best performance and to reduce the risk of injury. Follow instructions for lubricating and changing accessories. Inspect trimmer periodically and replace if damaged, have it repaired by an authorized service facility. Keep handles dry, clean, free from oil and grease.
18) Checked damage parts - Before further use of the trimmer, a guard or other part that is damaged should be carefully checked to determine that it will operate properly and perform its intended function. Check for the alignment of moving parts, binding of moving parts, breakage of parts,
mounting, and any other condition that may affect its operation. A guard or other part that is damaged should be properly repaired or replaced by an authorized service center unless indicated elsewhere in this manual.
c) EDGER-TRIMMERS
1) Keep guards in place and in working order.
2) Keep blade sharp.
3) Keep hands and feet away from cutting area.
d) ADDITIONAL INSTRUCTIONS FOR LAWN TRIMMER/EDGE TRIMMER:
⚠️DANGER: Never use steel blades or other devices. Use of any other accessories or attachments will increase the risk of injury.

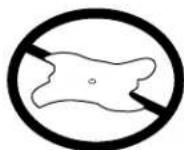
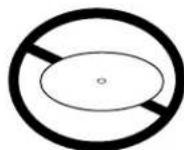
CAUTION!
The blade will continue to rotate after turning the trimmer OFF. Wait until the blade has completely stopped before making contact. Do not try to stop the cutting device with your hands. Be careful of the blade, which can give deep cuts.
- Only use the type of blade originally provided with the trimmer.
- Do not use the trimmer to cut grass which is not in contact with the ground.
- Do not switch the grass trimmer on in enclosed or poorly ventilated spaces or in the presence of inflammable and/or explosive substances such as liquids, gas, and powders.
- Only cut during broad daylight or with corresponding artificial light.
- Do not cross roads or gravel paths with the trimmer still running.
- The trimmer must be operated vertical, perpendicular to the ground.
- Check regularly that the screws are properly secured.
CAUTION!
The guard is critical to the safety of the operator and people near the trimmer. The guard keeps the trimmer in good working order and must always be in place during operation. Failure to have the guard in place during operation is dangerous and will void the warranty.
Safety Symbols
The following table depicts and describes safety symbols that may appear on this product. Read, understand, and follow all instructions on the machine before attempting to assemble and operate.
| Symbol Description | ||
| READ follow assem |  | RATOR'S MANUAL(S) Read, understand and actions in the manual(s) before attempting to operate. |
| WARN |  | out of rain and away from wet areas. |
| DANGE injury. K | 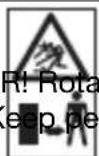 | ting objects may spin off and cause personal people away from hazard area. |
| WARNING electrical mainten |  | ways turn the machine OFF and disconnect the r before conducting inspection, cleaning and |
| DANGE |  | to electrical extension cable away from tines. |
| DANGE blade to inspecti |  | ting parts may cause serious injury. Allow the etely stop cleaning and maintaining and maintenance. |
| SAFE |  | |
| DOUB |  | ATION |
Know Your SharperBlade Electric Trimmer/Edger

Technical Data
Power supply voltage - 120V\~60Hz
Power consumption - 4.5A
Cutting diameter - 12.6 inch
Idle Speed - 7700rpm
SECRETS to a Long Lasting SharperBlade™
CONGRATULATIONS! YOU ARE ABOUT TO EXPERIENCE A FASTER, EASIER, WAY OF GROOMING YOUR LAWNS EDGE AND MANAGING WEEDS.
First, you will notice that there are obvious differences between your SharperBlade and string line, among which are size and shape. These differences require you to operate your trimmer slightly different:
- Use MINIMAL pressure when edging against concrete, brick, or stone. Since the SharperBlade is more ridged than string, you may feel the need to put pressure on the blade while edging. The more pressure you apply, the FASTER the blade will wear. In contrast, the less pressure you apply against hard surfaces, the LONGER the blade will last! The SECRET is to keep the blade just off the hard surface.
- NEVER FORCE your SharperBlade. High speed along with an impact against any hard surface may cause the blade to buckle near the center hub and tear. The SECRET is to allow the SharperBlade to do ALL the work without extra effort.

We sincerely hope you feel the SharperBlade has helped you finish your work faster.
Warm regards,
Customer Service Staff
SharperBlade™
Assembly
Before using the SharperBlade Electric Trimmer/Edger, follow these instructions to assemble:
1) Remove the trimmer and parts from the box.

2) Assemble the assist handle by fixing the knob (Figure 1).

3) Insert the steel flower guard into the lower motor cover and lock in place (Figure 2).

4) Place the Shield over the blade shaft and snap into place (Figure 3).
Installing or Changing Blade

1) Remove screw knob (Figure 5).

5) Now the diameter of the protection area is 9 inches (Figure 4).
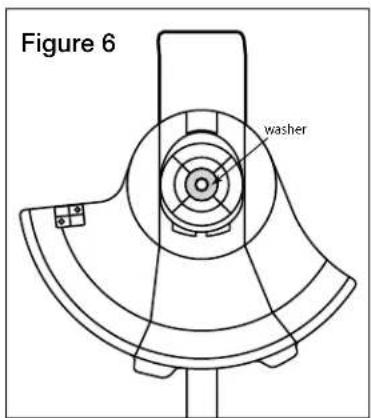
2) Remove the washer (Figure 6).
6) Ultimately you can remove the flower guard from the motor cover. This will allow you maximum use of the SharperBlade.
NOTE: Be careful when operating the machine while steel flower guard is removed.
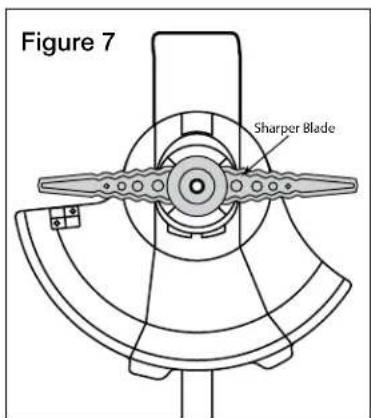
3) Assemble the SharperBlade to the Electric Trimmer/Edger (Figure 7).

4) Place the washer on the Blade (Figure 8).

5) Tighten the screw knob (Figure 9).
Operation
WARNING:
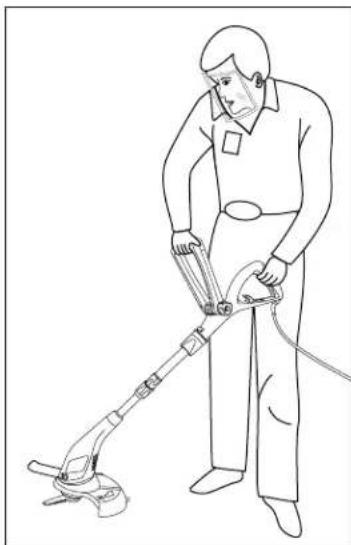
Rocks or debris may ricochet or be thrown into eyes and face, cause blindness, or other serious injury. Never lean over the trimmer head and always wear eye protection.
When operating unit, stand as shown and check for the following:
- Wear eye protection and heavy clothing.
- Hold the trigger handle with one hand and adjustable handle with the other hand.
- Keep the trimmer below waist level.
- Cut only from your right to your left to ensure debris is thrown away from you. Without bending over, keep the trimmer near and parallel to the ground.
WARNING:
Use only SharperBlade Electric Trimmer/Edger™ replacement blade. Other products will not work properly and will result in improper cutting head function or can cause serious injury. Do not use other materials such as steel blades, wire, string, rope, etc. Other materials can break off during cutting and become a dangerous missile that can cause serious injury.
TRIMMING
Hold the bottom of the trimmer head above the ground and at an angle if desired. Allow only the blade to make contact. Do not force blade into work area.
Trimming
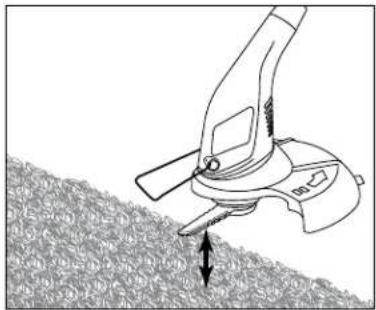
Blade above the ground
SCALPING
The scalping technique removes unwanted vegetation down to the ground. Hold the bottom of the trimmer head about 3 inches (8 cm) above the ground and at an angle. Allow the tip of the line to strike the ground around trees, posts, monuments, etc. This technique increases blade wear.
Scalping

MOWING
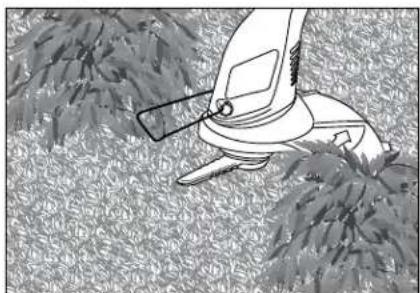
Your trimmer is ideal for mowing in places conventional lawn mowers cannot reach. In the mowing position, keep the line parallel to the ground. Avoid pressing the head into the ground as this can scalp the ground and damage the tool.
Mowing
SWEEPING
Fanning action can be used for quick and easy clean up. Keep the line parallel to and above the surfaces being swept and move the tool from side to side.
Sweeping

EDGING
To change your SharperBlade Trimmer into an edger, you must slide down the Twist-N-Groom Shaft (balck ring) 1/2 ", and twist to rotate the black ring 180° in a clockwise direction.
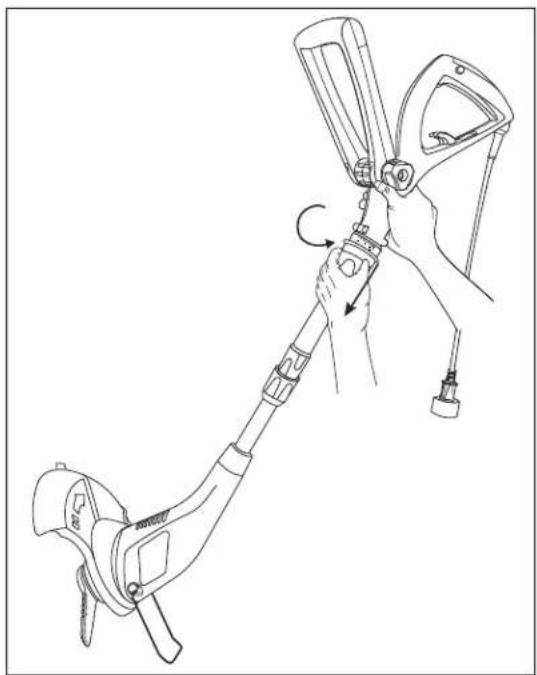
To convert from edger back to trimmer, hold the green handle, slide the Twist-N-Groom Shaft (black ring) down 1/2 ", and twist to rotate the black ring 180° anti-clockwise direction.
Maintenance
Before carrying out any maintenance operations, cut off the electric power supply by disconnecting the plug from the extension cable.
- Regular cleaning and maintenance of you grass trimmer will ensure efficiency and prolong the life of your machine.
• After each cutting operation, take apart and clean out the grass and soil from; the whole trimmer and guard. - During operation, keep the air slots clean and free from grass.
- Only use a cloth soaked with hot water and a soft brush to clean the grass trimmer.
- Do not spray or wet the appliance with water.
- Do not use detergents or solvents as these could ruin the trimmer. The parts in plastic can easily be damaged by chemical agents.
- If cutting blade no longer cuts or breaks, have this replaced by contacting an authorized service center.
CAUTION!
The blade can give deep cuts.
- For repairs which have not been explained in these instructions, contact an authorized service center.
Trouble-Shooting
CAUTION!
Always disconnect the electric power supply before conducting maintenance or troubleshooting.
- If the grass trimmer vibrates: remove the spool and clean the slots, carefully remove any grass and weeds and so forth. If vibration persists after reassembly, replace the blade with a new one. In the evert of the problem not disappearing, have the trimmer checked at an authorized service center.
- If the trimmer does not start: check all the electrical connections; make sure the safety circuit-breaker has not been activated; check that a fuse has blown in your electrical system. Take the trimmer to an authorized service center if the trimmer does not start after completing the checks.
Storage
Follow these recommendations for storing the grass trimmer.
- Carry out general cleaning of the grass trimmer and its ancillary parts (see maintenance paragraph), this prevents mould from forming.
- Store it out of the reach of children, in a stable and safe position and in a dry place where the temperature is not too hot or too cold.
- Store the trimmer in a location with minimal light, away from direct sunlight.
- Do not store the grass trimmer resting on the floor. Hang it by the upper handgrip instead, so that the guard does not touch anything. The resting of the guard on a surface could alter its shape and therefore its dimensions and safety characteristics would be modified.
Service and Support
If your SharperBlade Electric Trimmer/Edger requires service or maintenance, please call 1-866-766-9563 for assistance.
Model and Serial Numbers
When contacting the company or reordering parts, you will need to provide the model and serial numbers of your product. These are found on the decal affixed to the housing or guard of your SharperBlade Electric Trimmer/Edger. Copy these numbers into the space provided below.


A Two-Year Full Warranty for residential use in the United States and Canada

General Conditions:
Snow Joe, LLC warrants this product to the original purchaser for two years against defects in material or workmanship when used for normal residential purposes. Snow Joe, LLC will repair any defect in material or workmanship, and repair or replace any defective part, subject to the conditions, limitations, and exclusions set forth herein. Such repair or parts replacement will be free from charge to the original purchaser except noted below.
The duration of the warranty applies only if the product is put to personal use around the household or residence. If the product is put to any business use, commercial or industrial, then the duration of this warranty is 90 days from the date of original purchase. If any product is rented or leased, the duration of the warranty is 90 days from the date of original purchase.
It is the owner's responsibility to perform correctly all maintenance, and minor adjustments explained in the owner's manual.
Electric Products:
To obtain a replacement electric powered unit or repair the existing electric powered unit, you must return the complete unit and postage prepaid to: Snow Joe Return Center, 86 Executive Avenue, Edison, NJ 08817.
Gasoline / Battery Products:
Limitations
- Batteries are warranted only for the period of 12 months after the date of purchase on a prorated basis. Rechargeable batteries will be replaced free from charge during the first 90 days. After the initial 90 days, batteries will be replaced at prorated cost to the customer
- Idlers, cables, and electrical components are warranted to the original purchaser for use at household or residence for a period of two years
Exclusions
- Snow Joe brand engines are covered under this warranty. All other engines and engine accessories are covered only by the engine manufacturer's warranty and are not covered by this warranty
- Parts used that are not genuine Snow Joe parts are not covered by this warranty
- Damages resulting from misuse, alteration, improper assembly, improper adjustment, neglect, or accident which requires repair is not covered under this warranty
- Belts, augers, and tines are not covered under warranty – belts, augers, and tines wear out and can be purchased at www.snowjoe.com or by calling 1-866-766-9563
Snow Joe, LLC may from time to time change the design of its products. Nothing contained in this warranty shall be construed as obligating Snow Joe, LLC to incorporate such design changes into previously manufactured products, nor shall such changes be construed as an admission that previous designs were defective.
This warranty is intended to cover product defects only. Snow Joe, LLC is not liable for indirect, incidental, or consequential damages in connection with the use of the Snow Joe Products covered by this warranty. This warranty does not cover any cost or expense incurred by the purchaser in providing substitute equipment or service during reasonable periods of malfunction or non-use of this product, while waiting for completion of repairs under this warranty. Some states do not allow exclusions of incidental or consequential damages, so the above exclusions may not apply in all states. This warranty may give you specific legal rights in your state.
If you wish to contact Snow Joe, please direct inquiries to the:
Customer Service Department
Snow Joe Center
86 Executive Avenue
Edison, NJ 08817
Customers who have purchased Snow Joe products exported from the United States and Canada should contact their Snow Joe Distributor (Dealer) to obtain information applicable for your country, province, or state. If for any reason, you are not satisfied with the distributor's service, or if you have difficulty obtaining warranty information, contact your Snow Joe seller. If in the event your efforts are unsatisfactory, please write to the Snow Joe Center at the above address.
If you have any questions about your product warranty, please call 1-866-SNOW-JOE or visit us online at www.snowjoe.com.


- CAUTION
- SAFETY RULES
- EDGER-TRIMMERS
- SAFETY SYMBOLS
- KNOW YOUR SHARPERBLADE ELECTRIC TRIMMER/EDGER
- TECHNICAL DATA
- SECRETS TO A LONG LASTING SHARPERBLADE™
- ASSEMBLY
- OPERATION
- WARNING
- TRIMMING
- SCALPING
- MOWING
- SWEEPING
- EDGING
- MAINTENANCE
- TROUBLE-SHOOTING
- STORAGE
- SERVICE AND SUPPORT
- MODEL AND SERIAL NUMBERS
- A TWO-YEAR FULL WARRANTY FOR RESIDENTIAL USE IN THE UNITED STATES AND CANADA
- GENERAL CONDITIONS
- ELECTRIC PRODUCTS
- GASOLINE / BATTERY PRODUCTS
- LIMITATIONS
- EXCLUSIONS
Brand : Snow Joe
Model : SharperBlade SB601E
Category : Lawn mower