
MP220 - Projector 3M - Free user manual and instructions
Find the device manual for free MP220 3M in PDF.


| Brand | 3M |
| Model | MP220 |
| Product Type | Mobile Projector |
| Battery | Lithium-Ion, rechargeable |
| Charging Time | Approximately 3 hours |
| Power Adapter | Included with US, EU, UK, AUS plugs |
| Warranty | 1 year from date of purchase |
| Display | Built-in touch screen for navigation |
| Touch Sensor | Trackball or Mouse mode |
| Internal Memory | Yes (onboard storage) |
| MicroSD Card Slot | Accepts microSD up to 32GB |
| USB Port | Micro USB Type AB for data transfer, USB host for mouse/keyboard |
| Video Input | VGA-AV (cables sold separately) |
| Audio | Built-in speakers, earphone jack |
| Focus Adjustment | Focus wheel |
| Remote Control | Optional (sold separately) |
| Ventilation | Do not block air vents to prevent overheating |
| Supported Files | Photo, music, video, office documents via Documents To Go |
| Accessories Included | Power adapter, USB cable |
| Optional Accessories | AV Video Cable, VGA Cable, Component AV Cable, Adapter Cable for Apple, Remote Control |
Frequently Asked Questions - MP220 3M
User questions about MP220 3M
0 question about this device. Answer the ones you know or ask your own.
Ask a new question about this device
Download the instructions for your Projector in PDF format for free! Find your manual MP220 - 3M and take your electronic device back in hand. On this page are published all the documents necessary for the use of your device. MP220 by 3M.
USER MANUAL MP220 3M
natural_image
Exterior view of a black and silver portable electronic device with a white ventilation grille and 'MENU' logo, surrounded by abstract pink and white graphics (no readable text or symbols)quick start
quick start 4
démarrage rapide 14
kurzanleitung....24
inicio rápido....34
guida rapida 44
snelstartgids....54
快速入门指南 64
快速入門指引 74
クイックスタートガイド 84
빠른 시작 가이드....94
Thank You
Thank you for purchasing the mobile projector from 3M. Now you can enjoy your favorite movies, TV shows, videos, and photo slideshows in larger than life viewing – on walls, floors, and even ceilings! This little projector can project images from other devices, with additional cables (sold separately).
Important Notice
Before using this product, please read all warning and caution statements in the Product Safety Guide.
Warranty
The 3M™ Mobile Projector MP220 (the "3M product") is warranted to be free from defects in material or manufacture for a period of 1 year from the date of purchase. If the product needs service please call 1-866-631-1656. For the detailed terms and conditions of the Warranty, refer to the Product Safety and Warranty Guide or contact us at 1-866-631-1656 or meetings@mmm.com or go to www.3mpocketprojector.com/support.
Customer Support
For manuals, frequently asked questions, and technical support, call 1-866-631-1656 (Toll Free in the US) or go to www.3mpocketprojector.com/support.
Updating Software
For information on updating your MP220, please go to http://www.3mpocketprojector.com/support.
Remove Battery Protective Film
The mobile projector comes with a partially charged battery. Before use, remove the protective film and fully charge the battery.
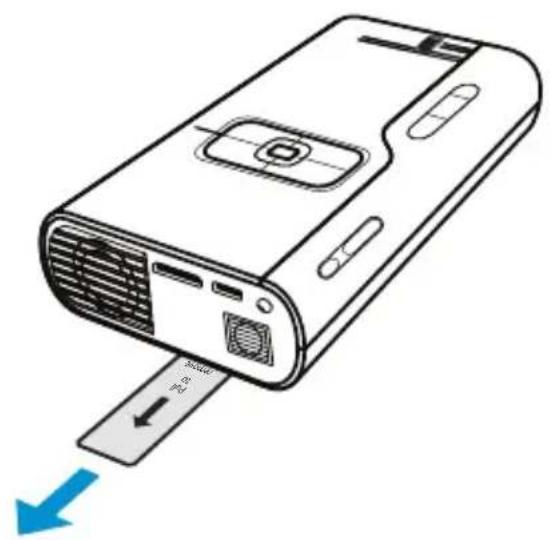
natural_image
Line drawing of a projector device with a blue arrow indicating left-side motion (no text or symbols)Assemble the Power Adapter
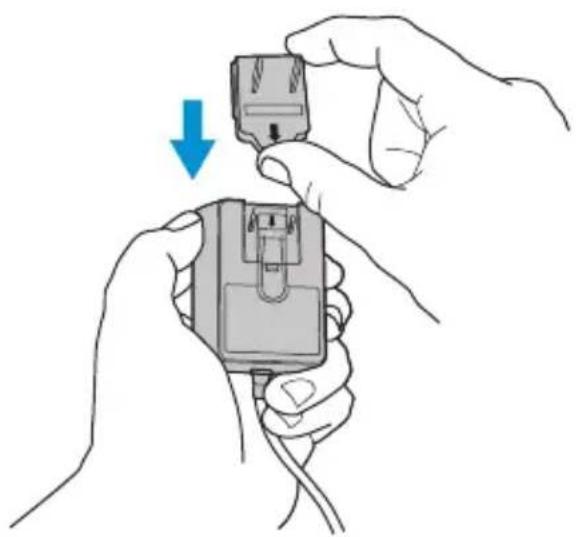
natural_image
Illustration of hands holding a small electronic device with a blue arrow indicating the process (no text or symbols present)Charge the Battery
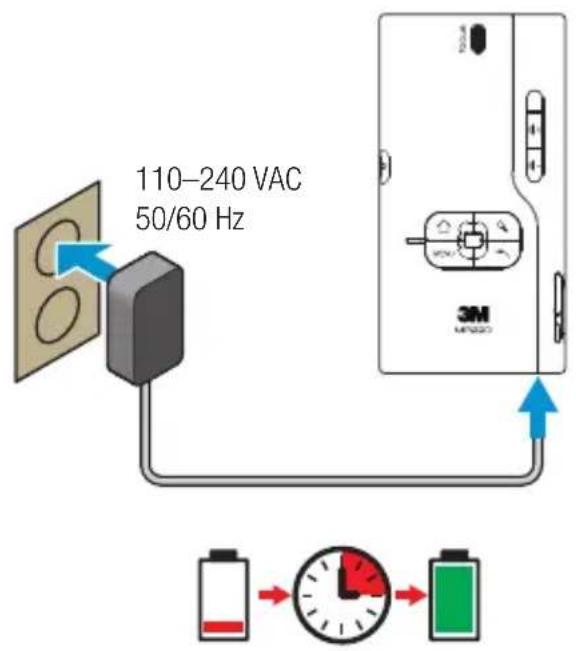
3 hours
flowchart
graph TD
    A["Current Battery"] --> B["Power Rating"]
    C["Voltage"] --> D["Current Battery"]
    E["Battery"] --> F["Power Rating"]
    G["Power"] --> H["Power Rating"]
    I["Power"] --> J["Power Rating"]
    K["Power"] --> L["Power Rating"]
    M["Power"] --> N["Power Rating"]
    O["Power"] --> P["Power Rating"]
    Q["Power"] --> R["Power Rating"]
    S["Power"] --> T["Power Rating"]
    U["Power"] --> V["Power Rating"]
    W["Power"] --> X["Power Rating"]
    Y["Power"] --> Z["Power Rating"]
    AA["Power"] --> AB["Power Rating"]
    AC["Power"] --> AD["Power Rating"]
    AE["Power"] --> AF["Power Rating"]
    AG["Power"] --> AH["Power Rating"]
    AI["Power"] --> AJ["Power Rating"]
    AK["Power"] --> AL["Power Rating"]
    AM["Power"] --> AN["Power Rating"]
    AO["Power"] --> AP["Power Rating"]
    AQ["Power"] --> AR["Power Rating"]
    AS["Power"] --> AT["Power Rating"]
    AU["Power"] --> AV["Power Rating"]
    AW["Power"] --> AX["Power Rating"]
    AY["Current Battery"] --> Z
    AZ["Voltage"] --> AA
    BA["Battery"] --> BB
    BC["Power Rating"] --> BC
    BD["Power Rating"] --> BD
    BE["Power Rating"] --> BE
    BF["Power Rating"] --> BF
    BG["Power Rating"] --> BH
    BI["Power Rating"] --> BJ
    BK["Power Rating"] --> BL
    BM["Power Rating"] --> BN
    BO["Power Rating"] --> BP
    BQ["Power Rating"] --> BR
    BS["Power Rating"] --> BT
    BU["Power Rating"] --> BV
    BW["Power Rating"] --> BX
    BY["Power Rating"] --> BY
    BZ["Power Rating"] --> BZ
    CA["Power Rating"] --> CA
    CB["Power Rating"] --> CB
    CC["Power Rating"] --> CC
    CD["Power Rating"] --> CD
    CE["Power Rating"] --> CE
    CF["Power Rating"] --> CF
    CG["Power Rating"] --> CG
    DH["Power Rating"] --> DH
    DI["Power Rating"] --> DI
    DJ["Power Rating"] --> DJ
    DK["Power Rating"] --> DK
    DL["Power Rating"] --> DL
    DV["Power Rating"] --> DV
    DW["Power Rating"] --> DW
    DX["Power Rating"] --> DX
    DXN["Power Rating"] --> DXN
    DXN --> DXN0
    DXN0 --> DXN0A
    DXN0A --> DXN0B
    DXN0B --> DXN0C
    DXN0C --> DXN0D
    DXN0D --> DXN0E
    DXN0E --> DXN0F
    DXN0F --> DXN0G
    DXN0G --> DXN0H
    DXN0H --> DXN0I
    DXN0I --> DXN0J
    DXN0J --> DXN0K
    DXN0K --> DXN0L
    DXN0L --> DXN0M
    DXN0M --> DXN0N
    DXN0N --> DXN0O
    DXN0O --> DXN0P
    DXN0P --> DXN0Q
    DXN0Q --> DXN0R
    DXN0R --> DXN0S
    DXN0S --> DXN0T
    DXN0T --> DXN0U
    DXN0U --> DXN0V
    DXN0V --> DXN0W
    DXN0W --> DXN0X
    DXN0X --> DXN0Y
    DXN0Y --> DXN0Z
    DXN0Z --> DXN0A
    DXN0A --> DXN0B
    DXN0B --> DXN0C
    DXN0C --> DXN0D
    DXN0D --> DXN0E
    DXN0E --> DXN0F
    DXN0F --> DXN0G
    DXN0G --> DXN0H
    DXN0H --> DXN0I
    DXN0I <--> DG["MENU"]
Parts
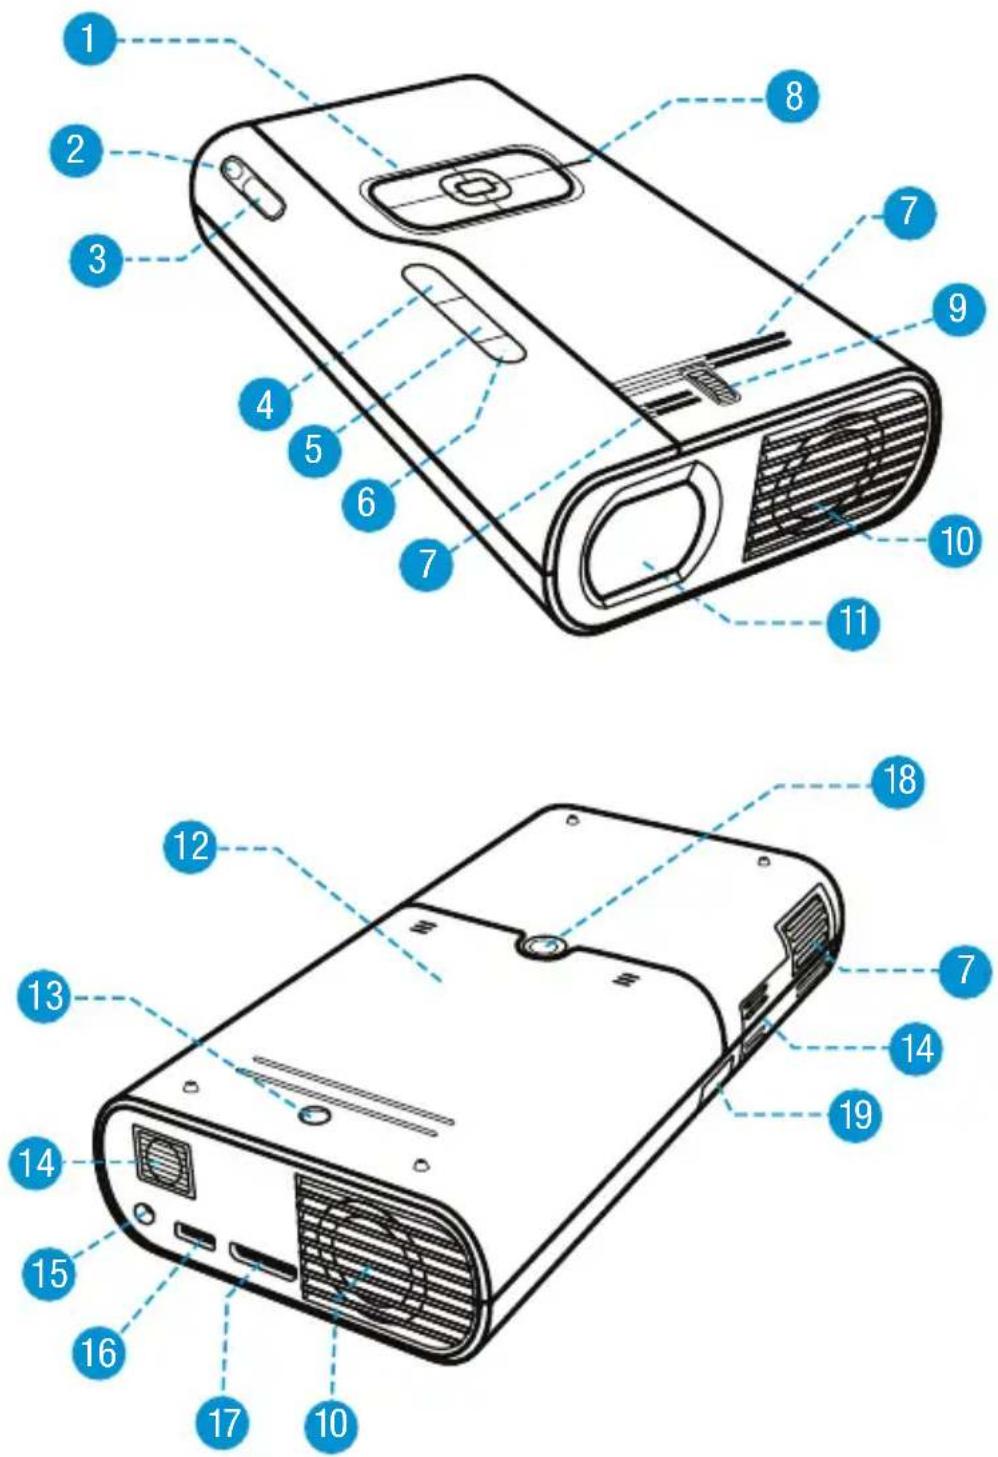
1 Navigation panel
2 Power On/Off – Powers the projector on and off, or turns off the lamp.
3 microSD card slot – Accepts a 32GB or less microSD card.
4 Volume down – Turns down speaker or audio out output.
5 Volume up – Turns up speaker or audio out output.
6 IR sensor – Accepts commands from 3M remote control. Remote control sold separately.
7 Air vents – Do not block fans or vents while projector is operating or cooling down. This will cause projector to overheat and automatically turn off.
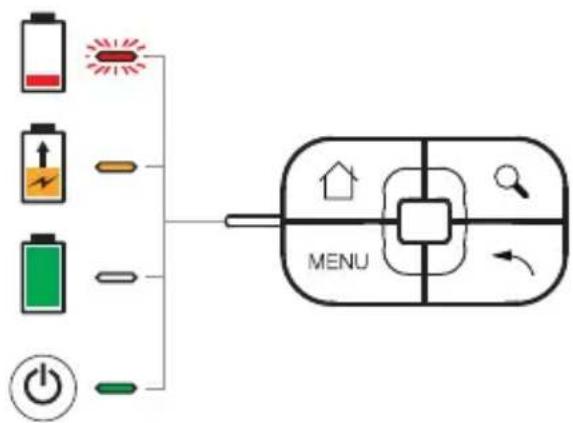
8 Status indicator LED
9 Focus wheel – Adjusts to sharpen image.
10 Cooling fans – Do not block fans or vents while projector is operating or cooling down. This will cause projector to overheat and automatically turn off.
11 Lens
12 Battery compartment
13 Battery cover securing screw
14 Speakers
15 DC power in – Powers the projector or charges the battery using the 3M power supply.
16 USB – Transfer files back and forth from your computer to the projector. Attach a USB computer mouse, or keyboard. Access files on USB memory stick.
17 VGA-AV — Connect the 3M VGA or Video cable to your computer, DVD Player, or other video device and project its image. Cables sold separately.
18 Tripod Mount
19 Earphone jack – Attach earphones or computer speakers.
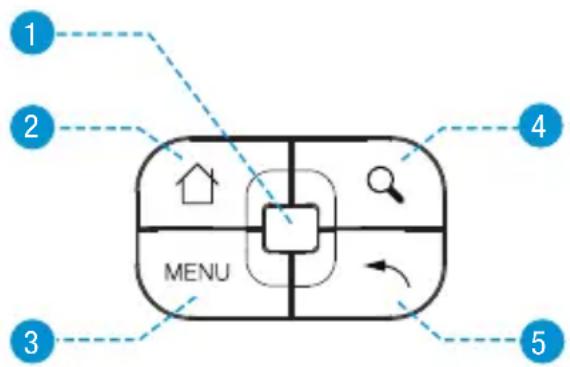
Navigation Panel
flowchart
graph TD
    A["1"] --> B["2"]
    B --> C["3"]
    C --> D["4"]
    D --> E["5"]
    style A fill:#fff,stroke:#000
    style B fill:#fff,stroke:#000
    style C fill:#fff,stroke:#000
    style D fill:#fff,stroke:#000
    style E fill:#fff,stroke:#000
1 Touch sensor – Moves pointer around screen or chooses between available menu items.
2 Home key – Press to open the Home screen. Press and hold to open recently used applications.
3 Menu key – Press to open the menu for the current screen or application.
4 Mode key – Press and hold to open the mouse mode menu.
5 Back key – Press to open previous screen or closes onscreen keyboard.
Turn the Projector On
Press the power button momentarily. Note that the projector might take some time to fully power on.
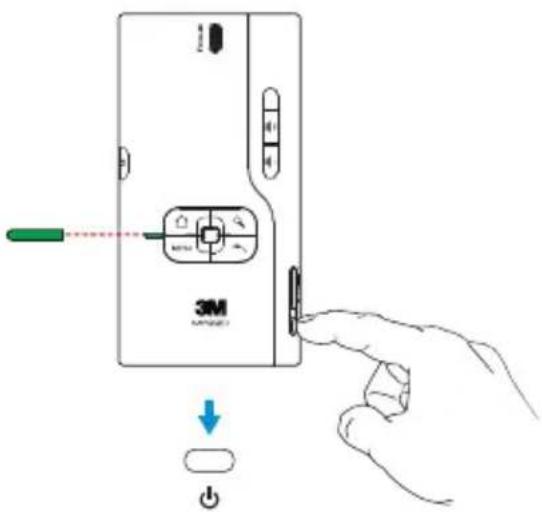
Turn the Projector Off
1 Press and hold the power button until the Device options menu appears on the screen.
2 Select Power off from the menu.
3 Confirm that you wish to turn the projector off by selecting OK.
Turn the Lamp Off
To turn the projector lamp off, press and quickly release the power button.
To turn the lamp back on, press any button.
Note: When only the lamp is off, the projector continues to use a small amount of power. Do not place projector into a bag in this state as it can easily be turned back on.
Using the Touch Sensor
The touch sensor detects the movement of your finger and moves the cursor on the screen accordingly. Depending on how you like to navigate, the touch sensor can be used in one of two modes, as follows:
- Trackball mode - Jumps from one menu item to the next in a similar way to most mobile phone menus.
- Mouse mode - Moves the cursor around the screen just like on a computer.
No matter which mode is being used, clicking the touch sensor will select the highlighted option (or the option under the cursor), just like left-clicking on a standard computer mouse.
Switching Between Touch Sensor Modes
To switch between touch sensor modes, press and hold the Search key until the Touch sensor mode switch message appears. Click OK to confirm that you want to switch modes.
Note that on some screens one mode may be better than the other in order to easily select all available options.
Initial Setup
The first time you switch on your MP220, you will need to set up your language and the time & date.
Setting your Language
1 Click Locale.
2 Choose your language. If your language does not appear on the screen, you may have to scroll down.
Setting the Date & Time
To set the date and time, click Date & Time.
Setting the time
1 Click on Set time.
2 Click on the + or - to change the hours and minutes.
3 To change from AM to PM, click on AM.
4 Once finished, click Set.
Note: Clicking and holding + or - will cycle through the hours or minutes.
Setting the date
1 Click on Set date.
2 Click on the + or - to change the month, day and year.
3 Once finished, click Set.
Note: Clicking and holding + or - will cycle through the days, months or years.
To return to the Home screen, press the Home key on the navigation panel.
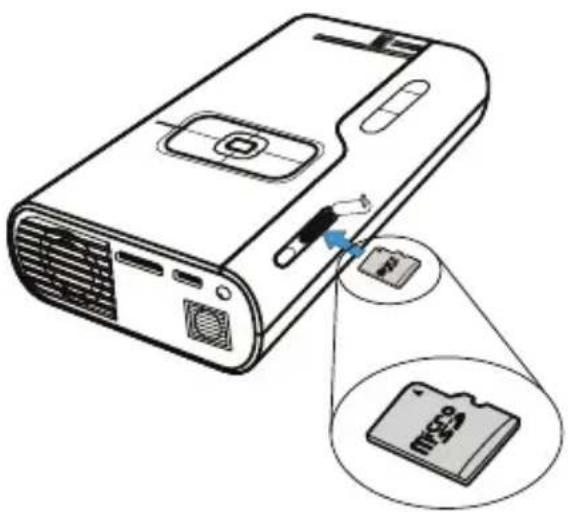
Install Optional microSD Card
natural_image
Illustration of a projector with a USB flash drive and two memory cards (no text or symbols)To insert or remove the microSD card, press it in until it clicks.
Note: Before you remove the microSD from the projector, you should unmount it first, as follows:
1 From the Home screen click on the applications icon at the bottom of the screen.
2 Click on the Settings icon.
3 Select SD card & local storage.
4 Select Unmount SD card.
Transfer files to the projector
natural_image
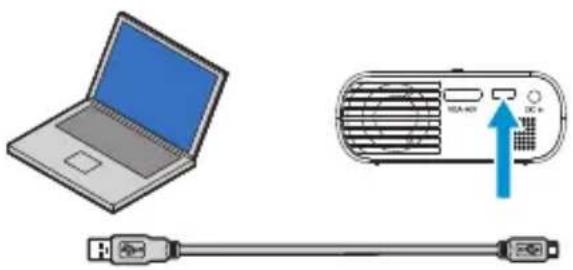
Illustration of a laptop connected to an air conditioner unit with USB cable (no text or symbols)Note: The USB cable is for the transfer of data only and cannot be used to project an image directly from your computer.
USB cable
Type of devices that may transfer data to projector:
- Computers
- Netbooks
- Tablets
Connector on device and projector
• Computer: USB Type A connector
- Projector: Micro USB Type AB connector
Access Files on the projector from your computer
1 Turn on the projector and make sure the Home screen is displayed on the touch screen.
2 Connect the USB cable to the projector.
3 Connect the USB cable to the computer.
4 Notification appears that USB is connected.
5 Click Turn on USB storage.
6 The projector and the microSD will be detected as a removable drive by the computer. The drive labeled "Internal" is the projector's onboard memory, and "Removable Disk" is the microSD card in the projector SD card slot.
7 Now you are ready to access files on the projector from your computer in the computer's file browser.
Before disconnecting the projector from the computer's USB port
You must properly eject the removable drives on your computer or you may lose data.
Eject both removable drives on your computer operating system, as follows:
Eject a drive on computers running Microsoft Windows: Open Windows Explorer, right-click the drive, and click Eject from the context menu.
Eject a drive on a computer running Apple Mac OS 10: Open finder, choose the drive, and then choose File>Eject
Viewing Photos
The MP220 can display photos from internal memory or from a microSD card.
To view photos, follow the steps below:
1 From the Home screen, click on the Apps icon 📄 the bottom of the screen.
2 Select the Gallery icon.
3 Select the album you would like to view.
4 Select the image you would like to see.
5 Use the displayed controls to navigate your photos.

Single view - Press to display an image in the selected album in actual size.

Play Slideshow - Press to start slideshow.

Zoom in - Press to zoom in on the current image. This button may be pressed several times to increase zoom.

Zoom out - Press to zoom out of the current image.

Original size - When in zoom mode, press to return image to original size.

Fullscreen - Press to stretch the current image to fill the screen.
Listening to Music
The MP220 can play music from internal memory or from a microSD card.
To listen to music, follow the steps below:
1 From the Home screen, click on the Media tab.
2 Select the Music icon.
3 Select the artist, album, song or playlist you would like to listen to, or select Now playing to hear the track currently being played.
4 Use the displayed controls to control your music.
Playlist - Press to show a list of tracks in the current playlist.

Random mode - Press to switch between random or sequential track order.
Repeat mode - Press to turn repeat mode on or off.

Skip back - Press to skip to previous track. Press and hold to rewind within the current track.
Play/pause - Press to play or pause the current track.

Skip forward - Press to skip to next track. Press and hold to fast forward within the current track.
Watching Videos
The MP220 can play videos from internal memory or from a microSD card.
To play a video, follow the steps below:
1 From the Home screen, click on the Apps icon 📄 the bottom of the screen.
2 Select the Video Player icon.
3 Select the video you would like to play.
4 Use the displayed controls to control your video.
Note: If no controls are visible, click on the screen to make them appear.

Rewind - Press and hold to rewind within the current track.

Play/pause - Press to play or pause the current track.

Fast forward - Press and hold to fast forward within the current track.
Documents To Go®
The MP220 comes with Documents To Go software. With this software, you can open and view many different office and pdf files from internal memory or from a microSD card.
To open an office or pdf file, follow the steps below:
1 From the Home screen, click on the Apps icon at the bottom of the screen.
2 Select the Documents To Go icon.
3 Select Local Files.
4 Browse to the location of the file you wish to open.
Use the optical mouse in Trackball mode to navigate documents as follows:
- Swipe up/down to scroll up/down.
- Swipe left/right to either scroll left/right, or to move between pages, depending on the type of document being viewed.
File Compatibility
For detailed information about file compatibility, please go to http://www.3mpocketprojector.com/support.
Replacement Accessories
Call 1-866-631-1656 to order 3M accessories.
| Description 3M Part | Number | Consumer UPC |
| Power Adapter with US, EU, UK, AUS plugs | 78-6972-0033-1 | 0 51125 63407 6 |
| Lithium-Ion Battery 78-6972- | 0053-9 | 0 51125 63447 2 |
Optional Accessories
| Description 3M Part | Number | Consumer UPC |
| AV Video Cable 78-6972- | 0031-5 | 0 51125 63405 2 |
| VGA Cable 78-6972- | 0030-7 | 0 51125 63404 5 |
| Component AV cable 78-6972- | 0032-3 | 0 51125 63406 9 |
| 3M Adapter Cable for Apple® 78-6972- | 0034-9 | 0 51125 63408 3 |
| Remote Control 78-6972- | 0074-5 | 0 51125 63482 3 |
3M is a trademark of 3M Company. All other trade names referenced are the service marks, trademarks or registered trademarks of their respective companies.

Mobile Interactive Solutions 3M Austin Center
6801 River Place Blvd.
Austin, TX 78726-9000
866-631-1656
www.3MPocketProjector.com
meetings@mmm.com

Please Recycle. Printed in China.
© 3M 2011. All Rights Reserved.
78-6971-1589-3-B-1
- Thank You
- Important Notice
- Warranty
- Customer Support
- Updating Software
- Remove Battery Protective Film
- Parts
- Navigation Panel
- Turn the Projector On
- Turn the Projector Off
- Turn the Lamp Off
- Using the Touch Sensor
- Switching Between Touch Sensor Modes
- Initial Setup
- Setting your Language
- Setting the Date & Time
- Setting the time
- Setting the date
- Install Optional microSD Card
- Transfer files to the projector
- USB cable
- Connector on device and projector
- Access Files on the projector from your computer
- Before disconnecting the projector from the computer's USB port
- Viewing Photos
- Listening to Music
- Watching Videos
- Documents To Go®
- File Compatibility
- Replacement Accessories
- Mobile Interactive Solutions 3M Austin Center
Brand : 3M
Model : MP220
Category : Projector