Compay 125 (2008) - Rollerblades APRILIA - Free user manual and instructions
Find the device manual for free Compay 125 (2008) APRILIA in PDF.


| Product Type | Scooter (Roller) |
| Brand | Aprilia |
| Model | Compay 125 (2008) |
| Overall Length | 1950 mm |
| Overall Width | 900 mm |
| Overall Height (to headlamp) | 1120 mm |
| Saddle Height | 750 mm |
| Wheelbase | 1315 mm |
| Minimum Ground Clearance | 140 mm |
| Kerb Weight | 97 kg |
| Fuel Capacity (incl. reserve) | 7.5 L |
| Fuel Reserve Capacity | 2 L |
| Fuel Type | Premium unleaded petrol, min. 95 RON |
| Engine Type | Single-cylinder, 2-stroke |
| Displacement | 125 cc |
| Ignition | CDI (Capacitor Discharge Ignition) |
| Spark Plug (standard) | CHAMPION RG6YC |
| Spark Plug Electrode Gap | 0.7 - 0.8 mm |
| Idle Speed | 1,600 ± 200 rpm |
| Transmission | Automatic continuous variator (CVT) |
| Clutch | Centrifugal |
| Cooling | Forced air circulation |
| Front Brake | Hydraulic disc brake |
| Rear Brake | Drum brake |
| Front Tyre | Tubeless, size not specified |
| Rear Tyre | Tubeless, size not specified |
| Battery (MC125) | Maintenance-free type |
| Headlight Bulb | 12V - 35/35W (halogen) |
| Mixer Oil Capacity (reserve included) | 1.4 L |
| Gearbox Oil Capacity | 130 cm³ |
Frequently Asked Questions - Compay 125 (2008) APRILIA
User questions about Compay 125 (2008) APRILIA
0 question about this device. Answer the ones you know or ask your own.
Ask a new question about this device
Download the instructions for your Rollerblades in PDF format for free! Find your manual Compay 125 (2008) - APRILIA and take your electronic device back in hand. On this page are published all the documents necessary for the use of your device. Compay 125 (2008) by APRILIA.
USER MANUAL Compay 125 (2008) APRILIA
APRILIA WOULD LIKE TO THANK YOU
for choosing one of its products. We have compiled this booklet to provide a comprehensive overview of your vehicle's quality features. Please, read it carefully before riding the vehicle for the first time. It contains information, tips and precautions for using your vehicle. It also describes features, details and devices to assure you that you have made the right choice. We believe that if you follow our suggestions, you will soon get to know your new vehicle well and that it will continue to give you satisfactory service for many years to come. This booklet is an integral part of the vehicle and must be handed over to the new owner in the event of sale.
APRILIA WIL U BEDANKEN
The instructions in this manual have been prepared to offer mainly a simple and clear guide to its use; it also describes routine maintenance procedures and regular checks that should be carried out on the vehicle at an authorised aprilla Dealer or Workshop. The booklet also contains instructions for simple repairs. Any operations not specifically described in this booklet require the use of special tools and/or particular technical knowledge: for these operations, please take your vehicle to an aprilla Dealer or Authorised Workshop.
Failure to completely observe these instructions will result in serious risk of personal injury.
Safeguarding the environment
Sections marked with this symbol indicate the correct use of the vehicle to prevent damaging the environment.
Bescherming van
The incomplete or non-observance of these regulations leads to the risk of serious damage to the vehicle and sometimes even the invalidity of the guarantee.
The sings above are very important. They are used to highlight those parts of the booklet that should be read with particular care. As you can see, each sign consists of a different graphic symbol, making it quick and easy to locate the various topics. Before starting the engine, read this manual carefully, particularly the "SAFE RIDING" section. Your safety as well as other's does not only depend on the quickness of your reflexes and agility, but also on how well you know your vehicle, its efficiency and your knowledge of the rules for SAFE RIDING. For your safety, get to know your vehicle well so as to safely ride and master it in road traffic IMPORTANT This booklet is an integral part of the vehicle, and should the vehicle be sold, it must be transferred to the new owner.
Arrangement of the main components.... 12
Dashboard.... 15
Key switch....19
Locking the steering wheel....20
Switch direction indicators.... 21
Horn button....21
Light switch.... 22
Start-up button 23
Engine stop button....23
Opening the saddle 24
Lifting the Helmet Bay 25
Identification 26
Door top box opening 27
Rear top box opening....21 Ran slip....28
Bag trip....20
USE 29
Checks 30
Refuelling.... 32
Shock absorber adjustment.... 37
Running in 37
Starting up the engine 39
Difficult start up 50
Stopping the engine 52
Stepping the engine to maintain the position of 32 Catalytic silencer. 54
Oatalytic Shienceer....54 Stand. 57
Stand 50
Suggestions to prevent their 58
Safe driving....60
MAINTENANCE.... 67
Engine oil level 68
Engine oil level check....69
Engine oil top-up....70
VOERTUING....7
Engine oil change....71
Hub oil level 71
Tyres 73
Spark plug dismantlement....76
Removing the air filter....80
Checking the brake oil level....81 Braking system fluid top up....95
Braking system fluid top up....85
Battery 85
Use of a new battery....93
Checking the electrolyte level....95
Long periods of inactivity....96
Fuses....97
Lamps....10
Front light group.... 10
Headlight adjustment.... 10
Front direction indicators....10
Rear optical unit....11
Number plate light.... 11
Rear-view mirrors.... 11
Idle adjustment.... 11
Front disc brake.... 11
Rear drum brake....11
Periods of inactivity 11
Cleaning the vehicle.... 11
Transport 12
TECHNICAL DATA....12
Kit equipment....13
PROGRAMMED MAINTENANCE....13
Scheduled maintenance table.... 14
Arrangement of the main components (01\_01, 01\_02, 01\_03, 01\_04)
KEY - 50 MODEL
-
Left rear-view mirror
-
Left inspection cover
-
Central inspection cover
-
Glove compartment
-
Battery
-
Fuse box
-
Passenger handgrip
-
Saddle lock
-
Air filter
-
Kick starter
-
Centre stand
-
Side stand (OPT)
-
Spark plug
-
Left retroreflector
-
Helmet compartment / glove-box
-
Mixer oil reservoir cap
-
Fuel tank cap
-
Ignition switch /steering lock
-
Bag hook
- Left rear-view mirror
- Glove compartment
- Left inspection cover
- Central inspection cover
- Left passenger footrest
- Air filter
- Passenger handgrip
- Saddle lock
- Centre stand
- Engine oil refill cap
- Battery
- Side stand (OPT)
- Helmet compartment / glove-box
- Right inspection cover
LEGENDE VERSIE 125
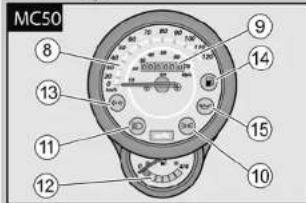
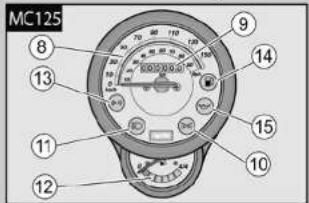
01_05
Dashboard (01\_05)
KEY
- Electrical controls on the left-hand side of the handlebars
- Rear brake lever
- Instruments and gauges
- Throttle grip
Legenda (01\_05)
Legende
Shows the total number of kilometres covered.
Turns on every time the ignition switch is set to «ON».
Turns on when the front headlamp is set to high-beam.
Shows the approximate fuel level in the tank.
It turns on when there is a 2-litre fuel reserve in the tank.
Turns on when the ignition switch is set to «ON» and the starter button is pressed, checking if the bulb is working adequately. Replace the bulb if it does not turn on upon starting the vehicle.
CAUTION
IF THE BULB TURNS ON BUT DOES NOT GO OFF AFTER RELEASING THE STARTER BUTTON, OR IF IT TURNS ON DURING REGULAR RIDING, THIS MEANS THE MIXER OIL LEVEL IS IN RESERVE; IF THIS OCCURS, TOP-UP WITH MIXER OIL.
Turns on every time the ignition switch is set to «ON» and the engine has not been started; this tests the bulb operation. Replace the bulb if it does not turn on at this phase. The warning light should turn off as soon as the engine is started.
The ignition switch «1» is located on the right-hand side, near the headstock.
NOTE
KEY《2》 ACTIVATES THE IGNITION SWITCH/ STEERING LOCK, THE SADDLE LOCK AND THE GLOVE-BOX LATCH. TWO KEYS ARE SUPPLIED WITH THE VEHICLE (ONE IS A SPARE KEY).
NOTE
KEEP THE SPARE KEY IN DIFFERENT PLACE, NOT WITH THE VEHICLE.
Sleutelschakelaar (01\_06, 01\_07)
ON «A»: The engine and lights can be set to work. The key cannot be extracted.
OFF «B»: The engine and lights cannot be set to work. The key can be extracted.
LOCK «C»: The steering is locked. It is not possible to start the engine or switch on the lights. The key can be extracted.
Locking the steering wheel (01\_08)
CAUTION
AVOIDING LOSING CONTROL OF THE VEHICLE - NEVER TURN THE KEY TO «LOCK» WHILE RIDING.
To lock the steering:
- Turn the handlebar fully left-
wards.
• Turn the key «2» to «OFF» - Press and turn the key to set it to « LOCK ».
Take out the key.
Om de stuurinrichting te blokkeren:
When the switch «2» is set to «A», the following are always activated: tail lights, instrument panel lights and low-beam light. If it is set to «B», the high-beam light is activated.
If the light switch «2» is pressed when set to «C», the high-beam light flashes.
natural_image
Mechanical assembly diagram showing a component with numbered parts (no readable text or symbols)Start-up button (01\_12)
By pressing the starter button «2» and operating a brake lever (front or rear) at the same time, the starter motor spins the engine.
NOTE
ELECTRICAL COMPONENTS FUNCTION ONLY WHEN THE IGNITION KEY IS SET TO "ON"
Startknop (01\_12)
Engine stop button (01\_13)
(countries where required)
It acts as an engine cut-off or emergency stop switch. With the switch «1» in «B» RUN, it is possible to start the engine; pressing the switch when set to «A» OFF will stop the engine.
NOTE
ELECTRICAL COMPONENTS FUNCTION ONLY WHEN THE IGNITION KEY IS SET TO "ON"
CAUTION

DO NOT ACTIVATE THE ENGINE STOP SWITCH WHILE RIDING THE VEHICLE.
natural_image
Medical illustration of a pelvic region with labeled parts (1 and 2), no text or symbols presentOpening the saddle (01\_14)
To unlock and lift the saddle:
- Rest the vehicle on its centre stand.
- Insert the key in the saddle lock «1»,
- Turn the key anticlockwise and lift the saddle «2».
NOTE
BEFORE LOWERING AND LOCKING THE SADDLE, MAKE SURE THAT THE KEY HAS NOT BEEN LEFT INSIDE THE HELMET COMPARTMENT / GLOVE-BOX.
• To lock the saddle, lower and press it (without forcing it) to trip the lock.
natural_image
Technical line drawing of a mechanical component with a circular housing and handle (no text or symbols)CAUTION
BEFORE RIDING, MAKE SURE THAT THE SADDLE IS CORRECTLY LOCKED INTO POSITION.
Lifting the Helmet Bay (01\_15)
Thanks to the helmet compartment/glove-box it is not necessary to carry the helmet with you after parking your vehicle. The compartment is located under the saddle and can hold a "JET"-type helmet.
To reach it:
- Lift the saddle.
NOTE
PLACE THE HELMET WITH ITS OPENING FACING DOWN AS SHOWN IN THE FIGURE.
CAUTION
DO NOT OVERLOAD THE HELMET COMPARTMENT / GLOVE-BOX.
Characteristic
Maximum allowed weight
2.5 kg
LET OP
VOORALEER MEN GAAT RIJDEN, CONTROLEERT MEN OF HET ZADEL CORRECT GEBLOKKEERD IS.
Omhoogklappen helmbak (01\_15)
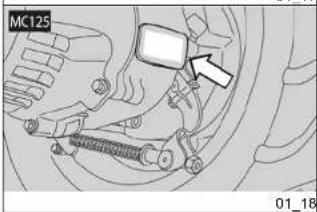
Identification (01_16, 01_17, 01_18)
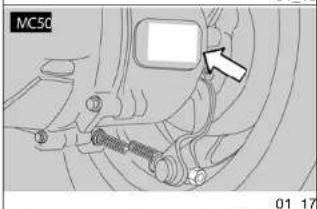
Write down the chassis and engine numbers in the specific space of this manual. The chassis number can be used to order spare parts.
NOTE

ALTERING IDENTIFICATION NUMBERS CAN BE SERIOUSLY PUNISHED BY LAW, PARTICULARLY MODIFYING THE CHASSIS NUMBER WILL IMMEDIATELY INVALIDATE THE WARRANTY.
CHASSIS NUMBER
The chassis number is stamped on the central chassis bar. Remove the cover«1» to read it.
Chassis No. ....
NOTE
THE COVER «1» CAN BE FITTED IN ONLY ONE POSITION. THE SECTION WITH THE TWO TABS «2» IS THE BOTTOM ONE.
Identificatie (01_16, 01_17, 01_18)
natural_image
Technical diagram of a device interior showing a handle and seat (no text or symbols)ENGINE NUMBER
The engine number is stamped on the rear, near the rear brake set screw.
Engine No.
Rear top box opening (01\_19)
Located below the handlebar, in the internal shield.
To reach it:
- Insert the key in the lock «3».
- Turn the key clockwise, pull it and open the cover «4».
NOTE
BEFORE LOCKING THE COVER, MAKE SURE THAT THE KEY HAS NOT BEEN LEFT INSIDE THE GLOVE-BOX.
Lift and press the cover «4» to lock it. The key is not needed.
Characteristic
Maximum allowed weight
1.5 kg
MOTORNUMMER
natural_image
Illustration of a hand holding a small object with a numbered label (no text or symbols present)Bag clip (01\_20)
CAUTION

DO NOT HANG BULKY BAGS OR PACKAGES ON THE HOOK TO AVOID OBSTRUCTING VEHICLE HANDLING AND FEET MOVEMENT.
Tassenhaak (01\_20)
LET OP

HANG GEEN TE GROTE TASSEN OF PAKKEN AAN DE LASTHAAK, OM-DAT DE HANDELBAARHEID VAN HET VOERTUIG OF DE BEWEGING VAN DE VOETEN ZOU KUNNEN GEHINDERD WORDEN.
The bag hook «2» is under the saddle in the front part.
Characteristic
Maximum allowed weight
1.5 kg
BEFORE SETTING-OFF, ALWAYS CARRY OUT A PRELIMINARY CHECK OF THE VEHICLE, FOR CORRECT AND SAFE OPERATION. FAILURE TO DO SO MAY RESULT IN SEVERE PERSONAL INJURY OR VEHICLE DAMAGE.
DO NOT HESITATE TO CONTACT AN Official aprilia Dealer IF YOU DO NOT UNDERSTAND HOW SOME CONTROLS WORK OR IF MALFUNCTION IS DETECTED OR SUSPECTED.
CHECKS DO NOT TAKE LONG AND RESULT IN SIGNIFICANTLY ENHANCED SAFETY.
Controles
LET OP

VÓÓR HET VERTREK VOERT MEN STEEDS EEN VOORAFGAANDE CONTROLE UIT VAN HET VOERTUIG, VOOR EEN CORRECTE EN VEILIGE WERKING. HET NIET UITVOEREN VAN DEZE CONTROLEHANDELINGEN KAN ERNSTIGE LETSELS AAN UZELF OF SCHADE AAN HET VOERTUIG VEROORZAKEN.
AARZEL NIET OM ZICH TE WENDEN TOT EEN Officiële aprilia Dealer, WAN- NEER OPGEMERKT WORDT DAT ER ONREGELMATIGHEDEN ZIJN IN VER- BAND MET ENKELE COMMANDO'S OF MET DE WERKING.
DE NODIGE TIJD VOOR EEN CONTROLE IS UITERST BEPERKT, EN DE VEILIGHEID KOMT OP DE EERSTE PLAATS.
PRE-RIDE CHECKS
| Front brake Check its correct operation, the | |
| brake fluid level and possibleleaks. Check brake pads for wear.If necessary, top-up the brake fluid. | |
VOORAFGAANDE CONTROLES
| Fuel tank Check the coolant level and refill if necessary.Check the circuit for potential leaks or obstructions. | |
| Engine stop switch (ON-OFF)(Countries where required) | Check for its correct operation. |
| Lights, warning lights, horn and electrical devices | Check the correct operation of these devices. Replace the light bulbs or repair the failure, if necessary. |
Stel ze af of sluit ze eventueel.
natural_image
Mechanical component diagram showing a spherical housing with mounting holes and a numbered label (1), no readable text or symbols present.Refuelling (02_01, 02_02, 02_03)
CAUTION

FUEL USED TO DRIVE EXPLOSION ENGINES IS HIGHLY FLAMMABLE AND CAN BECOME EXPLOSIVE UN- DER SPECIFIC CONDITIONS.
CARRY OUT REFILLING AND MAINTENANCE OPERATIONS IN A WELL VENTILATED PLACE AND WITH THE ENGINE OFF.
DO NOT SMOKE WHILE REFUELLING OR WHEN CLOSE TO FUEL VAPOURS, AVOID CONTACT WITH NAKED FLAMES, SPARKS OR ANY OTH-
Tanken (02_01, 02_02, 02_03)
LET OP

DE BRANDSTOF DIE WORDT GE-BRUIKT VOOR DE AANDRIJVING VAN DE ONTPLOFFINGSMOTOR IS UITERST BRANDBAAR EN KAN EXPLOSIEF WORDEN IN BEPAALDE OM-STANDIGHEDEN.
VOER HET TANKEN EN DE ONDER-HOUDSHANDELINGEN UIT IN EEN GEVENTILEERDE ZONE EN MET DE MOTOR UIT.
ROOK NIET TIJDENS HET TANKEN EN IN DE NABIJHEID VAN BRAND- STOFDAMPEN, EN VERMIJDT ABSO-
ER SOURCE THAT MAY CAUSE FUEL TO CATCH FIRE OR EXPLODE.
AVOID SPILLING FUEL OFF THE FILLER AS IT MAY CATCH FIRE IN CONTACT WITH THE ENGINE HOT SURFACES. IN CASE OF ACCIDENTAL FUEL SPILLS, CHECK THAT THE AREA IS COMPLETELY DRY BEFORE STARTING THE VEHICLE.
FUEL EXPANDS WHEN EXPOSED TO HEAT OR SUN RAYS, THEREFORE BE CAREFUL AND DO NOT REFILL THE TANK UP TO THE TOP.
CLOSE THE CAP ADEQUATELY AFTER REFUELLING. BE CAREFUL FUEL DOES NOT GET INTO CONTACT WITH THE SKIN, DO NOT INHALE VAPOURS OR SWALLOW FUEL. DO NOT TRANSFER FUEL FROM ONE CONTAINER TO ANOTHER USING A HOSE.
CAUTION

DO NOT DISPOSE OF FUEL INTO THE ENVIRONMENT.
LUUT CONTACT MET VRIJE VLAMMEN, VONKEN EN EENDER WELKE ANDER BRON DIE HET VLAM VATTEN OF EXPLODEREN ERVAN KAN VEROORZAKEN.
VERMUDT BOVENDIEN HET UIT-STROMEN VAN BRANDSTOF UIT DE KLEP, OMDAT HIJ KAN VLAM VAT-TEN IN CONTACT MET DE GLOEIEND HETE OPPERVLAKKEN VAN DE MO-TOR. WANNEER ER ONVRIJWILLIG BRANDSTOF WORDT GEMORST, CONTROLEERT MEN OF DE ZONE COMPLEET DROOG IS, VOORDAT MEN HET VOERTUIG START.
BRANDSTOF ZET UIT INDIEN BLOOTGESTELD AAN WARMTE EN ZONNE-STRALEN, DUS MAG MEN DE TANK NOOIT VULLEN TOT AAN DE RAND.
SLUIT ZORGVULDIG DE DOP NA HET TANKEN. VERMIJDT DAT DE BRAND-STOF IN CONTACT KOMT MET DE HUID, VERMIJDT HET INADEMEN VAN DE DAMPEN, HET INSLIKKEN, EN HET OVERGIETEN VAN EEN TANK NAAR EEN ANDERE MET BEHULP VAN EEN BUIS.
LET OP

LOOS DE BRANDSTOF NIET IN HET MILIEU.
CAUTION
LET OP


KEEP OUT OF THE REACH OF CHIL- DREN
BUITEN BEREIK VAN KINDEREN HOUDEN
Use only premium unleaded petrol with minimum octane rating of 95 (NORM) and 85 (NOMM).
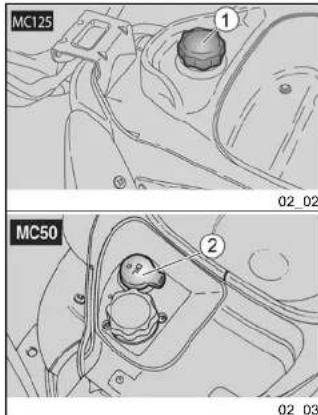
- Lift the saddle.
• Unscrew and remove fuel tank
cap «1». - Carry out the refuelling.
FUEL TANK CAPACITY (including reserve):
7.51(MC50);
CAPACITEIT VAN DE TANK (inclusief de reserve):
81(MC125)
7,51(MC50)
TANK RESERVE:
BI (MC125)
21
RESERVE VAN DE TANK :
21
• Refit the cap «1».
Top-up the mixer oil reservoir following the instructions in the scheduled maintenance table. The vehicle is equipped with an independent mixer that controls the fuel-oil mix to lubricate the engine.
If the low mixer oil warning light located on the instrument panel turns on, this means the reserve is being used.
Should this warning light turn on, the oil reservoir should be topped-up at the following refuelling and in any case before travelling another 150 km.
CAUTION

DO NOT RIDE THE VEHICLE WITHOUT MIXER OIL AS THIS CAN CAUSE SERIOUS DAMAGE TO THE ENGINE.
IN CASE THERE IS NO MORE OIL IN THE MIXER RESERVOIR OR THE MIXER OIL PIPE HAS BEEN REMOVED, CONTACT AN Official aprilia Dealer TO HAVE THE SYSTEM PURGED.
THIS OPERATION IS ESSENTIAL AS THE ENGINE CAN BE SERIOUSLY DAMAGED IF IT RUNS WITH AIR IN THE MIXER OIL CIRCUIT.
N.B.
NA HET TANKEN, PLAATST MEN DOP «1» OPNIEUW OP CORRECTE WIJZE.
Recommended products
AGIP CITY 2T
Mixer oil
ISO-L-ETC++, API TC++
DEZE HANDELING IS ABSOLUUT NOODZAKELIJK, OMDAT DE WERKING VAN DE MOTOR MET LUCHT IN DE INSTALLATIE VAN DE OLIE VAN DE MENGER ERNSTIGE SCHADE AAN DE MOTOR ZELF ZOU KUNNEN VEROORZAKEN.
To add mixer oil to the reservoir:
- Lift the saddle.
- Remove the cap «2».
- Add the oil.
Characteristic
RESERVOIR CAPACITY:
1.4 |
TANK RESERVE:
0.41
Shock absorber adjustment
FRONT AND REAR SUSPENSION INSPECTION
Check that all components are tightened and that the front and rear suspension joints work properly according to the instructions in the scheduled maintenance table.
CAUTION

IN CASE OF FAILURE OR WHEN THE INTERVENTION OF SPECIALISED PERSONNEL IS REQUIRED, TAKE YOUR SCOOTER TO AN Official aprilla Dealer.
AFTER THE FIRST 1000 KM (625 MILES) IN OPERATION, PERFORM THE CHECKS INDICATED IN THE SCHEDULED MAINTENANCE CHART TO AVOID INJURING YOURSELF,
Inrijden (02\_04)
LET OP

NA DE EERSTE 1000 KM (625 MIJL) VAN WERKING, MOETEN DE CONTROLES UITGEVOERD WORDEN DIE VOORZIEN ZIJN IN DE TABEL VAN HET GEPROGRAMMEERD ONDERHOUD, OM LETSELS AAN ZICHZELF
OTHERS AND/OR DAMAGING THE VEHICLE.
Engine run-in is essential to ensure engine long life and correct operation. If possible, ride on roads with lots of bends and/or slopes to test that the engine, suspensions and brakes perform efficiently.
NOTE
ONLY AFTER THE RUN-IN PERIOD IS IT POSSIBLE TO ATTAIN THE BEST SPEED AND ACCELERATION PERFORMANCE OF YOUR VEHICLE.
Follow these indications:
- Do not twist the throttle grip fully at low rpm whether during or after run-in.
- 0-100 km (0-62 miles) During the first 100 km (62 miles) operate the brakes with caution to avoid rough and long braking. That is to permit the adequate adjustment of the pad friction material to the brake disc and the shoes to the rear wheel drum.
- 0-500 km (0-312 miles) Do not keep the throttle grip twisted more than half its travel during long stretches.
OF ANDEREN EN/OF SCHADE AAN HET VOERTUIG TE VOORKOMEN.
Starting up the engine (02_05, 02_06, 02_07, 02_08, 02_09, 02_10, 02_11, 02_12, 02_13)
CAUTION

EXHAUST FUMES CONTAIN CARBON MONOXIDE, AN EXTREMELY HARMFUL SUBSTANCE IF INHALED. NEVER START THE ENGINE IN CLOSED OR NOT WELL-VENTILATED ROOMS.
FAILURE TO OBSERVE THIS WARNING COULD LEAD TO UNCONSCIOUSNESS AND EVEN DEATH CAUSED BY SUFFOCATION.
DO NOT CLIMB ON THE VEHICLE TO START IT UP. DO NOT START THE EN-
Starten des motors (02_05, 02_06, 02_07, 02_08, 02_09, 02_10, 02_11, 02_12, 02_13)
LET OP

DE UITLAATGASSEN BEVATTEN KOOLMONOXIDE, EEN UITERST SCHADELIJKE STOF WANNEER ZE WORDT INGEADEMD. VERMIJD HET STARTEN VAN DE MOTOR IN GESLOTEN OF ONVOLDOENDE GEVENTILEERDE RUIMTEN.
WANNEER MEN DIT ADVIES NIET OP-VOLGT, KAN MEN FLAUWVALLEN EN OOK STERVEN DOOR VERSTIKKING.
GA NIET OP HET VOERTUIG ZITTEN VOOR HET STARTEN. START DE MO- TOR NIET WANNEER HET VOERTUIG
2 Use / 2 Gebruik
GINE WHILE THE VEHICLE RESTS ON ITS SIDE STAND.
ELECTRIC START-UP
- Park the vehicle on its centre stand.
- Set the engine stop switch «1» In «ON» (where available).
• Make sure the light switch «2» is set to LOW-BEAM. - Turn the key «3» and set the ignition switch to «ON».
CAUTION
(MC125) NOW, THE ENGINE OIL PRESSURE WARNING LIGHT TURNS ON IN THE INSTRUMENT PANEL AND WILL REMAIN ON UNTIL THE ENGINE STARTS UP.
- Block at least one wheel by operating one brake lever «4». If the vehicle does not start, it means that there is no current at the ignition relay and so the starter motor does not work.
NOTE
IF THE VEHICLE IS NOT USED FOR A LONG TIME, FOLLOW THE PROCEDURE FOR STARTING THE ENGINE AFTER PROLONGED INACTIVITY.
OP DE LATERALE STANDAARD IS GEPLAATST.
ELEKTRISCHE START
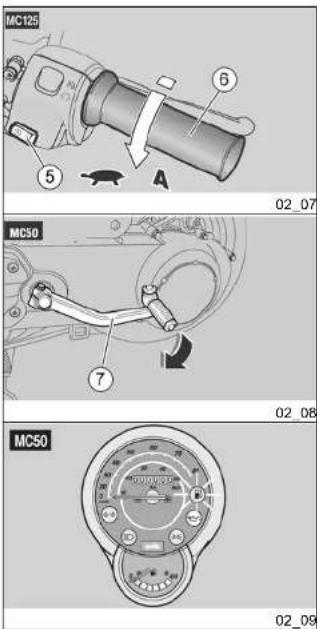
- Press the starter button «5» without opening the throttle and release it as soon as the engine starts.
CAUTION

(MC50) PRESS THE STARTER BUTTON AND THE LOW MIXER OIL WARNING LIGHT TURNS ON. WITH ENGINE RUNNING, RELEASE THE STARTER BUTTON AND THE LOW OIL MIXER WARNING LIGHT SHOULD TURN OFF; IF IT REMAINS LIT, TOP-UP WITH MIXER OIL.
CAUTION

NEVER PRESS THE STARTER BUTTON «5» WHEN THE ENGINE IS AL-
N.B.
OM EEN EXCESSIEF VERBRUIK VAN DE ACCU TE VERMIJDEN, HOUDT MEN DE STARTKNOP NIET VOOR LANGER DAN VIJF SECONDEN INGE-DRUKT (TIEN SECONDEN IN GEVAL VAN EEN START NA EEN LANGE IN-ACTIVITEIT). WANNEER IN DIT TIJDS-INTERVAL DE MOTOR NIET START, WACHT MEN TIEN SECONDEN EN DRUKT MEN OPNIEUW OP DE START-KNOP.
- If the engine does not start within three or four seconds, slightly turn the throttle grip «6» to (Pos. A) and hold down the starter button «5».
CAUTION

THE ENGINE OIL PRESSURE WARNING LIGHT SHOULD TURN OFF ONCE THE ENGINE IS RUNNING. IF THE WARNING LIGHT REMAINS ON OR TURNS ON WHILE THE ENGINE IS WORKING PROPERLY, THIS MEANS THAT THE OIL PRESSURE IN THE CIRCUIT IS NOT ENOUGH. IF THIS OC-CURS, STOP THE ENGINE AT ONCE AND CONTACT AN OFFICIAL APRILIA DEALER. NEVER USE THE VEHICLE
LET OP

VERMIJDT OM DE STARTKNOP «5» IN TE DRUKKEN WANNEER DE MOTOR REEDS GESTART IS: HET STARTMO- TORTJE ZOU BESCHADIGD KUNNEN WORDEN.
Versie (MC125)
- Keep the brake levers operated and accelerate only when setting off.
KICK START (MC50)
To start the vehicle with the kick starter:
- Park the vehicle on its centre stand.
- Stand on the left-hand side of the vehicle.
- Set the engine stop switch «1»
to «RUN» (where available). Make sure the light switch «2» is
Make sure the light switch «Z» is set to LOW-BEAM.
• Turn the key «3» and set the ignition switch to «ON». - To avoid loss of control of the vehicle at start-up, lock both wheels by operating the brake levers «4».
- Kick the pedal «7» with your right foot and release it immediately. If necessary, repeat the operation until the engine starts.
SCHADE TE VERMIJDEN AAN DE ONDERDELEN VAN DE MOTOR.
SETTING OFF AND RIDING
CAUTION
IF THE LOW FUEL WARNING LIGHT ON THE INSTRUMENT PANEL TURNS ON WHILE RIDING, THIS MEANS THE RESERVE IS BEING USED.
REFUEL AS SOON AS POSSIBLE.
CAUTION

REFERENCES TO RIDING WITH PASSENGER ARE INTENDED ONLY FOR COUNTRIES WHERE THIS IS PERMITTED. (MC50)
CAUTION

WHEN RIDING WITHOUT PASSENGERS, MAKE SURE THE PASSENGER FOOTRESTS ARE FOLDED. WHILE RIDING, KEEP YOUR HANDS FIRMLY ON THE HANDGRIPS AND YOUR FEET ON THE FOOTRESTS.
LET OP

HANDEL NIET OP HET STARTPE-DAAL WANNEER DE MOTOR REEDS GESTART IS.
VERTREK EN RIJDEN
LET OP
WANNEER TIJDENS HET RIJDEN DE CONTROLELAMP VAN DE BRAND-STOFRESERVE OP HET DASH-BOARD OPLICHT, HEEFT MEN DE ZONE VAN DE RESERVE BEREIKT.
TANK ZO VLUG MOGELIJK BRAND-STOF.
LET OP

IF RIDING WITH A PASSENGER, IN-STRUCT THE PERSON CARRIED SO AS TO AVOID CAUSING TROUBLE WHEN MANOEUVRING.
BEFORE SETTING OFF, MAKE SURE THE STAND/S ARE COMPLETELY RETRACTED TO THEIR POSITION.
SAGIER GESLOTEN ZIJN. TIJDENS HET RIJDEN HOUDT MEN DE HAN-DEN STEVIG OP DE HANDVATEN EN LAAT MEN DE VOETEN STEUNEN OP DE VOETENSTEUNEN.
RIJ NOOIT IN ANDERE POSITIES.
WANNEER MEN MET PASSAGIER RIJDT, GEEFT MEN INLICHTINGEN AAN DEZE PERSOON ZODAT DEZE GEEN MOEILJKHEDEN VEROOR-ZAAKT TIJDENS DE MANOEUVRES.
VOOR HET VERTREK CONTROLEERT MEN OF DE STANDAARD OF DE STANDAARDS VOLLEDIG INGE-KLAPT ZIJN.
To set off:
- Release the throttle grip (Pos. C), operate the rear brake and take the vehicle off the stand.
• Get on the vehicle and, for stability reasons, keep at least one foot on the ground. - Adjust the rear-view mirror angle correctly.
Om te vertrekken:
- To set off, release the brake lever and accelerate, gradually twisting the throttle grip (Pos. B); the vehicle will start moving forward.
NEVER ACCELERATE AND DECELERATE REPEATEDLY AND CONTINUOUSLY AS YOU MAY INADVERTENTLY LOSE CONTROL OF YOUR VEHICLE.
CAUTION

IF YOU HAVE TO BRAKE, OPERATE BOTH BRAKES TO OBTAIN A UNIFORM BRAKING, CAREFULLY APPLYING PRESSURE TO THE BRAKING SYSTEM PARTS IN AN ADEQUATE MANNER.
LET OP

NIET HERHAALDELIJK EN VOORTDUREND GAS GEVEN EN VERTRAGEN, OMDAT MEN DE CONTROLE OVER HET VOERTUIG ONOPZETTELIJK KAN VERLIEZEN.
LET OP

WANNEER MEN REMT, VERTRAAGT, OF BEIDE REMMEN ACTIVEERT OM UNIFORM TE VERTRAGEN, DOSEERT MEN OP GESCHIKTE WIJZE DE DRUK OP DE REMMEN.
IN CASE OF STOP IN ASCENT, FULLY DECELERATE AND ONLY USE THE BRAKES TO KEEP THE VEHICLE STOPPED. USING THE ENGINE TO KEEP THE VEHICLE STOPPED MAY CAUSE THE CLUTCH AND THE VARIATOR TO OVERHEAT.
BEFORE GETTING INTO A BEND, REDUCE SPEED AND BRAKE; WHILE BENDING, RIDE AT THE SAME MODERATE AND CONSTANT SPEED OR SLIGHTLY ACCELERATE; DO NOT BRAKE IN EXCESS: THERE IS VERY HIGH RISK OF SKIDDING.
BRAKING CONTINUOUSLY WHILE GOING DOWNHILL MAY RESULT IN FRICTION GASKET OVERHEATING AND CONSEQUENTLY IN POOR BRAKING. TAKE ADVANTAGE OF THE ENGINE COMPRESSION USING THE BRAKES ALTERNATIVELY.
WHEN GOING DOWNHILL NEVER RIDE WITH THE ENGINE OFF.
WANNEER MEN ENKEL DE VOOR-REM OF DE ACHTERREM ACTIVEERT, VERMINDERT MEN DE REMKRACHT AANZENLIJK, EN LOOPT MEN HET RISICO DAT ER EEN WIEL BLOKKEERT, MET GRIPVERLIES ALS GEVOLG.
WANNEER MEN MOET STOPPEN OP EEN HELLING, VERTRAAGT MEN VOLLEDIG EN GEBRUIKT MEN EN- KEL DE REMMEN OM HET VOERTUIG STIL TE LATEN STAAN. WANNEER MEN DE MOTOR GEBRUIKT OM HET VOERTUIG STIL TE LATEN STAAN, KUNNEN DE KOPPELING EN DE VA- RIATOR OVERVERHIT RAKEN.
VOORALEER MEN EEN BOCHT NEEMT, VERMINDERT MEN SNELHEID OF REMT MEN, ZODAT MEN DE BOCHT MET GEMATIGDE EN CONSTANTE SNELHEID OF LICHT VERTRAAGD INGAAT; VERMIJDT OM HARD TE REMMEN: HET ZOU GOED MOGELIK ZIJN DAT MEN GAAT SCHUIVEN.
WANNEER MEN TIJDENS EEN DALING VOORTDUREND REMT, KUNNEN DE WRIJVINGSPAKKINGEN OVERVERHIT RAKEN ZODAT DE DOELTREFFENDHEID VAN HET REMMEN VERMINDERT. GEBRUIK DE COMPRESSIE VAN DE MOTOR, DOOR REGELMATIG GEBRUIK TE MAKEN VAN BEIDE REMMEN.
CAUTION

WHEN RIDING ON WET SURFACES OR WITH POOR GRIP (SNOW, ICE, MUD, ETC.) RIDE AT A MODERATE SPEED AVOIDING SUDDEN BRAKING OR MANOEUVRING THAT MAY LEAD TO LACK OF GRIP AND CONSEQUENTLY TO FALLS.
PAY ATTENTION TO OBSTACLES ON OR VARIATIONS IN THE ROAD SURFACE.
UNEVEN ROADS, RUTS, DRAINS, TRAFFIC SIGNS PAINTED ON THE ROADS, PIPEWORK METAL SHEETS MAY BECOME SLIPPERY WHEN IT RAINS. CROSS OVER THEM WITH EXTREME CAUTION, RIDE CAREFULLY AND INCLINE THE VEHICLE THE LEAST POSSIBLE.
TIJDENS EEN DALING MAG MEN NIET RIJDEN MET DE MOTOR UIT.
LET OP

OP EEN NATTE ONDERGROND, OF ALLESZINS MET WEINIG GRIP (SNEE-UW, IJS, MODDER, ENZ), RIJDT MEN MET EEN GEMATIGDE SNELHEID, EN VERMIJDT MEN OM BRUUSK TE REM-MEN EN OM MANOEUVRES UIT TE VOEREN DIE GRIPVERLIES VEROOR-ZAKEN, EN DUS HET VALLEN TOT GEVOLG HEBBEN.
LET OP VOOR EENDER WELK OBSTAKEL OF VERANDERING VAN DE GEOMETRIE VAN HET WEGDEK.
ONVERHARDE WEGEN, RAILS, PUT-DEKSELS, GESCHILDERDE SIGNALERINGEN OP HET WEGDEK EN METALEN PLATEN VAN WERVEN WORDEN GLAD WANNEER HET REGENT, EN DAAROM MOETEN DEZE ZEER VOORZICHTIG WORDEN BENADERD, EN MAG MEN NIET BRUUSK RIJDEN EN ZO WEINIG MOGELIJK HET VOERTUIG DOEN HELLEN.
CAUTION

ALWAYS SIGNAL CHANGES IN DI- RECTION WITH THE APPROPRIATE DEVICES AND WELL IN ADVANCE, AVOID ABRUPT AND DANGEROUS MANOEUVRES. TURN OFF THE DEVI- CES IMMEDIATELY AFTER THE CHANGE IN DIRECTION. RIDE WITH EXTREME CAUTION WHEN OVERTAKING OR BEING OVERTAKEN BY OTHER VEHICLES. WHEN IT RAINS, SPRAY CAUSED BY LARGE VEH- CLES REDUCES VISIBILITY; AIR SHIFTS MAY CAUSE LOSS OF CON- TROL ON YOUR VEHICLE.
CAUTION

IF THE LOW OIL MIXER WARNING LIGHT TURNS ON WHILE THE ENGINE IS WORKING PROPERLY, THIS MEANS THAT THE OIL RESERVE IS BEING USED; IF THIS OCCURS, TOP-UP THE MIXER OIL. (MC50)
LET OP

MELDT STEEDS OP VOORHAND WANNEER MEN VAN RIJBAAN OF RIJRICHTING VERANDERT MET DE HIERVOOR VOORZIENE MECHANISMEN, EN VERMIJDT BRUUSKE OF GEVAARLIJKE MANOEUVRES. SCHAKEL DE MECHANISMEN ON-MIDDELLIKK UIT NADAT MEN VAN RIJRICHTING HEEFT VERANDERD. WANNEER MEN INHAALT OF MEN WORDT INGEHAALD DOOR ANDERE VOERTUIGEN, MOET MEN ZEER VOORZICHTIG ZIJN. BIJ REGEN WORDT HET ZICHT VERMINDERD DOOR HET OPSTUIVEN VAN WATER, DAT WORDT VEROORZAAKT DOOR GROTE VOERTUIGEN; DOOR DE LUCHTVERPLAATSING KAN MEN DE CONTROLE OVER HET VOERTUIG VERLIEZEN.
LET OP

WANNEER DE CONTROLELAMP VAN DE OLIERESERVE OPLICHT TIJDENS DE NORMALE WERKING VAN DE MOTOR, BEVINDT HET OLIEPEIL VAN DE MENGER ZICH IN RESERVE; IN DIT GEVAL VULT MEN OLIE BIJ IN DE MENGER. (MC50)
Difficult start up (02\_14)
FLOODED ENGINE
The engine may get flooded if the start-up procedure is not properly carried out or there is excess fuel in the inlet ducts.
To clean a flooded engine:
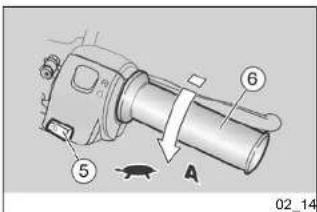
- Press the starter button «5» for a few seconds (running the engine with no gear engaged) with the throttle grip «6» completely twisted (Pos. A).
COLD START
If the ambient temperature is low (near or below 0°C), there may be problems with the first start-up.
In this case:
- Hold down the starter button «5» for five seconds and at the same time slightly twist the throttle grip «6» to (Pos. A).
If the engine starts.
- Release the throttle grip «6». - If idle speed is not stable, twist the throttle grip «6» slightly and frequently.
NOTE

BEFORE SETTING OFF, LET THE ENGINE RUN WITH NO GEAR ENGAGED
AND AT LOW REVS FOR A COUPLE OF SECONDS.
N.B.

VÓÓR DE START LAAT MEN DE MOTOR VOOR ENKELE SECONDEN LEEG EN AAN EEN LAAG REGIME DRAAIEN.
If the engine does not start. Wait a few seconds and repeat the "cold start" procedure.
• If necessary, remove the spark plug and check it is not wet.
- Clean and dry the spark plug if it is wet.
Before refitting:
- Press the starter button «5» and make the starter motor turn for about five seconds, without accelerating.
If the vehicle has been inactive for a long time, starting may be delayed as the fuel supply circuit may be partially empty.
In this case:
- Press the starter button «5» for about ten seconds so that the carburettor float chamber gets filled.
Stopping the engine (02\_15, 02\_16, 02\_17)
CAUTION
WHENEVER POSSIBLE, AVOID ROUGH BRAKING, SUDDEN DECELERATION AND BRAKING IN EXCESS.
- Release the throttle grip (Pos. A) and operate the brakes gradually to stop the vehicle.
- Keep at least one brake operated while at a temporary halt..
PARKING PARKEREN
CAUTION

PARK ON SAFE AND LEVEL GROUND TO PREVENT THE VEHICLE FROM FALLING.
DO NOT LEAN THE VEHICLE ON A WALL OR LAY ON THE GROUND.
MAKE SURE THE VEHICLE AND SPECIALLY ITS HOT PARTS DO NOT POSE ANY RISK TO PEOPLE OR CHILDREN. DO NOT LEAVE YOUR VEHICLE UNATTENDED WITH THE ENGINE ON OR THE KEY IN THE IGNITION SWITCH.
DO NOT SEAT ON THE VEHICLE WHEN THE STAND IS LOWERED.
LET OP

PARKEER HET VOERTUIG OP EEN VASTE EN VLAKKE ONDERGROND, ZODAT HET NIET VALT.
LAAT HET VOERTUIG NIET STEUNEN TEGEN MUREN, EN LEG HET NIET OP DE GROND.
CONTROLEER OF HET VOERTUIG, EN VOORAL DE GLOEIEND HETE DELEN ERVAN, NIET GEVAARLIJK ZIJN VOOR PERSONEN EN KINDEREN. LAAT HET VOERTUIG NIET ONBEWAAKT ACHTER MET DE MOTOR AAN, OF MET DE SLEUTEL IN DE ONSTEKINGSSCHAKELAAR.
GA NIET OP HET VOERTUIG ZITTEN WANNEER DE STANDAARD UITGE-KLAPT IS.
Catalytic models have a silencer with a "two-way platinum-rhodium" catalytic converter.
This device oxidises CO (carbon monoxide) and HC (unburned hydrocarbons) present in exhaust fumes, turning them into carbon dioxide and water vapour respectively.
The high temperature reached by exhaust fumes due to the catalytic reaction burns oil particles, keeping the silencer clean and eliminating the exhaust smoke.
For a correct and lasting catalytic converter operation and for minimising fouling problems in the thermal and exhaust groups, avoid keeping very low rpm over long stretches.
Alternate with periods of slightly high running engine speed even for just a few seconds, as long as this is done somehow frequently.
This is specially important after each cold engine start-up in order to achieve the rpms needed to "trigger" the catalytic reaction, just make sure that the thermal group temperature is 50^ minimum; this
OMDAT DE KATALYTISCHE UITLAAT TIJDENS HET GEBRUIK ZEER HOGE TEMPERATUREN BEREIKT; LET DUS ZEER GOED OP EN VERMIJDT EENDER WELK CONTACT, VÓÓR ZE HELEMAAL AFGEKOELD IS.
generally occurs a few seconds after start-up.
Vehicle owners are warned that the law may prohibit the following:
- the removal of any device or part belonging to a new vehicle or any other action by anyone, leading to render it non-operating, if not for maintenance, repair or replacement reasons, in order to control noise emission before the sale or delivery of the vehicle to the final buyer or while it is used.
- using the vehicle after that device or part has been removed or made non-operating.
Check the muffler/exhaust silencer and the silencer pipes, make sure there are
no signs of rust or holes and that the exhaust system works properly.
If exhaust noise increases, take your vehicle to an Official aprilia Dealer at once.
Stand (02\_18, 02\_19)
RESTING THE VEHICLE ON ITS STAND CENTRE STAND
- Grasp the left handgrip and the passenger handgrip «1».
- Push the stand lever «2».
SIDE STAND (OPT) - Grasp the left handgrip and the passenger handgrip «1».
Standaard (02\_18, 02\_19)
PLAATSING VAN HET VOERTUIG OP DE STANDAARD CENTRALE STANDAARD
Suggestions to prevent theft
Tips tegen diefstal
NEVER leave the ignition key in the lock and always use the steering lock.
Park the scooler in a safe place such as a garage or a place with guards.
Whenever possible, use the aprilia "Bodyguard" armoured cable or an additional antitheft device.
Make sure all vehicle documents are in order and the road tax paid.
Write down your personal details and telephone number on this page to help identifying the owner in case of vehicle retrieval after a theft.
LAST
NAME:
To ride the vehicle it is necessary to comply with all legal requirements (driving license, minimum driving age, psychophysical performance, insurance, taxes and fees, registration, license plate, etc.).
You should practise using the vehicle in traffic-free areas and/or private property until you have become thoroughly acquainted with the vehicle.
Driving under the influence of medication, alcohol and narcotic drugs or psychotropic substances dramatically increases the risk of accidents.
Do not ride your vehicle if you feel tired or drowsy and always keep safe psycho-physical riding conditions.
The main cause of motorcycle accidents is users' inexperience.
NEVER lend the vehicle to beginners and always make sure that the rider complies with all necessary requirements for a safe riding.
Strictly obey all national and local traffic signs and rules.
Avoid any abrupt and dangerous swerves for your own as well as others' safety (for example: rearing up on the
back wheel, riding over the speed limit, etc.). Besides, always assess and bear in mind the road surface conditions, visibility, etc.
Do not knock obstacles that can damage the vehicle or cause loss of control.
Do not ride on the course of the vehicle in front just to improve your own speed.
CAUTION

ALWAYS RIDE WITH BOTH HANDS ON THE HANDLEBAR AND FEET ON THE FOOTRESTS (OR THE RIDER'S FOOTRESTS) IN THE ADEQUATE RIDING POSITION.
Never stand on your feet or stretch yourself while riding.
The rider should always be attentive, never get distracted or influenced by people, things or actions (never smoke, eat, drink, read, etc.) while riding.
Always use fuel and lubricants specific for the vehicle, of the type recommended in the "LUBRICANTS TABLE". Check fuel, oil and coolant frequently for correct level.
In case of an accident or after the vehicle has fallen down or suffered a sudden bump, make sure the control levers, piping, cables, brake circuit and main parts of the vehicle have not been damaged.
If necessary, take the vehicle to an Official aprilia Dealer to check especially the frame, handlebar, suspensions, safety components and any device the user cannot assess without the aid of a specialist.
Report any malfunction to the engineers and/or mechanics in order to facilitate their work.
Never ride the vehicle if the damage jeopardises safety.
Do not modify the position, angle or colour of: license plate, turn indicators, lighting devices and horn.
Any changes to the vehicle will void the warranty.
Any change introduced to the vehicle and the removal of original parts may jeopardise the vehicle performance and therefore reduce safety or even render the vehicle inappropriate for legal riding.
Comply with all national and local laws and regulations on vehicle equipment.
In particular do not introduce technical changes leading to improve performance and under no circumstances alter the original specifications of the vehicle.
Never race with vehicles.
Never ride off-road.
Before riding off, remember to put on the helmet and fasten it correctly. Make sure it is a homologated model, that it is undamaged, of the right size and that the visor is clean.
Wear appropriate protective clothes, preferably light-coloured and/or in reflective material. In this way you will be easily visible to other drivers, thus reducing the risk of being hit, and you will be better protected in case of falling.
Always wear tight-fitting clothes without open cuffs; avoid hanging strings, belts or
KLEDING
ties; these or any other objects should not interfere with a safe riding when getting entangled with the riding elements or due to a special movement.
Never carry in your pockets objects that can be potentially dangerous in case of fall, like: pointed objects such as keys, pens, glass containers, etc. (the same rule applies to passengers).
User is personally responsible for the installation and use of the accessories.
While assembling accessories, make sure that they do not cover the sound or light alarm devices or affect their correct functioning, do not limit the suspension travel or the steering angle, do not obstruct control actuation or reduce the ground clearance and inclination angle at corners.
Do not use accessories that hinder access to the controls as they may increase the reaction time in case of an emergency.
Fairings and large windshields fitted to the vehicle may cause aerodynamic forces that affect the vehicle stability while riding, mainly at high speeds.
ACCESSOIRES
Make sure the accessory is firm and secured to the vehicle and that it does not pose any risks while riding the vehicle.
Do not add or modify electrical equipment that exceed the vehicle capacity as this may result in a sudden stop or a dangerous lack of power required to keep the sound and light alarm devices operative.
aprilia advises using original accessories (aprilia genuine accessories).
Do not overload your vehicle. Keep packages as close as possible to the vehicle centre of gravity and distribute load evenly on both sides to minimise imbalance. Check also that the load is firm and secured to the vehicle, mainly for long trips.
Do not hang anything from your vehicle's handlebars, mudguards or forks, such as protruding, bulky, heavy and/or dangerous objects: this will slow the vehicle performance when turning and will upset the handling of your vehicle.
Do not carry packages that protrude from vehicle sides as this may hit people or
BELASTING
objects and result in loss of control of your vehicle.
Never carry packages that are not securely fastened to the vehicle.
Do not carry packages that protrude from the luggage rack or which cover any of the sound and light alarm devices.
Never carry animals or small children on the glove-box or the luggage rack.
Never exceed the maximum weight allowed for each luggage rack.
Overloading the vehicle may result in lack of stability and poor handling.
In 4T engines, the engine oil is used to lubricate the distribution elements, the main bearings and the thermal group.
CAUTION

OPERATING THE SCOOTER WITH IN- SUFFICIENT OIL CAN DAMAGE THE ENGINE.
In all 4T engines, a loss of efficiency in oil performance and some oil consumption should be considered normal. Consumption can particularly reflect the conditions of use (i.e.: when driving at "full speed" all the time, oil consumption increases).
The replacement intervals indicated by the maintenance chart are defined according to the total oil content in the engine and the average consumption levels measured following standardised methods.
CAUTION

IN ORDER TO PREVENT ANY PROBLEMS, WE RECOMMEND CHECKING OIL LEVEL EVERY TIME YOU RIDE YOUR SCOOTER.
Engine oil level check (03\_01)
- Check the oil level as indicated
- Park the vehicle on its centre stand.
NOTE
EVERY TIME THE SCOOTER IS USED, CHECK ENGINE OIL LEVEL WHEN THE ENGINE IS COLD.
ELKE KEER MEN HET VOERTUIG GE-BRUIKT.
- Unscrew and take out the measuring tap-dipstick «1».
- Clean the area in contact with oil with a clean cloth.
- Screw the tap-dipstick «1» completely in its tube «2».
- Remove the tap-dipstick «1» again and read the level the oil reaches on the dipstick.
- The level is correct when it is close to the maximum notch marked on the measuring dipstick.
- Top up if necessary. The MAX level reference indicates a quantity of about 850 cc of oil in the engine. If the check is carried out after the
vehicle has been used, and therefore with a hot engine, the level line will be lower; in order to carry out a correct check, it is necessary to wait for at least 10 minutes after the engine has been stopped so as to get the correct level.
- Unscrew and remove the engine oil filler cap «1».
- Pour a small quantity of oil through the tube «2» and wait approximately five minutes so that the oil flows evenly into the crankshaft.
- Check the oil level and top up, if required
- Top up with small quantities of oil, until the recommended level is reached.
- Screw and tighten the engine oil filler cap «1».
LET OP
NA HET BIJVULLEN, PLAATST MEN DOP «1» OPNIEUW OP CORRECTE WIJZE.
DO NOT RIDE THE VEHICLE WITH INSUFFICIENT LUBRICATION OR WITH CONTAMINATED OR INCORRECT LUBRICANTS AS THIS ACCELERATES THE WEAR AND TEAR OF THE MOVING PARTS AND CAN CAUSE IRRETRIEVABLE DAMAGE.
Engine oil change
TO CHANGE THE ENGINE OIL, PLEASE CONTACT AN Official aprilia Dealer. IF YOU ARE ADEQUATELY TRAINED AND EXPERIENCED, REFER TO THE INSTRUCTIONS IN THIS WORKSHOP BOOKLET AVAILABLE ALSO AT ANY DEALER.
LET OP

GEBRUIK HET VOERTUIG NIET MET ONVOLDOENDE SMERING OF MET VERONTREINIGDE OF ONGESCHIKTE SMEERMIDDELEN, OMDAT DE BEWEGENDE DELEN ERVAN SNELLER ZULLEN VERSLIJTEN EN DUS ERNSTIGE SCHADE KAN TOEBRENGEN.
Hub oil level (03\_02, 03\_03, 03\_04)
- Ride a few kilometres until the regular working temperature is reached, then stop the engine.
• Park the vehicle on its centre stand. - Unscrew and take out the measuring tap-dipstick «1».
- Clean the area in contact with oil with a clean cloth.
- Screw the tap-dipstick «1» completely in its tube «2».
- Remove the tap-dipstick again and read the level the oil reaches on the dipstick.
- The level is correct when it reaches the reference mark printed on the dipstick indicated in the figure.
- Top-up if necessary.
CAUTION

DO NOT DISPOSE OF OIL INTO THE ENVIRONMENT.
CAUTION

TIGHTEN UP THE FILLER CAP «1» AND MAKE SURE THE OIL DOES NOT SEEP.
CHECK REGULARLY THAT THERE ARE NO LEAKS IN THE CRANKCASE COVER GASKET.
DO NOT RIDE THE SCOOTER WITH INSUFFICIENT OIL OR WITH CONTAMINATED OR DIRTY LUBRICANTS AS THIS ACCELERATES THE WEAR AND TEAR OF THE MOVING PARTS AND CAN CAUSE IRRETRIEVABLE DAMAGE. TAKE YOUR SCOOTER TO AN Official aprilla Dealer TO HAVE THE OIL CHECKED AND CHANGED.
natural_image
Cross-sectional diagram of a mechanical component with labeled part (1), no readable text or symbols presentRecommended products
AGIP GEAR SYNTH SAE 75W-90
Gearbox oil API GL4, GL5
GEARBOX OIL CHANGE
Replace the gearbox oil as indicated in the scheduled maintenance tables.
Take your scooter to an Official aprilia Dealer to have the oil controlled and changed.
Tyres (03\_05, 03\_06)
This vehicle is fitted with tyres without inner tubes (Tubeless).
CAUTION

CHECK FREQUENTLY TYRE PRESSURE WITH TYRES AT AMBIENT TEMPERATURE.
THE MEASUREMENT MAY BE INCOR- RECT IF TYRES ARE WARM. CHECK
natural_image
Diagram showing a mechanical component with a circular feature and a bulb-like structure, no text or symbols present.REPLACEMENT, REPAIR, MAINTENANCE AND BALANCING OPERATIONS ARE HIGHLY IMPORTANT AND SO THEY SHOULD BE CARRIED OUT USING THE SPECIFIC TOOLS AND WITH THE ADEQUATE KNOWLEDGE. IT IS THEREFORE ESSENTIAL TO HAVE YOUR TYRES AND WHEELS SERVICED AT AN Official aprilia Dealer OR A SPECIALISED TYRE WORKSHOP. NEW TYRES CAN BE COVERED BY A SLIPPERY COAT: RIDE WITH CAUTION DURING THE FIRST
SLIJTAGE VAN DE BANDEN, EN VERVANG ZE INDIEN ZE VERSLETEN ZIJN. WANNEER DE BANDEN OUD ZIJN, EN OOKAL ZIJN ZE NIET VERSLETEN, KUNNEN ZE VERHARDEN EN DUS DE WEGLIGGING SCHADEN. IN DIT GEVAL VERVANGT MEN DE BANDEN VERVANG DE BANDEN WANNEER ZE VERSLETEN ZIJN, OF WANNEER ER EEN EVENTUEEL GAT IS IN DE ZONE VAN HET RIJVLAK DAT GROTER IS DAN 5 MM. NADAT MEN DE BAND HEEFT LATEN HERSTELLEN, LAAT MEN DE WIELEN BALANCEREN. GEBRIUK UITSLUITEND DE MAAT VAN BANDEN DIE WORDT AANGEDUID DOOR HET HUIS. PLAATS GEEN BANDEN VAN HET TYPE MET BINENBAND OP VELGEN VOOR TUBELESS BANDEN, EN VICEVERSA. CONTROLEER OF DE KLEPPEN VOOR HET OPBLAZEN STEEDS HUN DOPJES HEBBEN, OM HET PLOTSELING LEEGLOPEN VAN DE BANDEN TE VERMIJDEN.
DE HANDELINGEN VAN HET VERVANGEN, HERSTELLEN, ONDERHOUD EN BALANCEREN ZIJN ZEER BELANGRIJK, EN MOETEN DUS UITGEVOERD WORDEN MET GESCHIKTE GEREEDSCHAPPEN EN MET DE NODIGE ERVARING. DAAROM RAADT MEN AAN OM ZICH TE WENDEN TOT EEN Officiële aprillia Dealer OF EEN BANDENSPECIALIST VOOR HET UITVOEREN VAN DE VOORAF-
KILOMETRES. DO NOT APPLY UN- SUITABLE LIQUIDS ON TYRES.
GAANDE HANDELINGEN. WANNEER DE BANDEN NIEUW ZIJN, KUNNEN ZE BEDEKT ZIJN MET EEN GLADDE LAAG: DE EERSTE KILOMETERS MOET MEN VOORZICHTIG RIJDEN. SMEER DE BANDEN NIET IN MET ON-GESCHIKTE VLOEISTOFFEN.
TREAD DEPTH MINIMUM THRESHOLD «2»
| Front: 1.5 mm | Vooraan: 1,5 mm |
| Rear 1.5 mm | Achteraan 1.5 mm |
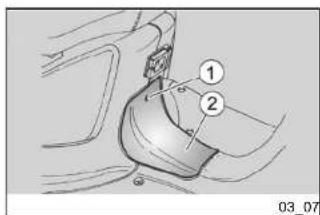
Spark plug dismantlement (03_07, 03_08, 03_09, 03_10, 03_11)
Check and replace the spark plug following the instructions in the scheduled maintenance table.
Remove the spark plug regularly, clean off carbon scales, and replace the spark plug if necessary.
To reach the spark plug:
Demonteren van de bougie (03_07, 03_08, 03_09, 03_10, 03_11)
HANDLE PLASTIC AND PAINTED COMPONENTS WITH CARE; DO NOT SCRATCH OR SPOIL THEM.
• Rest the vehicle on its centre
- Undo and remove the screw «1».
- Remove the central inspection cover «2».
NOTE

UPON REFITTING. INSERT
THE FITTING TABS CORRECTLY IN THEIR SLOTS.
(MC125) MODEL
NOTE
HANDLE PLASTIC AND PAINTED COMPONENTS WITH CARE; DO NOT SCRATCH OR SPOIL THEM.
- Lift the saddle.
- Operating from the right hand side of the vehicle undo and remove the upper screw «3».
- Undo and remove the side screw «4».
- Remove the right hand side inspection cover «5».
N.B.
HANTEER ZORGVULDIG DE PLASTIC EN GELAKTE DELEN; KRAS OF BE-SCHADIG ZE NIET.
For removal and cleaning:
- Remove the tube of the spark plug «6».
- Clean off any trace of dirt from the spark plug base. Unscrew it using the spanner supplied in the tool kit and remove it from its seat, being careful not to let dust or any other substance into the cylinder.
- Check that the spark plug electrode and centre porcelain are free of carbon deposits or signs of corrosion. If necessary, clean using suitable spark plug cleaners, a wine and its metal brush
- Blow with a strong air blast to avoid removed dirt getting into the engine. Replace the spark plug if there are cracks on the spark plug insulating material, corroded electrodes or large deposits.
- Check the electrode gap with a thickness gauge.
The gap should be:
Characteristic
Electrode gap (MC50)
if necessary, adjust it by carefully folding the earth electrode.
- Make sure the washer is in good conditions. Once the washer is fitted, manually screw the spark plug to avoid damaging the thread.
- Tighten using the spanner supplied in the tool kit, make the spark plug complete 1/2 a turn to press the washer.
CAUTION

TIGHTEN THE SPARK PLUG CORRECTLY, OTHERWISE THE ENGINE MAY OVERHEAT AND GET IRRETRIEVABLE DAMAGED. USE SPARK PLUGS OF THE RECOMMENDED TYPE ONLY. OTHERWISE, ENGINE LIFE AND PERFORMANCE COULD BE COMPROMISED.
Spark plug tightening torque (MC125)
12 - 14 Nm
- Connect the spark plug tube «6».
• Refit the inspection cover.
Removing the air filter
CAUTION
TO REMOVE AND CLEAN THE AIR FILTER, PLEASE CONTACT AN Official aprilia Dealer. IF YOU ARE ADEQUATELY TRAINED AND EXPERIENCED, REFER TO THE INSTRUCTIONS IN THE WORKSHOP BOOKLET AVAILABLE ALSO AT ANY DEALER.
DERS ZOUDEN DE PRESTATIES EN DE DUUR VAN DE MOTOR GE- SCHAAD KUNNEN WORDEN.
Checking the brake oil level (03_12)
CAUTION

UNEXPECTED CLEARANCE VARIATIONS OR ELASTIC RESISTANCE IN THE BRAKE LEVER ARE DUE TO FAILURE IN THE HYDRAULIC CIRCUIT. CONTACT AN Official aprilia Dealer IN CASE OF DOUBTS ON THE CORRECT OPERATION OF THE BRAKING SYSTEM OR WHEN UNABLE TO CARRY OUT ROUTINE CHECK PROCEDURES.
CAUTION

PAY SPECIAL ATTENTION TO THE BRAKE DISC AND THE FRICTION GASKETS AND CHECK THAT THEY ARE NOT OILY OR GREASY, SPECIALLY AFTER MAINTENANCE OPERATIONS OR CHECKS.
CHECK THAT THE BRAKE PIPE IS NOT TWISTED OR WORN.
DO NOT DISPOSE OF THE FLUID INTO THE ENVIRONMENT.
KEEP OUT OF THE REACH OF CHIL- DREN
This vehicle is fitted with front hydraulic disc brake. When the friction pads wear
out, the fluid level goes down to automatically compensate for that wear. The front brake fluid reservoir «1» is placed near the front brake lever connection. Frequently check the brake fluid level in the reservoir «1» and the brake pad for wear.
CAUTION

DO NOT USE YOUR VEHICLE IF A FLUID LEAK IN THE BRAKING CIRCUIT IS DETECTED.
MIN = minimum level.
If the fluid does not reach at least the "MIN" reference mark
CAUTION
- Check brake pads for wear.
If pads and/or the disc need not to be replaced:
• Take your vehicle to an Official aprillia Dealer to carry out the top-up.
CAUTION

CHECK BRAKING EFFICIENCY.
IN CASE OF EXCESSIVE TRAVEL OF THE BRAKE LEVER OR POOR PERFORMANCE OF THE BRAKING CIRCUIT, TAKE YOUR SCOOTER TO AN Official aprilia Dealer AS IT MAY BE NECESSARY TO PURGE AIR FROM THE CIRCUIT.
Braking system fluid top up
CAUTION
TO HAVE THE BRAKING SYSTEM FLUID TOPPED-UP, PLEASE CONTACT AN Official aprilia Dealer. IF YOU ARE SUITABLY AND EXPERIENCED, FOLLOW THE INSTRUCTIONS IN THE WORKSHOP BOOKLET, WHICH IS AVAILABLE FROM ANY DEALER.
Check the electrolyte level and the leads tightening according to the instructions in the scheduled maintenance table.
CAUTION

THE BATTERY ELECTROLYTE IS TOXIC, CORROSIVE AND AS IT CONTAINS SULPHURIC ACID, IT CAN CAUSE BURNS WHEN IN CONTACT WITH THE SKIN. WEAR PROTECTION CLOTHES, A FACE MASK AND/OR SAFETY GOGGLES WHEN CARRYING OUT MAINTENANCE OPERATIONS.
IF THE ELECTROLYTIC FLUID GETS INTO CONTACT WITH THE SKIN, WASH WITH ABUNDANT COOL WATER.
IF THE FLUID GETS INTO CONTACT WITH THE EYES, WASH WITH ABUNDANT WATER FOR FIFTEEN MI-
LET OP

BRANDGEVAAR. HOU BRANDSTOF EN ANDERE ONTVLAMBARE STOFFEN VER WEG VAN ELEKTRISCHE ONDERDELEN.
VERSIE (MC50)
IF IT IS ACCIDENTALLY SWALLOWED, DRINK LARGE QUANTITIES OF WATER OR MILK, FOLLOWED BY MILK OF MAGNESIA OR VEGETAL OIL, AND SEEK MEDICAL ADVICE IMMEDIATELY.
THE BATTERY RELEASES EXPLOSIVE GASES; KEEP IT AWAY FROM FLAMES, SPARKS, CIGARETTES OR ANY OTHER HEAT SOURCE.
WHEN RECHARGING OR USING THE BATTERY, BE CAREFUL TO HAVE THE ROOM ADEQUATELY AIRED. DO NOT BREATH GASES RELEASED WHEN THE BATTERY IS BEING RECHARGED.
KEEP OUT OF THE REACH OF CHIL- DREN
PAY ATTENTION NOT TO TILT THE VEHICLE EXCESSIVELY TO AVOID DANGEROUS SPILLS OF BATTERY FLUID.
BATTERY FLUID IS CORROSIVE.
DO NOT POUR OR SPREAD IT ESPECIALLY ON PLASTIC PARTS.
TER VOOR ONGEVEER VIJFTIEN MINUTEN, EN ONMIDDELLIJK EEN OOGARTS RAADPLEGEN.
WANNEER HET TOEVALLIG ZOU WORDEN INGESLIKT, MOET MEN VEEL WATER OF MELK DRINKEN, DAARNAA MAGNESIUMMELK OF VEGETALE OLIE DRINKEN, EN ONMIDDELLIK EEN ARTS RAADPLEGEN.
DE ACCU VERSPREIDT EXPLOSIEVE GASSEN; HET WORDT AANGERA-DEN OM VLAMMEN, VONKEN, SIGARETTEN EN EENDER ANDERE WARMTEBRON VER WEG TE HOU-DEN.
TIJDENS HET LADEN OF HET GE-BRUIK, VOORZIET MEN HET LOKAAL VAN EEN GESCHIKTE VENTILATIE EN VERMIJDT MEN HET INADEMEN VAN DE GASSEN DIE VRIJKOMEN TIJDENS HET OPLADEN VAN DE AC-CU.
BUITEN BEREIK VAN KINDEREN HOUDEN
LET OP OM HET VOERTUIG NIET TE VEEL TE HELLEN, OM GEVAARLIJKE UITSTROMINGEN VAN VLOEISTOF UIT DE ACCU TE VERMIJDEN.
DE VLOEISTOF VAN DE ACCU IS CORROSIEF.
GIET ZE NIET UIT EN VERSPREIDT ZE NIET, VOORAL NIET OP DE PLASTIC DELEN.
(MC125) MODEL
WARNING
THIS VEHICLE IS FITTED WITH A MAINTENANCE-FREE BATTERY AND DOES NOT NEED ANY INTERVENTION, EXCEPT FOR SPORADIC CHECKS AND RECHARGE.
NOTE
IF YOU NEED ASSISTANCE OR TECHNICAL ADVICE, CONSULT AN Official aprilia Dealer WHO WILL PROVIDE AN ACCURATE AND PROMPT SERVICE.
VERSIE (MC125)
WAARSCHUWING
DIT VOERTUIG IS UITGERUST MET EEN ACCU VAN HET TYPE ZONDER ONDERHOUD, EN ER MOET DUS GEEN ENKELE HANDELING UITGEVOERD WORDEN, BEHALVE EEN CONTROLE AF EN TOE EN EVENTUEEL OPLADEN.
N.B.
WANNEER MEN ASSISTENTIE OF TECHNISCH ADVIES NODIG HEEFT, WENDT ZICH TOT EEN Officiële aprilia Dealer DIE EEN ZORGVULDIGE EN SNELLE DIENST GARANDEERT.
BATTERY REMOVAL (MC50)
- Unscrew and remove the screw «1».
- Remove the battery cover «2».
- Make sure the ignition switch is set to «OFF».
- Disconnect the negative lead (-) first and then the (red) positive lead (+).
- Remove the battery breather pipe.
- Remove the battery from its housing and put it away on a level surface in a cool and dry place.
VERWIJDERING VAN DE ACCU (MC50)
PROCEED WITH CAUTION.
DO NOT DAMAGE THE TABS AND/OR THEIR CORRESPONDING SLOTS.
- Grasp the battery «6» and slide it off its housing from behind.
LET OP

DE VERWIJDERDE ACCU MOET WORDEN OPGEBORGEN OP EEN VEILGE PLAATS EN UIT DE BUURT VAN KINDEREN.
THE BATTERY IS CONNECTED TO THE ELECTRIC WIRES. DO NOT FORCE THE WIRES WHEN REMOVING THE BATTERY.
Total removal
- Disconnect the negative lead (-) first and then the (red) positive lead (+).
- Put the battery «6» away on a level surface in a cool and dry place.
CAUTION

ONCE REMOVED THE BATTERY MUST BE PUT AWAY IN A SAFE PLACE AND OUT OF THE REACH OF CHILDREN.
CHECKING AND CLEANING TERMINALS AND LEADS
(MC50) MODEL
CAUTION

PARK THE VEHICLE ON SAFE AND LEVEL GROUND.
LET OP
DE ACCU IS GEBONDEN AAN DE ELEKTRISCHE KABELS. FORCEER DE KABELS NIET BIJ DE VERWIJDERING.
• Rest the vehicle on its centre stand.
• Make sure the ignition switch is set to «OFF»
- Lift the saddle.
- Undo and remove the screw «1».
- Remove the battery cover «2».
NOTE
UPON REFITTING, INSERT THE TAB «3» CORRECTLY IN ITS SLOT.
- Remove the battery partially. At this stage (MC50, MC125)
- Check that the terminals «7» of the cables and the battery leads «8» are:
- in good conditions (not corroded or covered by deposits);
- covered by a special grease or petroleum jelly.
If necessary:
• Make sure the ignition switch is set to «OFF».
- Disconnect the negative lead (-) first and then the (red) positive lead (+).
• Brush with a metal bristle brush to remove all signs of corrosion.
VERSIE (MC125)
- Connect again the (red) positive lead (+) first and then the negative one (-).
• Cover the leads and terminals with special grease or petroleum jelly.
Afterwards:
• Refit the battery cover (MC50).
• Refit the battery (MC125).
BATTERY RECHARGE
(MC50) Model
- Remove the battery from its
housing.
• Unscrew and remove the cell
caps.
• Check the battery electrolyte
level.
- Once the battery is recharged, control the electrolyte level and top up with distilled water if necessary.
• Tighten the cell caps.
CAUTION
REFIT THE BATTERY ONLY 5-10 MINUTES AFTER DISCONNECTING THE CHARGER AS THE BATTERY KEEPS
Use of a new battery (03\_19)
(MC50) MODEL
- Remove the battery cover «2».
- Place the battery in its housing.
- Connect the battery breather pipe.
CAUTION

ALWAYS CONNECT THE BATTERY BREATHER SO THAT SULPHURIC ACID STEAM FROM THE BREATHER DOES NOT CORRODE THE ELECTRICAL SYSTEM, PAINTED PARTS, RUBBER COMPONENTS OR GASKETS.
DE ACCU EEN KORTE PERIODE GAS BLIJFT PRODUCEREN.
- Connect the (red) positive lead (+) first and then the negative one (-).
• Cover the leads and terminals with special grease or petroleum jelly.
CAUTION
UPON REFITTING, THE ELECTRIC WIRES SHOULD BE LED INTO POSITION SO THAT THEY DO NOT GET CRUSHED.
- Place the battery in its housing. - Fit the battery cover «5» to the vehicle.
CAUTION
OPERATE WITH CAUTION. DO NOT DAMAGE THE TAB AND/OR ITS SLOTS.
NOTE

UPON REFITTING, INSERT THE FITTING TABS CORRECTLY IN THEIR SLOTS.
- Tighten the screws «4» fixing the battery cover «5».
- Remove the battery from its housing.
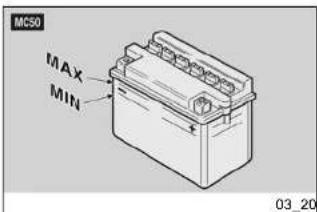
- Check that the electrolyte level is between the two «MIN» and «MAX» notches stamped on the battery side.
Otherwise:
- Unscrew and remove the cell caps.
- Restore the fluid level by adding distilled water only.
- Refit the cell caps.
(MC125) Model
The vehicle is fitted with a maintenance-free battery that does not require electrolyte level checks.
Long periods of inactivity
If the vehicle is inactive longer than fifteen days, it is necessary to recharge the battery to avoid sulphation,
In winter or when the vehicle remains stopped, check the charge frequently (about once a month) to avoid deterioration.
- Fully recharge with an ordinary charge.
If the battery is still on the vehicle, disconnect the cables from the terminals (M50, MC50).
LET OP
NA HET BIJVULLEN HERPLAATST MEN CORRECT DE DOPPEN VAN DE ELEMENTEN.
Fuses (03_21, 03_22, 03_23, 03_24)
CAUTION

NEVER ATTEMPT TO REPAIR FAULTY FUSES. NEVER USE A FUSE OF A RATING OTHER THAN SPECIFIED. THIS COULD DAMAGE THE ELECTRICAL SYSTEM OR CAUSE A SHORT CIRCUIT, WITH THE RISK OF FIRE.
NOTE
IF A FUSE BLOWS OUT FREQUENTLY, THAT MAY BE DUE TO A SHORT CIRCUIT OR OVERLOAD. IN THIS EVENT, CONTACT AN Official aprilia Dealer.
Checking the fuses is necessary whenever an electrical component fails to operate or is malfunctioning or when the engine does not start. To check:
- Set the ignition switch to «OFF» to avoid an accidental short circuit.
Zekeringen (03_21, 03_22, 03_23, 03_24)
LET OP

HERSTEL GEEN DEFECTE ZEKERINGEN. GEBRUIK NOOIT ANDERE ZEKERINGEN DAN GESPECIFICEERD. MEN ZOU SCHADE KUNNEN VEROORZAKEN AAN HET ELEKTRISCH SYSTEEM, OF ZELFS BRAND IN GEVAL VAN KORSTSLUITING.
N.B.
WANNEER EEN ZEKERING FREQUENT WORDT BESCHADIGD, IS ER WAARSCHIJNLIJK EEN KORTSLUITING OF EEN OVERBELASTING. IN DIT GEVAL RAADPLEEGT MEN EEN Officiële aprilia Dealer.
- Park the vehicle on its centre stand.
• Make sure the ignition switch is set to "OFF". - Lift the saddle.
- Unscrew and remove the screw «1».
- Remove the battery cover «2».
NOTE
UPON REFITTING, INSERT THE TAB «3» CORRECTLY IN ITS SLOT.
To reach the fuses (MC125):
NOTE
HANDLE PLASTIC AND PAINTED COMPONENTS WITH CARE; DO NOT SCRATCH OR SPOIL THEM.
- Open the glove-box.
- Undo the two screws «4» and remove the battery cover «5».
LET OP

PLAATS HET VOERTUIG OP EEN VASTE EN VLAKKE ONDERGROND.
• Take out one fuse at a time and
check if the filament is broken.
• Before replacing the fuse, find
and solve, if possible, the rea-
son that caused the problem.
- If the fuse is damaged, replace it with another of the same amperage.
NOTE
IF THE SPARE FUSE IS USED, SUPPLY ANOTHER OF THE SAME TYPE IN THE CORRESPONDING FITTING.
• Refit the battery cover (M50 - MC50).
N.B.
BIJ DE HERMONTAGE PLAATST MEN DE LIPJES CORRECT IN DE SPECIA-LE ZITTEN.
Voor de controle:
7.5A Fuse «6» From key-switch to: start-up relay and circuit, fuel level sensor and circuit, horn, tail lights and instrument panel lighting, turn indicators and circuit, stop light and
PLAATS VAN DE ZEKERINGEN (MC50)
BEFORE REPLACING A BULB, TURN THE IGNITION SWITCH TO "KEY OFF" AND WAIT A FEW MINUTES FOR THE BULB TO COOL OFF.
WEAR CLEAN GLOVES OR USE A CLEAN DRY CLOTH TO REPLACE THE BULB.
DO NOT LEAVE PRINTS ON THE BULB AS THIS MAY CAUSE IT TO OVERHEAT OR EVEN BLOW OUT. IF YOU TOUCH THE BULB WITHOUT WEARING GLOVES, CLEAN OFF PRINTS WITH ALCOHOL TO AVOID DAMAGING THE BULB.
DO NOT FORCE ELECTRICAL CABLES.
LET OP

VOORALEER MEN EEN LAMPJE VERVANGT, PLAATST MEN DE ONTSTE-KINGSSCHAKELAAR IN POSITIE «OFF», EN WACHT MEN ENKELE MINUTEN ZODAT DEZE KAN AFKOELEN.
WANNEER MEN HET LAMPJE VERVANGT, DRAAGT MEN REINE HANDSCHOENEN OF GEBRUIKT MEN EEN REIN EN DROOG DOEK.
LAAD GEEN AFDRUKKEN ACHTER OP HET LAMPJE, OMDAT HET KAN OVERVERHITTEN EN DUS STUK KAN GAAN. WANNEER MEN HET LAMPJE MET DE BLOTE HANDEN AANRAAKT, REINIGT MEN DE EVENTUELE AF- DRUKKEN MET ALCOHOL, OM TE VERMIJDEN DAT HET WORDT BE- SCHADIGD.
FORCEER DE ELEKTRISCHE KA- BELS NIET.
BULBS AND WARNING LIGHTS (MC50)
Front light group (03\_25, 03\_26, 03\_27, 03\_28)
In the front headlight there are:
• one tail light bulb «1»;
- one low-/high-beam light bulb «2» (halogen).
To reach the bulbs:
- Park the vehicle on its centre stand.
- Undo and remove the screw «16» (operate both sides of the vehicle).
- Remove the headlamp ring nut «17».
NOTE
UPON REFITTING, INSERT THE FIXING TAB «18» CORRECTLY IN ITS SLOT.
CAUTION

PROCEED WITH CAUTION.
DO NOT FORCE ELECTRICAL CABLES.
- Partially remove the parabole «3».
For replacement:
TAIL LIGHT BULB
CAUTION

DO NOT PULL THE ELECTRICAL CABLES WHEN TAKING OUT THE BULB HOLDER.
- Hold the bulb holder «4», pull and extract it from its fitting.
N.B.
BIJ DE HERMONTAGE MOET HET KLEMLIPJE «18» CORRECT IN DE SPECIALE ZIT GEPLAATST WORDEN.
LET OP

WEES VOORZICHTIG BIJ HET GE-BRUIK.
FORCEER DE ELEKTRISCHE KA- BELS NIET.
- Slide off the tail light bulb «1» and replace it with one of the same type.
LOW-/ HIGH-BEAM LIGHT BULB (HALOGEN)
CAUTION

DO NOT PULL THE ELECTRICAL CABLES WHEN TAKING OUT THE BULB HOLDER.
- Hold the bulb electrical connector «15», pull and disconnect it from the bulb «16».
- Release the spring «17» fixing the bulb «16».
- Extract the bulb from its fitting. When refitting:
NOTE
INSERT THE BULB INTO THE BULB HOLDER, MAKING SURE THE REFERENCE FITTINGS MATCH.
Headlight adjustment (03\_29, 03\_30)
For a quick check of the correct direction of the front light beam, place the vehicle ten metres from a vertical wall and make sure the ground is level.
Turn on the low beam light, sit on the vehicle and check that the light beam projected to the wall is a little below the headlight horizontal straight line (about 9/10 of the total height).
To adjust the light beam:
- Loosen the nut «1».
- Adjust the angle of the head-lamp «2».
• Tighten the nut «1». - Check that nut «1» is adequately tightened.
- Check once again that the head-lamp «2» is adequately directed.
NOTE
IN COMPLIANCE WITH LOCAL LEGIS-LATION, SPECIFIC PROCEDURES
Front direction indicators (03_31, 03_32)
NOTE
THIS PROCEDURE ALSO APPLIES TO REAR TURN INDICATORS.
For replacement:
- Undo and remove the screw «1».
NOTE
BEFORE REPLACING A BULB, CHECK THE FUSES.
NOTE
REMOVE THE PROTECTIVE GLASS WITH CAUTION SO AS NOT TO BREAK THE FITTING TABS «2».
LICHTBUNDEL SPECIFIEKE PROCEDURES AANGENOMEN WORDEN.
INSERT THE BULB IN THE BULB HOLDER SO THAT THE TWO GUIDING PINS COINCIDE WITH THEIR GUIDES ON THE BULB HOLDER.
N.B.
PLAATS HET LAMPJE IN DE LAMPENHOUDER, DOOR DE TWEE GELEIDERPINNETJES TE DOEN OVEREENKOMEN MET DE RESPECTIEVELIJKE GELEIDERS OP DE LAMPENHOU-DER.
• Install a bulb of the same type adequately.
When refitting:
Rear optical unit (03_33, 03_34)
NOTE
(MC50) BEFORE REPLACING A BULB, CHECK THAT THE FUSES AND THE STOP LIGHT SWITCHES WORK PROPERLY.
For replacement:
• Rest the vehicle on its stand.
- Undo and remove the two
screws «1»
- Remove the protection glass
«2».
NOTE
UPON REFITTING, POSITION THE PROTECTIVE GLASS CORRECTLY IN ITS FITTING. THE LOWER SECTION HAS A SHAPED PROFILE.
CAUTION

UPON REFITTING, TIGHTEN THE TWO SCREWS «1» CAREFULLY AND MODERATELY TO AVOID DAMAGING THE PROTECTIVE GLASS.
Achterste optische groep (03_33, 03_34)
N.B.
(M50, MC50) VOORALEER EEN LAMPJE VERVANGEN WORDT, MOETEN DE ZEKERINGEN EN DE EFFICIËNTIE VAN DE SCHAKELAARS VAN DE STOPLICHTEN GECONTROLEERD WORDEN.
Voor de vervanging:
- Slightly press the bulb «3» and turn it anticlockwise.
• Take out the bulb from its fitting.
INSERT THE BULB IN THE BULB HOLDER SO THAT THE TWO GUIDING PINS COINCIDE WITH THEIR GUIDES ON THE BULB HOLDER.
• Install a bulb of the same type adequately.
NOTE
(MC50) CORRECTLY POSITION THE LICENSE PLATE TRANSPARENT GLASS «4» IF IT HAS BEEN PREVIOUSLY REMOVED.
THE FRONT SECTION HAS A SHAPED PROFILE.
NOTE
(MC125) CORRECTLY POSITION THE TRANSPARENT GLASS «4» IF IT HAS BEEN PREVIOUSLY REMOVED.
N.B.
PLAATS HET LAMPJE IN DE LAMPENHOUDER, DOOR DE TWEE GELEIDERPINNETJES TE DOEN OVEREENKOMEN MET DE RESPECTIEVELIJKE GELEIDERS OP DE LAMPENHOU-DER.
THE FRONT SECTION HAS A SHAPED PROFILE.
Number plate light (03\_35, 03\_36)
MC 125 MODEL
For replacement:
- Park the vehicle on its centre stand.
- Unscrew and remove the screw «1».
- Remove the light assembly «2».
CAUTION
DO NOT PULL THE ELECTRICAL CABLES WHEN TAKING OUT THE BULB ELECTRICAL CONNECTOR.
- Hold the bulb holder «3», pull
and extract it from its fitting. - Remove the bulb «4» from its fitting.
• Fit a bulb of the same type adequately.
CAUTION
UPON REFITTING, FIT THE ELECTRICAL CABLE CORRECTLY IN ITS
LICHT «4» CORRECT GEPLAATST WORDEN.
HET VOORSTE DEEL HEEFT EEN GE-FREESD PROFIEL.
Rear-view mirrors (03\_37)
The information below refers to one rear-vie mirror but it applies to both (for countries where a second rear-view mirror is required, M50).
• Park the vehicle on its centre stand.
• Lift the protection cover «1».
- Loosen the nut «2» completely.
- Unscrew and remove the rear-view mirror «3»,
LET OP
BIJ DE HERMONTAGE MOET DE ELEKTRISCHE KABEL CORRECT IN DE SPECIALE ZIT MET GROEF OP DE RECHTER KANT VAN DE GROEP VAN HET LICHT «2» GEPLAATST WORDEN.
Check brake pads for wear and replace them following the instructions in the scheduled maintenance tables.
Disc brake pad wear depends on the use, the riding style and the roads.
Riding your vehicle on dirty or wet streets accelerates wear.
CAUTION

CHECK BRAKE PADS FOR WEAR MAINLY BEFORE EACH RIDE.
To carry out a quick pad check:
- Park the vehicle on its centre stand.
- Remove the brake calliper cover «1».
- Carry out a visual inspection of brake disc and pads.
CAUTION
EXCESSIVE WEAR OF FRICTION MATERIAL MAKES THE PAD METAL SUPPORT GET INTO CONTACT WITH THE DISC, WHICH RESULTS IN A METALLIC NOISE AND SPARKS IN THE CALLIPER; THIS COMPROMISES BRAKING EFFICIENCY AND SAFE RIDING AS WELL AS DAMAGING THE DISC.
- Replace both brake pads when the friction material is worn (even in just one brake pad) to about 1.5 mm (MC125 or even if one of the wear indicators is no longer visible).
TEIT VAN DE SCHIJF WORDEN OP DEZE MANIER GESCHAAD.
natural_image
Technical illustration of a mechanical component with two views: top shows a circular component inserted into a housing, bottom shows a close-up of a switch mechanism (no text or symbols)Periods of inactivity (03\_40, 03\_41)
Take some measures to avoid the side effects of not using the vehicle. Besides, it is necessary to carry out general repairs and checks before garaging the vehicle as one can forget to do so afterwards.
Proceed as follows:
• Empty the fuel tank completely.
- Remove the spark plug.
• Pour a teaspoonful (5 -10 cm ^3 ) of engine oil into the cylinder.
NOTE
PLACE A CLEAN CLOTH ON THE CYLINDER NEXT TO THE SPARK PLUG SEAT TO PROTECT IT FROM POSSIBLE OIL SPLASHES.
- Set the ignition switch to ON» and press the starter button for a few seconds to distribute the oil on the cylinder surfaces evenly.
- Remove the protection cloth.
- Refit the spark plug.
- Remove the battery.
• Wash and dry the vehicle.
• Polish the painted surfaces.
• Uncover and clean the vehicle.
- Check the battery for charge and install it.
- Check that the carburettor drain screws are completely tightened (drain screw closing index.
• Refill the fuel tank.
- Carry out the preliminary checks.
CAUTION

AS A TEST, RIDE THE VEHICLE FOR A FEW KILOMETRES AT A MODER-ATE SPEED AND AWAY FROM TRAFFIC AREAS.
Cleaning the vehicle
Clean the vehicle frequently when it is exposed to adverse conditions, such as:
• Air pollution (cities and industrial areas)
• Salinity and humidity in the atmosphere (seashore areas, hot and wet weather).
• Special ambient/seasonal conditions (use of salt, anti-icing chemical products on roads in winter).
- Make sure to clean off any industrial residue or polluting dirt as well as remove tar stains, dead insects, bird droppings, etc.
- Avoid parking your vehicle under trees; during some seasons, some residues, resin, fruits or leaves containing chemical substances which damage the paint fall from trees.
To clean off dirt and mud deposited from painted surfaces, soften caked dirt with a low-pressure water jet. Sponge off using a car body sponge soaked in a car body shampoo and water solution (2 + 4% parts of shampoo in water).
Then rinse with plenty of water, and dry with a chamois leather.
To clean the engine outer parts, use degreasing detergent, brushes and old cloths.
REMEMBER TO CLEAN THE VEHICLE CAREFULLY BEFORE ANY POLISHING WITH SILICON WAX.
DO NOT USE ABRASIVE PASTES TO POLISH MATT FINISH PAINTWORK.
THE VEHICLE SHOULD NEVER BE WASHED IN DIRECT SUNLIGHT, ESPECIALLY DURING SUMMER, OR WITH THE BODYWORK STILL HOT AS THE CAR SHAMPOO CAN DAMAGE THE PAINTWORK IF IT DRIES BEFORE BEING RINSED OFF.
DO NOT USE LIQUIDS AT TEMPERA- TURES OVER 40 °C WHEN CLEANING PLASTIC PARTS OF THE VEHICLE.
DO NOT AIM HIGH PRESSURE AIR/WATER JETS OR STEAM JETS DIRECTLY TO THE FOLLOWING PARTS: WHEEL HUBS, CONTROLS LOCATED ON THE RIGHT OR LEFT SIDE OF THE HANDLEBAR, BEARINGS, BRAKE PUMPS, INSTRUMENTS AND GAUGES, MUFFLER EXHAUST END, GLOVE-BOX / TOOL KIT, IGNITION / STEERING LOCK SWITCH.
DO NOT USE ALCOHOL, PETROL OR SOLVENTS TO CLEAN RUBBER AND PLASTIC PARTS AND THE SADDLE. USE ONLY WATER AND NEUTRAL SOAP INSTEAD.
LET OP

MEN HERINNERT DAT HET OPPOETSEN MET SILICONENWAS UITGEVOERD MOET WORDEN NADAT MEN HET VOERTUIG ZORGVULDIG HEEFT GEWASSEN.
POETS MATTE LAKKEN NIET OP MET SCHURENDE PASTA'S.
HET WASSEN MAG NOOIT WORDEN UITGEVOERD IN DE ZON, VOORAL NIET IN DE ZOMER WANNEER DE CARROSSERIE NOG WARM IS, OM- DAT DE SHAMPOO DIE VÓÖR HET SPOELEN OPDROOGT DE LAK KAN BESCHADIGEN.
GEBRUIK GEEN VLOEISTOFFEN MET EEN TEMPERATUUR VAN MEER DAN 40°C VOOR HET REINIGEN VAN DE PLASTIC DELEN VAN HET VOER- TUIG.
RICHT DE WATERSTRALEN OF PERSLUCHT OF DAMP NIET OP DE VOLGENDE DELEN: DE NAVEN VAN DE WIELEN, DE COMMANDO'S OP HET RECHTER EN LINKER KANT VAN HET STUUR, DE KUSSENTJES, DE REMPOMPEN, DE INSTRUMENTEN EN DE INDICATORS, DE UITLAAT VAN DE KNALDEMPER, DE DOCUMENTENRUIMTE/GEREEDSCHAPS-
CAUTION
DO NOT APPLY ANY PROTECTIVE WAX ON THE SADDLE OR IT MAY BE-COME SLIPPERY.
KIT, DE ONTSTEKINGSSCHAKELAAR/STUURSLOT.
VOOR DE REINIGING VAN DE RUBBEREN EN PLASTIC DELEN MAG MEN GEEN ALCOHOL OF BENZINE OF OPLOSMIDDELEN, MAAR ENKEL WATER EN NEUTRALE ZEEP GE-BRUIKEN.
LET OP
GEBRUIK OP HET ZADEL GEEN BE- SCHERMENDE WAS, OM TE VERMIJ- DEN DAT HET GAAT SCHUIVEN.
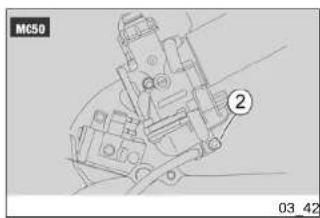
natural_image
Mechanical assembly diagram showing a bracket with labeled parts (no readable text or symbols)IN CASE OF FAILURE, DO NOT HAVE THE VEHICLE TOWED. ASK FOR AN ADEQUATE ASSISTANCE.
EMPTYING THE FUEL TANK
CAUTION

FIRE HAZARD.
ALLOW ENGINE AND EXHAUST SI- LENCER TO COOL OFF.
FUEL VAPOURS ARE HARMFUL TO HEALTH.
BEFORE ANY OPERATION, MAKE SURE THAT THE ROOM WHERE YOU ARE HAS ADEQUATE AIR VENTILA- TION.
DO NOT INHALE FUEL VAPOURS.
DO NOT SMOKE OR USE NAKED FLAMES.
DO NOT DISPOSE OF FUEL INTO THE ENVIRONMENT.
MAAR MOET MEN EEN HULPDIENST CONTACTEREN.
HET LEDIGEN VAN DE BRANDSTOF-TANK
LET OP

BRANDGEVAAR.
WACHT TOT DE MOTOR EN DE KNAL- DEMPER VAN DE UITLAAT VOLLEDIG AFGEKOELD ZIJN.
DE BRANDSTOFDAMPEN ZIJN SCHA- DELIJK VOOR DE GEZONDHEID.
CONTROLEER EERST OF HET LO- KAAL WAAR MEN HANDELT GOED VERLUCHT IS.
ADEM DE BRANDSTOFDAMPEN NIET IN.
ROOK NIET EN GEBRUIK GEEN VRIJE VLAMMEN.
LOOS DE BRANDSTOF NIET IN HET MILIEU.
and put it on the ground to the left of the vehicle.
- Remove the fuel tank cap.
• Use a manual pump or a similar system to empty the fuel tank.
CAUTION
AFTER EMPTYING THE TANK, REFIT THE FUEL TANK CAP ADEQUATELY.
• Refit the fuel tank cap.
To empty the carburettor completely:
- Remove the rear case. - Place the free end of tube «1» inside a container.
- Open the carburettor drain loosening the drain screw «2» under the float chamber.
When all the fuel in the carburettor is drained:
- Loosen the drain screw «2» completely.
CAUTION
TIGHTEN THE DRAIN SCREW «2» CORRECTLY TO AVOID FUEL LEAKS FROM THE CARBURETTOR WHEN REFILLING IT.
| Max. length 1950 mm |
| Max. width 900 mm |
| Max height (to the headlamp) 1120 mm |
| Saddle height 750 mm |
| Wheelbase 1315 mm |
| Minimum ground clearance 140 mm |
| Kerb weight 97 kg |
| Variator transmission Continuous, automatic |
| Main transmission V belt |
| Secondary transmission gear reduction unit |
| Minimum engine total ratio for 3.7 continuous transmission |
| Maximum engine total ratio for 0.78 continuous transmission |
| Fuel capacity (reserve included) 7.5 l |
| Fuel reserve capacity 2 l |
| Transmission oil capacity 130 cm3 |
| Mixer oil capacity (reserve 1.4 l included) |
| Ignition electric + kick starter |
| Clutch centrifugal |
| Gearbox automatic continuous variator |
| Cooling Forced air circulation cooling |
| Carburettor model DELLORTO PHBN 17.5 |
| Carburettor diffuser ∅ 17.5 mm |
| Fuel supply premium unleaded petrol as per DIN 51607, minimum octane rating of 95 (NORM) and 85 (NOMM). |
| Ignition CDI |
| Ignition advance 17^ ± 1^ before TDC |
| Standard spark plug CHAMPION RN1C |
| Spark plug electrode gap 0.6 ÷ 0.7 mm |
| Engine revs at idle speed 1600 ± 200rpm |
| Ignition type CDI / inductive |
| Ignition advance Variable, electronically controlled |
| Spark plug CHAMPION RG6YC |
| Alternative spark plug NGK CR7EB |
| Spark plug electrode gap 0.7 - 0.8 mm |
| Engine revs at idle speed 1,600 ± 200 rpm |
| Low-/high-beam light bulb 12V - 35/35W | |
| Front tail light bulb 12V - 5W | |
| Turn indicator bulb 12V - 10W | |
| Rear tail light /rear stop light/ license plate light bulb | 12 V - 5 / 21 W |
| Instrument panel lighting bulbs 12V - 1.2W | |
| Tail lights and low-beam light warning light | 12V - 1.2W |
| High-beam warning light 12V - 1.2W | |
| Turn indicator warning light 12V - 2W | |
| Low mixer oil warning light | 12V - 2W |
| Low fuel warning light 12V - 2W | |
LAMPJES EN CONTROLELAMPEN (MC50)
BULBS AND WARNING LIGHTS (MC125)
natural_image
Technical diagram of a mechanical component with labeled part (1), no readable text or symbols presentKit equipment (04\_01)
The tool kit is located inside the helmet compartment / glove-box
To reach it:
- Lift the saddle.
• Take the tool kit «1».
The tool kit «1» consists of:
MC50 MODELS
- one toolkit pouch;
- one twin screwdriver;
- one 13-21 mm box-spanner;
- one 8-mm flat wrench.
MC125 MODELS
- one toolkit pouch:
- one twin screwdriver;
- one 16-mm box-spanner:
- one 8-mm flat wrench.
DO NOT HOLD ANY MECHANICAL OR OTHER VEHICLE PARTS WITH YOUR MOUTH: VEHICLE COMPONENTS ARE NOT EDIBLE, ON THE CONTRARY SOME OF THEM ARE HARMFUL AND EVEN TOXIC.
Tabel van het
UNLESS OTHERWISE INDICATED, REFIT THE UNIT FOLLOWING THE REMOVAL STEPS BUT IN REVERSE ORDER.
WHEN CARRYING OUT MAINTENANCE OPERATIONS, IT IS ADVISABLE TO WEAR LATEX GLOVES.
ZIJN INTEGENDEEL SCHADELIJK OF ZELFS GIFTIG.
LET OP
WANNEER HET NIET UITDRUKKE- LIJK IS BESCHREVEN, WORDT DE HERMONTAGE VAN DE GROEPEN IN OMGEKEERDE ZIN VAN DE MONTA- GEHANDELINGEN UITGEVOERD.
BIJ ONDERHOUDSHANDELINGEN RAADT MEN AAN OM LATEX HANDSCHOENEN TE GEBRUIKEN.
In general routine maintenance operations can be carried out by the user; in some cases it is necessary to use specific tools and have some technical knowledge.
If you need assistance or technical advice, consult an Official aprilia Dealer who will provide a precise and prompt service
Ask your Official aprilia Dealer to test the vehicle on the road after a repair or regular maintenance operation.
Nonetheless, personally carry out the Preliminary Checks after a maintenance operation.
| Km x 1,000 1 5 10 15 20 25 | 30 35 | 40 45 | 50 55 | 60 | ||||||||
| Safety locks I I I I I I I I I I I I I | ||||||||||||
| Spark plug I R R R R R R R R | R R R | R | ||||||||||
| Transmission and control cables I I I I I I I I I I I I I I I | ||||||||||||
| Mixer belt R R R | ||||||||||||
| driving belt I R I R I R I R | ||||||||||||
| AIR FILTER C C C C C C C C C | C C C | C C | ||||||||||
| Rear brake shoes | I I I | I I I I I | I I I | |||||||||
| Electrical system and battery | I I I | I I I I I | I I I I | |||||||||
| Braking systems | I I I | I I I I I | I I I I | |||||||||
| Light circuit | I I I | I I I I I | I I I I | |||||||||
| Brake fluid ** I I I I I I I I I I I I I | ||||||||||||
| Exhaust muffler/ silencer | I I I | I I I I I | I I I | |||||||||
| Mixer | I I I | I I I I I | I I I I | |||||||||
| Hub oil | R I R | R I R | R I R | R I R | ||||||||
| Mixer oil* | I I I | I I I I I | I I I | |||||||||
| Rear brake cam pin | L | L | L | L | L | L | L | L | L | L | L | |
| Headlight | A | A | A | A | A | |||||||
| Vehicle and brake test - test ride I I I I I I I I I I I I I I I I I I I I I I I I I I I I I I I I I I I I I I I I I I I I I I I I I I I I I I I I I I I I I I I I I I I I I I I I I I I I I I I I I I I I I I I I I I I I I I I I I I I I | ||||||||||||
| Brake pads | I I I | I I I I I | I I I I I | |||||||||
| Electric start-up gear pins | L | L | L | L | L | |||||||
| Wheels/tyres||||||||| | ||||||||||||
| Variable speed rollers/Sliding blocks R R R | R R R | |||||||||||
| Idle speed A A A A A A | ||||||||||||
| Suspensions||||||||| | ||||||||||||
| Steering||||||||| | ||||||||||||
| Braking system pipes***||||||||| | ||||||||||||
| Mixer oil pipes||||| | ||||||||||||
| Fuel pipes***||||||||| | ||||||||||||
I: INSPECT AND CLEAN, ADJUST, LUBRICATE OR REPLACE IF NECESSARY
C: CLEAN, R: REPLACE, A: ADJUST, L: LUBRICATE
* Check level every 500 km
**Replace every 2 years
*** Replace every 4 years
ROUTINE MAINTENANCE TABLE - MC125 MODEL
| Km x 1,000 | 16 | 1218 | 2430 | 3642 | 4854 | 60 | |||||
| Driven pulley roller casing | L | L | L | L | L | ||||||
| Safety locks | ||||| | | ||||||||||
| Spark plug | I | R | I | R | I | R | I | R | I | R | |
| driving belt | I | R | I | R | I | R | I | R | I | R | |
| Throttle control | A A | A A A A | |||||||||
| Brake disc | |||| | ||||||| | I | ||||||||
5 Programmed maintenance / 5 Gepland onderhoud
| Km x 1,000 1 6 12 18 24 30 36 42 | 48 54 | 60 | |||||||||
| AIR FILTER C C C C C C C C C | |||||||||||
| SAS filter C C C C C | |||||||||||
| Oil mesh filter C C C C C C C C C C | |||||||||||
| Engine oil filter R R R R R R R R R R | |||||||||||
| Valve clearance A A A A | |||||||||||
| Electrical system and battery I I I I I I I I I I I | |||||||||||
| Braking systems I I I I I I I I I I | |||||||||||
| Light circuit | I I I I I I I I I I | ||||||||||
| Brake control levers | L | L | L | L | L | L | |||||
| Brake fluid ** | I I I I I I I I I I | ||||||||||
| Exhaust muffler/ silencer | I | I | I | I | I | ||||||
| Engine oil* | R R | R R R | R R R | R R R | |||||||
| Hub oil | R | I | I | I | R | I | I | I | R | I | I |
| Headlight aiming adjustment | A A | A A A | |||||||||
| Brake pads | I I I I I I I I I | ||||||||||
| Sliding blocks / Variable speed rollers | I | R | I | R | I | R | I | R | I | R | |
| Vehicle road test | I I I I I I I I I | ||||||||||
| Idle speed | A A A A A A | ||||||||||
| Wheels/tyres | I I I I I I I I I | ||||||||||
| Suspensions | I | I | I | I | I | ||||||
| Steering | I | I | I | I | I | I | |||||
| TransmissionsKm x 1,000 1 6 12 18 24 30 36 42 48 | 54 60 | L | L | L | L | L | |||||
| Fuel pipes*** ||| | | | | | | | | | | | | | | | | | | | | | | | | | | | | | | | | | | | | | | | | | | | | | | | | | | | | | | | | | | | | | | | | | | | | | | | | | | | | | | | | | | | | | | | | | | | | | | | | | | | | | | | | | | | | | | | | | | | | | | | | | | | | | | | | | | | | | | | | | | | | | | | | | | | | | | | | | | | | | | | | | | | | | | | | | | | | | | | | | | | | | | | | | | | | | | | | | | | | | | | | | . |
I: INSPECT AND CLEAN, ADJUST, LUBRICATE OR REPLACE IF NECESSARY
C: CLEAN, R: REPLACE, A: ADJUST, L: LUBRICATE
* Check level every 3,000 km
^** Replace every 2 years
*** Replace every 4 years
TABEL VAN HET PERIODIEK ONDERHOUD VERSIE MC50
| Km x 1.000 1 5 10 15 20 25 30 | 35 40 | 45 50 | 55 60 | |||||||||
| Veiligheidsblokkeringen I I I I I I I I I I I I I I I I I I I I I I I I I I I I I I I I I I I I I I I I I I I I I I I I I I I I I I I I I I I I I I I I I I I I I I I I I I I I I I I I I I I I I I I I I I I I I I I I I I I I II | ||||||||||||
| BOUGIE I R R R R R R R R R R R R R | ||||||||||||
| Kabels van de transmissie en de commando's I I I I I I I I I I I I I I I I I I I I I I I I I I I I I I I I I I I I I I I I I I I I I I I I I I I I I I I I I I I I I I I I I I I I I I I I I I I I I I I I I I I I I I I I I I I I I I I I I I I | ||||||||||||
| Riem van de menger R R R | ||||||||||||
| Transmissieriem I R I | R | I R I | R | |||||||||
| LUCHTFILTER | C C | C C C | C C C | C C C | C C | |||||||
| Achterste remblokjes | I I I | I I I I I I | I I I | |||||||||
| Elektrische installatie en accu | I I I | I I I I I | I I I I | |||||||||
| Reminstallaties | I I I | I I I I I | I I I I | |||||||||
| Installatie lichten | I I I | I I I I I | I I I I | |||||||||
| Remvloeistof ** | I I I | I I I I I | I I I I | |||||||||
| Uitlaat/knaldemper | I I I | I I I I I | I I I | |||||||||
| Menger | I I I | I I I I I | I I I I | |||||||||
5 Programmed maintenance / 5 Gepland onderhoud
| Km x 1.000 1 5 10 15 20 25 | 30 35 | 40 45 | 50 55 | 60 | ||||||||
| Naafolie R I R I R I R I R I R | R | |||||||||||
| Olie van de menger* I I I I I I I I I I I I I I I I I I I I I I I I I I I I I I I I I I I I I I I I I I I I I I I I I I I I I I I I I I I I I I I I I I I I I I I I I I I I I I I I I I I I I I I I I I I I I I I I I I I I | ||||||||||||
| Pin van de nok van de achterrem L L L L | L L L L | L L L L | ||||||||||
| Koplamp A A A A A A | ||||||||||||
| Test van het voertuig en reminstallatie - rijtest I | I I I I I I I I I I I I I I I I I I I I I I I I I I I I I I I I I I I I I I I I I I I I I I I I I I I I I I I I I I I I I I I I I I I I I I I I I I I I I I I I I I I I I I I I I I I I I I I I I I I I II | |||||||||||
| Rempastilles I I I I I I I I I I I I I I I I I I I I I I I I I I I I I I I I I I I I I I I I I I I I I I I I I I I I I I I I I I I I I I I I I I I I I I I I I I I I I I I I I I I I I I I I I I I I I I I I I I I | ||||||||||||
| Pin van de overbrenging van de elektrische start | L L L L | L L | ||||||||||
| Wielen/banden | I I I I I I I I I I I I I I I I I I I I I I I I I I I I I I I I I I I I I I I I I I I I I I I I I I I I I I I I I I I I I I I I I I I I I I I I I I I I I I I I I I I I I I I I I I I I I I I I I I II | |||||||||||
| Variatorrollen/schuifsleden | R | R | R | R | R | |||||||
| Minimum regime | A | A | A | A | A | A | ||||||
| Ophangingen | I I I I I I I I I I I I I I I I I I I I I I I I I I I I I I I I I I I I I I I I I I I I I I I I I I I I I I I I I I I I I I I I I I I I I I I I I I I I I I I I I I I I I I I I I I I I I I I I I I | |||||||||||
| Stuur | I I I I I I I I I I I I I I I I I I I I I I I I I I I I I I I I I I I I I I I I I I I I I I I I I I I I I I I I I I I I I I I I I I I I I I I I I I I I I I I I I I I | |||||||||||
| Bebuizing van de reminstallatie*** | I I I I I I I I I I I I I I I I I I I I I I I I I I I I I I I I I I I I I I I I I I I I I I I I I I I I I I I I I I I I I I I I I I | |||||||||||
| Oliebebuizing van de menger | I | I | I | I | I | I | ||||||
| Brandslofbebuizing*** | I I I I I I I I I I I I I I I | |||||||||||
I: CONTROLEREN EN REINIGEN, REGELEN, SMEREN OF VERVANGEN INDIEN NODIG
C: REINIGEN, R: VERVANGEN, A: REGELEN, L: SMEREN
* Controleer het peil eilleke 500 km
** Vervang elke 2 jaar
** Vervang elke 4 jaar
TABEL VAN HET PERIODIEK ONDERHOUD VERSIE MC125
| Km x 1.000 1 6 12 18 24 30 36 42 | 48 54 | 60 | |||||||||
| Rollenkoker van de geconduceerde poelie L L L L L | |||||||||||
| Velligheidsblokkeringen I I I I I I | |||||||||||
| BOUGIE I R I R I R I R I R | |||||||||||
| Transmissieriem I R I R I R I R I R | |||||||||||
| Gascommando A A A A A A A | |||||||||||
| Remschijf I I I I I I I I I I I I | |||||||||||
| LUCHTFILTER | C | C | C | C | C | C | C | C | C | C | |
| Secundaire luchtfilter SAS | C | C | C | C | C | ||||||
| Netoliefilter | C | C | C | C | C | C | C | C | C | C | C |
| Filter van de motorolie | R | R | R | R | R | R | R | R | R | R | R |
| Kleppenspeling | A A | A | A | ||||||||
| Elektrische installatie en accu | I I I I I I I I I I I I | ||||||||||
| Reminstallatias | I I I I I I I I I I I | ||||||||||
| Installatie lichten | I I I I I I I I I I I | ||||||||||
| Commandohendels rem | L L L L L L | ||||||||||
| Remvloeistof ** | I I I I I I I I I I I | ||||||||||
| Uitlaat/knaldemper | I I I I I | ||||||||||
| Motorolie* | R | R | R | R | R | R | R | R | R | R | R |
| Naafolie | R I I I R I I I I R I I | ||||||||||
| Richting van de koplamp | A A | A A A | |||||||||
| Rempastiles I I I I I I I I I I I I | |||||||||||
| Schuifsleden / Variatomrollen I R I R I R I R I R | |||||||||||
| Proefrit I I I I I I I I I I I | |||||||||||
| Minimum regime A A A A A A | |||||||||||
| Wielen/banden I I I I I I I I I I I I | |||||||||||
| Ophangingen I I I I I | |||||||||||
| Stuur I I I I I I | |||||||||||
| Transmissies | L | L | L | L | L | ||||||
| Brandstofbebuizing*** | I I I I I I I I I I |
Product Description Specifications
AGIP GEAR SYNTH SAE 75W-90 Gearbox oil API GL4, GL5
RECOMMENDED PRODUCTS TABLE (MC125)
Product Description Specifications
AGIP CITY HI TEC 4T Engine oil CCMC G-4, API SJ
AGIP FORK 7.5W Fork oil -
AGIP GREASE 30 Bearings and other lubrication points
AGIP BRAKE 4 Brake fluid DOT 5 compatible
AGIP GEAR SYNTH SAE 75W-90 Gearbox oil API GL4, GL5
Maintenance: 67, 139, 140
Mirrors: 113
s
Saddle: 24
Scheduled maintenance:
140
Shock absorber: 37
Spark plug: 76
Stand: 57
Start-up: 23
T
Technical data: 127
Tyres: 73
TREFWOORDENREGISTER
A
ACCU: 85, 93
|
Identificatie: 26
R
Thanks to continuous technical updates and specific training programs on aprilla products, only aprilla Official Network mechanics know this vehicle fully and have the special tools necessary to carry out maintenance and repair operations correctly.
The reliability of the vehicle also depends on its mechanical conditions. Checking the vehicle before riding, its regular maintenance and the use of Original aprilia Spare Parts only, are essential factors! For information about the nearest Official Dealer and/or Service Centre, consult the Yellow Pages or search directly on the inset map in our Official Websites:
www.aprilia.com
Only aprilia Original Spare Parts ensure products already studied and tested during the vehicle design stage. All aprilia Original Spare Parts undergo quality control procedures to guarantee full reliability and duration.
The descriptions and illustrations given in this publication are not binding; while the basic characteristics as described and illustrated in this manual remain unchanged, aprilla reserves the right at any time and without being required to update this publication beforehand, to make any changes to components, parts or accessories, which it considers necessary to improve the product or which are required for manufacturing or construction reasons.
Not all versions/models shown in this publication are available in all countries. The availability of individual versions/models should be confirmed with the official Aprila sales network.
© Copyright 2006- Aprilia. All rights reserved. Reproduction of this publication in whole or in part is prohibited. Aprilia - After-sales service.
Aprilia trademark is property of Piaggio & C. S.p.A.
DE WAARDE VAN DE ASSISTENTIE
- APRILIA WOULD LIKE TO THANK YOU
- APRILIA WIL U BEDANKEN
- Safeguarding the environment
- Bescherming van
- USE 29
- MAINTENANCE.... 67
- VOERTUING....7
- Arrangement of the main components (01\_01, 01\_02, 01\_03, 01\_04)
- KEY - 50 MODEL
- LEGENDE VERSIE 125
- Dashboard (01\_05)
- KEY
- Legenda (01\_05)
- Legende
- CAUTION
- NOTE
- Sleutelschakelaar (01\_06, 01\_07)
- Locking the steering wheel (01\_08)
- Start-up button (01\_12)
- Startknop (01\_12)
- Engine stop button (01\_13)
- Opening the saddle (01\_14)
- Lifting the Helmet Bay (01\_15)
- Characteristic
- LET OP
- Omhoogklappen helmbak (01\_15)
- CHASSIS NUMBER
- ENGINE NUMBER
- Rear top box opening (01\_19)
- MOTORNUMMER
- Bag clip (01\_20)
- Tassenhaak (01\_20)
- Controles
- KEEP OUT OF THE REACH OF CHIL- DREN
- BUITEN BEREIK VAN KINDEREN HOUDEN
- FUEL TANK CAPACITY (including reserve):
- CAPACITEIT VAN DE TANK (inclusief de reserve):
- TANK RESERVE:
- RESERVE VAN DE TANK :
- N.B.
- Recommended products
- AGIP CITY 2T
- RESERVOIR CAPACITY:
- Shock absorber adjustment
- Inrijden (02\_04)
- OTHERS AND/OR DAMAGING THE VEHICLE.
- OF ANDEREN EN/OF SCHADE AAN HET VOERTUIG TE VOORKOMEN.
- ELECTRIC START-UP
- ELEKTRISCHE START
- Versie (MC125)
- KICK START (MC50)
- SCHADE TE VERMIJDEN AAN DE ONDERDELEN VAN DE MOTOR.
- SETTING OFF AND RIDING
- REFUEL AS SOON AS POSSIBLE.
- VERTREK EN RIJDEN
- Difficult start up (02\_14)
- FLOODED ENGINE
- COLD START
- BEFORE SETTING OFF, LET THE ENGINE RUN WITH NO GEAR ENGAGED
- Stopping the engine (02\_15, 02\_16, 02\_17)
- Stand (02\_18, 02\_19)
- RESTING THE VEHICLE ON ITS STAND CENTRE STAND
- Standaard (02\_18, 02\_19)
- PLAATSING VAN HET VOERTUIG OP DE STANDAARD CENTRALE STANDAARD
- Suggestions to prevent theft
- Tips tegen diefstal
- KLEDING
- ACCESSOIRES
- BELASTING
- Engine oil level check (03\_01)
- ELKE KEER MEN HET VOERTUIG GE-BRUIKT.
- NA HET BIJVULLEN, PLAATST MEN DOP «1» OPNIEUW OP CORRECTE WIJZE.
- Engine oil change
- Hub oil level (03\_02, 03\_03, 03\_04)
- AGIP GEAR SYNTH SAE 75W-90
- GEARBOX OIL CHANGE
- Tyres (03\_05, 03\_06)
- (MC125) MODEL
- Removing the air filter
- CHECK BRAKING EFFICIENCY.
- Braking system fluid top up
- VERSIE (MC50)
- BATTERY REMOVAL (MC50)
- VERWIJDERING VAN DE ACCU (MC50)
- PROCEED WITH CAUTION.
- Total removal
- Afterwards:
- BATTERY RECHARGE
- (MC50) Model
- Use of a new battery (03\_19)
- Long periods of inactivity
- To reach the fuses (MC125):
- Voor de controle:
- PLAATS VAN DE ZEKERINGEN (MC50)
- Front light group (03\_25, 03\_26, 03\_27, 03\_28)
- To reach the bulbs:
- Headlight adjustment (03\_29, 03\_30)
- To adjust the light beam:
- For replacement:
- Voor de vervanging:
- Number plate light (03\_35, 03\_36)
- MC 125 MODEL
- Rear-view mirrors (03\_37)
- TEIT VAN DE SCHIJF WORDEN OP DEZE MANIER GESCHAAD.
- Periods of inactivity (03\_40, 03\_41)
- Cleaning the vehicle
- Kit equipment (04\_01)
- MC50 MODELS
- MC125 MODELS
- Tabel van het
- Product Description Specifications
- RECOMMENDED PRODUCTS TABLE (MC125)
- s
- T
- TREFWOORDENREGISTER
- A
- |
- R
- www.aprilia.com
- DE WAARDE VAN DE ASSISTENTIE
Brand : APRILIA
Model : Compay 125 (2008)
Category : Rollerblades