
My Net - Wi-Fi repeater WESTERN DIGITAL - Free user manual and instructions
Find the device manual for free My Net WESTERN DIGITAL in PDF.


| Type of product | Wi-Fi repeater / range extender |
| Brand | Western Digital |
| Model | My Net |
| Dimensions (approx.) | 100 x 60 x 30 mm |
| Weight (approx.) | 150 g |
| Power supply | AC adapter (input: 100-240V, output: 5V/1A) |
| Wireless standard | IEEE 802.11 b/g/n |
| Frequency band | 2.4 GHz only |
| Maximum wireless speed | 300 Mbps |
| Interface | 1 x RJ-45 10/100 Ethernet port |
| Security | WEP, WPA, WPA2 |
| WPS support | Yes |
| Operating temperature | 0°C to 40°C |
| Storage temperature | -20°C to 60°C |
| Humidity operating | 10% to 85% non-condensing |
| LED indicators | Power, WPS, Ethernet, Signal strength |
| Buttons | Reset, WPS |
| Antenna type | Internal |
| Mounting | Desktop or wall-mount (optional) |
| Cleaning and maintenance | Wipe with a soft, dry cloth. Do not use liquid cleaners. |
| Spare parts and repairability | No spare parts available. Device is not user-serviceable. |
Frequently Asked Questions - My Net WESTERN DIGITAL
User questions about My Net WESTERN DIGITAL
0 question about this device. Answer the ones you know or ask your own.
Ask a new question about this device
Download the instructions for your Wi-Fi repeater in PDF format for free! Find your manual My Net - WESTERN DIGITAL and take your electronic device back in hand. On this page are published all the documents necessary for the use of your device. My Net by WESTERN DIGITAL.
USER MANUAL My Net WESTERN DIGITAL
natural_image
Three white and black electronic devices with control buttons and indicator lights, displayed against a white background (no visible text or symbols)WD® Service and Support
Should you encounter a problem, please give us an opportunity to address it before returning this product. Most technical support questions can be answered through our knowledge base or e-mail support service at http://support.wdc.com. If the answer is not available or, if you prefer, please contact WD at the best telephone number shown below.
Your product includes 30 days of free telephone support during the warranty period. This 30-day period starts on the date of your first telephone contact with WD technical support. E-mail support is free for the entire warranty period and our extensive knowledge base is available 24/7. To help us keep you informed of new features and services, remember to register your product online at http://register.wdc.com.
Accessing Online Support
Visit our product support website at http://support.wdc.com and choose from these topics:
- Downloads - Download drivers, software, and updates for your WD product.
- Registration - Register your WD product to get the latest updates and special offers.
- Warranty & RMA Services - Get Warranty, Product Replacement (RMA), RMA Status, and Data Recovery Information.
- Knowledge Base - Search by keyword, phrase, or answer ID.
- Installation - Get online installation help for your WD product or software.
- WD Community – Share your thoughts and connect with other users.
Contacting WD Technical Support
When contacting WD for support, have your WD product serial number, system hardware, and system software versions available.
North America Asia Pacific
| English | 855-842-5370China 800 820 6682/+65 62430496 | Australia | 1 800 42 9861 |
| Spanish | 800.832.4778 | Hong Kong | +800 6008 6008 |
| India 1 800 | 11 9393 (MNTL)/1 800 200 5789 (Reliance)011 26384700 (Pilot Line) | ||
| Europe (toll free)* | 00800 ASK4 WDEU(00800 27549338) | Indonesia | +803 852 9439 |
| Japan | 00 531 650442 | ||
| Korea | 02 703 6550 | ||
| Europe | +31 880062100 | Malaysia | +800 6008 6008/1 800 88 1908/+65 62430496 |
| Middle East | +31 880062100 | Philippines | 1 800 1441 0159 |
| Africa | +31 880062100 | Singapore | +800 6008 6008/+800 608 6008/+65 62430496 |
| Taiwan | +800 6008 6008/+65 62430496 |
* Toll free number available in the following countries: Austria, Belgium, Denmark, France, Germany, Ireland, Italy, Netherlands, Norway, Spain, Sweden, Switzerland, United Kingdom.
Table of Contents
WD® Service and Support 2
1 Important User Information .... 1
Important Safety Instructions .... 1
Recording Your WD Product Information 2
Registering Your WD Product 2
2 Product Overview .... 3
Features. 3
Package Contents 5
Components 6
3 Getting Started 10
Installing the Router on the Network .....10
Using the Setup CD 10
Using a Browser for Setup (Windows or Mac) ..... 13
Installing WD Software from the CD (Optional) 18
4 Basic Settings and Tasks ..... 20
Opening My Dashboard After Setup....20
Understanding My Dashboard .... 21
Connecting to the Internet 23
Configuring Wireless Settings 24
Setting Up External Storage 25
Adding a Device 27
5 Advanced Settings .... 30
Typical Advanced Settings Screen 30
Advanced WAN (Internet) Category 31
Advanced Wireless Category 36
Advanced LAN Category 38
Security Settings Category 42
Additional Features Category 45
Admin Category 50
6 Performing Advanced Tasks .....55
Enabling Guest Access 55
Setting Up Parental Controls 56
Changing the Administrator's Password 62
Accessing Files Stored on an Attached USB Drive 62
Updating the Router's Firmware 66
Restoring the Router to Factory Defaults 67
Rebooting the Router 67
Using the Router as an Access Point 68
Configuring UPnP 71
Enabling Port Forwarding 71
Accessing My Net View 73
7 Installing and Using WD Print Share .....74
Installing WD Print Share (Windows) 74
Using WD Print Share. 75
8 Troubleshooting....76
9 Regulatory and Warranty Information .....77
Regulatory Compliance 77
Warranty Information (All Regions Except Australia/New Zealand). 82
Warranty Information (Australia/New Zealand only) 82
GNU General Public License ("GPL") 84
Appendix: Technical Specifications....85
My Net N600/N750 85
My Net N900 86
Index....87
1
Important User Information
Important Safety Instructions
This device is designed and manufactured to assure personal safety. Improper use can result in electric shock or fire hazard. The safeguards incorporated into this unit will protect you if you observe the following instructions for installation, use, and servicing.
- Read these instructions.
- Keep these instructions.
■ Heed all warnings.
■ Follow all instructions.
■ Do not use this apparatus near water.
■ Clean only with dry cloth. - Do not block any ventilation openings. Install in accordance with the manufacturer's instructions.
- Do not install near any heat sources such as radiators, heat registers, stoves, or other apparatus (including amplifiers) that produce heat.
- Protect the power cord from being walked on or pinched particularly at plugs, convenience receptacles, and the point where they exit from the apparatus.
- Only use attachments/accessories specified by the manufacturer.
■ Unplug this apparatus during lightning storms or when unused for long periods of time. - Refer all servicing to qualified service personnel. Servicing is required when the apparatus has been damaged in any way, such as power-supply cord or plug is damaged, liquid has been spilled or objects have fallen into the apparatus, the apparatus has been exposed to rain or moisture, does not operate normally, or has been dropped.
- Carefully read and follow the Quick Install Guide and User Manual.
- Do not operate this device outside the temperature range of 5°C–35°C (41°F–95°F).
■ Do not drop or shake the device.
■ Do not move the device when it is powered on.
■ Power supply cords should be routed so that they are not likely to be walked on or pinched by items placed upon them or against them. - Do not overload wall outlets.
For additional safety information, refer to www.wdc.com.
Recording Your WD Product Information
In the following table, write the serial and model numbers of your new WD product. You can find this information on the label on the bottom of the device. You should also note the date of purchase. This information may be required when requesting technical support.
| Serial Number: |
| Model Number: |
| Purchase Date: |
| System and Software Notes: |
Registering Your WD Product
Your WD product includes 30 days of free technical support during the applicable warranty period for your product. The 30-day period commences on the date of your first telephone contact with WD technical support. Register your WD product online at http://register.wdc.com.
2
Product Overview
Thank you for purchasing the My Net™ router. This user manual provides step-by-step instructions for installing and using your new router. For the latest WD product information and news, visit our website at www.wdc.com.
This chapter contains the following topics:
Features
Package Contents
Components
Getting Started
Features
The WD My Net dual band routers (My Net N600, N750, and N900 Pro) look similar, their user interfaces are similar, and they work in much the same way. The table below summarizes the features that are different are different.
| Feature My Net N600 | My Net N750 My Net N900 | ||
| Wireless speed1 | 300 Mbps + 300 Mbps | 300 Mbps + 450 Mbps | 450 Mbps + 450 Mbps |
| Wired speed 10/100 Fast Ethernet 10/100/1000 Gigabit Ethernet | 10/100/1000 Gigabit Ethernet | ||
| USB ports (1) USB 2.0 (2) USB 2.0 (2) USB 2.0 | |||
| Ethernet ports (4) RJ45 (4) RJ45 (7) RJ45 | |||
| WMM QoS | √ | √ | √ |
| FasTrackTM | √ | √ | X |
| FasTrack Plus X X | √ | ||
Note: For detailed technical specifications, see "Appendix: Technical Specifications" on page 85.
The following features are common to all of the routers unless specified otherwise.
Easy Setup (for Windows Computers) – Installation software that connects your router and sets up Wi-Fi security, creating a secure wireless home network.
Simultaneous dual band speed ^1 – Enables you to enjoy smooth, uninterrupted video streaming and online gaming.
Wired speed – For My Net N600 and N750 routers, connect up to four Ethernet-enabled devices for fast wired speed within your network. For My Net N900 routers, connect up to seven such devices.
Exclusive FasTrack™ and FasTrack Plus technology – Instantly detect entertainment traffic and deliver smart real-time prioritization for smooth HD streaming to your smart TV, tablet, smartphone, computers, and other Wi-Fi connected devices.
Plug USB storage and printers into your router – Gives you the flexibility to add storage and share files as well as to connect a printer and print from any computer within your network.
DLNA/UPnP media server – An external hard drive connected to a USB port on the My Net router can be used to stream photos, video, and music to any media client on the network.
Internet Security and Parental Controls – Use this feature to block web sites or content based on your preferences.
Guest access – Set up guest access to allow others to use your Internet connection without joining your personal network. While guests will have access to the Internet, they will not have access to your personal files or local resources such as printers.
WPS (Wi-Fi Protected Setup™) security – Use the one-touch WPS button on your router to establish a secure connection between the My Net router and other WPS-enabled Wi-Fi devices such as tablets and notebook computers.
Keep your network up and running – The included network diagnostics tool monitors your network for you. It shows how many devices are on your network, continually analyzes common network connectivity issues and helps correct them when they occur so you are back up and running quickly.
Advanced settings – Users who want to customize and have control over their router can use the Advanced Settings module on the router's internal My Dashboard user interface.
Additional software – The product CD provides additional software:
- WD Quick View runs in the background on your computer and notifies you of important warnings or events on the network. For example, it opens the My Dashboard interface, shows network attached storage status, and opens the public share of an attached USB storage device.
- WD Print Share enables users to share a printer connected to a USB port on the My Net router.
- My Net View diagnoses and detects any issue within the network and recommends ways to address the issue. WD Customer Service also uses this software to get necessary information to support customers with network issues.
Package Contents
In addition to your router, the package contains:
■ Network (Ethernet) cable
■ AC Power adapter
- Setup CD containing setup software, additional software, and product documentation
■ Quick Install Guide on the CD cover
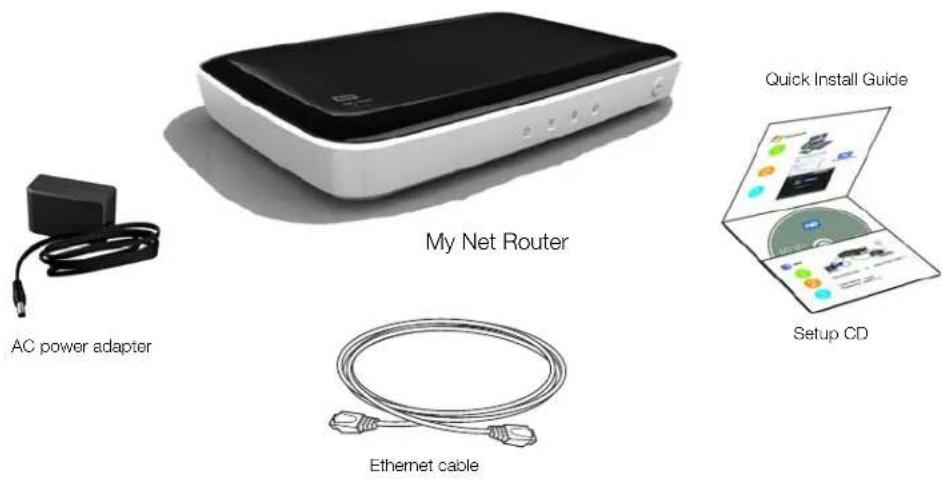
Accessories
For U.S. residents, visit www.shopwd.com to view additional accessories available for your My Net router. For users outside the U.S., visit http://support.wdc.com.
AC Power Adapters
The AC power adapter varies, depending on your location. Some locations do not require a power plug clip. Units sold in those locations will have a fixed power plug. Refer to the illustrations below.
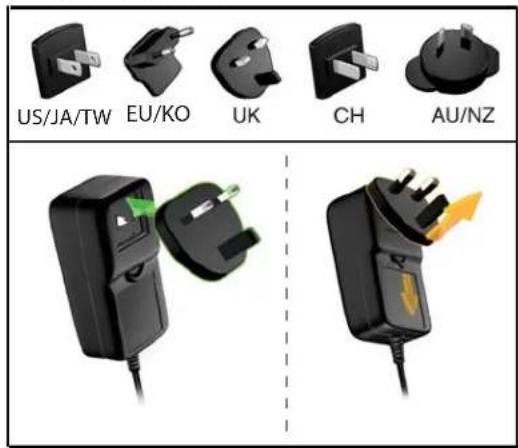
Installing
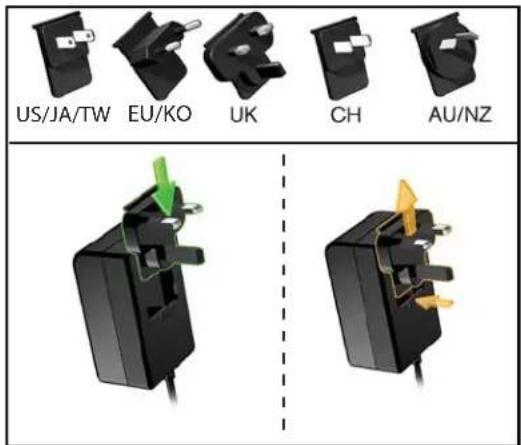
Removing
Installing
Removing
Components
Front Panel
The front panels of the My Net N600, My Net N750, and My Net N900 routers are identical.
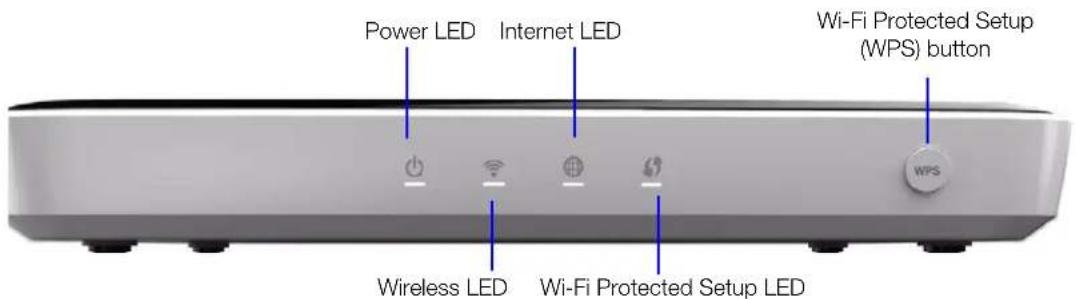
Front panel LED indicators
| LED Description | |
| Power Steady when the router is powered on and operational; flashes slowly during bootup, firmware upgrades, and system self-tests. | |
| Wireless Lit when wireless connection is active. | |
| Internet Lit when Internet connection is active. | |
| Wi-Fi Protected Setup (WPS) | When connecting the router and a wireless device (e.g., a printer) that you want to add to the network, the LED indicates the status of WPS:When WPS is connecting a network device, the light blinks slowly.If an error occurs during setup, the light blinks quickly.After setup, light is solid when WPS is active. |
Front button
| Button Description | |
| WPS (Wi-Fi Protected Setup) button | Enables you to configure Wi-Fi security on WPS-enabled devices. |
Back Panel
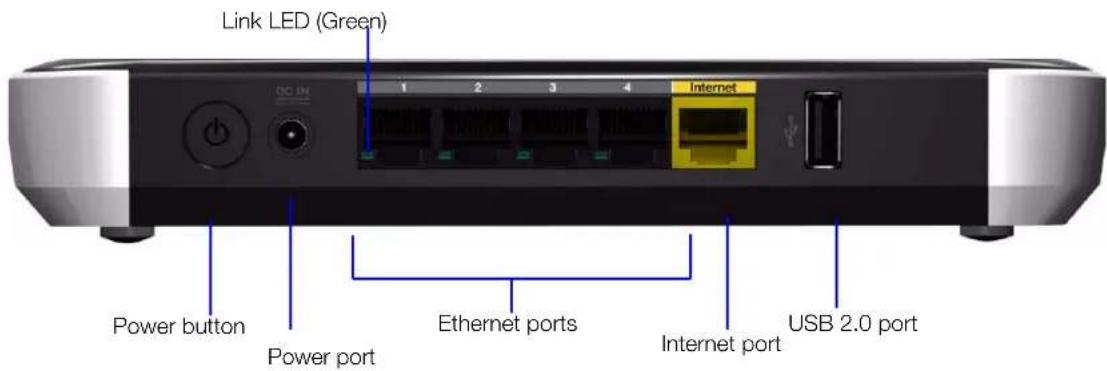
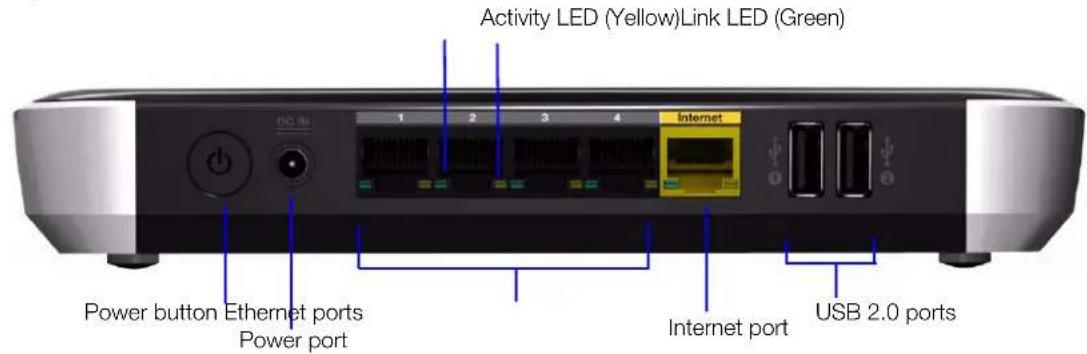
The back panels of the three My Net router models are similar except for the number of USB and Ethernet ports.
My Net N600 router
My Net N750 router
My Net N900 router
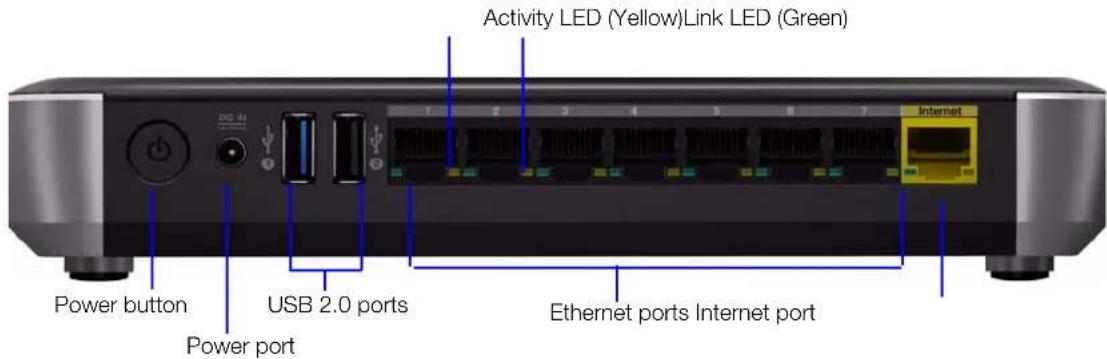
| Component How to use | |
| Internet (WAN) port (yellow) Use an Ethernet (network) cable to connect this port to a modem. | |
| Ethernet (LAN) ports Use Ethernet (network) cables to connect wired network devices to these ports. | |
| Power port Use the included AC power adapter to connect this port to the power source. | |
| Power button Press to turn on the router. Press again to turn off the router. | |
| USB 2.0 port(s) Connect storage devices such as the WD Passport or a printer to your network so you can share files and resources. | |
Port LEDS
| Component LED Description | ||
| Ethernet ports Link LED (Green) | Steady on when a cable | connects the port to a network device's Ethernet port. |
| Activity LED (Yellow) Blinks | to indicate network activity on that Ethernet port. | |
| Internet port Link LED (Green) | On when a cable connects | the port to the modem. |
| Activity LED (Yellow) Blinks | to indicate network activity on that port. | |
Bottom (not shown)
| Component Description | |
| Reset button To reset your My Net router to factory defaults, press and hold the Reset button for at least 10 seconds. When the reset starts, the Power LED blinks. | |
3
Getting Started
This chapter contains the following topics:
Installing the Router on the Network
Using the Setup CD
Using a Browser for Setup (Windows or Mac)
Installing WD Software from the CD (Optional)
Installing the Router on the Network
Two methods install the My Net router on your network:
- Setup CD – The Easy Setup utility for Windows discovers and installs the router on the network. Use the utility to configure the Internet connection, wireless network, and install additional WD software.
- Browser – Mac users must use a web browser to set up the router. Windows users may also use a web browser to set up the router.
Using the Setup CD
Starting Easy Setup (Windows)
Windows XP
- Insert the Setup CD into your computer's CD/DVD drive.
■ If AutoRun (AutoPlay) is enabled, the Choose your setup option screen displays.
- If AutoRun (AutoPlay) is disabled, click Start > My Computer and locate the My Net router CD drive under Devices with Removable Storage. Double-click the CD, and then double-click EasySetup.exe to display the Choose your setup option screen.
- Continue to "Setting up a New Router" on page 11.
Windows Vista/Windows 7
-
Insert the Setup CD into your computer's CD/DVD drive.
-
If a dialog box displays, click Run EasySetup.exe:
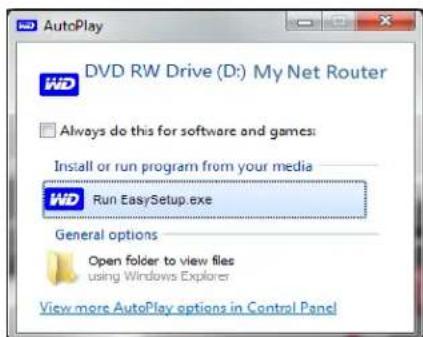
-
If a dialog box does not display, click Start or > Computer and locate the My Net router CD drive under Devices with Removable Storage.
-
Double-click the CD, and then double-click EasySetup.exe to display the Choose your setup option screen.
-
Continue to "Setting up a New Router" below.
Setting up a New Router
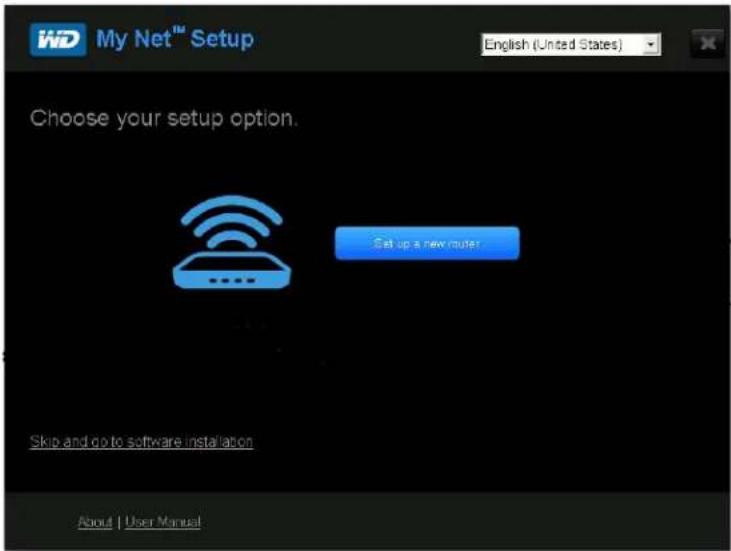
- On the Choose your setup option screen, click Set up a new router. A screen showing a connected router appears:
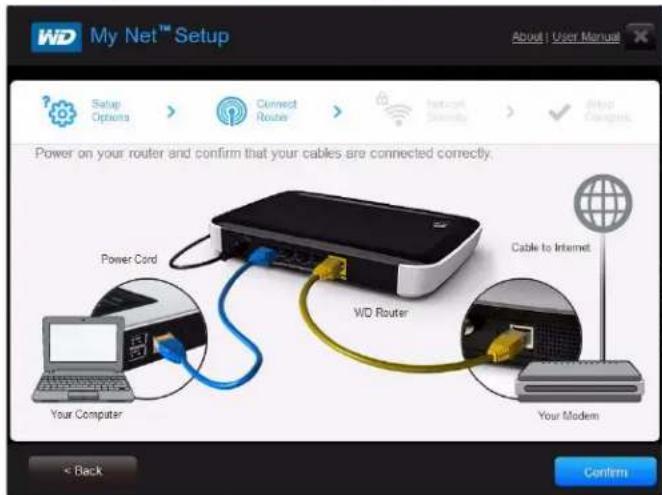
- Make sure that your router is connected properly and click Confirm.
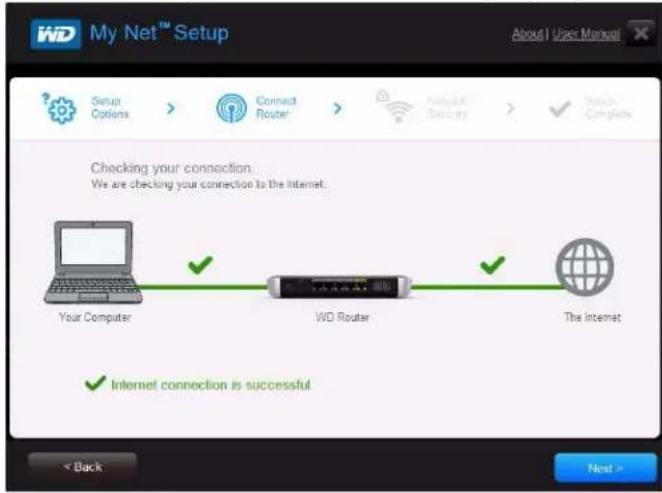
- The utility checks your connection to the router and the Internet. When both connections are confirmed, click Next.
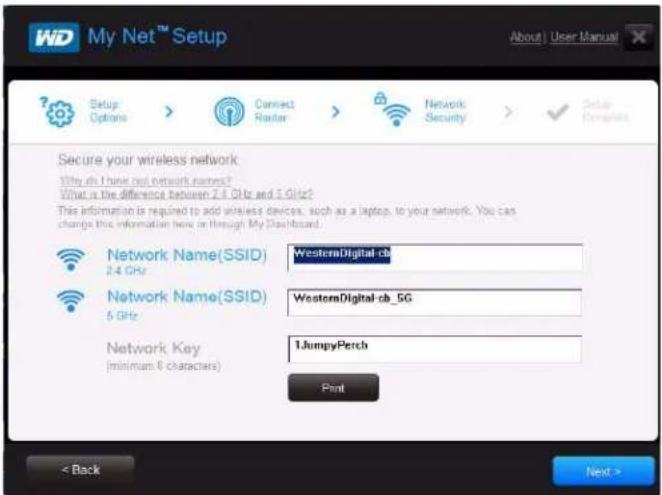
- Follow the instructions in the Easy Setup wizard for configuring the router's wireless settings:
-
Click Print to make a hard copy of the Wireless network settings.
-
Click Next to complete the router's wireless settings.
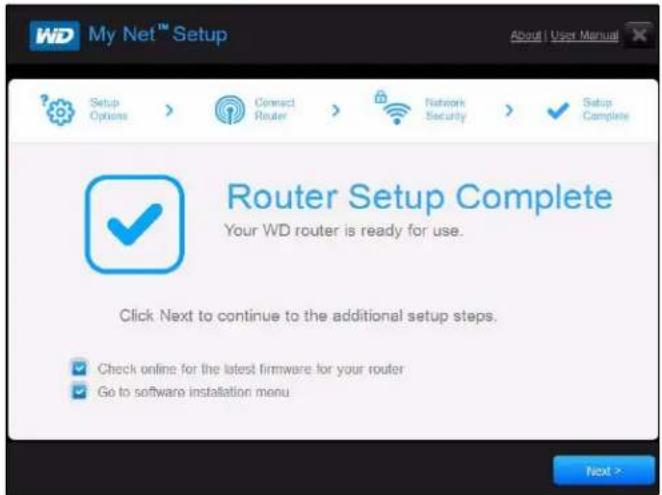
- On the Setup Complete screen, do one of the following:
a. Check online for the latest firmware for your router or go to the software installation menu and select the appropriate check box(es).
Note: For more information on these processes, see "Updating the Router's Firmware" on page 66 and "Installing WD Software from the CD (Optional)" on page 18.
b. To use or configure the router without selecting the other options, clear the check boxes and click Next.
Note: You can install the software from the Setup CD and update the firmware from the My Dashboard user interface at any time.
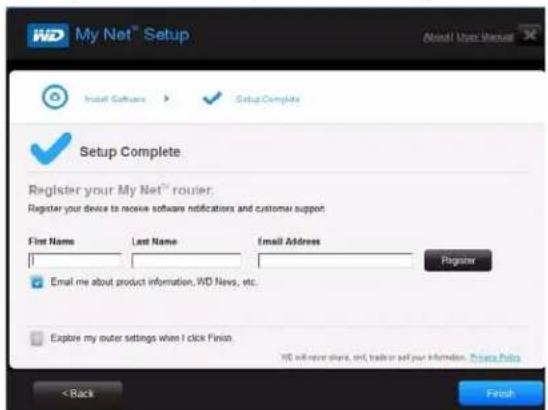
- Register your router to receive software notifications and customer support. Enter your name, email address, and click Register:
- To configure additional router settings, continue with "Basic Settings and Tasks" on page 20.
Using a Browser for Setup (Windows or Mac)
To connect a Mac computer to a My Net router you must use a browser.
Note: Windows users can set up the router using a browser instead of Easy Setup.
The initial physical connection may be wired, as described in “Connecting the Router Physically” below, or wireless, as described in “Connecting to the Router Wirelessly (WD SSID)” on page 15.
Connecting the Router Physically
While the installation wizards for the router lead you through the steps for physically connecting the router, this section is for users who want more specific information and for those who simply want to connect the router and start using it.
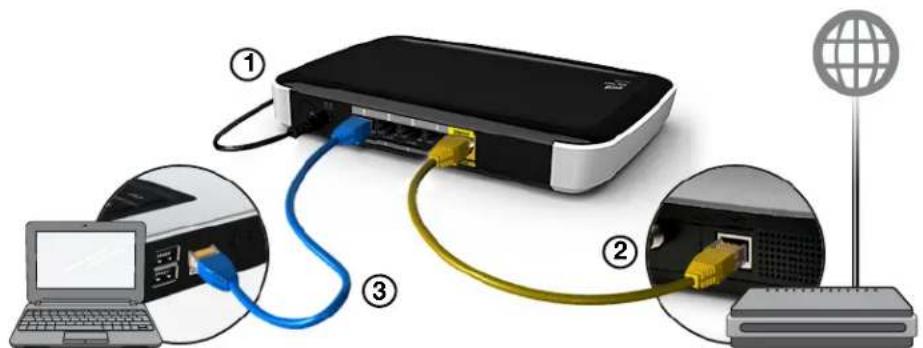
- Connect the power cable to the router's DC connector and into an AC power outlet. Press the On/Off button on the back of the router once to turn it on. The four LEDs on the front panel of the router light up one by one as it boots up.
- Connect the included yellow Internet (Ethernet) cable to the router's Internet port and the the modem.
Note: One Ethernet (network) cable is included in the product package. You can purchase additional cables from the WD Store or another source. - Using Ethernet cables, connect network devices or computers to the router's unused Ethernet ports.
- Continue to "Configuring a New Router" on page 15.
Connecting to the Router Wirelessly (WD SSID)
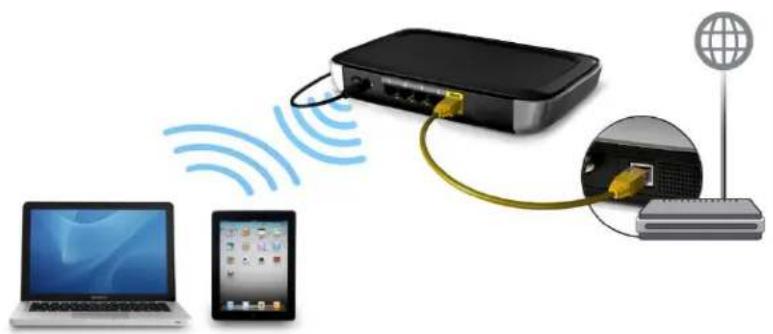
If you are using a desktop computer with a wireless card or a laptop computer with wireless capability, you can connect wirelessly to the router immediately. The same is true of mobile wireless devices with Wi-Fi enabled.
natural_image
Diagram showing wireless network connection between a router, laptop, and mobile device (no text or symbols)- Make sure your computer's Wi-Fi is turned on.
- Select the network WesternDigital from the list of wireless networks on the computer's or device's screen, and connect. By default there is no password. Continue to Configuring a New Router, below.
Configuring a New Router
- Open a browser. (See requirements in "Appendix: Technical Specifications" on page 85.)
- In the address field, type http://wdrouter or http://192.168.1.1. The Welcome screen displays:
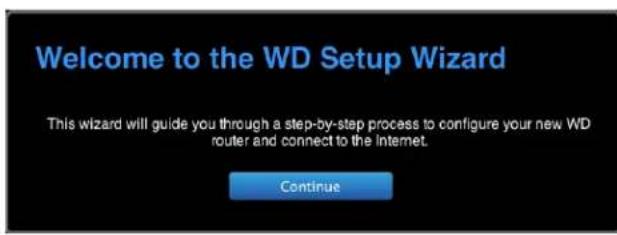
- Click Continue to display the first Connect to Internet screen.
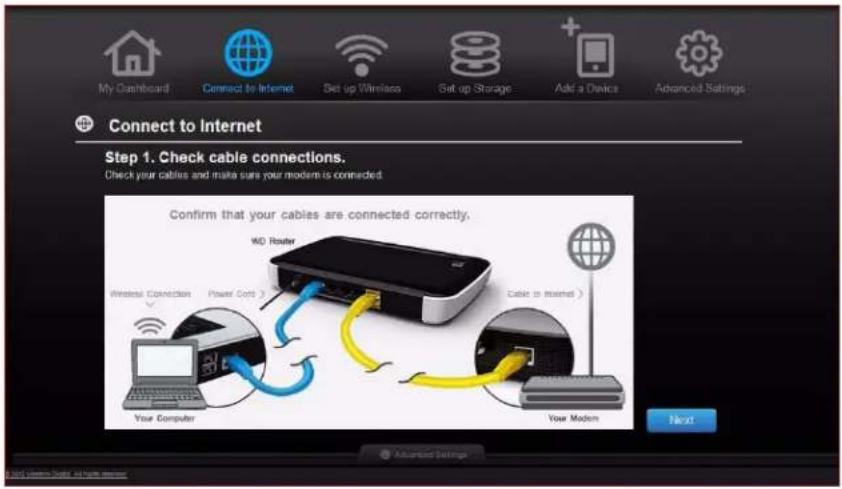
- Make sure that your router is connected properly and click Confirm.
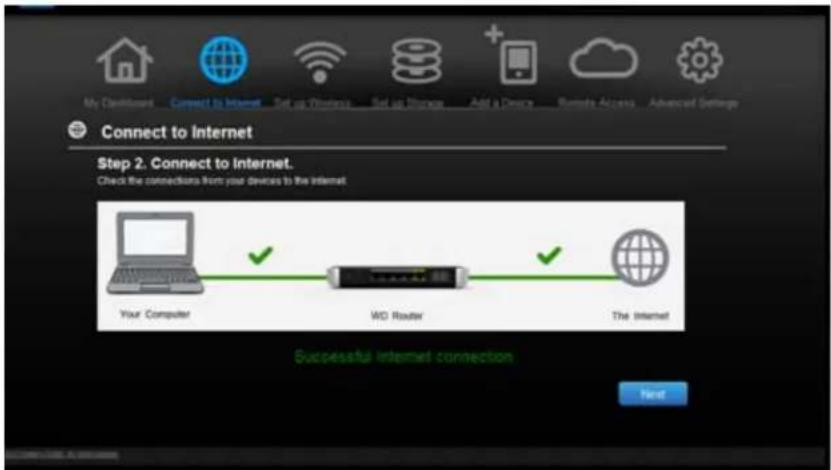
- When both connections are confirmed, click Next.
-
Follow the installation wizard's instructions.
-
When the Set up Wireless screen displays, you can change the Network Name (SSID) and Security Mode for more protection. (See "Configuring Wireless Settings" on page 24 for more information.)
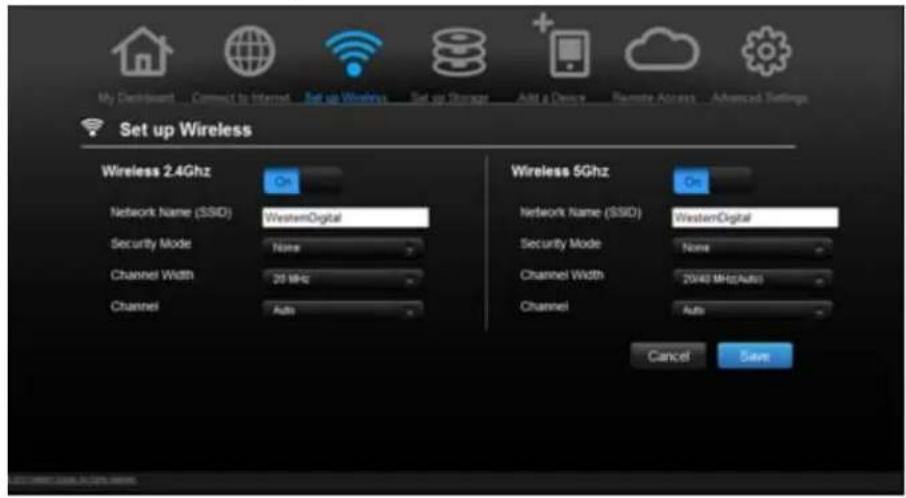
Note: If you do so, you will have to connect your computer or wireless device to the new SSID.
- Click Save.
- Complete the installation wizard, including installing WD Software (optional). For more information, see "Installing WD Software from the CD (Optional)" on page 18.
- Click Finish. The My Dashboard home screen displays.
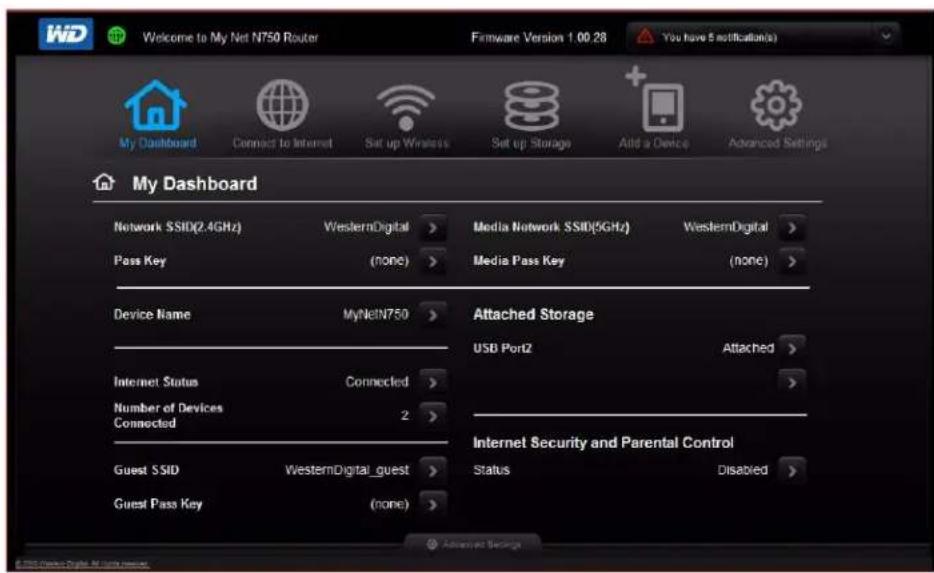
Note: To configure your router, continue with "Basic Settings and Tasks" on page 20.
Installing WD Software from the CD (Optional)
Easy Setup (Windows)
Use Easy Setup to install additional WD software on a Windows computer at any time.
- Start Easy Setup as described in "Using the Setup CD" on page 10.
- On the Choose your setup option screen, click Skip and go to software installation. A list of available software applications displays:
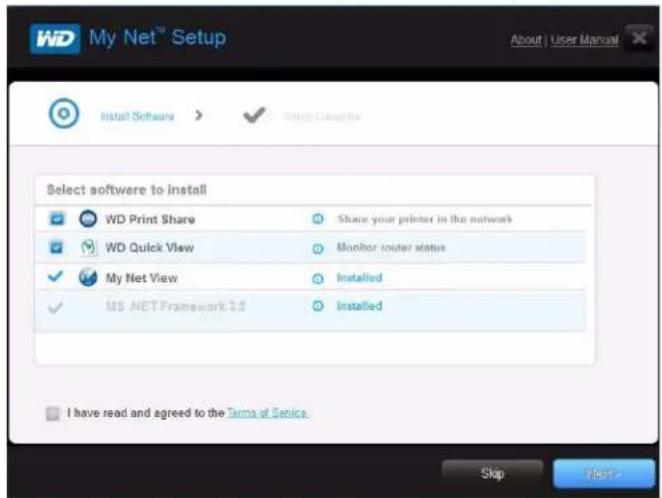
- Click the check boxes for the software you want to install and click Next.
Note: For information about WD Quick View, see "Using WD Quick View (Windows or Mac)" on page 63. For information about WD Print Share, see "Installing and Using WD Print Share" on page 74. For information about My Net View, see "Accessing My Net View" on page 73.
- Complete the wizards to install the software, and then click Finish.
My Net Software (Mac)
Use My Net Setup on the Setup CD to install WD Printshare and WD Quick View on a Mac computer.
- Insert the Setup CD into the CD drive of your Mac computer to display the Welcome to the My Net Setup Installer screen.
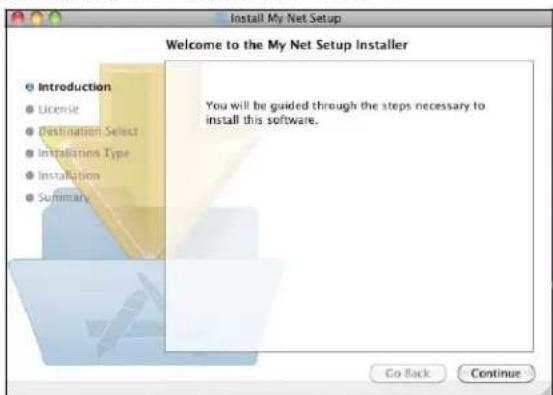
Note: As you follow the steps in the wizard, they appear in bold letters in the list on the left
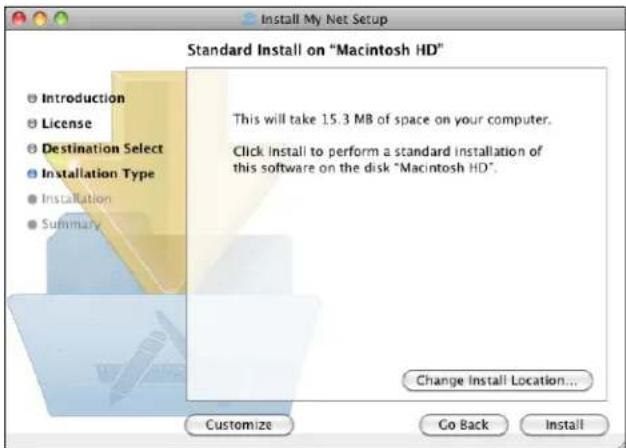
-
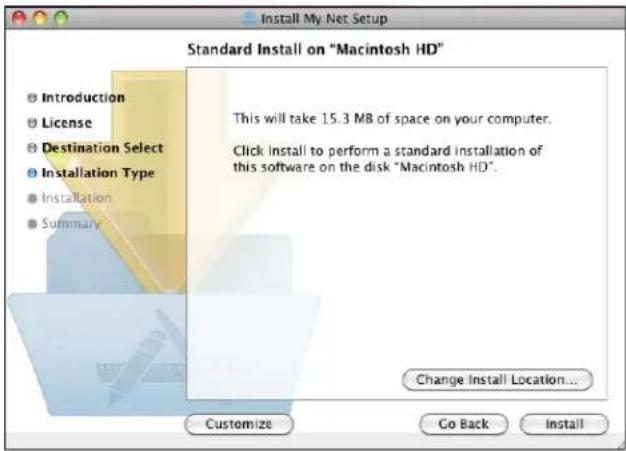
Click Continue to display the Standard Install on "Macintosh HD" screen, which provides several options:
-
To change the where the applications should be installed, click Change Install Location.
- To customize the installation, click Customize and select the applications you want to install.
- To perform a standard installation of WD Quick View and WD Print Share, click Install.
Note: For information about WD Quick View, see "Using WD Quick View (Windows or Mac)" on page 63. For information about WD Print Share, see "Installing and Using WD Print Share" on page 74.

Basic Settings and Tasks
This chapter contains the following topics:
Opening My Dashboard After Setup Understanding My Dashboard Opening My Dashboard After Setup Connecting to the Internet Configuring Wireless Settings Setting Up External Storage Adding a Device
Opening My Dashboard After Setup
To open the My Net router dashboard after initial configuration:
- Enter http://wdrouter or http://192.168.1.1 in the address field of your browser. The Welcome screen displays.
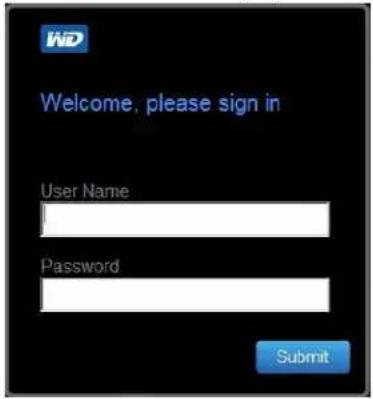
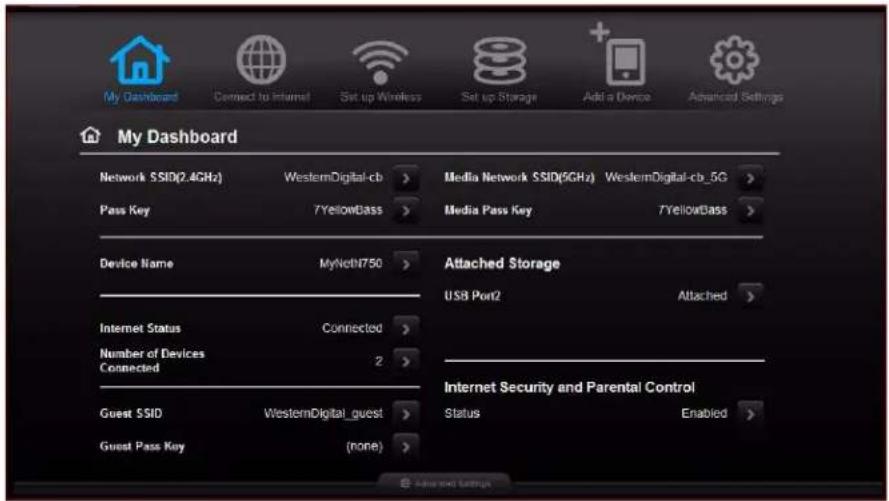
- Enter the router's username (default value is admin) and password (default value is lowercase password) and click Submit. The My Dashboard home screen displays:
Understanding My Dashboard
Basic Dashboard Icons
The icons at the top of the screen open modules and wizards for performing important tasks. The red Alert icon at the upper right of the screen displays notices concerning the router.
| Icon Name Actions See ... | |||
 | My Dashboard Review and change current settings. “Basic Settings and Tasks” on page 20 | ||
 | Connect to Internet | Connect the router to the Internet and follow the wizard through the process of setting up the Internet connection. | “Connecting to the Internet” on page 23 |
 | Set up Wireless Configure wireless settings such as network name and security. | “Configuring Wireless Settings” on page 24 | |
 | Set up Storage Follow the wizard guiding you through setting up a storage device connected to the USB port of the router. | “Setting Up External Storage” on page 25 | |
 | Add a Device Add a wireless device and configure its security settings. | “Adding a Device” on page 27 | |
 | Advanced Settings | Configure advanced settings for Internet connections, wireless connections, storage, devices, system administration, security, and the local network (LAN) settings. | “Advanced Settings” on page 30 |
 | Alert Click to display recent alerts about new firmware and network issues and shortcuts to important settings. | ||
Reviewing Current Settings

The My Dashboard's home screen is a simple snapshot of the router's configuration with the most essential information in one screen. It includes summary information for wireless settings, Internet status, guest network, parental control, and attached hard drive(s).
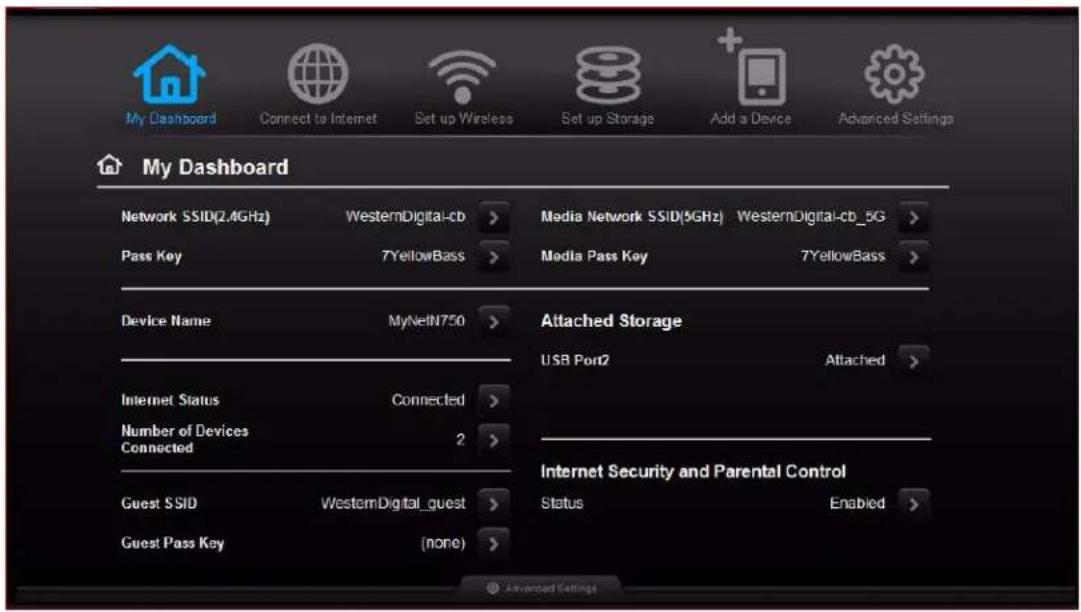
- Review the following settings on the My Dashboard home page. If you used Easy Setup, you may have changed the settings from the defaults already. If not, you can change them here.
| Setting Description | |
| Network SSID (2.4 GHz) Unique identifier of the 2.4 GHz network. | |
| Pass Key Password for accessing the 2.4 GHz network. | |
| Device Name Name assigned to the router. | |
| Internet Status Router is Connected to or Disconnected from the Internet. | |
| Number of Devices Connected Number of devices connected to the router. | |
| Guest SSID To provide guests with limited access to the Internet, you can create a guest network. The guest network is disabled by default. | |
| Guest Pass Key Password for accessing the guest network. | |
| Media Network SSID (5 GHz) | Unique identifier of the 5 GHz network. This network is generally used for media and smart devices because it minimizes interference that might interrupt media streaming. |
| Media Pass Key Password for accessing the 5 GHz network. | |
| Attached Storage Status of a storage device connected to the router’s USB port. | |
| Internet Security and Parental Control status | If status is Enabled, this feature controls access to the Internet by restricting dangerous or undesirable web access. Disabled by default.See “Setting Up Parental Controls” on page 56. |
- To change a setting, click the arrow to the right of the setting to display another screen or a list of options.
Connecting to the Internet

To check or troubleshoot your Internet connection:
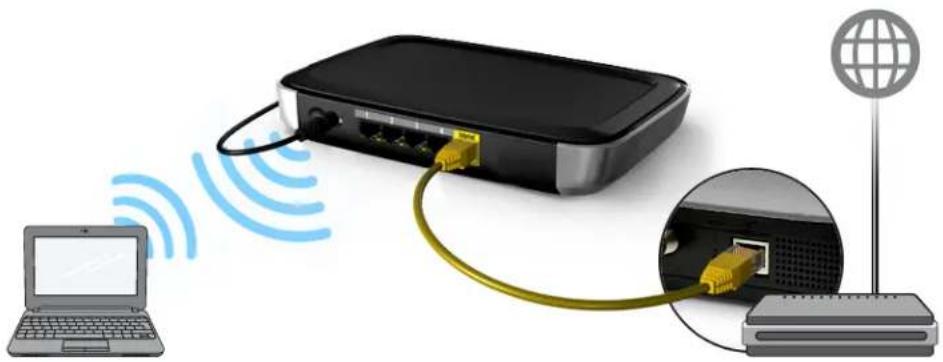
- Click the Connect to Internet icon to display a diagram showing you how to connect the router cables.
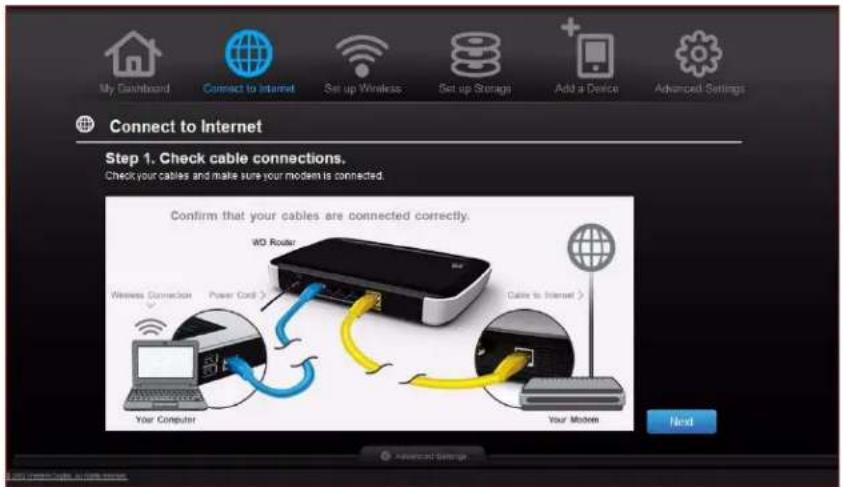
- Click Next. A screen displays the status of the connections: from the computer to the router and from the router to the Internet.
- When a connection succeeds, a check mark displays above it.
a. Click Next to display the Congratulations screen.
b. Click Finished to display the My Dashboard home page again.
- If the connection to the Internet fails:
a. Click Next and enter your Internet service provider account PPPoE Username and Password.
b. Click Next to display the My Dashboard home page again.
Configuring Wireless Settings

Once you configure wireless settings on the router, you can easily connect wireless devices such as notebooks, laptops, tablets, PDAs, or smart phones to the Internet and to other devices on the network.
natural_image
Illustration of a wireless router connected to a laptop and a network tower, with no visible text or symbols.To configure basic wireless settings:
- Click the Set Up Wireless icon at the top of the page. The Set Up Wireless screen displays.
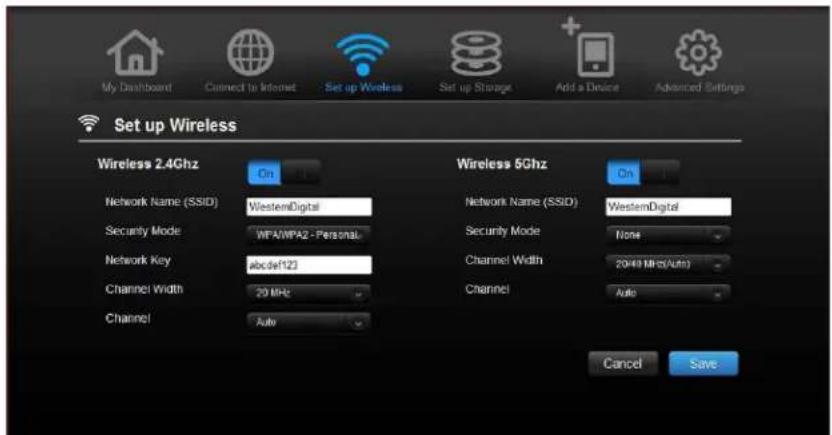
- View or modify the required wireless settings for the 2.4 GHz network and the 5 GHz network.
Note: You can change some settings on this screen. See "Advanced Wireless Category" on page 36 for additional wireless settings.
| Setting Description | |
| On/Off Wireless service is enabled by default. To disable, toggle to the Off setting. | |
| Network Name (SSID) | Name given to the wireless network. |
| Security Mode Type of security applied to the wireless network. The default is WPA-Personal/WPA2-Personal.WPA (Wi-Fi Protected Access) and WPA2 are security protocols that use a dynamically changing key. WPA2 is the second generation protocol that uses stronger AES (Advanced Encryption Standard) encryption. The third option is None.WPA/WPA2 mixed security mode provides better compatibility with legacy devices. However, for better performance and connectivity, WPA2 security mode is highly recommended. | |
| Network Key Password for accessing the wireless network. | |
| Channel Width The default setting is 20/40 MHz (Auto) for the 5 GHz band, This setting is recommended unless you have connectivity issues. The other option is 20 MHz for the 5 GHz band.The default setting is 20 MHz for the 2.4 GHz band. The other option is 20/40 MHz (Auto) for the 2.4 GHz band. | |
| Channel Accept the default (Auto), or select a channel from the drop-down list. | |
3. Click Save.
Setting Up External Storage

You can modify storage settings such as network shares for USB storage device(s) attached to the router.
- Make sure the storage device is properly connected to the router's USB port.
- Click the Set Up Storage icon to display the first screen of the storage wizard.
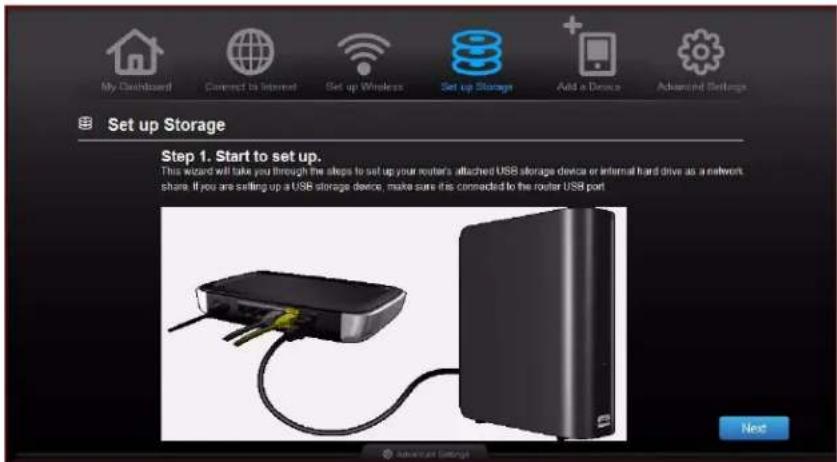
- Click Next to display a list of connected storage devices.
- Select the device you want to set up and click Next to display the Step 3. Share function for storage screen.
Note: If the storage device is locked, enter the device's password as prompted.
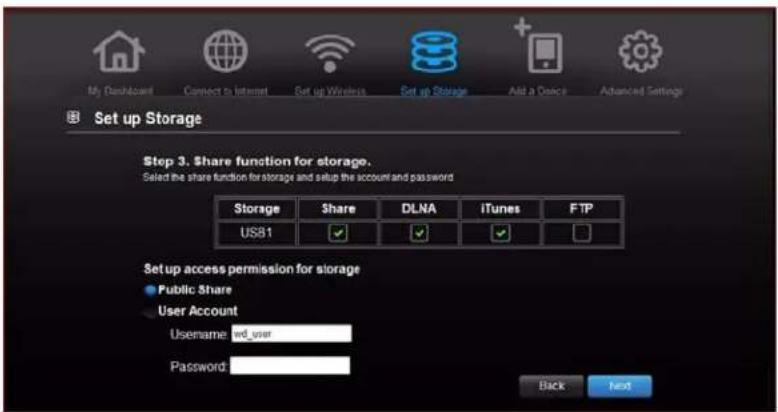
- In the table, select the check box(es) for the desired services. The services allow you to to serve the contents stored on the USB device using Share (SMB), DLNA, iTunes, and FTP.
-
Create or change your user account by entering a user name and password for accessing content on the USB device (e.g., music for iTunes). The default value is Public.
-
Click Next to save your settings.
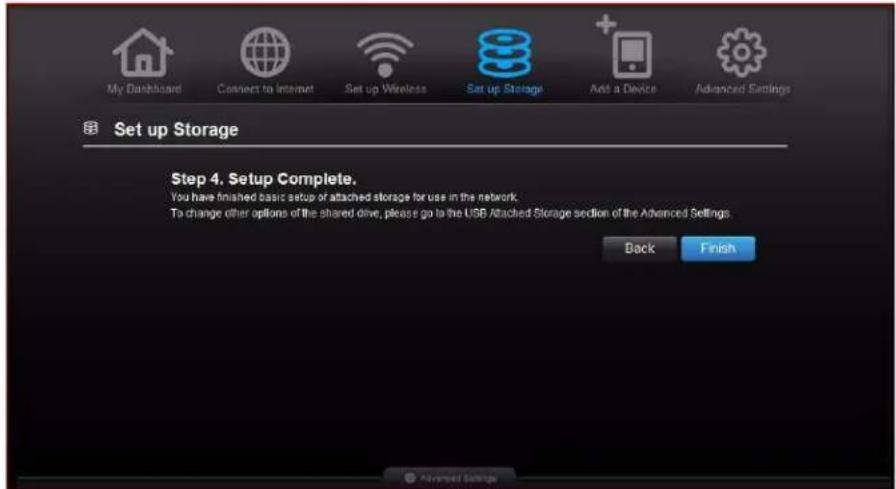
- On the Step 4 screen, click Finish. The My Dashboard home screen appears.
Adding a Device

To connect a WPS-enabled wireless device, press the WPS button on the front of the router or enter a PIN on the device's Wi-Fi connection page. If the device is not capable of WPS, you can still connect to the router using a network name and password.
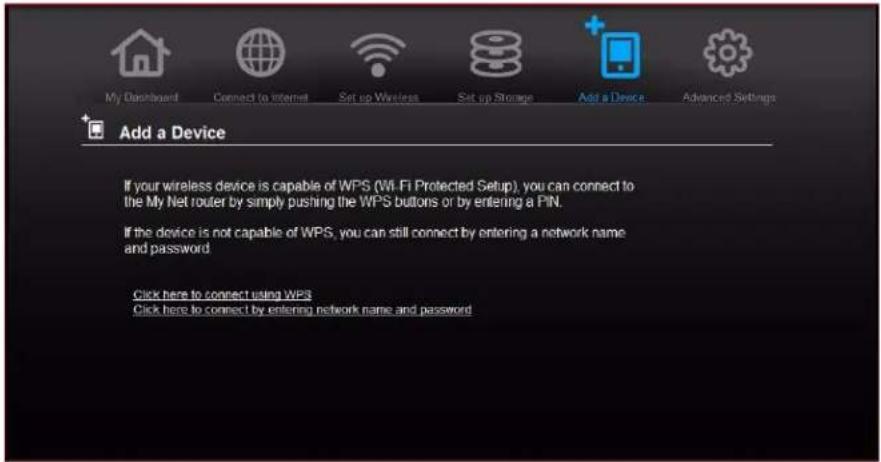
To connect a WPS-enabled device:
- Click the Click here to connect using WPS link to display the screen shown below:
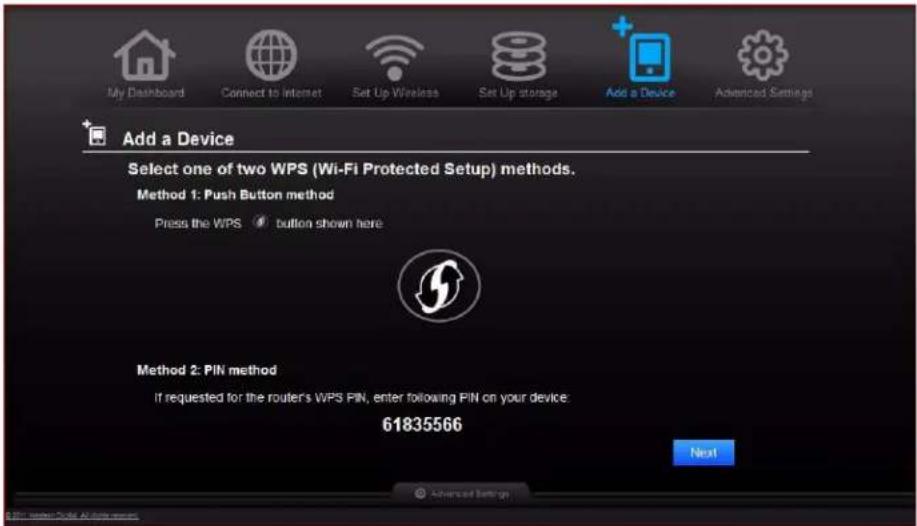
- Select one of the two WPS methods:
a. Method 1: Press the WPS button on the front of the router or click the virtual button on this screen. On your wireless device, press the physical WPS button or click the virtual WPS button.
b. Method 2: If prompted by your wireless device, enter the router's WPS PIN shown on the screen into your wireless device.
Note: The label on the bottom of the router displays the default PIN. You can change the PIN on the Wi-Fi Protected Setup screen. (See "Advanced Wireless Category" on page 36.) Once you change the PIN, the default value is invalid unless you reset the router to default values.
- Click Next.
To connect a device that is not WPS enabled:
- On the Add a Device screen, click the Click here to connect by entering network name and password key.
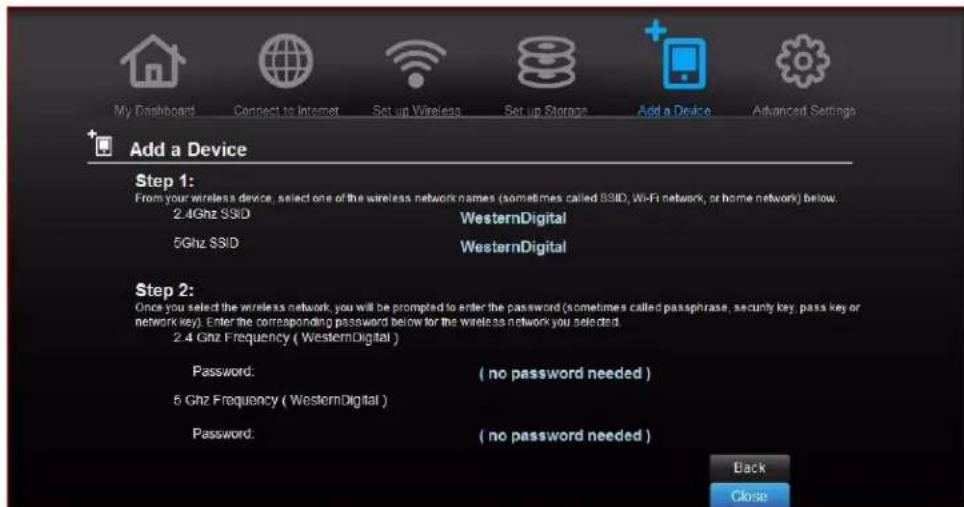
- Using the values shown on the screen, enter the following into your wireless device's Wi-Fi connection screen as prompted:
■ The Wi-Fi network SSID for the wireless network you want to use
■ The password for the wireless network you selected
Note: By default there is no password. If a password was configured during setup, that password displays in the password field.
- Click Close.
5
Advanced Settings

The Advanced Settings icon takes you to screens and icons for entering more detailed settings and configuring more advanced functions than those discussed in the previous chapter.
Note: Another way to access the Advanced Settings screen is to click the arrow to the right of the setting on the basic screen. When a "basic" icon has a small Advanced Settings icon to its upper left, you are configuring that function's advanced settings. For example, the icon for Internet Settings
looks like this:

This chapter contains the following topics:
Typical Advanced Settings Screen
Advanced WAN (Internet) Category
Advanced Wireless Category
Advanced LAN Category
Security Settings Category
Additional Features Category
Admin Category
Typical Advanced Settings Screen
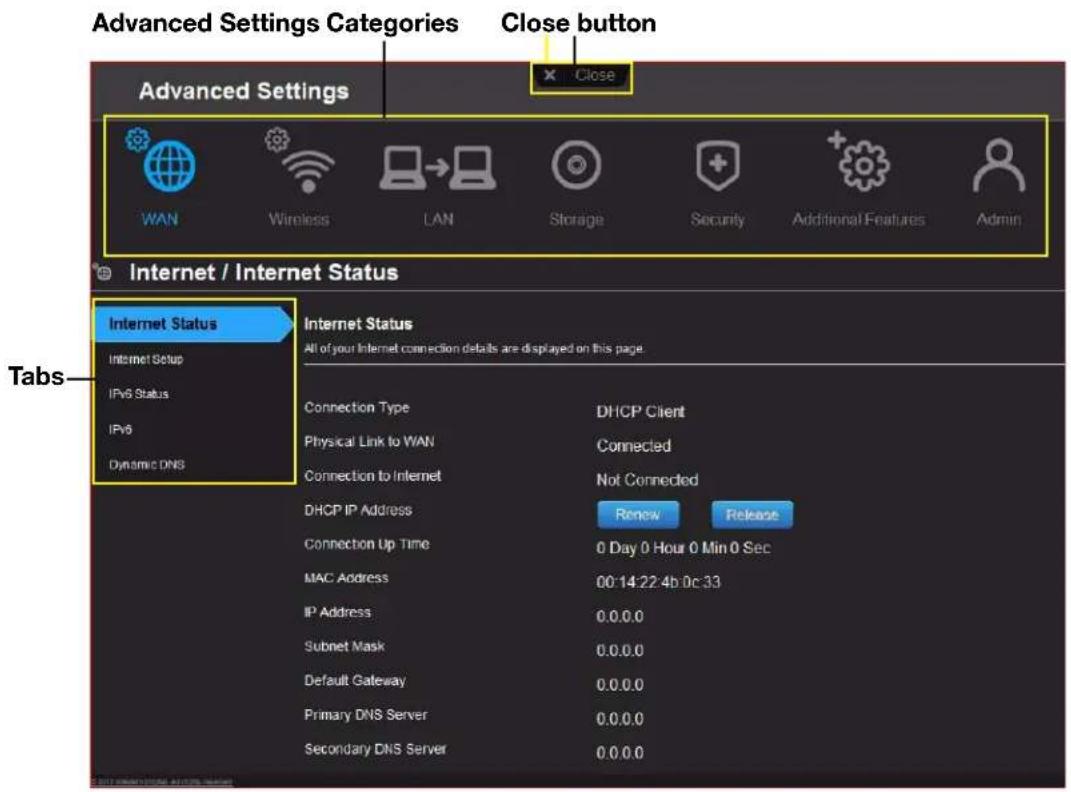
Note: To close an Advanced Settings screen, click the Close button at the top of the screen. The My Dashboard home screen displays.
Advanced WAN (Internet) Category

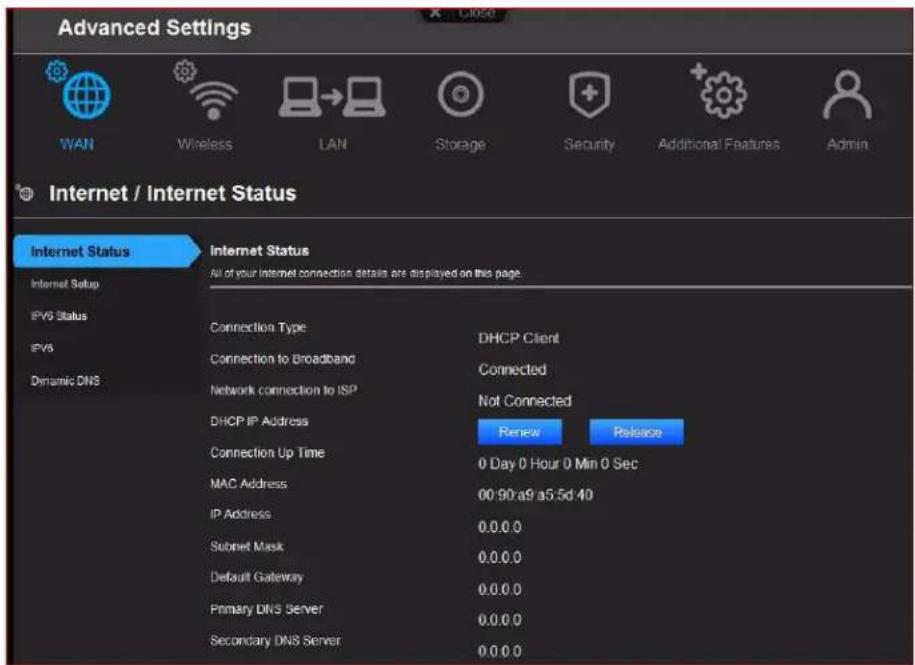
Screen Descriptions
Internet Status – View current Internet connection details. Allows you to renew or release a DHCP IP Address or to connect or disconnect a PPTP/PPPoE connection.
Internet Setup – Configure your Internet connection type.
IPv6 Status – View all Internet and network connection details related to the IPv6 Internet protocol.
IPv6 – Configure the IPv6 connection type and internal network settings of your router.
Dynamic DNS (DDNS) – Host a server (for example, an FTP or a Game server) using a domain name purchased with your dynamically assigned IP address from a DDNS service provider. Once you have DDNS set up, others can just enter your domain name into their browser or FTP client, for example, and connect just as they would to any other site.
Internet Status Screen
| Internet Status | |
| Connection Type Can be Static IP, Dynamic IP (DHCP), PPPoE (Username/Password), or PPTP (Username/Password). | |
| Physical Link to WAN Indicates whether the router has established a physical link to the WAN. | |
| Connection to Internet Indicates whether the router is connected to an Internet Service Provider. | |
| DHCP IP Address IP address assigned dynamically by a DHCP server.Click theRenewbutton to renew the address or theReleasebutton to return it to the pool for other clients. | |
| Connection Up Time Days, hours, minutes, and seconds the connection has been active. | |
| MAC Address Unique identifier that the manufacturer assigns to a device. | |
| IP Address The WAN/Internet IP address assigned to your router by the ISP. | |
| Subnet Mask The Subnet Mask is configured and maintained by your ISP. Check with your ISP for this information. | |
| Default Gateway The IP address of the device to which your router is connected. | |
| Primary DNS Server The primary DNS Server address is configured and maintained by your ISP. Contact your ISP for this information. | |
| Secondary DNS Server The secondary DNS Server address is configured and maintained by your ISP. Contact your ISP for this information. | |
| Internet Connection Type: Static IP | |
| IP Address The WAN/Internet IP address assigned to your router by the ISP. | |
| Subnet Mask The Subnet Mask is configured and maintained by your ISP. Check with your ISP for this information. | |
| Default Gateway The IP address of the device that your router is connected to. | |
| Primary DNS Server The primary DNS Server address is configured and maintained by your ISP. Contact your ISP for this information. | |
| Secondary DNS Server The secondary DNS Server address is configured and maintained by your ISP. Contact your ISP for this information. | |
| MTU (Maximum Transmission Unit) Size (in bytes) of the largest protocol data unit that can be transmitted over the network. | |
| MAC Address Identification number assigned to the router by the manufacturer.Clone Your computer's MAC Address button:Copies the MAC address of the computer that are you currently using into the MAC address field. This allows the router to present your computer's MAC address to your ISP. | |
| Internet Connection Type: Dynamic IP (DHCP) | |
| Primary DNS Server The primary DNS Server address is configured and maintained by your ISP. Contact your ISP for this information. | |
| Secondary DNS Server The secondary DNS Server address is configured and maintained by your ISP. Contact your ISP for this information. | |
| MTU (Maximum Transmission Unit) Size (in bytes) of the largest protocol data unit that can be transmitted over the network. | |
| MAC Address Identification number assigned to the router by the manufacturer.Clone Your computer's MAC Address button:Copies the MAC address of the computer that are you currently using into the MAC address field. This allows the router to present your computer's MAC address to your ISP. | |
| Internet Connection Type: PPPoE (Username/Password) | |
| Address Mode Select to assign the router either a static or a dynamic IP address. | |
| Username Username for accessing the ISP. | |
| Password and Verify Password Password for accessing the ISP. | |
| Service Name Your ISP configures and maintains the Service Name.Contact your ISP for this information. | |
| Reconnect Mode Select one of the reconnect modes for your PPPoE connection:Always On-Your Internet connection will remain connected and reconnect if there is a disconnection from the server.On Demand-Your Internet connection will disconnect after the Idle time has passed. The connection will automatically reconnect when a client attempts to access the Internet.Manual-You can connect or disconnect the Internet connection on the Internet Status page. | |
| Maximum Idle Time Number of minutes the connection can be idle; 0 (zero) means the disconnection can last indefinitely. | |
| DNS Mode Method by which names are associated with IP addresses. | |
| Primary DNS Server The primary DNS Server address is configured and maintained by your ISP. Contact your ISP for this information. | |
| Secondary DNS Server The secondary DNS Server address is configured and maintained by your ISP. Contact your ISP for this information. | |
| MTU (Maximum Transmission Unit) Size | (in bytes) of the largest protocol data unit that can be transmitted over the network. |
| MAC Address Unique identification number | ordered assigned to the router by the manufacturer.Clone Your computer's MAC Address button:Copies the MAC address of the computer that are you currently using into the MAC address field. This allows the router to present your computer's MAC address to your ISP. |
| Internet Connection Type: PPTP (Username/Password) | |
| Address Mode Server address can by dynamic or static. | |
| PPTP Server IP Address IP address of the PPTP server. | |
| Username Username for accessing the ISP. | |
| Password and Verify Password Password for accessing the ISP. | |
| Reconnect Mode Select one of the reconnect modes for your PPPT connection:• Always On -Your Internet connection remains connected and reconnects if the router disconnects from the server.• On Demand -Your Internet connection disconnects after the Idle time has passed. The connection automatically reconnects when a client attempts to access the Internet.• Manual - You can connect or disconnect the Internet connection on the Internet Status page. | |
| Maximum Idle Time Number of minutes | the connection can be idle; 0 means the disconnection can last indefinitely. |
| Primary DNS Server The primary DNS Server address is configured and maintained by your ISP. Contact your ISP for this information. | |
| Secondary DNS Server The secondary DNS Server address is configured and maintained by your ISP. Contact your ISP for this information. | |
| MTU (Maximum Transmission Unit) | Size (in bytes) of the largest protocol data unit that can be transmitted over the network. |
| MAC Address Unique identification number | ordered assigned to the router by the manufacturer.Clone Your computer's MAC Address button:Copies the MAC address of the computer that are you currently using into the MAC address field. This allows the router to present your computer's MAC address to your ISP. |
IPv6 Status Screen
| IPv6 Connection Information | |
| IPv6 Connection Type | Click to select Static IPv6, Auto (SLAAC/DHCPv6), PPPoE or Link-local Only connection type to connect to your ISP. Check with your ISP for this information. |
| IPv6 Default Gateway The IPv6 address of the gateway device to which your router is connected. | |
| LAN IPv6 Link-Local Address The LAN link-local IPv6 address of your router. | |
| LAN IPv6 Computers | |
| IPv6 Address IPv6 address of the computer on the IPv6. | |
| Name (if any) Name of the computer associated with the IPv6 address. | |
IPv6 Screen
| My IPv6 Connection Type | Click to select Static IPv6, Auto (SLAAC/DHCPv6), PPPoE or Link-local Only connection used to connect to your ISP. Check with your ISP for this information. |
| LAN IPv6 Address Setting | |
| LAN IPv6 Link-Local Address Local IPv6 | IP address that has been assigned automatically. |
Dynamic DNS Screen
| Dynamic DNS Settings | |
| Dynamic DNS | Click On or Off to enable or disable dynamic DNS. |
| DNS (Domain Name System) Server System that translates text host names into numeric IP addresses used to uniquely identify any device connected to the Internet. | |
| Host Name The host name (domain name) you configured/purchased from your DDNS service provider. | |
| Username (Email) Username (email) required to access your DDNS account. | |
| Password (Key) and Verify Password (Key) | Password required for accessing your DDNS account. |
| Status Status of whether your router can successfully connect to and update your IP address to the DDNS service. | |
Advanced Wireless Category

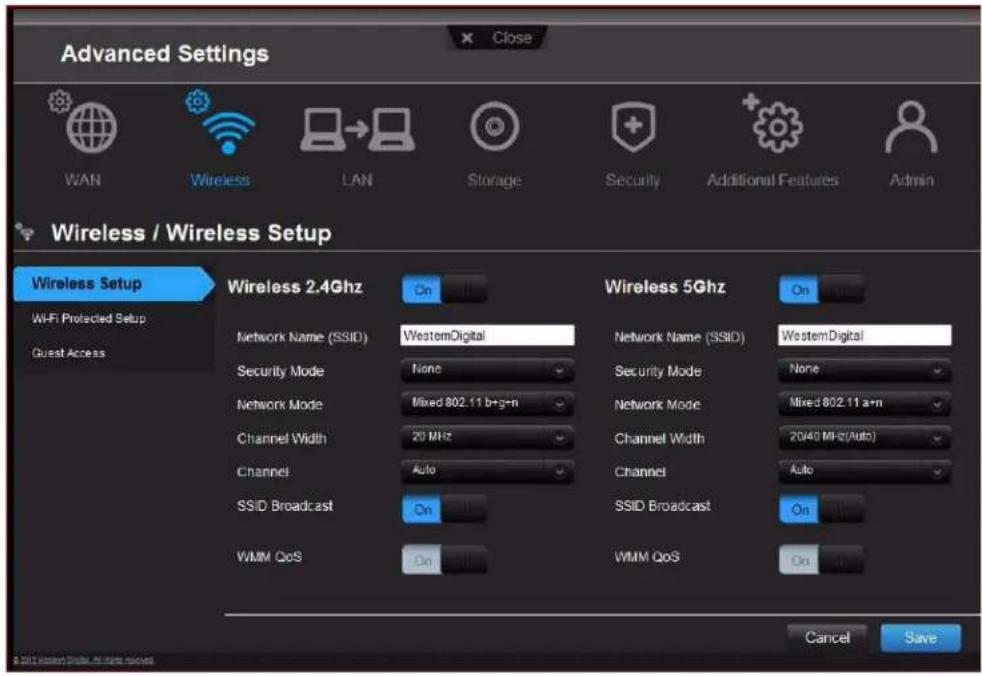
Screen Descriptions
Wireless Setup – Change wireless settings and turn SSID Broadcast and WMM QoS On or Off.
Wi-Fi Protected Setup – Add a new wireless device into this network using the WPS push button or PIN; generate a new PIN or set it to the default value.
Guest Access – Allow visitors access to the 2.4 GHz and 5 GHz wireless bands.
Wireless Setup Screen
| Wireless 2.4 GHz and Wireless 5 GHz | |
| Network Name (SSID) Name given to the wireless network. | |
| Security Mode Type of security being applied to the wireless network. Options include WEP (Wired Equivalent Privacy)-Personal, WPA2-Personal, WPA-Personal, WPA/WPA2-Personal (default), WPA-Enterprise, WPA2-Enterprise, and WPA/WPA2-Enterprise. If 802.11n is selected as the network mode, WEP is not available, but it is available to 802.11b-only, 802.11 g-only, 802.11 a-only, and a mix of these. | |
| Network Key Password for accessing the wireless network. For some Enterprise modes, additional fields display: • Radius Server IP Address • Port • Shared Secret | |
| Network Mode For the 2.4 GHz band, the default network mode is Mixed 802.11 b+g+n. Keep this setting for maximum client compatibility. The other network modes are 802.11b only, 802.11g only, 802.11n only, Mixed 802.11 b+g, and Mixed 802.11 g+n. For the 5 GHz band, the default network mode is Mixed 802.11 a+n. Keep this setting for maximum client compatibility. The other network modes are 802.11a only and 802.11n only. | |
| Channel Width The default setting of 20/40 MHz (Auto) for the 5 GHz network is recommended unless you are having connectivity issues. The default for the 2.4 GHz network is 20 MHz. | |
| Channel Accept the default (Auto) or select a channel from the drop-down list. | |
| SSID Broadcast Your wireless clients identify and connect to your router using the network name or SSID (Service Set Identifier). The SSID broadcast is On by default. For additional security, you can turn SSID broadcast to Off. | |
| WMM QoS WMM (Wi-Fi Multimedia) is a standard that defines quality of service (QoS) in Wi-Fi networks, prioritizes capability, and optimizes video and audio performance. WMM QoS is forced to On (grayed out) when the Network mode set includes 802.11n. If you select any mode not including 802.11n, you have the option to turn WMM QoS Off. |
Wi-Fi Protected Setup (WPS) Screen
| Add new wireless device into this network | |
| Router/Access Point: PIN Code | Personal identification number for WPS authentication. |
| Wi-Fi Protected Setup (WPS) | |
| Enable WPS Enable the router to establish a secure connection to other WPS-enabled Wi-Fi devices. Enabled by default. | |
Guest Access Screen
| Wireless 2.4 GHz and Wireless 5 GHz | |
| Guest Network SSID Accept | the default value or enter another name for the wireless networks. |
| Security Mode The default value is None. If you toggle the Security Mode button to Off, from the drop-down list, select the type of security needed to restrict guess access:WPA/WPA2 - PersonalW PA - PersonalWPA2 - Personal | |
| Network Key Password for accessing the wireless network. | |
Advanced LAN Category
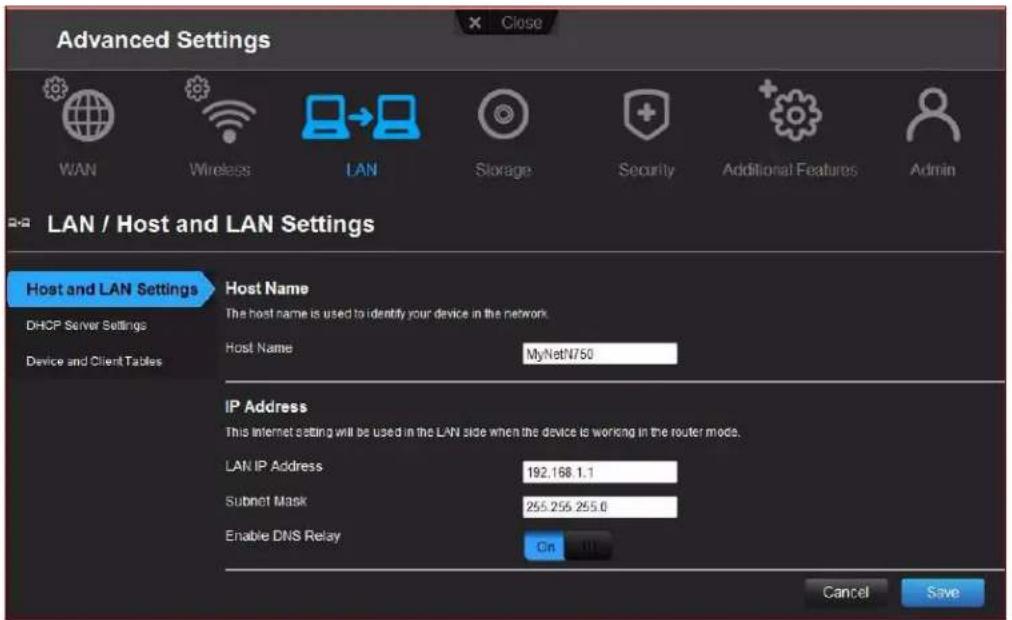
Screen Descriptions
Host and LAN Settings – View and change host name, subnet mask, and LAN IP address, and enable DNS (Domain Name System) relay.
DHCP Server Settings – Enable or disable DHCP server, which provides the IP address to the LAN-side computers dynamically, when your router is working in router mode
Device and Client Tables – View the DHCP client table. This table shows all of the wired and wireless devices that are connected to the router. You can manually add a device to the table.
Host and LAN Settings Screen
| Host Name | |
| Host name Name identifying | the router on the network. |
| IP Address | |
| LAN IP address IP address | of the router on the network (when router is in router mode). |
| Subnet Mask The subnet m | ask is used to control how many subnetworks exist in your local network. The more subnetworks there are, the fewer the hosts you can have per subnet. |
| Enable DNS Relay LAN-side | clients use the router to relay DNS queries to the Internet. |
DHCP Server Settings Screen
| DHCP Server | |
| Enable DHCP Server Enable | the server that provides an IP address to the LAN-side computers dynamically when your router is working in router mode. |
| DHCP IP Address Range Range | Range of IP addresses that can be assigned by the DHCP server. |
| Local Domain Name You can | append a local domain name to your clients' Internet requests to avoid entering the complete address of commonly used Internet domains. (For example, when setting the local domain name wdc.com, entering store in a client's web browser results in a request for store.wdc.com.) |
| DHCP Lease Time Amount | of time for which the device or computer leases the DHCP address. If the client does not renew the lease before it expires, the IP address returns to the pool for other clients. |
Device and Client Tables Screen
| DHCP Client Table | |
| IP Address IP address of a device on your network. | |
| MAC Address Unique identifier of the device being added. | |
| Device Name Name of the device attached to your network. | |
| Lease Time Amount of time remaining for the client's IP address lease. | |
| Manual Add Device | |
| IP address IP address of the device being added on your network. | |
| MAC Address Unique identifier of the device being added. | |
| Device Name Name assigned to the device. |
Advanced Storage Category

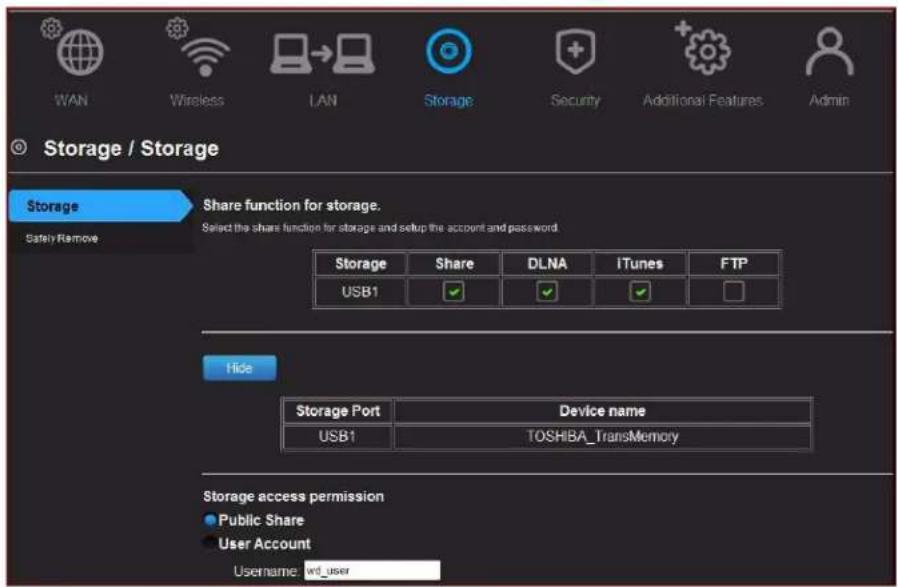
Screen Descriptions
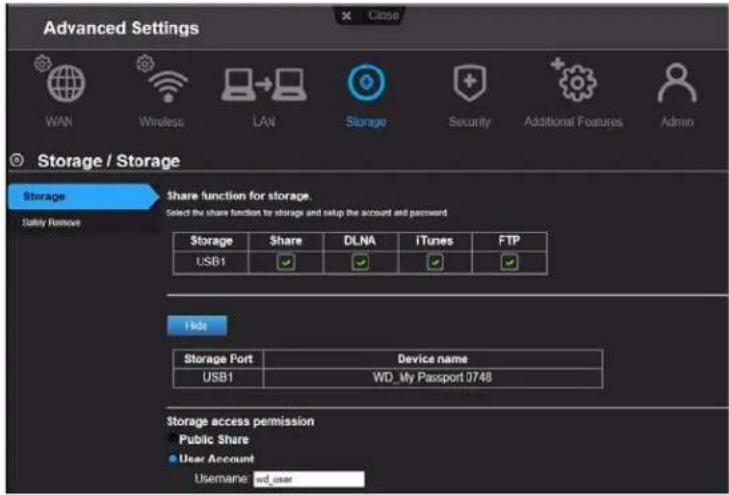
Storage – You can update your user account and storage settings on this screen. (See "Setting Up External Storage" on page 25.)
Safely Remove – Use this screen to safely remove USB storage devices connected to the router's USB port(s).
Storage Screen
| Share function for storage | |
| Storage USB port that the storage device is connected to on the My Net router. | |
| Share | Files sharing service among local network client devices using the SAMBA protocol. |
| DLNA (Digital Living Network Alliance) | Makes stored digital media contents available to networked media players. |
| iTunes | Allows streaming of music to other devices in the network that have iTunes. |
| FTP Uses the File Transfer protocol (FTP) to exchange files over the network. | |
| Show/Hide | |
| Storage Port | Click the Show button to display the number of the port to which the storage device is attached. My Net N600 has one USB port; My Net N750 and My Net N900 have two USB ports. |
| Device name | When you click the Show button, the name of the storage device appears. |
| Set up access permission for storage | |
| User Account Select to enable user account authentication access to the shares/services. | |
| Public Share Select to enable public access (no authentication) to the shares/services. Selected by default. | |
| Username To restrict public access, enter the username of the person being granted access to the share. | |
| Password Enter the password of the person being granted access to the private share. |
Safely Remove Screen
| Remove the storage safely | |
| Storage Port Number of the | port to which the storage device is attached.My Net N600 has one USB port; My Net N750 and My Net N900 have two USB ports. |
| Device name Name of the | storage device. |
| Eject button Click the button | to the right of the USB device name on the table to safely detach the USB storage drive. |
Security Settings Category

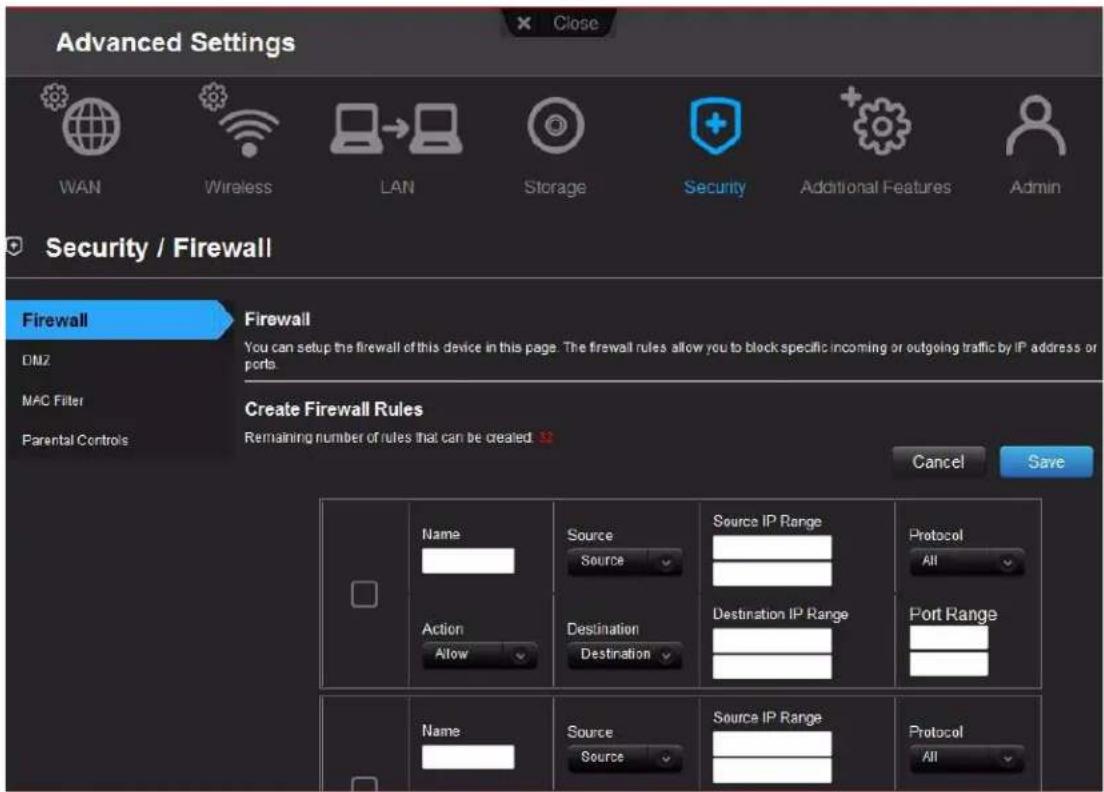
Screen Descriptions
Firewall – Set up a firewall for this router to block specific incoming or outgoing traffic by IP address and/or ports.
DMZ – Set up a DMZ (Demilitarized Zone) to allow computers behind the router firewall to be accessible to Internet traffic. Typically, your DMZ would contain Web servers and FTP servers.
You can set up a single computer on your network outside of the router. If you have a computer that cannot run Internet applications successfully from behind the router, you can place the computer into the DMZ for unrestricted Internet access.
Note: Firewall settings and Port Forwarding Rules supersede the configured DMZ host.
Important: Because of serious security concerns, use this option only as a last resort.
MAC Filter – Control network access based on the MAC address of the client device. The MAC address is a unique ID assigned by the manufacturer.
Parental Controls – Control Internet access to specific websites and access periods. See "Setting Up Parental Controls" on page 56.
Firewall Screen
| Create Firewall Rules | |
| Name Name to identify the | firewall rule. |
| Source Local network (LAN) | or Internet (WAN). |
| Source IP Range Range of | IP addresses where the traffic initiates. |
| Protocol | Protocol that will be applied in the firewall rule. Available options are All, TCP, UDP, and ICMP. |
| Action From the drop-down | list, select whether to allow or deny incoming and outgoing traffic. |
| Destination Local network (LAN) or Internet (WAN). | |
| Destination IP Range Range of | IP addresses where the traffic is destined. |
| Port Range | Network traffic port range that will be applied in the firewall rule. |
DMZ Screen
| DMZ Host | |
| Enable DMZ | Toggle the button toOnto enable DMZ. |
| DMZ IP Address If DMZ is enabled, select a computer from the list and click the double arrows to populate the IP address, or manually enter the computer’s IP address. | |
MAC Filter Screen
| MAC Filtering Rules | |
| MAC Filtering drop-down list | The default setting is Turn MAC Filtering OFF. Other options are:Turn MAC Filtering ON and DENY computers listed to access the network.Turn MAC Filtering ON and ALLOW computers listed to access the network. |
| Active Status of the MAC filtering entry. | |
| MAC Address | Unique identifier of your local network device being filtered. |
| Double arrows | After selecting a computer from the DHCP Client List, click the double arrows to populate the MAC Address box. |
| DHCP Client List | Computers and devices that are currently connected to your router. |
DMZ Screen
| Computer Name Name ass | gned to the computer for easier identification. Click the computer name to populate its MAC address. |
Internet Security & Parental Controls Screen
| Parental Controls | |
| Enable parental control | Toggle the button toOn. |
| Router location 1.From the drop-down list, select the region where the router is located: - USA - EMEA (Europe, Middle East, Africa) - APAC (Asia Pacific)2. ClickApply. | |
| Router Registration (Parental Controls) | |
| Email address Email address to be used for accessing your Parental Control settings. | |
| Password Password to be used for accessing your Parental Control settings. | |
| Device Information | |
| Active | Select to activate parental controls on the associated computer or device. |
| Device name Name assigned to the computer or device on the network. | |
| MAC Address Unique identifier that the manufacturer assigns to a device. | |
Additional Features Category

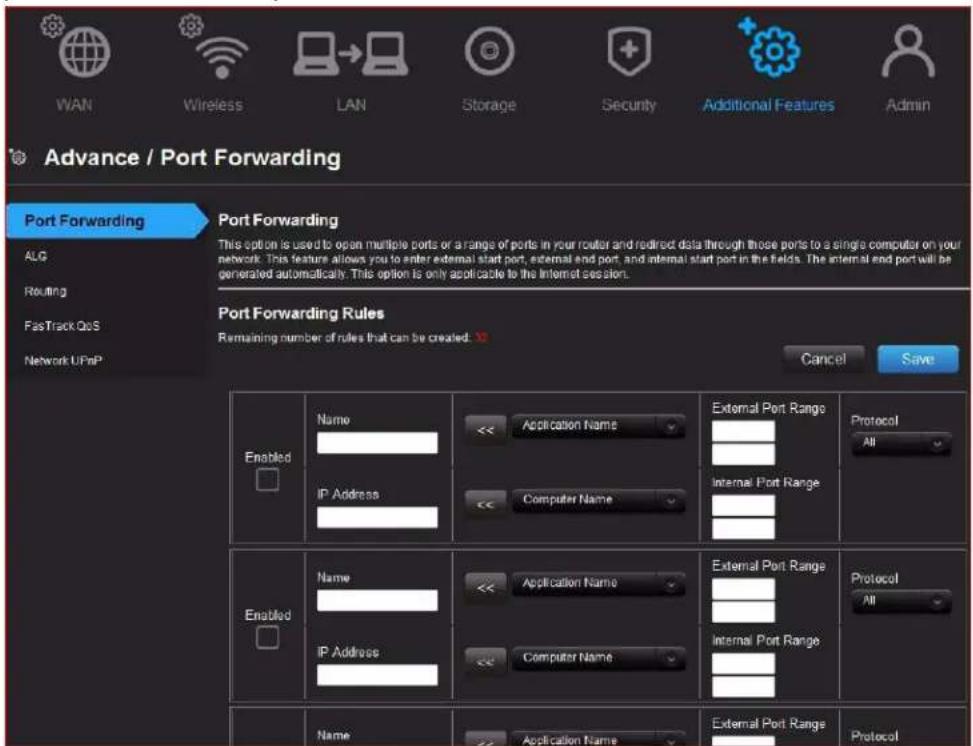
(N600 and N750)
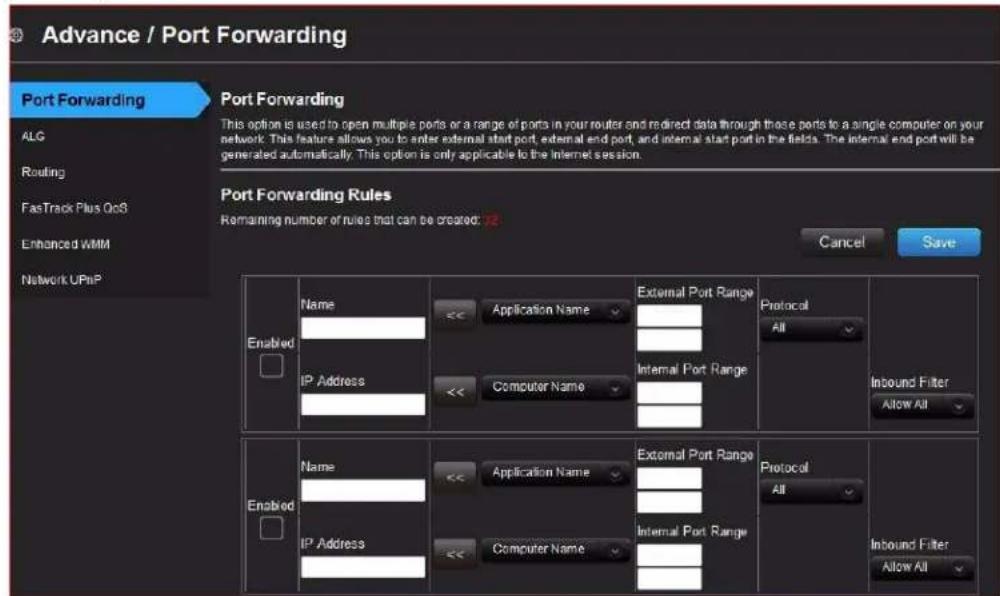
(N900)
Screen Descriptions
Port Forwarding – Open a single port or a range of ports in your router and redirect data through those ports to a single computer on your network. Applies only to an Internet session.
ALG – Enable or disable Application Level Gateway (ALG) configuration. This allows certain clients, such as PPTP, IPSec or SIP, to have temporary firewall rules created automatically when detected by the firewall.
Routing - Define static routes to specific destinations.
FasTrack QoS – (My Net N600 and N750 routers) Configure QoS powered by WD FasTrack QoS technology. This engine improves your media applications and online game experience by prioritizing your game traffic over other network traffic, such as Web traffic. Use QoS rules to set the priority of your applications.
FasTrack Plus QoS (My Net N900 router) – Configure FasTrack Plus QoS powered by WD FasTrack Plus QoS technology. This technology improves your online gaming experience by ensuring that your game traffic is prioritized over other network traffic, such as FTP or Web.
Enhanced WMM (My Net N900 router) –Wi-Fi Multimedia (WMM) refers to QoS (Quality of Service) over Wi-Fi. QoS enables Wi-Fi access points to prioritize traffic and optimizes how different applications share network resources.
Network UPnP – Enable or disable peer-to-peer Plug and Play functionality for network devices
Port Forwarding Screen
| Port Forwarding Rules | |
| Enabled Select to enable the port forwarding rule. Clear the check box to disable. | |
| Application Name From the drop-down list, select the application whose data you want to forward to the client on your local network. Click the double arrows to populate the Name, Internal Port, External Port, and Protocol fields. | |
| External Port Range Enter the port(s) you want to forward from the WAN interface (Internet). The port is automatically populated when you pick an application from the drop-down list. | |
| Protocol Select the protocol that you wish to port forward. The options are All, TCP, and UDP. The protocol will be automatically selected if you pick an application from the drop-down list. | |
| IP Address Can be manually entered or populated by your selection from the Computer Name drop-down list. | |
| Computer Name | Device on your local network to which the rule will be applied. Click the double arrows to populate the IP Address field. |
| Internal Port Range Enter the port(s) on the LAN client to which you want to forward data. The port is automatically populated when you pick an application from the drop-down list. | |
ALG Screen
| Application Level Gateway (ALG) Configuration | |
| PPTP (Point-to-Point Tunneling Protocol) | Turn On (default) PPTP ALG if you use a PPTP client to dial into your corporate network via the Internet. |
| IPSec (VPN) | Turn On (default) IPSec ALG if you use a IPSec client to dial into your corporate network via the Internet. |
| SIP (Session Initiation Protocol) | A signaling protocol for Internet Telephony. Turn On (default) SIP ALG if you use VoIP telephone service over your Internet connection. |
Routing Screen
| Route List | |
| Active Select the check box to enable the routing entry. | |
| Name Enter a name for the routing entry. | |
| Interface Select the interface (WAN or LAN) for the routing entry. | |
| Destination IP IP address/network to which the data is sent. | |
| Netmask Enter a Netmask for the Destination IP to define the destination network. | |
| Gateway Enter the Gateway IP address through which this router can be reached. The Gateway IP should be reachable from your router. |
FasTrak QoS Screen (My Net N600/My Net N750 Routers)
| Enable QoS | |
| Enable QoS | Enable or disable the QoS application to prioritize different client applications/traffic types over the Internet. |
| QoS Setup | |
| Uplink Speed The uplink speed (in Kbps) at which data can be transferred from the router to your ISP. The Auto (default) setting can automatically detect the uplink speed, or you can select other values from the drop-down list or enter your own. QoS prioritizes all Internet traffic based on this setting. | |
| FasTrack Rules | Click theRestore Defaultbutton to restore the default names and priorities. |
| Classification Rules | |
| Name Name given to the service/client for the classification entry. | |
| Priority When creating a rule, select the precedence in which the application or device sends data over the network compared to other applications or devices. The default value is 1-Highest. | |
| TypeFrom the drop-down list, select the option that specifies whether the rule applies to a connected device or to an application. | |
| Detail • For Device rules, specify the LAN IP and/or Remote IP address(es), and protocol(s) for the rule.• For Application rules, specify the Start and End port as well as the protocol for the rule.• The protocols available are TCP, UDP, and Both. | |
| Delete icon Click to delete the row. | |
FasTrack Plus QoS (My Net N900 Router)
| Enable FasTrack Plus QoS | |
| Enable FasTrack Plus QoS | Enable or disable the QoS application to prioritize different client applications/traffic types over the Internet. |
| WAN Uplink Speed | |
| Set Uplink Speed at The uplink speed (in Kbps) at which data can be transferred from the router to your ISP. The Auto (default) setting automatically detects the uplink speed. You can select other values from the drop-down list or enter your own. QoS prioritizes all Internet traffic based on this setting. | |
| Classification Rules | |
| Name Name given to the service/client for the classification entry. | |
| Priority When creating a rule, select the precedence in which the application or device sends data over the network compared to other applications or devices. The default value is 1-Highest. | |
| Protocol Internet protocol for transferring data. Select TCP or UDP. | |
| Local IP Range IP address range of the device(s) on your local network the rule applies to. | |
| Local Port Range Port range of the application(s) on your local network the rule applies to. | |
| Remote IP Range | Remote IP address range of the service on the Internet the rule applies to. |
| Remote Port Range | Remote port range of the service on the Internet the rule applies to. |
Enhanced WMM Screen (My Net N900 Router)
| Enhanced WMM Setup | |
| Enable Enhanced WMM Enhanced WMM is enabled by default. This feature prioritizes the traffic of various wireless (WI-Fi) applications. | |
| Classification Rules | |
| Name Name given to the service/client for the classification entry. | |
| Priority When creating a rule, select the precedence in which the application or device sends data over the network compared to other applications or devices. The default value is 1-Highest. | |
| Protocol Internet protocol for transferring data. Select TCP or UDP. | |
| Local IP Range IP address range of the device(s) on your local network the rule applies to. | |
| Local Port Range Port range of the application(s) on your local network the rule applies to. | |
| Remote IP Range Remote IP address range of the service on the Internet the rule applies to. | |
| Remote Port Range Remote port range of the service on the Internet the rule applies to. |
Network UPnP Screen
| UPnP | |
| Enable/Disable UPnP IGD(Internet Gateway Device) | Toggle to enable or disable Universal Plug and Play functionality for network devices. |
Admin Category
Screen Descriptions
Administrator – The admin account manages the router interface. The admin has read/write access and can create passwords. The default password is password; to keep your router secure, it is a best practice to create a new password. See “Changing the Administrator's Password” on page 62.
Time Settings – Configure, update, and maintain the correct time on the router manually or automatically by NTP (Network Time Protocol).
Firmware Update – Check for router firmware updates and upload new firmware.
System – Save configuration settings on your local hard drive, load configuration settings, or restore factory default settings.
Connection Check – Use ping tests to check connectivity between the router and network/Internet hosts.
Registration – Register your router if you have not already done so. Registering enables WD to notify you of updates to the firmware and send you important information.
Log - Display and save logs generated by the router.
Language – Change language settings.
Device Mode – Configure your router to operate in router mode or extender mode. When the router is used as an access point, extender mode adds wireless capability to your existing network, expanding Internet access to all the computers in your home.
Administrator Screen
| Admin Password | |
| Original Password Enter the ex | existing password for the admin (administrator) account. The default ispassword(all lower case). |
| New Password/Verify New Password | Type the same new password for each. |
| Administration | |
| Enable HTTPS Server Click to | enable or disable Hypertext Transfer Protocol Secure (HTTPS), a combination of Hypertext Transfer Protocol (HTTP) with SSL/TLS protocol. It provides encrypted communication and secure identification of your web connections to your router. |
| Remote Management | |
| Enable Remote Management | Click to enable the user to manage the router from a remote location. |
| Remote Admin Port The port | that will be used for remote management connections. Default is 8080. The Remote Admin Port cannot be used in an external port range of any port forwarding rules. |
| Use HTTPS Click to enable or | disable use of HTTPS for remote management of the router. |
Time Settings Screen
| Time and Date Configuration | |
| Time Current date and time at the router's location. | |
| Time Zone Select the time zone in which the router is located. | |
| Enable Daylight Saving Click to enable or disable Daylight Saving time. | |
| Daylight Saving Offset | If you select Daylight Saving time, from the drop-down list, select the daylight saving offset. The offset is a formula that combines a time of day with the time zone and is based on a 24-hour clock. |
| Daylight Saving Dates | If you select Daylight Saving time, from the drop down lists select the month, week, day of the week, and time of the start and end of Daylight Saving time in your time zone. |
| Automatic Time and Date Configuration | |
| Network Time Protocol Function | Click to enable use of Network Time Protocol (NTP). |
| Adding User Defined NTP Server | Add alternate NTP servers to be used. |
| NTP Server Used From the drop-down list, select the name of the NTP server to be used. | |
Firmware Update Screen
| Firmware Information | |
| Current Firmware Version Version of the router's current firmware. | |
| Current Firmware Date Date of current firmware. | |
| Check Online Now for Latest Firmware Version | ClickUpdate Nowto update your router's firmware to the version displayed. |
| Firmware Upgrade from a File | |
| Select a File to Upgrade | Note: It is a best practice to update the firmware file when the router has a wired connection to your computer.You have two options:1. ClickChoose a Fileand browse to the firmware file.2. If it is available, do one of the following:- Update your current firmware by clickingUpload- Select the file, save it, and clickUploadto upgrade the router firmware.Note: For assistance, contact Customer Support at http://support.wdc.com. |
System Screen
| Save and Restore Settings | |
| Save settings to a file | Click Save Configuration. The router's current configuration is downloaded to your computer. |
| Restore Settings from a File | To restore settings from a file, click Choose File and select it. Click Restore Configuration. |
| Reset to Factory Default Settings | To reset the router to its original settings, click Reset. |
| Reboot the router Click Reboot. | |
| Logout | |
| Logout Click Logout. | |
Connection Check Screen
| Ping Test | |
| Host Name or IP Address Enter | the host name or IP address of a computer you want to locate on the network. Click Ping. |
| Ping Result The result of whether your router can reach the specified host name or IP address. | |
Registration Screen
| Registration | |
| First Name, Last Name, Email Address | Enter your first and last name and email address. Click Register. |
Log Screen
| Save Log File | |
| Save Log File to Local Hard Drive | After generating a system log file, click Save. |
| Log Level | |
| Log Level From the drop-down list, select the alert level of the log you want to generate. Options are Debug, Notice, and Warning. | |
| System Log Status | |
| Log Type From the drop-down list, select the type of log you want to generate. Options are System, Attack, and Drop. The default is system log. | |
| Log Table | |
| Log Table Click the tabs to reveal the log pages you want to view, or to clear or refresh the table. | |
Language Screen
| Language | |
| Select language From the drop | -down list, select the language in which you want the user interface to display. |
Device Mode Screen
| Device Mode | |
| Mode From the drop-down list, select whether the router should be inRouter Mode or Extender Mode. When this device is set to Extender Mode, it adds/extends wireless capability to your existing network. | |
| LAN Connection Type If you select Extender Mode, this drop-down list displays. Select Static IP or Dynamic IP (DHCP). If you select Static IP, additional fields display. | |
| LAN IP address IP address of the device that is being configured as an Extender.The IP address should be on the same network as your existing router. | |
| Subnet Mask The subnet mask | is used to control how many subnetworks can exist in your local network. The more subnetworks there are, the fewer the hosts you can have per subnet. |
| Default Gateway IP address of | the router to which this device is connected while configured as an extender. |
| Primary DNS Server The primary | DNS Server address is configured and maintained by your ISP. This can be found on your main router or contact your ISP for this information. |
| Secondary DNS Server The secondary | DNS Server address is configured and maintained by your ISP. Contact your ISP for this information. |
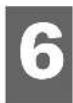
Performing Advanced Tasks
This chapter describes the most important tasks the administrator performs in setting up and maintaining the My Net router. It includes the following topics:
Enabling Guest Access
Setting Up Parental Controls
Changing the Administrator's Password
Accessing Files Stored on an Attached USB Drive
Updating the Router's Firmware
Restoring the Router to Factory Defaults
Rebooting the Router
Using the Router as an Access Point
Configuring UPnP
Enabling Port Forwarding
Accessing My Net View
Enabling Guest Access

A guest network allows visitors to get Internet access without giving them access to your home network.
To enable guest access:
-
Click the Advanced Settings icon and then the Wireless icon to display the Wireless/Guest Access screen.
-
Click the Guest Access tab.
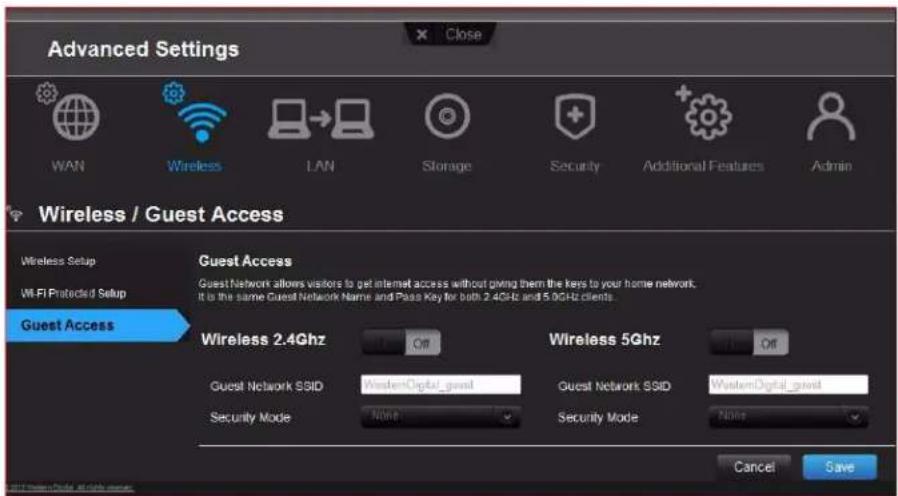
- For the wireless 2.4 GHz and/or 5 GHz band, toggle the On/Off button to turn access on.
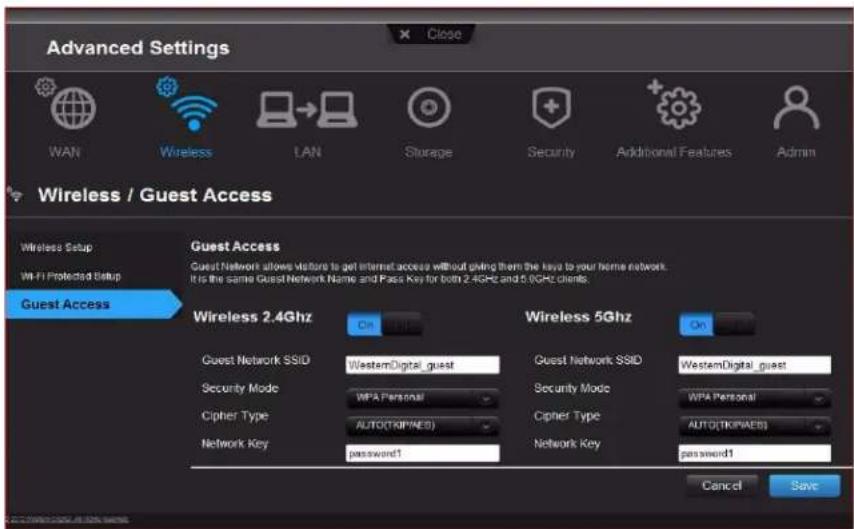
- Specify the following:
| Setting Description | |
| Guest Network SSID Accept the default value or enter another name for the wireless network. | |
| Security Mode The default value is None. To restrict guest access, select the type of security needed from the drop-down list:WPA - PersonalWPA2 - PersonalWPA/WPA2 - Personal | |
| Network Key Create a password for the guest user to prevent an unauthorized user from accessing your guest network. | |
- Click Save.
Setting Up Parental Controls

Registering Parental Controls
Set up your router with parental controls that restrict the websites, times, and content a user can access on the Internet. You can set controls on a master level that apply to all devices connected to the router or to individual devices. You need to register the router to activate Parental Control service for your router.
To set up parental controls:
- Click the Advanced Settings icon and then the Security icon to display the Security/Parental Controls screen.
- Click the Parental Controls tab.
-
Toggle the Enable parental control button to On. The Security/Parental Controls screen appears.
-
For Device location, select the region where the router is located.
- Click Apply. The screen expands to enable you to register the router and the devices using the router.
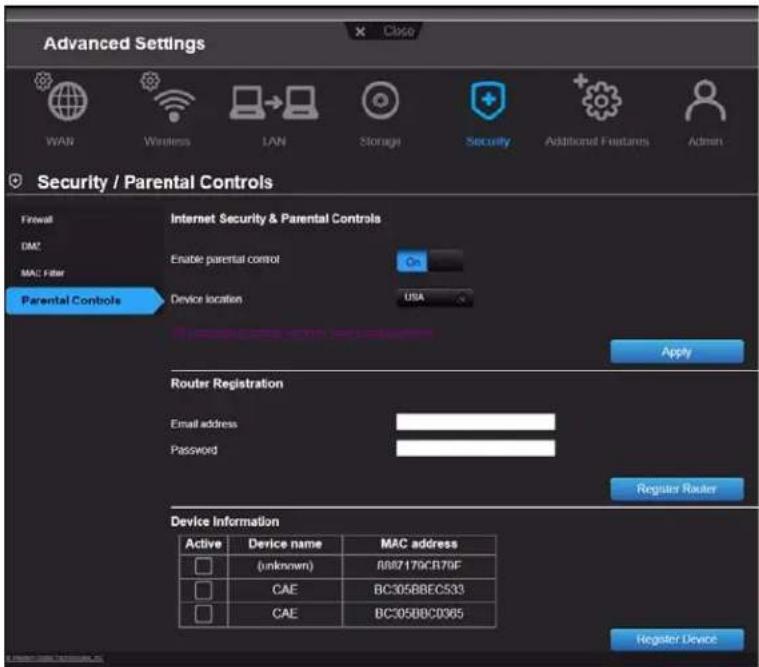
- In the Router Registration section, enter your email address and click Register Router. After registration takes place, open the confirmation that was sent to your email address. Follow the instructions in the email to confirm your registration of Parental Controls. Parental Controls are activated about fifteen minutes after you confirm your registration.
- On the Policy Management screen, enter your password and click Login.
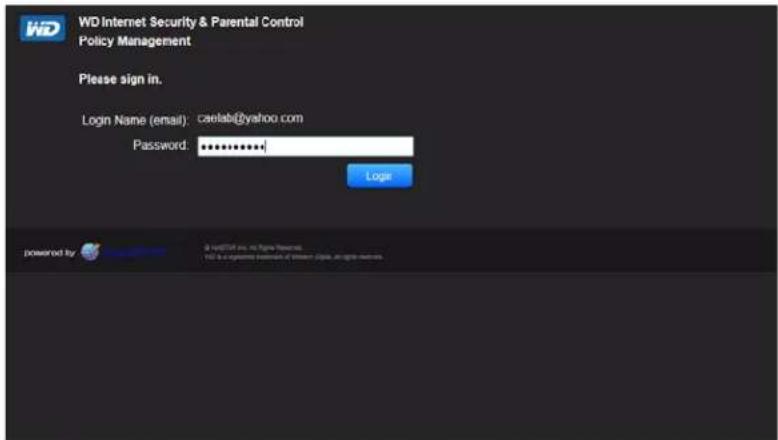
- The main Parental Controls screen displays.
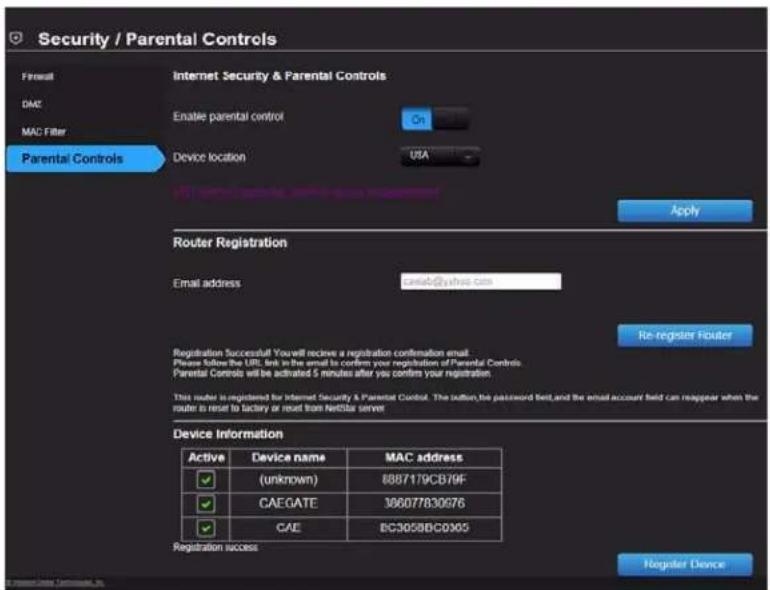
-
In the Device Information table, select the devices you want to register for parental controls.
-
Click Register Device (at bottom of screen).
-
Click the WD Internet Parental Controls Policy Management link in the middle of the page to launch the Device List View screen.
Managing Parental Controls
The Device List View screen enables you to manage parental controls on a master, device, and time range level.
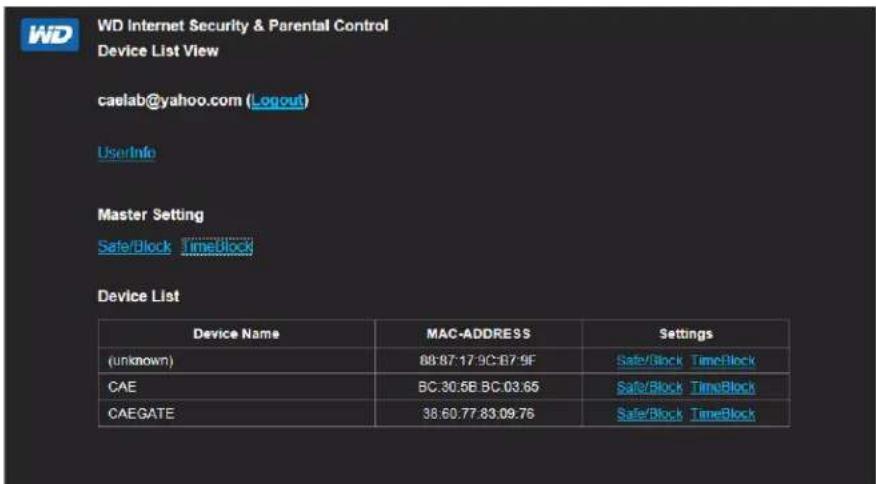
User Information
On the Device List View screen, click UserInfo to display the User Information Setting screen.
![WD Internet Security & Parental Control User Information Setting Back to Device List View User name MyNatN750_0000A9A5764A Password Current password New password New password [confirm] Password reset information Password reset question what is your e-mail? Password reset answer caelab@yahoo.com Confirm](/content/2026/05/1017659/images/540a3dfb28a377dd061cdcd989690f7f816d687c635ff47e20d46ebdcb13edd6.jpg)
-
(Optional) Update the User name, Password and Password reset information as desired.
-
Click Confirm to return to the Device List View screen.
Safe/Block List Setting
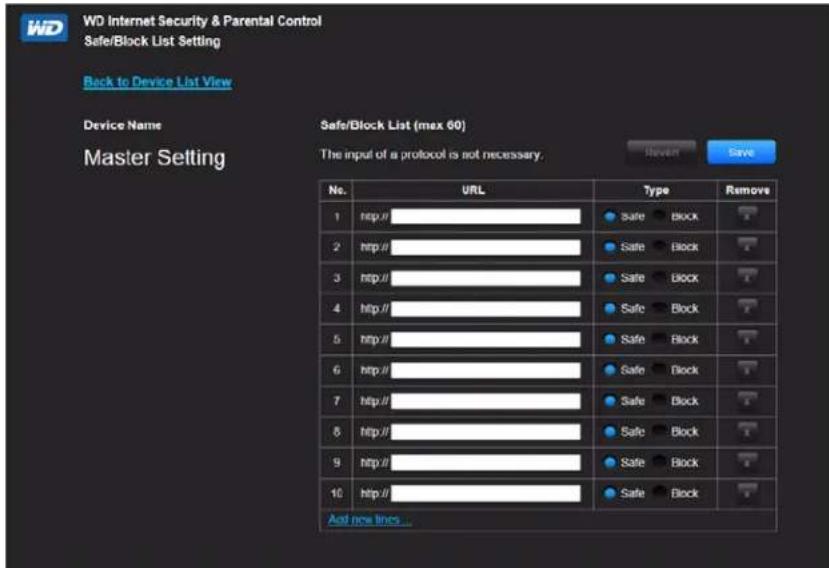
The Safe/Block List Setting enables you to enter up to 60 URLs and designate them as safe or blocked. The safe/block list overrides any of the categories listed in the time block. These are master settings, so they affect all devices on your network that have been registered for parental controls.
- On the Devices List View screen (see page 58), below Master Setting, click Safe/Block. The Safe/Block List displays.
-
Enter the URLs of sites to which you want to control access and select either Safe or Block.
-
Click Save. The Device List view appears.
Time Block
The Time block enables you to filter web sites by time range. The web filtering levels include:
- All – Blocks all web access regardless of category.
- Maximum – Protects against social networks, video, and games. Includes all lower level blocks.
- High – Protects against dating and all adult-related content. Includes all lower level blocks.
- Medium – Protects against gambling, alcohol, and tobacco content. Includes all lower level blocks.
- Moderate – Protects against occult, illegal acts, and advocacy. Includes all lower level blocks.
- Low – Protects against pornography and hard core adult content.
- None – Does not provide blocking; allows all web access.
The default setting is Low.
- On the Device List View screen (see page 58), below Master Setting, click Time Block to display the Time Block Policy Setting screen.
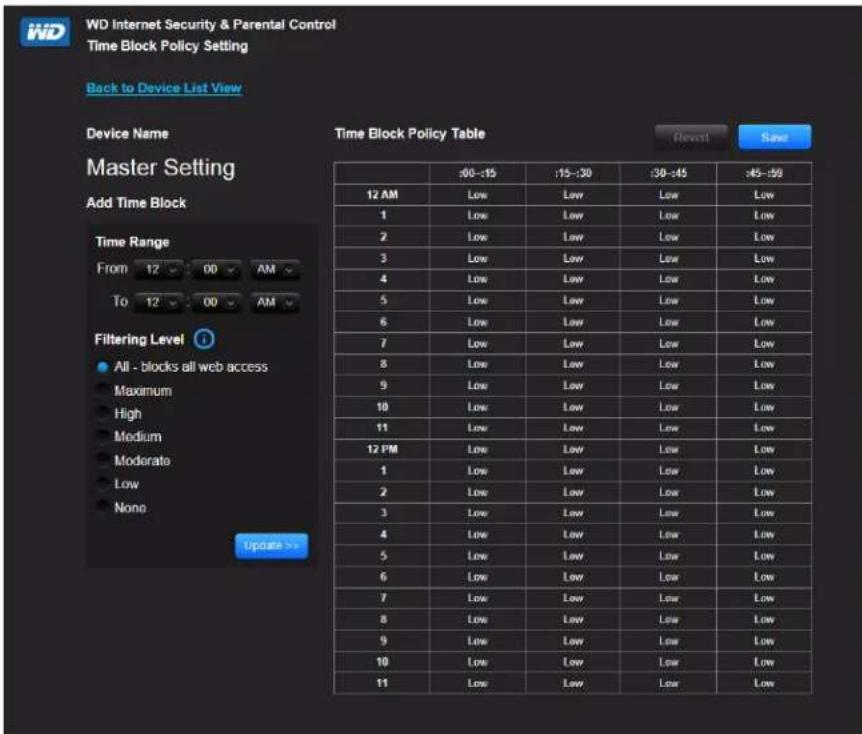
- Select the Time Range and the Filtering Level it should apply to. By default, the screen shows a 24-hour range (12 A.M. - 12 A.M.); you can adjust the range to your preferences. For example, you may want to block all web access from (8 A.M.- 5 P.M.).
Note: Use the Update button to change the Filtering Level for the whole table. For example, if you click Maximum and then Update, the Time Block Policy table changes all times within the time range to Maximum. The filtering level affects the whole table if you set the time range from 12 A.M. - 12 A.M.
- Click Save.
Managing at the Device Level
If you prefer to apply controls to selected devices rather than at the Master level, you can do that too.
- On the Safe Block List Setting or the Time Block Policy Setting screen, click Back to Device List View.
- Select a device in the Device Table and click the type of block (Safe/Block or Time Block) you want to apply.
- Follow the same steps as you do for applying a block on a master level.
- Click Save.
Changing Parental Control Settings Remotely
To access the WD Internet Security and Parental Control Policy Management utility remotely:
- Type www.wdinternetsecurity.com in your browser's address field.
- Log in using your parental control username (email) and password.
Changing the Administrator's Password

It is a good practice to change the administrator's password for accessing and managing the router.
To change the administrator's password:
- Click the Advanced Settings icon and then the Administrator icon to display the Admin/Administrator screen.
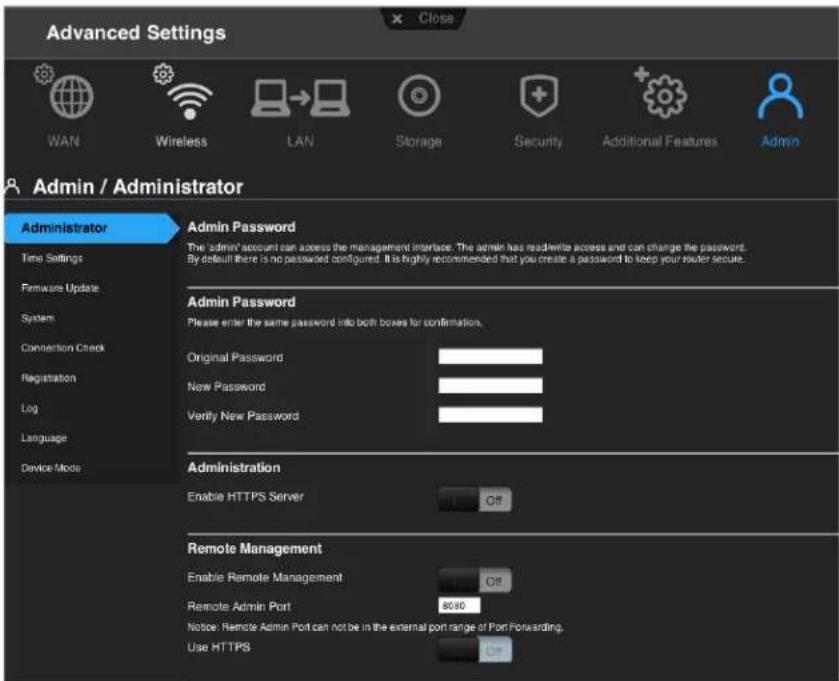
- Enter the new administrator's password in the Password and Verify Password fields and click Save.
Accessing Files Stored on an Attached USB Drive
To access files stored on an attached WD USB storage drive such as a WD Passport or My Book, you have two options:
Note: For information on installation, see "Installing WD Software from the CD (Optional)" on page 18 or "Using a Browser for Setup (Windows or Mac)" on page 14.
If you installed WD Quick View on your computer during setup, use the WD Quick View icon in the system tray of a Windows computer or the in the Menu bar of a Mac computer to select the storage device and display a menu of options.
Note: WD SmartWare provides online Help for its procedures.
■ Use your browser.
Using WD Quick View (Windows or Mac)
Once you install WD Quick View, you can use a shortcut to access your files and folders on an attached storage device.
Windows
- Right-or left-click the WD Quick View icon in the system tray to display a menu.
- Move the pointer over or click to select your My Net router and display a submenu.
![About WD Quick View Open MyNetN750 [MyNetN750] Dashboard [External USB] Alerts... Verbatim_STORE N GO [External USB] Properties Exit](/content/2026/05/1017659/images/622e5511d5f98bbc73a1afb59797a6cb6d14618b8e22135a4592be923f8ae79a.jpg)
-
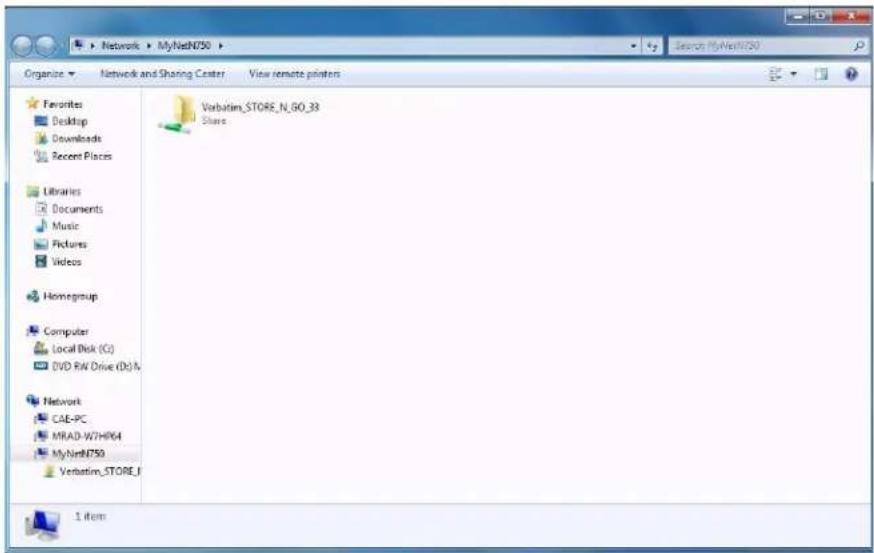
Select Open on the WD Quick View submenu.
-
The shares display in Windows Explorer:
Mac
- Click the WD Quick View icon 📋 in the menu bar to display a menu, and move the pointer over the name of your My Net Router to display a submenu.
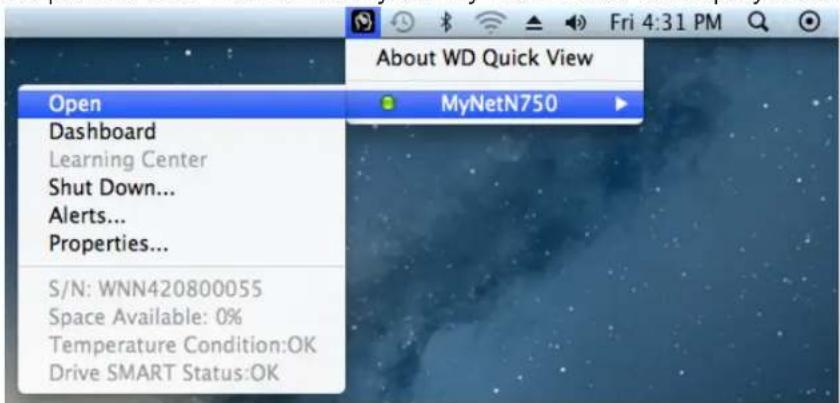
- Select Open.
- If you are prompted for a username and password, enter the username and password that you created when you set up external storage. If a password was not created, select or enter guest. Click Connect.
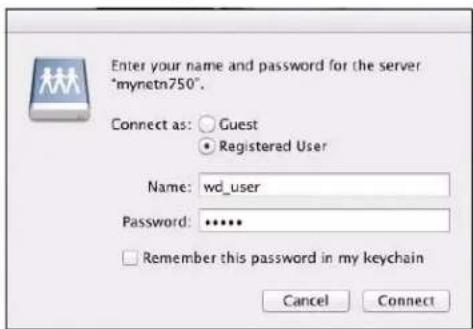
- Select the USB device to mount onto the Mac and click OK.
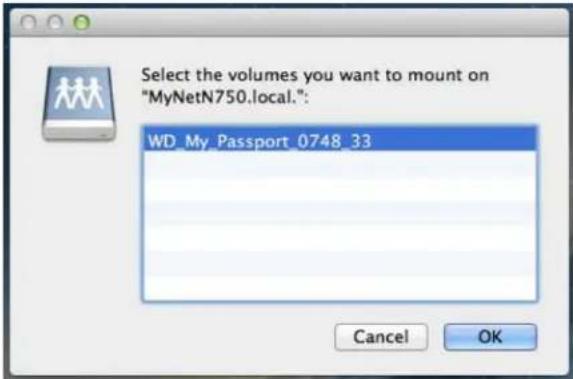
- In Finder, the My Net router displays below Shared, and the name of your USB device displays in the right pane:
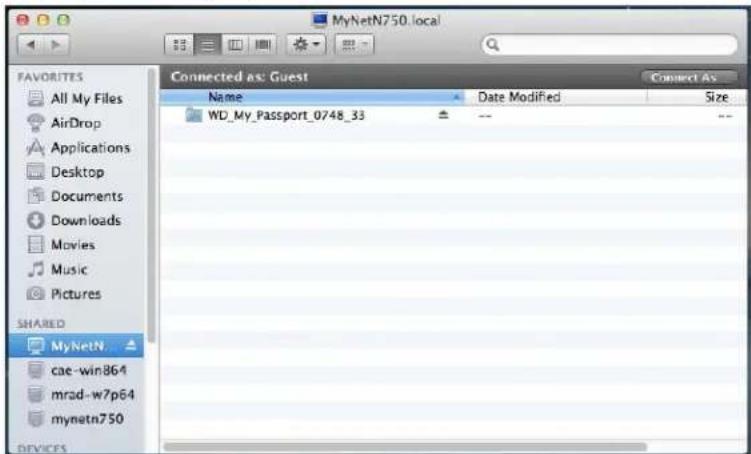
- To view all of the shares on the drive, double-click the name of your storage device.
To access the files stored on a USB drive connected to the router, make sure that the drive was properly set up as described in "Setting Up External Storage" on page 25. After the setup is complete, access it through the network as follows:
Windows XP
- Click Start > Run and type \mynetnXYZ, where XYZ is the router's model number. If the router's default name was changed from the default host name, substitute the new name. The folder that displays represents the external USB drive. Double-click the folder to access the drive.
Windows Vista/Win7
-
Click 📋> Start and in the Search programs and files box, type \mynetnXYZ, where XYZ is the number of the router model. If the router's default host name was changed during setup, substitute the new name. The folder that displays represents the external USB drive.
-
Double-click the folder to access its contents.
Note: If a password was set on the router during storage setup, at the prompts, enter the username and the password that you created.
Setting up a Share (Mac)
To access the files stored on a USB drive connected to the router, make sure that the drive was properly set up as described in "Setting Up External Storage" on page 25. After the setup is complete, access it through the network by doing the following:
-
Click Finder and then on the menu bar, click Go > Connect to Server.
-
Type smb://mynetnXYZ, where XYZ is the number of the router model. If the router's default host name was changed during setup, substitute the new name. The folder that displays is the external USB drive.
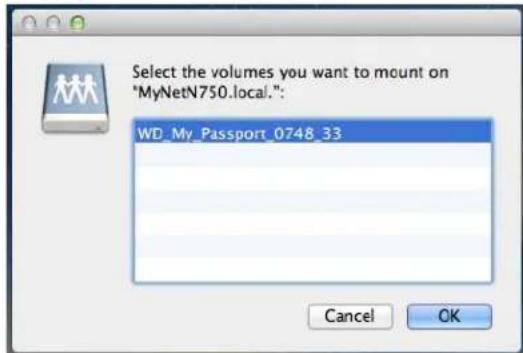
-
Click OK to mount the volume.
-
If you are prompted for a username and password, enter the username and password that you created when you set up external storage. If a password was not created, select or enter guest. Click Connect.
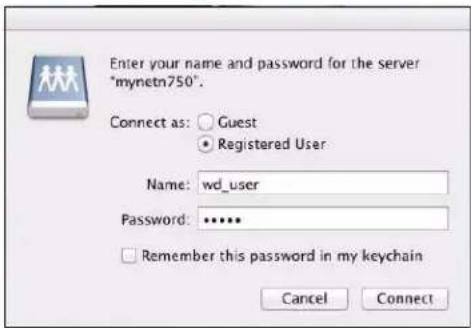
Updating the Router's Firmware

Note: For best results, upload the firmware using a wired connection.
- Click the Advanced Settings icon and then the Administrator icon.
- Click the Firmware Update tab.
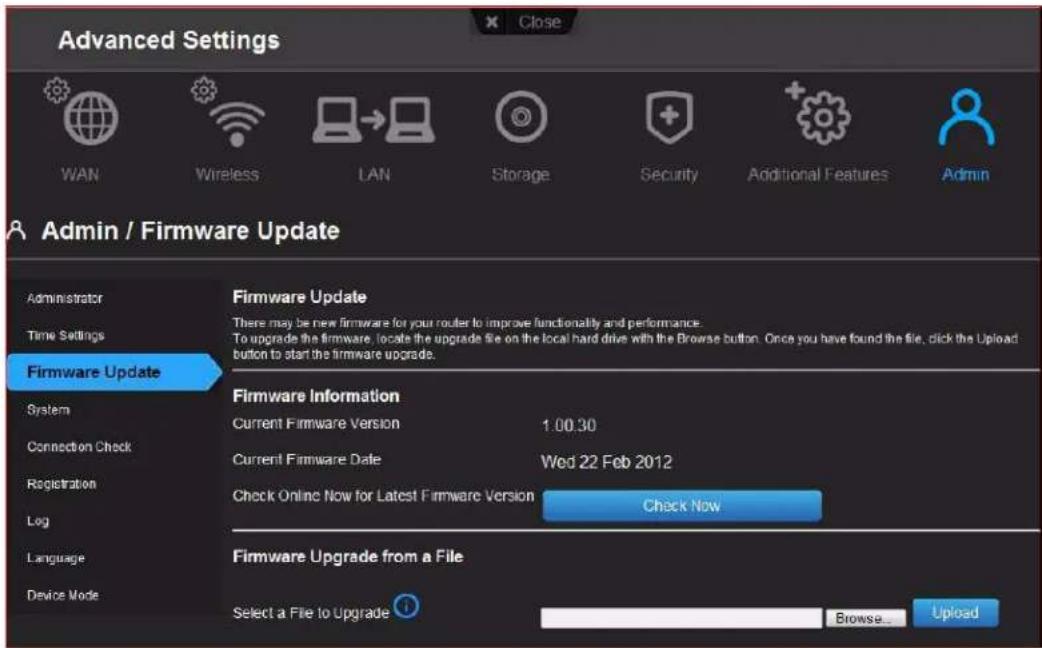
To check for the latest firmware version:
- Click Check Now. The router searches the WD website for a new firmware file.
If a new file exists, the latest firmware version and an Update Now button appear. - Click Update Now to begin the firmware update. A message informs you of how long the upload will take. Please wait while the firmware update is taking place.
To update from a file:
- Locate the firmware file on the WD Support site at http://support.wdc.com and download it to your computer.
- On the router screen, browse to the firmware file you saved and click Open. The file name displays in the browser field on the router screen.
- Click Upload. A message says how long the upload will take. Please wait while the firmware update is taking place.
Important: Do not disconnect or turn off the router while the update is in process.
Restoring the Router to Factory Defaults

You may want to reset the router to how it was when you bought it. You have two options for restoring factory defaults: through the user interface or through the Reset button on the bottom of the router.
To use the user interface:
- Click the Advanced Settings icon and then the Administrator icon.
- Click the System tab.
- Click Reset to the right of Reset to Factory Default Settings.
- When a confirmation message displays, click OK.
- Wait until the router reboots before using it.
To reset the router manually:
- Press and hold the Reset button on the bottom of the router for at least 10 seconds. When the reset finishes, the Power LED blinks.
Important: Do not reboot the router or close the application while the update is taking place.
Rebooting the Router

WARNING! To avoid data loss, before rebooting, stop all network and read/write activities.
You can reboot the router two ways. If you are physically close to it, just press the On/Off button on the router. If you cannot easily press the button:
- Click the Advanced Settings icon and then the Administrator icon.
- Click the System tab.
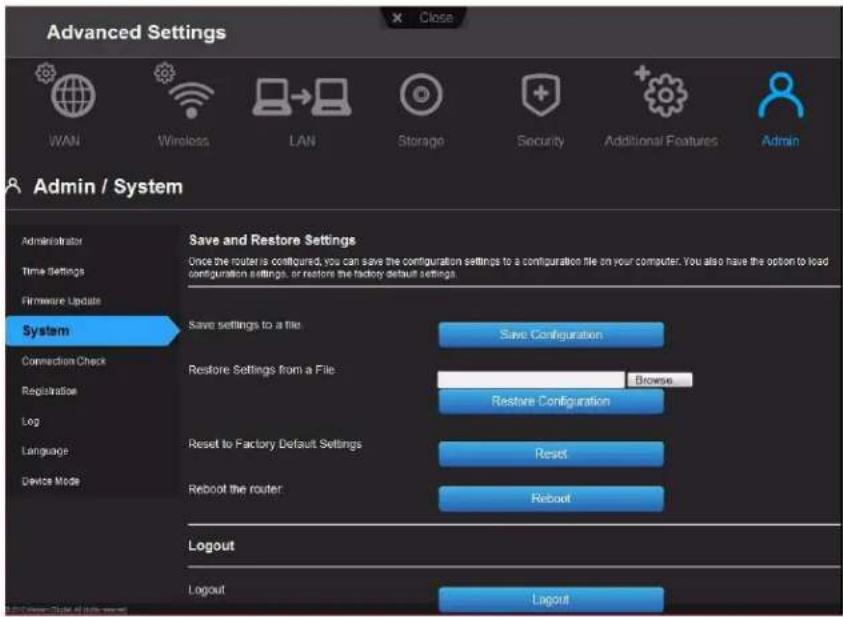
- Scroll to the bottom of the screen and click Reboot.
Using the Router as an Access Point

You can use your My Net router as an extender or access point (AP). Extender mode can:
- Add wireless coverage to a home network without wireless coverage.
- Expand a home network's wireless coverage.
Note: To use the router in extender mode, the router must be connected by wire to your computer.
To convert the router to extender mode:
- Click the Advanced Settings icon and then the Admin icon.
- Click the Device Mode tab. The LAN Connection Type displays.
- From the Device Mode drop-down list, select ExtenderMode (wired AP). The LAN Connection Type displays.
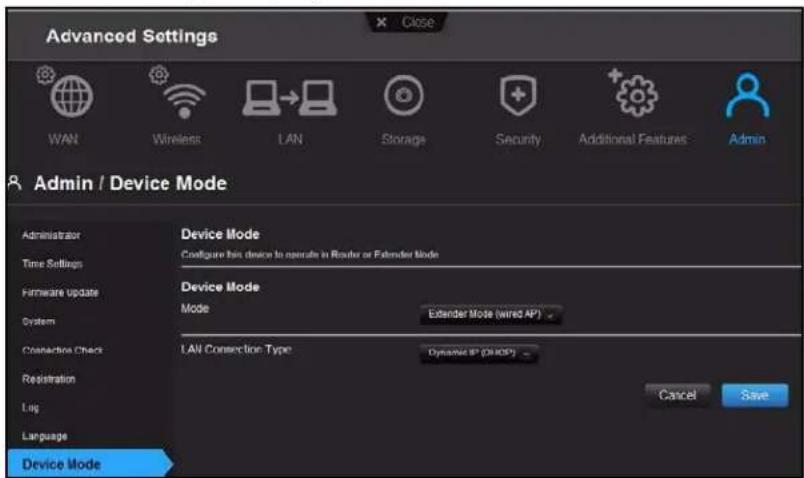
- To configure LAN Connection Type, select Dynamic IP (DHCP) (default) or Static IP, complete the required fields, and click Save. (See "" on page 53 for details.) The screen informs you of how long the process will take. The router reboots, and the login screen displays.
Note: The IP address of your extender is the static IP you assigned or the DHCP IP address assigned by your main router.
Setting up the DHCP Server on the My Net Router
You can use your router as a DHCP server that assigns IP addresses to other components of your network.
To set up a DHCP Server on My Net Router:
-
Click the Advanced Settings icon and then the LAN icon.
-
Click the DHCP Server Settings tab.
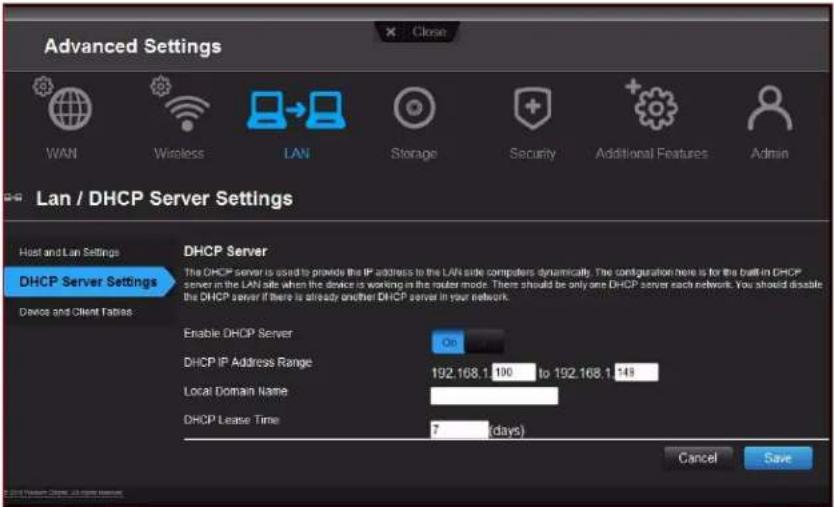
- Enable DHCP server (On by default) and click Save.
- Configure DHCP IP Address Range. By default the range is IP address 192.168.1.100 to IP address 192.168.1.149.
- (Optional) Set a Local Domain Name.
- Set the DHCP Lease Time (hours) and click Save.
-
Connect all the client devices.
-
Click the Device and Client Table tab. The table lists all of the client devices (wired/wireless) and displays the number of devices connected along with the IP address and MAC address of each device.
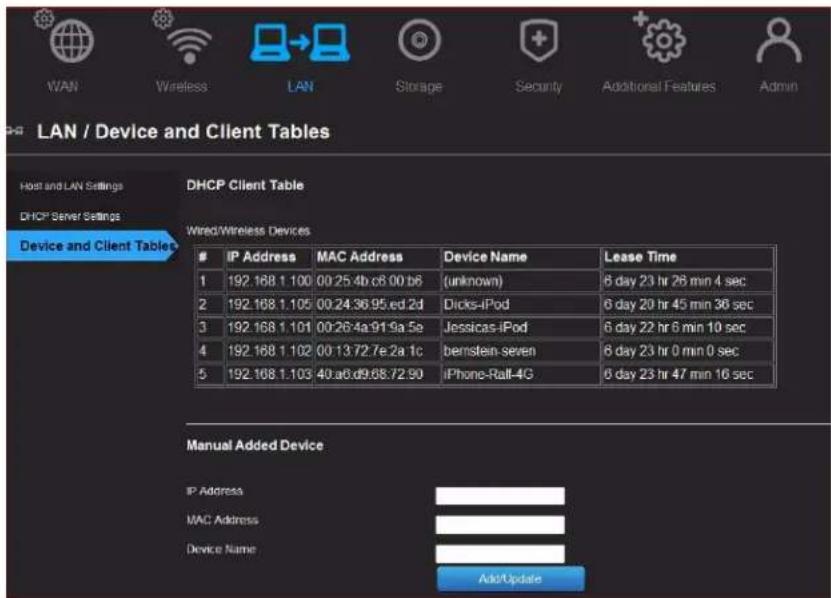
To manually assign a device a DHCP IP address:
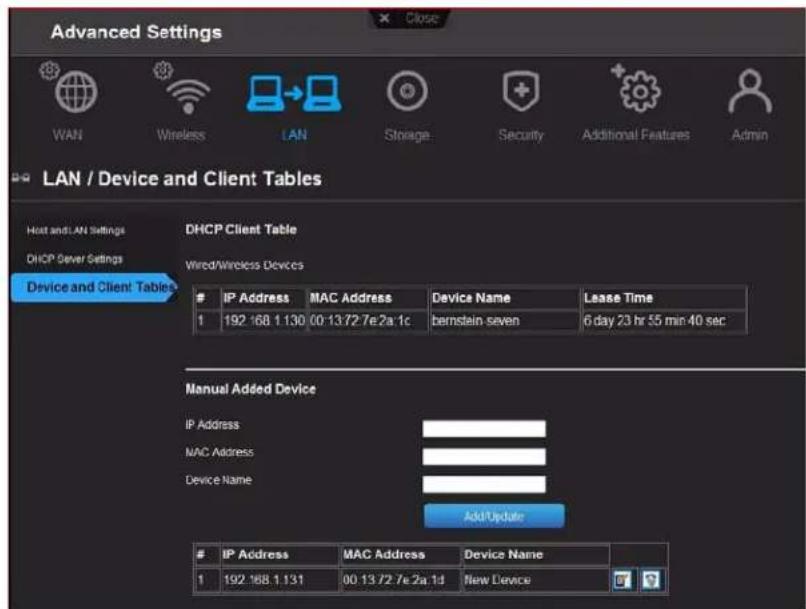
- In the Manual Added Device section of the screen, enter the device's IP address, MAC address, and device name.
- Click Add/Update. The device information populates the device table below.
- To update a device, select it in the table and click the Edit icon. Edit the information and click Add/Update.
- To delete a device, disconnect it, select it in the table, and click the Delete (trash can) icon.
Note: For more information, search for refer to KBA Answer ID 9423 on the Support website at http://support.wdc.com.
Configuring UPnP

UPnP enables networked devices to discover each other and start working together on a network.
To enable UPnP:
- Click the Advanced Settings icon and then the Additional Features icon.
- Click the Network UPnP tab.
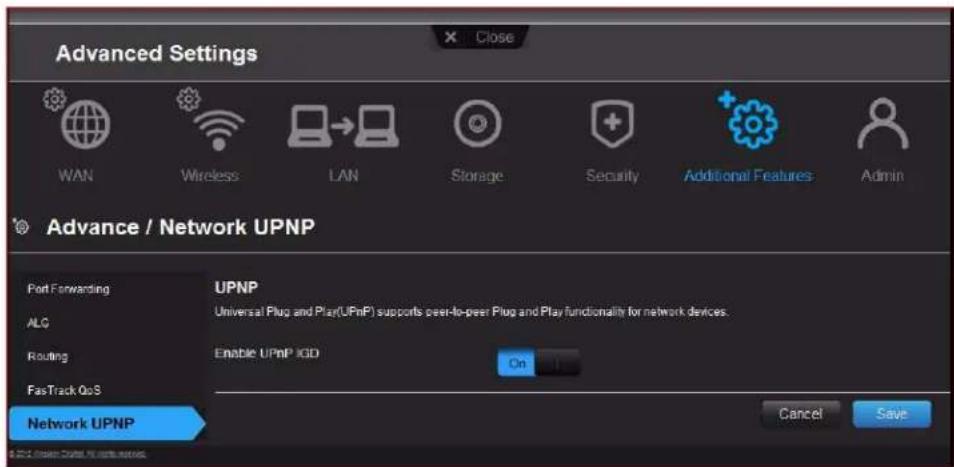
- To enable UPnP, toggle the UPnP IGD button to On. (UPnP is enabled by default.)
- Click Save.
Enabling Port Forwarding

On a private network, port forwarding maps Internet traffic coming into a specific port to a specific device on your LAN like a web server. Port forwarding is useful, for example, when you host a game to which others want to connect. Instead of their being blocked because of the router's network address translation (NAT), port forwarding allows their information to come through.
To create port forwarding rules:
- Click the Advanced Settings icon and then the Additional Settings icon.
- Click the Port Forwarding tab.
(N600/N750)
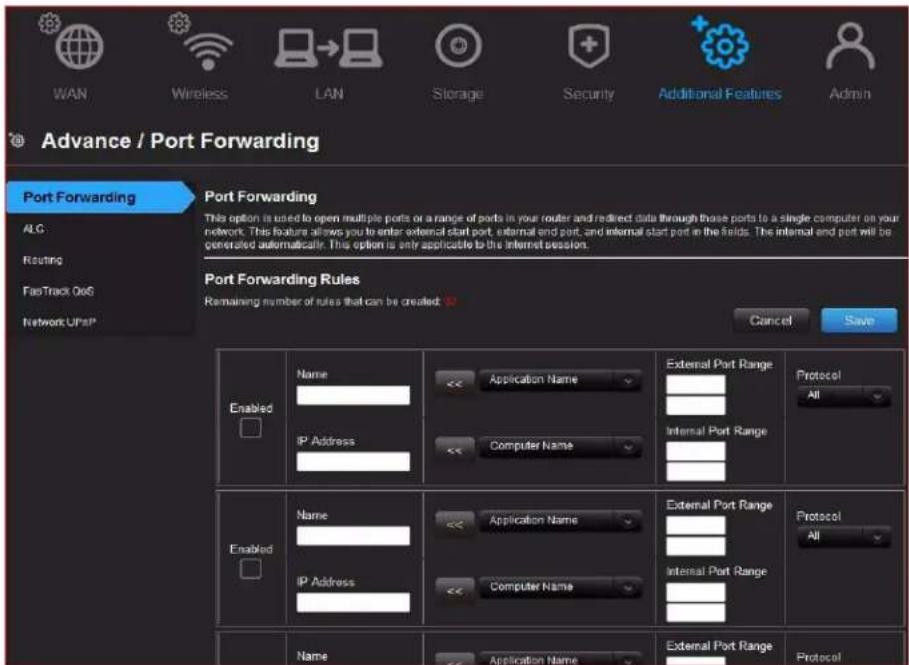
(N900)
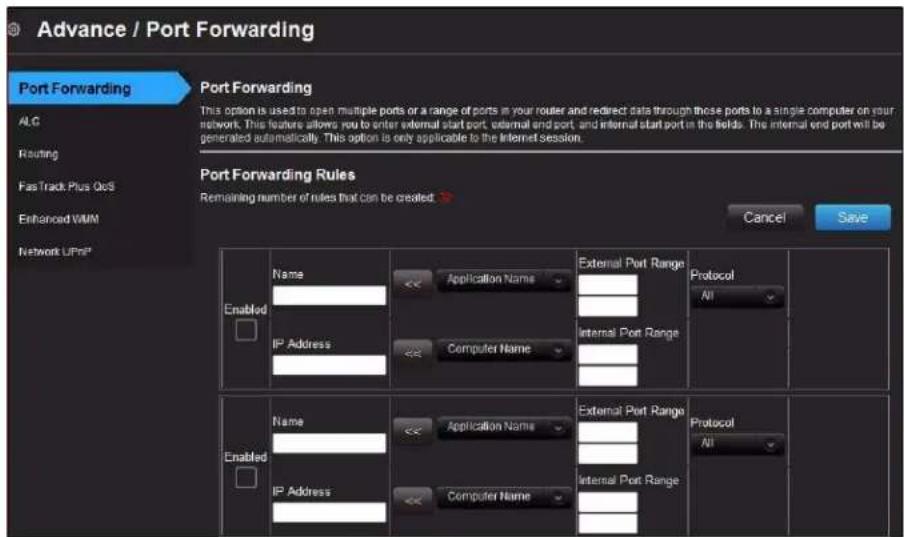
- Enter the following information for each port forwarding rule you create:
| Port Forwarding Rules | |
| Enabled Select the check box to enable the port forwarding rule. Clear the check box to disable. | |
| Application Name From the drop-down list, select the application whose data you want to forward to the client on your local network. Click the double arrows to populate the Name, Internal Port, External Port and Protocol fields. | |
| External Port Range Enter the port(s) you want to forward from the WAN interface (Internet). The port is automatically populated when you pick an application from the drop-down list. | |
| Protocol Select the protocol that you wish to port forward. The options are All, TCP, and UDP. The protocol will be automatically be selected if you pick an application from the drop-down list. | |
| IP Address Can be manually entered or populated by your selection from the Computer Name drop-down list. | |
| Computer Name | Device on your local network to which the rule will be applied. Click the double arrows to populate the IP Address field. |
| Internal Port Range Enter the port(s) on the LAN client to which you want to forward data. The port is automatically populated when you pick an application from the drop-down list. | |
- Click Save at the top or bottom of the page.
Accessing My Net View
Once you install My Net View on your computer, you can use it to diagnose network problems.
To access My Net View:
- Double-click the My Net View icon on your Desktop. The My Net View Welcome page displays.
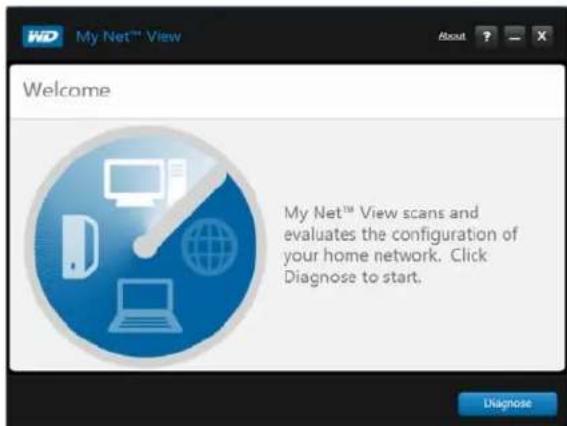
- Click Diagnose, and use the online Help (?) to guide you through the diagnostic procedures.
7
Installing and Using WD Print Share
Your My Net router can share a printer, a multi-function printer, or a scanner with computers on your network. Just connect the printer/scanner to an available USB port on the router, install the printer/scanner manufacturer's software, and then install WD Print Share software on each computer that will share the printer/scanner.
This chapter contains the following topics:
Installing WD Print Share (Windows)
Using WD Print Share
Installing WD Print Share (Windows)
Before installing WD Print Share software, make sure the manufacturer's printer/scanner driver and software are installed in your computer.
- Connect the USB printer/scanner to any available USB port on the back your router.
- Insert the Setup & Resource CD into your computer's CD drive. If the setup screen doesn't start automatically, open the CD and double-click EasySetup.exe.
- If you have already set up your router, click Skip and go to software installation.
- Select WD Print Share and click Next to start installation.
- When the installation is done, open the WD Print Share icon on the desktop.
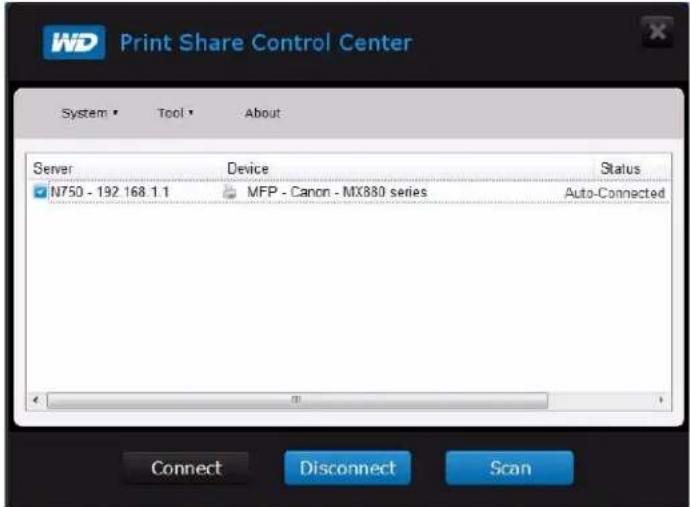
- Make sure the status is Auto-Connected or Connected. You are now ready to print.
Using WD Print Share
Using an Auto-Connected Printer
By default, the printer is in Auto-Connected mode, which allows the computer to be connected to the printer only when you send a print job to the printer. Another user in the network can use the printer while you are disconnected.
Using the Connect Button
Connected mode is for both printing and scanning. Selecting the printer or scanner and clicking Connect manually connects the device to your computer for the timeout duration set in Tool > Set Timeout in the menu.
Using the Connect Button With a Scanner
- Select the scanner from the list on the WD Print Share Control Center.
- Click Connect. The status changes to Connected.
- Launch the software that came with your scanner.
- After the scanning job is done, disconnect by clicking Disconnect or let the scanner disconnect automatically in the predefined time set in Tool > Set Timeout in the menu.
Using the Scan Button
You can also use the Scan button on the WD Print Share Control Center to activate scanning with the industry standard TWAIN or WIA interface.
- Select the scanner from the list on the WD Print Share Control Center.
- Click Scan. You are prompted to select a scanner interface. A scanner user interface appears on the screen.
- Choose options and click Scan to scan your picture or document.
- After scanning is done, click Close.

Troubleshooting
| Problem Solution | |
| The power LED does not illuminate. | 1. Ensure that the power cord is correctly connected to the router.2. Ensure that the electrical outlet is working properly.To do this, plug a different electronic device into the outlet and try to power it on.3. Ensure that you are using the AC adapter provided with the router. |
| A port number LED does not illuminate. 1. | Ensure that the connected device is powered on.2. Ensure that the Ethernet cable(s) are securely connected to the ports on both the device and the router.3. To ensure that the cable between the router and the electronic device is working properly, replace it with another cable. |
| Computers are unable to access the Internet. | 1. Ensure that the router is powered on. The power LED should be solid and not flashing.2. Check the cable connections between the modem, router and computer. The Ethernet cable connected to your modem should be connected to the Internet port on the router. An Ethernet cable from your computer should be connected to a LAN port on the back of the router.3. Power off and power on your modem, router, and computer.4. If all else fails, install My Net View from the product CD or contact Technical Support at http://support.wdc.com or your ISP. |
| (For My Net N900 only)All front panel LEDs flash continuously. | 1. Relocate your router to a place that has good ventilation.2. Turn off your router, and set it aside for 15 to 20 minutes until it cools down. Turn your router back on to resume operation.3. If the problem persists, contact Technical Support at http://support.wdc.com. |

Regulatory and Warranty Information
This chapter contains the following topics:
Regulatory Compliance
Warranty Information (All Regions Except Australia/New Zealand)
Warranty Information (Australia/New Zealand only)
Environmental Compliance (China)
Regulatory Compliance
Federal Communication Commission Interference Statement
This device complies with Part 15 of the FCC Rules. Operation is subject to the following two conditions: (1) This device may not cause harmful interference, and (2) this device must accept any interference received, including interference that may cause undesired operation.
This equipment has been tested and found to comply with the limits for a Class B digital device, pursuant to Part 15 of the FCC Rules. These limits are designed to provide reasonable protection against harmful interference in a residential installation. This equipment generates, uses and can radiate radio frequency energy and, if not installed and used in accordance with the instructions, may cause harmful interference to radio communications. However, there is no guarantee that interference will not occur in a particular installation. If this equipment does cause harmful interference to radio or television reception, which can be determined by turning the equipment off and on, the user is encouraged to try to correct the interference by one of the following measures:
■ Reorient or relocate the receiving antenna.
■ Increase the separation between the equipment and receiver.
- Connect the equipment into an outlet on a circuit different from that to which the receiver is connected.
- Consult the dealer or an experienced radio/TV technician for help.
Regulatory Information/Disclaimers
Installation and use of this Wireless LAN device must be in strict accordance with the instructions included in the user documentation provided with the product. Any changes or modifications (including the antennas) made to this device that are not expressly approved by the manufacturer may void the user's authority to operate the equipment. The manufacturer is not responsible for any radio or television interference caused by unauthorized modification of this device, or the substitution of the connecting cables and equipment other than manufacturer specified. It is the responsibility of the user to correct any interference caused by such unauthorized modification, substitution or attachment. Manufacturer and its authorized resellers or distributors will assume no liability for any damage or violation of government regulations arising from failing to comply with these guidelines.
For operation within 5.15 \~ 5.25 GHz frequency range, it is restricted to indoor environment. This device meets all the other requirements specified in Part 15E, Section 15.407 of the FCC Rules.
CAUTION: To comply with FCC RF exposure compliance requirements, the antenna used for this transmitter must be installed to provide a separation distance of at least 20 cm from all persons and must not be co-located or operating in conjunction with any other antenna or transmitter.
Note: The country code selection is for non-US models only and is not available for all US models. Per FCC regulations, all WiFi products marketed in the US must be fixed to US operation channels only.
Industry Canada (IC)
This device complies with RSS-210 of the Industry Canada Rules. Operation is subject to the following two conditions: (1) This device may not cause harmful interference, and (2) this device must accept any interference received, including interference that may cause undesired operation.
CAUTION! The device for operation in the band 5150-5250 MHz is only for indoor use to reduce the potential for harmful interference to co-channel mobile satellite systems.
Radiation Exposure Statement: This equipment complies with IC radiation exposure limits set forth for an uncontrolled environment. This equipment should be installed and operated with minimum distance 20 cm between the radiator and your body.
This device complies with Canadian ICES-003 Class B.
This product is intended to be supplied by a listed limited power source, double insulated, or direct plug-in power unit marked "Class 2."
Safety Compliance
Approved for US and Canada. CAN/CSA-C22.2 No. 60950-1, UL 60950-1: Safety of Information Technology Equipment.
This device is only for use with the compatible UL Listed AC adapter.
For Russia FAC DoC Only
For Brazil Only
CE Compliance for Europe
Operation of this device is subjected to the following National regulations and may be prohibited to use if certain restriction should be applied.
Marking by the CE symbol indicates compliance of this system to the applicable Council Directives of the European Union, including the EMC Directives (2004/108/EC), (1999/5/EC), the Low Voltage Directive (2006/95/EC), and EuP Directive (2005/32/EC). A “Declaration of Conformity” in accordance with the applicable directives has been made and is on file at Western Digital Europe.
Environmental Compliance (China)
产品中毒有害物质或元素的名称及含量
Warranty Information (All Regions Except Australia/New Zealand)
Limited Warranty
WD warrants that the Product, in the course of its normal use, will for the term defined below, be free from defects in material and workmanship and will conform to WD's specification therefor. The term of your limited warranty depends on the country in which your Product was purchased. The term of your limited warranty is for 1 year in the North, South and Central America region, 2 years in the Europe, the Middle East and Africa region, and 3 years in the Asia Pacific region, unless otherwise required by law. The term of your limited warranty period shall commence on the purchase date appearing on your purchase receipt. WD may at its discretion make extended warranties available for purchase. WD shall have no liability for any Product returned if WD determines that the Product was stolen from WD or that the asserted defect a) is not present, b) cannot reasonably be rectified because of damage occurring before WD receives the Product, or c) is attributable to misuse, improper installation, alteration (including removing or obliterating labels and opening or removing external enclosures, unless the product is on the list of limited user-serviceable products and the specific alteration is within the scope of the applicable instructions, as found at http://support.wdc.com), accident or mishandling while in the possession of someone other than WD. Subject to the limitations specified above, your sole and exclusive warranty shall be, during the period of warranty specified above and at WD's option, the repair or replacement of the Product with an equivalent or better Product. The foregoing warranty of WD shall extend to repaired or replaced Products for the balance of the applicable period of the original warranty or ninety (90) days from the date of shipment of a repaired or replaced Product, whichever is longer.
The foregoing limited warranty is WD's sole warranty and is applicable only to products sold as new. The remedies provided herein are in lieu of a) any and all other remedies and warranties, whether expressed, implied or statutory, including but not limited to, any implied warranty of merchantability or fitness for a particular purpose, and b) any and all obligations and liabilities of WD for damages including, but not limited to accidental, consequential, or special damages, or any financial loss, lost profits or expenses, or lost data arising out of or in connection with the purchase, use, or performance of the Product, even if WD has been advised of the possibility of such damages. In the United States, some states do not allow exclusion or limitations of incidental or consequential damages, so the limitations above may not apply to you. This warranty gives you specific legal rights, and you may also have other rights which vary from state to state.
Obtaining Service
WD values your business and always attempts to provide you the very best of service. If this Product requires maintenance, either contact the dealer from whom you originally purchased the Product or visit our product support Web site at http://support.wdc.com for information on how to obtain service or a Return Material Authorization (RMA). If it is determined that the Product may be defective, you will be given an RMA number and instructions for Product return. An unauthorized return (i.e., one for which an RMA number has not been issued) will be returned to you at your expense. Authorized returns must be shipped in an approved shipping container, prepaid and insured, to the address provided on your return paperwork. Your original box and packaging materials should be kept for storing or shipping your WD product. To conclusively establish the period of warranty, check the warranty expiration (serial number required) via http://support.wdc.com. WD shall have no liability for lost data regardless of the cause, recovery of lost data, or data contained in any Product placed in its possession.
Warranty Information (Australia/New Zealand only)
For consumers purchasing products in Australia and New Zealand, please refer to this warranty information.
Nothing in this warranty modifies or excludes your legal rights under the Australian Competition and Consumer Act or the New Zealand Consumer Guarantees Act. This warranty identifies WD's preferred approach to resolving warranty claims which is likely to be quick and simple for all parties.
No other warranties either express or implied by law, including but not limited to those contained in the Sale of Goods Act, are made with respect to the Product. If you purchased your Product in New Zealand for the purposes of a business, you acknowledge and agree that the New Zealand Consumer Guarantees Act does not apply.
In Australia, our goods come with guarantees that cannot be excluded under the Australian Consumer Law. You are entitled to a replacement or refund for a major failure and compensation for any other reasonably foreseeable loss or damage. You are also entitled to have the goods repaired or replaced if goods fail to be of acceptable quality and the failure does not amount to a major failure. What constitutes a major failure is set out in the Australian Consumer Law.
Warranty
WD warrants that the Product, in the course of its normal use, will for the term defined below, be free from defects in material and workmanship and will conform to WD's specifications. The term of your warranty is 3 years in Australia and New Zealand, unless otherwise required by law. The term of your warranty period shall commence on the purchase date appearing on your purchase receipt from an authorized distributor or authorized reseller. Proof of purchase shall be required to be eligible for this warranty and to establish the commencement date of this warranty. Warranty service will not be provided unless the Product is returned to an authorized distributor, authorized reseller or regional WD return center where the Product was first shipped by WD. WD may at its discretion make extended warranties available for purchase. WD shall have no liability for any Product returned if WD determines that the Product was (i) not purchased from an authorized distributor or authorized reseller, (ii) not used in accordance with WD specifications and instructions, (iii) not used for its intended function, or (iv) stolen from WD, or that the asserted defect a) is not present, b) cannot reasonably be rectified because of damage occurring before WD receives the Product, or c) is attributable to misuse, improper installation, alteration (including removing or obliterating labels and opening or removing external enclosures, including the mounting frame, unless the product is on the list of limited user-serviceable products and the specific alteration is within the scope of the applicable instructions, as found at http://support.wdc.com), accident or mishandling while in the possession of someone other than WD.
PRODUCTS ARE COMPLEX AND FRAGILE ITEMS THAT MAY OCCASSIONALY FAIL DUE TO (A) EXTERNAL CAUSES, INCLUDING WITHOUT LIMITATION, MISHANDLING, EXPOSURE TO HEAT, COLD, AND HUMIDITY, AND POWER FAILURES, OR (B) INTERNAL FAULTS. SUCH FAILURES CAN RESULT IN THE LOSS, CORRUPTION, DELETION OR ALTERATION OF DATA. NOTE THAT YOU SHALL BE RESPONSIBLE FOR THE LOSS, CORRUPTION, DELETION OR ALTER A HOWSOEVER CAUSED, AND FOR BACKING UP AND PROTECTING DATA AGAINST LOSS, CORRUPTION, DELETION OR ALTERATION. YOU AGREE TO CONTINUALLY BACK UP ALL DATA ON THE PRODUCT, AND TO COMPLETE A BACKUP PRIOR TO SEEKING ANY GENERAL SERVICE AND TECHNICAL SUPPORT FROM WD.
In Australia, if the Product is not of a kind ordinarily acquired for personal, domestic or household use or consumption, provided it is fair and reasonable to do so, WD limits its liability to replacement of the Product or supply of equivalent or better Product.
This warranty shall extend to repaired or replaced Products for the balance of the applicable period of the original warranty or ninety (90) days from the date of shipment of a repaired or replaced Product, whichever is longer. This warranty is WD's sole manufacturer's warranty and is applicable only to Products sold as new.
Obtaining Service
WD values your business and always attempts to provide you the very best of service. Should you encounter any problem, please give us an opportunity to address it before returning this Product. Most technical support questions can be answered through our knowledge base or e-mail support service at http://support.wdc.com. If the answer is not available or, if you prefer, please contact WD at the applicable telephone number shown in the front of this document.
If you wish to make a claim, you should initially contact the dealer from whom you originally purchased the Product. If you are unable to contact the dealer from whom you originally purchased the Product, please visit our product support Web site at http://support.wdc.com for information on how to obtain service or a Return Material Authorization (RMA). If it is determined that the Product may be defective, you will be given an RMA number and instructions for Product return. An unauthorized return (i.e., one for which an RMA number has not been issued) will be returned to you at your expense. Authorized returns must be shipped in an approved shipping container, prepaid and insured, to the address provided with your RMA number. If following receipt of a qualifying claim under this warranty, WD or the dealer from whom you originally purchased the Product determines that your claim is valid, WD or such dealer shall, at its discretion, either repair or replace the Product with an equivalent or better Product or refund the cost of the Product to you. You are responsible for any expenses associated with a claim under this warranty. The benefits provided to you under this warranty are in addition to other rights and remedies available to you under the Australian Competition and Consumer Act or the New Zealand Consumer Guarantees Act.
Your original box and packaging materials should be kept for storing or shipping your WD product. To conclusively establish the period of warranty, check the warranty expiration (serial number required) via http://support.wdc.com.
Western Digital Technologies, Inc.
3355 Michelson Drive, Suite 100
Phone: 949-672-7000
E-mail: support@wdc.com
GNU General Public License ("GPL")
Firmware incorporated into this product may include third party copyrighted software licensed under the GPL or Lesser General Public License ("LGPL") (collectively, "GPL Software") and not Western Digital's End User License Agreement. In accordance with the GPL, if applicable: 1) the source code for the GPL Software may be downloaded at no charge from http://support.wdc.com/download/gpl or obtained on CD for a nominal charge from http://support.wdc.com/download/gpl or by calling Customer Support within three years of the date of purchase; 2) you may re-use, re-distribute, and modify the GPL Software; 3) with respect solely to the GPL Software, no warranty is provided, to the extent permitted by applicable law; and 4) a copy of the GPL is included herewith, may be obtained at http://www.gnu.org, and may also be found at http://support.wdc.com/download/gpl.
Modification of or tampering with the Software, including but not limited to any Open Source Software, is solely at your own risk. Western Digital is not responsible for any such modification or tampering. Western Digital will not support any product in which you have or have attempted to modify the Software supplied by Western Digital.
Appendix: Technical Specifications
My Net N600/N750
| Specification My Net N600 My Net N750 | ||
| Ethernet 10/100 Fast Ethernet 10/100/1000 Gigabit Ethernet | ||
| I/O ports | 4 Ethernet (RJ-45) ports | |
| USB ports (1) USB 2.0 (2) USB 2.0 | ||
| Supported operating systems | Windows XP with Service Pack 3 | |
| Windows Vista with Service Pack 2 | ||
| Windows 7 with Service Pack 1 | ||
| Mac OS X Leopard | ||
| Mac OS X Snow Leopard | ||
| Mac OS X Lion | ||
| Supported browsers | For PCs: IE7, IE8, and IE9 | |
| For MACs: Safari (version 2 and above) | ||
| For PCs and MACs: Firefox (version 2.0 and above) and Google Chrome (version 7 and above) | ||
| Physical dimensions | Length: 8.3" (219 mm) | |
| Width: 5.4" (138 mm) | ||
| Height: 1.4" (35 mm) | ||
| Weight: My Net N600: 0.71 lb (0.32 Kg) | My Net N750: 0.75 lb (0.34 Kg) | |
| Power supply | Input voltage: 100V to 240V AC | |
| Input frequency: 50 to 60 Hz | ||
| Output voltage: 12V DC, 2A | ||
| Power supply: 24W | ||
| Temperature | Operating temperature: 5 to 35 °C (41 to 95 °F) | |
| Non-operating temperature: -20 to 65 °C (-4 to 149 °F) | ||
My Net N900
| Ethernet 10/100/1000 Gigabit Ethernet | ||
| I/O ports (7) Ethernet (RJ-45) ports | ||
| USB ports (2) USB 2.0 ports | ||
| Supported operating systems | Windows XP with Service Pack 3 | |
| Windows Vista with Service Pack 2 | ||
| Windows 7 with Service Pack 1 | ||
| Mac OS X Leopard | ||
| Mac OS X Snow Leopard | ||
| Mac OS X Lion | ||
| Supported browsers | For PCs: IE7, IE8, and IE9 | |
| For MACs: Safari (version 2 and above) | ||
| For PCs and MACs: Firefox (version 2.0 and above) and Google Chrome (version 7 and above) | ||
| Physical dimensions | Length: 9.3" (237 mm) | |
| Width: 6.1" (156 mm) | ||
| Height: 1.2" (30 mm) | ||
| Weight: 1.05 lb (0.48 Kg) | ||
| Power supply | Input voltage: 100V to 240V AC | |
| Input frequency: 50 to 60 Hz | ||
| Output voltage: 12V DC, 3A | ||
| Power supply: 36W | ||
| Temperature | Operating temperature: 5 to 35 °C (41 to 95 °F) | |
| Non-operating temperature: -20 to 65 °C (-4 to 149 °F) | ||
Index
A
AC power adapters 6
accessing external USB storage 62
accessories 5
adding a wireless device 27
Additional Features screens 45
additional software 4
Admin screens 50
administrator password 62
Advanced LAN screens 38
Advanced Settings screens, components 30
advanced tasks 55
Advanced WAN (Internet) screens 31
Advanced Wireless screens 36
attached storage, accessing files on 62
B
back panels of routers 8
basic wireless settings, configuring 24
bottom 9
box contents 5
button
Close 30
On/Off 14
Reset 9
WPS 27
C
CD, getting started with 10
changing admin password 62
closing an Advanced Settings screen 30
components 8
connecting to the Internet 23
current settings 20
D
dashboard icons 21
device not WPS enabled, connecting 27, 28
dual band speed 3
E
Easy Setup for Windows computers 10
environmental compliance (China) 81
external storage,setting up 25
F
factory defaults, restoring 67
front panels of routers 6
G
getting started 10
GPL software 84
guest access 4, 55
|
icons, dashboard 21
installing the router 10
Internet connection 23
L
LEDs 7, 8
M
My Dashboard
accessing after setup 19
accessing during setup 15
current settings 22
home page 19
My Net Software for Mac computers 18
My Net View
accessing 73
description 4
0
obtaining service 82
obtaining service (Australia and New Zealand) 83
operating precautions 1
P
package contents 5
parental controls 56
port forwarding 71
N600 and N750 45
N900 45
power adapters 6
product
accessories 5
overview 3
registration 2
safety information 1
warranty 82
product information, recording 2
R
rebooting 67
registering the router 2
regulatory compliance 77
Reset button 9
restoring to factory defaults 67
RoHS 81
router
as an access point 68
components 8
installation 11
USB ports 3
wired speed 3
wireless speed 3
s
safety instructions 1
screens
Admin 50
Administrator 51
ALG 47
Connection Check 52
Device and Client Tables 39
Device Mode 53
DHCP Server Settings 39
DMZ screen 43
Dynamic DNS 35
Enhanced WMM (My Net N900) 49
FasTrack Plus QoS (My Net N900) 48
FasTrak QoS (My Net N600/N750) 47
Firewall 43
Firmware Update 52
Guest Access 38
Host and Lan Settings 39
Internet Security & Parental Controls 44
Internet status 31
IPv6 35
IPv6 Status screen 35
Language 53
Log 53
MAC Filter 43
Network UPnP 49
Port Forwarding 46
Registration 53
Routing 47
System 52
Time Settings 51
Wi-Fi Protected Setup (WPS) 38
Wireless Setup 37
service 82
service (Australia /New Zealand) 83
setting up a new router (PC) 11
settings
advanced 30
basic 20
storage 25
setup
Windows Vista/Win7 10
Windows XP 10
setup options 11
sharing a printer on the network 74
software, GPL 84
speed, wired 3
storage
settings 25
USB 4
T
tasks
advanced 55
basic 20
troubleshooting 76
U
UPnP 71
USB storage 4
W
warranty 82
warranty, Australia/New Zealand 82
WD Print Share 4, 74
WD Print share
installing 74
WD Print Share, using 75
WD Quick View
accessing files on USB device 63
description 4
Wi-Fi Protected Security (WPS) 4
wireless
adding devices 27
speed, simultaneous dual band 3
wireless device, connecting 27
wireless settings 24
WPS LED 7
WPS-enabled device, connecting 27
The wall mount system located at the bottom of the unit is not designed for general usage by the end user.
Information furnished by WD is believed to be accurate and reliable; however, no responsibility is assumed by WD for its use nor for any infringement of patents or other rights of third parties which may result from its use. No license is granted by implication or otherwise under any patent or patent rights of WD. WD reserves the right to change specifications at any time without notice.
Western Digital, WD and the WD logo are registered trademarks in the U.S. and other countries; My Net is a registered trademark of Western Digital Technologies, Inc. Adobe and Adobe Reader and the included Adobe Reader logo are either registered trademarks or trademarks of Adobe Systems Incorporated in the United States and/or other countries. Other marks may be mentioned herein that belong to other companies.
© 2012 Western Digital Technologies, Inc. All rights reserved.
Western Digital
3355 Michelson Drive, Suite 100
Irvine, California 92612 U.S.A.
4779-705072-A01 APR 2012
- WD® Service and Support
- Accessing Online Support
- Contacting WD Technical Support
- Table of Contents
- Important User Information .... 1
- Product Overview .... 3
- Getting Started 10
- Basic Settings and Tasks ..... 20
- Advanced Settings .... 30
- Performing Advanced Tasks .....55
- Installing and Using WD Print Share .....74
- Troubleshooting....76
- Regulatory and Warranty Information .....77
- Appendix: Technical Specifications....85
- Index....87
- 1
- Important User Information
- Important Safety Instructions
- Recording Your WD Product Information
- Registering Your WD Product
- 2
- Product Overview
- Features
- Package Contents
- Accessories
- AC Power Adapters
- Components
- Front Panel
- Front panel LED indicators
- Front button
- Back Panel
- My Net N600 router
- 3
- Getting Started
- Installing the Router on the Network
- Using the Setup CD
- Starting Easy Setup (Windows)
- Windows XP
- Windows Vista/Windows 7
- Setting up a New Router
- Using a Browser for Setup (Windows or Mac)
- Connecting the Router Physically
- Connecting to the Router Wirelessly (WD SSID)
- Configuring a New Router
- Installing WD Software from the CD (Optional)
- Easy Setup (Windows)
- My Net Software (Mac)
- Basic Settings and Tasks
- Opening My Dashboard After Setup
- Understanding My Dashboard
- Basic Dashboard Icons
- Reviewing Current Settings
- Connecting to the Internet
- To check or troubleshoot your Internet connection:
- Configuring Wireless Settings
- To configure basic wireless settings:
- Click Save.
- Setting Up External Storage
- Adding a Device
- To connect a WPS-enabled device:
- To connect a device that is not WPS enabled:
- 5
- Advanced Settings
- Advanced WAN (Internet) Category
- Screen Descriptions
- Advanced Wireless Category
- Advanced Storage Category
- Security Settings Category
- Additional Features Category
- Admin Category
- Performing Advanced Tasks
- Enabling Guest Access
- To enable guest access:
- Setting Up Parental Controls
- Registering Parental Controls
- Managing Parental Controls
- User Information
- Safe/Block List Setting
- Time Block
- Managing at the Device Level
- Changing Parental Control Settings Remotely
- Changing the Administrator's Password
- Accessing Files Stored on an Attached USB Drive
- Using WD Quick View (Windows or Mac)
- Windows
- Mac
- Windows Vista/Win7
- Setting up a Share (Mac)
- Updating the Router's Firmware
- To check for the latest firmware version:
- To update from a file:
- Restoring the Router to Factory Defaults
- To use the user interface:
- To reset the router manually:
- Rebooting the Router
- Using the Router as an Access Point
- To convert the router to extender mode:
- Setting up the DHCP Server on the My Net Router
- To set up a DHCP Server on My Net Router:
- IP Address MAC Address Device Name Lease Time
- IP Address MAC Address Device Name
- Configuring UPnP
- To enable UPnP:
- Enabling Port Forwarding
- To create port forwarding rules:
- Accessing My Net View
- To access My Net View:
- 7
- Installing and Using WD Print Share
- Installing WD Print Share (Windows)
- Using WD Print Share
- Using an Auto-Connected Printer
- Using the Connect Button
- Using the Connect Button With a Scanner
- Using the Scan Button
- Regulatory and Warranty Information
- Regulatory Compliance
- Federal Communication Commission Interference Statement
- Regulatory Information/Disclaimers
- Industry Canada (IC)
- Safety Compliance
- For Russia FAC DoC Only
- For Brazil Only
- CE Compliance for Europe
- Environmental Compliance (China)
- Warranty Information (All Regions Except Australia/New Zealand)
- Limited Warranty
- Obtaining Service
- Warranty Information (Australia/New Zealand only)
- For consumers purchasing products in Australia and New Zealand, please refer to this warranty information.
- Warranty
- GNU General Public License ("GPL")
- Appendix: Technical Specifications
- Index
- A
- B
- C
- D
- E
- F
- G
- |
- L
- M
- 0
- P
- R
- s
- T
- U
- W
Brand : WESTERN DIGITAL
Model : My Net
Category : Wi-Fi repeater