
ERX650 - Fitness Equipment Toorx - Free user manual and instructions
Find the device manual for free ERX650 Toorx in PDF.


| Product Type | Elliptical Trainer |
| Model | ERX650 |
| Brand | Toorx |
| Dimensions (L x W x H) | 150 x 70 x 170 cm |
| Product Weight | 65 kg |
| Maximum User Weight | 130 kg |
| Power Source | Batteries or AC adapter (included) |
| Display Type | LCD screen with backlight |
| Display Metrics | Time, distance, speed, calories, heart rate, pulse |
| Resistance System | Magnetic, 16 levels |
| Programs | 12 preset programs + manual mode |
| Heart Rate Monitoring | Hand pulse sensors on handlebars |
| Flywheel Weight | 8 kg |
| Pedal Type | Oversized anti-slip pedals |
| Transport Wheels | Yes, for easy movement |
| Foldable | No |
| Maintenance | Regular cleaning with dry cloth; lubricate moving parts every 3 months |
| Safety | Emergency stop key, stable frame, non-slip pedals |
| Spare Parts & Repairability | Available via manufacturer; user-replaceable batteries and fuse |
| Warranty | 2 years |
Frequently Asked Questions - ERX650 Toorx
User questions about ERX650 Toorx
0 question about this device. Answer the ones you know or ask your own.
Ask a new question about this device
Download the instructions for your Fitness Equipment in PDF format for free! Find your manual ERX650 - Toorx and take your electronic device back in hand. On this page are published all the documents necessary for the use of your device. ERX650 by Toorx.
USER MANUAL ERX650 Toorx
natural_image
Black CRONO LINE 2020 stationary exercise bike with visible branding and app icon (no text on body)
READY 3.0
ERX650
i
EXPLODED DIAGRAM


HARDWARE PACKAGE

PARTS LIST
| No. | Description | Qty. | No. | Description | Qty. | |
| 1 | Computer | 1 | 40 | Bushing Φ18*1.5*Φ14.6*5*Φ10.1 | 4 | |
| 2 | Adapter | 1 | 41 | Washer d6*Φ16*1.5 | 5 | |
| 3 | Bolt M5*15 | 4 | 42 | Bolt M6*15*S5 | 4 | |
| 4 | Middle handlebar | 1 | 43 | End cap J60*30*15 | 2 | |
| 5 | Grip foam | 2 | 44 | Pedal | 2 | |
| 6 | Handle pulse plate | 2 | 45 | Cover | 2 | |
| 7 | Screw ST4.2*19 | 2 | 46 | Washer d8*Φ25*2 | 15 | |
| 8 | End cap φ25*26 | 2 | 47 | Bearing R12 | 4 | |
| 9 | Handle pulse wire | 2 | 48 | Bushing Φ60*16.6Φ41.18*13.11 | 4 | |
| 10 | Washer d8*Φ20*2 | 14 | 49 | Bolt M8*50*20*S14 | 2 | |
| 11 | Spring washerd8 | 21 | 50 | Connector | 2 | |
| 12 | Bolt M8*20*S5 | 23 | 51 | Cover | 4 | |
| 13 | Cover | 1 | 52 | Shaft | 2 | |
| 14 | Handlebar post | 1 | 53 | Bushing Φ32*3.3*Φ28*20.5*Φ19.1 | 8 | |
| 15 | Bolt M8*25*S13 | 4 | 54L/R | Linkage | 1 | |
| 16L/R | Handlebar post cover | 1 | 55 | Spacer φ22*φ17.1*8.8 | 4 | |
| 17 | Supporter | 1 | 56 | Shaft for transportation wheel | 2 | |
| 18 | Screw ST4.2*16 | 25 | 57 | Cushion | 1 | |
| 19 | Screw ST4.2*19 | 24 | 58 | Roller | 2 | |
| 20 | Main frame | 1 | 59 | Wheel cover | 2 | |
| 21 | End cap | 2 | 60 | Front stabilizer | 1 | |
| 22L/R | Handlebar L/R | 1 | 61L/R | End cap L/R | 1 | |
| 23 | Grip foam | 2 | 62 | Screw ST4.2*16 | 6 | |
| 24 | Handlebar cover | 2 | 63 | Bolt M8*20*S13 | 5 | |
| 25L/R | Reciprocating bar L/R | 1 | 64 | Rail | 1 | |
| 26 | Nylon nut M8*H7.5*S13 | 8 | 65 | Round cover Φ25*16 | 1 | |
| 27 | Arc washer d8*Φ20*2*R16 | 4 | 66 | Round cover Φ38 | 2 | |
| 28 | Bolt M8*40*15*S5 | 4 | 67 | Spring | 1 | |
| 29 | Spacer Φ30*Φ20*9 | 2 | 68 | Knob | 1 | |
| 30 | Wave washer d19*Φ25*0.3 | 4 | 69 | Bolt M4*12*φ8 | 1 | |
| 31 | Bushing Φ27*1*Φ19.2*16 | 4 | 70 | Bolt M4*16*φ8 | 1 | |
| 32 | Bushing Φ50*Φ21*20 | 4 | 71 | Alum plate | 2 | |
| 33 | Washer d8*Φ32*2 | 2 | 72 | Incline adjustment handle | 1 | |
| 34 | Handlebar cover | 2 | 73 | Washer d4*Φ9*1 | 2 | |
| 35 | Screw ST4.2*13 | 4 | 74 | Cap nut M4*H7*S7 | 2 | |
| 36L/R | Swing bar cover L/R | 2 | 75 | Rail Shaft | 2 | |
| 37 | End cap PT25*50 | 4 | 76L/R | End cap L/R | 1 | |
| 38L/R | Linkage L/R | 1 | 77 | Screw ST4.2*8 | 4 | |
| 39 | Bolt Φ10*34*M6*15*S6 | 2 | 78 | Trunk wire 1 | 1 | |
| 79 | Fixed tube for cover | 1 | 104 | Washer φ6*φ18*2 | 1 | |
| 80 | Slope cover | 1 | 105 | Idler rod | 1 | |
| 81 | Crank cover | 2 | 106 | Idler | 1 | |
| 82 | Nut M10*1.25*H7.5*S14 | 2 | 107 | Bolt M6*12*S10 | 1 | |
| 83 | Turntable | 2 | 108 | Spring | 1 | |
| 84 | Crank | 2 | 109 | Bolt M5*16 | 4 | |
| 85L/R | Chain cover | 1 | 110 | Washer d5*Φ13*1 | 4 | |
| 86 | Bearing6004 | 3 | 111 | Washer d8*Φ28*2 | 1 | |
| 87 | Spacer Φ25*Φ20.2*4 | 1 | 112 | Bearing holder | 2 | |
| 88 | Nylon nut M6*H6*S10 | 5 | 113 | Flywheel | 1 | |
| 89 | Belt plate | 1 | 114 | SpacerΦ30*Φ25*6.5 | 1 | |
| 90 | Shaft | 1 | 115 | Bearing 61905 | 1 | |
| 91 | Spring washerd6 | 4 | 116 | Flat key 8*7*25 | 1 | |
| 92 | Bolt M6*16*S5 | 4 | 117 | Flywheel axle | 1 | |
| 93 | Belt | 1 | 118L/R | End cap L/R | 1 | |
| 94 | Plastic connector | 1 | 119 | Sensor holder | 1 | |
| 95 | Bolt M8*55*13*S14 | 1 | 120 | Sensor | 1 | |
| 96 | Washer d8*Φ16*1.5 | 2 | 121 | Trunk wire 2 | 1 | |
| 97 | Magnetic plate | 1 | 122 | Motor | 1 | |
| 98 | Screw ST3.0*10 | 9 | 123 | Resistance control cable | 1 | |
| 99 | Magnetic location grid | 2 | 124 | Adapter trunk wire | 1 | |
| 100 | Magnet | 7 | 125 | Cover | 1 | |
| 101 | Bolt M6*65*S10 | 1 | ||||
| 102 | Spring | 1 | A | Wrench S5 | 1 | |
| 103 | Nut M6*H5*S10 | 1 | B | Spanner S13-15 | 1 |
ASSEMBLY INSTRUCTIONS
STEP 1:

a. Connect trunk wire 1(78) on the handlebar post(14) with trunk wire 2(121) on the main frame(20) well, then put the wires inside of main frame(20).
b. Fix handlebar post(14) to main frame(20) with bolts(15), spring washers(11) and washers(10) by spanner(B).
C.Secure handlebar post covers(16L/R) with screws(19), then secure them on the handlebar post(14) with screws(18) by wrench(A).
STEP 2:

a. Remove bolts(63), spring washers(11) and washers(10) from front stabilizer(60) by spanner(B), then attach front stabilizer(60) to main frame(20) with bolts(63), spring washers(11) and washers(10) by spanner(B).
STEP 3:

a. Remove bolts(12) from pedal(44) by wrench(A), then attach pedal(44) to Linkage(38L/R) with bolts(12) by wrench(A).
STEP 4:

a. Put handlebar covers(24) into handlebar(22L/R),
b. Attach handlebar(22L/R) to reciprocating bar(25L/R) with bolts(28), arc washers(27) and nylon nuts(26) by wrench(A).
STEP 5:
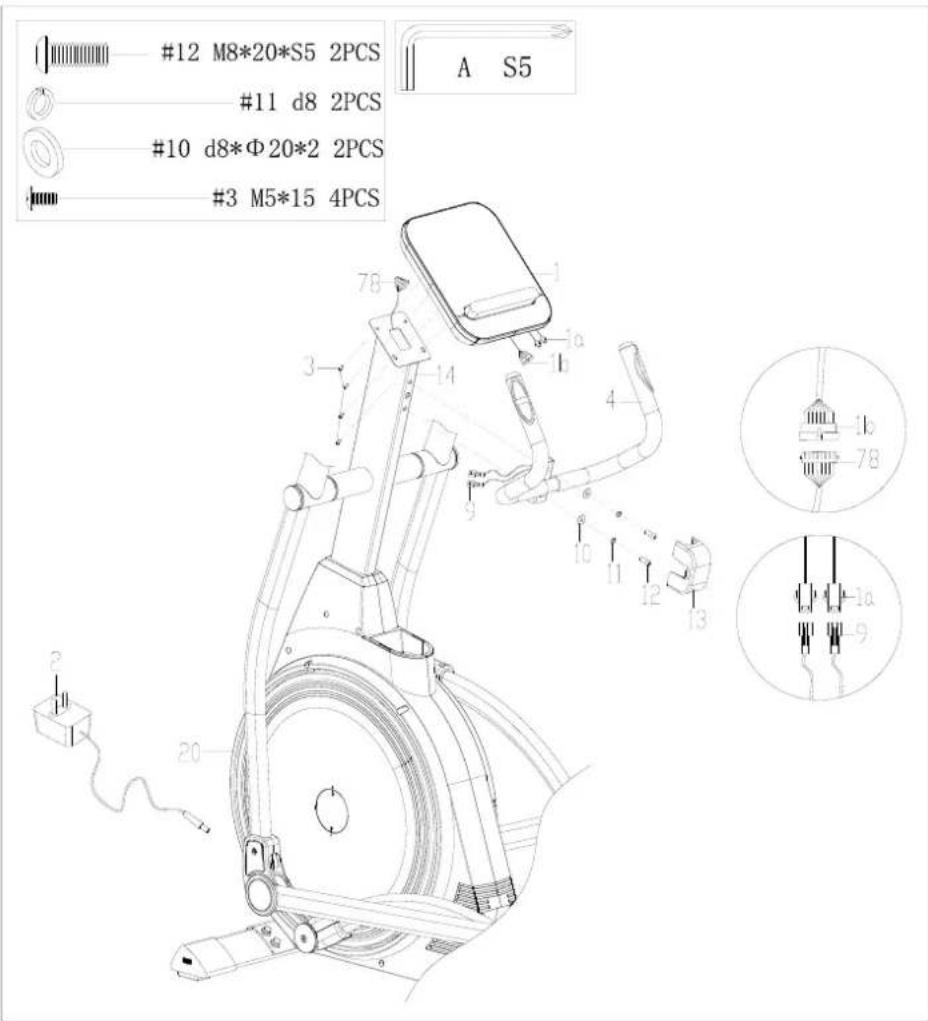
a. Remove bolts(12), spring washer(11) and washers(10) from handlebar post(14) by spanner(A).
b. Draw the handle pulse wire(9) through the hole of handlebar post(14).
c. Fix middle handlebar(4) to handlebar post(14) with bolts(12), spring washer(11) and washers(10) from handlebar post(14) by spanner(A).
d. Connect computer wire(1a) with handle pulse wire(9), computer wire(1b) with trunk wire wire 1(78) well.
e. Take out the bolts(3) from the back of computer(1) by spanner(A), then attach computer(1) to handlebar post(14) with bolts(3) by spanner(A).
f. Insert adapter wire(2) to power hole on the main frame(20), then plug the adapter into an outlet.
Attention: Cut off the power source when don't use it long time.
The assembly is complete!
ADJUSTMENTS GUIDE
1.MOVING THE MACHINE
natural_image
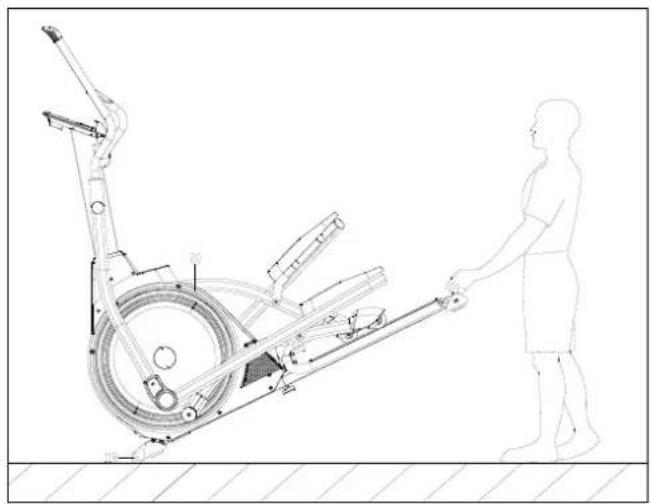
Technical line drawing of a stationary exercise machine with a person standing beside it (no text or symbols present)To move the machine, push the handlebar until the transportation wheels(118) on the main frame(20) touch the ground. With the wheels on the ground, you can transport the bike to the desired location at ease.
2.ADJUSTING THE BALANCE

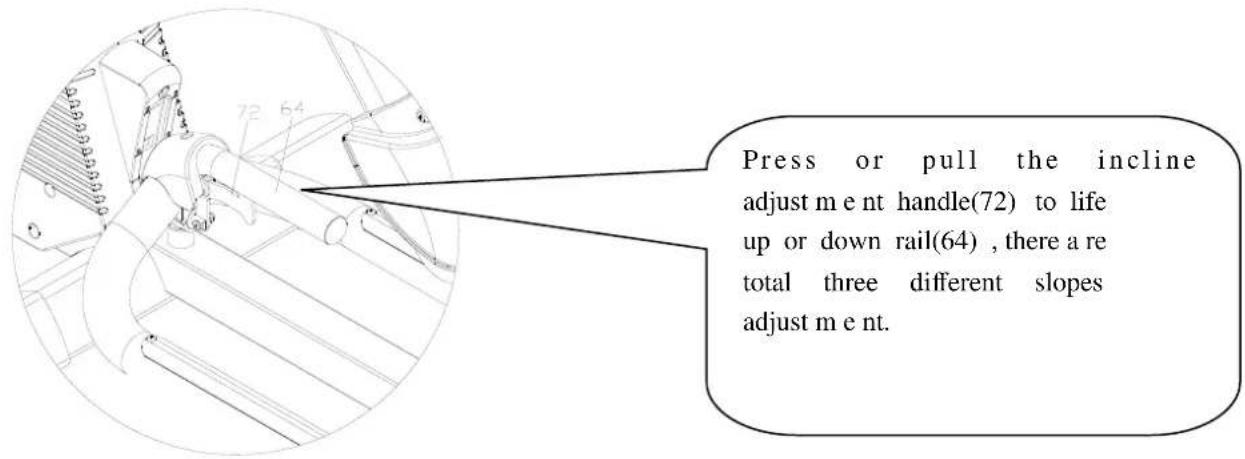
3. SLOPE INCLINE ADJUSTMENT
Quick Start Guide
Stretch exercise
No matter how you do sports, please do some stretch at first, The warm muscle will extend easily, so warm up yourself with
5-10minutes, Then We suggest the following stretch exercise, five times.10 counts for each time or longer do these exercise again after sports.
- Toe Touch
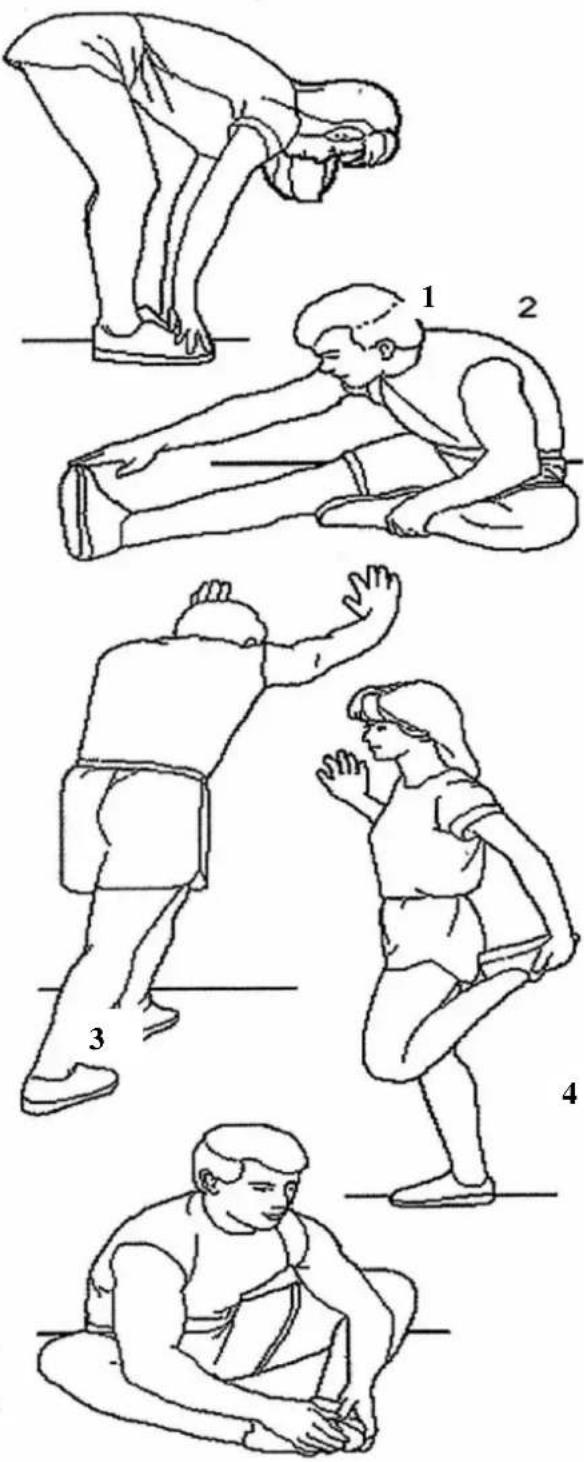
Slow bend forward from your waist, letting your back and shoulders relax as you stretch toward your toes, Reach down as far as you can and hold for 15 counts. And then relax, repeat 3 times.(Picture 1)
2.Hamstring Stretch
Sit with your right leg extend. Rest the sole of your left foot against your right inner thigh. Stretch toward your toe as far as possible. Hold for 15 counts. Relax and then repeat with left leg extend .Then relax and repeat 3 times for each leg.. (Picture 2)
3.Calf-Achilles Stretch
Lean against a wall with your left leg in front of the right and your arms forward,
Keep your right leg straight and the left foot on the floor, then bend the left leg and lean forward by moving your hips toward the wall, Hold, then repeat on the other side for 15 counts. Then relax and repeat 3 times for each leg(Picture 3)
- Quadriceps stretch
With one hand against a wall for balance, reach behind you and pull your right foot up .Bring your heel as close to your buttocks. hold for 10-15counts,relax.Repeat three times for each foot.(P 5 re 4).
- Inner Thigh Stretch
Sit with the soles of your feet together with your knees pointing outward. Pull your feet as close into your groin as possible. Gently push your knees towards the floor. Hold for 15 counts. Then relax and repeat 3 times. (Picture 5).
MOTORIZED
1. Program: 21 programs as following
A: 1 Manual Program

C: 1 Watt Control Program (WATT PRO: P16)

D: 4 Heart Rate Control Program: (PULSE PRO: P17-P20) 55% H.R, 75% H.R, 95% H.R and TARGET H.R


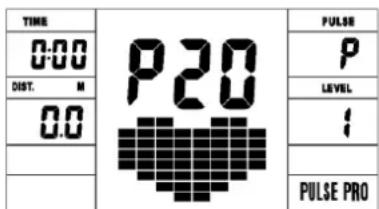
E: 5 User Setting Programs: CUSTOM1 to CUSTOM5 (P11 \~ P15)


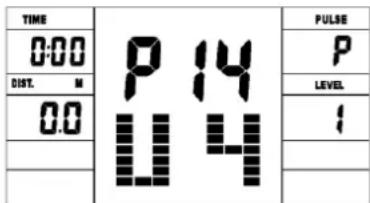
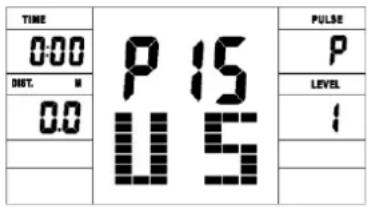
- Record the user's data of 5 User Setting Programs.
- Display Speed(RPM), TIME and WATT., CAL and DIST, at the same time.
-
The computer will turn off automatically if there is no operation, speed signal and pulse signal over 4 minutes. Meanwhile, it will store your current exercise data and turn the loading resistance to the minimum. Once you press any button or in motion, the computer will turn on automatically.
-
There are 10 columns of loading bars, and 8 bars in each column. Each column represents 1 minute workout (without the change of TIME value), and each bar represent 2 levels of loading.

natural_image
Grid of black squares with no text or symbolsButtons:
1. ENTER:
- In "stop" mode, press ENTER button to enter into program selection and setting value which flash in related window.
A: When you choose the program, press Enter to confirm the one you like.
B: When in setting, press ENTER to confirm the value that you would like to preset.
● During the start mode, press ENTER to choose display the speed or RPM, or switch automatically.
- START/STOP:
● Press START/STOP button to start or stop the programs.
● During any mode, hold down this button for 2 seconds to totally reset the computer.
- UP:
- In stop mode and the dot matrix character flash, press this button to select the program up. If the related window value flash, press this button to increase the value.
● During the start mode, press this button to increase the training resistance.
- DOWN:
- In stop mode and the dot matrix character flash, press this button to select the program down. If the related window value flash, press this button to decrease the value.
● During the start mode, press this button to decrease the training resistance.
- RECOVERY:
- First test your current heart rate and show your heart rate value, press this button to enter into pulse recovery testing.
- When you are in pulse recovery mode, press this button to exit.
NOTE: ① To press or rotate of UP, DOWN button should be followed by different model.
② It is suggested to cover your finger within the marked region to
select functions in case of any wrong action.
Operation
- Turn on the computer
Plug in one end of the adaptor to the AC electrical source and connect the other end to the computer.
The computer will beep and enter into initial mode.
- Program select and value setting
● Manual Program and Preset Program P1~ P10
A. Press UP, DOWN button to select the program that you like.
B. Press ENTER button to confirm the selected program and enter time setting window.
C. The time will flash, and then press UP, DOWN button to set up your desired time. Press ENTER to confirm the value.
D. The distance will flash, and then press UP, DOWN button to set up the desired distance value. Press ENTER to confirm the value.
E. The calories will flash, and then press UP, DOWN to set up the desired calories to be consumed. Press ENTER to confirm the value.
F. Press START/ STOP to begin exercise.
● Watt Control Program(WATT PRO:P16)
A. Press UP, DOWN to select the watt control program.
B. Press ENTER to confirm the selected watt control program, and enter into time setting window.
C. The time will flash, and then press UP, DOWN button to set up the desired time,. Press ENTER to confirm the value.
D. The distance will flash, and then press UP, DOWN button to set up the desired distance value. Press ENTER to confirm the value.
E. The calories will flash, and then press UP, DOWN button to set up the desired calories to be consumed. Press ENTER to confirm the value.
F. The watt display will flash, and then press UP, DOWN button to set up the watt to do the exercise. Press ENTER to confirm the value.
G. Press START/ STOP to begin exercise.
NOTE: The WATT value is decided by the TORQUE and RPM. In this program, the WATT value will keep at constant value. It means that if you peddle quickly, the load resistance will decrease and if you peddle slowly, the load resistance will increase to ensure you at the same watt value.
● HEART RATE CONTROL PROGRAM: 55% H.R, 75% H.R and 95% H.R(PULSE PRO: P17-P19)
The maximum heart rate depends on different age and this program will ensure you do the healthy exercise within maximum heart rate.
A. Press UP, DOWN button to choose the heart rate control program.
B. Press ENTER to confirm the heart rate control program, and enter
into AGE setting window.

C. The time will flash, and then press UP, DOWN button to set up the desired time. Press ENTER to confirm the value.
D. The distance will flash, and then press UP, DOWN button to set up the desired distance value. Press ENTER to confirm the value.
E. The calories will flash, and then press UP, DOWN button to set up the desired calories to be consumed. Press ENTER to confirm the value.
F. The age will flash, and then press UP, DOWN button to set the user's age. Press ENTER to confirm the value.
G. When the target heart rate control program flash, the computer will display the user's target heart rate according to user's age.
H. Press START/ STOP to begin exercise.
● HEART RATE CONTROL PROGRAM: TARGET HEART RATE(PULSE PRO: P20)
The user can set any target heart rate to do the exercise.
A. Press UP, DOWN button to select TARGET HEART RATE program.
B. Press ENTER to confirm your choice and enter time setting window.
C. The time display will flash, and then press UP, DOWN button to set the desired time to do the exercise. Press ENTER to confirm the value.
D. The distance will flash, and then press UP, DOWN button to set up
the desired distance value. Press ENTER to confirm the value.
E. The calories will flash, and then press UP, DOWN button to set up the desired calories to be consumed. Press ENTER to confirm the value.
F. The target heart rate will flash, and then press UP, DOWN button to set up your target heart rate. Press ENTER to confirm the value.
G. Press START/ STOP to begin exercise.
NOTE: During exercise, the user's heart rate value depends on resistance level and speed. The heart rate control program is to ensure your heart rate within the preset value. When the computer detect your current heart rate is higher than preset, it will decrease the resistance level automatically or you may slow down exercise. If your current heart rate is lower than preset, it will increase resistance and you may speed up.
- User Profile Programs: CUSTOM1~ CUSTOM5(P11-P15)
A. Press UP, DOWN button to select the user.
B. Press ENTER to confirm your choice, and enter into time setting window.
C. The time display will flash, and then press UP, DOWN button to set up the desired time to do the exercise. Press ENTER to confirm the value.
D. The distance will flash, and then press UP, DOWN button to set up the desired distance value. Press ENTER to confirm the value.
E. The calories will flash, and then press UP, DOWN button to set up
the desired calories to be consumed. Press ENTER to confirm the value.
F. The first resistance level will flash, and then press UP, DOWN button to set the desired load resistance. Press ENTER to confirm. Then repeat above operation to set the resistance from 2 to 10.
G. Press START/ STOP to begin exercise.
The pulse recovery test is to compare your heart rate before and after exercise. It is target to determine your heart strength via the measuring. Please do the test as below:
A. Both your hands hold the pulse sensor or via wireless transmitter belt to test the pulse(if applicable), the computer will display your current pulse value.
B. Press RECOVERY to enter the pulse recovery test and the computer program will enter the stop status.
| TIME | PULSE | |
| 0:60 | P | |
C. Keep pulse detecting.
D. Time will count down from 60 seconds to 0 second.
E. When time reaches 0, the test result (F1-F6) appears on the display.
F1=Excellent F2=Good F3=Fair F4=below average F5= No Good F6= Poor
F. If the computer does not detect your current heart rate first, pressing RECOVERY will not enter into pulse recovery test. During the
pulse recovery test, press RECOVERY to exit the test and return to the stop status.
3. Pulse Measurement
Please place both your palms on the contact pads and the computer will show your current heart beat rate in beats per minute (BPM) on the LCD after 3\~4 seconds. During the measurement, heart icon will flash with simulative ECG showing.
Remark: During the process of pulse measurement, because of the contact jamming, the measurement value may not be stable when start, then it will return to normal level. The measurement value cannot be regarded as the basis of medical treatment.
NOTE: If the computer is also equipped with wireless heart rate measuring via the transmitter belt, and with hand pulse function, the hand-measurement-signal-detecting is preferred.
Specifications
Speed KM/H(M/H): showing your current speed. Range: 0.0 \~ 99.9 KM/H(M/H).
RPM: showing the current rotate per minute. Range : 0\~ 999.
TIME: the accumulative exercise time, range : 0:00\~ 99M59S.
the preset time range is 5:00\~99M00S. The computer will start to count down from preset time to 0:00 with average time for each resistance level. When it reaches to zero, the program will stop and computer alarm. If you do not preset the time, it will run with one
minute decrement each resistance level.
DIST: the exercise accumulative distance. Range : 0.0 \~ 99.9 \~ 999KM(MILE) the preset distance range :1.0 \~ 99.0 \~ 999. When the distance reaches 0, the program will stop and the computer will alarm.
CALORIE: he exercise accumulative calories burnt. Range : 0.0 \~ 99.9 \~ 999 the preset calories range :10.0 \~ 90.0 \~ 990. When the calorie reaches 0, the program will stop and the computer will alarm.
PULSE: showing the exercise heart rate value.
Range: 60\~ 240BPM(beat per minute)
Colorful screen: Computer dormancy after, light and screen put out together.
RESISTANCE LEVEL: showing level. Range:1\~ 16
WATT: show the exercise watt, the interval should be 10, between 30-350.
BLUE TOOTH & APP:
Download APP first, Then open a blue tooth and Position, The exactitude links APP.
■ ADAPTOR
INPUT: AC 230-240V
OUTPUT: 8VDC 500MA

Garlando
GARLANDO SPA
Via Regione Piemonte, 32 - Zona Industriale D1
15068 - Pozzolo Formigaro (AL) - Italy
www.toorx.it - info@toorx.it
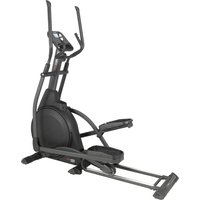

- ERX650
- EXPLODED DIAGRAM
- ASSEMBLY INSTRUCTIONS
- STEP 1:
- STEP 2:
- STEP 3:
- STEP 4:
- STEP 5:
- ADJUSTMENTS GUIDE
- 1.MOVING THE MACHINE
- 2.ADJUSTING THE BALANCE
- SLOPE INCLINE ADJUSTMENT
- Quick Start Guide
- Stretch exercise
- MOTORIZED
- Program: 21 programs as following
- Buttons:
- ENTER:
- Operation
- Pulse Measurement
- Specifications
- Garlando
Brand : Toorx
Model : ERX650
Category : Fitness Equipment