
Soundbar - Soundbar NEBULA - Free user manual and instructions
Find the device manual for free Soundbar NEBULA in PDF.


| Product Type | Soundbar – Fire TV Edition |
| Model | D3000 |
| Dimensions (without brackets) | 930 × 120 × 61 mm (36.6 × 4.7 × 2.4 in) |
| Dimensions (with brackets) | 930 × 135 × 63 mm (36.6 × 5.3 × 2.5 in) |
| Weight | 3.3 kg (116 oz) |
| Power Input | 100-240V ~ 50/60Hz, 1.68A |
| Audio Output Power | Front L/R: 20W × 2ch, Subwoofer: 60W |
| Audio Decoding | Dolby Digital, Dolby Digital Plus |
| Bluetooth | Version 5.0 |
| Connectivity | HDMI ARC, Optical, AUX (3.5mm), USB (firmware only) |
| Remote Control | Included with Alexa voice button |
| Equalizer Modes | Movie, Music, Voice |
| Surround Sound | On/Off via settings |
| Wall Mountable | Yes (brackets and template included) |
| Operating Temperature | 5°C to 35°C (41°F to 95°F) |
| Cleaning Instructions | Use a dry, soft lint-free cloth; avoid corrosive cleaners |
| Safety Features | Overheat protection, auto standby after 30 min |
| Warranty | 12 months for quality issues; 30-day money-back guarantee |
| App Support | Nebula Connect App (iOS/Android) |
Frequently Asked Questions - Soundbar NEBULA
User questions about Soundbar NEBULA
0 question about this device. Answer the ones you know or ask your own.
Ask a new question about this device
Download the instructions for your Soundbar in PDF format for free! Find your manual Soundbar - NEBULA and take your electronic device back in hand. On this page are published all the documents necessary for the use of your device. Soundbar by NEBULA.
USER MANUAL Soundbar NEBULA
For FAQs and more information, please visit:
www.SeeNebula.com

support@SeeNebula.com

+1 (800) 988 7973 (US) Mon-Fri 9:00am - 5:00pm (PT)
+44 (0) 1604 936200 (UK) Mon-Fri 6:00 - 11:00 (GMT)
+49 (0) 69 9579 7960 (DE) Mo-Fr 6:00 - 11:00
natural_image
Simple line drawing of a cylindrical object with rounded ends and a flat top, no text or symbols present.©Anker Innovations Limited. All rights reserved. NEBULA and the NEBULA logo are trademarks of Anker Innovations Limited, registered in the United States and other countries. All other trademarks are the property of their respective owners.
Model: D3000
User Manual
Nebula Soundbar – Fire TV Edition
Table of Contents
02 Important Safety Instructions
03 What's Included
04 Overview
05 Remote Control
08 Placement
09 Connection
11 Powering On Your Soundbar
12 Using Your Soundbar
16 Updating Software
17 Specifications
18 Troubleshooting
19 Notice
22 Trademarks
22 Warranty
Important Safety Instructions
Please read this user manual carefully and save it for future reference. Do not make unauthorized alterations to the product; doing so may compromise safety, regulatory compliance, system performance, and may void the warranty.
- Avoid dropping.
- Do not disassemble.
- Do not submerge in water.
- Avoid extreme temperatures.
- Do not use the device outdoors during thunderstorms.
- Use original or certified cables.
- Do not place dangerous items on top of this device (e.g. liquid filled objects, lit candles).
- Clean with a dry, soft lint-free cloth. Do not use any corrosive cleaner or oil.
• To avoid hearing damage, do not listen for extended periods at high volume. - Do not expose the batteries to extreme heat sources such as direct sunlight or open flames.
- The ideal operating temperature for this product and its accessories is between 41°F / 5°C and 95°F / 35°C.
- The adapter should be installed near the device and should be easily accessible.
- Do not use this product in environments of extreme heat or cold. Never expose this device to strong sunshine or wet environments.
Additional Legal Rights for Consumers
For consumers who are covered by consumer protection laws or regulations in their country of purchase or, if different, their country of residence, the benefits conferred by Anker's Limited Warranty are in addition to all rights and remedies conveyed by such consumer protection laws and regulations, including but not limited to these additional rights.
For FAQs and more information, please visit anker.com/support.
☐ This is CLASS II apparatus with double insulation, and no protective earth provided.

This caution sticker is located on the underside of the soundbar.

This symbol is intended to alert the user to the presence of uninsulated "dangerous voltage" within the product's enclosure that may be of sufficient magnitude to constitute a risk of electric shock to persons.

This symbol is intended to alert the user to the presence of important operating and maintenance (servicing) instructions in the literature accompanying the appliance.
What's Included
Carefully unpack the box and check if the following parts are included.
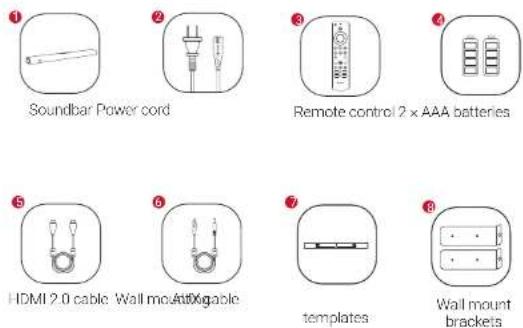
① Nebula Soundbar- Fire TV Edition
② Power cord
③ Remote control
4 2 × AAA batteries
⑤ HDMI 2.0 cable
6 AUX cable
7 Wall mounting template
8 Wall mount brackets
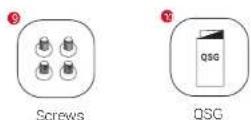
9 Screws
10 Quick Start Guide

The accessories may vary by region.
Overview
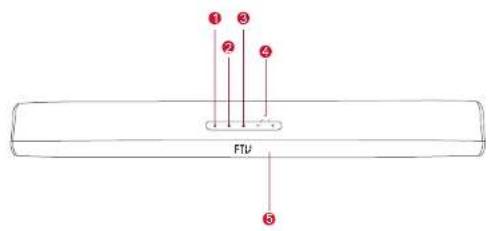
Top panel and front panel
1 Power button
- Press and hold for 3 seconds to power on / off
- Touch to enter standby mode or wake up your soundbar
② (Source input)
- Touch to switch between FTV, BT, ARC, OPTIC, and AUX mode
③ EQ button
- Touch to switch between MOVIE, MUSIC, and VOICE
4 Volume control button
5 Display panel
6 IR receiver
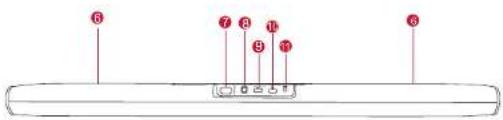
Rear panel
7 Screw holes for wall mounting
8 Power input
- Connect to power supply (with the provided cable)
9 OPTICAL
- Connect to devices with an optical port (optical cable NOT included)
USB port (Only for factory software upgrade)
HDMI (ARC)
- Connect to HDMI Player (TV)
- Connect to Audio Return Channel (ARC)
1 AUX IN
- Connect to an audio output device
Remote Control
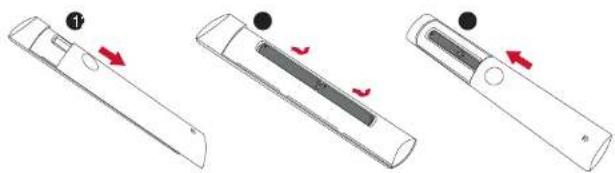
Insert the batteries before using the remote control.
① Slide the battery cover off.
② Insert the batteries (matching + / - polarity as indicated) into the battery compartment.
③ Slide the battery cover back into position.
1. Remote control buttons
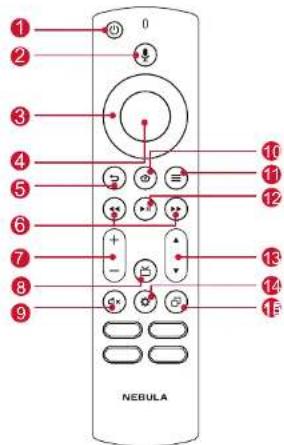
1 Power button
- Press and hold for 3 seconds to power on / off
- Press to enter standby mode or wake up your soundbar
② Voice button
- Press to give commands after pairing is complete (Amazon Alexa feature)
③ Navigation button
- Press up, down, left, or right to navigate
4 Confirmation button
- Press to confirm the selected function
5 Return button
- Press to return to the previous menu
6 / (Previous / Next)
• FTV mode: Fast forward and rewind video content
• BT mode: Skip to the previous or next track
7 Volume +/- button
- Increase / decrease volume
8 Guide button
- Press to display Guide screen
9 Mute button
- Mute or unmute the soundbar audio
10 Home button
- Press to access the home menu
Menu button
- Press to access pop out menu
12 ▶ II (Play / pause)
- FTV mode: start, pause, or resume play
• BT mode: press to play / pause - BT mode: press and hold for 3 seconds to disconnect and enter Bluetooth pairing mode
13 Channel button
- Press to access the Channel menu
14 Settings button
- Press to access soundbar settings menu
15 Recents button
- Press to display Recents screen

Point your remote control squarely at the soundbar's IR receiver while using the remote control.
Placement

• Make sure there is an AC power outlet nearby.
- To avoid wireless interference, keep other wireless devices 1-3 ft away from the soundbar.
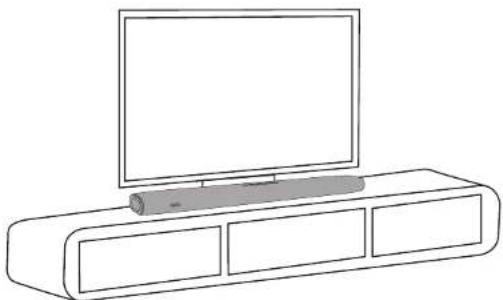
Table Placement
① Place the soundbar on a solid surface with the top panel facing up.
natural_image
Line drawing of a modern TV set with a flat-screen monitor on top (no text or symbols)Wall Mount Installation

• Make sure the soundbar is powered off and unplugged before installing
- Use the fixing screws appropriate for your drill and the type of wall you have.
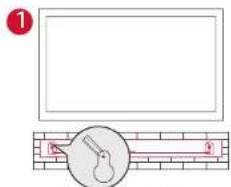
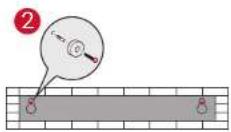
① Place the wall mounting template card against the wall. Push a pen tip through the center to mark the location for the wall-mount brackets.
② Drill a hole in the wall at each marking.
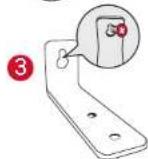
③ Screw the wall-mount brackets into the holes with screws (not provided) in the wall.
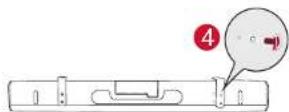
④ Fix the L-brackets to the bottom of the soundbar with the provided screws.
Wall Mount the Soundbar
Connection
1. Connecting to Your TV

- Before connecting devices to the soundbar, make sure that you unplug all devices from the power outlet.
• To enjoy audio from your soundbar, make sure you select the corresponding signal source on your TV. Refer to your TV's user manual for details.
There are two ways to connect to your TV.
Option 1: Connect to your TV with an HDMI cable (preferred, FTV / ARC mode)
Using the provided HDMI cable, connect the HDMI (ARC) on the rear of the soundbar to the HDMI IN (ARC) port on your TV.
HDMI (ARC)
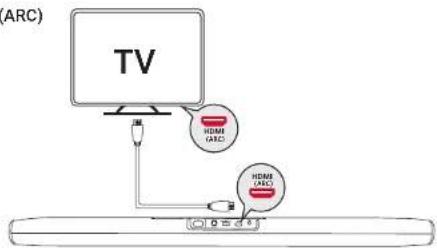

• The HDMI IN (ARC) connector on the TV might be labeled differently.
- If your TV is HDMI ARC compliant, it is recommended that you connect the soundbar to your TV's HDMI (ARC) port. You can use both FTV mode and ARC mode.
- If your TV is not HDMI ARC compliant, you can use the soundbar in FTV mode only by connecting it to your TV via the HDMI port.
- If your TV has a DVI connector only, use an HDMI / DVI adapter to connect to your TV.
Option 2: Connect to your TV with an optical cable (OPTIC mode)
You cannot enjoy Fire TV content if the soundbar and TV are connected using an optical cable.
① Remove the protective caps from both ends of the optical cable.
② Connect the OPTICAL jack on the rear of the soundbar to the OPTICAL jack on your TV.
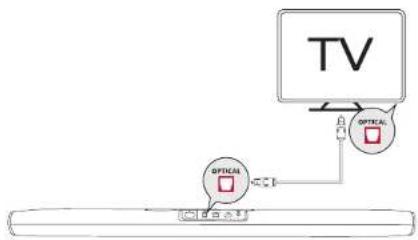
flowchart
graph TD
    TV["TV"] -->|OPTICAL Interface| Device["Device"]
    Device -->|OPTICAL Interface| TV
    Device -->|OPTICAL Interface| Optical["Optical Interface"]

- The OPTICAL jack cannot be used simultaneously when an HDMI ARC-compliant TV is connected to the soundbar.
• The OPTICAL jack might be labeled differently
Other Connection Options
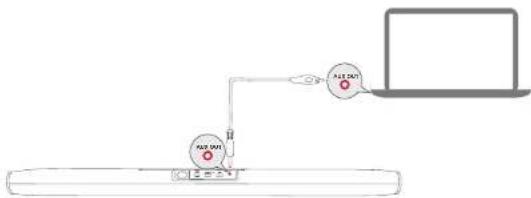
You can connect to computers and other devices with an AUX OUT connector using the provided AUX cable.
Powering On Your Soundbar

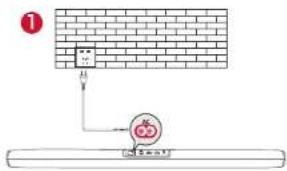
- Before connecting the power cord to an AC outlet, make sure you've completed all other connections.
- When you disconnect the power cord, always pull the plug instead of cable.
① Plug one end of the power cord into the AC IN connector on the rear of the soundbar and the other end into a wall outlet.
The soundbar will automatically enter the initialization process. "LOADING" will show on the display panel for 7 seconds and then disappear.
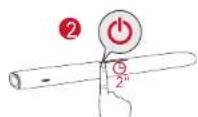
② Press and hold ⏻ on the display panel for 3 seconds to power on.
| Action Description | |
| Press ⏻ | Enter standby mode |
| Press and hold ⏱or 3 seconds | Power on / off |

- The soundbar will automatically switch to standby mode when no audio input is received for 30 minutes.
- The soundbar will wake up from standby mode when any button is pressed or source input is received.
Using Your Soundbar
You can stream Fire TV from your soundbar or TV audio to your soundbar by selecting the corresponding source.
1. Stream Fire TV from your Soundbar
① Press ☑ on the top panel of the soundbar until the FTV appears on the display panel.
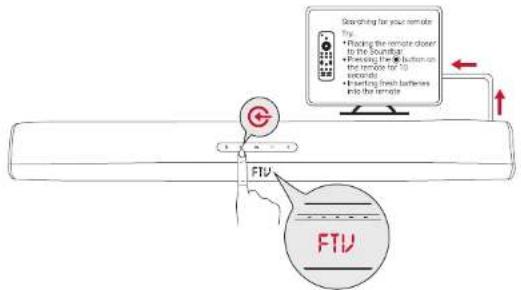
② Follow the on-screen instructions to complete the setup process.

- Make sure you select the "HDMI" source in your TV settings.
- If you do not hear the sound coming from the soundbar, check the "Troubleshooting" section.
2. Stream TV audio to your soundbar
Press ☑ on the top panel of the soundbar until ARC appears on the display panel.
The TV's audio will be heard through your soundbar.
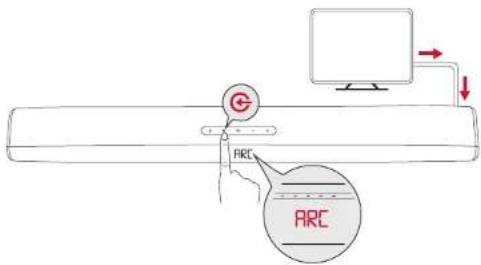

Make sure your TV supports Audio Return Channel (ARC) and you select ARC on your TV.
3. Play music via Bluetooth
① Press ⬇ until "BT" appears on the display panel.
② Enable Bluetooth on your device, search for Nebula Soundbar – Fire TV Edition on your Bluetooth list, and then connect.
➢ Music will be streamed through the soundbar.
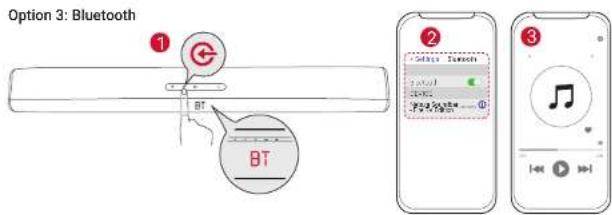
| BT flashing Pairing to Bluetooth device or Bluetooth device has disconnected |
| BT stays steady Connected to device |

When Nebula Soundbar – Fire TV Edition is turned on, it will automatically connect to the last connected device if available. If not, hold ▶ the remote control for 3 seconds to activate Bluetooth mode.
Having connection problems? Try pairing your device with the soundbar again.
- Remove Nebula Soundbar – Fire TV Edition from your device's Bluetooth history.
• To get the best sound quality, make sure to keep your soundbar 33 ft / 10 m away from the connected device.
4. Adjust Soundbar Settings
Option 1: Using the touch panel
Touch ⬤ to switch between FTV, BT, ARC, OPTIC, and AUX source modes. Touch EQ on the top panel to switch between MOVIE, MUSIC, and VOICE mode.
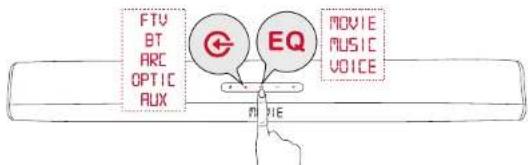
Touch Panel LED Display
| HELLO Power on | |
| FTV Fire TV mode | |
| ARC HDMI ARC source mode | |
| BT Bluetooth speaker mode | |
| OPTIC | Optical source mode |
| AUX | AUX IN mode |
| MUSIC, MOVIE, VOICE | Equalizer mode |
| S ON, S OFF | Surround on / Surround off |
| BA XX | Bass volume is XX |
| TR XX | Treble volume is XX |
| SLEEP | Soundbar is on standby |
Option 2: Using the remote control
To adjust the soundbar's settings:
① Press ⚙ on the remote control to access the soundbar's settings.
② Press the navigation button up or down on the remote control to switch between Source Mode (FTV / BT / ARC / OPTIC / AUX), EQ (Movie / Music / Voice), Surround (S), Bass (BA), and Treble (TR) modes.
③ Press the navigation button left or right on the remote control to switch between options within each mode.
④ Press ● to confirm the selection.
| Mode Description | |
| Surround on When | surround mode is selected, the soundbar creates a fuller, more immersive experience that puts you inside the action. |
| Surround off Switch | back to 2-channel stereo playback. Select from one of the 3 sound modes to tailor the sound to the media. |
| BA / TR Set the high frequency (treble) and low frequency (bass). | |
5. Download the Nebula Connect App
To easily control your Nebula Soundbar – Fire TV Edition, we recommend downloading the Nebula Connect App.
① Download the Nebula Connect from the App Store (iOS devices) or Google Play (Android devices).
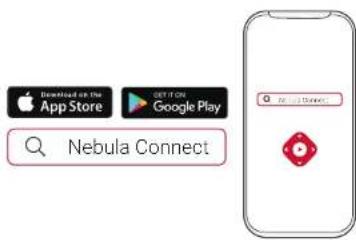
② Enable Bluetooth on your smartphone.
③ Open the Nebula Connect app and select [Nebula Soundbar – Fire TV Edition] as the device to be connected.
④ Follow the on-screen instructions to complete connection setup.
Updating Software
To get the best features and support, update your soundbar with the latest software.
① Download the Nebula Connect app on your phone.
② Follow the on-screen instructions to connect the soundbar.
③ Touch the "Settings" icon to enter the "Settings" page, and check the update. If a prompt appears, tap "Update" to begin updating.
While updating the software:
① Keep your phone on the "Update" page.
② Make sure the Nebula Connect app and your soundbar are connected.
③ Make sure your soundbar is connected to a power supply.
④ After updating has completed, the soundbar will automatically restart.
Specifications

Specifications are subject to change without notice.
| Input 100-240V ~ 50/60Hz 1.68A | |
| Audio output Front L / R: 20W x 2chSubwoofer: 60W | |
| Decoder Dolby Digital | Dolby Digital Plus4K HDR VideoDolby Vision |
| Input jack TV IN (OPT) × 1 | AUX IN (3.5 mm stereo mini) × 1 |
| Output jack HDMI OUT × 1 | |
| Additional jack USB (for factory firmware update only) | |
| Bluetooth Version 5.0 | |
| Size 930 × 120 × 61 mm / | 36.6 × 4.7 × 2.4 in |
| Product size (with wallmount brackets installed) | 930 mm × 135 mm × 63 mm/ 36.6 × 5.3 × 2.5 in |
| Weight (without packaging) | 3.3 kg / 116 oz |
Troubleshooting
Never try to repair the product yourself. If you have problems using this product, check the following points before you request service.
Sound
No sound from the soundbar's speakers.
- Make sure you select the correct audio input on your soundbar and TV.
• Make sure your soundbar is not muted.
Sound is distorted or echoey. - If you play audio from the TV, make sure that the TV is muted.
Bluetooth
A device cannot connect with the soundbar.
- Check if you have enabled the Bluetooth function of the device.
• Make sure the device is connected correctly. - The soundbar is already connected with another Bluetooth device. Disconnect that device and then pair with a new device.
Poor audio quality from a connected Bluetooth device.
- The Bluetooth reception is poor. Move the device closer to the soundbar or remove any obstacle between the device and the soundbar.
Remote control
The remote control doesn't work.
- Check if the batteries are installed properly.
- Replace the batteries.
Notice

This product complies with the radio interference requirements of the European Community.
Declaration of Conformity
Hereby, Anker Innovations Limited declares that this device is in compliance with the essential requirements and other relevant provisions of Directive 2014/53/EU. For the declaration of conformity, visit the Web site: www.seenebula.com.
Due to the used enclosure material, the product shall only be connected to a USB Interface of version 2.0 or higher.
Do not use the Device in the environment at too high or too low temperature, never expose the Device under strong sunshine or too wet environment.
The suitable temperature for the product and accessories is 5°C\~35°C.
It is recommended to charge the device in an environment with a temperature that ranges from 5°C\~25°C.
RF exposure information: The Maximum Permissible Exposure (MPE) level has been calculated based on a distance of d = 20cm between the device and the human body. To maintain compliance with RF exposure requirement, use product that maintains a 20cm distance between the device and human body.
CAUTION RISK OF EXPLOSION IF BATTERY IS REPLACED BY AN INCORRECT TYPE. DISPOSE OF USED BATTERIES ACCORDING TO THE INSTRUCTIONS
Wifi Operating Frequency Range: 2412\~2472MHz(2.4G); 5150\~5250MHz, 5725\~5850MHz (5G)
Wifi Max Output Power: 19dBm(2.4G); 15dBm(5G)
Bluetooth Operating Frequency Range: 2402\~2480MHz; Bluetooth Max Output Power: 8dBm
5150\~5250 MHz can be used indoor only.
| AT | BE | BG | HR | CY | CZ | DK | |
| EE | FI | FR | DE | EL | HU | IE | |
| IT | LV | LT | LU | MT | NL | PL | |
| PT | RO | SK | SI | ES | SE | UK |
The following importer is the responsible party (contact for EU matters only) Importer: Anker Technology (UK) Ltd
Importer Address: Suite B, Fairgate House, 205 Kings Road, Tyseley, Birmingham, B11 2AA, United Kingdom

This product is designed and manufactured with high quality materials and components, which can be recycled and reused.

This symbol means the product must not be discarded as household waste, and should be delivered to an appropriate collection facility for recycling. Proper disposal and recycling helps protect natural resources, human health and the environment. For more information on disposal and recycling of this product, contact your local municipality, disposal service, or the shop where you bought this product.
FCC Statement
This device complies with Part 15 of the FCC Rules. Operation is subject to the following two conditions: (1) This device may not cause harmful interference, and (2) this device must accept any interference received, including interference that may cause undesired operation.
Warning: Changes or modifications not expressly approved by the party responsible for compliance could void the user's authority to operate the equipment.
Note: This equipment has been tested and found to comply with the limits for a Class B digital device, pursuant to Part 15 of the FCC Rules. These limits are designed to provide reasonable protection against harmful interference in a residential installation.
This equipment generates uses and can radiate radio frequency energy and, if not installed and used in accordance with the instructions, may cause harmful interference to radio communications. However, there is no guarantee that interference will not occur in a particular installation. If this equipment does cause harmful interference to radio or television reception, which can be determined by turning the equipment off and on, the user is encouraged to try to correct the interference by one or more of the following measures: (1) Reorient or relocate the receiving antenna. (2) Increase the separation between the equipment and receiver. (3) Connect the equipment into an outlet on a circuit different from that to which the receiver is connected. (4) Consult the dealer or an experienced radio/TV technician for help.
FCC Radio Frequency Exposure Statement
The device has been evaluated to meet general RF exposure requirements. The device can be used in fixed/mobile exposure condition. The min separation distance is 20cm.
Notice: Shielded cables
All connections to other computing devices must be made using shielded cables to maintain compliance with FCC regulations.
FCC ID:2AOKB-D3000
The following importer is the responsible party.
Company Name: Fantasia Trading LLC
Address: 9155 Archibald Avenue, Suite 202, Rancho Cucamonga, CA, 91730, US
This device complies with Industry Canada licence-exempt RSS standard(s). Operation is subject to the following two conditions:
(1) this device may not cause interference, and
(2) this device must accept any interference, including interference that may cause undesired operation of the device."
This Class B digital apparatus complies with Canadian ICES-003.
When using the product, maintain a distance of 20cm from the body to ensure compliance with RF exposure requirements.
The Bluetooth ^® word mark and logos are registered trademarks owned by the Bluetooth SIG, Inc. and any use of such marks by Anker Innovations Limited is under license. Other trademarks and trade names are those of their respective owners.
HDMI
HDMI, and HDMI logo and High-Definition Multimedia Interface are trademarks or registered trademarks of HDMI licensing LLC in the United States and other countries.

DOLBY
AUDIO
Manufactured under license from Dolby Laboratories. Dolby, Dolby Audio, Pro Logic, and the double-D symbol are trademarks of Dolby Laboratories.
Warranty
30-Day Money-Back Guarantee for Any Reason
You may return your undamaged product and packaging within 30 days of purchase to receive a FULL REFUND for any reason. If the reason for return isn't quality-related, the customer must pay for the return shipping.
12-Month Warranty for Quality-Related Issues
Nebula's products are warranted to be free from material and workmanship defects for 12 months from the date of purchase. Within this period, Nebula will provide a replacement and cover any return shipping costs for products that fail in normal use.
Please note: Any provided shipping labels must be used within 20 days from the date they're issued by Nebula Support.
Anker Innovations Limited
Room 1318-19, Hollywood Plaza, 610 Nathan Road, Mongkok, Kowloon, Hong Kong
- Table of Contents
- Important Safety Instructions
- Additional Legal Rights for Consumers
- What's Included
- Overview
- Top panel and front panel
- Rear panel
- Remote Control
- Remote control buttons
- Placement
- Table Placement
- Wall Mount Installation
- Connection
- Connecting to Your TV
- Option 1: Connect to your TV with an HDMI cable (preferred, FTV / ARC mode)
- Option 2: Connect to your TV with an optical cable (OPTIC mode)
- Other Connection Options
- Powering On Your Soundbar
- Using Your Soundbar
- Stream Fire TV from your Soundbar
- Stream TV audio to your soundbar
- Play music via Bluetooth
- Adjust Soundbar Settings
- Option 1: Using the touch panel
- Option 2: Using the remote control
- Download the Nebula Connect App
- Updating Software
- Specifications
- Troubleshooting
- Sound
- Bluetooth
- Notice
- Declaration of Conformity
- FCC Statement
- FCC Radio Frequency Exposure Statement
- HDMI
- Warranty
- 30-Day Money-Back Guarantee for Any Reason
- 12-Month Warranty for Quality-Related Issues
Brand : NEBULA
Model : Soundbar
Category : Soundbar