Samurai TT-MG20 - Food processor TurboTronic - Free user manual and instructions
Find the device manual for free Samurai TT-MG20 TurboTronic in PDF.


| Product Type | Food Processor |
| Brand | TurboTronic |
| Model | Samurai TT-MG20 |
| Power | 800 W |
| Bowl Capacity | 2.0 L |
| Speed Settings | 2 speeds + pulse |
| Dimensions (W x D x H) | 30 x 25 x 35 cm |
| Weight | 3.5 kg |
| Material | Stainless steel blades, plastic bowl |
| Functions | Chopping, slicing, shredding, mixing, kneading, blending |
| Accessories Included | S-blade, slicing disc, shredding disc, kneading hook, spatula |
| Safety Features | Safety lock on lid, non-slip feet, overload protection |
| Cleaning | Removable parts dishwasher safe |
| Power Supply | 220-240 V, 50/60 Hz |
| Warranty | 2 years |
Frequently Asked Questions - Samurai TT-MG20 TurboTronic
User questions about Samurai TT-MG20 TurboTronic
0 question about this device. Answer the ones you know or ask your own.
Ask a new question about this device
Download the instructions for your Food processor in PDF format for free! Find your manual Samurai TT-MG20 - TurboTronic and take your electronic device back in hand. On this page are published all the documents necessary for the use of your device. Samurai TT-MG20 by TurboTronic.
USER MANUAL Samurai TT-MG20 TurboTronic
natural_image
Black TurboTronic kitchen electric oven with stainless steel feeder (no visible text or symbols on body)ELECTRIC MEAT GRINDER
TT-MG20




Thank you for purchasing Samurai – Electric Meat Grinder by TurboTronic®.
TT-MG20 meat grinder is fast and functional, allowing you to chop meat in an instant, much more convenient and faster than chopping by hand. It is equipped with three types of stainless-steel blades (fine, medium and coarse), a convenient pusher, a kubbe attachment and a nozzle for stuffing sausages and a cookie accessory.
TECHNICAL DETAILS
| ITEM NUNBER: | TT-MG20 | BRAND | TurboTronic |
| PRODUCT SIZE: | 311*202*342mm | QTY.: | 1 PCS/CTN |
| GB PACKAGE SIZE: | 413*230*205mm | N.W: | 3.4KG |
| MC PACKAGING SIZE: | 425*242*220mm | G.W: | 4.4KG |
| DESCRIPTION: | Electric Meat Grinder | POWERCORD: | out 1.0m VDE |
| POWER &VOLTAGE: | 220-240V, 50/60Hz, 550WMax locked power: 2000W | COLOR: | Black / chrome |
| MATERIALS: | Stainless steel cutting blade.Detachable aluminum tube.Front panel with chrome. | EAN: | 4260563038315 |

IMPORTANT SAFEGUARDS
When using electrical appliances, basic safety precautions should always be followed to reduce the risk of fire, electric shock, and/or injury to persons, including the following:
- Read all the instructions.
-
This appliance is not intended for use by persons (including children) with reduced physical, sensory, or mental capabilities, or lack of experience and knowledge, unless they are closely supervised and instructed concerning use of the appliance by a person responsible for their safety.
-
Close supervision is necessary when any appliance is used by or near children. Children should be supervised to ensure that they do not play with the appliance.
-
To protect against a risk of electrical shock, do not immerse the cord, plug, or base in water or other liquid.
-
Unplug from outlet when not in use and before cleaning. Allow to cool before putting on or taking off parts.
-
The use of accessory attachments is not recommended by the appliance manufacturer as it may cause injuries.
-
Do not operate any appliance with a damaged power cord or plug, or after the appliance malfunctions or if it has been dropped or damaged in any way. Power cord replacement and
repairs must be conducted by the manufacturer, its service agent, or similarly qualified persons in order to avoid a hazard. Call the customer service number provided for information on examination, repair, or adjustment.
- Do not use outdoors.
- Do not let cord hang over the edge of a table or counter or touch hot surfaces, including the stove.
-
Do not use the appliance for purposes other than its intended use.
-
⚠️ WARNING: Risk of electric shock.
-
Intended for countertop use only.
-
Do not place the unit directly under cabinets when operating Avoid reaching over the product when it is operating.
-
WARNING: Keep appliance and power cord away from children. Never drape the power cord over edge of counter, never use outlet below the counter, and never use with an extension cord.
FOR HOUSEHOLD USE ONLY SAVE THESE INSTRUCTIONS

ADDITIONAL IMPORTANT SAFEGUARDS
When using electrical appliances, basic safety precautions should always be followed including the following:
- Unplug from outlet while not in use, before putting on or taking off parts, and before cleaning.
- Unplug when assembling and disassembling the unit.
- Close supervision is necessary when any appliance is used near children.
- When carrying the unit be sure to hold the body with both hands. Do not carry the unit by the hopper plate or head.
- Do not fix the cutting blade and cutting plate when using kibbe attachment.
- Never push products in by hand. Use the food pusher.
- Do not grind hard food such as bones, nuts, etc.
- Do not grind ginger and other materials with hard fiber.
- The meat grinder should not be operation for 10 minutes. Then allow a 10-minute interval to allow the motor to cool.
- Allow 30 seconds when switching the unit from “ON” to “REVERSE” or from “REVERSE” to “ON”, or this may cause some abnormal behavior of the unit, such as moving up and down and easily damaging the unit.
- To avoid jamming, do not force the unit to operate with excessive pressure.
- When the circuit breaker activates, do not switch on.
- Never try to replace the parts and repair the unit by yourself.
- Do not immerse cord or the body of mixer in water as this may give rise to electric shock.
| Indicates to read and review instructions to understand operation and use of product. | |
| Indicates the presence of a hazard that can cause personal injury, death or substantial property damage if the warning included with this symbol is ignored. | |
| For indoor and household use only. |
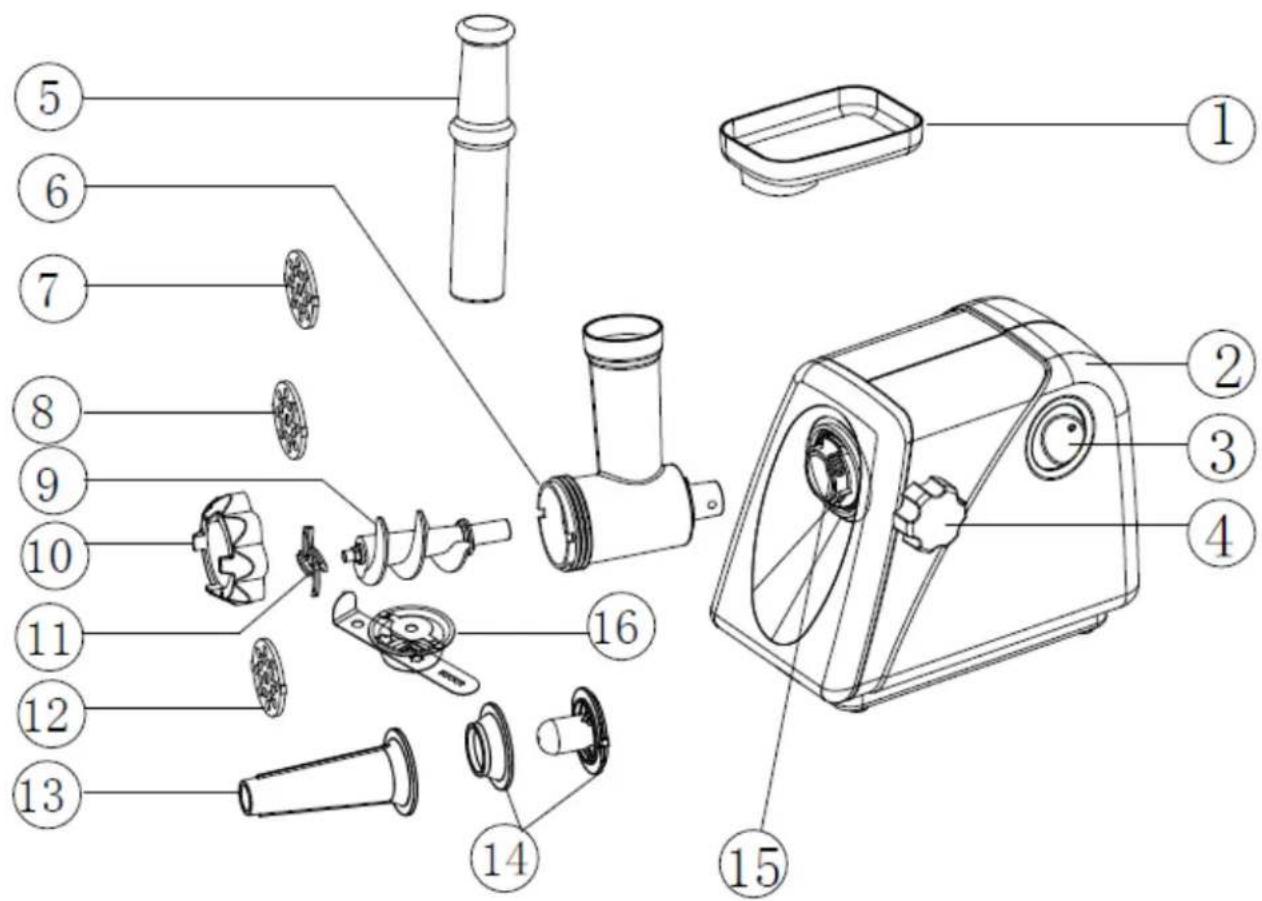
DESCRIPTION
- Hopper plate
- Body
- ON/OFF/REVERSE SWITCH
- Fasten knob
- Food pusher
- Head
- Cutting plate (fine)
-
Cutting plate (medium)
-
Snake
- Fixing ring
- Blade
- Cutting plate (large)
- Sausage
- Kibbe attachment
- Head inlet
- Cookie accessory
BEFORE FIRST USE
- Check that voltage indicated on the rating label corresponds to the main voltage in your home.
○ Wash all parts (except body) in warm soapy water.
Before plugging in, ensure the ON/OFF/REVERSE switch is in the "OFF" position.
INSTRUCTION FOR USE
ASSEMBLY
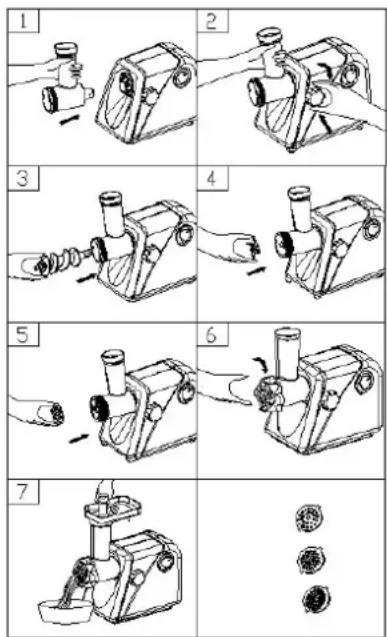
- Press the fasten button, hold the head and insert it into the inlet (when inserting please pay attention the head must be slanted as per arrow indicated on the top, see fig.1), then move the head anti-clockwise so that the head is fastened tightly. You will hear a click when it locks in place (fig. 2).
- Place the worm into the head, long end first, and turn to feed the screw slightly until it is set into the motor housing (fig. 3).
- Place the cutting blade onto the worm shaft with the blade facing the front as illustrated (fig. 4). If it is not fitted properly, the meat will not be ground.
○ Place the desired cutting plate next to the cutting blade, fitting protrusions in the slot (fig. 5).
o Support or press the center of the cutting plate with one finger, then screw the fixing ring tight with another hand (fig. 6). Do not overtighten. - Place the body on the head and fix it into position.
- Position the unit on a firm surface.
- The air passage at the bottom and the side of the motor housing should be kept free and not blocked.
MINCING MEAT
- Cut all food into pieces (Sinewless, boneless and fatless meat is recommended, approximate size :20 mm x 20 mm x 60 mm) so that the pieces fit easily into the hopper opening.
- Plug the unit on and switch ON/OFF/REVERSE knob to "ON" position.
- Feed foods into the hopper plate. Only use the food pusher. (fig. 7).
- After use switch the unit off and unplug it from the power supply.
REVERSE FUNCTION
- In case of jamming, switch off the appliance, position and ON/OFF/REVERSE switch to "REVERSE" position.
- Snake will be rotated in the opposite direction, and the head will get empty.
- If it doesn't work, switch off the unit and clean it.
ASSEMBLING THE KIBBE ATTACHMENT
RECIPE
STUFFING
Mutton 100g
Olive oil 1 1/tablespoons
Onion (cut finely) 1 1/tablespoons
Spices to your taste
Salt to your taste
Flour 1 1/tablespoons
- Mince mutton once or twice.
- Fry onion until brown and add minces mutton, all spice, salt and flour.
OUTLET COUVER
Lean meat 450g
Flour 150-200g
Spices to your taste
Nutmeg (cut finely) 1
Powdered red pepper to your taste
Pepper to your taste
- Mince the meat three times and mix all ingredients together in a bowl. Use more meat and less flour for outlet cover create better consistency and taste.
- Grind the mixture three times.
- Disassemble by reversing the steps from 5-3 to remove the cutting plate and cutting blade.
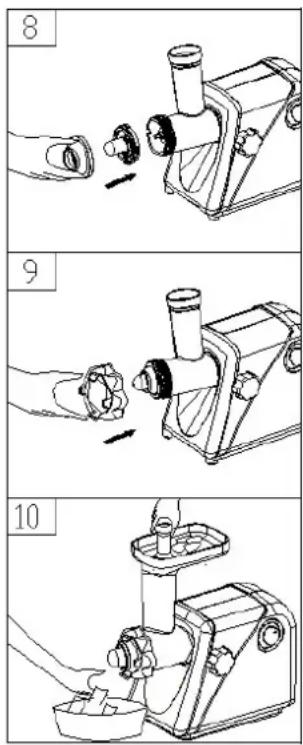
- Place kibbe attachments A and B onto the feed screw shaft together, fitting protrusions in the slots (fig. 8).
- Screw cap into place until tight. Do not over tighten (fig. 9).
- Screw on the cylindrical outlet cover (fig. 10).
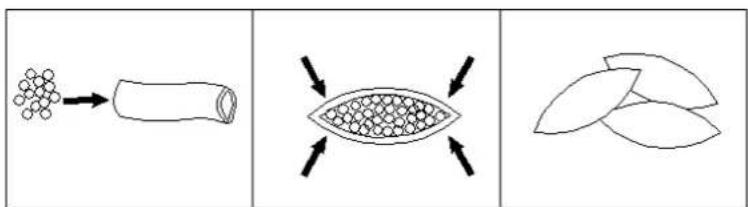
○ Form kibbe as illustrated below and deep fry.
MAKING SAUSAGES
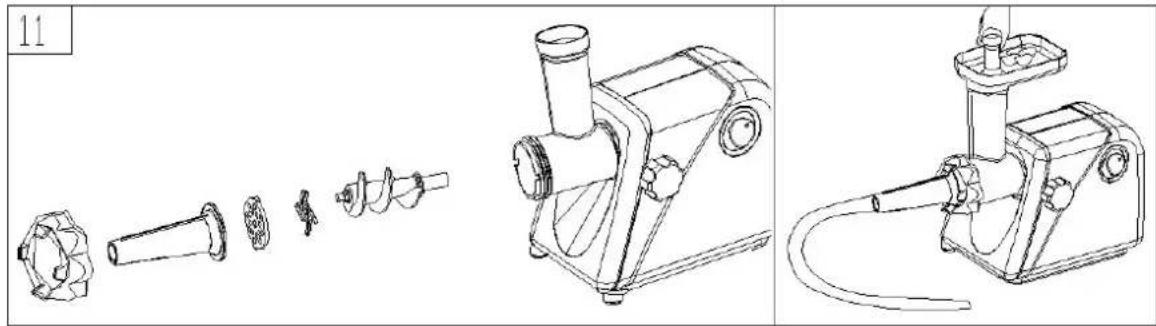
Before starting, please assemble the sausage attachment as shown below (fig. 11)
natural_image
Technical line drawings of a manual cutting tool and a motor assembly (no text or labels)MAKING COOKIES
Self-raising flour 500g
Warm water 250g
Cooking oil 20g
Sugar 50g
Or according to taste
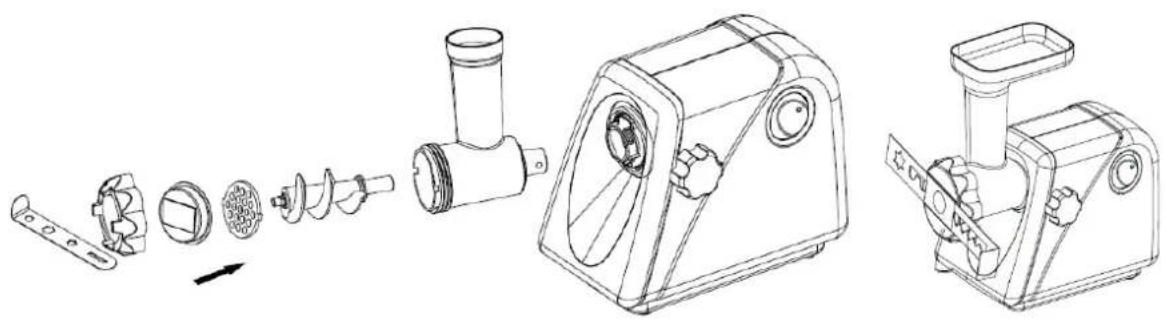
Stir the above mixture well, choose your favorite type of cookie-cutter, such as star-shaped cookie, put the cookie board into the middle of the cookie cover, fix it as shown in the picture, start the machine, and then put the mixed ingredients into the top of the meat grinder's head, push it with a food pusher. When the cookie bar comes out from the head, cut it into the desired size of pieces with a knife. Roll out the cookie bar and cut into the desired cookie shapes with the cookie cutter.
natural_image
Technical line drawing of a kitchen tool assembly, showing exploded view and exploded view (no text or labels)CLEANING AND MAINTENANCE
DISASSEMBLY
○ Make sure that the motor has stopped completely.
- Disconnect the plug from the power socket.
○ Disassemble by reversing the steps from figures 1 - 6.
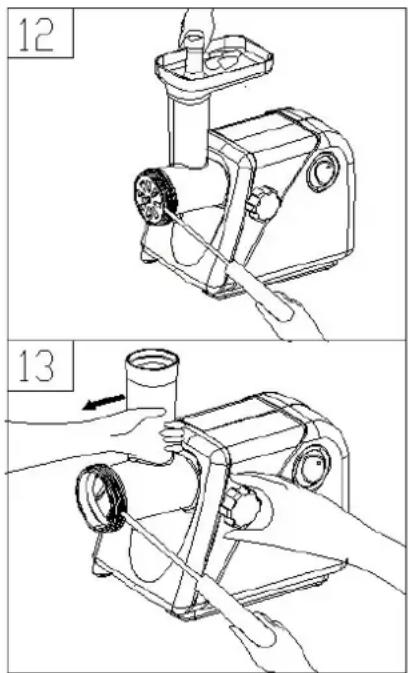
To remove the cutting plate easily, place a screwdriver between the cutting plate and the head as illustrated and lift it up (fig.12)
- Press the fastener knob, move the head as per direction illustrated on fig .13, then you can take out the head.
CLEANING
- Remove meat, etc. wash each part in warm soapy water.
○ A bleaching solution containing chlorine will discolor the aluminum surfaces. - Do not immerse the motor housing in water, only wipe it with a damp cloth.
- Thinners and petrol will crack or change the color of the unit.
- Wipe all the cutting parts with a wet cloth.
ENVIRONMENTALLY FRIENDLY DISPOSAL
DISPOSAL OF OLD ELECTRICAL APPLIANCES:
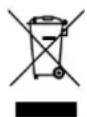
The European directive 2002/96/EC on Waste Electrical and Electronic Equipment (WEEE), requires that old household electrical appliances must not be disposed of in the normal unsorted municipal waste stream. Old appliances must be collected separately in order to optimize the recovery and recycling of the materials that they contain, and reduce the impact on human health and the environment. The crossed out “wheeled bin” symbol on the product is a reminder of your obligation, that when you dispose of
the appliance, it must be separately collected.
Consumers should contact their local authority or retailer for information concerning the correct disposal of their old appliance.
LIMITED WARRANTY:
Limited Warranty applies to purchases made from authorised retailers of TurboTronic ^® . TurboTronic ^® Warranty coverage applies to the original owner and to the original product only and is not transferable.
TurboTronic ^® warrants that the unit shall be free from defects in material and workmanship. The Limited Warranty applies only when it is used under normal household conditions and maintained according to the requirements outlined in the Owner's Guide, subject to the following conditions and exclusions:
ANY WARRANTY OR AFTER PURCHASE SERVICE, SHOULD BE WITH A THIRD PARTY COMPANY, FROM WHICH YOU PURCHASED THE PRODUCT. TURBOTRONIC® PROVIDES THE WARRANTY ONLY TO OUR THIRD-PARTY SUPPLIERS. SINCE THIS PRODUCT IS NOT PURCHASED DIRECTLY FROM TURBOTRONIC® BUT VIA ONE OF OUR THIRD-PARTY SUPPLIERS, ANY ISSUE AFTER THE PURCHASE, CUSTOMER SERVICE OR EXCERCISING THE WARRANTY SHOULD BE ONLY/DIRECTLY THROUGH THE THIRD-PARTY SUPPLIERS FROM WHICH YOU PURCHASED THE PRODUCT.
What is covered by this warranty?
- The original unit and/or non-wearable parts deemed defective will be repaired or replaced, at the sole discretion of TurboTronic®.
- TurboTronic ^® reserves the right to replace the unit with one of equal or greater value.
What is not covered by this warranty?
-
Normal wear and tear of wearable parts (such as blending vessels, lids, cups, blades, blender bases, removable pots, racks, pans, etc.), which require regular maintenance and/or replacement to ensure the proper operation of your unit, are not covered by this warranty.
-
Any unit that has been tampered with or used for commercial purposes.
-
Damage caused by misuse, abuse, negligent handling, failure to perform required maintenance (e.g., failure to keep the well of the motor base clear of food spills and other debris), or damage due to mishandling in transit.
- Consequential and accidental damage.
- Defects caused by repair persons not authorized by TurboTronic ^® . These defects include damages caused in the process of shipping, altering, or repairing the TurboTronic ^® product (or any of its parts) when the repair is performed by a repair person not authorized by TurboTronic ^® .
- Products purchased, used, or operated outside Europe.
Illustrations may differ from actual product.
We constantly strive to improve our products, therefore the specifications contained herein are subject to change without notice.
TurboTronic ^® and Z-Line ^® are registered trademarks of Z-GLOBAL B.V.B.A ^® .
PRINTED IN PRC

- IMPORTANT SAFEGUARDS
- FOR HOUSEHOLD USE ONLY SAVE THESE INSTRUCTIONS
- ADDITIONAL IMPORTANT SAFEGUARDS
- DESCRIPTION
- BEFORE FIRST USE
- INSTRUCTION FOR USE
- ASSEMBLY
- MINCING MEAT
- REVERSE FUNCTION
- ASSEMBLING THE KIBBE ATTACHMENT
- RECIPE
- OUTLET COUVER
- MAKING SAUSAGES
- MAKING COOKIES
- CLEANING AND MAINTENANCE
- DISASSEMBLY
- CLEANING
- ENVIRONMENTALLY FRIENDLY DISPOSAL
- DISPOSAL OF OLD ELECTRICAL APPLIANCES:
- LIMITED WARRANTY:
- What is covered by this warranty?
- What is not covered by this warranty?
Brand : TurboTronic
Model : Samurai TT-MG20
Category : Food processor