
FreshDaddy 05622 - Vacuum sealer Presto - Free user manual and instructions
Find the device manual for free FreshDaddy 05622 Presto in PDF.


| Product Type | Vacuum Sealer |
| Brand | Presto |
| Model | FreshDaddy 05622 |
| Dimensions (approx.) | 16 x 6 x 4 inches |
| Weight | 4 lbs |
| Power Supply | 120V, 60Hz, 120W |
| Vacuum Pressure | -60 kPa |
| Pump Type | Single piston pump |
| Sealing Width | 12 inches |
| Sealing Modes | Vacuum & Seal, Seal Only, Pulse Vacuum |
| Canister Hose Port | Yes, for vacuum canisters |
| Drip Tray | Removable, easy to clean |
| Bag Types Compatible | All standard vacuum bags (smooth and textured) |
| Automatic Shut-off | Yes, after sealing cycle |
| Cool-down Mode | Automatic between cycles |
| Maintenance | Wipe exterior with damp cloth; clean drip tray and gaskets regularly |
| Spare Parts | Sealing gasket, vacuum hose, drip tray available |
| Warranty | 1 year limited warranty |
| Manual Languages | English only (PDF download available) |
Frequently Asked Questions - FreshDaddy 05622 Presto
User questions about FreshDaddy 05622 Presto
0 question about this device. Answer the ones you know or ask your own.
Ask a new question about this device
Download the instructions for your Vacuum sealer in PDF format for free! Find your manual FreshDaddy 05622 - Presto and take your electronic device back in hand. On this page are published all the documents necessary for the use of your device. FreshDaddy 05622 by Presto.
USER MANUAL FreshDaddy 05622 Presto
• Vacuum sealing keeps food fresh up to five times longer than ordinary methods.
- Settings for dry or moist food, seal only, vacuum seal, and stop/pulse.
• Built-in bag cutter makes custom-size bags in seconds.
- Includes starter set of bags and vacuum tube accessory.

Compatible with FreshDaddy™ and most other brands of vacuum sealer bags and rolls.
Visit www.GoPresto.com
INSTRUCTIONS
TABLE OF CONTENTS
Important Safeguards....2
Cord Information 2
Important Safety Precautions for Vacuum Sealing ..... 3
Introduction....3
Getting Acquainted....3
How to Use
How to Make a Bag from Roll Material ....3
How to Vacuum Seal a Bag....4
VAC Accessory Button Function 5
How to Use the Vacuum Tube with Vacuum Seal Zipper Bags .... 5
Tips for Vacuum Sealing
General Tips 6
Tips for Vacuum Sealing Meat, Fish, and Other Moist Food....6
Tips for Vacuum Sealing Fruits, Vegetables, and Baked Goods....6
Tips for Vacuum Sealing Fine-Grained Foods, such as Coffee, Flour, and Spices .... 7
Tips for Vacuum Sealing Soups, Stews, and Casseroles ... 7
Storing, Thawing, and Heating Vacuum Sealed Food ..... 7
Non-Food Uses for Vacuum Sealing ....7
Care and Cleaning 7
Troubleshooting 8
Consumer Service Information 9
Warranty....9
FreshDaddy™ Vacuum Sealer Accessories ..... 10
This is an 📄Listed appliance. The following important safeguards are recommended by most portable appliance manufacturers.
IMPORTANT SAFEGUARDS
To reduce the risk of personal injury or property damage when using electrical appliances, basic safety precautions should always be followed, including the following:
- Read all instructions before using this appliance.
- The brown sealing strip becomes hot during the sealing process. To prevent burns, avoid touching the sealing strip during and immediately after use.
- To protect against electrical shock, do not immerse the cord, plug, or vacuum sealer in water or other liquid.
- Close supervision is necessary when any appliance is used near children. Children should be supervised to ensure that they do not play with the appliance.
- This appliance is not intended for use by persons (including children) with reduced physical, sensory, or mental capabilities, or lack of experience and knowledge, unless they are closely supervised and instructed concerning use of the appliance by a person responsible for their safety.
- Always attach plug to appliance first, then plug into the wall outlet. To disconnect, remove plug from wall outlet and then from appliance.
- Unplug from outlet when not in use and before cleaning. Allow to cool before putting on or taking off parts and before cleaning the appliance.
- Do not operate any appliance with a damaged cord or plug, or in the event the appliance malfunctions or has been damaged in any manner. Return the appliance to the Presto Factory Service Department for examination, repair, or electrical or mechanical adjustment.
- Do not let cord hang over edge of table or counter or touch hot surfaces.
- The use of accessory attachments not recommended by the appliance manufacturer may cause injuries.
- Do not use outdoors.
- Do not place on or near a hot gas or electric burner or in a heated oven.
- Do not use this appliance for other than intended use.
SAVE THESE INSTRUCTIONS
THIS APPLIANCE IS FOR HOUSEHOLD USE ONLY.
CORD INFORMATION
- This appliance has a polarized plug (one blade is wider than the other). To reduce the risk of electric shock, this plug is intended to fit into a polarized outlet only one way. If the plug does not fit fully into the outlet, reverse the plug. If it still does not fit, contact a qualified electrician. Do not attempt to modify the plug in any way.
- A short detachable power supply cord is provided to reduce the risk of becoming entangled in or tripping over a longer cord. An extension cord may be used if care is properly exercised in its use.
- If an extension cord is used, the marked electrical rating of the extension cord should be at least as great as the electrical rating of the appliance. The extension cord should be arranged so that it will not drape over the countertop or tabletop where it can be pulled on by children or tripped over unintentionally.
- Plug the power cord into the AC port on the back of the vacuum sealer and then plug into a 120VAC electrical wall outlet only. The light on the FOOD button will illuminate. To save energy, after 10 minutes of nonuse the light will go out. To reactivate, press the FOOD button.
IMPORTANT SAFETY PRECAUTIONS FOR VACUUM SEALING
WARNING! Vacuum sealing is NOT a substitute for pressure or water bath canning, refrigeration, or freezing. To prevent food spoilage, perishable food that is vacuum sealed must be refrigerated or frozen after sealing.
Some foods should never be vacuum sealed due to the risk of anaerobic bacteria*. These foods include:
- Soft cheeses: Due to the nature of soft cheeses, they are more likely to grow mold and anaerobic bacteria when vacuumed sealed. Examples include Brie, Blue, Goat, Ricotta, and Mozzarella, and unpasteurized cheese. It is perfectly safe to vacuum seal hard cheeses.
- Raw onions and garlic: Gases emitted by raw onions and garlic can inflate the vacuum sealed bag and cause spoilage. Raw onions and garlic spoil faster when vacuum sealed, increasing the risk of anaerobic bacteria.
- Raw mushrooms: Raw mushrooms decay faster when vacuum sealed due to their ripening cycle, increasing the risk of anaerobic bacteria. Cooked mushrooms are safe to vacuum seal.
- Raw bananas: Similar to raw mushrooms, raw bananas ripen faster when vacuum sealed, increasing the risk of anaerobic bacteria. Once a banana is peeled and frozen, it is safe to vacuum seal.
INTRODUCTION
Oxygen promotes certain reactions in food which causes them to deteriorate. The process of vacuum sealing removes air from packages which helps prevent the growth of mold and bacteria and keeps food fresh longer. Vacuum sealing is ideal for many foods, including those you buy in bulk, cheese, cold cuts, fresh berries, meat and more. The airtight seal helps extend refrigerator and pantry shelf life, prevent freezer burn, and reduce waste.
There are some foods that should never be vacuum sealed (see safety precautions above), and others that require special instructions before vacuum sealing, such as broccoli and cauliflower (see page 6).
In addition to keeping food fresh longer, the vacuum sealer is perfect for sous vide cooking. Steaks, fish, vegetables and more can be sealed in vacuum bags for delicious sous vide meals.
GETTING ACQUAINTED
Before using the vacuum scaler for the first time, become familiar with the unit (Fig. A) and read the instructions thoroughly. Also, remove the protective film from the top of the unit and from the control panel.
To access the AC port on the back of the unit, lift and rotate the protective rubber plug (Fig. B). Plug the power cord into the port and then into a 120VAC electrical wall outlet.
HOW TO USE
Always use the vacuum sealer on a dry level surface.

How to Make a Bag from Roll Material
- Remove the plastic wrapper and the two green seals from the roll of bag material. Then open the vacuum sealer and place the roll of bag material in the bag storage bay.
- Slide the bag cutter all the way to the left (Fig. A).
- Determine the amount of bag material needed to hold the item to be sealed. Include space for the item itself plus add 3 inches of headspace for thick foods, like meat, or 2 inches for thin foods. If your plan is to open and then reseal the bag, include an additional inch for each time you expect to reseal the bag.
Then pull the determined length of bag material from the roll in the storage bay and insert the edge of the bag material under the cutter (Fig. C).


-
Hold the material securely by placing your thumb below the bag cutter and your index finger on the bag material. With the index finger of your other hand, carefully slide the bag cutter slowly across the material. You will now have a bag with two open ends.
-
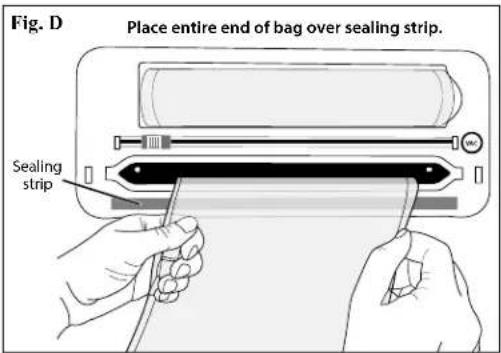
Position one of the two ends so it completely overlaps the brown sealing strip (Fig. D). Do not block the vacuum nozzle.
The sealing strip heats the bag material and forms the seal. Make sure the bag material is smooth; there should be no folds or wrinkles.
Important: Always cut the bag material from the roll before sealing the end, then roll the extra back into the bag storage bay. Never block the vacuum nozzle.
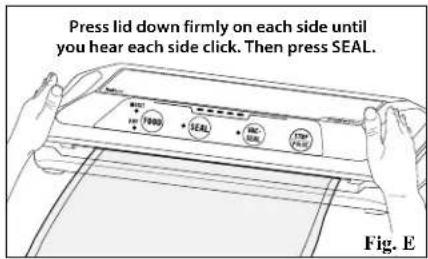
- Close the unit. Use the heels of your hands to firmly press each side of the lid down separately (Fig. E) until you feel and hear each side click. This indicates the unit is locked. Additional force may be needed for the first couple of uses.
IMPORTANT: The unit must be locked to create a complete seal.
-
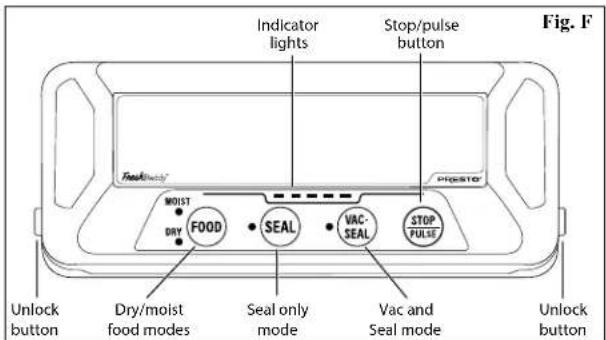
Press the SEAL button (Fig. F). The button light will illuminate. As the unit warms up and during the scaling process, the indicator lights scroll. When the seal is complete, the unit shuts off and the seal button and indicator lights go out.
-
Press the unlock buttons on the sides of the vacuum sealer (Fig. F), open the unit, and remove the bag.
CAUTION! To prevent burns, avoid touching the brown sealing strip immediately after use, as it may be hot.
- Verify the seal is complete and forms a smooth straight line. If there are folds or wrinkles in the seal, cut off the sealed end, wait 60 seconds, and repeat the sealing process.
Once you have sealed the end of a bag, complete the vacuum sealing process before cutting and sealing the next bag. This allows for a 60 second cooldown between each seal, which is ideal for continuous use of the vacuum sealer. Less time between seals can cause the unit to overheat.
If overheated, the unit will enter overheat protection mode and
several lights on the unit will flash at the same time. After a 5 to 10 minute cooling period, the unit will operate as normal.
How to Vacuum Seal a Bag
Refer to the vacuum sealing tips on pages 6 and 7. Follow instructions applicable for the type of food being vacuum sealed.
-
If vacuum sealing moist or messy foods, such as raw meat, turn the top 2 inches of the bag inside out before filling. That will keep the open end of the bag clean and dry. For other foods, this step is optional.
-
Fill the bag with the item(s) you want vacuum sealed. If you turned the bag inside out in step 1, unfold the top of the bag. Verify there are 2 to 3 inches of space between the bag contents and the sealing end and that the sealing end is clean and dry (Fig. G).
-
Open the vacuum sealer and position the entire unsealed end of the bag in the vacuum cavity (Fig. H). Do not block the vacuum nozzle.
Flatten the open end of the bag so it is smooth with no wrinkles or folds. Hold the bag in place with one hand and lower the vacuum sealer lid.
- Close the unit. Use the heels of your hands to firmly press each side of the lid down separately (Fig. I) until you feel and hear each side click. This indicates the unit is locked.
IMPORTANT: The unit must be locked or it will not vacuum seal the bag.


-
Look at the FOOD button and make sure the light next to the type of food or item(s) you will be vacuuming (DRY or MOIST) is illuminated. If it is not, press the FOOD button and select the mode desired.
-
Press the VAC-SEAL button to vacuum seal non-delicate foods. If vacuum sealing delicate foods or foods that crush easily, see step 7. The button light will illuminate. As the unit warms up and during the vacuum process, the indicator lights scroll.
As air is removed, the bag will shrink up around the food/item(s). This should occur within seconds of pressing the VAC-SEAL button. If it does not, press the STOP/PULSE button and skip to step 8.
When all of the air is removed, the unit will seal the bag. The seal button light will be illuminated and the indicator lights will scroll. When the seal is complete, the unit will shut off and the indicator and seal button lights will go out.
NOTE: It takes longer to vacuum seal bags of moist food than dry food.
- To vacuum seal delicate foods or foods that may crush easily, press and hold the STOP/PULSE button to start the vacuum process. This button allows you to manually control the vacuum pressure.
Once the desired amount of air is removed from the bag, release the STOP/PULSE button. Then press the SEAL button to seal the bag.
- If the bag does not shrink up when pressing VAC-SEAL or STOP/PULSE:
• Make sure the lid is fully closed by pressing down on the front corners of the lid, one at a time. If you hear a click, repeat steps 5 and 6.
- Open the unit and reposition the bag so the entire open end is in the vacuum cavity. Try vacuum sealing again following the steps above. If the bag still will not vacuum, stop the unit, remove the bag, and try the suggestions below.
• Make sure the end of the bag is clean and dry. If sealing moist food, follow the tips on page 6. Try vacuum sealing again.
- If the bag still does not shrink up, it may have holes or a bad bottom seal. Place the food in a new bag and try vacuum sealing again.
- Press the unlock buttons, open the unit, and remove the bag. Follow proper storage procedures on page 7.
CAUTION! To prevent burns, avoid touching the brown sealing strip immediately after use, as it may be hot.
NOTICE: It is recommended you allow the appliance to cool 60 seconds between each seal.
VAC Accessory Button Function
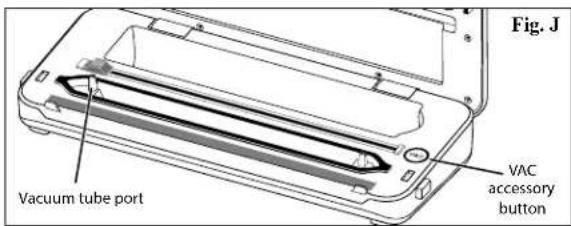
The VAC accessory button (Fig. J) is used with the vacuum tube and zipper bag that came with the vacuum sealer. See the instructions below.
The VAC accessory button is also used with vacuum seal storage containers and bottle stoppers which are sold separately (see page 10).
IMPORTANT: Do not use the VAC accessory button with custom-made vacuum sealer bags or precut vacuum sealer bags without ports. Use the VAC-SEAL button on the lid for these types of bags.
NOTE: This vacuum sealer does not include a marinate function.
How to Use the Vacuum Tube with Vacuum Zipper Bags
NOTE: Vacuum zipper bags are intended for storing foods that are consumed regularly as you can repeatedly open and reseal the bags. They are recommended for pantry and refrigerator use only.
As received, the port and vacuum adapters will be connected to the vacuum tube (Fig. K).
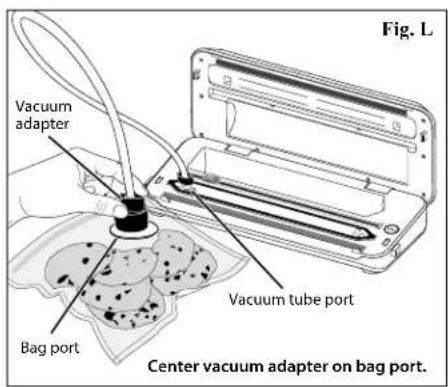
- Connect the port adapter end of the vacuum tube to the vacuum tube port that is inside the vacuum scaler (Fig. J). Push the gray rubber end onto the port until secure (Fig. L).
- Fill a vacuum zipper bag with the item(s) you want vacuum sealed. Do not place liquid in the bag. Also, avoid placing item(s) directly under the bag port.
IMPORTANT: If using the bag for fine-grained foods, see the tips on page 7 before filling the bag.
-
Press the zipper closed. The bags are very durable and the zipper portion is quite firm. To ensure the bag is fully closed so air cannot escape, press the zipper inch by inch from one end of the bag to the other.
-
Lay the zipper bag flat so the white plastic port on the outside of the bag is facing up. Hold the vacuum adapter, centered, over the bag port (Fig. L).
-
Press the VAC accessory button (Fig. J) to start a vacuum cycle. The VAC button can also be used to stop the vacuum cycle.

-
The bag material should immediately begin to shrink around the item(s) in the bag. If the bag does not shrink up, check the following:
-
Confirm the vacuum tube is attached to the vacuum tube port.
• Make sure the zipper top of the bag is fully closed. -
When a successful vacuum occurs, the vacuum adapter will stick to the bag port.
NOTE: If the vacuum adapter does not stick to the bag port, food particles may be stuck in the bag port. Clean the port following the instructions on page 8.
- When the vacuum process is complete, the unit will automatically stop. After a few seconds, the vacuum adapter will fall off the bag port.
NOTE: If the bag fills with air after the vacuum adapter falls off the bag port, food particles may have become lodged in the bag port during the vacuum process. Empty the bag and clean it following the instructions on page 8. Then try again.
If the bag still fills with air, the bag may have tiny holes or simply be worn out from multiples uses. Try again with a new bag.
TIPS FOR VACUUM SEALING
General Tips
- To seal a bag without vacuuming, simply press the SEAL button. You can also press the SEAL button at any time during the vacuum scaling process to stop the vacuum process and immediately seal the bag.
- Do not overfill bags. Leave 2 to 3 inches of space between the bag contents and the end of the bag you will be sealing. Certain foods, such as nuts, will only require 2 inches, whereas meat or other thick foods will require 3 inches. If you plan to open and reseal the bag, leave an additional inch for each time you expect to reseal it.
- Place the open end of the bag flat against the sealing strip to ensure a complete seal.
- Be sure the end of the bag is clean and dry. Dirty or wet bags may interfere with the sealing process and prevent the bag from sealing.
- To keep the sealing edge clean, fold the top of the bag back 2 inches before placing food inside the bag, then unfold the bag before sealing.
- If sealing food or items with sharp edges or points, wrap the sharp edges with wax paper or paper towels before sealing to prevent punctures in the bag.
- When storing sealed food, check the bags from time to time. If you notice a bag is no longer compressed and has air in it, the seal is broken. Cut the bag open and reseal it or place the item(s) in a new bag and seal.
- Do not reuse vacuum sealer bags that were previously used for raw meat, fish, or greasy foods. Also, do not reuse bags after microwaving or simmering in them.
Tips for Vacuum Sealing Meat, Fish, and Other Moist Food
- It is recommended that meat, fish, and other moist food be frozen before vacuum sealing. This helps retain the meat juice and also prevents liquids from being drawn into the vacuum cavity during sealing.
- If unable to pre-freeze meat, fish, or moist food before sealing, wrap the food in plastic wrap before placing in the vacuum scaler bag and then seal. Another option is to place a folded paper towel in the bag above the food and just below the seal area. This will absorb moisture as the bag is vacuumed so the bag can seal properly. Be sure to select the MOIST food setting before use.
- Keep the end of the bag dry, as a wet bag may not seal. To keep the sealing edge dry and clean, turn the top 2 inches of the bag inside out before placing food inside the bag, then unfold the bag before sealing.
Tips for Vacuum Sealing Fruits, Vegetables, and Baked Goods
- Prior to freezing, vegetables should be blanched and then vacuum sealed. Blanching helps the vegetables retain their color, flavor, and nutritional content.
- Arugula, bok choy, broccoli, Brussels sprouts, cabbage, cauliflower, kale, radishes, turnips, and any other vegetables in this family (known as Cruciferous vegetables) must be blanched before being vacuum sealed and stored in the freezer. These vegetables emit gases if vacuum sealed without blanching, causing them to spoil.
- Flash freeze baked goods, blanched vegetables, and delicate fruits (such as blueberries, raspberries, and strawberries) before vacuum sealing. To flash freeze, place individual pieces of food on a wax paper lined pan, allowing space between each item. Freeze for about an hour. Then, place food in a bag and vacuum seal.
- Large fruit, such as apples, pears, and peaches, should be sliced before vacuum sealing.
- To preserve the color of apple slices, brush them with lemon juice before sealing.
Tips for Vacuum Sealing Fine-Grained Foods, such as Coffee, Flour, and Spices
- Before vacuum sealing fine-grained foods, place the food in a standard plastic bag inside of the vacuum sealer bag. Alternatively, place a folded coffee filter or paper towel above the food in the bag. The plastic bag, filter, and paper towel help prevent food particles from being drawn into the unit.
Tips for Vacuum Sealing Soups, Stews, and Casseroles
- Soups, stews, casseroles, and other liquid-based food must be frozen before vacuum sealing. Freeze in ice cube trays or lined baking pans until solid. Once frozen, remove from tray or pan, vacuum seal, and store in the freezer.
STORING, THAWING, AND HEATING VACUUM SEALED FOOD
Storing Vacuum Sealed Food
- Non-perishable vacuum sealed food, such as dry goods, nuts, and crackers can be stored at room temperature. Store in a cool, dark place.
- Perishable vacuum sealed food must be stored in the refrigerator or freezer. If food is to be kept longer, such as meat, store it in the freezer.
NOTE: When red meat is vacuum sealed, the removal of oxygen may cause it to look darker. This is normal and does not indicate spoilage.
Thawing Vacuum Sealed Food
- Remove vacuum sealed fish from the package before thawing or cut the package open to allow oxygen in. This prevents harmful bacteria from growing.
- Never thaw perishable food at room temperature. Thaw food in the refrigerator or in a microwave oven.
Heating Vacuum Sealed Food
- Before heating vacuum sealed food in the microwave, puncture the bag or cut a corner from the bag. Heat the bag in a microwave-safe dish.
- Do not microwave vacuum sealed bags containing greasy food or bone-in meats, due to hot spots. Instead, place the bags in a pot of simmering water (below 170°F ).
NON-FOOD USES FOR VACUUM SEALING
The vacuum sealer can be used to protect non-food items from moisture and corrosion. Place items such as matches, batteries, first aid supplies, keys, cell phones, silver, and collectibles in vacuum sealer bags and follow the sealing instructions.
CARE AND CLEANING
- Unplug the vacuum sealer from the wall outlet before cleaning.
-
Wipe the inside of the unit, including the sealing strip, sealing gaskets (upper and lower), silicone contact bar, and vacuum cavity with a damp, soapy cloth. Dry thoroughly. The vacuum cavity catches overflow liquids and needs to be cleaned regularly.
CAUTION! To prevent electrical shock and damage to the vacuum sealer, never immerse it in water or any other liquid. -
If necessary, the lower sealing gasket and silicone contact bar (Fig. A, page 3) may be removed and cleaned in warm, soapy water. Allow these parts to dry thoroughly before reinserting them into the unit. To reinsert the lower gasket, start by inserting one end into the vacuum cavity. Gently press the gasket toward the other end, without stretching it, until it is fully installed.
NOTE: Replace the lower gasket if it is cracked or worn. Visit www.GoPresto.com or see the Consumer Service Information (page 9).
- Gently wipe the outside of the unit with a damp cloth.
NOTICE: To avoid scratches, do not use abrasive cleaners on the unit.
- Always store the vacuum sealer in the unlocked position so the sealing gaskets are not compressed. This helps maintain the function of the sealing gaskets.
Cleaning Zipper Bags with Ports
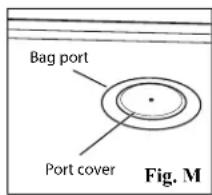
To clean the bag port, first remove the port cover on the outside of the bag (Fig. M). Insert your fingernail between the port cover and the bag port to pry it off. Remove the cover and red gasket (Fig. N).
Wash the bag port parts and bag in hot, soapy water. Do not wash in the dishwasher. After washing, rinse and dry all parts thoroughly.
Reassemble the bag port by placing the red gasket, nub side down (Fig. O), in the port.
Then snap the port cover in place.

TROUBLESHOOTING

A. I'm having trouble making a bag. Sometimes the end won't seal and other times the end looks like it's sealed, but it's not a smooth straight line. What am I doing wrong?
- You may not have fully closed the vacuum sealer. Use the heels of your hands and press down firmly on the front corners of the lid (see Fig. E, page 4) until you hear both sides click. This indicates the unit is locked. Try again.
- You may not have positioned the bag material so the entire open end is overlapping the brown sealing strip. Reposition (see Fig. D, page 4) and try again.
- You attempted to seal the end of the bag material before cutting it from the roll in the bag storage bay. As a result, the end may not fully seal or the seal may not be a smooth straight line. Before trying again, first cut off the bad seal. Next, cut the bag material from the roll and roll the extra back into the storage bay. Then try sealing the end again following the steps on page 4.
B. Why won't the bag contract around the food when I'm vacuuming bags made from roll material?
- You may not have fully closed the vacuum scaler. See A1 above.
- You did not insert the open end of the bag in the vacuum cavity or the bag is blocking the vacuum nozzle. Reposition the bag (see Fig. H, page 4).
- You may not have a good bottom seal. Reseal the bottom. See A2 and A3 above.
- You may have overfilled the bag. Make sure to allow enough space between the items that are being sealed and the end of the bag.
- The bag material itself may have pin holes or has been punctured. Discard the bag and make a new bag.
C. The bag contracts during the vacuum process, however, at the end of the process, it expands again. What is happening?
- The food may be wet, and the moisture is preventing the bag from sealing. Follow the tips for sealing moist foods on page 6.
- The end of the bag may be wet or has particles on it preventing it from sealing. Clean the end of the bag and dry thoroughly, or use a new, clean, dry bag.
- The sealed end of the bag may have a fold or other defect, such as a pin hole. Cut off the sealed end. Flatten the bag and reseal it.
- Something in the bag has a sharp point or edge and has punctured the bag. Wrap the sharp edges with wax paper or paper towels and place in a new bag and reseal.
- The sealing strip or gaskets may be dirty or damaged. Clean the sealing strip and gaskets. Replace the lower gasket, if damaged. Visit www.GoPresto.com or see the Consumer Service Information (page 9).
- There may be liquid in the vacuum cavity that is getting on the bag, preventing it from sealing. Wipe out the vacuum cavity and dry it thoroughly. Then try again.
D. When I'm using the vacuum tube with reusable zipper bags, I cannot get a vacuum. What should I do?
- Check the vacuum tube connections. Make sure the vacuum tube is securely attached to the port inside the unit. Also make sure the port adapter and vacuum adapter are securely attached to the tube.
- Be sure the zipper is fully closed. Press the zipper firmly from one end of the bag to the other.
- Be sure there aren't any items directly under the bag port when filling the bag.
- Make sure you are placing the vacuum adapter over the correct side of the bag. The white plastic port located on the outside of the bag should be facing up.
- Adjust the position of the vacuum adapter. Center it on the port until suction occurs.
E. My resealable zipper bag contracts during the vacuum process, however, at the end of the process, it expands again. Why?
- The bag port may be blocked or dirty. Try cleaning the bag port as suggested above. In the meantime, use a different bag and remember if you're using the bag for fine-grained foods, follow the tips on page 7.
- The bag may be worn out. Discard the bag and try a new bag.
F. Air has re-entered the bag after vacuum sealing. What causes this?
- The seal may have a fold or wrinkle in it causing air to get in the bag. Cut off the sealed end. Flatten the bag and reseal it. If that doesn't work, try another bag.
- The bag may contain vegetables that released gas, causing the bag to fill with air.
NOTE: Raw onions and garlic should never be vacuum sealed. The fumes emitted can inflate the bag and cause spoilage. Blanch vegetables prior to vacuum sealing to prevent gas from releasing.
G. Why are several lights flashing on the unit, and when I press the SEAL or VAC-SEAL button nothing happens?
The unit is in overheat protection mode due to continuous use. Allow the appliance to cool 5 to 10 minutes. After the cooling period, the unit should operate as normal.
H. The unit appears to be vacuuming the bag, but it stays in that mode for several minutes. When I press STOP and open the unit, the bag is not sealed and fills back up with air. What is happening?
You pressed the VAC accessory button inside of the unit (Fig. J, page 5) instead of the VAC-SEAL button on the lid of the unit. This button is strictly for zipper bags with ports, vacuum seal storage containers, and bottle stoppers. When using custom or precut bags, always use the VAC-SEAL button on the lid.
CONSUMER SERVICE INFORMATION
If you have any questions regarding the operation of your Presto® appliance or need parts for your appliance, contact us by any of these methods:
• Call 1-800-877-0441 weekdays 8:00 AM to 4:00 PM (Central Time)
- Email us through our website at www.GoPresto.com/contact
• Write: National Presto Industries, Inc., Consumer Service Department 3925 North Hastings Way, Eau Claire, WI 54703-3703
Inquiries will be answered promptly by email, telephone, or letter. When emailing or writing, please include a phone number and a time when you can be reached during weekdays if possible.
When contacting the Consumer Service Department, please indicate the model and series numbers located on the bottom of the vacuum sealer.
Please record this information:
Model
Series
Date Purchased
The Presto Factory Service Department is equipped to service Presto ® appliances and supply genuine Presto ® parts. Genuine Presto ® replacement parts are manufactured to the same exacting quality standards as Presto ® appliances and are engineered specifically to function properly with its appliances. Presto can only guarantee the quality and performance of genuine Presto ® parts. “Look-alikes” might not be of the same quality or function in the same manner. To ensure that you are buying genuine Presto ® replacement parts, look for the Presto ® trademark.
Canton Sales and Storage Company, Presto Factory Service Department 555 Matthews Drive, Canton, MS 39046-3251
PRODUCT REGISTRATION
IMPORTANT: Please go online and register this product within ten days of purchase. Proper registration will serve as proof of purchase in the event your original receipt becomes misplaced or lost. Registration will not affect warranty coverage, but it may expedite the processing of warranty claims. The additional information requested will help us develop new products that best meet your needs and desires.
To register your product, visit www.GoPresto.com/registration or simply scan this QR code. If you do not have computer access, call the Consumer Service Department at 1-800-877-0441 for assistance with registration.

Presto® Limited Warranty
(Applies only in the United States)
This quality Presto ® appliance is designed and built to provide many years of satisfactory performance under normal household use. Presto pledges to the original owner that should there be any defects in material or workmanship during the first year after purchase, we will repair or replace it at our option. Our pledge does not apply to damage caused by shipping. Outside the United States, this limited warranty does not apply. To obtain service under the warranty, please call our Consumer Service Department at 1-800-877-0441. If unable to resolve the problem, you will be instructed to send your Presto ® appliance to the Presto Factory Service Department for a quality inspection; shipping costs will be your responsibility. When returning an appliance, please include your name, address, phone number, and the date you purchased the appliance as well as a description of the problem you are encountering with the appliance.
We want you to obtain maximum enjoyment from using this Presto® appliance and ask that you read and follow the instructions enclosed. Failure to follow instructions, damage caused by improper replacement parts, abuse, misuse, disassembly, alterations, or neglect will void this pledge. This warranty gives you specific legal rights, and you may also have other rights which vary from state to state. This is Presto's personal pledge to you and is being made in place of all other express warranties.
National Presto Industries, Inc., Eau Claire, WI 54703-3703
FRESHDADDY™ VACUUM SEALER ACCESSORIES
FreshDaddy™ Vacuum Sealer accessories are used with Presto® Vacuum Sealers and should be available wherever Presto® Vacuum Sealers are sold; however, if you would like to order them directly from Presto, see the information below.
| FreshDaddyTM Vacuum Sealer Bag Material Rolls | |
| 8-inch x 20-foot roll (Stock No. 09510/Part 81710) | 11-inch x 20-foot roll (Stock No. 09511/Part 81711) |
| 2 rolls per package | 2 rolls per package |
FreshDaddy™ Reusable Vacuum Seal Zipper Bags with Ports
| Quart size (Stock No. 09513/Part 81713) |
| 10 bags per package |
| Gallon size (Stock No. 09514/Part 81712) |
| 8 bags per package |
FreshDaddy™ 3-Piece Vacuum Seal Storage Container Set (Stock 09512/Part 81714)
| 1 Small (1 quart) · 1 Medium (1.5 quarts) · 1 Large (2 quarts) |
| · Ideal for items such as baked goods, berries, brown sugar, chips, crackers, and salad greens. |
| · Transparent containers are scratch, stain, shatter, and odor resistant. |
| · Dishwasher and refrigerator safe. · Stackable for space-saving storage. |
FreshDaddy™ Bottle Stopper (Stock 09515/Part 81715)
Removes air from bottles of wine and specialty oils and vinegars to keep them fresh longer.
The above accessories are all BPA free and food safe.
NOTE: Pre-cut vacuum sealer bags and marinate containers are sold in stores and online. They are not available from Presto 6 .
How to Order:
Visit www.GoPresto.com. If you do not have computer access, call the Consumer Service Department at 1-800-877-0441 weekdays between 8:00 AM and 4:00 PM (Central Time).
Please have your credit/debit card number and expiration date ready. Payment options on telephone orders limited to credit/debit cards only.
Sous Vide Cooking
Presto® vacuum sealed bags are ideal for sous vide cooking and so is the...
Presto Precise® Tuxedo®
digital precision skillet multi-cooker
Digital heat control provides the precision heat regulation at low temperatures needed for sous vide.
Also ideal for pan frying, sautéing, poaching chicken or fish, making sauces, simmering soups and stews, making yogurt, and proofing dough.
Get yours today at your favorite retailer or online at www.GoPresto.com.

Available in 12-inch and 16-inch models.
- INSTRUCTIONS
- TABLE OF CONTENTS
- IMPORTANT SAFEGUARDS
- SAVE THESE INSTRUCTIONS
- CORD INFORMATION
- IMPORTANT SAFETY PRECAUTIONS FOR VACUUM SEALING
- INTRODUCTION
- GETTING ACQUAINTED
- HOW TO USE
- HOW TO MAKE A BAG FROM ROLL MATERIAL
- HOW TO VACUUM SEAL A BAG
- VAC ACCESSORY BUTTON FUNCTION
- HOW TO USE THE VACUUM TUBE WITH VACUUM ZIPPER BAGS
- TIPS FOR VACUUM SEALING
- GENERAL TIPS
- TIPS FOR VACUUM SEALING MEAT, FISH, AND OTHER MOIST FOOD
- TIPS FOR VACUUM SEALING FRUITS, VEGETABLES, AND BAKED GOODS
- TIPS FOR VACUUM SEALING FINE-GRAINED FOODS, SUCH AS COFFEE, FLOUR, AND SPICES
- TIPS FOR VACUUM SEALING SOUPS, STEWS, AND CASSEROLES
- STORING, THAWING, AND HEATING VACUUM SEALED FOOD
- STORING VACUUM SEALED FOOD
- THAWING VACUUM SEALED FOOD
- HEATING VACUUM SEALED FOOD
- NON-FOOD USES FOR VACUUM SEALING
- CARE AND CLEANING
- CLEANING ZIPPER BAGS WITH PORTS
- TROUBLESHOOTING
- AIR HAS RE-ENTERED THE BAG AFTER VACUUM SEALING. WHAT CAUSES THIS
- WHY ARE SEVERAL LIGHTS FLASHING ON THE UNIT, AND WHEN I PRESS THE SEAL OR VAC-SEAL BUTTON NOTHING HAPPENS
- THE UNIT APPEARS TO BE VACUUMING THE BAG, BUT IT STAYS IN THAT MODE FOR SEVERAL MINUTES. WHEN I PRESS STOP AND OPEN THE UNIT, THE BAG IS NOT SEALED AND FILLS BACK UP WITH AIR. WHAT IS HAPPENING
- CONSUMER SERVICE INFORMATION
- PRODUCT REGISTRATION
- PRESTO® LIMITED WARRANTY
- (APPLIES ONLY IN THE UNITED STATES)
- FRESHDADDY™ VACUUM SEALER ACCESSORIES
- HOW TO ORDER
- SOUS VIDE COOKING
- PRESTO PRECISE® TUXEDO®
Brand : Presto
Model : FreshDaddy 05622
Category : Vacuum sealer