
Ft. Lauderdale 900 - Car radio BLAUPUNKT - Free user manual and instructions
Find the device manual for free Ft. Lauderdale 900 BLAUPUNKT in PDF.


| Type | Car Stereo |
| Brand | Blaupunkt |
| Model | Ft. Lauderdale 900 |
| Dimensions (W x H x D) | 180 x 50 x 120 mm (1-DIN) |
| Weight | 1.2 kg |
| Power Supply | 12V DC (negative ground) |
| Maximum Power Output | 4 x 50 W |
| RMS Power Output | 4 x 22 W |
| Radio Bands | FM, AM |
| CD Playback | Yes (CD, CD-R, CD-RW) |
| USB Input | Yes (front panel) |
| AUX Input | Yes (3.5 mm front) |
| Bluetooth | Yes (hands-free calling, audio streaming) |
| Display | LCD with adjustable backlight |
| Remote Control | Included (wired or IR) |
| Preset EQ | Rock, Pop, Classic, etc. |
| Installation | DIN slot, mounting sleeve included |
| Maintenance | Clean with dry, soft cloth. Avoid liquids. |
| Safety | Use specified fuse (10A). Professional installation recommended. |
| Spare Parts | Fuses, remote control, mounting accessories |
Frequently Asked Questions - Ft. Lauderdale 900 BLAUPUNKT
User questions about Ft. Lauderdale 900 BLAUPUNKT
0 question about this device. Answer the ones you know or ask your own.
Ask a new question about this device
Download the instructions for your Car radio in PDF format for free! Find your manual Ft. Lauderdale 900 - BLAUPUNKT and take your electronic device back in hand. On this page are published all the documents necessary for the use of your device. Ft. Lauderdale 900 by BLAUPUNKT.
USER MANUAL Ft. Lauderdale 900 BLAUPUNKT
Operating instructions
NOTE: Please do not watch videos or use other Apps while the vehicle is in motion.
Doing so, is a safety violation. To watch videos or use Apps, please ensure that the vehicle is in parked mode with handbrake activated.
Please check compatibility Of the device with your mobile phone before purchase.
New phone software versions in the future may or may not be compatible with the device.
In-Warranty replacement will not be applicable for non compatibility Of the mobile phone with the device.
Panel Introduction
Head unit features a brilliant capacitive display with a high-end tuner and runs on Android OS Version 9.0.

1 Microphone
2 Reset button
Restore to default factory settings of the device.
Caution, All personal setting will be lost!
3 POWER/MUTE button
Short press: Turn ON device; In operation: Mute audio source;
Long press: Turn OFF device
4 HOME button
Short press: Go to source menu
Long press: Open Apps in background
5 BACK button
Press to return to previous menu
6 Press this button to increase audio volume
7 Press this button to decrease audio volume
Contents
Safety notes 04
Symbols used 04
General Warning 04
Road safety 05
Instructions to read this User Manual 05
Declaration of conformity 05
Cleaning notes 05
Disposal notes 05
Scope of delivery 05
Placing the device in operation 06
Switching ON/OFF with the POWER button 06
Volume 06
Main menu(Home) 06
Radio mode 06
Start radio mode 06
Select memory bank 06
Tuning into a station 06
Storing stations manually 07
Storing stations automatically
Adjusting the seek tuning sensitivity
Switching RDS on/off 07
Sound Settings 08
Equalizer 08
Volume distribution (Fader/Balance) 08
Time Alignment 08
USB media playback 09
USB data carrier 09
Audio playback from USB 09
Video playback from USB 10
Image playback from USB 10
Bluetooth mode 11
Starting Bluetooth mode 11
Registering Bluetooth devices 11
Telephone mode 11
Dialing 11
Answer a call 12
Audio playback via Bluetooth streaming 12
EasyConnection / Phonelink 12
Entering connection prompt 12
AUX IN 14
Camera Input 14
Steering wheel control(SWC) 14
File Manager 14
Settings 15
Video 15
General 15
Wi-Fi 15
Bluetooth 15
SourceVolumeLevel 15
Navigation 15
Key Light 16
SWC 16
Factory 16
CANBUS Settings 16
Android Settings 16
Upgrade & Reset 16
System Info 16
Wireless Apple CarPlay and Android Auto 17
Starting connection 17
Useful information 18
Connection diagram 19
Troubleshooting 20
Safety notes
Safety notes
The car sound system was manufactured according to recommended and established safety guidelines in a state of the art facility. Even so, dangers may occur if you do not observe the safety notes in the instruction manual.
These instructions are intended to familiarise you with important functions.
- For best results, please read the user manual carefully and completely before using the car audio system.
• Always keep the user manual accessible to all users.
• Always handover the car audio system to any third party along with these instructions. - In addition, observe the instructions of the devices used in combination with this car audio system.
Symbols used
Below are the symbols used in this user manual, please go through them carefully:

CAUTION:
Warns about possibilities of any injuries that might occur.

DANGER:
Warns about damages to the DVD/CD drive
(No applicable to all Series 900 Model)

LOUD VOLUME:
Warns about high volume
√ Identifies a sequencing step
• Identifies a listing
General Warning
To avoid any injury or damage to yourself, your car and others, please make sure to do as following. Observe the following note to protect yourself against injuries:
- Do not modify or open the device. Do not do any unauthorised modification to the device. In case you need any assistance, please visit the nearest service centre. The device should be open by an authorised person only.
- Use as Directed: this car audio system is intended for installation and operation in a vehicle with 12V (negative ground) vehicle system voltage. Observe the output limits of the device. Only an authorised specialist should perform repairs and installation, if necessary.
- Installation Instructions: You may only install the car audio system yourself if you are experienced in installing car audios systems, and are very familiar with the electrical system of the vehicle. For this purpose, observe the connection diagram at the end of these instructions. For self-installation make sure you have the right tools with you.
- Use your device in such a way that you can always safely control your vehicle. In case of doubt, stop at a suitable location and operate your device while the vehicle is parked. As the driver, you must not use the applications that will distract you from traffic (depending on the scope of functions of the device, e.g. viewing videos, searching for a destination) (Navigation equipped radios and other downloaded application)
- Follow driving recommendations during the route guidance only if you are not violating any traffic regulations: Traffic signs and traffic regulations always have priority over driving recommendations.
- Always listen at moderate volume to protect your hearing and to be able to hear warning signals (e.g. police sirens and other external alerts while driving). During mute phases (e.g. when changing the audio source), changing the volume is not advisable. Do not increase the volume during this mute phase.
Safety notes
Road safety
Observe the following notes about road safety:
To avoid any injury or damage to yourself, your car and others, please make sure to do as following. Observe the following note to protect yourself against injuries:
• Before using this unit, please read all related instructions ca refully.
• Any damage to this unit caused by improper operations will void the warranty.
- Please do not watch videos or use other Apps while the vehicle is in motion. Doing so, is a Safety violation. To watch videos or use Apps, please ensure that the vehicle is in parked mode with handbrake activated.
- The below-listed applications while driving the vehicle may divert your attention form the traffic situation and may lead to serious accidents:
Using the navigation feature like entering the destination address
Video playback or watching any kind of video
Usage of internet via the browser
Use of connected phone via Phonelink
Use or Download of Google PlayStore / Google Maps / YouTube is not permitted in the automotive environment
- You are advised to refrain from any activity which could possibly divert your attention while driving. The best way to use these applications is when your vehicle is parked in a safe location.
- To avoid short circuit, please do not dispose the unit into the water and please do not place or leave any kind of metal object (such as a coin or metal tools) in the unit.
- Please operate the unit as per this Manual, it is not allowed to open the unit for maintenance; In case if maintenance is required, please seek professional help.
• After the car engine is off, please do not use the car audio for a long time, battery could be drained.
Instructions to read this User Manual
Illustrations are used in this manual to explain operations and precautions. The illustrations used in this manual are only for reference, please take the actual unit as standard.
Marks
Mark for important preventive measures; please read carefully to prevent any injury.
Mark for a special explanation, auxiliary interpretation, imitation and references.
Mark for additional information to operate this unit. Warm notes: When there is any difference between the Manual and the actual unit, please take the actual units as standard.
Declaration of conformity
We declares that the device complies with the basic requirements and the other relevant regulations of the RED Directive 2014/53/EU.
Cleaning notes
- Solvents, cleaning and scouring agents as well as dashboard spray and plastics care products may contain ingredients that will damage the surface & screen of the audio system.
• Use only a dry or slightly moistened cloth for cleaning the audio system.
Disposal notes
• Do not dispose of your old unit/batteries in the household trash.
• Use the return and collection systems available to dispose of the old device.
Scope of delivery
The scope of delivery includes:
• Car audio system
• GPS antenna
• External Bluetooth microphone
vise, the small parts set, installation material
- Screws and fasteners
- Connecting cables
Placing the device in operation
Switching ON/OFF with the POWER button
• To switch-ON, press the ☑ ] button.
• To switch-OFF, hold the ☐ ] button pressed for more than 2 seconds.
Volume
Adjusting the volume
You can adjust the volume in steps from 0 (off) to 40 (maximum).
Press the button [◀ + ] to raise volume and ▶ - ] button to lower the volume.
Muting the car sound system (Mute)
Briefly press the [💡] button to mute the device or to reactivate the previous volume.
Main menu(Home)
In the main menu, press the buttons on the touchscreen to call up the different sources and operating modes.
• In the current source, press the ] button.
The main menu is displayed.
- Enter main menu
- Top bar: Drag down to see more functions
- Now Playing source
- Back
- Enter Radio menu
- Enter Android Auto menu
- Enter Apple CarPlay menu
- Enter Settings menu
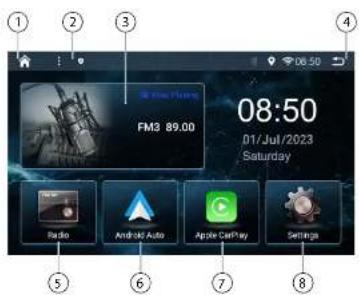
- Swipe left on the screen to source icons.
Note:
The figures used in these instructions are intended to facilitate the explanations and details may deviate from your device.

Radio mode
Start radio mode
In the main menu, press the button. The radio playback menu is displayed.

Select memory bank
Different memory banks and wavebands are available. Up to 6 stations can be stored in each memory bank.
- Press the [BAND] button repeatedly until the desired memory bank is displayed.
Tuning into a station
Tuning into stations manually
- Briefly press the [◀] or [▶] button to change the frequency in increments.
- You can select broadcast frequency directly by dragging the red " | " in the frequency.
Radio
Starting station seek tuning
- Hold the [ ] or [ ] button to start station seek tuning. The radio tunes into the next receivable station. Press again to stop seeking.
Note:
For reception area Europe: In FM waveband, only traffic information capable stations are tuned into if the priority for traffic information is switched on.
Storing stations manually
- Set the desired station.
- Press one of the memory buttons [P1] - [P6] for approx. 2 seconds to store the current station at the button.
- Press the [K] or [▶] button to switch to previous/next stored station.
Storing stations automatically
You can automatically search for and store the strongest reception in the region in the current memory bank. Any previously stored stations in this memory bank are deleted in the process.
- Select a memory band.
- Press the [O] button.
- The tuner starts the automatic station seek tuning. After the storing is completed, the radio plays the station at memory location 1 of the previously selected memory band.
Note:
For the Erurope reception area: If traffic information is switched-on, only traffic informations capable stations are stored.
Adjusting the seek tuning sensitivity
The seek tuning sensitivity decides whether the automatic station seek tuning finds only strong stations or also weaker stations that may have some interference.
- Press the · 0 ] button to adjust the sensitivity of station seek tuning. If LOC is on, only stations with a strong signal are selected during seek tuning. If DX is on, stations with a strong and weak signal are selected during seek tuning.
Switching RDS on/off
Many FM stations are RDS (Radio Data System) signal capable and in addition to their programme in the reception area Europe / Asia that allows additional functions, such as the display of the station name and genre type.
- Press the [RDS] button to show RDS options.
Switching the AF (alternate frequency) function ON/OFF
If the AF function is activated, the car sound system automatically tunes into the best receivable frequency for the station that is currently set.
Press the button [AF] to switch the AF function on or off.
Switching priority for traffic announcements ON / OFF
In the reception region Europe, a FM station can identify traffic announcements via RDS signal. If priority for traffic reports is switched on, a traffic report is automatically broadcast, even if the car audio system is currently not in radio mode.
- Press the button [TA] to switch the priority for traffic announcements ON or OFF.
Selecting Program Type and Start Seek Tuning
You can select a programme type with the PTY function to search for a particular genre of station, for example, select stations that broadcast rock music or sport events.
- Press the button [PTY] to display the programme types.
Scroll up/down a program with the selected program type, it locks on to it and commences playback.
Sound Settings
Sound Settings
Equalizer
You can adjust the equalizer for all sources.
- Press [ ] on the main menu or [ ] of the current audio source.
The equalizer menu is displayed.

- Select a preset equalizer via preset buttons - Flat / POP / Easy / Rock / Classic / Jazz / User1 / User2.
-Or-
- Press the [User] button to adjust the level of the available frequency bands according to your preferences.
Note:
With the [Reset] button, you can reset the customised setting again.
-Or-
- Press the [ Flat ] button for a linear sound playback.
• Turn on the [Loudness] to increase bass and treble at low volume.
Volume distribution (Fader/Balance)
You can adjust the volume distribution in the vehicle for all sources.
- Press the ] button in EQ menu.
The menu for fader and balance is displayed.

- Press the arrow buttons or drag the cursor to adjust fader and balance.
Time Alignment
You can set the audio delay for each loudspeaker.
- Press the ] button in EQ menu.

- Touch on the slide control or swipe across the slide control loudspeaker to adjust the delay required.
USB
USB media playback
The car audio system is equipped with USB ports to play MP3 or WMA files on USB data carriers.
In addition, you can view movies and images from USB data carriers on the display or a connected monitor.
For safety reasons, the playback of movies and images on the integrated monitor is allowed only while the vehicle is in parked mode and the handbrake is applied. The "PARKING" cable must be connected with the hand brake connection of the vehicle (see Connection diagram at the end of these instructions). The movie playback on an external monitor is also possible while driving.
Notes:
Blaupunkt cannot guarantee that all USB pen drives are compatible with this car audio system.
USB data carrier
This device features 2 USB ports at the rear of the device.
Connecting a USB data carrier
- Insert the USB data carrier in the USB socket.
The device automatically switches to USB mode. Data is read and playback commences.
Removing the USB data carrier
• Turn off the car sound system.
- Remove the USB data carrier.
Audio playback from USB
The principles of the audio playback (MP3/WMA) from data carriers are identical for all sources.
- Select the [Music] source via the main menu.
The device changes to the USB source and the playback starts.

- Progress Bar
- Sound effect
- Display the folder/file list
- Previous track
- Pause playback and Resume playback
- Next track
- Repeat/Random play
Folder/file list:

USB
Briefly tap on the name of the folder/track. The folder is opened/the track commences.
After starting a title, the playback menu is displayed.
Video playback from USB
- Select [Video] source via the main menu.

- Progress Bar
- Play in a small window
- Display the folder/file list
- Previous chapter
- Pause playback and Resume playback
- Next chapter
- Repeat/Random play
- Aspect ratio
Folder/file list:
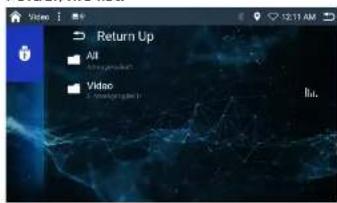
Note:
Folders and videos are selected and started as described under audio playback.
Image playback from USB
- Select the [Picture] via the main menu.

Touch the thumbnail to view the pictures.
Bluetooth
Bluetooth mode
The Bluetooth * function allows pairing cell phones and media playback devices with the car sound system.
Whena cell phone is paired with the car sound system, you can make phone calls with the built-in hands-free function. You can access the lists of dialled numbers and the phone book of the registered cell phone.
If the connected Bluetooth® device supports the functions A2DP and AVRCP, you can play the music via the car sound system and control the playback. During a call, the music playback is interrupted and continued again after the call.
If a cell phone is paired via Bluetooth ® and a call is received during the playback of another source, the source playback is interrupted and the call menu is displayed.
Starting Bluetooth mode
• In the main menu, press on [BT Phone].
The Bluetooth® menu is displayed. It contains the list of known Bluetooth® devices. Other audio sources are switched off.
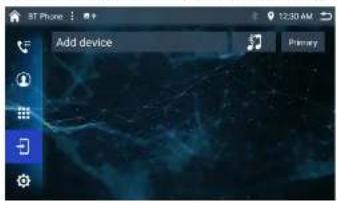
Registering Bluetooth devices
If you want to register a device with the car sound system for the first time, proceed as follows:
- Ensure that Bluetooth® is activated at the car sound system and at your Bluetooth® device.
• Search for new devices/connections on your Bluetooth® device.
• The car sound system appears as "BP900" in the list of Bluetooth® devices. - Establish the connection; you may have to enter the pairing of previously entered on the car sound system.
- The connection is being established and the menu for the registered device is displayed.
Note:
If a telephone is connected with the car audio system, the Bluetooth ® icon is lighted at the top of the display in all audio/video sources.
Telephone mode
If you connected a phone with the car audio system via Bluetooth ® , the following menu appears.
- Call up records lists.
- Call up phone book.
- Call up dial keypad menu
- Call up device menu
- Call up BT setting menu
- The dial keypad
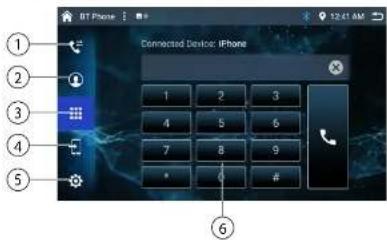
Dialing
- Enter a phone number with the keypad and press the [ ] button.
-Or- - Select a contact/number via the caller lists or phone book.
Bluetooth | Phonelink
Answer a call
During an incoming call the "Calling" number is displayed.
- Press the Green [ ] button to answer a call.
- Press the Red [ ] button to reject a call.

Audio playback via Bluetooth streaming
If an audio streaming device is connected with the car audio system via Bluetooth ® , you can play back the music via the car audio system and control the playback.
- Press the [ BT Music ] button to change to playback audio.

[ ] Short press: Title selection.
[Ⅱ] ▶ Pause playback and Resume playback
[ ]Short press: Title selection.
EasyConnection / Phonelink
Phonelink function allows the mobile device screen to be displayed on the Car Radio screen.
With EasyConnection/Phonelink you can synchronize the screen from your smart phone to the car multi-media player.
The function of the EasyConnection/Phonelink depends on the configuration of your smart phone.
Open the Main Menu and touch [Phonelink] to enter.
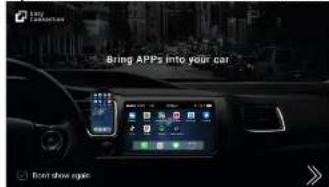
In some versions of Android, the USB debugging needs to be accessed under About Phone [USB debugging]:
Entering connection prompt
Android/iPhone USB
- Open the Bluetooth of your mobile phone and pair the car audio system with the mobile device.
Please see
- Connect USB data cable (original).
Ensure that the original data cable of the device is used..
- If the phone does not have the EasyConnection App installed, scan the 2D code and install the App to the phone.
Phonelink

- Open the EasyConnection App in your phone, and the screen will transfer to the car device.
Android WiFi
- Open the hotspot in the settings menu of your Android phone.
- Open the Bluetooth of your mobile phone and pair the car audio system.
- Turn on the WiFi function on the settings menu of the car audio system. Select the hotspot in the list to connect.
- If the Android phone does not have the EasyConnection App, scan the 2D code and install the App to the phone.
- Open the EasyConnection App in your phone, and the phone screen will display on the car audio system screen.
iPhoneWiFi
- Open hotspot in the settings menu of your iPhone. Select "WiFi and Bluetooth" if necessary.
- Open the Bluetooth of your iPhone and pair the car audio system.
- Turn on the WiFi function on the settings menu of the car device. Select the hotspot in the list to connect.
- Slide up on your iPhone to open the Shortcuts control bar, find Airplay and select the car audio system to connect.
Tip:
• For your driving safety, please do not use this function during driving.
- Since the mobile phone data cable differs by brand, it is strongly recommended using the original USB data cable to connect so as to ensure connection stability.
- Due to variations in the performance and standard features of mobile phones, the performance of EasyConnection may vary with each individual brand of mobile phone.
• BPIN can not guarantee the compatibility of all phones with this device.
AUX IN
This device features AUX input for audio / video playback. The AUX-IN RCA inputs are located at the rear of the device.
- Start the AUX-IN mode with the button [AUX]. The display shows the audio or video playback of the selected AUX source.
Camera Input
This device features video input for connecting a reverse camera. If a reverse camera is connected, the image is displayed on the screen when the rear gear is engaged.
Steering wheel control(SWC)
Select [ SWC ] in the Settings menu to enter SWC setting menu.
- Select a function icon on the screen.
• Long press a steering wheel button.
• Repeat step 1 and 2 until all the settings are done.
- Touch [ Save and Exit ] after all buttons are set.
• To reset the programming, touch [Reset].

File Manager
- Select [ Files ] in the main menu to enter File Manager menu.
- Select the desired folder to access your files.

In the settings menu, you can adjust the basic settings for the different functions of the device to your requirements.
- In the main menu, press the [Settings] button. The settings menu is displayed.
- Call up the submenus with the buttons in the lower area of the settings menu.
Video
- Touch [Video], if necessary.

Parking – In Parking "Off" mode, the screen will display Warning information if you play video. The warning screen will prevent the driver from watching videos while the vehicle is in motion.
General
- Select an option to access/setup.
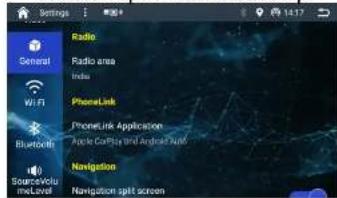
Wi-Fi
- Turn on the Wi-Fi and search the available networks. - Select a hotspot to connect.
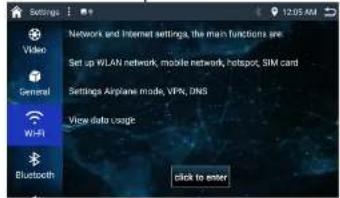
Bluetooth
- Manage Bluetooth devices.

SourceVolumeLevel
• Set the Volum Level of each Source.
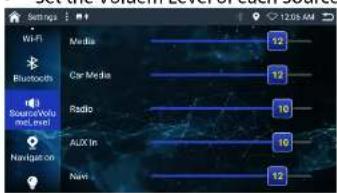
Navigation
- Select a Navigation source from the available list.

Settings
Key Light
• Set the color of Keys on the front display.

SWC
• Refer to Steering wheel control in previous chapter.
Factory
- Acess Factory configuration.

Default Password: 8888
CANBUS Settings
• View and manage CANBUS Settings.

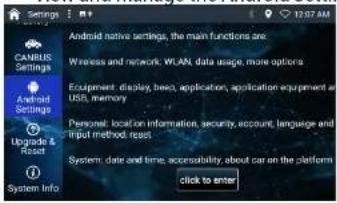
Android Settings
• View and manage the Android Settings.
Upgrade & Reset
- Upgrade the software & Reset the default settings.

System Info
• View System Informations

Wireless Apple CarPlay and Android Auto
This unit features wireless Apple CarPlay and Android Auto.
CarPlay and Android Auto is a smarter, safer way to use your iPhone while you drive. You can get directions, make calls, send and receive messages, and enjoy your favorite music. All on your car's head unit.

-
Android Auto: support most of Android OS phones with Android Auto function.
-
Apple CarPlay: support iPhone with IOS.
Starting connection
- Find [Settings] -> [General] -> [PhoneLink Application], Choose [Apple Carplay/Android Auto].
- Turn on the Bluetooth and WiFi button on phones.
• Find [BT Phone] source on the Home page and press [Add device].
• Find your phones and pair.
• After Bluetooth is connected, allow your phones to connect CarPlay or Android Auto.
- Follow the prompts on the screen and on your phone to start.
• After paring successfully, the Apple Carplay or Android Auto Home page will show up.
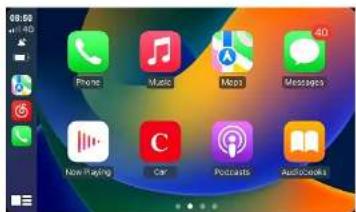
Apple CarPlay home page

Android Auto home page
Warranty | Service
Useful information
Warranty
We provide a 2 year manufacturer's warranty for products bought within the India, For devices purchased outside the India, the warranty terms issued by our respective responsible domestic agency is valid.
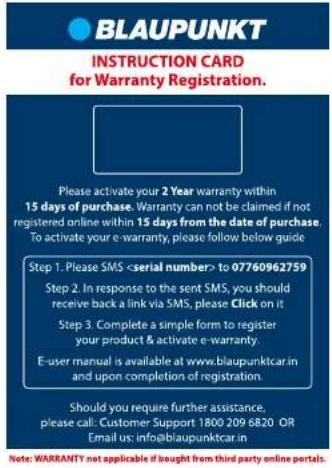
Register ONLINE within 15 days of PURCHASE to activate WARRANTY.
The procedure to activate the warranty is given below;
Service
If your device should need service or to get more information about our local authorised service center, you can email us at
Email: Support@blaupunktcar.in
OR
call 1800 209 6820
Connection diagram
Diagram of power cable and RCA Cable
Note only work within DC10.6V\~16V power FM 87.5\~108.0MHz Speaker prohibit grounding! AM 522KHz\~1620KHz

Power Cable Diagram

[2] RCA output socket


Troubleshooting
What appears to be trouble is not always serious. Please check the following points before calling a service center.
| Problem Cause Corrective action | ||
| General | ||
| Unit can not power on | Unit fuse blown. Install new fuse with correct rating. | |
| Car battery fuse blown. Install new fuse with correct rating. | ||
| Illegal operation Reset the unit. | ||
| No/low audio output | Improper audio output connection. Check wiring and correct. | |
| Volume set too low. Increase volume level. | ||
| Speakers damaged. Replace speakers. | ||
| Heavily biased volume balance. Adjust the channel balance to center position. | ||
| Speaker wiring is in contact with metal part of car. | Insulate all speaker wiring connections. | |
| Poor sound quality or distortion | Speaker power rating does not match unit. Replace speakers. | |
| Wrong connections. Check wiring and correct. | ||
| Speaker is shorted. Check wiring and correct. | ||
| Unit resets itself when engine is off | Incorrect connection between ACC and BATT. | Check wiring and correct. |
| TFT monitor | ||
| Warning information is shown at all times | Parking break wiring is not correct. | Check wiring and correct. |
| Flashing image or interference appears on screen | Video cable damaged. | Replace cables. |
| Improper video signal connections. | Check wiring and correct. | |
Appendix
This item incorporates copy protection technology that is protected by U.S. patents and other intellectual property rights of Rovi Corporation. Reverse engineering and disassembly are prohibited.
Windows ® und Windows Media ® are registered trademarks of the Microsoft Corporation in the U.S.A. and/or other countries. This product is protected by certain intellectual property rights of Microsoft. Use or distribution of such technology outside of this product is prohibited without a license from Microsoft.
The Bluetooth ® word mark and logos are registered trademarks owned by Bluetooth SIG, Inc.
| Video Files | |||
| File Format | Supported File Extension | Supported Video Code | Supported Audio Code |
| MPEG | .mpg, .mpeg, .dat, .vob, .m2v, .m1v | MPEG-1, MPEG-2 ,H.264 | MPEG, PCM, MP3 |
| AVI | .avi, xvid | MPEG-1, MPEG-2, MPEG-4, H.264, VC-1, MJPEG, H.263, Sorenson | MPEG, MP3, PCM, WMA, AAC, FLAC |
| RM | ..rm, .rmvb, .ra (audio only) | RV30; RV40 | COOK, AAC |
| FLV | .flv, .hlv | H.264; Sorenson H263 | PCM, MP3, AAC |
| ASF/WMV | .asf, wmv, .wma (audio only) | MPEG-1, MPEG-2, MPEG-4, H.264, H.263, VC-1 | MP3, PCM, AAC, MPEG, WMA |
| MP4 | .mp4, mov, .m4v, .3gp, m4a (audio only) | MPEG-1, MPEG-2, MPEG-4, H.264, H.263, MJPEG | AAC, MPEG, MP3, PCM |
| MKV | .webrn, .mkv, .mka (audio only) | MPEG-1, MPEG-2, MPEG-4, H.264, RV, H.263, MJPEG, VC-1, Sorenson H263 | MP3, AAC, PCM, MPEG, FLAC, VORBIS, WMA |
| OGM | .ogm, .ogg (audio only) | MPEG-2, MPEG-4, H.264, RV, H.263, VC-1 | MPEG, MP3, PCM, AAC, COOK, VOBIS, WMA |
| TS | .ts, .m2ts, .m2t, .tp, .trp | MPEG-2, H.264, MPEG-4, VC-1 | MPEG, MP3, AAC, PCM |
| Audio Files | ||
| File Format | Supported File Extension | Supported Audio Code |
| MP3 | .mp1, .mp2, .mp3 | MPEG / MP3 |
| WAV | .wav, .pcm | PCM / Microsoft ADPCM / IMA ADPCM |
| FLAC | .flac | flac |
| APE | .ape | ape |
BPIN Private Limited
47, Atlanta Society, Nariman Point, Mumbai- 400 021. Maharashtra. India.
www.blaupunktcar.in



- OPERATING INSTRUCTIONS
- PANEL INTRODUCTION
- CONTENTS
- SAFETY NOTES
- SYMBOLS USED
- CAUTION
- DANGER
- LOUD VOLUME
- GENERAL WARNING
- ROAD SAFETY
- OBSERVE THE FOLLOWING NOTES ABOUT ROAD SAFETY
- INSTRUCTIONS TO READ THIS USER MANUAL
- MARKS
- DECLARATION OF CONFORMITY
- CLEANING NOTES
- DISPOSAL NOTES
- SCOPE OF DELIVERY
- PLACING THE DEVICE IN OPERATION
- SWITCHING ON/OFF WITH THE POWER BUTTON
- VOLUME
- ADJUSTING THE VOLUME
- MUTING THE CAR SOUND SYSTEM (MUTE)
- MAIN MENU(HOME)
- NOTE
- RADIO MODE
- START RADIO MODE
- SELECT MEMORY BANK
- TUNING INTO A STATION
- TUNING INTO STATIONS MANUALLY
- RADIO
- STARTING STATION SEEK TUNING
- STORING STATIONS MANUALLY
- STORING STATIONS AUTOMATICALLY
- ADJUSTING THE SEEK TUNING SENSITIVITY
- SWITCHING RDS ON/OFF
- SWITCHING THE AF (ALTERNATE FREQUENCY) FUNCTION ON/OFF
- SWITCHING PRIORITY FOR TRAFFIC ANNOUNCEMENTS ON / OFF
- SELECTING PROGRAM TYPE AND START SEEK TUNING
- SOUND SETTINGS
- EQUALIZER
- VOLUME DISTRIBUTION (FADER/BALANCE)
- TIME ALIGNMENT
- USB
- USB MEDIA PLAYBACK
- NOTES
- USB DATA CARRIER
- CONNECTING A USB DATA CARRIER
- REMOVING THE USB DATA CARRIER
- AUDIO PLAYBACK FROM USB
- VIDEO PLAYBACK FROM USB
- IMAGE PLAYBACK FROM USB
- BLUETOOTH
- BLUETOOTH MODE
- STARTING BLUETOOTH MODE
- REGISTERING BLUETOOTH DEVICES
- TELEPHONE MODE
- DIALING
- ANSWER A CALL
- AUDIO PLAYBACK VIA BLUETOOTH STREAMING
- EASYCONNECTION / PHONELINK
- ENTERING CONNECTION PROMPT
- ANDROID/IPHONE USB
- PHONELINK
- ANDROID WIFI
- IPHONEWIFI
- TIP
- AUX IN
- CAMERA INPUT
- STEERING WHEEL CONTROL(SWC)
- FILE MANAGER
- VIDEO
- GENERAL
- WI-FI
- SOURCEVOLUMELEVEL
- NAVIGATION
- SETTINGS
- KEY LIGHT
- SWC
- FACTORY
- CANBUS SETTINGS
- ANDROID SETTINGS
- UPGRADE & RESET
- SYSTEM INFO
- WIRELESS APPLE CARPLAY AND ANDROID AUTO
- STARTING CONNECTION
- USEFUL INFORMATION
- WARRANTY
- SERVICE
- CONNECTION DIAGRAM
- TROUBLESHOOTING
- APPENDIX
- BPIN PRIVATE LIMITED
Brand : BLAUPUNKT
Model : Ft. Lauderdale 900
Category : Car radio