GX2 - Mobile Phone GSmart - Free user manual and instructions
Find the device manual for free GX2 GSmart in PDF.


| Product Type | Mobile Phone |
| Brand | GSmart |
| Model | GX2 |
| Dimensions (H x W x D) | 150 x 70 x 8 mm |
| Weight | 150 g |
| Display Size | 5.5 inches |
| Resolution | 1280 x 720 pixels |
| Processor | Quad-core 1.3 GHz |
| RAM | 2 GB |
| Internal Storage | 16 GB |
| Expandable Storage | MicroSD up to 64 GB |
| Battery Capacity | 3000 mAh |
| Operating System | Android 6.0 Marshmallow |
| Rear Camera | 8 MP with LED flash |
| Front Camera | 2 MP |
| Connectivity | Wi-Fi, Bluetooth 4.0, GPS, 4G LTE |
| Sensors | Accelerometer, Proximity, Ambient Light |
| Power Input | 5V/1A via Micro USB |
| Maintenance | Clean with soft dry cloth; avoid liquids |
| Safety | Do not disassemble; avoid extreme temperatures |
| Spare Parts | Battery, screen, charging port available |
| Repairability | Moderate; recommended service center |
| Package Contents | Phone, charger, USB cable, user manual |
Frequently Asked Questions - GX2 GSmart
User questions about GX2 GSmart
0 question about this device. Answer the ones you know or ask your own.
Ask a new question about this device
Download the instructions for your Mobile Phone in PDF format for free! Find your manual GX2 - GSmart and take your electronic device back in hand. On this page are published all the documents necessary for the use of your device. GX2 by GSmart.
USER MANUAL GX2 GSmart
GX2
Copyright
All mobile products by GIGA-BYTE COMMUNICATIONS INC. mentioned in this document, including the device, accessories, software, text, music, and pictures, are owned by, or authorized by original manufacturers to GIGA-BYTE COMMUNICATIONS INC. Reproduction, transfer, distribution, or storage of part or all of the contents in this document in any form without the prior written permission of GIGA-BYTE COMMUNICATIONS INC. is prohibited.
General Information
This section contains important information on safe and efficient operation. Please read this information before using the device. Ignorance of the following notices may lead to violations of the law.
● Before using the device, please make sure you have fully charged the battery.
- Do NOT remove the battery from the device during charging.
● Before inserting SIM card into the device, make sure that the device is switched off.
- Do NOT attempt to dissemble the device on your own. This should be done by an authorized person.
- Use the device in accordance to instructions when in public facilities.
- In some countries, it is a violation against the law to record phone conversations. Always ask permission of the other party when you are going to record a conversation.
- To protect your ears, turn down the volume before you use stereo headsets or other audio devices.
- To avoid damaging the touch screen and the device, do NOT apply excessive pressure on them, and remove the device from your pants' pocket before you sit down. It is also recommended that you only use the stylus or your finger to interact with the touch screen. It is not covered by the warranty that you crack the touch screen because of the improper usage.
- When you use the device for a long time, such as talking on the phone, browsing online, or charging the battery, the device may become warm. In most cases, this condition is normal.
- Refer servicing to the provider, or an authorized technician under the following conditions: 1. The device has been damaged. 2. When you follow the instructions to use your device, it does not operate normally. 3. The device has been exposed to water. 4. Liquid has been spilled or an object has fallen onto the device.
- Do Not push unauthorized objects into slots and openings in your device.
- The device should be placed away from heat sources such as stoves, radiators, heat registers, or other products that produce heat.
- Condensation may form on or within your device, when you move your device between environments with very different temperature and/or humidity ranges. To avoid damaging your device, make the moisture to evaporate before you use the device.
- To avoid damaging your device, do Not put your device on an unstable table, stand, bracket, or other places.
- Before you clean your device, unplug it, please. Use a damp cloth for cleaning, but do Not use water, liquid cleaners, or aerosol cleaners to clean the touch screen.
- SAR is measured with the device at a separation of 1.5 cm to the body, while transmitting at the highest certified output power level in all frequency bands of the mobile device. The max SAR 10g of position is RC GPRS 900 CH975 2D4U SIM1, SAR 10-g is 0.742 W/kg.
- This device complies with the R&TTE Directive (1999/5/EC), the EMC Directive (2004/108/EC), and the Low Voltage Directive (2006/95/EC) issued by the Commission of the European Community.
- This device has been tested to comply with the Sound. Pressure Level requirement laid down in the applicable EN50332-1 and/or EN 50332-2 standards. Permanent hearing loss may occur if earphones or headphones are used at high volume for prolonged periods of time. Prevention of Hearing Loss Warning statement requirement under EN 60950-1:A12.

Warning: To prevent possible hearing damage, do not listen to high volume levels for long periods.
DTS Studio Sound™

dts®
Studio Sound
For DTS patents, see http://patents.dts.com. Manufactured under license from DTS Licensing Limited. DTS, the Symbol, & DTS and the Symbol together are registered trademarks, and DTS Studio Sound is a trademark of DTS, Inc. © DTS, Inc. All Rights Reserved.
CE 2200 ⚠️ ✕️ EAC ⏰ 052 UA UCRF
Table of Contents
| Copyright | 1 |
| General Information | 2 |
| 1. Getting Started 5 | |
| 1.1 Your Phone | 5 |
| 1.2 Installing or uninstalling the SIM Card, Battery, and Memory Card | 5 |
| 1.3 Charging the Battery | 7 |
| 1.4 Turning the Phone On or Off | 8 |
| 1.5 Lock/Unlock | 8 |
| 1.6 Contacts | 8 |
| 1.7 The Home Screen | 9 |
| 2. Phone Functions & Messages | 11 |
| 2.1 Voice Calls | 11 |
| 2.2 Creating and sending a text message | 12 |
| 2.3 Multimedia Message | 13 |
| 3. Wi-Fi & Bluetooth | 14 |
| 3.1 Wi-Fi | 14 |
| 3.2 Bluetooth | 14 |
| 4. Multimedia Applications | 15 |
| 4.1 Camera | 15 |
| 4.2 Music | 15 |
| 5. Pre-Installed Programs Introduction | 17 |
| 6. Managing Your Phone | 19 |
| 6.1 Protecting Your Phone | 19 |
| 6.2 Backup or Reset Your Phone | 19 |
| 7. Specifications | 20 |
1. Getting Stared
1.1 Your Phone
This section introduces you to the hardware of the device.


| No | items | No | Items |
| 1 | Earphone Jack | 10 | Home |
| 2 | LED | 11 | Return |
| 3 | P Sensor/ Light Sensor | 12 | MIC |
| 4 | Receiver | 13 | Micro-USB Port |
| 5 | Front Camera | 14 | Flash LED |
| 6 | Volume | 15 | 13MP Camera |
| 7 | GSmart EZ Key | 16 | Power |
| 8 | Touch Screen | 17 | Battery Cover |
| 9 | Menu | 18 | Speaker |
1.2 Installing or uninstalling the SIM Card, Battery, and Memory Card
SIM card
The SIM card contains your phone number, memory storage, and details of network service.
To remove the back cover
- Please turn over your phone with the back cover facing up.
- Please move your fingertip into the slot.
- Pull the back cover with your fingertip and remove it.
Gsmart

natural_image
Illustration of hands installing or adjusting a device component with an inset magnified view (no text or symbols)To install the SIM card
There are two slots for SIM cards. Left slot is for SIM1 (WCDMA+GSM) and right slot is for SIM2 (GSM). The gold contacts are facing down. And the cut-off corner is facing toward the inside.

natural_image
Line drawing of hands inserting a small electronic component into a device casing (no text or symbols)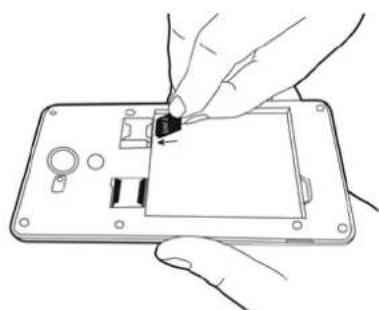
natural_image
Line drawing of hands installing or adjusting a device on a handheld device (no text or symbols visible)To install the SIM1 card To install the SIM2 card
To remove the SIM card
Please turn off your phone first, and use your finger to slide the SIM card out of card slot.
Battery
Your phone comes with an embedded rechargeable battery. Battery life varies depending on the network, used applications, and the type of connections attached to your phone.
To replace the back cover
(1) Insert the cover into the slot from the bottom.
(2) Then, press all around back cover fully until hearing clicks.
Memory card
You may need a microSD card to store photos, music, videos and other data.
To install the memory card
(1) Insert the memory card with the gold contact facing down.
(2) Push the memory card until it clicks into slot.

natural_image
Line drawing of hands installing or adjusting a device component on a device casing (no text or symbols visible)Gsmart
To remove the memory card
(1) For safe removal, tap Applications tab > Settings > Storage > Unmount SD card > OK.
(2) Push the memory card to eject it from the slot.
1.3 Charging the Battery
When you take your phone out of box for the first time, the battery isn't at full power. Please charge the battery fully before using.
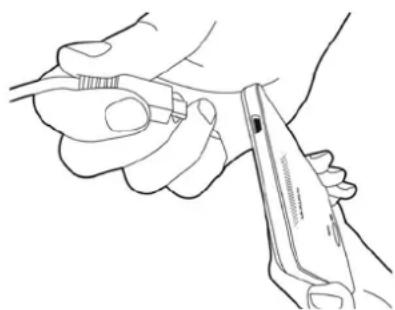
(1) Connect the USB cable to the AC adapter, and then, connect to the device via the USB cable.
(2) Plug the AC adapter to a socket to start the charge.
(3) For phone's safety, please only use the original charger that comes with your device. Any possible damage caused by using non-original charger or any other equipment will not be under GIGABYTE Communication Inc.'s responsibility.
natural_image
Line drawing of a hand holding a tool, no text or symbols presentNOTE:
*To ensure safety, do not remove the battery from the phone while the AC adapter is connected or while it is being charged.
* Risk of explosion if battery is replaced by an incorrect type. Dispose of used batteries according to the instructions.
1.4 Turning the Phone on or off
To turn on your phone
Press and hold the power button until the phone shortly vibrates.
To turn off your phone
(1) Press and hold the power button for several seconds.
(2) A pop-up window appears, then tap "Power off".
(3) Select "OK" to confirm.
To set your phone to the sleep mode
To set your phone to the sleep mode, press the power button briefly. It will turn the display off. To turn the display on, press the power button briefly again.
1.5 Lock/Unlock
There are four functions you may use when turning the device on or coming back from sleep mode.
Unlock the device
Drag Lock icon on screen and slide to Unlock icon for unlocking the device.

Taking pictures
Drag Lock icon to Camera icon to taking some pictures.
Muting the speaker
Drag Lock icon to Mute icon to mute the speaker.
Making a phone call
If you what to make a phone call, please drag the Lock Icon to Phone icon.
1.6 Contacts
"Contacts" is your phonebook that you can store friends' names, phone numbers, e-mail addresses and other information. "Contacts" can connect to your Google, corporate accounts, and integrate your contact information.
Adding a Contact
(1) Tap Applications tab >
(2) Tap > tap + to add a new contact.
(3) Choose where you want to synchronize the new contact with Google account, Phone, SIM1 or SIM2.
(4) A new contact screen appears.
(5) Tap each field to fill out the contact information.
(6) Tap "DONE" to save it.
NOTE:
The SIM card contact can't add picture to contact information.
Gsmart
Searching for Contacts
On Contact Screen, do any of the following to easily search for contacts:
- Tap 🔒 to type the first few letters of the contact name to search. The list is filtered when typing. When finishing searching, you could tap ✗ to go back to the contacts screen.
1.7 The Home Screen
On Home Screen, you can quickly access common features and view notifications of missed calls, received messages, battery, and the status of the connection.
Default Home Screen: Main functions.

| Icons Descriptions | |
| Favorites Tray can keep your most important shortcuts and folders. | |
| Tap to launch Application Drawer. | |
You can slide the Home Screen from the left side to the right side or from the right side to the left side to switch it. The icons located at the bottom of the home page have different functions:
Self-defined Home Screen: You can add the shortcuts and widgets.

| Icons | Functions |
| ↑↓ | Tap to turn on/off network. |
| dtsStudio Sound | Tap to turn on/off DTS studio sound |
| Tethering or hotspot active | |
| Enable/disable Wi-Fi. | |
| Enable/disable Bluetooth. | |
| Enable/disable GPS. | |
| Enable/disable Data Synchronization. | |
| Tap to adjust the brightness. |
Status Icons
The icons of the status bar indicate different types of information. Tap the status bar and scroll down to view notifications or view system information.
| Types | Icons | Descriptions |
| Phone call | [3ACV] | Call is in progress. |
| [0427] | Your call is on hold. | |
 | Mute the call. | |
| [0000] | Speaker is on. | |
| Volume | [46AC] | Vibration is on. |
| [4HH0] | Wired headset connected. | |
| [XXCK] | Wired microphone headset connected. | |
| Battery | [4D48] | Battery is full. |
 | Battery is low. | |
| [WT03] | Battery is very low. | |
| [1K431] | Battery is charging. | |
| Network and Connection |  | Maximum signal strength. Fewer bars indicate lower signal strength. Left icon is SIM1 signal (WCDMA+GSM). Right icon is SIM2 signal (GSM). |
| [1HHW] | GPRS\EDGE\ 3G\ HSPA is in progress.SIM1 supports GPRS\ EDGE\ 3G\ HSPA networks.SIM2 supports GPRS\ EDGE networks. | |
| [1YTW] | ||
| [1YHW] | Wi-Fi is connected. | |
| [1ZZ64] | Wi-Fi is in progress. | |
| [CYX8] | Wi-Fi Network is activated. | |
| [CYX9] | Airplane mode. | |
| [1HX34] | Portable Wi-Fi hotspot is activated. | |
| [TKX2] | Both USB tethering and Portable Wi-Fi hotspot are activated. | |
| [AKZ7] | GPS is on. | |
 | Bluetooth is on. | |
| [8T22] | The device is connected to PC via the USB cable. | |
| Notification | [8C30] | New text message. |
| [0748] | New e-mail. | |
| [YY08] | New Gmail. | |
| [1A664] | Alarm. | |
| [4773] | Event notification. | |
[4420] | USB debugging is connected.Missed call. | |
| Notification | ||
 | General notification. | |
 | FM radio is on. | |
 | Playing a song. | |
 | Downloading an application. |
2. Phone Functions & Messages
2.1 Voice Calls
To make a call from the Phone screen
(1) Go to the Phone screen.
(2) Use the keypad to input phone numbers.
(3) Choose SIM1 or SIM2 to make the phone call.
NOTE:
Tap ✗ to delete a number. Tap and hold ✗ to erase entire numbers.
To make a call from Contacts
(1) Tap Applications tab >
(2) Tap .
(3) Tap a contact you want to call.
(4) If SIM2 inserted, there is a menu will pop up. You may select "SIM1" or "SIM2" to make a phone call.
To make emergency calls
You have to unlock your device before making an emergency call. Enter the international emergency number 112, and tap 🔔 to make the emergency call.
Answering a call
When there is an incoming call:
- The phone will ring with the ring volume is turned on.
- A notification message will appear on the screen.
Ending a call
Tap ☐. It's the end icon to end a call.
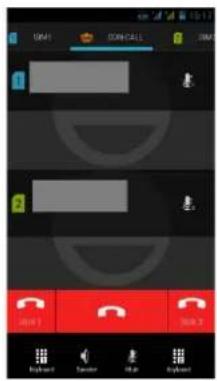
To Start a Three-way call
(1) When you are already having a call conversation, tap number(If SIM2 inserted).
to enter another phone
(2) Tap Three-way call to set up the conference call.

Gsmart
NOTE:
Three-way call doesn't go through Wi-Fi or operators special service. It is a function on your phone.
2.2 Creating and sending a text message
Your phone offers several ways to create and send a new text message.
From Message screen
(1) Tap Applications tab >

(2) Tap + to create a new message.
(3) In the "To" field, enter the recipient's phone numbers or names to add from your contacts.
(4) Type your message in the "Type message" field.
(5) Tap ▶ to send your message. You may select SIM1 or SIM2 (If SIM2 inserted).
From Contact screen
(1) Tap Applications tab >

(2) Tap a contact to display the contact information.
(3) Tap the icon ☐ to send the message.
(4) Compose your message.
(5) Tap ▶ to send your message.
NOTE:
If you exit Messages before sending, unsent message will be saved as a draft automatically.
TouchPal keyboard
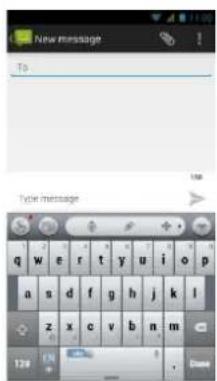
| Icons Function | |
 | Tap to close input keyboard. |
 | Tap to active Capital letter mode. |
| [GBW4] | Tap to delete words. |
 | Switch different language inputs and methods. |
 | Tap to activate the symbols and numerical keyboard. |
| [HEX6] | Tap to move to the next text zone. |
Android keyboard

| Icons Function | |
| Tap to active Capital letter mode. | |
| Tap to activate the symbols and numerical keyboard. | |
| Tap to input something by voice. | |
| Tap to delete words. | |
2.3 Multimedia Message
A Multimedia message or MMS can contain letters, an image, an audio, or a video file.
To send MMS from Message screen
(1) Tap Applications tab >
(2) Tap + to create a new message.
(3) Enter the recipient's phone numbers in the "To" field
(4) Tap 📋 to attach pictures, capture picture, videos, capture video, audio, record audio, or slideshow. The message converts to a MMS message automatically.
(5) Enter your message with the on-screen keyboard in "Type message" filed.
(6) Tap ▶ to send your message.
3. Wi-Fi & Bluetooth
3.1 Wi-Fi
Your device can connect to the detected network through Wi-Fi.
(1) Tap Applications tab > Wi-Fi.
(2) Switch to turn "Wi-Fi" on or off.
To connect to a Wi-Fi network
(1) Tap "WI-FI", check Wi-Fi function and turn it on. Begin to search the available Wi-Fi networks.
(2) Detected networks are displayed below. Tap one network then tap "Connect".
(3) If you select an open network, the connection is established automatically.
(4) To connect a secured connection, you will be prompted for the password. Enter the password then tap "Connect".
(5) When Wi-Fi is connected, the connection icon will be displayed on the status bar.
To add Wi-Fi network
(1) Tap Applications tab > Wi-Fi.
(2) In Wi-Fi screen, tap + to ADD NETWORK. An on-screen window will pop-up.

(3) Follow the on-screen instructions and enter the necessary information, then tap "Save" to save the settings.
3.2 Bluetooth
Bluetooth on your phone operates in three different modes:
- On: Bluetooth is turned on. Your phone detects other Bluetooth devices, but your phone is not visible to others.
● Discoverable: Bluetooth is turned on, and your phone is visible to other Bluetooth devices. - Off: Bluetooth is turned off.
To turn Bluetooth on or off
(1) Tap Applications tab > 🙏 > Bluetooth.
(2) Switch or tap to turn it on.
(3) Tap "Menu" to view the menu options.
(4) Tap the device's name to make your device visible to others.
To connect to Bluetooth devices
A connection to a Bluetooth device is called a partnership. You need to pair and create a partnership with a Bluetooth device to exchange information.
(1) Tap Applications tab > 🙏 > Bluetooth.
(2) Tap "SEARCH FOR DEVICES" to search for a new device.
(3) Detected Bluetooth devices are displayed on the screen. Tap one device to connect.
(4) Start to pair, enter the password, and then tap "OK" to finish pairing.
Gsmart
4. Multimedia Applications
4.1 Camera
Your phone is equipped with a 13MP camera to take photos and videos.
Camera Function

natural_image
Colorful street scene with colorful buildings along a canal under a clear blue sky (no visible text or signage)| Icon | Function | Icon | Function |
 | Tap to take a photo. |  | Stand Capture mode. |
 | Tap to record a video. |  | HDR mode. |
 | Panorama mode. |  | Exposure mode. |
 | Switch between rear and front camera. | [BH58] | Configure camera settings. |
 | Display the flash mode. |  | Displays the last image. |
Taking a photo
(1) Tap Applications tab > ☐. The screen switches to landscape view automatically.
(2) Tap ☐ to take a picture.
Recording a video
(1) Tap Applications tab > .
(2) Switch to recorder mode.
(3) Aim the phone at the subject.
(4) Tap ■ to start to record, tap ■ to stop recording.
4.2 Music
You have to copy your audio files to the storage card before playing music, because the music player only plays audio files saved in the storage card of your phone. Tap Applications tab > Music.
Gsmart
- Playback screen: Displays the playback area with the playback controls.
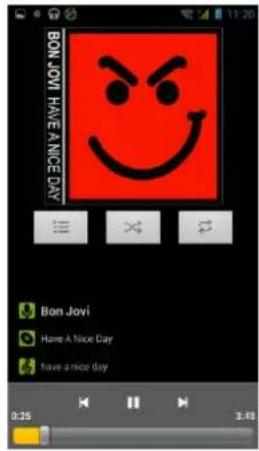
| Icon Function | |
 | Album art picture or animation |
 | The area of audio information |
 | Slide to go forward or backward |
 | To play the song |
 | To pause the song |
 | Previous song |
 | Next song |
 | Tap to go to playlists |
| [52DY] | To start or close shuffle function |
 | To repeat the current song/ all songs |
- Pre-Installed Programs Introduction
| Icons | Programs | Description Icons | Programs | Description | |
 | Battery Doctor | To save juice and extend battery life significantly. |  | Calculator | Performs arithmetic functions, such as addition, subtraction, multiplication, and division, etc. |
 | Calendar | Creates and tracks schedule or appointments. |  | Camera | Captures still images. |
 | Chrome | Google's browser service. |  | Clean Master | Clearing cache, residual files, privacy data and uninstalling apps. |
 | Clock | Sets up alarm clock. |  | Call Navigator | Introducing how to make a concall. |
 | Downloads | To view files and items you've downloaded. |  | Drive | Google drive to store files with Google Docs. |
 | Dropbox | Bring and share your photos, docs, and videos anywhere. |  | Sends and receives e-mail messages. | |
 | EZ Key | Quickly enter the preferred app, shortcut or function. |  | File Manager | Manages all files. |
 | FM Radio | Listen to music/news on the FM Radio. |  | Gallery | Views and edits photos and videos. |
 | Gmail | Google's web-based e-mail service. |  | Google Search | Google's search service. |
 | Google Settings | Shortcuts to your Google+ settings, Location, Search & Now, Android Device Manager and Drive Apps. |  | Google+ | Checks friends' updates and post updates of your own. |
 | Hangouts | Google's instant messaging program. | [DBX8] | Kingsoft Office | Office Software. |
 | Maps | Google's mapping service for searching places you want. |  | Messaging | Sends and receives all types of messages. |
 | Music | Plays and manages the music and audio files. |  | News & Weather | Google's news and weather services. |
 | People | Stores names, numbers, e-mail, and other information. |  | Phone | Makes and receives phone calls. |
 | Photo Grid | Creating attractive photo montages out of your works of art. |  | Photos | Google service to edit and back up pictures. |
 | Play Books | Google e-book Store. |  | Play Games | Google game center. |
 | Play Music | Listening to your music collection anywhere. |  | Play Newsstand | Google News Center. |
 | Play Store | To find applications which you can download and install on your phone. |  | Reminder Timer | Set up a reminder timer list on your phone. |
 | SIM Toolkit | It enables the SIM to initiate actions. |  | Smart Saving | Help you to save power. |
 | Smart Reset | You can simply reset contacts data or application data. |  | Sound Recorder | Records a voice note. |
| [KYWIC] | System update | Checking the system update information. |  | TouchPal X | To set up your Touchpal Keyboard. |
 | Voice Search | Quickly to search your phone, the web, and nearby locations by speaking. |  | YouTube | It is online video streaming service that to view, search, and upload videos. |
6. Managing Your Phone
6.1 Protecting Your Phone
You can protect your phone from unauthorized users in a few different ways.
Set up PIN Protection
(1) Tap Applications tab > Security > Screen lock > PIN.
(2) Enter your PIN, and then, tap "Continue". Confirm your password, then, tap "OK".
(3) If you want to disable screen lock security, please tap Application Drawer > Security > Screen lock. Confirm your PIN, and then, tap "Continue". Tap "None" to disable it.
Set up Password Protection
(1) Tap Applications tab > Security > Screen lock > Password.
(2) Enter your password, and then, tap "Continue". Confirm your password, then, tap "OK".
(3) If you want to disable screen lock security, please tap Application Drawer > Security > Screen lock. Confirm your password, and then, tap "Continue". Tap "None" to disable it.
Set up Unlock Pattern
You can further secure your data by locking the screen and requiring a screen unlock pattern every time after your phone is turned on or it wakes up from the sleep mode every time (screen is off).
(1) Tap Applications tab > Security > Screen lock > Pattern.
(2) Draw the unlock pattern by connecting at least four dots. Then tap "Continue".
(3) Draw the unlock pattern again, and then, tap "Confirm".
(4) If you want to disable the function, please tap Applications tab > Security > Screen lock. Confirm the saved pattern, and then, tap "None" to disable it.
Set up Face Unlock
You can use front-facing shot to verify your identity to unlock your phone.
(1) Tap Applications tab > Security > Screen lock > Face Unlock.
(2) Tap Set it up > Continue.
(3) Show your face in front of your phone until face captured. Then tap continue.
(4) Set up Pattern or PIN as the backup lock.
(5) If you want to disable the function, please tap Applications tab > Security > Screen lock. Confirm the saved pattern, and then, tap "None" to disable it.
6.2 Backup or Reset Your Phone
With Clean Boot, you can reset your phone to its factory defaults. When you reset your phone, the data stored in your phone may be erased.
(1) Tap Applications tab > 🎨 > Backup & reset.
(2) Tap Factory data reset > Reset phone > Erase everything to reset the phone.
NOTE:
Before resetting your device, please remember to back up all your data and information.
- Specifications
| System Information | |
| Platform Android 4.4 | |
| Processor | 1.6GHz Quad Core |
| Memory | ROM 8GB/ RAM 2GB |
| Display | |
| Size 5" | |
| Resolutions | 1920 x 1080 pixels |
| Size | |
| Dimensions | 146.5 x 73.4 x 8.7 mm (L x W x H) |
| Weight | 135 grams with battery |
| Power | |
| Battery Li-ion pack | 2200 mAh |
| Power Adapter AC input | 100-240V, 50/60Hz, 0.5A max. |
| DC output 5V, 2A | |
| Standby time | Up to 350 hours (It may vary depending on the availability of local networks and the individual usage.) |
| Talk time | Up to 12 hours (It may vary depending on the availability of local networks and the individual usage.) |
| Radio Band & Standard | |
| GSM/GPRS/EDGE | 850/900/1800/1900 MHz |
| WCDMA/HSDPA 850/900/1900/2100 MHz | |
| Connectivity | |
| GPS GPS, AGPS | |
| Wi-Fi | IEEE 802.11 a/b/g/n |
| Bluetooth | Bluetooth 4.0 |
| USB | Micro USB |
| Audio Jack | 3.5 mm stereo audio jack |
| Digital Camera | |
| Rear Camera | 13MP Color Camera with AF and Video Recording |
| Front Camera | 2MP |
| External Memory | |
| Memory Card | microSD supports up to 64GB |
| Temperature | |
| Operating | 0°C to 40°C |
| SIM Card Slot | |
| Dual SIM card slot. | |
NOTE:
- Specifications are subject to change without the prior notice. They may vary in some regions also.
- Mobile data interruption, unexpected error in CPU and high power consumption could be caused by in-app AD in Android phone. We suggest you try to remove
Gsmart
those apps with AD which had been installed in your device for preventing any abnormal situation happens and saving more power as well.
If this document is modified, please download the latest version on GSmart official website. www.gigabytecm.com
Android 4.4 Introduction

natural_image
Illustration of a brown Android robot with segmented body and antennae (no text or symbols)Table of Contents
| Chapter 1 Phone Functions & Input | 2 |
| 1.1 Phone Calls 2 | |
| 1.2 Video Calls | 4 |
| 1.3 Using On-Screen Keyboard | 5 |
| Chapter 2 Email & Messages | 6 |
| 2.1 Creating and sending a text message | 6 |
| 2.2 E-mail Accounts 9 | |
| Chapter 3 Using the Internet | 11 |
| 3.1 Connecting to the Internet | 11 |
| 3.2 Bluetooth modes 13 | |
| Chapter 4 Multimedia Applications | 14 |
| 4.1 Viewing Photos and Videos | 14 |
| 4.2 Music | 15 |
| Chapter 5 Programs | 17 |
| 5.1 Browser 17 | |
| 5.2 Calculator | 17 |
| 5.3 Calendar | 18 |
| 5.4 Sound Recorder 18 | |
| 5.5 Gmail | 19 |
| 5.6 Maps | 20 |
| 5.7 Clock 20 | |
| 5.8 Play Store | 20 |
| 5.9 YouTube | 21 |
| 5.10 Google Search/ Google Now | 21 |
| 5.11 Downloads | 21 |
| 5.12 File Manager | 21 |
| 5.13 FM Radio 22 | |
| 5.14 Google+ | 22 |
| 5.15 Connecting your phone to a computer | 23 |
| 5.16 Screenshots 23 | |
| Chapter 6 Managing Your Phone | 24 |
| 6.1 Managing Basic Settings | 24 |
| 6.2 Managing Your SIM Cards | 26 |
| 6.3 Managing Your Accounts | 26 |
| 6.4 Protecting Your Phone | 27 |
| 6.5 Resetting Your Phone | 28 |
1. Phone Functions & Input
Phone Functions
Tap Application Drawer > APPS tab > Phone.
1.1 Voice Calls
To make a call from the Phone screen
- Go to the Phone screen.
- Use the keypad to input phone number.
- Tap
NOTE:
Tap ✗ to delete a number. Tap and hold ✗ to erase entire numbers.
To make a call from People
- Tap Application Drawer > APPS tab >
- Tap a contact into the information screen.
- Tap a phone number you want to call.
- If SIM2 inserted, there is a menu will pop up. You may select "SIM1" or "SIM2" to make a phone call.
To make emergency calls
You have to unlock your device before making an emergency call. On the Phone screen, input the international emergency number 112, and tap SIM1 or SIM2 to make the emergency call.
To make international calls
- Go to the Phone screen.
- Tap and hold 0 until the "+" is displayed which is international prefix code.
- Enter the country code, area code, and phone number.
- Then tap SIM1 or SIM2 to make the international call.
To accept or reject an incoming call
- To accept a call, slide to on the screen.
- To reject a call, slide to 📄 on the screen.
Quick response an incoming call
When there is an incoming call, you can quick response with message by sliding to on the screen.

To put a call on hold
If you are having a call conversation, you can tap || to put the call on hold.
To switch between calls
If you are having a call conversation, and there is another incoming call, slide to put the first call on hold and answer the second call. Tap ☑ to switch between calls.
To set up conference calls
- When you are already having a call conversation, tap 📄+ to enter another phone number.
- When someone answer your phone call, tap ⬆. Merge calls to set up the conference call.
- If you are having a call conversation, and there is another incoming call, you can tap to set up the conference calls also.
NOTE:
Conference call is a network service. Please check with your network carrier for this function.
To manage other voice call features
When you are having a call conversation
- Tap 📋 to activate speakerphone, or tap 📋 again to cancel it.
- Tap 🖱️ to mute microphone, or tap 🖱️ again to un-mute it.
Ending a call
Tap ☐ End icon to end a call.
1.2 Video Calls
To make a video call from Phone screen
- Go to the Phone screen.
- Use the keypad to input phone number.
- Then tap : > Video Call to make the video call.
To make a video call from People
- Tap Application Drawer > APPS tab >
- On 🖱 tab, tap a contact into information screen.
- Tap to make the video call.
Ending a video call
Tap End icon to end a video call.
To manage other video call features
When you are having a video call conversation
- Tap 📋 to activate speakerphone, or tap 📋 again to cancel it.
- Tap 🖱️ to mute microphone, or tap 🖱️ again to un-mute it.
- Tap to switch the video windows.
1.3 Using On-Screen Keyboard
On-screen keyboard appears in portrait mode when an application requires text input, such as messaging and writing e-mails. The keyboard input method is activated by the default settings.
Using on-screen keyboard
- Use the keys on the on-screen keyboard.
- Tap the keys to enter the characters.
Setting the Input Method from Settings Screen
- Tap Application Drawer > APPS tab > 🎨 > Language & input.
- Tap "Default". There is a pop-up window will show.
- Select an input method you want to use.
Personal Dictionary
- Tap Application Drawer > APPS tab > 🎨 > Language & input > Personal dictionary.
- Tap + to add the self-defined words in the personal dictionary for English or all languages. When you compose, you can use them. Tap the self-defined word in the personal dictionary to edit it or tap 📄b delete it.
Using Google Keyboard
● To toggle between upper and lower case letter display, tap
● To display the numerical and symbols keyboard, tap ?123.
Google Keyboard Settings
- Tap Application Drawer > APPS tab > 🎨 > Language & input
- On Keyboard & Input Methods Screen, Tap ☐ to do the preference settings
2. Email & Messages
2.1 Creating and sending a message
Create and send messages
- Text messages could be included text and emotional icons.
- Multimedia messages/ MMS contain letters, an image, an audio, or a video file.
- Support to send voice messages and attach files with ringtone and audio.
NOTE:
- If you insert both of SIM1 and SIM2, the messages service will be set as default.
- Tap Application Drawer > APPS tab > SIM management > Messaging to change the default setting.
From Message screen
- Tap Application Drawer > APPS tab >
- Tap + to create a new message.
- Type the recipient's phone number or tap + to add from your contacts.
- Type your message and tap ▶ to send your message.

NOTE:
If you exit Messaging before sending, unsent message will be saved as a draft automatically.
From People screen
- Tap Application Drawer > APPS tab >
- Tap a contact to display the contact information.
- Tap ☐ to send the message.
- Compose your message and tap ➤ to send your message.

From Phone screen
- Tap Application Drawer > APPS tab >
- Tap ⏻ tab to view all call history.
- Tap a call contact from the call log.
- Tap icon ☐ to send the message.
- Compose your message and tap ➤ to send your message.

Receive and Manage messages
When you send and receive messages from a contact, these messages are grouped as a message thread. A message thread looks like an exchanged conversation.
To reply to a text message
- Tap Application Drawer > APPS tab >

-
Tap a message you want to reply.
-
Type your message and tap ➤ to send your message.
To forward a text message
- Tap Application Drawer > APPS tab >
- Tap a message to view the whole thread.
- Tap and hold a message to show Message option list.
- Tap "Forward".
- Tap + to select recipient.
- Tap ▶ to send your message.
To delete all messages
- Tap Application Drawer > APPS tab >
- Tap Menu > Delete all threads.
- Tap "Delete" to delete all messages in this message box.
To delete a message thread
- Tap Application Drawer > APPS tab >
- Long press a message thread you want to delete.
- Tap to delete the message thread.
To delete a message within a thread
- Tap Application Drawer > APPS tab >
- Choose a message you want to delete.
- Tap and hold it until a Message options list shows.
- Tap "Delete" to delete the message.
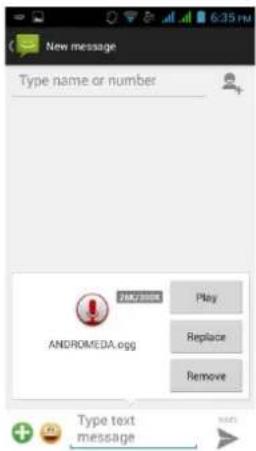
To create a voice message
- Tap Application Drawer > APPS tab >
- Tap + to create a new message.
- Tap + >
- Add "Ringtone" or "Audio" on the Message screen
- Tap "Play" to listen to your recording again, Tap "Replace" to be replaced another attachment, or tap "Remove" to delete.
- Type your message and tap ➤ to send your message.
2.2 Email Accounts
All your received email messages are delivered to your phone.
Set up an Internet Email account
- Tap Application Drawer > APPS tab >

- Enter your e-mail address and Password. Tap "Next".
- Select the e-mail account of types.
-
The phone will retrieve the e-mail settings automatically.
-
If the e-mail settings are pre-configured, the e-mail setup wizard displays a successful message.
-
If the e-mail settings are not found, manual setup is in process automatically. You can follow the instructions to complete the settings.
-
Enter Account name and then, tap "Next" to finish the settings.
NOTE:
The Account name is the name shown on the Email screen.
To add the second Email account

- Tap Application Drawer > APPS tab >
- Tap Menu > Settings > ADD ACCOUNT.
- Please follow the "Account setup" steps to finish the settings
To delete an Email account

- Tap Application Drawer > APPS tab >
- Tap Menu > Settings.
- Tap one of your accounts (If you have two more email accounts).
- Tap "Remove account" which is on the bottom of the page.
- Tap "OK" to confirm.
Composing and sending an Email

- Tap Application Drawer > APPS tab >
- Tap Account name to select an account.
- Tap + to compose a new email.
- Enter the recipient's email address.
- Enter the Subject and compose your email.
- Tap ▶ to send your email.
Sending an E-mail from People screen

- Tap Application Drawer > APPS tab >
- Tap a contact you want to email to.
- Tap the contact's Email address. Tap "Email" in the submenu.
- Enter the Subject and compose your email.
- Tap ▶ to send your email.
Adding attachments to an Email message
Before sending your message, tap Menu > Attach file, and then, choose an attachment you
want to attach.
To reply or forward an Email
- Open an e-mail.
-
Refer the following instructions:
-
Reply: Tap to reply the email.
- Reply all: Tap : > to reply all recipients and sender.
-
Forward: Tap : > to forward the e-mail to other people.
-
Enter the recipient and compose your e-mail.
- Tap ▶ to send your email.
To delete an Email
- Tap Application Drawer > APPS tab >

- In your mail Inbox, select the email you would like to delete.
- Tap 📄 to delete the email.
3. Using the Internet
3.1 Connecting to the Internet
Your phone connects to the Internet via:
Wi-Fi
● GPRS/ EDGE/ 3G/ 3.5G/ HSPA+
NOTE:
If you connect to the Internet, you may be charged. If you want to stop the connection, you need to tap Application Drawer > APPS tab > SIM management > Data connection to unmark data enabled.
Wi-Fi
- Tap Application Drawer > APPS tab > Wi-Fi.
- Switch to turn "Wi-Fi" on or off.
To connect to a Wi-Fi network
- Tap "Wi-Fi", check Wi-Fi function and turn it on. Begin to search the available Wi-Fi networks.
- Detected networks are displayed below. Tap one network then tap "Connect".
- If you select an open network, the connection is established automatically.
- To connect a secured connection, you will be prompted for the password. Enter the password and then tap "Connect".
- When Wi-Fi is connected, the connection icon will be displayed on the status bar.
To add Wi-Fi network
- Tap Application Drawer > APPS tab > Wi-Fi.
- On Wi-Fi screen, tap + And an on-screen window will pop-up.
- Follow the on-screen instructions and enter the necessary information, then tap "Save" to finish the settings.
To configure Wi-Fi settings
- Tap Application Drawer > APPS tab > Wi-Fi.
- Tap Menu > Advanced to check the Wi-Fi settings.
Tethering & portable hotspot
- Share your phone's mobile data connection via USB, Bluetooth, or as a portable Wi-Fi hotspot.
- Tap Application Drawer > APPS tab > More > Tethering & portable hotspot.
- You can turn on/off USB tethering, Portable Wi-Fi hotspot, Bluetooth tethering and configure the Wi-Fi hotspot settings.
VPN settings
- Tap Application Drawer > APPS tab > More > VPN.
- You must set lock screen pattern, PIN or password before using credential storage. Please tap "OK" go to Unlock selection, then choose which way you want to lock the screen.
-
After you set it up. It will go back to VPN screen.
-
Tap "Add VPN network" to edit VPN network.
- After filling in all necessary information, tap "Save" to finish the settings.
To start a data connection
If you set up multiple data connections, select the connection you want to use.
- Tap Application Drawer > APPS tab > SIM management > Data connection.
- Choose a SIM card you want to enable data access over Mobile network.
Enabling data roaming
Please set up your data connection first, and then follow the steps as below:
- Tap Application Drawer > APPS tab > SIM management > Roaming > Data roaming.
- Check the SIM card you want to connect to data when roaming.
3.2 Bluetooth modes
Bluetooth on your phone operates in three different modes:
- On: Bluetooth is turned on. Your phone detects other Bluetooth devices, but your phone is not visible to others.
- Discoverable: Bluetooth is turned on, but your phone is not visible to other Bluetooth devices.
- Off: Bluetooth is turned off.
To turn on/off Bluetooth
- Tap Application Drawer > APPS tab > Bluetooth.
- Switch or tap to turn it on.
- Tap "Bluetooth" to view the menu options.
- Tap the device's name to make your device visible to others.
Connecting to Bluetooth Devices
A connection to a Bluetooth device is called a partnership. You need to pair and create a partnership with a Bluetooth device to exchange information.
- Tap Application Drawer > APPS tab > Bluetooth.
- Tap "SEARCH FOR DEVICES" to search for a new device.
- Detected Bluetooth devices are displayed on the screen .Tap one device to connect.
- Start to pair, enter the password, and then tap "OK" to finish pairing.
NOTE:
- The password enter on your phone must be the same one be entered on the device which you want to pair with. The password is required at the first time, once a partnership has been created, the password will no longer require again.
- If you want to view the received files, you can tap Menu > Show received files.
4. Multimedia Applications
4.1 Viewing Photos and Videos
To view photos in the album
- Tap Application Drawer > APPS tab >

- Tap one of picture folders to view the images in thumbnails.
- Tap an image to view.
- Slide the screen from left side to right side or from right side to left side to view all the photos in this album.
To play slideshow
- While viewing an image, tap Menu > Slideshow.
- Tap screen to stop the slide show.
To set the image as Wallpaper
- While viewing the image, tap Menu > Set picture as > Wallpaper.
- Drag your finger to select the crop area.
- Tap "CROP" to set the image as the wallpaper.
To save an image as Contact photo
- While viewing the image, tap Menu > Set picture as > Contact photo.
- Choose a contact to add image.
- Drag your finger to select the crop area.
- Tap "CROP" to save the image as the contact photo.
To edit an image
While viewing the image, to edit an image:
- To crop, tap Menu > Crop. Drag your finger to select the area you want to keep. Tap "CROP" to save the image.
- To add effects, tap Menu > Edit. Using effects on the bottom to apply to the image. Tap "Save" to save the image.
To view file properties
- While viewing the image, tap Menu > Details.
- The file information is displayed. Tap "Close" to return to the image.
Play video from the video file
- Tap Application Drawer > APPS tab > Gallery > [icon] > select a video file you want.
- Tap ▶ to play it.
4.2 Music
To play music
- Tap Application Drawer > APPS tab >
- Tap Songs, and all songs on the phone will be displayed.
- Tap to select a song, and then it will play automatically.


| Icon Function | |
 | Album art picture or animation |
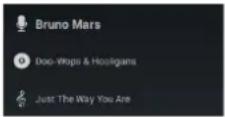 | The area of audio information |
 | Slide to go forward or backward |
 | To play the song |
 | To pause the song |
| [5S8Z] | Previous song |
 | Next song |
 | Tap to go to playlists |
| [KXWT] | To start or close shuffle function |
| [0ZZG] | To repeat the current song/ all songs |
Changing Playback options
While playing music, tap Menu button on the bottom of screen.
- Tap "Party shuffle" to play all songs in shuffle order.
- Tap "Add to playlist" to add the song.
- Tap "Use as ringtone" to set up your personal ringtone.
- Tap "Delete" to delete the song which is playing.
- Tap "Library" to see all playlists.
To edit music
You could set up effects, tap Menu > Sound effects.
- Drag or tap Equalizer to turn it on.
- Tap arrow to show different effect list
- Tap to select an effect you want. Items will be adjusted automatically.
- Tap arrow to show different preset reverb list.
- Tap to select an effect you want.
Creating a new playlist
Add songs to a specific playlist or create a playlist.
- Tap Application Drawer > APPS tab >
- In Songs tab, long press a song you want to add, then tap "Add to playlist" in the pop-up submenu.
- Tap "New" to create a new playlist. The song will be added to the new playlist automatically.
- You may check this new playlist in Playlists tab.
To remove a music file from the playlist
- Tap Application Drawer > APPS tab >
- In Songs tab, tap and hold the song you want to delete. Then, tap "Delete" in the pop-up submenu.
- Tap "OK", and then, the song will be deleted from the list.
5. Programs
5.1 Browser
Open the Browser to view web pages.
- Tap Application Drawer > APPS tab >
- An address bar appears at the upper side of screen, and you can type the URL there.
- You can open several web pages at the same time.

- Tap 📄 to view all of web pages that are opening.
- Tap + to open a new web page.
- Tap ✗ to close a web page.
- Tap to view BOOKMARKS.
To set the Home page
- While viewing a web page, tap Menu > Setting > General > Set homepage.
- Tap "Other" to enter the URL of the page that you want to set as your home page.
- Tap "OK" to save your settings.
To add the Bookmarks
- While viewing a web page, tap Menu > Save to bookmarks.
- Edit the bookmark label and other information if needed.
- Tap "Add to" to save the bookmark to Home screen, Bookmarks, or Other Folder.
- Tap "OK" to save your settings.
Managing Bookmarks
On a web page, tap Menu > Bookmarks/History. You can view BOOKMARKS, HISTORY and SAVED PAGES.
5.2 Calculator
With Calculator, you can perform basic arithmetic functions on your phone.
-
Tap Application Drawer > APPS tab >
-
In Calculator screen, tap "Menu" to select the advanced panel.
5.3 Calendar
- Calendar helps you schedule and sound alarms for appointments, meetings, and events.
- Tap Application Drawer > APPS tab > 31.
- If you do not log in your Google Account, tap Menu > Settings > ADD ACCOUNT to create an account, or tap "Existing" to sign in the Google account. Please follow the on-screen instruction to log in.
- Tap Calendar arrow > Day, Week, Month, or Agenda to change the displays of your events.
- Tap 25 to go back to today.
- Tap Menu > Settings to see more settings.
To view an event
- Tap Application Drawer > APPS tab > 31.
- Tap Calendar arrow > Agenda to display the events.
To add and schedule an event
- Tap Application Drawer > APPS tab > 31.
- Tap Menu > New event.
- Enter the details of the event.
- Select the dates in the fields of "From" and "To". For an all-day event, check "ALL DAY".
- To set up the "REPETITION", select one of the options from the list.
- To set up a reminder, select the time from the list.
- When finished, tap "DONE" to return to the calendar.
NOTE:
The added and scheduled events will be showed in the status bar.
5.4 Sound Recorder
- Tap Application Drawer > APPS tab >
- On the recorder screen, tap ● to record. Tap ■ to end recording. Then Tap ▶ to play.
- Tap "Discard" to delete an audio file. Tap "Save" to store an audio file.
To play an audio file
- Tap Application Drawer > APPS tab > Playlists > My recordings.
- Tap an audio file to play.
5.5 Gmail
Gmail is Google's web-based email service. Gmail can be configured when you set up your phone for the first time. Depending on your settings of the synchronization, Gmail on your phone may be synchronized with your Gmail account on the web automatically.
- Tap Application Drawer > APPS tab >

- If you do not log in your Google Account, tap "NEW" to create an account, or tap "Existing" to sign in the Google account. Please follow the on-screen instruction to log in.
- Once logged in, you can begin reading and sending emails from your Gmail account.
To remove Gmail account
- Tap Application Drawer > APPS tab > ACCOUNTS Google > the preferred Gmail account > Sync.
- Tap Menu > Remove account.

5.6 Maps
Google's mapping service help you search for the places you want.
To open Maps
- Tap Application Drawer > APPS tab >

| Icons | Function |
 | Display your current location |
| [25TW] | Select different layers, such as Traffic, Satellite, Transit Lines, etc. |
 | Type in a keyword and search for a place you want |
| [0026] | Input the start point and end point to get the direction |
| Find places, such as restaurants, cafes, bars, attractions, etc. |
-
Tap Menu to set more options as below:
-
To view about, terms, and privacy: Tap Menu > Settings > About, terms & privacy.
● To show extra functions on map: Tap Menu > Settings.
NOTE:
If you connect to the Internet and turn on the GPS, you may be charged.
5.7 Clock
- Tap Application Drawer > APPS tab >
- Tao Ⓤ to set alarms. Tap ⚙ to select the time in different cities. Tap ⦋ > Settings > adjust CLOCK/ALARMS settings.
- Tap ☒ to use Timer function. Tap ⏻ to use Stopwatch function. Tap ⏱ to back to Clock function.

5.8 Play Store
Play Store allows you to find and download applications and fun games to your phone.
- Tap Application Drawer > APPS tab >
- If you do not log in your Google Account, tap "NEW" to create an account, or tap "Existing" to sign in the Google account. Please follow the on-screen instruction to log in.
- Once logged in, you can search and download programs from the market. Slide the screen to switch the pages of play store.
- You can also tap Menu > My apps to view the programs you have downloaded.

5.9 YouTube
YouTube is an online video streaming service that allows you to view, search, and upload videos.
To Play YouTube
- Tap Application Drawer > APPS tab >
- Videos are grouped into categories. Tap a category to watch the available videos.
- Tap a video to play.

To upload your video
- Tap Application Drawer > APPS tab >
- Tap Menu > Sing in. Then select one of your accounts to sign in.
- Tap the YouTube icon on the top left of the screen.
- Tap your account name into account information screen.
- Tap ↑ then Tap a video to upload.

5.10 Google Search/ Google Now
Search for the information in the Internet and on the phone. Tap Application Drawer > APPS tab > You can also see the Google search bar on the Home screen.
5.11 Downloads
Files and other items you downloaded in Email or Browser are stored. You can view, reopen or delete what you've downloaded.
- Tap Application Drawer > APPS tab >
- Choose "Sort by size" or "Sort by date".

5.12 File Manager
File manager helps you manage the files in your phone and in your SD card.
-
Tap Application Drawer > APPS tab >
-
Tap the folder you want to browse it.

5.13 FM Radio
Tap Application Drawer > APPS tab >
Please plug in your earphone before listening.
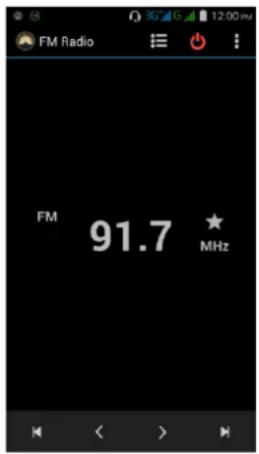
| Icons Function | |
 | Open the channel list |
 | Close FM Radio |
| More functions | |
 | Add to favorites |
 | Previous radio frequency/ Next radio frequency |
 | Previous channel/ Next channel |
5.14 Google+
You can check your friends' updates, post updates of your own and chat with your friends in Google+.
- Tap Application Drawer > APPS tab >
- If you do not log in your Google Account, tap "NEW" to create an account, or tap "Existing" to sign in the Google account. Please follow the on-screen instruction to log in.

5.15 Connecting your phone to a computer
Tap and drag down Status Bar and tap "Connected as USB Storage" on your device. Please choose one of modes to connect with your computer


5.16 Screenshots
Please press the and hold "Volume Down Key" and "Power Key" at the same time to capture any screen from the device. Tap > view screenshots. Please refer the screenshots link :/Pictures/Screenshots
6. Managing Your Phone
6.1 Managing Basic Settings
Date and Time
You can set up the date and the time on your phone.
To set up the date and time
- Tap Application Drawer > APPS tab > Date & time.
- If you turn on "Automatic data & time", the system will get the information of the current date and time automatically from network or GPS. You can set up the date and the time manually also.
- If you check "Automatic time zone", the system will get the information of time zone automatically. You can tap "Select time zone" to select a time zone from the list also.
- Tap "Set date". Please adjust the month, the day, and the year. Tap "Set" to save the settings.
- Tap "Set Time". Please adjust the hour and the minute. You can switch AM/PM. Tap "Set" to save the settings.
- Check "Use 24-hour format" if you want.
- Tap "Select date format" to select the date format you want.
Setting Alarms
You can set up many alarms on your phone.
To set the alarm
- Tap Application Drawer > APPS tab >
- Tap Ⓤ to set up a new alarm.
- Tap + to adjust the hour and the minute. You can switch AM/PM. Tap "OK" to save the settings.
- Tap "Repeat" to select a day to sound the alarm.
- Tap "CESIUM" to set up the preferred ringtone as the alarm sounds. Tap "OK" to save the settings.
- Check "Vibrate" to enable/disable the vibration as the alarm sounds.
- Tap "Label" to enter the description for the alarm.
- Tap "OK" to save the settings of the alarm.
To turn off the backlight when the phone is idle
- Tap Application Drawer > APPS tab > 🎨 > Display > Sleep.
- Select from the list of screen timeout. Your setting is saved automatically.
To adjust the brightness
- Tap Application Drawer > APPS tab > Display > Brightness.
- Drag the slider of brightness to adjust the brightness.
- Or select "Automatic brightness" to let device adjust brightness by itself.
To change the screen orientation
-
Tap Application Drawer > APPS tab > Display.
-
Check "Auto-rotate screen" to adjust the screen automatically.
To display the screen never sleep while charging
- Tap Application Drawer > APPS tab > About phone.
- Tap five times on "Build number".
- "Develop options" will be show up.
- Select "Stay awake" to display the screen never sleep while charging.
To create a new ringtone mode
You can create several audio profiles to use. In the meanwhile, you may also set up the voice call ringtone, video call ringtone, volumes, and ringtone of events together.
- Tap Application Drawer > APPS tab > Audio profiles.
- Tap + to add a new audio profile.
- Input the new profile name.
- Tap the new audio profile on the settings screen.
6.2 Managing your SIM cards
Setting SIM card' background color
You can change the SIM1 and SIM2 background colors. It helps you identify SIM1 and SIM2 quickly.
- Tap Application Drawer > APPS tab > SIM management.
- Tap a SIM card from "SIM INFORMATION" list.
- Tap "Set background color" to select one of colors.
Setting the default SIM for Voice call/ Messaging
If you insert SIM1 and SIM2 at the same time, please follow the step as below:
- Tap Application Drawer > APPS tab > SIM management.
- Tap "Voice call"/ "Messaging" to show option list.
- Select one of SIM cards, or "Always ask".
6.3 Managing your accounts
Adding one or more Google Accounts
- Tap Application Drawer > APPS tab > ACCOUNTS.
- Tap "ADD ACCOUNT".
- Tap "Google".
- Tap "NEW" to create an account, or tap "Existing" to sign in the Google account. Please follow the on-screen instruction to sign in.
Syncing all your accounts automatically
- Tap Application Drawer > APPS tab > ACCOUNTS.
- Tap the account you want to sync.
- Tap Menu > Sync now.
Removing your account
- Tap Application Drawer > APPS tab > ACCOUNTS.
- Tap the account you want to remove.
- Tap Menu > Remove account.
NOTE:
- Let Google apps access your location, please tap Application Drawer > APPS tab > Google ACCOUNTS > Location settings > ON.
- To allow location access by non-Google apps, please go to Application Drawer > APPS tab > Location access.
6.4 Protecting Your Phone
You can protect your phone from unauthorized users by requiring the PIN or entering a password.
Enable the PIN of the SIM card
When the PIN is enabled, you are required to enter the PIN before making a call.
- Tap Application Drawer > APPS tab > Security > Set up SIM card lock.
- Tap "SIM1" or "SIM2". (If SIM2 inserted).
- Select "Lock SIM card". Input the PIN, and then, tap "OK".
Change the PIN of the SIM card
- Tap Application Drawer > APPS tab > Security > Set up SIM card lock.
- Tap "SIM1" or "SIM2". (If SIM2 inserted).
- Tap "Change SIM PIN". Type the old PIN. Then tap "OK".
- Type the new PIN. Then tap "OK".
- Re-type the new PIN. Then tap "OK" to change the PIN.
Set up Password Protection
- Tap Application Drawer > APPS tab > Security > Screen lock > Password.
- Enter your password, and then, tap "Continue". Confirm your password, then, tap "OK".
- If you want to disable screen lock security, please tap Application Drawer > APPS tab > Security > Screen lock. Confirm your password, and then tap "Continue". Tap "None" to disable it.
Set up unlock pattern
You can further secure your data by locking the screen and requiring a screen unlock pattern every time after your phone is turned on or it wakes up from the sleep mode every time (screen is off).
- Tap Application Drawer > APPS tab > Security > Screen lock > Pattern.
- Draw the unlock pattern by connecting at least four dots. Then tap "Continue".
- Draw the unlock pattern again, and then, tap "Confirm".
- If you want to disable the function, please tap Application Drawer > APPS tab > Security > Screen lock. Confirm the saved pattern, and then, tap "None" to disable it.
6.5 Resetting Your Phone
With Clean Boot, you can reset your phone to its factory defaults. When you reset your phone, the data stored in your phone may be erased.
- Tap Application Drawer > APPS tab > Backup & reset.
- Tap Factory data reset > Reset phone > Erase everything to reset the phone.
NOTE:
Before reset your device, please remember to back up all your data and information.
Check IMEI on the phone
You may check IMEI on the phone, please choose the below instructions:
- Input *#06#, IMEI will automatically appear on the screen.
- Or tap Application Drawer > APPS tab > About phone > Status > IMEI information.
Functions and applications may vary by model.
Please visit www.gigabytecm.com and download the latest version if any.
- Copyright
- General Information
- Getting Stared
- Your Phone
- Installing or uninstalling the SIM Card, Battery, and Memory Card
- SIM card
- To remove the back cover
- Gsmart
- To install the SIM card
- To remove the SIM card
- Battery
- To replace the back cover
- Memory card
- To install the memory card
- To remove the memory card
- Charging the Battery
- NOTE:
- Turning the Phone on or off
- To turn on your phone
- To turn off your phone
- To set your phone to the sleep mode
- Lock/Unlock
- Unlock the device
- Taking pictures
- Muting the speaker
- Making a phone call
- Contacts
- Adding a Contact
- Searching for Contacts
- The Home Screen
- Status Icons
- Phone Functions & Messages
- Voice Calls
- To make a call from the Phone screen
- To make a call from Contacts
- To make emergency calls
- Answering a call
- Ending a call
- To Start a Three-way call
- Creating and sending a text message
- From Message screen
- From Contact screen
- TouchPal keyboard
- Android keyboard
- Multimedia Message
- To send MMS from Message screen
- Wi-Fi & Bluetooth
- Wi-Fi
- To connect to a Wi-Fi network
- To add Wi-Fi network
- Bluetooth
- To turn Bluetooth on or off
- To connect to Bluetooth devices
- Multimedia Applications
- Camera
- Camera Function
- Taking a photo
- Recording a video
- Music
- Managing Your Phone
- Protecting Your Phone
- Set up PIN Protection
- Set up Password Protection
- Set up Unlock Pattern
- Set up Face Unlock
- Backup or Reset Your Phone
- Android 4.4 Introduction
- Phone Functions & Input
- Phone Functions
- Voice Calls
- To make a call from People
- To make international calls
- To accept or reject an incoming call
- Quick response an incoming call
- To put a call on hold
- To switch between calls
- To set up conference calls
- To manage other voice call features
- Video Calls
- To make a video call from Phone screen
- To make a video call from People
- Ending a video call
- To manage other video call features
- Using On-Screen Keyboard
- Using on-screen keyboard
- Setting the Input Method from Settings Screen
- Personal Dictionary
- Using Google Keyboard
- Google Keyboard Settings
- Email & Messages
- Creating and sending a message
- Create and send messages
- From People screen
- From Phone screen
- Receive and Manage messages
- To reply to a text message
- To forward a text message
- To delete all messages
- To delete a message thread
- To delete a message within a thread
- To create a voice message
- Email Accounts
- Set up an Internet Email account
- To add the second Email account
- To delete an Email account
- Composing and sending an Email
- Sending an E-mail from People screen
- Adding attachments to an Email message
- To reply or forward an Email
- To delete an Email
- Using the Internet
- Connecting to the Internet
- Wi-Fi
- To configure Wi-Fi settings
- Tethering & portable hotspot
- VPN settings
- To start a data connection
- Enabling data roaming
- Bluetooth modes
- To turn on/off Bluetooth
- Connecting to Bluetooth Devices
- Viewing Photos and Videos
- To view photos in the album
- To play slideshow
- To set the image as Wallpaper
- To save an image as Contact photo
- To edit an image
- To view file properties
- Play video from the video file
- To play music
- Changing Playback options
- To edit music
- Creating a new playlist
- To remove a music file from the playlist
- Programs
- Browser
- To set the Home page
- To add the Bookmarks
- Managing Bookmarks
- Calculator
- Calendar
- To view an event
- To add and schedule an event
- Sound Recorder
- To play an audio file
- Gmail
- To remove Gmail account
- Maps
- To open Maps
- Clock
- Play Store
- YouTube
- To Play YouTube
- To upload your video
- Google Search/ Google Now
- Downloads
- File Manager
- FM Radio
- Google+
- Connecting your phone to a computer
- Screenshots
- Managing Basic Settings
- Date and Time
- To set up the date and time
- Setting Alarms
- To set the alarm
- To turn off the backlight when the phone is idle
- To adjust the brightness
- To change the screen orientation
- To display the screen never sleep while charging
- To create a new ringtone mode
- Managing your SIM cards
- Setting SIM card' background color
- Setting the default SIM for Voice call/ Messaging
- Managing your accounts
- Adding one or more Google Accounts
- Syncing all your accounts automatically
- Removing your account
- Protecting Your Phone
- Enable the PIN of the SIM card
- Change the PIN of the SIM card
- Resetting Your Phone
- Check IMEI on the phone
Brand : GSmart
Model : GX2
Category : Mobile Phone