EZ-48-3AB-125-35 - Tripod Ambient Weather - Free user manual and instructions
Find the device manual for free EZ-48-3AB-125-35 Ambient Weather in PDF.


| Product Type | Wireless Weather Station |
| Model | EZ-48-3AB-125-35 |
| Brand | Ambient Weather |
| Display | Color LCD with backlight |
| Dimensions (Display) | 7.5 x 4.5 x 1.2 inches |
| Weight (Display) | 0.7 lbs |
| Power Source | AC adapter (included) or 3 x AA batteries (backup) |
| Wireless Range | 330 feet (100 meters) line of sight |
| Supported Sensors | Up to 8 remote sensors (temperature/humidity) |
| Temperature Range (Indoor) | 14°F to 140°F (-10°C to 60°C) |
| Temperature Range (Outdoor) | -40°F to 149°F (-40°C to 65°C) |
| Humidity Range | 1% to 99% |
| Data Logging | 24-hour barometric pressure history |
| Connectivity | Wi-Fi to Weather Underground / AmbientWeather.net |
| Mounting | Table stand or wall mount |
| Warranty | 1 year limited warranty |
Frequently Asked Questions - EZ-48-3AB-125-35 Ambient Weather
User questions about EZ-48-3AB-125-35 Ambient Weather
0 question about this device. Answer the ones you know or ask your own.
Ask a new question about this device
Download the instructions for your Tripod in PDF format for free! Find your manual EZ-48-3AB-125-35 - Ambient Weather and take your electronic device back in hand. On this page are published all the documents necessary for the use of your device. EZ-48-3AB-125-35 by Ambient Weather.
USER MANUAL EZ-48-3AB-125-35 Ambient Weather
EZ-48-3AB-125-35 Weather Station Mounting Tripod and Mast
EZ-125-35M 35" Mast Extension (Optional)
EZ-125-SK Stake Kit (Optional)
EZ-46-3 Tar Pad Kit (Optional)
EZ-GWA Guy Wire Kit (Optional)
EZ-48-3AB-125-35 Weather Station Mounting Tripod and Mast

The EZ-48-3AB-125-35 Tripod assembly is constructed of 18 gauge 1008-10 steel tubing, galvanized using the Flo-Coat (zinc-chromate-polymer) process for excellent corrosion protection.
Ungalvanized leg braces, mast collars, & connecting components are gold irridited for corrosion protection.
Mast collars feature a captive "stop-nut" design, to eliminate lock nut spin when tightened; and a mast supporting cup for additional stability. The tripod base is 33" (85.8 cm).
Tripod height 33 inches (85.8 cm). Supplied with one mast for an assembly height of 53" inches (150.8 cm), and an adjustment range of 41 to 58 inches (106.6 to 150.8 cm).
Add up to two mast extensions to extend the height of 31" per mast extension.
Add the optional stake kit for moderate wind ground installation.
Add the optional tar pads for roof-top installations.
Add the optional guy wire kit for configurations with two extension poles, or for locations that experience sustained periods of high wind.
Figure 1
Components
The EZ-48-3AB-125-35 Tripod assembly includes the following components.

Mounting Tripod 33" x 33" x 33"
Mast (mounting pole) 36"

6 5/16" Bolts (already assembled to the Mounting Tripod)
Figure 2
Tools and Materials Needed
- Adjustable Wrench
- Level or Plumb
- Drill
Important Installation Instructions
CAUTION: Improper installation of the mounting tripod to your roof top may result in leaks. We recommend a licensed roofing specialist for evasive installations.
CAUTION: Any metal object may attract a lightning strike, including your weather station and tripod.
Never install your weather station in a thunderstorm.
We recommend properly grounding the tripod to avoid extensive damage to the weather station and structure. Consult a licensed electrician or local lightning detection expert prior to installing a ground wire.
Tripod Installation
Unfold the tripod so the installed pads are flat on the ground.

Figure 3
Reference Figure 3. Insert the mounting pole into the center of the two collars. Secure the mast by tightening the hex nuts on the 5/15" bolts until the bolts hold the mast in place securely. Make sure the mast is level.
EZ-125-35M 35" Mast Extension (Optional)

Galvanized 1-1/4 inch (3.25 cm) O.D., 35 inch (89 cm) long steel post with one end crimped for insertion into another post of the same O.D.
Made of 18 gauge 1008-10 steel tubing, galvanized using the Flo-Coat (zinc-chromate-polymer) process for excellent corrosion protection.
When used with the EZ-48-3AB-125-35 Mast assembly, this extension will raise the anemometer to a height of 84 inches, with an effective adjustment range of 72 to 89 inches (187.2 to 231.4 cm).
Figure 4
Mast Extension Installation

Figure 5
Reference Figure 5. Insert the swaged end of the mast extension into the mounting tripod mast and tighten so the extension does not rotate.
Repeat this step for additional mast extensions (maximum two is recommended).
EZ-125-SK Stake Kit (optional)
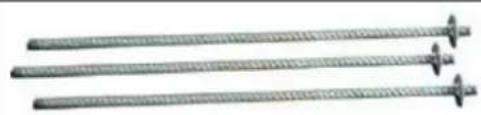
The stake kit consists of 3-12 7/8" bolts, solid steel spikes with a welded cap on one end. The spikes are designed to be driven into soil, through holes provided in the Tripod foot pads. This installation technique effectively anchors the tripod in light to moderate wind, or serves as a temporary installation method. If high winds are anticipated, or a permanent tripod installation is required, it is recommended that the tripod be connected to a concrete pad or other permanent base using bolts and guy-wires.
Stake Kit Installation
Insert the three ground stakes into the three foot bracket holes. With a hammer, drive the stakes
Figure 6
all the way into the ground to secure the tripod and mast assembly.
Installation Note – for high wind locations, place concrete cinder blocks on top of each of the foot brackets.
EZ-46-3 Tar Pad Kit (Optional)
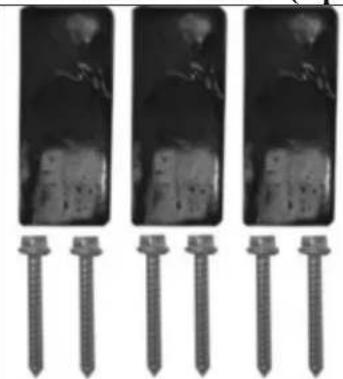
Apply the pitch pads to each leg of the Mounting Tripod for roof mount installations.
Includes 3-3" Tar pads, 6 ¼-20 Lag screws
Figure 7
Tar Pad Kit Installation (Optional)
Note – Improper installation of the mounting tripod to your roof top may result in leaks. Use a licensed roofing specialist for evasive installations.
Reference Figure 9. Mount the tripod and mast on the desired pitched or flat surface.
For pitched roof applications, place the pitch pad in between the mounting feet and the roof surface (Figure 8).
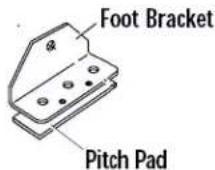
Figure 8

ambient weather
Ambient Weather
6845 W. Frye Road
Chandler, AZ 85226
TEL 480-346-3380 ● FAX 480-346-3381
www.AmbientWeather.com
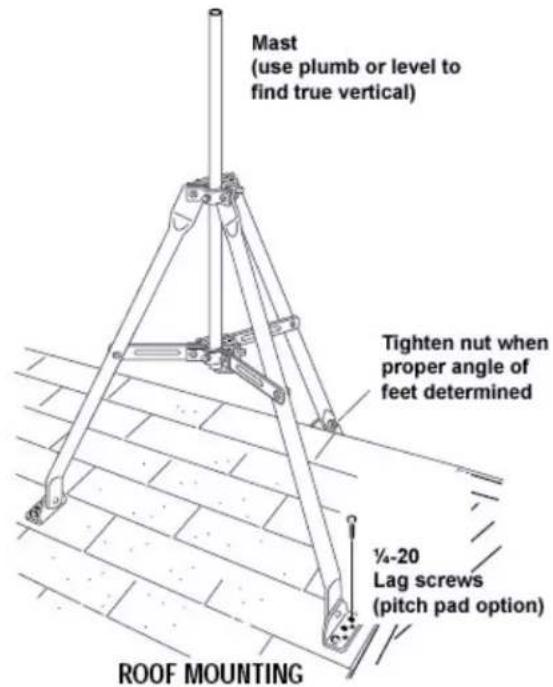
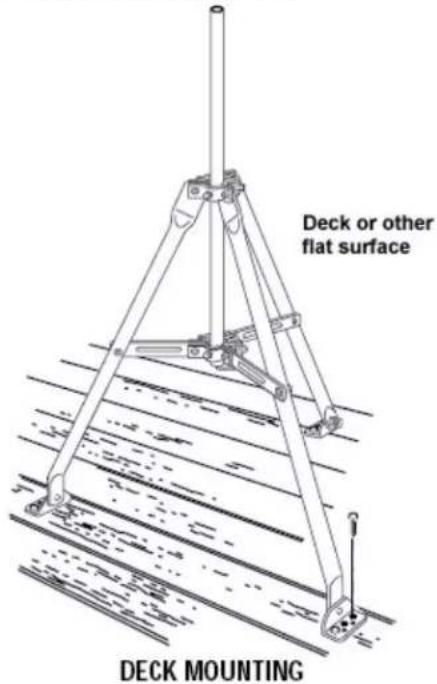
Figure 9
EZ-GWA Guy Wire Kit (Optional)
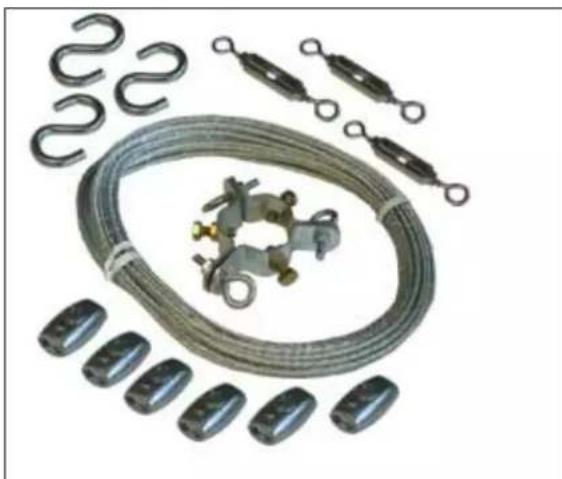
The Guy-wire Kit contains three precut lengths of plastic coated, steel guy-wire cable, and all hardware required to secure the guy-wires to the top of the tripod mast, and the bottom of the tripod legs.
Alternatively, the bottom connection can be made to eye-bolts set into a concrete pad, or other fixed structure. The guy-wire kit is designed for permanent installations, or for tripod configurations with two extension poles, or for locations that experience sustained periods of very high wind.
Figure 10
Guy Wire Kit Installation (Optional)
For areas with winds greater than 50 mph, use the guy wire kit and stake kit to reduce vibration.
Reference Figure 12. Attach the tri-clamp to the top of tripod mast. Secure the mast by tightening the hex nuts on the 5/15" bolts until the bolts hold the tri-clamp in place securely. Orient the eyebolts on the tri-clamp so they align with each tripod foot EZ-125-SK stake.
Attach one end of the guy wire cable to one eyebolt on the tri-clamp. Open the wire clamp by loosening the screw on it. Place the clamp over the wire and tighten. Leave 1 inch of wire protruding from the clamp.

Figure 11
Hook one "S" hook and one turnbuckle on the corresponding stake (Figure 12) or leg (Figure 13).
Cut the guy wire cable so that it can be put through the loose end of the turnbuckle and the wire clamp. Make sure each turnbuckle is extended as shown in Figure 12 and Figure 13 before feeding the cable through.
Install the hooks, turnbuckles and cables onto the other two stakes or tripod legs.
Tighten the three guy wires evenly by turning the turnbuckles.
Attach a post level on the upper mast to maintain the mast at vertical.
The guy wires should be taunt when the installation is complete.

Figure 12
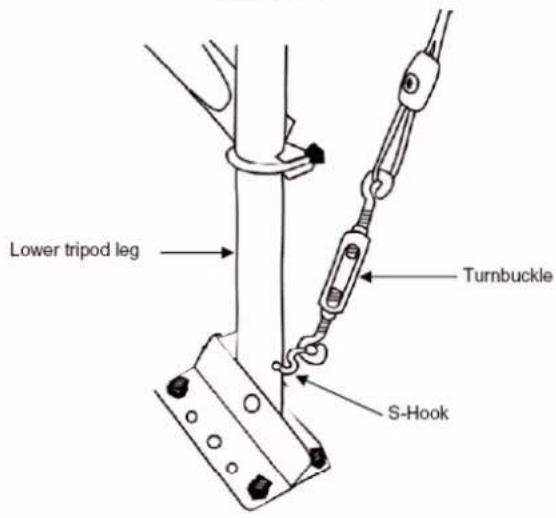
Figure 13
Liability Disclaimer
Please help in the preservation of the environment and return used batteries to an authorized depot. The electrical and electronic wastes contain hazardous substances. Disposal of electronic waste in wild country and/or in unauthorized grounds strongly damages the environment.
Reading the “User manual” is highly recommended. The manufacturer and supplier cannot accept any responsibility for any incorrect readings and any consequences that occur should an inaccurate reading take place. This product is designed for use in the home only as indication of weather conditions. This product is not to be used for medical purposes or for public safety information. The specifications of this product may change without prior notice.
This product is not a toy. Keep out of the reach of children. No part of this manual may be reproduced without written authorization of the manufacturer.
Ambient, LLC WILL NOT ASSUME LIABILITY FOR INCIDENTAL, CONSEQUENTIAL, PUNITIVE, OR OTHER SIMILAR DAMAGES ASSOCIATED WITH THE OPERATION OR MALFUNCTION OF THIS PRODUCT.
Warranty Information
Ambient, LLC provides a 1-year limited warranty on this product against manufacturing defects in materials and workmanship.
This limited warranty begins on the original date of purchase, is valid only on products purchased and only to the original purchaser of this product. To receive warranty service, the purchaser must contact Ambient, LLC for problem determination and service procedures.
Warranty service can only be performed by an Ambient, LLC. The original dated bill of sale must be presented upon request as proof of purchase to Ambient, LLC.
Your Ambient, LLC warranty covers all defects in material and workmanship with the following specified exceptions: (1) damage caused by accident, unreasonable use or neglect (lack of reasonable and necessary maintenance); (3) damage resulting from failure to follow instructions contained in your owner's manual; (4) damage resulting from the performance of repairs or alterations by someone other than an authorized Ambient, LLC authorized service center; (5) units used for other than personal use (6) applications and uses that this product was not intended (7) the products inability to receive a signal due to any source of interference or metal obstructions and (8) extreme acts of nature, such as lightning strikes or floods.
This warranty covers only actual defects within the product itself and does not cover the cost of installation or removal from a fixed installation, normal set-up or adjustments, claims based on misrepresentation by the seller or performance variations resulting from installation-related circumstances.
California Prop 65
WARNING: Use of the Ambient Weather Products can expose you to chemicals, including lead and lead compounds, which are known to the State of California to cause cancer and bisphenol A (BPA), and compounds, which are known to the State of California to cause cancer and bisphenol A (BPA), and phthalates DINP and/or DEHP, which are known to the State of California to cause birth defects or other reproductive harm.
Can I Trust that Ambient Weather Products are Safe Despite this Warning? In 1986, California voters approved the Safe Drinking Water and Toxic Enforcement Act known as Proposition 65 or Prop 65. The purpose of Proposition 65 is to ensure that people are informed about exposure to chemicals known by the State of California to cause cancer, birth defects and/or other reproductive harm. A company with ten or more employees that operates within the State of California (or sells products in California) must comply
with the requirements of Proposition 65. To comply, businesses are: (1) prohibited from knowingly discharging listed chemicals into sources of drinking water; and (2) required to provide a "clear and reasonable" warning before knowingly and intentionally exposing anyone to a listed chemical. Proposition 65 mandates that the Governor of California maintain and publish a list of chemicals that are known to cause cancer, birth defects and/or other reproductive harm. The Prop 65 list, which must be updated annually, includes over 1,000 chemicals, including many that are commonly used in the electronics industry.
Although our manufacturing process is "lead-free" and RoHS compliant, it remains possible that trace amounts of lead could be found in components or subassemblies of Ambient Weather Products. Bisphenol A (BPSA) could conceivably be present in minute amounts in our plastic housings, lenses, labels or adhesives, and DEHP & DINP (phthalates) could possibly be found in PVC wire coatings of our cables, housings, and power cords. Unlike RoHS, Prop 65 does not establish a specific threshold for reporting on the substances of concern and instead sets forth a much less definitive standard requiring that the business demonstrate with certainty that there is "no significant risk" resulting from exposure. With respect to carcinogens, the "no significant risk" level is defined as the level which is calculated to result in not more than one excess case of cancer in 100,000 individuals exposed over a 70-year lifetime. In other words, if you are exposed to the chemical in question at this level every day for 70 years, theoretically, it will increase your Version 1.14 ©Copyright 2020, Ambient LLC. All Rights Reserved. Page 60 chances of getting cancer by no more than 1 case in 100,000 individuals so exposed. With respect to reproductive toxicants, the "no significant risk" level is defined as the level of exposure which, even if multiplied by 1,000, will not produce birth defects or other reproductive harm. In other words, the level of exposure is below the "no observable effect level," divided by 1,000. (The "no observable effect level" is the highest dose level which has not been associated with observable reproductive harm in humans or test animals.) Proposition 65 does not clarify whether exposure is to be measured only in normal operation, or in the event of misuse such as intentionally damaging, incinerating, or consuming an Ambient Weather Product or component and Ambient Weather has not attempted to evaluate the level of exposure.
A Proposition 65 warning means one of two things: (1) the business has evaluated the exposure and has concluded that it exceeds the "no significant risk level"; or (2) the business has chosen to provide a warning simply based on its knowledge about the presence of a listed chemical without attempting to evaluate the exposure. The California government has itself clarified that "The fact that a product bears a Proposition 65 warning does not mean by itself that the product is unsafe." The government has also explained, "You could think of Proposition 65 more as a 'right to know' law than a pure product safety law."
While using Ambient Weather Products as intended, we believe any potential exposure would be negligible or well within the "no significant risk" range. However, to ensure compliance with California law and our customers' right to know, we have elected to place the Proposition 65 warning signs on Ambient Weather Products.
For further information about California's Proposition 65, please visit https://oehha.ca.gov/prop65/background/p65plain.html
- EZ-48-3AB-125-35 WEATHER STATION MOUNTING TRIPOD AND MAST
- COMPONENTS
- TOOLS AND MATERIALS NEEDED
- IMPORTANT INSTALLATION INSTRUCTIONS
- TRIPOD INSTALLATION
- EZ-125-35M 35" MAST EXTENSION (OPTIONAL)
- MAST EXTENSION INSTALLATION
- EZ-125-SK STAKE KIT (OPTIONAL)
- STAKE KIT INSTALLATION
- FIGURE 6
- EZ-46-3 TAR PAD KIT (OPTIONAL)
- TAR PAD KIT INSTALLATION (OPTIONAL)
- EZ-GWA GUY WIRE KIT (OPTIONAL)
- GUY WIRE KIT INSTALLATION (OPTIONAL)
- LIABILITY DISCLAIMER
- WARRANTY INFORMATION
- CALIFORNIA PROP 65
Brand : Ambient Weather
Model : EZ-48-3AB-125-35
Category : Tripod