
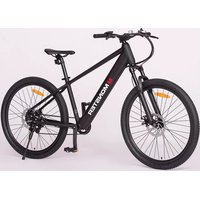
E-Fat Bike MT-EFB - Bicycle MONSTER - Free user manual and instructions
Find the device manual for free E-Fat Bike MT-EFB MONSTER in PDF.


| Product Type | Electric Fat Bike (E-Fat Bike) |
| Model Number | MT-EFB |
| Weight (bike only) | 36 kg |
| Dimensions (assembled) | 1680 x 730 x 1140 mm |
| Max Permissible Total Weight | 156 kg (bike + rider + luggage) |
| Motor Type | 250 W brushless hub motor |
| Maximum Assisted Speed | 25 km/h (pedal assist cut-off) |
| Battery Type | Removable lithium-ion (model FP-SX3610) |
| Battery Voltage / Capacity | 36 V / 10 Ah (360 Wh) |
| Battery Weight | 3.3 kg |
| Charger Model | XVE-4200150 (smart charger) |
| Charger Input / Output | 110-240 V~ 50/60 Hz / 42 V, 1.5 A |
| Charging Time (0-100%) | Approx. 7.5 hours |
| Tyre Pressure | 35-65 psi (240-450 kPa) |
| Recommended Rider Height | Must straddle with at least 2.5 cm clearance above top tube |
| Maximum Rider Weight | 120 kg |
| Gear System | Shimano 7-speed (shifter TX50-7, derailleur FT35-A) |
| Brakes | Front and rear linear-pull brakes with brake light activation |
| Lighting | Front headlight, rear light with brake light function |
| Pedal Assist Levels | 3 levels (0=off, 1=low, 2=medium, 3=high) |
| Walk Mode | 6 km/h push-assist mode |
| Warranty | 1 year |
| Compliance | AS 15194, RCM Mark |
Frequently Asked Questions - E-Fat Bike MT-EFB MONSTER
User questions about E-Fat Bike MT-EFB MONSTER
0 question about this device. Answer the ones you know or ask your own.
Ask a new question about this device
Download the instructions for your Bicycle in PDF format for free! Find your manual E-Fat Bike MT-EFB - MONSTER and take your electronic device back in hand. On this page are published all the documents necessary for the use of your device. E-Fat Bike MT-EFB by MONSTER.
USER MANUAL E-Fat Bike MT-EFB MONSTER
E Fat Bike
USER MANUAL
Model Number MT-EFB
Welcome
Premium connectivity that fuels modern lifestyle and empowers innovation.
A better everyday experience through amazing products.
The user manual will provide everything you need to know about using your new product.
All our products are produced and tested to stringent standards of performance and safety, and are pleased to provide a 1 Year Warranty with your purchase.
We hope you enjoy your purchase.

Always Lead. Never Follow.™
For more information on this bike, including detailed assembly instructions, please scan the QR code:

Contents
02 Welcome
04 General Safety Instructions
07 Product Overview
08 Getting Started
09 Assembly
14 Battery Charging
17 Instructions
20 FAQs and Troubleshooting Guide
21 Other Useful Information
General Safety Instructions
IMPORTANT SAFETY INSTRUCTIONS READ CAREFULLY AND KEEP FOR FUTURE REFERENCE
Read this manual thoroughly before first use, even if you are familiar with this type of product. The safety precautions enclosed herein reduce the risk of injury and product damage. Keep the manual in a safe place for future reference, along with the completed warranty card, purchase receipt and carton. If applicable, pass these instructions on to the next owner of the bicycle.
NOTE: Throughout the instructions, this product may be referred to as electric mountain bike, e-mountain bike, bicycle or simply as bike.
Always follow basic safety precautions and accident prevention measures when riding a bike (or e-bike or), including the following:
WARNING: Read and follow all safety warnings before riding!
- Local traffic laws: Some state and local traffic laws may require that your bicycle be equipped with a warning device, such as a horn or bell and a light, if the bicycle is to be ridden after dark. When you are riding on the road, make sure that you are always visible to other vehicles. Please respect the road rules in all circumstances.
- Intended use: This bicycle should only be used for personal recreational purposes, and not for commercial activities, trade or competition. Do not use this bike for stunts. Do not use the bicycle for anything other than its intended purpose, and only use it as described in this manual. Improper use may affect the warranty.
- Usage restrictions: This bicycle is not intended for use by persons (including children) with reduced physical, sensory or mental capabilities, or lack of experience and knowledge, unless they have been given supervision or instruction concerning use of the bicycle by a person responsible for their safety.
- Protective equipment: Always wear proper protective equipment, such as an Australian standards-approved helmet, elbow pads, knee pads, long sleeve shirt, gloves, long pants.
- Wet weather warning: Slow down your speed when riding in rainy and snowy conditions and in slippery areas. Increase your braking distance to ensure safety. Use the rear brake lever FIRST, then the front brake lever.
- Always double-check your bike before riding it (tighten the handlebars and stem, check the saddle, wheels and brakes, etc.). We strongly recommend that significant mechanical repairs are carried out by a skilled bicycle mechanic.
- Height adjustment: The rider must be able to straddle the bicycle with at least 2.5 cm clearance above the horizontal bar when standing.
General Safety Instructions (Cont.)
- Check the tyre pressure: The tyre pressure of this bicycle is 240 kPa (35 psi), which is marked on the tyre. Please ensure that the tyre pressure is within this range to avoid accidents (1 psi = 6.895 kPa).
- Children below 14 years old should not play with the product. DO NOT LET CHILDREN INFLATE TYRES. Charging, cleaning and maintenance should not be performed by children without adult supervision.
- Recommended torque requirements in Newton metres (Nm) for the following:
(A) Handlebar clamp nut/bolt: 8-12 Nm
(B) Handlebar stem expander bolt: 35-45 Nm
(C) Pedal: 20-26 Nm
- Torque approximation: If you do not have a torque wrench, for reference 5-10 Nm is only just snug. To achieve approx. 40 Nm, use your index finger to hold the allen key, and then turn it using the strength from your whole arm. As soon as your finger starts to struggle, stop turning. It should feel very solid, but should not take your entire body strength to get it to this point. One mistake people often make is to over-tighten.
- Bike Chain: If the chain skips or jumps, the rear derailleur may require adjustment. The relevant SHIMANO rear derailleur (model number: FT35-A) manual can be found online.
• Maximum rider weight: 120 kg (excluding the bicycle weight). - Night-time operation: We do NOT recommend riding your bike at night. If you have an emergency that makes it necessary to ride at right, have proper lights and reflectors. Do NOT ride at night without a headlight, taillight, a white front reflector, a red rear reflector and yellow wheel reflectors.
- On and off-road operation: Avoid the following hazards: drain grates, potholes, ruts, soft road edges, gravel and leaves, especially when they are wet.
- Maintenance schedule: We strongly recommend to establish and respect a periodic maintenance schedule, which will be determined by the frequency and length of your rides, your style of riding, as well as the terrain on which you most often ride.
- Bike maintenance: Before maintenance or cleaning, make sure the bicycle is disconnected from the charger.
- Before first use: The battery is 60% pre-charged. As it is a smart lithium battery, no special action needs to be taken when first charging. We provide a dedicated smart charger with a charge protection function.
WARNING!
- NEVER leave the battery charging without supervision!
- We strongly recommend that you disconnect the battery from the bicycle before charging it. If you leave the battery in the bike while it is being charged, then the bicycle MUST be switched off during this process.
General Safety Instructions (Cont.)
- Appropriate environment: We recommend that you do not use the bike in temperatures outside the appropriate range from -10°C to 50°C . The best temperature range is between 0°C and 40°C , too cold or too hot temperatures will affect the battery efficiency and life.
- Charging the battery: Only charge the battery in a well-ventilated area. Do not expose the battery to heat or charge it in direct sunlight or in the rain.
- Do not disassemble or modify the battery. Do not connect the (+) and (-) connections of the battery with a metal object. Do not expose the battery to liquids. Do not short-circuit the positive (+) and negative (-) battery terminals.
- Disconnect after use: Do not leave the battery charger plugged into the power outlet while not in use.
- Infrequent use: In the event of non-use, infrequent use or storage, please recharge the battery at least every month to ensure that it will work properly, and keep it in a dry and cool environment. Prolonged storage of an empty battery may damage the battery.
- Do not let the battery run out of power completely, otherwise it will damage the battery. The best charge-discharge is 20%–80%.
- Battery storage: Do not store or leave the battery near fire. Do not immerse it in water or acidic liquids. Do not allow it to get wet.
- Battery replacement: If the battery needs to be replaced, please contact our after sales support centre to purchase a spare battery.
- Battery removal and disposal: The battery must be removed and discarded before disposal of the bike. Please ensure that the battery is disconnected from the charger and power supply before removing it from the bike. Dispose of the battery safely and responsibly after the service life of the product.
WARNING: Handle the battery charger with care!
- Only use the charger supplied with this bicycle to charge the battery. Do not charge the battery with any other (or universal) charger, doing so will void the warranty. Do not use this charger to charge any other bike.
- Indoor charging only: The charger must only be used indoors.
- Power cord: Never pull the external flexible cord of the battery charger to disconnect the charger. The external flexible cord of the battery charger cannot be replaced. If the cord is damaged, the charger must be responsibly disposed of.
Product Overview
Scope of delivery
A E Fat Bike
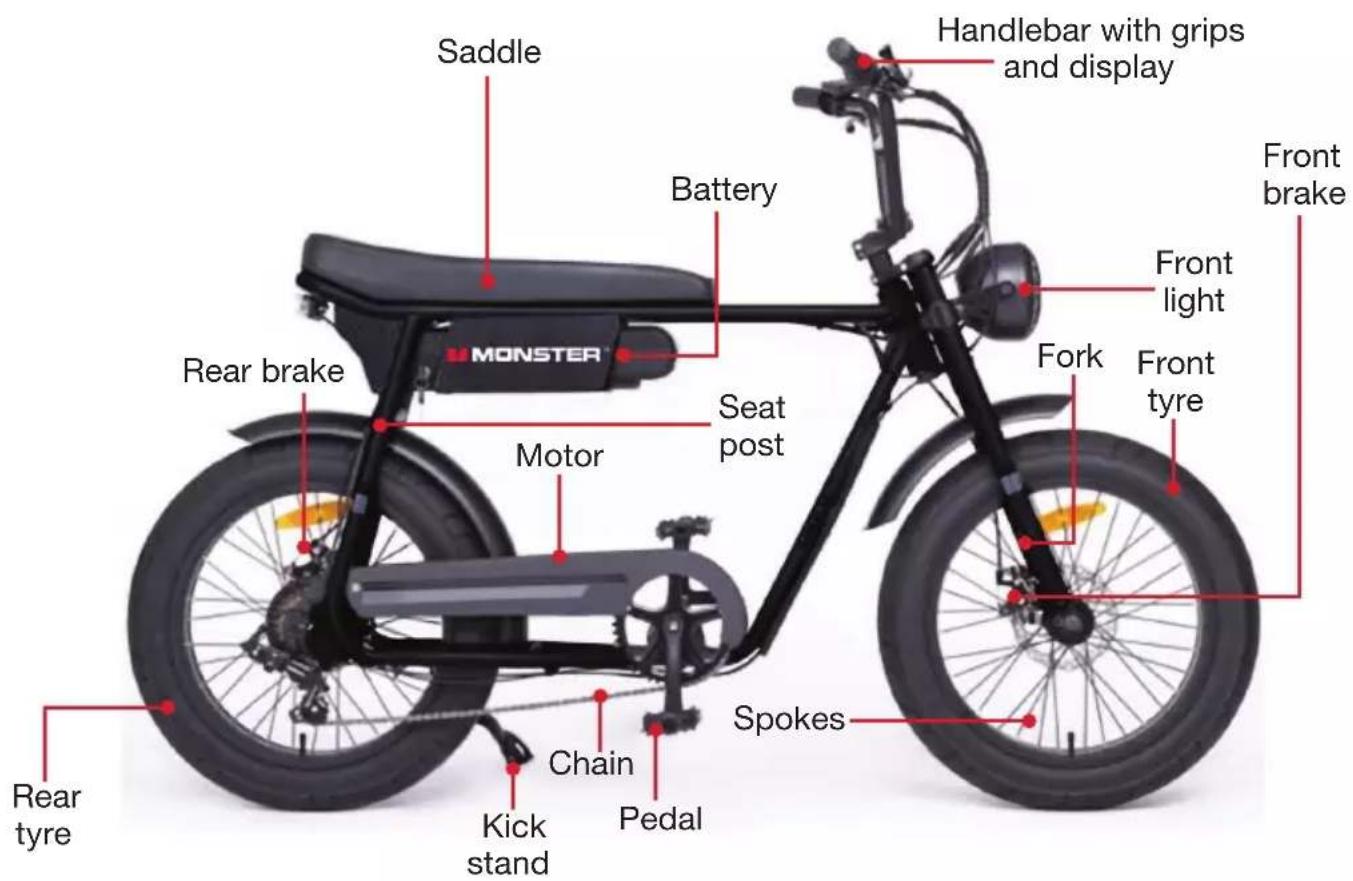
B Other inclusions
Battery charger Multipurpose tool
C Documentation (not pictured)
Instruction manual Warranty certificate


NOTE: Due to continued product improvement, images and illustrations in this manual may vary slightly from the product purchased. All images in this manual are for reference purposes only. Parts are not necessarily pictured to scale.
Getting Started
Before first use
- Unpack this bike, making sure to remove all parts from the packaging carton. The carton staples may be sharp, take care that you do not hurt yourself when reaching into the carton to remove parts.
- Packaging materials: Keep the original packaging materials in a safe place. It will help prevent any damage if the product needs to be transported in the future, and you can use it to store the bike when it is not in use. In the event that the carton is to be disposed of, please recycle it where possible.
- Unwrap all parts carefully. If you are using a retractable utility knife or scissors when unwrapping the parts, take care that you do not scratch the metal parts of the bike or pierce the tyres. Remove the plastic covers from the front wheel nuts, base of the fork and stem pillar.
Plastic wrapping can be a suffocation hazard for babies and young children, so ensure all packaging and protective materials are out of children's reach and disposed of safely.
- Key removal: The bike comes with two keys which are attached to the brake cables. Please ensure you remove the keys and keep them in a safe place, a key is required for locking the battery in place and unlocking it.
- Assembly requirements: The bike comes partially assembled (Fig. 1) and requires full assembly by a bicycle mechanic or competent person. The pedals need to be assembled with an M15 wrench (20-26 Nm). A multipurpose tool (containing the tools required for assembly) is supplied. Other torque requirements for the different part assemblies are listed on page 6. If you
do not have a torque wrench, for reference 5-10 Nm is only just snug. To achieve approx. 40 Nm, use your index finger to hold the allen key, and then turn it using the strength from your whole arm. As soon as your finger starts to struggle, stop turning. It should feel very solid, but should not take your entire body strength to get it to this point. One mistake people often make is to over-tighten.
- Inspect the cord and plug of the battery charger for damage or wear before each use. Do not use the charger if it is not working or if its cord is damaged. In case of damage, please contact our after sales support centre.
- Read all instructions in this manual and make sure you understand all warnings. To familiarise yourself with all the parts and operating principles of the bicycle, please refer to the Product Overview and the remaining sections in this manual. Also pay attention to the safety instructions on the previous pages.

Assembly
Step 1: Assembling the Stem and Handlebar
- Loosen the screws on the stem and remove the stem cover (Fig. 2).
- Fit the handlebars to the stem, ensuring they are centered. Put the stem cover and partially tighten the screws. Check the handlebars are in the correct position and, once satisfied, fully tighten the screws (Fig. 3).


- The steering stem is supplied assembled, but if you wish to make any adjustments, loosen the screws as shown, after the stem are in the satisfied position, tighten the screws (Fig. 4).

WARNING!
For safe operation, the clamp bolts must be tightened securely. If you can move the handlebar forward or backward, the bolts are not tight enough. Take care not to overtighten and damage the handlebar stem, which could cause injury to the rider.
Assembly (Cont.)
Gear shifter on the handlebar
The bike is equipped with a SHIMANO 7 speed system and the shifter is at the right side of the handlebar (Fig. 5).
Pull the lever to get a bigger tooth ratio (higher gear, and therefore more torque when you pedal). Push the button to get smaller tooth ratio (lower gear, and therefore less torque when you pedal).

WARNING!
If the chain skips or jumps, the rear derailleur may require adjustment - please take this bike to a qualified bicycle mechanic. Alternatively, you can find the manual of this gear lever and derailleur at the SHIMANO website (Shifter Model Number: TX50-7, Derailleur Model Number: FT35-A).
Assembly (Cont.)
Step 2: Installing the Pedals
WARNING!
- For safe operation, the pedal spindle must be securely tightened against the crank arm.
- Always replace damaged pedals, and always wear fully enclosed shoes or sneakers when riding a bicycle.
-
Look for the letters "R" or "L" stamped on the pedal spindle.
-
To install the pedals, proceed as illustrated below (Fig. 6):
- Thread the pedal marked "R" into the crank arm on the chain side of the bike. Turn the pedal spindle in a clockwise direction. Securely tighten the pedal spindle with the M15 wrench.
- Thread the pedal marked "L" into the crank arm on the left side of the bike. Turn the pedal spindle in an anticlockwise direction. Securely tighten the pedal spindle with the M15 wrench.

Torque requirements: 20–26 Nm.
NOTE: Both pedals should be tightened towards the front of the bicycle. Start each pedal spindle by hand to avoid stripping the threads.
Assembly (Cont.)
Step 3: Installing the Reflectors and Bell
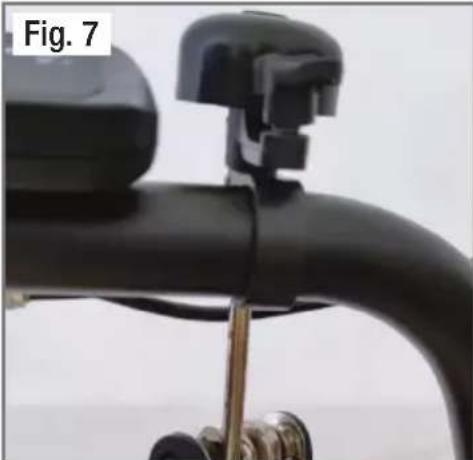
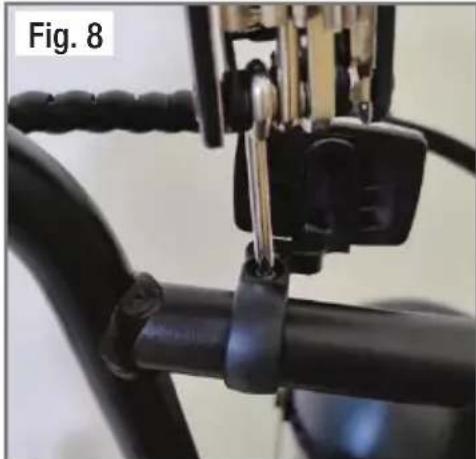
- Remove the clamp screw from the reflector (or bell) bracket.
- Push open the bracket "loop" and slide it onto the handlebar. (If there is a sizing insert included with the bracket, please be sure it is inside the clamp loop before mounting.)
- Position the bell bracket (Fig. 7) or the reflector bracket (Fig. 8) at a certain position on the handlebar and tighten the clamp screws securely.
Rear reflector (red)
- Now mount the rear reflector to the bike. Loosen the screws on the reflector so the reflector bracket can be fitted over the frame tube.
- Ensure the reflector aims toward the rear of the bike, and is vertically orientated. Tighten the screw to lock it in place (Fig. 9).

CAUTION!
- Be sure the reflector is in the same longitudinal plane as the bicycle (horizontal to the ground). If the reflector is aimed up or down, oncoming headlights may not reflect properly in the reflector. If the reflector is not horizontal to the ground, loosen the clamp screw and readjust the angle.
- It is important to check and adjust the position of the reflectors as you assemble your bike. The reflectors must always be vertical (perpendicular to the ground) and pointed toward the front and rear of the bike.
Assembly (Cont.)
Front light
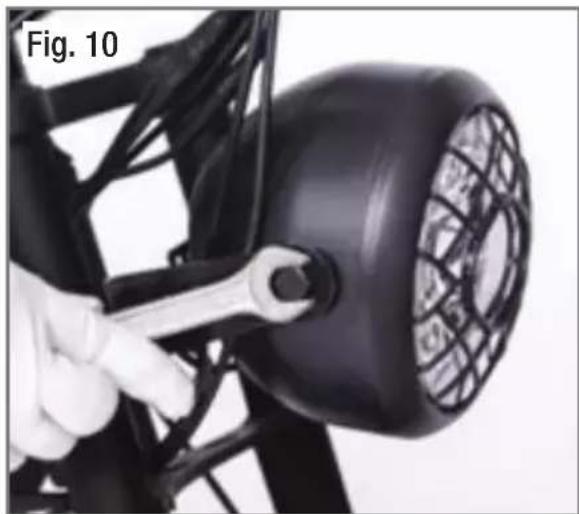
- The front light comes pre-assembled - these instructions are only necessary if adjustment or reinstallation is needed.
- Use the M6 hexagonal key on the multi-tool to loosen the screws on both sides of the front light (Fig. 10). You can then adjust/tilt the front light to a desired angle.
- Re-tighten the screws securely.
CAUTION!
- Transportation or more extreme riding (like emergency braking) may cause front light to move from the desired position/angle. In this case, simply adjust the light back to proper position, following the above steps.
Battery Charging
Battery
The bicycle comes with a removable lithium battery installed on the frame of the bike. Also supplied is a key (and a duplicate), attached to the brake cables, which you should have removed earlier in the assembly process. The key is required for locking the battery in place or unlocking it for removal of the battery.
WARNING!
NEVER leave the battery charging without supervision!
- We strongly recommend that you disconnect the battery from the bicycle before charging it. CAUTION: However, if you want to charge the battery while it is attached to the bike, make sure the bike is switched off.
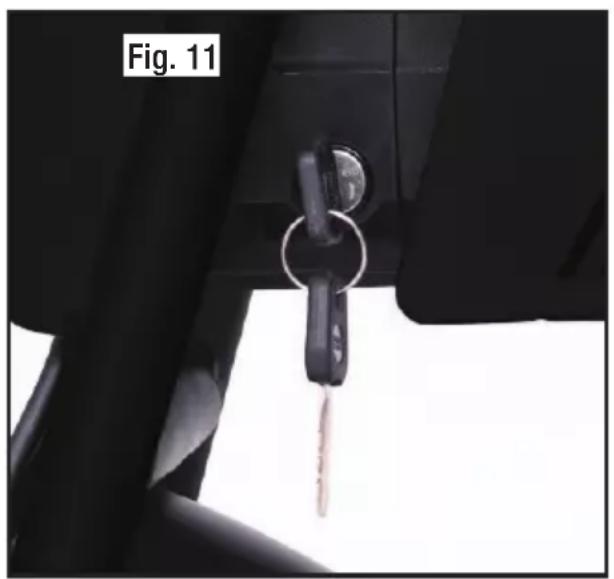
- To remove the battery, turn the key to the "UNLOCK" position and the battery will be ejected (Fig. 11). When removing battery, take care not to hit the bike frame (Fig 12) (as indicated by the red arrows).
- To attach the battery, insert it into the down tube and press firmly until it clicks securely in place. Then turn the key to the "LOCK" position to lock the battery. (When the key is in this position, you can pull it out.)
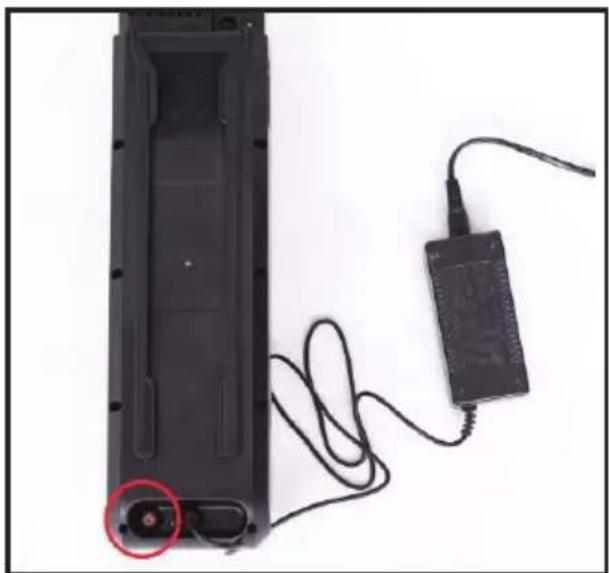
- Then, press the ON/OFF button at the bottom of battery (Fig. 13).

Battery Charging (Cont.)
- To show the battery status, press the button on the battery. The LED light will illuminate to show the battery status (Fig. 14):
Five lights: Approximately 80%–100% battery charge
Four lights: Approximately 60%–80% battery charge
Three lights: Approximately 40%–60% battery charge
Two lights: Approximately 20%–40% battery charge
One light (red): Very low/empty battery, charge immediately

Battery Charging (Cont.)
Charger
The bicycle comes with a smart charger for easy charging.
- Insert the AC plug into an appropriate electrical outlet.
- Open the battery cover and insert the DC connector into the battery (Fig. 15).
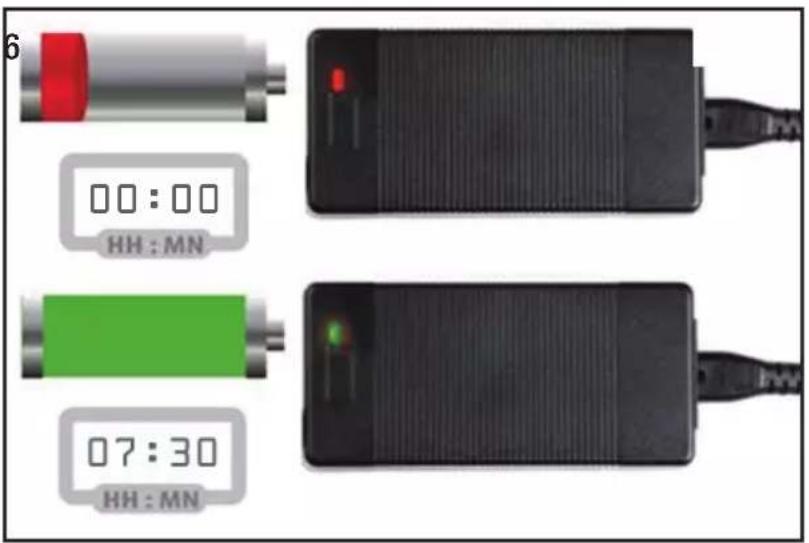
- When the battery is charging, the charging light illuminates red (Fig. 16).
- When the battery is about 80% charged, the charging light turns green. At this stage, please charge it for about one more hour, then it will be fully (100%) charged and the charger will automatically stop charging (Fig. 16).
A full charge (from 0% charge to 100%) takes approximately 7.5 hours.
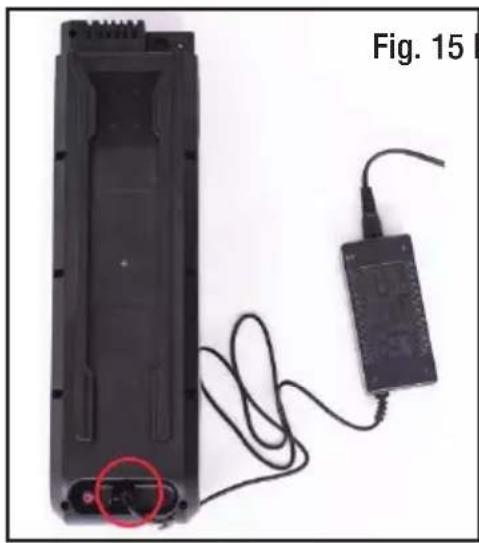
Fig. 16
WARNING!
- Only use the charger supplied with this bicycle to charge the battery. Do not charge the battery with any other (or universal) charger, doing so will void the warranty. Do not use this charger to charge any other bike.
- Do not leave the battery charging unsupervised.
Instructions
Control Panel
The bicycle's control panel (Fig. 17), located on the left side of the handlebar, allows you turn on the bike for electric power, select riding modes and check the battery status.

Operation
Turning on/off
- Ensure the battery is in the "LOCK" position and you have pressed the POWER button on the battery (see page 15).
- Then, long-press the POWER button on the control panel to turn on the e-bike. The display will show the approximate battery status and pedal assistance level.
- Long-press the POWER button on the control panel to turn off the e-bike. It can then be ridden as a regular bike. Please note, it will turn off automatically if there is no operation for 10 minutes after switching on.
Instructions (Cont.)
Electric-assisted mode (pedal assistance)
Power assistance helps increase your riding speed with the help of the motor. When the user brakes, the motor will stop working immediately. Power assistance will turn itself off when the bicycle has reached the maximum speed of 25 km/h.
You must turn on the battery to use the e-bike in electric-assisted mode. Once the e-bike is powered on, you can press the MODE / 6KM/H button repeatedly to cycle through the available pedal assistance levels.
The left LED will illuminate when the pedal assist level is 1 (low), the centre LED will illuminate when the pedal assist level is 2 (medium), and the right LED will illuminate when the pedal assist level is 3 (high). The top speed of the bike in pedal assistance level 3 is 25 km/h. When the pedal assist level is 0 (no pedal assistance) all three lights will remain off.
Using 6 km/h mode
6 km/h mode will provide assistance when pushing (walking along with) the electric fat bicycle.
- Press and hold the MODE / 6KM/H button to enter 6 km/h mode. The e-bike will start with a speed of 6 km/h.
- Release this button to turn off 6 km/h mode.
Light
- Short press the LIGHT button to turn on the lights at the front and rear of the bike. The small, LED light above the LIGHT button on the control panel will also illuminate.
Please note that the rear light has a brake light function, which means that it will illuminate when the brakes are applied, as a warning to riders, pedestrians, and other road users.
- Short press the LIGHT button again to turn the light at the front of the bike off.
Instructions (Cont.)
Getting Ready to Ride
Wear appropriate clothing
To protect yourself from injury, always wear appropriate clothing and equipment when riding a bike: an Australian standards-approved helmet, elbow pads, knee pads, long sleeve shirt, gloves, long pants. Always wear fully enclosed shoes. Make sure your shoe laces or buckles are done up properly before riding. You must not ride barefoot or in sandals.
Check the bike before every use
- Tighten the handlebars and stem—the screws must all be tightened securely.
- Check the tyres—they must be inflated to the appropriate pressure: 35-65 psi (1 psi = 6.895 kPa). The tyres should feel very firm, but not hard when squeezed between your thumb and fingers. For the average rider, the ideal tyre pressure will be approximately 50 psi, but this will depend on a range of factors, including the rider's preferences and the terrain.
- Check the brakes—test them before you ride. Inspect and replace the brake pad as required.
- Check the chain—ensure it is correctly routed. Clean and relubricate the chain when required. Replace chain when required.
WARNING: Failure to perform these checks could result in serious injury to yourself and others.
Follow the road rules
Make sure your bike is equipped with the appropriate warning devices (horn, bell, light) required by your state and local traffic laws
When you are riding on the road, make sure that you are always visible to other vehicles. Please respect the road rules in all circumstances.
WARNING: Failure to follow these warnings could result in a fall or accident and permanently and irreversibly damage the condition of the bike.
Enjoy your ride!
FAQs and Troubleshooting Guide
If you experience problems with your bicycle, check in the table below for solutions to common problems. If the problem persists after checking the suggested solutions, please contact our after sales support centre for advice.
| Problems Possible cause Solution | ||
| When turned on, the indicator light won’t turn on. | The battery is completely discharged. | Charge the battery. |
| The motor won’t work, the display won’t turn on. | The electric cable which connects the battery is loose. | Contact our after sales support centre for a service. |
| There is no electric power to the bike. | The fuse has burnt out. | Contact our after sales support centre for a service. |
| The travelling distance has been reduced. | Insufficient battery capacity. | Charge the battery fully. |
| The battery is getting old and needs replacement. | Replace the battery. Spare batteries are available for purchase from our after sales support centre. | |
| Braking frequently, riding uphill or running against the wind continuously. | Increase your pedalling speed and strength. | |
| The indicator light does not illuminate when charging. | The charger is damaged. | Contact our after sales support centre for a service. It may be necessary to replace the charger - spare chargers are available for purchase from our after sales support centre. |
| Other issues | Problems with electrical components. | Contact our after sales support centre for a service. |
Other Useful Information
Cleaning and care
WARNING!
Clean the bicycle properly and maintain it in good working condition. The warranty will not apply in case of corrosion due to lack of maintenance.
- After every ride, wash your bike with soapy water (liquid dish soap is recommended for its ability to remove grease without damaging the bike), but do not wash any electrical parts. Avoid using high-pressure washers. Always dry your bike with a soft cloth in order to avoid rust and corrosion. While carefully drying your entire bike, you will also be able to inspect all the different parts and detect any potential problems.
- Lubrication is an important part of maintaining an electric vehicle. Parts of the bike - including the chain and derailleur - should be scrubbed with an appropriate lubricating oil every six months. Lubrication is a function of climate. Talk to your local bike shop about appropriate lubrication.
- Check the chain tension after every ride. The correct chain tension is 8036 N. This should allow you to move it about 125 mm in either direction. The chain needs to be as tight as possible without creating friction that will waste energy and wear the chain and cogs prematurely.
- In terms of gear adjustment, the most important factor will be any adjustments made to the rear derailleur. If the bicycle is skipping or jumping gears, adjusting the derailleur may help fix this. If necessary, you can find the manual for the rear derailleur on the SHIMANO website (Model Number: FT35-A) for more information on this process.
- If the chain skips or jumps please refer to this SHIMANO rear derailleur manual (see above for more information), or a qualified bike mechanic.
Professional bike mechanics are required to carry out the following steps:
- To adjust the rear wheel's position, loosen one side and push the rim between the chain stays to one side to move the loose end of the axle a short distance back or forward. Retighten the nut. Loosen the other side and ease the rim in the other direction so the rear wheel is once again straight in the frame.
- Test again and repeat the process, moving the rear wheel a short distance forward or back until the tension is in the target zone. You need to test by spinning the pedals because neither cogwheel will be a perfect circle so the chain tension will vary as the cranks spin. Once the chain tension is acceptable, tighten both nuts fully.
- During the whole process please pay attention to the motor cable, do not damage or loosen the cable.
Other Useful Information (Cont.)
Storage
When it is not in use, store the bicycle in a cool, dry place, protected from dust, high humidity and frequent temperature changes, and out of reach of children.
For prolonged storage we recommend using the original carton for the bike and storing the battery separately. Please ensure the battery is at least partially charged as prolonged storage of an empty battery may damage the battery.
Service and repair
WARNING: Replace worn parts! As with all mechanical components, the bicycle is subjected to wear and high stresses. Different materials and components may react to wear or stress fatigue in different ways. If the design life of a component has been exceeded, it may suddenly fail, possibly causing injuries to the rider. Any form of crack, scratch or change of colouring in highly stressed areas indicates that the life of the component has been reached and it should be replaced.
Spare parts
Our after sales support centre stocks spare batteries and chargers for the e-bike. To purchase a part or book a service, please contact the centre at tempo.org/support or on 1300 886 649.
Other Useful Information (Cont.)
Technical specifications
| E Fat Bicycle Model number MT-EFB | |
| EPAC cut-off speed 25 km/h | |
| Mass of EPAC in the most usual configuration (weight) | 36 kg |
| Electric motor max. continuous rated power 250 W | |
| Max. permissible total weight 156 kg (bicycle + rider + luggage) | |
| Dimensions (assembled) 1680 x 730 x 1140 mm | |
| Rechargeable li-ion battery 10INR19/66-4 Model number FP-SX3610 | |
| Rated voltage 36 V | |
| Rated capacity 10 Ah, 360 Wh | |
| Dimensions and net weight 380 x 115 x 90 mm, 3.3 kg | |
| Battery charger Model number XVE-4200150 | |
| Output 42 V, 1.5 A | |
| Input 110-240 V~ 50/60 Hz, 1.5 A MAX | |
| Charging time (from 0% to 100%) | approx. 7.5 hrs |
* EPAC = electrically power-assisted cycles
Compliance
This appliance has been fully tested and meets all requirements as set out by standard AS 15194.

The RCM Mark (Regulatory Compliance Mark) indicates that the product complies with the relevant guidelines of the ACMA as well as corresponding government requirements for the safety of electrical devices.

This marking indicates only to charge the battery for the Electric Fat Bicycle with the supplied battery charger with the model number XVE-4200150.
Other Useful Information (Cont.)
Responsible disposal


Packaging materials are recyclable. Please dispose of them responsibly for recycling.
At the end of its working life, make the battery unserviceable by unplugging it from the power outlet and cutting the power cord.
Do not throw this bicycle out with your household waste.
Electrical and electronic products contain substances that can have a detrimental effect on the environment and human health if disposed of inappropriately. Observe any local regulations regarding the disposal of electrical consumer goods and dispose of it appropriately for recycling.
Contact your local authorities for advice on recycling facilities in your area. Or find recycling scheme services listed on Planet Ark's website at www.recyclingnearyou.com.au, or call Planet Ark on 1300 733 712.
This page has been left blank intentionally.
This page has been left blank intentionally.
This page has been left blank intentionally.
MONSTER™
Warranty returns
Should you for any reason need to return this product for a warranty claim, make sure to include all accessories with the product.
Product does not work?
If you encounter problems with this product, or if it fails to perform to your expectations, make sure to contact our After Sales Support Centre on (AU) 1300 886 649 or (NZ) 0800 836 761 for advice.
Distributed by Tempo (Aust) Pty Ltd ABN 70 106 100 252
PO BOX 132, Frenchs Forest NSW 1640, Australia
Customer Helpline:
(AU) 1300 886 649 (NZ) 0800 836 761
monster@tempo.org
monsterproducts.com.au
For an electronic copy of this manual, please contact our after sales support centre.
IM Version No: V1.2
Issue: December 2022
- E FAT BIKE
- USER MANUAL
- MODEL NUMBER MT-EFB
- WELCOME
- CONTENTS
- GENERAL SAFETY INSTRUCTIONS
- IMPORTANT SAFETY INSTRUCTIONS READ CAREFULLY AND KEEP FOR FUTURE REFERENCE
- GENERAL SAFETY INSTRUCTIONS (CONT.)
- WARNING
- WARNING: HANDLE THE BATTERY CHARGER WITH CARE
- PRODUCT OVERVIEW
- SCOPE OF DELIVERY
- A E FAT BIKE
- B OTHER INCLUSIONS
- C DOCUMENTATION (NOT PICTURED)
- GETTING STARTED
- BEFORE FIRST USE
- ASSEMBLY
- STEP 1: ASSEMBLING THE STEM AND HANDLEBAR
- ASSEMBLY (CONT.)
- GEAR SHIFTER ON THE HANDLEBAR
- STEP 2: INSTALLING THE PEDALS
- STEP 3: INSTALLING THE REFLECTORS AND BELL
- REAR REFLECTOR (RED)
- CAUTION
- FRONT LIGHT
- BATTERY CHARGING
- BATTERY
- NEVER LEAVE THE BATTERY CHARGING WITHOUT SUPERVISION
- BATTERY CHARGING (CONT.)
- CHARGER
- INSTRUCTIONS
- CONTROL PANEL
- OPERATION
- TURNING ON/OFF
- INSTRUCTIONS (CONT.)
- ELECTRIC-ASSISTED MODE (PEDAL ASSISTANCE)
- USING 6 KM/H MODE
- LIGHT
- GETTING READY TO RIDE
- WEAR APPROPRIATE CLOTHING
- CHECK THE BIKE BEFORE EVERY USE
- FOLLOW THE ROAD RULES
- FAQS AND TROUBLESHOOTING GUIDE
- OTHER USEFUL INFORMATION
- CLEANING AND CARE
- OTHER USEFUL INFORMATION (CONT.)
- STORAGE
- SERVICE AND REPAIR
- SPARE PARTS
- COMPLIANCE
- RESPONSIBLE DISPOSAL
- MONSTER™
- WARRANTY RETURNS
- PRODUCT DOES NOT WORK
Brand : MONSTER
Model : E-Fat Bike MT-EFB
Category : Bicycle