
WorkHorse 40916 - Animal trap Champion - Free user manual and instructions
Find the device manual for free WorkHorse 40916 Champion in PDF.


| Product Type | Auto-Feed Trap for sporting clays, trap, and skeet |
| Brand / Model | Champion WorkHorse 40916 |
| Weight | Approximately 32 lbs (14.5 kg) |
| Power Source | 12V deep cycle battery (not included) |
| Cycle Time | 2.5 seconds |
| Throwing Range | 55 to 75 yards (50-69 m) |
| Target Capacity | 50 standard 108mm or 110mm international clay targets |
| Release Mechanism | Foot pedal with 25 ft (7.6 m) cord |
| Leg Configuration | Fixed front legs with foldable adjustable rear leg |
| Safety Features | On/Off/Safe Release switch, 20A circuit breaker, throwing arm path indicator |
| Mainspring Tension | Adjustable for distance control |
| Elevation Adjustment | U-shaped wire lock pin, multiple holes |
| Throwing Arm | Balanced with replaceable flight rail |
| Construction Materials | Steel frame, plastic components |
| Warranty | 6 months limited warranty (original purchaser) |
| Recommended Lubricant | Teflon-based oil (e.g., OUTERS Tri-Lube) |
| Storage | Indoors, away from elements; remove mainspring and disconnect battery |
| Compliance | Not specified |
Frequently Asked Questions - WorkHorse 40916 Champion
User questions about WorkHorse 40916 Champion
0 question about this device. Answer the ones you know or ask your own.
Ask a new question about this device
Download the instructions for your Animal trap in PDF format for free! Find your manual WorkHorse 40916 - Champion and take your electronic device back in hand. On this page are published all the documents necessary for the use of your device. WorkHorse 40916 by Champion.
USER MANUAL WorkHorse 40916 Champion
natural_image
3D rendering of a mechanical device with vertical rods and a circular base, no visible text or symbolsInstruction Manual
Table of Contents
Section Page
I. Introduction 1
II. Safety
III. Required Tools 4
IV. Assembly and Installation 4
- Unpacking 4
- Contents 5
- Assembly 7
A. Assemble Legs 7
B. Install Mainspring 8
C. Attach the Throwing Arm Path Indicator 9
D. Attach the Magazine 10
E. Setup 10
V. Operation 11
VI. Adjustments 12
- Throwing Arm Limit Switch 12
- Elevation Adjustment 14
- Distance Adjustment 15
VII. Transportation and Storage 16
VIII. Troubleshooting 17
IX. Maintenance 18
X. Replacement Parts 18
XI. Warranty Information 19
XII. Contact Information 20
I. Introduction
The WorkHorse™ Auto-Feed Trap is designed for the active sporting clays, trap, and skeet shooter looking for an automatic, lightweight, and portable machine for practice/fun shooting.
Features and benefits of the WorkHorse™ Auto-Feed Trap:
Safety
- On-Off-Safe Release switch provides safe method to uncock arm.
- Arm path indicator ring provides visual indication of throwing arm path for safety.
- 20 amp circuit breaker protects electrical wires and motor.
Convenience
• Lightweight and portable - approximately 32 lbs.
- Detachable magazine holds 50 targets.
- Throws standard 108 mm or 110mm international clay targets.
• 25 ft. release cord with foot pedal release.
- Fixed front legs w/pivot (foldable) adjustable rear leg.
- Rear leg folds up once wire lock pins are removed during storage or transportation.
Performance
- Fast, 2.5 second cycle time.
- Standard throwing range of 55 to 75 yards
- Runs off 12 volt battery (deep cycle type recommended)
• Balanced throwing arm with replaceable flight rail
II. Safety
WARNING: THOROUGHLY READ ALL INSTRUCTIONS, WARNINGS, CAUTIONS AND SAFETY INFORMATION BEFORE INSTALLING OR OPERATING THE TRAP. FAILURE TO READ AND FOLLOW THESE INSTRUCTIONS COULD RESULT IN SERIOUS PERSONAL INJURY OR DEATH.
DO NOT STAND IN FRONT OF THE TRAP WHEN IT IS IN THE COCKED POSITION. SERIOUS INJURY OR DEATH CAN RESULT. TO AVOID POTENTIAL INJURY NEVER STAND TO THE SIDE OF THE TRAP, ALWAYS STAND BEHIND THE TRAP.
THIS TRAP IS CAPABLE OF THROWING TARGETS A DISTANCE OF OVER 75 YARDS. USE ONLY IN AREAS WHERE THERE IS NO RISK OF CAUSING INJURY TO ANOTHER PERSON OR CAUSING OTHER DAMAGE.
KNOW YOUR BACKSTOP. ENSURE THERE IS A SAFE PERIMETER THROUGHOUT TARGET FLIGHT PATH SUFFICIENT FOR AMMUNITION USED.

WARNING: IF THERE IS A TARGET ON THE THROWING ARM, SAFE RELEASING THE ARM WILL THROW THE TARGET. DO NOT STAND IN FRONT OF THE TRAP WHILE SAFE RELEASING THE THROWING ARM.

CAUTION: THE TRAP MUST HAVE AMPLE CLEARANCE AROUND THE TRAP. THE ON/OFF/SAFE RELEASE SWITCH FOR THE TRAP IS LOCATED ON THE REAR OF THE TRAP AND ALLOWS THE TRAP TO BE UNCOCKED BEFORE APPROACHING IT.
DO NOT INSTALL THE TRAP IN AN AREA THAT DOES NOT ALLOW SAFE (REAR) ACCESS TO THE TRAP AND THE ON/OFF/SAFE RELEASE SWITCH DURING LOADING AND USE.
- All personnel operating the trap should be thoroughly familiar with the operating instructions and the safety issues relating to the trap. ALWAYS FOLLOW THE RULES OF FIREARM SAFETY.
- Do not leave trap in the cocked position. Not only is this potentially dangerous, but it puts undue stress on the mainspring.
- Always load and operate the trap from the rear (switch end).
- Keep hands and body outside the trap and throwing arm path indicator areas while the trap is operating. The throwing arm path indicator shows the throwing arm's path when throwing a target, and should always be attached to the trap when it is in use.
- Be aware that a cracked or broken target thrown from the trap will sometimes scatter pieces out the right side of the machine as the arm throws. These pieces may hit nearby unsuspecting bystanders. To avoid potential injury NEVER stand to the side of the trap, always stand behind the trap.
- Always wear eye and hearing protection when shooting.
WARNING: BEFORE PERFORMING ANY REPAIR, MAINTENANCE, OR ASSEMBLY, MAKE SURE THE THROWING ARM IS IN THE UNCOCKED POSITION (SEE BELOW), THE ON/OFF/SAFE RELEASE SWITCH LOCATED ON THE REAR OF THE TRAP IS IN THE 'OFF' POSITION (SEE BELOW), AND THE BATTERY IS DISCONNECTED FROM THE TRAP AND THE MAIN SPRING IS DISENGAGED.
If the throwing arm is in the cocked arm position (see photo below), uncock the throwing arm by first connecting the red battery lead to the positive (+) terminal and the black battery lead to the negative (-) terminal on the battery. Momentarily press the on/off/safe release switch to the "SAFE RELEASE" position to release the throwing arm while standing in a safe position. After the trap fires, release the ON/OFF/SAFE RELEASE switch allowing it to return to the "OFF" position. The throwing arm should now be in the uncocked position. Disconnect the battery from the trap.
Flight Rail
Drop Hole Open
Drop Hole
Partially Closed
more than
4.5"
2.5" to 4.5"
Cocked Arm Position
(Ready to Launch Target)
Uncocked Arm Position
ON/OFF/SAFE RELEASE Switch
(shown in OFF Position)
rcuit Breaker
WARNING: FAILURE TO FOLLOW SAFETY RULES
CAN RESULT IN SERIOUS INJURY OR DEATH!
III. Tools Required for Assembly
Listed in order of usage:
• 10mm open ended wrench
• 13mm socket wrench (racheting)
• 15mm open ended wrench
• 16mm open ended wrench
• #2 Phillips screwdriver
IV. Assembly
1. Unpacking
- Carefully inspect the carton and trap machine to be sure that damage hasn't occurred during shipping. Report any damage found immediately to the shipper.
- Carefully remove trap assembly and all other components from cardboard shipping box and other smaller boxes. Remove all hardware from bags.
- Check that all parts were included. If any parts are missing, call the CHAMPION Customer Service Department at (800) 379-1732 to obtain replacement parts.
- Save all packing material and box if trap should ever need to be returned for service or replacement.
2. Contents
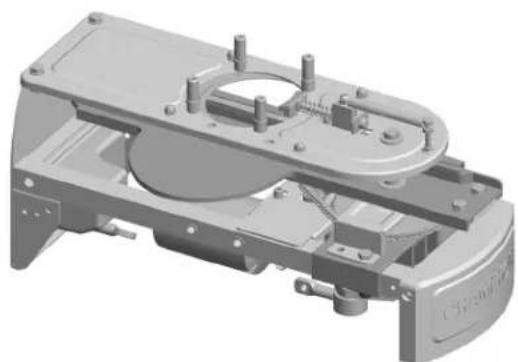
Trap Assembly
natural_image
3D mechanical assembly diagram showing internal components and mounting brackets (no text or symbols)Frame Legs Parts (not shown to scale)
Mainspring Assembly
S1 - Mainspring
S2 - Mainspring Bolt
S3 - 10mm Flat Washer
S4 - 10mm Flange Nut
S5 - 10mm Hex Nut

Throwing Arm Path Indicator Tubing Parts
A1 - Throwing Arm Path Indicator Tubing (1)
A2 - Throwing Arm Path Indicator Tube Support (2)
F3 - Throwing Arm Path Indicator Tube Stud (2)

Magazine Parts
M1 -Magazine Rods (4)
M2 - Magazine Top Plate
M3 - 5mm x 10mm Screws (4)


3. Assembly

CAUTION: PROVIDE AMPLE CLEARANCE AROUND THE TRAP. DO NOT OPERATE THE TRAP IN AN AREA THAT DOES NOT ALLOW SAFE (REAR) ACCESS TO THE TRAP AND THE ON/OFF/SAFE RELEASE SWITCH DURING LOADING AND USE.
A. Assemble Legs
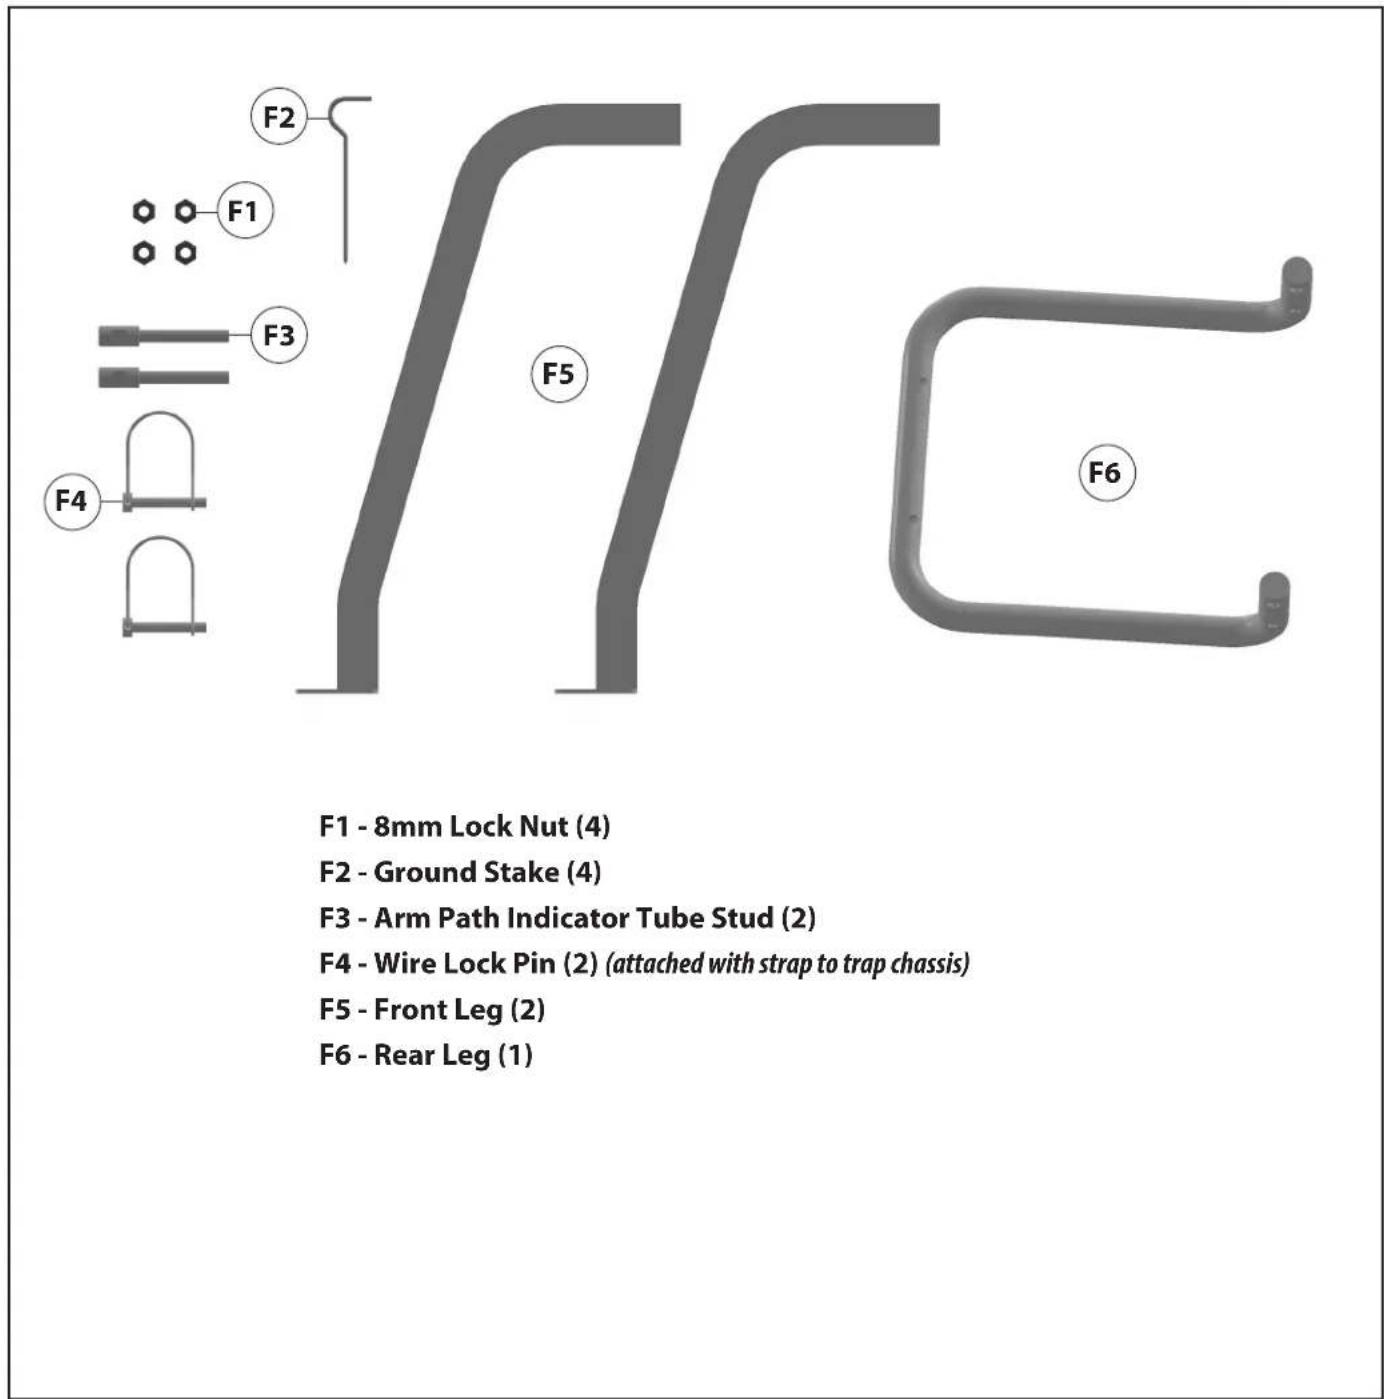
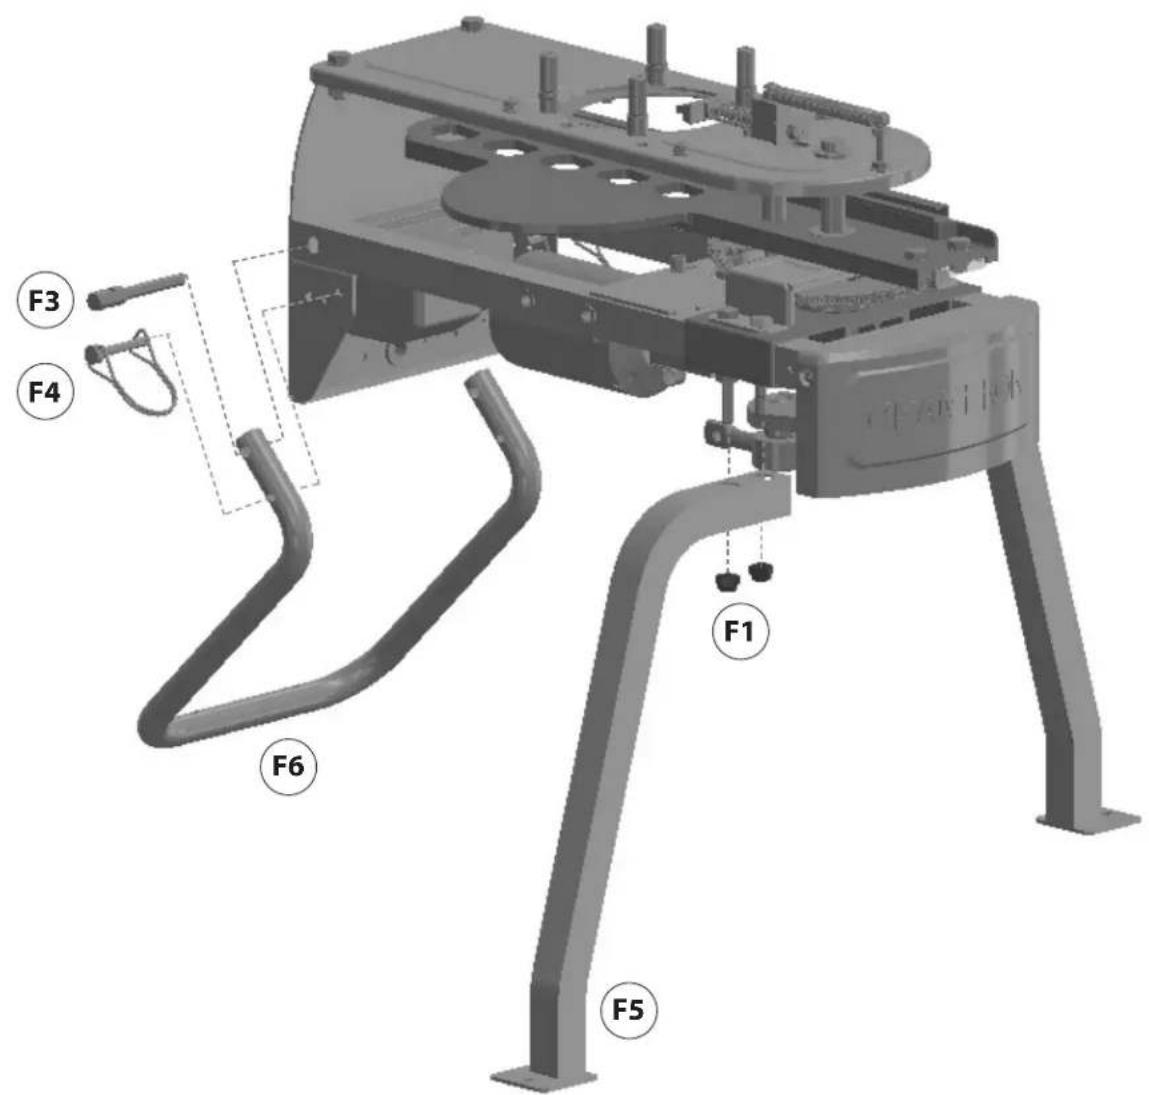
- Attach Rear Leg (F6) with Wire Lock Pins (F4) and Arm Path Tube Stud (F3).
- Attach Front Legs (F5) to Pre-assembled Bolts on front bottom side of Trap, using 8mm Lock Nuts (F1). Note: if crankshaft position blocks mounting front legs onto pre-assembled bolts, rotate throwing arm to move crankshaft so legs can be more easily mounted.
B. Install Mainspring
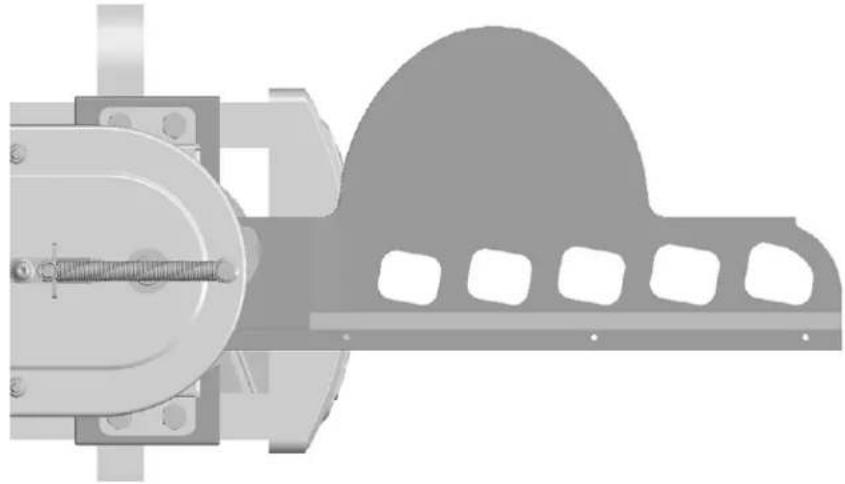
- Remove the plastic tie holding the throwing arm in place and rotate the arm counter clockwise 180^ so it is facing forward of the trap in the 12 o'clock position.
natural_image
Mechanical assembly diagram showing a bolted joint with a dome-shaped component and mounting bracket (no text or symbols)-
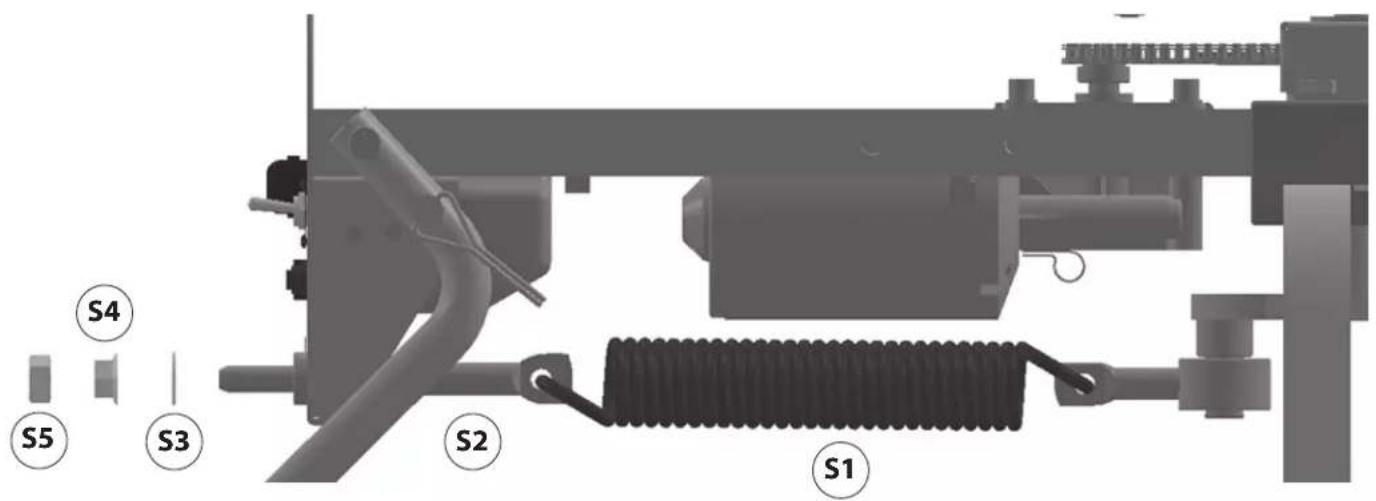
Attach the hook on one end of the Mainspring (S1) through the crankshaft eyebolt. (Eyebolt should be pointing toward rear of trap.)
-
Push threaded end of Mainspring Bolt (S2) through hole in rear of body.
-
Attach the hook on other end of Mainspring (S1) through the hole in end of Mainspring Bolt (S2).
-
Attach 10mm Flat Washer (S3) and 10mm Flange Nut (S4) to Mainspring Bolt (S2).
-
With the throwing arm still facing forward of the trap, tighten 10mm Flange Nut (S4) until all the slack is taken up in the spring and the bolt is tight. Add 10mm Hex Nut (S5) and tighten against 10mm Flange Nut (S4).
-
The throwing arm is now in the uncocked position (not shown) and is under standard tension.
C. Attach the Throwing Arm Path Indicator
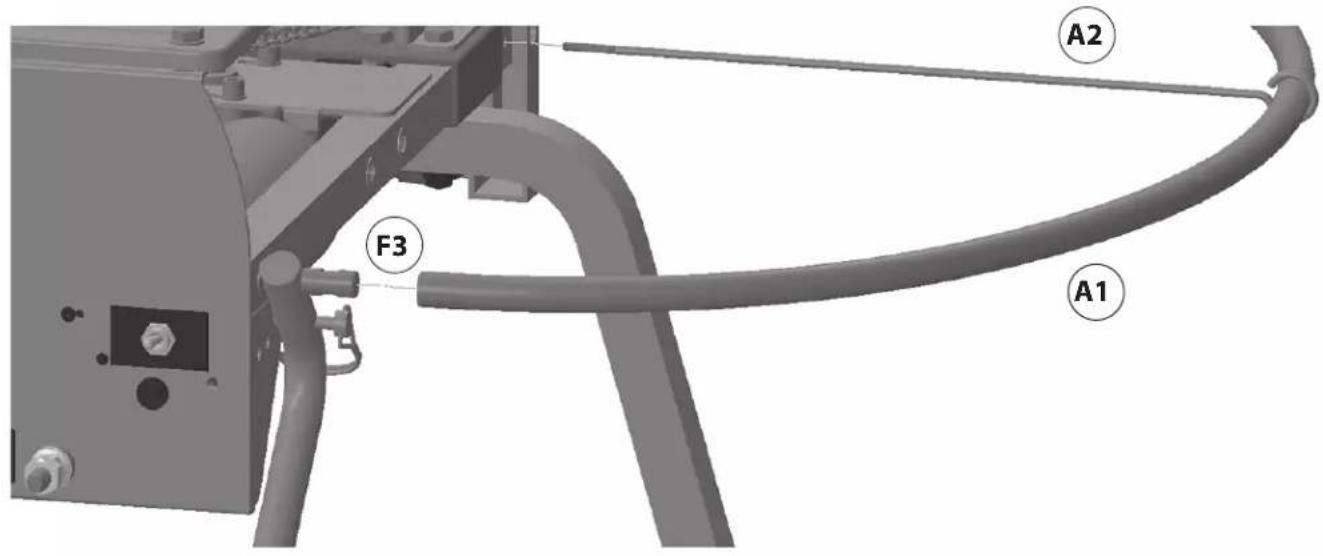
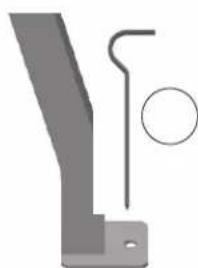
- Thread Arm Path Tube Support (A2) into pre-drilled holes on each front side of Trap. Do not overthread (does not have backstop).
- Unwind Arm Path Tubing (A1) and thread through each Arm Path Tube Support (A2) and connect each end to Arm Path Tube Stud (F3).

WARNING: FAILURE TO KEEP HANDS AND BODY OUTSIDE THE THROWING ARM PATH INDICATOR AREA CAN RESULT IN SERIOUS INJURY OR DEATH FROM BEING STRUCK BY THE THROWING ARM DURING USE.

Caution: Do not lift trap by throwing arm path indicator tubing, or throwing arm path indicator tube supports, these were not designed to be a lifting point.
Throwing arm path indicator tube support screws directly into frame
D. Attach the Magazine
- Slide Magazine Rod (M1) over each magazine stud as shown.
- Attach Magazine Top Plate (M2) using 5mm x 10 Screws (M3). Opening of Magazine Top Plate (M2) should be toward rear of trap.

natural_image
Mechanical assembly diagram showing a central circular component with multiple cylindrical pins and mounting holes (no text or symbols)Magazine Rods

Magazine Top Plate
E. SETUP

WARNING: MAKE SURE THAT THE "ON-OFF-SAFE RELEASE" SWITCH IS SET TO THE "OFF" POSITION BEFORE CONNECTING POWER TO THE TRAP. AN UNINTENTIONAL DISCHARGE OF THE TRAP COULD CAUSE SERIOUS INJURY OR DEATH.
DO NOT OPERATE THE TRAP IN AN AREA THAT DOES NOT ALLOW SAFE (REAR) ACCESS TO THE TRAP AND THE ON/OFF/SAFE RELEASE SWITCH DURING LOADING AND USE.
- Connect the red battery lead to the positive (+) terminal and the black battery lead to the negative (-) terminal of a charged deep cycle 12V battery.
- Remove wire ties from foot pedal release cable and unwind cable as needed and place foot pedal switch on ground.
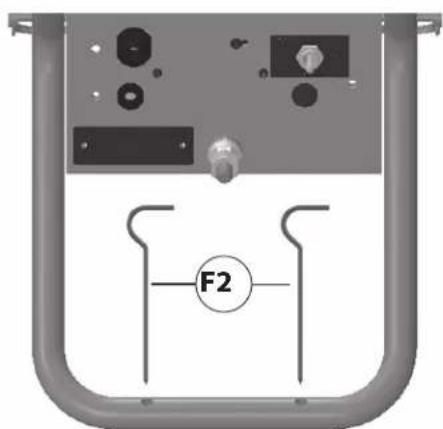
- Insert ground stakes (F2) into two holes on bottom of rear leg and front legs and drive into ground.

natural_image
Pure mechanical part diagram without any text, numbers, or symbolsV. Operation

WARNING: DO NOT STAND IN FRONT OF TRAP OR IN THE PATH OF THE THROWING ARM! SERIOUS INJURY OR DEATH MAY RESULT!
- The throwing arm path indicator must be mounted properly before using trap.
- Make sure that the trap is located to allow ample clearance around machine and provides safe access to the rear of the trap during operation. The trap must be located so that the user has safe access to the rear to operate the On/Off/Safe Release switch and reload the trap.
- Make sure that the On/Off/Safe Release switch is in the "OFF" position, and the arm is in the uncocked position (page 3).
- Place six (6) targets into magazine and hold them flat. Pull back on Target Retainer Loading Bar if the Rubber Target Retainer interferes with the targets.

- Release the Target Retainer Loading Bar if it was being held. The rubber target retainer should be pressing on the 2nd target. Release the targets. Continue to load targets into the magazine column.
- After the targets are loaded, connect the trap to a fully charged 12V battery, ensuring the remote release cord is safely away from and behind the trap.
- Turn the On/Off/Safe Release switch to the "ON" position.
- The trap should cock the throwing arm and at the same time drop one target onto the throwing arm as it is cocking.
- Activate the Foot Pedal Switch and the WorkHorse™ will release the throwing arm (launching the target), re-cock the throwing arm and deliver another target to the throwing arm.
WARNING: IF THERE IS A TARGET ON THE THROWING ARM, SAFE RELEASING THE THROWING ARM WILL THROW THE TARGET. DO NOT STAND IN FRONT OF THE TRAP.
- When reloading the trap, first move the ON/OFF/SAFE RELEASE switch on the trap to the "SAFE RELEASE" position momentarily to uncock the throwing arm. Allow the switch to return to the "OFF" position. The trap magazine can then be safely reloaded with targets from the rear of the trap.
VI. Adjustments
1. Throwing Arm Limit Switch

WARNING: BEFORE MAKING ANY ADJUSTMENTS, MAKE SURE THE THROWING ARM IS IN THE UNCOCKED POSITION, THE ON/OFF/SAFE RELEASE SWITCH IS IN THE "OFF" POSITION, AND THE BATTERY IS DISCONNECTED FROM THE TRAP! DO NOT MANUALLY FORCE THE THROWING ARM THROUGH THE UNCOCKED POSITION AS THE MAIN SPRING CAN BE RELEASED AND CAUSE SERIOUS INJURY OR DEATH.
The machine is set at the factory. Only make adjustments to the limit switch if a target doesn't drop onto the throwing arm as the throwing arm is cocking, or the throwing arm continuously fires. TEST MACHINE FIRST WITHOUT ANY TARGETS.
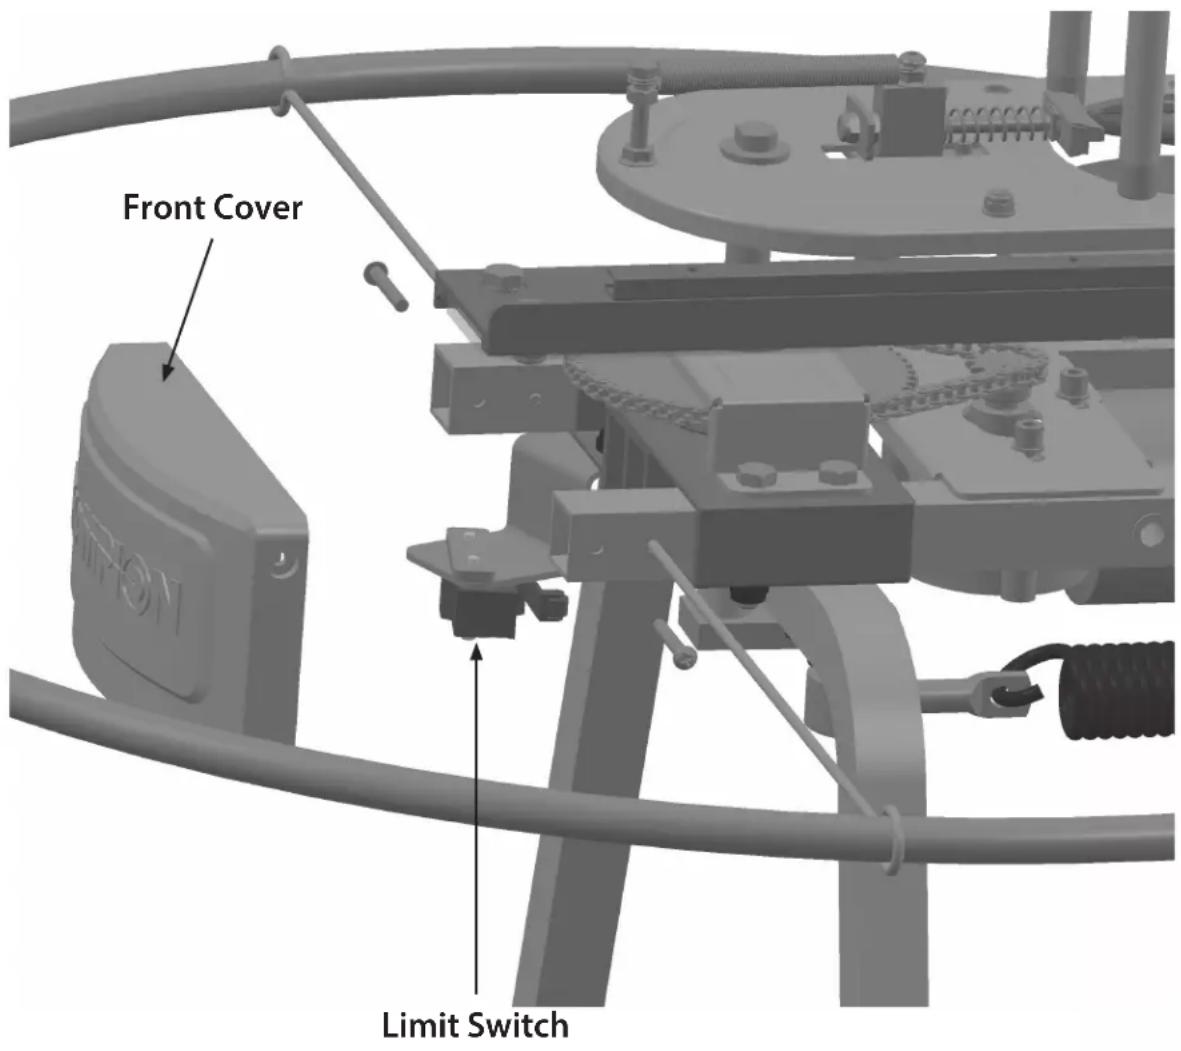
- The limit switch controls the stop position of the throwing arm during the traps cocking cycle. The limit switch is located under the trap near the front. The front cover can be removed to gain easier access to the switch. Replace cover after adjusting switch.
-
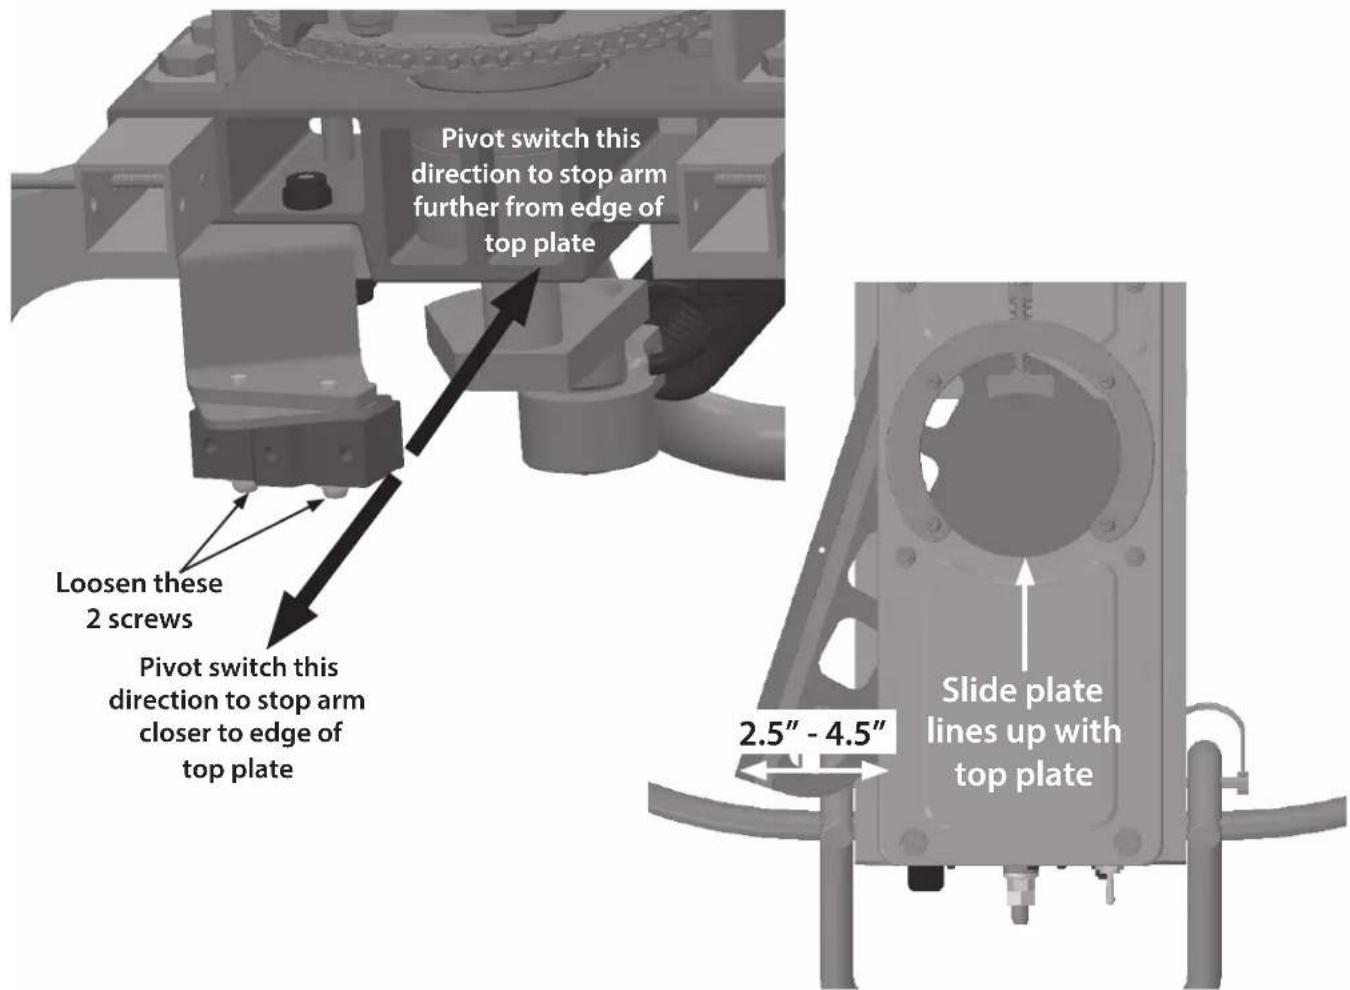
Adjustments to the limit switch are made by loosening the two mounting screws and moving the switch slightly:
-
Pivot the switch slightly towards the rear of the trap to make the arm stop further away from the edge of the main body.
- Pivot the switch slightly towards the front of the trap to make the arm stop closer to the edge of the main body.
- Re-tighten the mounting screws after adjusting the switch.
- Adjust switch so that a target drops onto the throwing arm as the arm is cocking. With the on/off/safe release switch set to "on", the tip of the arm should stop within 2.5" to 4.5" from the edge of the top plate of the trap. The opening in the sliding plate should line up with the opening in the top plate and allow a target to drop.

Caution: Adjusting the arm to stop at a point too far away from the spring's over-center point can result in a delayed release or improper loading and targets breaking.

WARNING: ADJUSTING THE ARM TO STOP AT A POINT TOO CLOSE TO THE SPRING'S OVER-CENTER POINT CAN RESULT IN THE ARM CONTINUOUSLY FIRING OR FIRING UNEXPECTEDLY WHICH COULD RESULT IN PERSONAL INJURY FROM THE THROWING ARM.
2. Elevation Adjustment

WARNING: BEFORE MAKING ANY ADJUSTMENTS, MAKE SURE THE THROWING ARM IS IN THE UNCOCKED POSITION, THE ON/OFF/SAFE RELEASE SWITCH IS IN THE "OFF" POSITION, AND THE BATTERY IS DISCONNECTED FROM THE TRAP. DO NOT MANUALLY FORCE THE THROWING ARM THROUGH THE UNCOCKED POSITION AS THE MAIN SPRING WILL TAKE OVER AND FIRE THE TRAP, POTENTIALLY CAUSING SERIOUS INJURY OR DEATH.
- To change the elevation position, insert a "U" shaped wire lock pin in the appropriate hole to establish your desired angle.

3. Distance Adjustment

WARNING: BEFORE MAKING ANY ADJUSTMENTS, MAKE SURE THE THROWING ARM IS IN THE UNCOCKED POSITION, THE ON/OFF/SAFE RELEASE SWITCH IS IN THE "OFF" POSITION, AND THE BATTERY IS DISCONNECTED FROM THE TRAP.
THIS TRAP IS CAPABLE OF THROWING TARGETS A DISTANCE OF OVER 75 YARDS. USE ONLY IN AREAS WHERE THERE IS NO RISK OF INJURY TO ANOTHER PERSON OR CAUSING OTHER DAMAGE.
Adjustment to throwing distance is made by adjusting the mainspring tension.
- With 10mm Flange Nut (S4) fully tightened and Mainspring Bolt (S2) tight, the mainspring is under standard tension. The trap will throw targets a distance which should be suitable for most users.
- If reduced throwing distance is desired, mainspring tension can be adjusted to reduce the throwing distance. First loosen 10mm Hex Nut (S5) and then the 10mm Flange Nut (S4) can be loosened up to a 1/2" on the Mainspring Bolt (S2). DO NOT EXCEED THIS AMOUNT-DAMAGE OR PREMATURE WEAR COULD RESULT.
- After adjusting the spring to the desired tension, tighten the 10mm Hex Nut (S5) against the 10mm Flange Nut (S4) to lock the setting in place. There should be a minimum of 2 1/4" of the Mainspring Bolt (S2) left exposed (beyond the 10mm Hex Nut (S5)).

VII. Transportation and Storage

WARNING: BEFORE MAKING ANY ADJUSTMENTS, MAKE SURE THE THROWING ARM IS IN THE UNCOCKED POSITION, THE ON/OFF/SAFE RELEASE SWITCH IS IN THE "OFF" POSITION, AND THE BATTERY IS DISCONNECTED FROM THE TRAP. UNINTENTIONAL FIRING OF THE TRAP CAN CAUSE INJURY OR DEATH FROM BEING STRUCK BY THE ARM.
WARNING: DO NOT TRANSPORT OR STORE TRAP WITH MAINSPRING INSTALLED OR BATTERY ATTACHED. UNINTENTIONAL FIRING OF THE TRAP CAN CAUSE SERIOUS INJURY OR DEATH FROM BEING STRUCK BY THE ARM.
WARNING: NEVER REMOVE THROWING ARM PATH INDICATOR UNLESS MAINSPRING HAS BEEN REMOVED FIRST. NEVER OPERATE TRAP WITHOUT THROWING ARM PATH INDICATOR IN PLACE. SERIOUS INJURY OR DEATH CAN RESULT.
- Make sure the throwing arm is in the uncocked position, the on/off/safe release switch is in the "off" position, and the battery is disconnected from the trap.
- Remove 10mm hex nut (S5) and carefully release spring tension by loosening the 10mm flange nut (S4).
- Remove the mainspring (S1).
- To prevent lost parts, reattach 10mm hex nut (S5), 10mm flange nut (S4), and 10mm flat washer (S3) to mainspring bolt (S2) for transportation.
- Once the mainspring (S1) is removed, manually rotate the throwing arm to the 6 o'clock position where it will be protected and is as compact as possible.
- Remove magazine assembly by sliding the magazine rods off the magazine studs.
- If necessary, detach throwing arm path indicator tube (A1) from both arm path tube studs (F3) and arm path tube supports (A2).
- If necessary, unscrew arm path tube supports (A2) from trap.
- Store trap indoors away from the elements and out of children's reach.
VIII. Troubleshooting
I. THE MOTOR WILL NOT START
- The "ON-OFF-SAFE RELEASE" switch on the trap is in the "OFF" position.
- Circuit breaker on rear of trap is tripped - determine cause before resetting.
- Battery is inadequately charged - recharge battery.
- Electrical connections are loose or damaged.
- The motor is hooked up incorrectly – check battery wires for correct polarity.
- The motor is burned out.
- The throwing arm is blocked from rotating.
- The "ON-OFF-SAFE RELEASE" switch is broken.
- The relay is burned out.
II. THE MOTOR RUNS, BUT DOES NOT COCK THROWING ARM
- Battery is inadequately charged - recharge battery.
- Drive chain broken
III. THE TRAP COCKS, BUT DOES NOT FIRE
- The "ON-OFF-SAFE RELEASE" switch is in the "OFF" position.
- Electrical connections are loose or damaged.
- The foot pedal switch is damaged.
IV. THE THROWING ARM STOPS, BUT A TARGET DOESN'T DROP
- The throwing arm limit switch is damaged or out of adjustment.
- Adjust limit switch so arm stops closer to the edge of the top plate.
- Test with a different brand or shipment of targets.
V. THE THROWING ARM DOES NOT STOP AND CONTINUES FIRING
- The throwing arm limit switch is damaged or out of adjustment.
- Adjust limit switch so arm stops farther away from the edge of the top plate
- Foot pedal switch stuck.
- Foot pedal switch cord wires are shorted together.
- The relay is burned out.
VI. EXCESSIVE TRAP NOISE OR VIBRATION
- Check all bolts to make sure they are tight.
- The mainspring is loose causing "spring slap". Check to make sure there is a minimum of 2 1/4" of the Mainspring Bolt (S2) left exposed behind 10 mm Hex Nut (S5).
IX. Maintenance
WARNING: BEFORE PERFORMING ANY MAINTENANCE ON THE TRAP MAKE SURE THAT THE THROWING ARM IS IN THE UNCOCKED POSITION, THE ON/ OFF/SAFE RELEASE SWITCH ON THE TRAP IS IN THE "OFF" POSITION AND THE BATTERY HAS BEEN DISCONNECTED. DO NOT MANUALLY FORCE THE THROW ARM THROUGH THE UNCOCKED POSITION AS THE MAIN SPRING CAN BE RELEASED AND CAUSE SERIOUS INJURY OR DEATH.
| Preventive Maintenance Action Frequency | |
| Remove dust, dirt, and target debris with soft brush Before every use | |
| Check mounting bolts to insure they remain tight Every month or 8,000 cycles | |
| Lubricate moving parts with a good quality Teflon based lubricating oil such as OUTERS Tri-Lube | Every month or 8,000 cycles |
| Disconnect Battery After every use | |

WARNING: ALWAYS CHECK THAT THE WIRING, THROWING MECHANISM AND SAFETY FEATURES ARE IN GOOD CONDITION AND THAT THE TRAP IS FREE OF DEBRIS BEFORE EVERY USE. FAILURE TO PROPERLY MAINTAIN THIS PRODUCT COULD INCREASE RISK OF DEATH OR SERIOUS INJURY.
X. Replacement Parts
Replacement parts are available by calling Champion Customer Service Department at (800) 379-1732.
CHAMPION®
Traps & Targets
XI. Warranty Card (Please fill out completely & return with a copy of the receipt)
Owner's Name : ____
Owner's Signature : ____
Address: ____ Ph #: ____
Date of Purchase : ____
Business where Trap was purchased (Retailer): ____
WARRANTY CERTIFICATE
Congratulations on the purchase of your new CHAMPION WORKHORSE™ AUTO-FEED trap machine. Your new WORKHORSE AUTO-FEED is warranted to be free from defects in material or workmanship for a period of six (6) months from the date of purchase. This warranty is extended only to the original consumer purchaser. Should you believe that your CHAMPION WORKHORSE AUTO-FEED is defective in material or workmanship, you should contact the CHAMPION TRAPS & TARGETS Customer Service Department via phone at 800-379-1732. In the event a warranty repair is required, all parts will be provided at no charge. THIS WARRANTY DOES NOT COVER DEFECTS OR DAMAGE RESULTING FROM: CARELESSNESS, MISUSE, IMPROPER INSTALLATION, MODIFICATION, OR NORMAL WEAR AND TEAR.
IN ORDER FOR THIS WARRANTY TO BE IN EFFECT, YOU MUST FILL OUT THIS WARRANTY CARD AND RETURN IT TO CHAMPION TRAPS & TARGETS WITHIN 30 DAYS OF PURCHASE. THE ATTACHED WARRANTY CARD MUST BE FILLED OUT COMPLETELY AND SIGNED BY THE OWNER IN ORDER TO BE VALID. WARRANTY SERVICES CANNOT BE PROVIDED WITHOUT MEETING THE ABOVE REQUIREMENT. Retain this warranty certificate for future reference. THE IMPLIED WARRANTIES OF MERCHANTABILITY AND FITNESS FOR A PARTICULAR PURPOSE ARE LIMITED TO THE DURATION OF THIS LIMITED WARRANTY.
CHAMPION TRAPS AND TARGETS IS NOT LIABLE FOR DAMAGES IN EXCESS OF THE PURCHASE PRICE OF THE PRODUCT AND UNDER NO CIRCUMSTANCES SHALL CHAMPION TRAPS AND TARGETS BE LIABLE FOR CONSEQUENTIAL OR INCIDENTAL DAMAGES. HOWEVER, SOME STATES DO NOT ALLOW LIMITATIONS ON INCIDENTAL, OR CONSEQUENTIAL DAMAGES, SO THE ABOVE LIMITATION OR EXCLUSION MAY NOT APPLY TO YOU.
The above warranty provides the sole and exclusive warranty available to the customer in the event of a defect in material or workmanship in the CHAMPION WORKHORSE AUTO-FEED. This warranty gives you specific legal rights, and you may also have other rights which vary from State to State.
CHAMPION TRAPS AND TARGETS
1 VISTA WAY
ANOKA, MN 55303
1-800-379-1732
www.championtarget.com
Champion Traps and Targets
1 Vista Way
Anoka, MN 55303
Toll Free: (800) 379-1732
Internet: www.championtarget.com
Email: tech.expert@vistaoutdoor.com
CHAVIPION®
Traps & Targets
Champion Traps and Targets
1 Vista Way
Anoka, MN 55303
Toll Free: (800) 379-1732
Internet: www.championtarget.com
Email: tech.expert@vistaoutdoor.com

- Instruction Manual
- Table of Contents
- Section Page
- Introduction
- Safety
- Convenience
- Performance
- Safety
- Tools Required for Assembly
- Assembly
- Unpacking
- Contents
- Trap Assembly
- Mainspring Assembly
- Throwing Arm Path Indicator Tubing Parts
- Magazine Parts
- Assembly
- Assemble Legs
- Install Mainspring
- Attach the Throwing Arm Path Indicator
- Attach the Magazine
- SETUP
- Operation
- WARNING: DO NOT STAND IN FRONT OF TRAP OR IN THE PATH OF THE THROWING ARM! SERIOUS INJURY OR DEATH MAY RESULT!
- WARNING: IF THERE IS A TARGET ON THE THROWING ARM, SAFE RELEASING THE THROWING ARM WILL THROW THE TARGET. DO NOT STAND IN FRONT OF THE TRAP.
- Adjustments
- Throwing Arm Limit Switch
- Elevation Adjustment
- Distance Adjustment
- Transportation and Storage
- Troubleshooting
- THE MOTOR WILL NOT START
- THE MOTOR RUNS, BUT DOES NOT COCK THROWING ARM
- THE TRAP COCKS, BUT DOES NOT FIRE
- THE THROWING ARM STOPS, BUT A TARGET DOESN'T DROP
- THE THROWING ARM DOES NOT STOP AND CONTINUES FIRING
- EXCESSIVE TRAP NOISE OR VIBRATION
- Maintenance
- Replacement Parts
- CHAMPION®
- Traps & Targets
- Warranty Card (Please fill out completely & return with a copy of the receipt)
- WARRANTY CERTIFICATE
- CHAVIPION®
Brand : Champion
Model : WorkHorse 40916
Category : Animal trap