
AccessPoint 001827 - Lock KIDDE - Free user manual and instructions
Find the device manual for free AccessPoint 001827 KIDDE in PDF.


| Product Type | Key Lock |
| Brand | Kidde |
| Model | AccessPoint 001827 |
| Category | Lock |
| Material | Zinc alloy |
| Finish | Satin nickel |
| Dimensions (exterior) | 2.75 x 4.5 x 0.75 in (70 x 114 x 19 mm) |
| Weight | 0.8 lb (363 g) |
| Key Type | Traditional key with pin tumbler |
| Key Blanks | KIDDE keyway (compatible with K1 blank) |
| Number of Keys Included | 2 |
| Installation | Standard door preparation (2-1/8 in bore, 2-3/4 in backset) |
| Door Thickness Range | 1-3/8 to 1-3/4 in (35 to 45 mm) |
| Security Rating | ANSI Grade 2 (Residential/Commercial Light Duty) |
| Anti-Pick | Security pins for basic pick resistance |
| Anti-Bump | No special bump protection |
| Weather Resistance | Not recommended for exterior doors without weather cover |
| Maintenance | Lubricate with graphite powder annually |
| Cleaning | Wipe with damp cloth; do not use harsh chemicals |
| Warranty | Limited lifetime warranty |
Frequently Asked Questions - AccessPoint 001827 KIDDE
User questions about AccessPoint 001827 KIDDE
0 question about this device. Answer the ones you know or ask your own.
Ask a new question about this device
Download the instructions for your Lock in PDF format for free! Find your manual AccessPoint 001827 - KIDDE and take your electronic device back in hand. On this page are published all the documents necessary for the use of your device. AccessPoint 001827 by KIDDE.
USER MANUAL AccessPoint 001827 KIDDE
Mounting Instructions
The TouchPoint™ Lock is a pushbutton access control device that permits authorized entry into cabinets, drawers or other locking enclosures. The TouchPoint Lock is easy to install on a variety of cabinets or enclosures and is intended for both indoor and outdoor applications.
The TouchPoint Lock can be ordered as a single component, or with optional mounting hardware including mounting brackets for sheet metal or thick panels, 90° or 180° stop cams, a straight cam (1-1/8" length), or offset cam (1-5/8" length, 5/16" offset). The variations depend on the type of cabinet or enclosure to which the lock is mounted.
Tools Needed/Recommended:
- Drill
• Hole saw (For Top Mount Option) - Router (For Flush Mount Options)
- File
- Philips screwdriver
- T15 Torx driver
- Pen or pencil
I. Mounting Options:
The TouchPoint Lock can be oriented vertically or horizontally to permit a wide range of locking options.
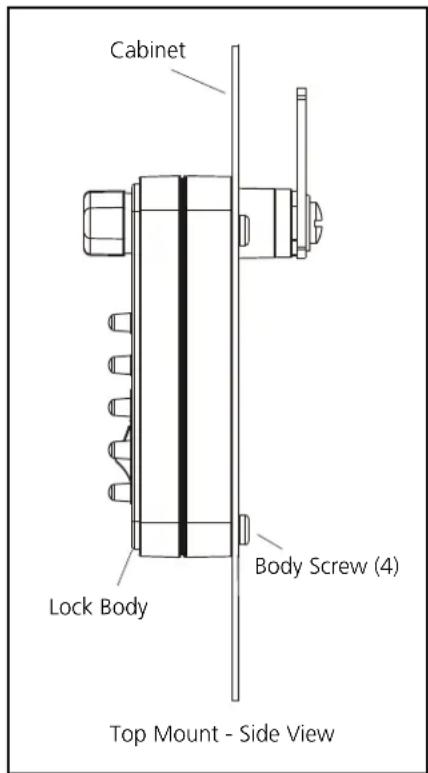
The TouchPoint Lock has three mounting options: top mount, flush mount with a sheet metal bracket, and flush mount with a thick panel bracket. In the top mount option, the back face of the Lock housing is mounted on the front face of the cabinet or enclosure. In the two flush mount options, the front face of the Lock housing is aligned flush with the front face of the cabinet or enclosure, secured by a bracket inside a hole cut into the cabinet surface.
In each of these options, the lock is secured to the panel or bracket through the use of thread rolling.
screws into bosses on the Lock housing. Any mounting scheme should be designed so that the mounting fasteners cannot be removed or tampered with when the Lock is mounted and the cabinet or enclosure is closed and locked.
II. Mounting Instructions
Option A - Top Mount
(For use on panels of 1/8" thickness or less)
- If the cabinet has an existing lock, remove the existing lock cylinder. If the opening is too small for the protrusion on the back of the TouchPoint lock, use a file to round out the lock tail hole.
- If the cabinet does not have an existing lock, use Template A to determine the dimensions and hole locations.
- Position the Lock over the holes and install the four body screws through the back of the cabinet and into the Lock body. Do not exceed 15 in-lb. of torque. Note: The screws are designed to cut threads into the Lock body as they are installed.
- Proceed to Cam Installation (Section III).
Standard Hardware Provided

10-24 x 1/4" Cam Screw, combination drive (1)

10 Round flat washer (1)

6-32 x 5/16" Body Screw, T15 torx drive (4)
Available Hardware

180° Stop Washer

90° Stop Washer
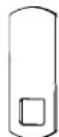
Straight Cam
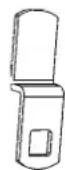
Offset Cam
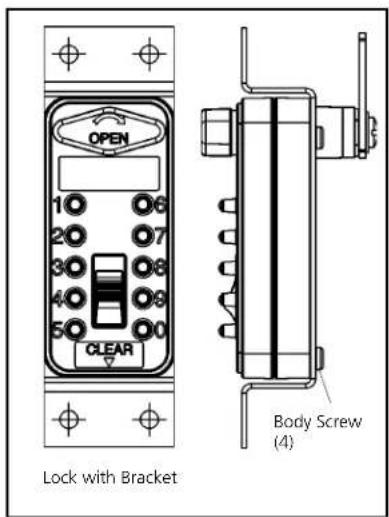
Option B - Flush Mount with Bracket, Sheet Metal Cabinet Use Option B for the following models ONLY:
001764, 001765, 001766, 001767, 001768, 001773, 001786, 001787, 001788, 001789, 001790, 001798
Mounting the Lock using the flush mount option requires the use of a mounting bracket.
- Use Template B to determine the dimensions and hole locations.
- Position the Lock and mounting bracket in place and install the four #6-32 torx Body Screws through the bracket into the Lock body and tighten. Do not exceed 15 in-lb. of torque.
Note: The screws are designed to cut threads into the Lock body as they are installed. - Attach the mounting bracket to the panel with your choice of fasteners through the four holes at the outer corners of the bracket.
- Proceed to Cam Installation (Section III).
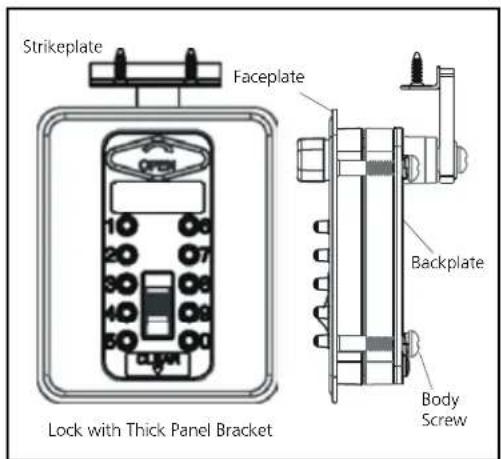
Option C - Flush Mount with Bracket, Thick Panel
Use Option C for the following models ONLY:
001827, 001828, 001829, 001830, 001831, 001832, 001833, 001834
This mounting option is intended for panels of 3/4" (± 1/16") thickness and requires the use of a thick panel bracket.
- Use Template C to determine the dimensions and hole locations; make sure the cam outline extends 1/4" beyond the door edge.
- Cut the hole for the Lock and four corner holes using the template as a guide.
-
Mount the backplate to the Lock using the four body screws; torque should not exceed 15 in-lbs.
-
Position the faceplate flush to the front of the cabinet, aligning the plate with the four corner holes.
-
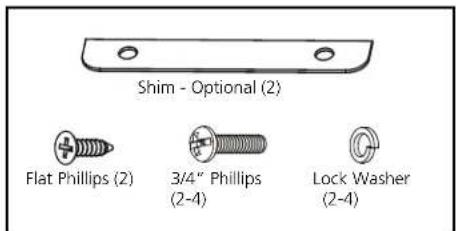
Insert the Lock with backplate into the large hole through the back side of the cabinet. Check for any gaps between the backplate and cabinet. If a gap is present, use the shims provided to fill the space between the backplate and cabinet.
-
Attach the backplate to the faceplate by installing the four Phillips screws and lock washers into the four corner holes in the backplate and tightening.
-
To mount the strikeplate, measure 1.35" in from the cabinet face and cut a rectangular hole. Drill two 1/16" pilot holes and mount with the two flat phillips screws.
-
Proceed to Cam Installation (Section III).
III. Cam Installation
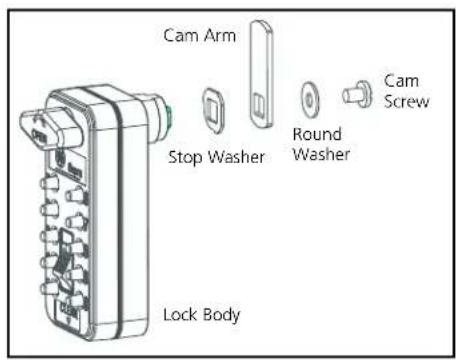
The Lock includes a camshaft which extends from the back of the Lock body and ends in a 5/16" square protrusion, designed to mount and orient the cam arm. An optional 90° or 180° stop washer must be used between the cam arm and Lock body to limit the rotation of the cam.
The stop washer, cam arm, and round washer are secured to the Lock using the 10-24 Cam Screw.
IV. Clutch
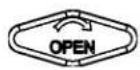
The Lock contains a clutch mechanism that guards against forced entry. If the clutch becomes disengaged during the use of this product, simply rotate the Open lever to its home position to reset the clutch.
V. After Installation is Complete
Follow the TouchPoint Pushbutton Lock Instructions to set the combination for the lock. Do not set the code with the Lock in the open position.
VI. Template Cutouts
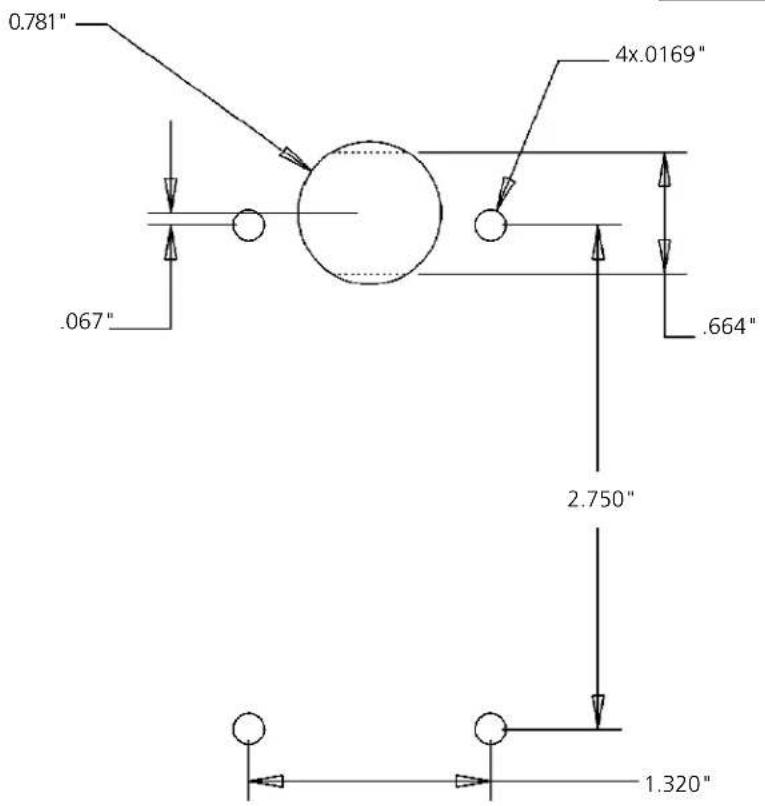
Template A - Top Mount
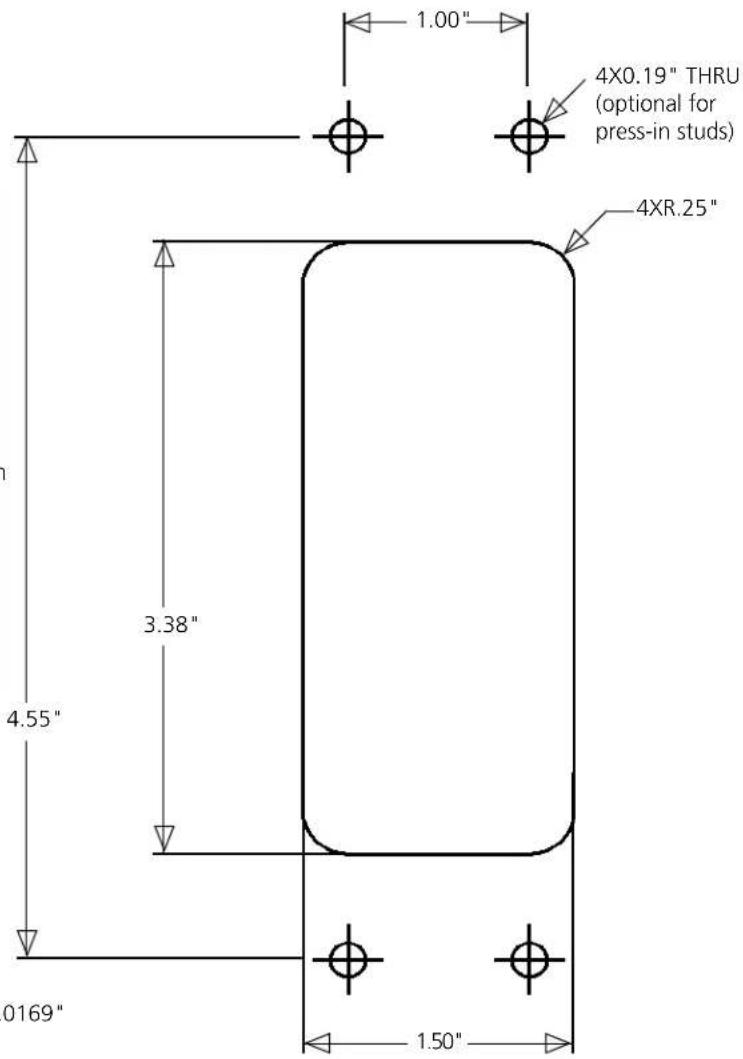
Template B - Sheet Metal Bracket
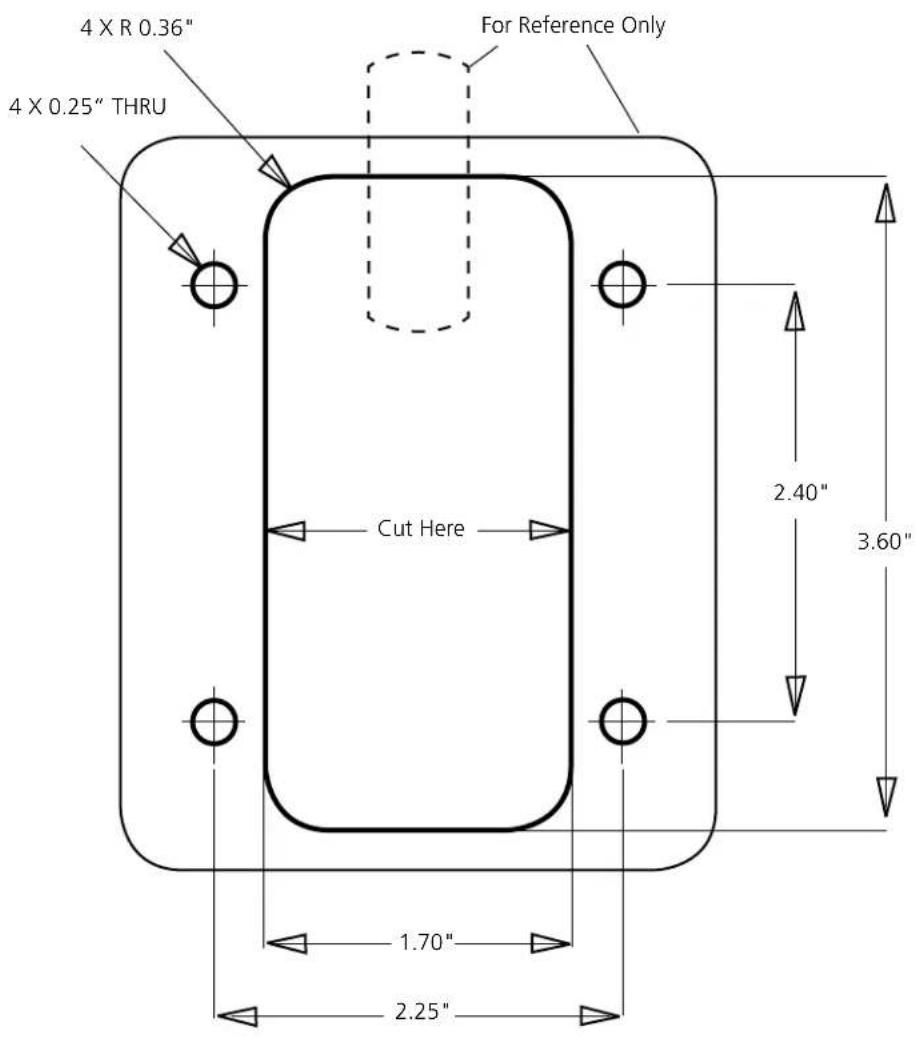
Template C - Thick Panel Bracket, Vertical Mount
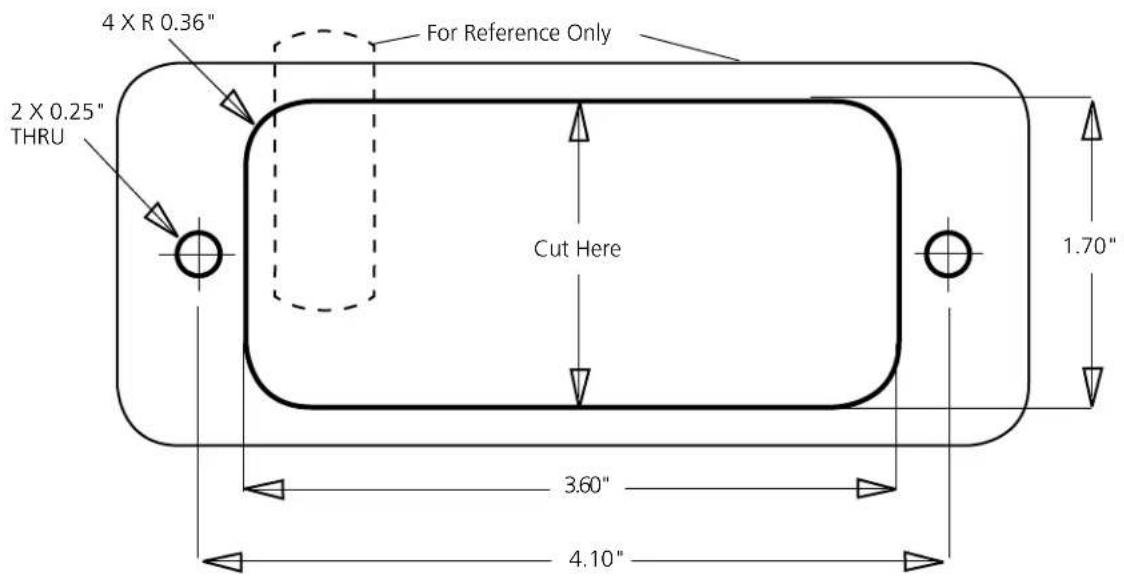
Template C - Thick Panel Bracket, Horizontal Mount
- Mounting Instructions
- Tools Needed/Recommended:
- Mounting Options:
- Mounting Instructions
- Option A - Top Mount
- Standard Hardware Provided
- 10-24 x 1/4" Cam Screw, combination drive (1)
- Round flat washer (1)
- 6-32 x 5/16" Body Screw, T15 torx drive (4)
- Available Hardware
- Option C - Flush Mount with Bracket, Thick Panel
- Cam Installation
- Clutch
- After Installation is Complete
- Template Cutouts
Brand : KIDDE
Model : AccessPoint 001827
Category : Lock