
Dcode SB-4 - Measuring instrument Denecke - Free user manual and instructions
Find the device manual for free Dcode SB-4 Denecke in PDF.


| Product Type | Timecode Slate |
| Brand | Denecke |
| Model | Dcode SB-4 |
| Display | Large bright LED digits for timecode and user bits |
| Timecode Formats | 30 fps ND, 29.97 fps DF/ND, 25 fps, 24 fps |
| Inputs | BNC timecode input, XLR audio input |
| Outputs | BNC timecode output, XLR audio output |
| Power Source | 2 x AA batteries (alkaline or NiMH) or external 5V DC |
| Battery Life | Approximately 8 hours with alkaline batteries |
| Dimensions | 11.5 x 7.5 x 2.5 inches (approx.) |
| Weight | 1.2 lbs (without batteries) |
| Construction | Rugged aluminum chassis with protective bumpers |
| Operating Temperature | 32°F to 104°F (0°C to 40°C) |
| Cleaning | Wipe with a dry, soft cloth. Do not use solvents. |
| Safety Warnings | Avoid exposure to moisture and extreme temperatures. Use only recommended batteries. |
| Spare Parts | Battery compartment cover, mounting bracket, AC adapter |
| Repairability | Repairs should be performed by authorized Denecke service centers. |
| Included Accessories | XLR cable, BNC cable, carry case, manual |
| Warranty | 1 year limited warranty |
Frequently Asked Questions - Dcode SB-4 Denecke
User questions about Dcode SB-4 Denecke
0 question about this device. Answer the ones you know or ask your own.
Ask a new question about this device
Download the instructions for your Measuring instrument in PDF format for free! Find your manual Dcode SB-4 - Denecke and take your electronic device back in hand. On this page are published all the documents necessary for the use of your device. Dcode SB-4 by Denecke.
USER MANUAL Dcode SB-4 Denecke
Denecke SB-4 User's Manual
DENECKE DCODE® SB-4 SYNCBOX® TIMECODE GENERATOR USER'S MANUAL
Introduction
The Dcode® SB-4 is designed to replace the SB-3 in the Denecke line of Timecode Generators. The SB-4 features a display and menu system, which allows for ease of use and display of timecode and settings. It reads, generates and jam syncs to all standard frame rates including 23.976 for High Definition shoots. The SB-4 features an automatic jam sync capability, which re-jams to any break in Timecode without the need to power down. Cross jamming of different rates can be accomplished. The advanced Temperature Compensated Crystal Oscillator (TCXO) has ten times the frequency stability than previous products, eliminating the need to jam more than once per day.
Features
- Generates and Jam Syncs to all common SMPTE Timecode frame rates.
• Cross jam regardless of incoming frame rates. - Sunlight-readable display with backlight.
- Jam from an external timecode source, or set it internally and use as a standalone generator.
- Continuously jams to new code so there is no need to power down the unit to re-jam.
- Provides indication of drift/inaccuracy between SB-4 and a timecode input signal.
- Selectable TC output levels, eliminating the need for external output reduction pads.
- Easy-to-use menu system and display of timecode.
- Runs on 2 AAA batteries or external power connection.
- Simple to set up
- Reprogrammable for new features and updates, via both Mac and Windows.
• Very high stability crystal ensures low drift. - Low and Dead battery warning.
Denecke SB-4 User's Manual
SB-4 Diagram
The figure below depicts the main external components of the SB-4.

- Battery Compartment
- Display with Backlight
- LED
- Joystick / pushbutton
- 5-pin LEMO Connector (TC IN, TC OUT, Ext. Power)
- BNC Connector (TC OUT)
- Micro USB Connector for Reprogramming
Denecke SB-4 User's Manual
Quick Start Guide
The following are Quick Start instructions which will get one started for most setups. Further details are provided in the rest of the manual and in online tutorial videos at http://www.denecke.com/
- Batteries: Insert two AAA batteries per polarity shown on the unit.
- Connections: Use LEMO connector for Timecode: TC IN, TC OUT, and External Power. BNC Connector also provides TC OUT.
• Power On: Press the joystick/select button in. - Menu Unlock: To unlock the Top Menu Level, press the Down button for 3 sec.
- Menu Show / Hide: Toggles with press of the joystick button at Top Menu Level.
- Menu Navigation: Use the joystick to scroll Up and Down, and Select by pressing in. When in menus, push Left to go back up a menu level.
- Backlight On/Off: From Menu Hidden screen, push joystick up to toggle on/off. Backlight will timeout per the Backlight Timer setting.
- Set Mode: From Main Menu, select Mode, then select desired setting. If jamming once without Cross Jamming, set to Auto Jam Once. If used as Stand Alone TC Generator, set to Generate. See Menu settings for further information.
- Set Frame Rate: From Main Menu, select Frame Rate, then select desired rate.
- User Bits: Often used for the date, this will typically be sent in the timecode stream when jammed, and can be viewed by pushing the joystick Right from the Menu Hidden screen. For Generate Mode, see User Bits Menu section.
- Connect and Go: Once set up, simply connect the SB-4 to the Master Timecode Generator, and jamming occurs.
- Indications: Once jam synced (or generating), timecode will be displayed and the LED will flash once per second (on Frame 00).
- Power Off: Powering off the unit will lose timecode sync, but will preserve all User Settings. From the Main Menu, scroll Down to Power Off, then select Turn Power Off, and select by pressing joystick button in.
- Battery Low is indicated by LED flashing twice per second.
- Battery Dead flashes the LED at three times per second.
Batteries
| Requires two AAA batteries.Insert batteries as shown.Polarity, facing outward: Left side: (-). Right side: (+).Note: when powered externally, no charging of rechargeable batteries is provided. |  |
Connections
| 5-pin LEMO Connector:The 5-pin LEMO connector provides connections for Timecode In, Timecode Out and External Power.Note: Connections to Ground are required when connecting to Timecode and External Power. | LEMO Pin No. | Function |
| 1 | Ground | |
| 2 | SMPTE Timecode In | |
| 4 | Ext. Power In (6-18 VDC) | |
| 5 | SMPTE Timecode Out |
| Chassis female pin-out (looking into front of connector mounted on chassis): Red dot indicates Pin 1. |  |
| Cable male pin-out (looking into front of connector at the end of user-supplied cable): Red dot indicates Pin 1. |  |
| BNC Connector:The BNC connector provides Timecode Out.Note: The SB-4 is capable of driving two TC OUT loads, so it is possible to connect TC OUT at both the LEMO and BNC connectors, if desired. |  | Tip = TC OutShield= Ground |
| Micro USB: A micro USB connection is provided for program updates and provides external power. | 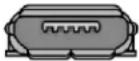 |
Joystick
Control of the SB-4 is achieved through a simple joystick / button.
To turn on the unit, press the button in.
At the top (main) level:
- Up to turn ON/OFF the backlight
• Right to view User Bits - Left to view drift value
- Down 3 seconds to unlock the main menu
- Press the button in to show the main menu (when menu unlocked).
In a menu:
- Up & Down to navigate
- Press button to select the desired setting
- Left to go back up one menu level
LEFT / DRIFT / BACK
Indicates battery and sync/internal run status.
| When the LED is off, the box is not generating timecode. Note: LED is illuminated for one second at power-up. |  | |
| The LED (green) indicates whether the SB-4 is in either jam sync mode or internal run mode. The LED flashes once per second (at the start of the frame 00) when in jam sync mode or internal run mode. |  | 1/second |
| Two flashes per second indicates battery low. |  | 2/sec., double blink rate |
| Three flashes per second indicates battery dead. The batteries should be replaced as soon as possible when dead battery is indicated. |  | 3/sec., triple blink rate |
Display
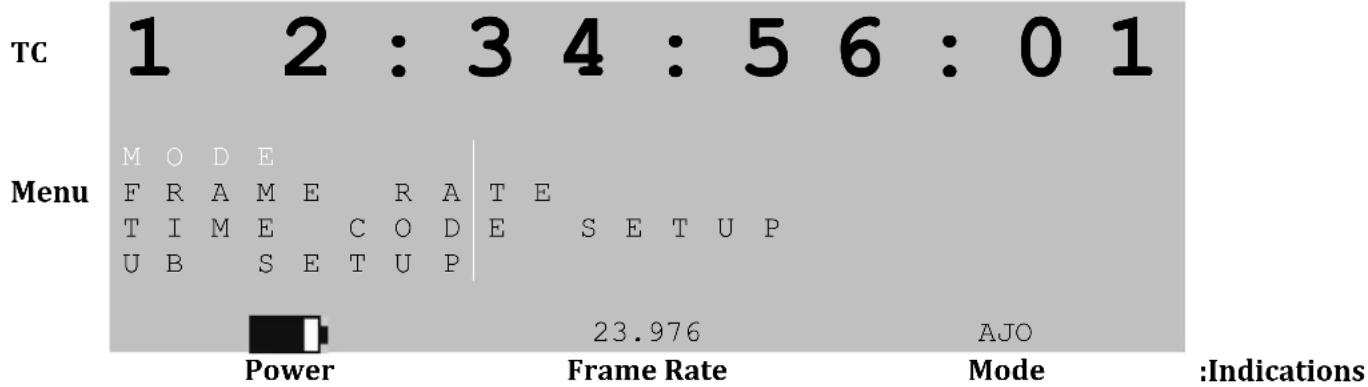
After unlocking the menu, pressing the joystick button in (selecting), toggles the display between showing and hiding the Main Menu.
Here is the display with Menu shown:
other
| Time | Power | Frame Rate | Mode | |------|-------|------------|------| | 1 | 23.976 | 23.976 | AJO |In the figure above, the first four menu selections are shown. Use the joystick to scroll Down to access more selections.
Menu Selections
THE FOLLOWING APPLIES TO ALL MENUS:
- The Main Menu is unlocked by pressing the Down Button for 5 seconds.
- All menu selections in this section assume starting with Main Menu Shown (by pressing joystick button in, after menu is unlocked, if the Main Menu is not visible, on the top level.)
- In each sub-menu, the presently-selected item is indicated by a *.
- Use the joystick to scroll Up and Down to the desired selection (indicated by white characters on a darker gray background)
- Choose your selection by pressing the joystick button in.
- After the choice is made, Indications will appear on the last line of the display for Mode and Frame Rate, as shown in the figure above, using abbreviations shown in the Indications section of this manual.
- After making a selection in a menu, the SB-4 automatically leaves the Menu screen (depress joystick button to return to Main Menu, if desired). If no selection is desired, select Exit to return to Main Menu, or push the joystick Left, to go back up a menu level. When the Main Menu is exited, the menu lock will engage after 10 seconds of switch inactivity.
Denecke SB-4 User's Manual
To access the Mode menu, scroll to MODE and select, by pressing joystick button in.
MODE
The Mode menu has the following choices:
| A | U | T | O | J | A | M | O | N | C | E | |||
| A | U | T | O | J | A | M | C | O | N | T | |||
| J | A | M | O | N | C | E | |||||||
| J | A | M | C | O | N | T | I | N | U | O | U | S | |
| G | E | N | E | R | A | T | E | ||||||
| R | E | A | D | I | N | P | U | T | |||||
| E | X | I | T |
- Auto Jam Once (AJO) is the most common mode used to sync the SB-4 to a TC IN signal. Connecting TC IN in this mode automatically jam syncs once to the Frame Rate of the incoming signal (the Frame Rate selected in the menu is ignored). The Indication portion of the display indicates the Frame Rate, and the LED flashes once per second at Frame 00.
- Auto Jam Continuous (AJC) is used like AJO, except that it rejams (after the initial jam) when new TC is plugged into the TC IN. After a TC drop out (removal of TC IN or anytime there is a break in the clock of the input timecode), the SB-4 will rejam when new code is at its input. This prevents having to re-enter the menu system to rejam the box.
- Jam Once (JO) is used when the operator sets the Jam Rate (see Frame Rate section) for TC OUT, regardless of the TC IN rate. Jamming occurs when TC IN is connected. Cross Jam: Jamming of different frame rates can be accomplished. The SB-4 is capable of cross jamming any selected rate to any TC IN rate. * When Cross Jamming, the Indication changes to "XJO". The LED and TC display are, as usual, in sync with TC OUT.
*Note: Integer (24,25,30) and non-integer rates (23.976, 29.970) are not compatible with one another for Cross Jamming.
- Jam Continuous (JC) is used like JO, except that it rejams (after the initial jam) when new TC is plugged into the TC IN. After a TC drop out (removal of TC IN), the SB-4 will rejam when new code is at its input. This prevents having to re-enter the menu system to rejam the box.
Cross Jam: See explanation under Jam Once, above. When Cross Jamming is selected, the Indication changes to "XJC".
Denecke SB-4 User's Manual
- Generate (GEN) is used when the SB-4 is used as the Master Clock Generator. The very accurate internal Temperature Controlled Oscillator provides a free-running TC OUT at the rate set in the Frame Rate menu, with initial TC and User Bits set by the corresponding menus. The LED flashes once per second (at Frame 00).
- Read Input (RD) Reads SMPTE/EBU timecode at normal operating speeds. It is used to determine the Timecode value, Frame Rate, and User Bits of a connected TC IN signal. This handy SB-4 feature then displays Timecode value at the top of the screen, the Frame Rate of the incoming signal in the Indications portion of the display, and will display User Bits when that reading is selected (see UB Reading Section). The input timecode is re-shaped and sent to the output connectors. If TC IN is invalid or not present, indication INV is displayed.
- After making a selection, the SB-4 automatically leaves the Menu screen (depress joystick button to return to menus, if desired). If no selection is desired, select Exit, or push the joystick Left, to go back up to Main Menu. When the Main Menu is exited, the menu lock will engage after 10 seconds of switch inactivity.
To select Frame Rate, scroll down to that menu row and select, by pressing joystick button in.
| FRAME RATE |
The Frame Rate selection choices, in Frames Per Second (FPS) are shown below:
| 3 | 0 | |||||
| 2 | 9 | . | 9 | 7 | 0 | |
| 2 | 5 | |||||
| 2 | 4 | |||||
| 2 | 3 | . | 9 | 7 | 6 | |
| 3 | 0 | D | F | |||
| 2 | 9 | . | 9 | 7 | 0 | D F |
| E | X | I | T |
DF indicates Drop Frame Modes. Note: In AJO and AJC modes, TC OUT is automatically set to the same rate as TC IN, so it is not necessary to set the Frame Rate, since this setting is ignored.
To select Timecode Setup, scroll down that menu row and select.
| TIME CODE SETUP |
Denecke SB-4 User's Manual
The first two choices will activate sub-menus:
| S | E | T | T | I | M | E | C | O | D | E | ||||
| T | C | O | U | T | P | U | T | L | E | V | E | L | ||
| E | X | I | T |
In Generate Mode, scroll to TIME CODE SETUP and select.
| S | E | T | T | I | M | E | C | O | D | E |
Set Time Code is used for Generate Mode only, when this SB-4 is used as the Master time source, which other devices will be synced to. As a starting point, it can be set to the Time Of Day (but will then continue at the selected Frame Rate). Note: see the User Bits section to set Date, if desired.
Set Time Code:
| HOURS | MINUTES | SECONDS | FRAMES |
| 1 2 : 3 4 : 5 6 : 0 1 | |||
| L - R TO SELECTU - D TO CHANGEPUSH TO A C C E P T | |||
When selected, the numbers will flash in pairs. Press the joystick button Up or Down to change the value. Press the joystick Left or Right, to select each pair. When complete, push the joystick button in, to accept the setting.
Entering Set Time Code Menu will stop the timecode and allow setting of new time and frame rate. This will offset the timecode. Be sure to re-jam any slave devices.
For reduced TC Output levels, scroll to TC OUTPUT LEVEL and select.
| T | C | O | U | T | P | U | T | L | E | V | E | L |
The choices are:
Some external devices require reduced timecode signal levels. This feature provides that, eliminating the need for external pads, to make the TC Output compatible.
To select User Bits Setup, scroll down that menu row and select USER BITS SETUP.
| USER BITS SETUP |
10
Denecke SB-4 User's Manual
The first two choices will activate a sub-menu:
| S | E | T | U | S | E | R | B | I | T | S | |||
| R | O | L | L | O | V | E | R | S | E | T | U | P | |
| E | X | I | T |
Scroll to SET USER BITS and select.
| S | E | T | U | S | E | R | B | I | T | S |
Set User Bits:
| UB FIELD 4 | UB FIELD 3 | UB FIELD 2 | UB FIELD 1 | ||||||||
| 0 | 7 | : | 0 | 4 | : | 1 | 6 | : | 0 | 0 | |
| L | - | R | T | O | S | E | L | E | C | T | |
| U | - | D | T | O | C | H | A | N | G | E | |
| P | U | S | H | T | O | A | C | C | E | P | T |
When selected, the numbers will flash in pairs. Press the joystick button Up or Down to change the value. Press the joystick Left or Right, to select each pair. When complete, push the joystick button in, to accept the setting. Note: the numbering system above x9 for each pair is "hexadecimal", per the SMPTE standard, and continues for each character from letters A-F. Simply continue pressing the joystick Up to get through these numbers to the normal 0-9 characters, as needed.
It is a common Industry practice (but not required) to set User Bits to the date. In the example above, the date shows July 4th, 2016. The date will automatically roll over after the Timecode reaches 23:59:59:xx. Which UB pair rolls over, for various date styles, is set per the next section.
Scroll to ROLLOVER SETUP and select.
| ROLLOVERSETUP |
The UB Rollover choices available are:
| U | B | F | I | E | L | D | 1 | ||||||
| U | B | F | I | E | L | D | 2 | ||||||
| U | B | F | I | E | L | D | 3 | ||||||
| U | B | F | I | E | L | D | 4 | ||||||
| N | O | U | B | R | O | L | L | O | V | E | R | ||
| E | X | I | T |
As mentioned in the last section, it is common Industry practice to use User Bits for the date. When using American-style dates, MM-DD-YY-00, select UB Field 3 (which is the factory default) to roll the DAY field. When using the alternate style dates, DD-MM-YY-00, select UB Field 4. In the event that User Bits are not being used for the date, it would not
Denecke SB-4 User's Manual
be desirable to have any UB field roll over after 23:59:59:xx. In this case, select No UB Rollover.
To change timer for the Backlight, scroll down to BACKLIGHT TIMER and select.
| BACKLIGHT TIMER |
The choices are:
| 1 | 0 | S | E | C | O | N | D | S | ||
| 3 | 0 | S | E | C | O | N | D | S | ||
| 1 | M | I | N | U | T | E | ||||
| 1 | 0 | M | I | N | U | T | E | S | ||
| N | O | T | I | M | E | O | U | T | ||
| E | X | I | T |
The backlight timer turns off the backlight after the selected amount of time. One can always turn the backlight on or off at the top level, with no menu shown by pressing the joystick Up. 30 seconds is the factory default, and, of course, conserves battery power. NO TIME OUT will disable the backlight timer, so the backlight will stay on indefinitely, until turned off by pressing the joystick Up with no menu shown. (Note: this mode will significantly reduce battery life).
Note: when the unit is powered externally (by either Ext Power or USB), the backlight remains on, for convenience, by default. To turn it off, press the joystick Up with no menu shown.
To change the Battery Chemistry, scroll to BATTERY TYPE
| B A T T E R Y T Y P E |
Then choose the battery chemistry desired:
| A | L | K | A | L | I | N | E | |
| L | I | T | H | I | U | M | ||
| N | I | M | H | |||||
| E | X | I | T |
Note: This selection will change the scale of the Battery Gauge Icon.
To power the unit off, scroll to POWER OFF
| POWER OFF |
Denecke SB-4 User's Manual
Then choose Turn Power Off, if desired:
| T | U | R | N | P | O | W | E | R | O | F | F | ||
| C | A | N | C | E | L | ||||||||
| E | X | I | T |
Note: powering off the SB-4 will cause it to loose sync with Timecode, but all User Settings will be retained by the unit's built-in memory.
If needed, scroll to REPROGRAM and select
| REPROGRAM |
Choices are Return to Factory Default and Reprogram Via USB:
| F | A | C | T | O | R | Y | D | E | F | A | U | L | T | |
| S | T | A | R | T | U | S | B | |||||||
| C | A | N | C | E | L |
To set the SB-4 to its Factory Default settings, removing User-selected settings, select Factory Default. Factory Default Settings are shown in a table at the end of this manual.
From time to time, Denecke may make software updates available, for added features, bug corrections, and improvements, as needed. To determine if your SB-4 needs an update, compare the Software Version shown in the About Menu below to that shown on the Denecke website, http://www.denecke.com/, which will also provide update details. To update Software:
-
The SB-4 can be updated from either a Mac or Windows computer. The Denecke Firmware Update Utility can be downloaded from http://www.denecke.com/.
-
On your computer, go to http://www.denecke.com/ to download the latest SB-4 Software Version.
-
On the SB-4, select START USB
-
Connect a USB cable between the SB-4's Micro USB connector and a computer.
-
On the computer, start the Denecke Firmware Update Utility, select the latest SB-4 software version, and select UPDATE.
NOTE: Do not disconnect the USB cable from the SB-4 nor computer until the update is complete, to avoid having to send the unit back for repair.
- The computer will indicate when update is complete.
To determine the version, serial number, etc., scroll to ABOUT, and select.
| A B O U T |
Denecke SB-4 User's Manual
Information shown is:
| M | O | D | E | L | : | S | B | - | 4 | |
| H | W | V | E | R | : | x | . | x | ||
| S | W | V | E | R | : | x | . | x | ||
| S | N | : | n | n | n | n | ||||
| W | W | W | . | D | E | N | E | C | K | E . C O M |
As discussed in the Reprogram section, the S/W Version can be compared to the latest on the Denecke website, to determine if an update is needed.
For online access to this manual, plus tutorial videos, information on all Denecke products, and the information for technical support, please go to http://www.denecke.com/

Any menu can be exited from by selecting EXIT, or by pressing the joystick Left.
Indications
Battery Life / External Power Indication:
ONE of the following battery / power indications will be shown:

When on battery power, the remaining battery life will be shown as a Battery Gauge. This user selectable gauge is calibrated to 1.5V batteries, like Alkaline and Lithium-Ion, or rechargeable 1.2V batteries such as NiMH. See LED section for LED indications corresponding to Battery Low and Battery Dead flashing indications.
When powered externally via the LEMO External Power connection, it will read EXT.
When powered via the USB connection, it will read USB.
Note: when powered by both USB and EXT, it will read USB. Also note that the internal batteries are protected from external power and do not need to be removed.
Frame Rate Indication:
ONE of the following Frame Rate indications will be shown:
| 3 | 0 | ||||
| 2 | 9 | . | 9 | 7 | 0 |
| 2 | 5 | ||||
| 2 | 4 | ||||
| 2 | 3 | . | 9 | 7 | 6 |
| 3 | 0 | D | F | ||
| 2 | 9 | D | F | ||
| I | N | V |
Denecke SB-4 User's Manual
These are in Frames Per Second, as described in the Frame Rate Menu section earlier in the manual. 30DF=30 Drop Frame and 29DF=29.970 Drop Frame.
When using the Read Input Mode, if no valid TC IN is present at the connector, an Invalid reading is indicated by INV.
Note: When cross jamming, the Frame Rate shown is the User-selected TC OUT Rate.
Note: When in the Read Input Mode, the TC IN rate is shown in the Frame Rate indication.
Mode Indication:
ONE of the following Mode indications will be shown:
| A | J | O |
| A | J | C |
| J | O | |
| J | C | |
| X | J | O |
| X | J | C |
| G | E | N |
| R | D |
See the Mode Selection section earlier in this manual for full explanations of modes. AJO = Auto Jam Once, AJC = Auto Jam Continuous, JO = Jam Once, JC = Jam Continuous, XJO = Cross Jammed Once, XJC = Cross Jammed Continuous, GEN = Generate, RD = Read.
Cross Jam Mode Indications:
If the SB-4 is set to either Jam Once (JO) or Jam Continuous (JC) mode, it can jam sync between any TC Input Rate and any Output Rate. When this occurs and the rates are not the same, Cross Jamming is indicated by XJO or XJC. The Frame Rate Indication will indicate the User-selected TC OUT Frame Rate. To determine Input Rate of a connected TC IN, see the Read Mode section.
Additional Indications:
Drift (Delta) Measurement Reading:
The SB-4 can be used for finding offsets and drift with its internal error display.
With no Menu shown, Drift measurement can be displayed by pushing the joystick Left.
The SB-4 has the ability to read a connected TC IN, and compare it to its internal Timecode value, and to calculate the Drift difference between the two.
Denecke SB-4 User's Manual
The drift is shown in two rows:
The first row is in hundredths of frames. A number preceded by a plus or minus sign indicates there is a difference between TC IN and internal TC (TC OUT). When TC IN is ahead of the SB-4's Internal (and TC OUT) value, a positive delay is indicated by a plus sign in front of the number. When TC IN is lagging behind the SB-4's internal time (and TC OUT) value, a negative delay is indicated by a minus sign in front of the number.
The second row is in HR:MIN:SEC:FRM format.
Note that in AJO and AJC modes, when TC IN is connected, it automatically rejams, so the drift reading will always be zero.
User Bits Reading:
With no Menu shown, User Bits can be displayed by pressing the joystick Right.
See User Bits Menu Section for more information.
Factory Default Settings
| Mode | Auto Jam Once |
| Frame Rate | 23.976 |
| Timecode Setup:TC Output Level | 0 dB |
| UB Setup:Start UBRollover Setup | 00:00:00:00UB Field 3 (for American Date Standard MM-DD-YY-00, to rollover days) |
| Backlight Timer | 30 seconds |
Denecke SB-4 User's Manual
Specifications
| TC Input: | -15dB (0.5V to 5V) @ 4.7K; LEMO Connector |
| TC Output: | Selectable from 0 dB (2.0V), -6 dB (1.0V), -12 dB (0.50V) and -20 dB (0.20V);LEMO & BNC Connectors |
| TCXO Crystal: | +/- 0.1PPM @ -40° to +85° C (less than a half frame drift per day) |
| Battery Power: | 2 “AAA” Batteries |
| Battery Life: | 30+ Hours. Approximately 15+ Hours with Back Light Continuously ON |
| External Power: | 6 to 18 Volts DC, via LEMO Connector5V, via Micro USB Connector |
| Size: | 2.5” (W) x 2.2” (H) x 1.0” (D) (63.5mm x 55.9mm x 25.4mm) |
| Weight: | 4 oz. (without batteries) |
Contents
Included with the SB-4 is a USB cable, and this User's Manual.
Custom cables are available. Contact Denecke Dealers for details.
Denecke SB-4 User's Manual

DENECKE, INC.
25209 Avenue Tibbitts * Valencia, CA 91355 * (661)607-0206
www.denecke.com * email: info@denecke.com


- DENECKE DCODE® SB-4 SYNCBOX® TIMECODE GENERATOR USER'S MANUAL
- Introduction
- Features
- Denecke SB-4 User's Manual
- SB-4 Diagram
- Quick Start Guide
- Batteries
- Connections
- Joystick
- Display
- Menu Selections
- THE FOLLOWING APPLIES TO ALL MENUS:
- The choices are:
- Then choose the battery chemistry desired:
- To power the unit off, scroll to POWER OFF
- Information shown is:
- Indications
- Battery Life / External Power Indication:
- Frame Rate Indication:
- Mode Indication:
- Cross Jam Mode Indications:
- Additional Indications:
- Drift (Delta) Measurement Reading:
- User Bits Reading:
- Contents
Brand : Denecke
Model : Dcode SB-4
Category : Measuring instrument