DT 65 - Rangefinder PCE Instruments - Free user manual and instructions
Find the device manual for free DT 65 PCE Instruments in PDF.


| Product Type | Contact and Non-Contact Tachometer |
| Model | DT 65 |
| Display | 5-digit LCD with backlight |
| Accuracy | ±(0.05% + 1 digit) |
| Contact RPM Range | 2 to 20,000 RPM |
| Non-Contact RPM Range | 2 to 99,999 RPM |
| Revolution Range (REV) | 1 to 99,999 |
| Resolution | 0.1 RPM (2 to 9,999.9 RPM), 1 RPM (≥10,000 RPM) |
| Sampling Time | 0.5 seconds (≥120 RPM) |
| Detecting Distance (Non-Contact) | 50 mm to 500 mm |
| Measurement Modes | RPM, rpm, Hz, M/M, I/M, F/M, Y/M, REV, M, In, FT, Yd |
| Memory | 40 readings: 10 MAX, 10 MIN, 10 AVG, 10 DATA |
| Laser Sighting | Yes (Class II laser) |
| Time Base | Quartz crystal |
| Power Supply | 9V battery (approx. 45 mA consumption) |
| Operating Temperature | 0°C to 50°C (32°F to 122°F) |
| Dimensions (Approx.) | 150 x 60 x 30 mm |
| Weight (Approx.) | 200 g (including battery) |
| Maintenance | Keep dry; avoid liquids and moisture; remove battery if not used for extended periods |
| Safety | Do not point laser at eyes; avoid looking directly into beam |
| Spare Parts / Accessories | Contact adapters, reflective tape, 9V battery (all included) |
| Warranty | Refer to manufacturer's warranty policy |
Frequently Asked Questions - DT 65 PCE Instruments
User questions about DT 65 PCE Instruments
0 question about this device. Answer the ones you know or ask your own.
Ask a new question about this device
Download the instructions for your Rangefinder in PDF format for free! Find your manual DT 65 - PCE Instruments and take your electronic device back in hand. On this page are published all the documents necessary for the use of your device. DT 65 by PCE Instruments.
USER MANUAL DT 65 PCE Instruments
Contact/Non-Contact Tachometer Instruction Manual
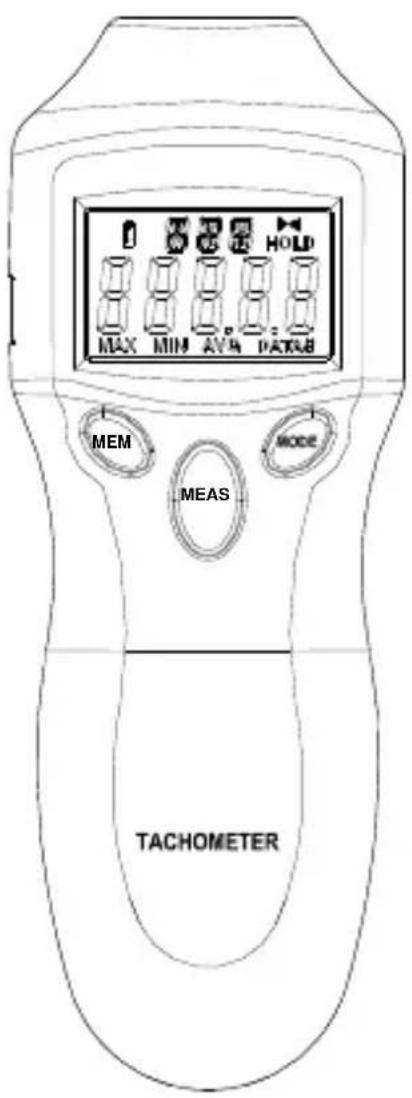
1 FEATURE
* The Digital Tachometer provides fast and accurate Contact and Non-Contact RPM and surface speed measurements of rotating objects.
* Measurement type: Rotation Speed (RPM,rPm), Total revolutions (REV), Frequency(HZ), Surface Speed(M/M,I/M,F/M,Y/M) and Length(M,In,FT,Yd).
* Wide measure range and high resolution.
* High visible digital LCD and Backlight display.
* 40 reading memories : 10 selectable MAX measurements, 10 selectable MIN measurements, 10 selectable AVG measurements, 10 selectable DATA measurements.
* Laser sighting.
2 SPECIFICATIONS
Display: 5 digits LCD display.
Accuracy: ±(0.05%+1 digits).
Contact Test rang: 2 to 20,000RPM
Non-Contact Test rang: 2 to 99,999RPM
Tot test rang: 1 to 99,999.
Resolution: 0.1 RPM (2 to 9999.9 RPM).
1 RPM. (over 10000 RPM)
Sampling time: 0.5 sec. (over 120 RPM)
Detecting distance: 50mm to 500 mm.
Time base: Quartz crystal
Power consumption: Approx 45mA
Battery: 9V
Operation temp: 0^ C to 50^ C(32 to 122^ F)
3 Operation
* Flip open the battery compartment cover and install a 9V Battery.
* Non-Contact: Stick the self-adhesive reflective tape on the object whose rotational speed is to be measured. The reflective tape should be stocked as close to the outer edge of the object to be measured as possible.
* Contact: Attach the contact adapter to the tachometer. Select the adapter included and slides it onto the shaft of the contact adapter. Align the adapter with the alignment pin on the shaft of the contact adapter.
* Press the “MEAS” button .Point the laser spot at the object or bring the contact probe to the object .Then read the measurement on the LCD display.
4 Function Description
In scan mode, the current measurement is displayed on the main display. The main display will hold the last values until the tachometer automatically turns off.
* Data Storage: Press the “MEAS” button until the reading displayed on the LCD display. Observe the reading and press the “MEM” bottom to record. The maximum, minimum, average and data during one shot measurement will be stored into a memory set. Then the Data numer will increase by one.
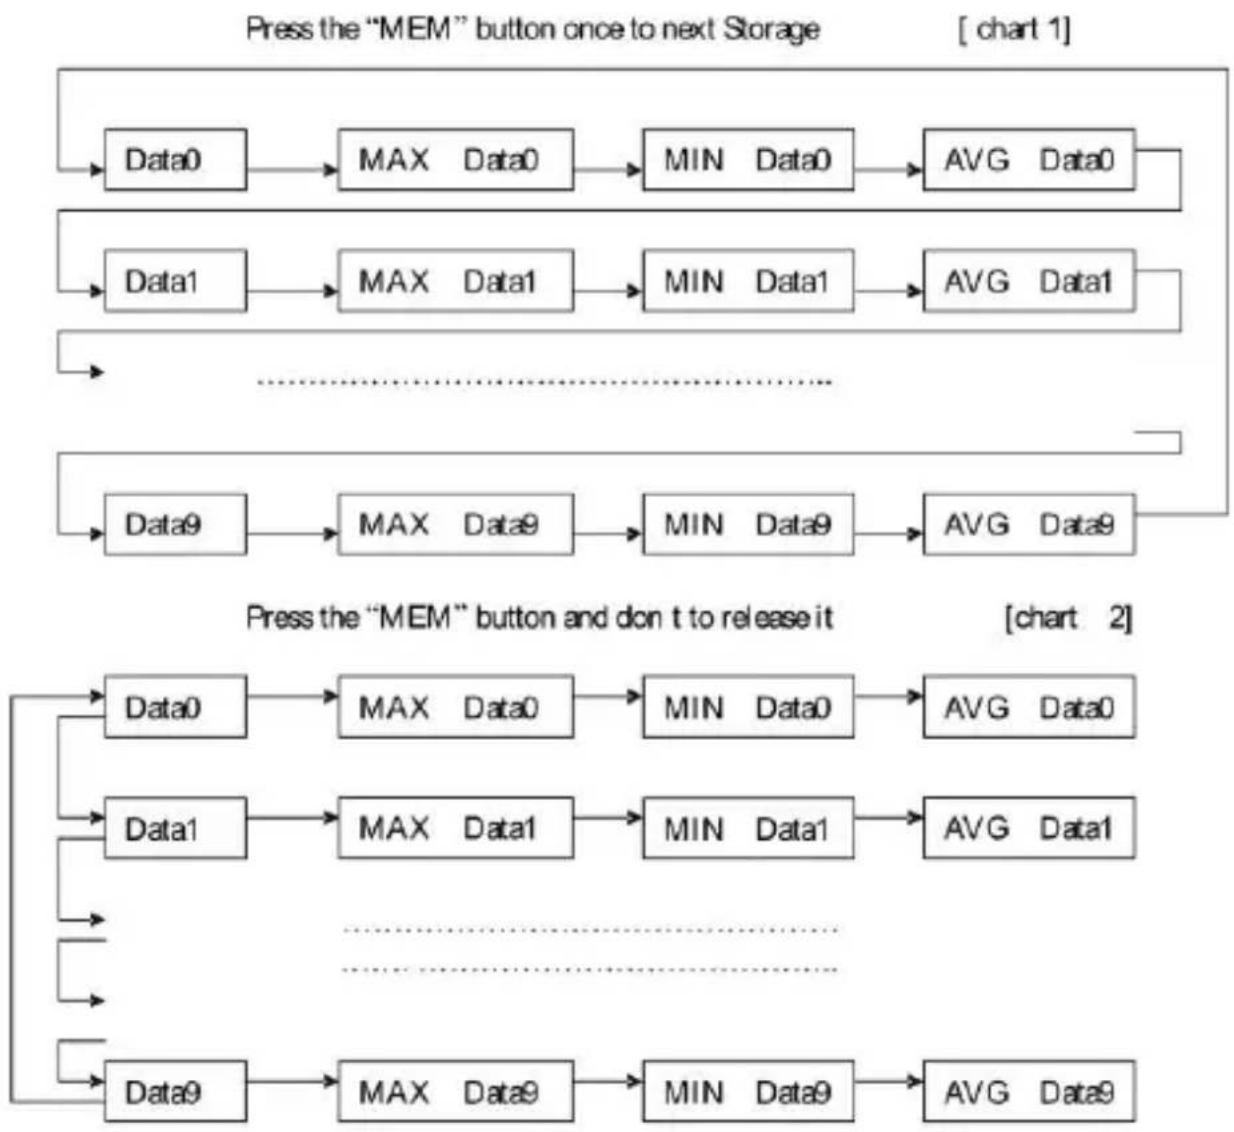
Recall Data: Use the “MEM” botton to scroll and view the stored data point. Press the “MEM” button once to next storage, you will view the MAX measurements, MIN measurements, AVG measurements and DATA measurements. Press the “MEM” button and don’t to
release it to leap to next Data Set. You will view Data0 to Data9 ,10 selectable Data measurements.
flowchart
graph TD
    subgraph "Press the 'MEM' button_once_to_next_Storage["chart 1""]
        A["Data0"] --> B["MAX Data0"] --> C["MIN Data0"] --> D["AVG Data0"]
        E["Data1"] --> F["MAX Data1"] --> G["MIN Data1"] --> H["AVG Data1"]
    end
    subgraph "Press the 'MEM' button and don't_release_it["chart 2"]"]
        I["Data0"] --> J["MAX Data0"] --> K["MIN Data0"] --> L["AVG Data0"]
        M["Data1"] --> N["MAX Data1"] --> O["MIN Data1"] --> P["AVG Data1"]
        Q["Data9"] --> R["MAX Data9"] --> S["MIN Data9"] --> T["AVG Data9"]
    end
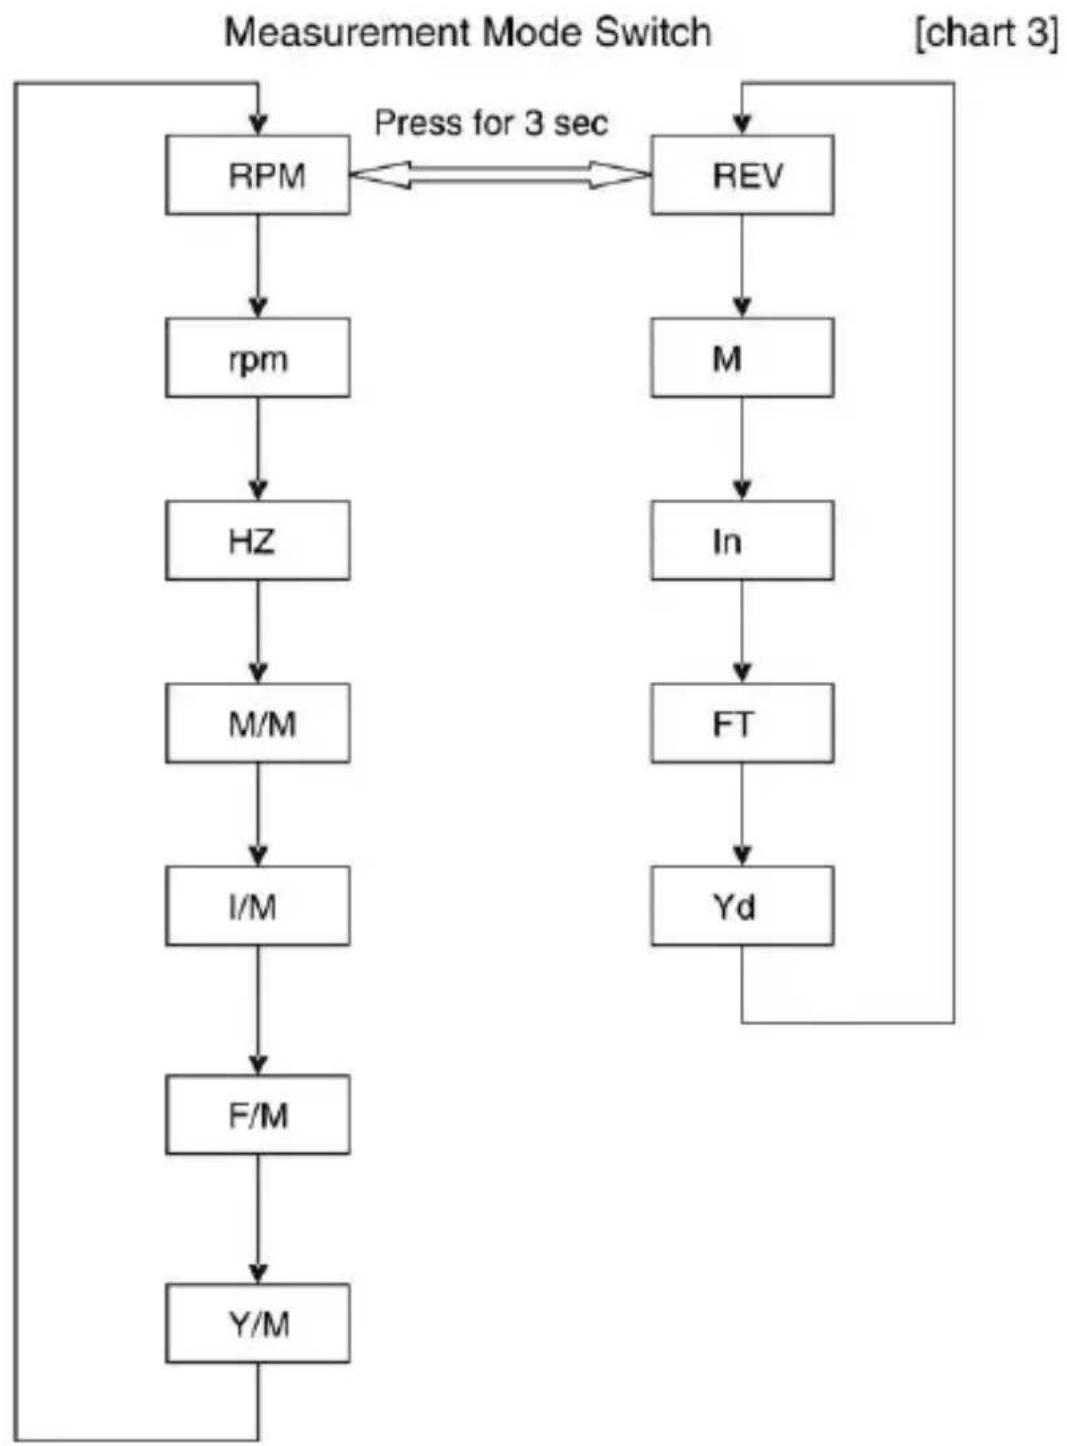
* Measurement Mode Switch: Release the “MEAS” button and press the “MODE” button before the instrument auto power off(released the “MEAS” button this instrument will auto power off in 15 sec).There are two group of measurement. You can press the “MODE” button once to change from RPM,rpm,HZ,...to the next sequentially. Press the “MODE” button and hold for
approx.3 sec to leap to the next group .Then you can press the “MODE” button once to change from REV,M,In....to the next sequentially. Selected the mode of you need, depress the “MEAS” start measures.
flowchart
graph TD
    A["RPM"] --> B["rpm"]
    B --> C["HZ"]
    C --> D["M/M"]
    D --> E["I/M"]
    E --> F["F/M"]
    F --> G["Y/M"]
    H["REV"] --> I["M"]
    I --> J["In"]
    J --> K["FT"]
    K --> L["Yd"]
    L --> A
    style A fill:#f9f,stroke:#333
    style H fill:#f9f,stroke:#333
    note right of A "Press for 3 sec"
* RPM: Non-Contact revolutions per minute measurements.
* rpm: Contact revolutions per minute measurements.
* HZ : Non-Contact /Contact frequency measurements.
* M/M: Contact Meter per minute measurements.
* I/M: Contact Inch per minute measurements.
* F/M : Contact Feet per minute measurements.
* Y/M: Contact Yard per minute measurements.
* REV: Revolution measurements.
* M : Length measurements in the uit of meter.(Using the master 10cm circumference wheel.)
* In : Length measurements in the uit of inch. (Using the master 10cm circumference wheel.)
* FT : Length measurements in the uit of feet. (Using the master 10cm circumference wheel.)
* Yd : Length measurements in the uit of yard. (Using the master 10cm circumference wheel.)
5 MEASURING CONSIDDERTATION
\*Reflective mark
Cut and adhesive tap provide into approx 12mm (0.5") squares and apply one square to each rotation shaft.
a. The non-reflective area must always be greater than the reflective area.
b. If the shaft is normally reflective, it must be covered with black tape or black paint before attaching reflective tape
c. Shaft surface must be clean and smooth before applying reflective tape.
\*VERY LOW RPM MEASUREMENT
As it is easy to get high resolution and fast sampling time. If measuring the very low RPM values, suggest user to attach more “REFLECTIVE MARKS” averagely. Then divide the reading shown by the number of “REFLECTIVE MARKS” averagely. Then divide the reading shown by the number of “REFLECTIVE MARKS” to get the real RPM
6 warnings
To avoid injuries to animal or human eyes, Please do not point the laser beam in eyes or look directly into beam. If the instrument is not to be used for any extended period, Please remove battery.
NOTE:
* If the battery current is weak, you will view the "BAT" on the LCD when you Press "MEM" bottom to measure.
* Be careful not to allow any liquids or moisture to get inside the tachometer.
Brand : PCE Instruments
Model : DT 65
Category : Rangefinder