
eXact-V 415 - Knife sharpener Chef's Choice - Free user manual and instructions
Find the device manual for free eXact-V 415 Chef's Choice in PDF.


| Product Type | Manual Knife Sharpener |
| Brand | Chef's Choice |
| Model | eXact-V 415 |
| Dimensions (H x W x D) | Approx. 20 cm x 5 cm x 5 cm |
| Weight | Approx. 200 g |
| Power Source | None (manual operation) |
| Sharpening Material | Diamond abrasives |
| Sharpening Slots | Two slots: coarse and fine |
| Sharpening Angle | Precision angle guides (typically 15°-20° per side) |
| Compatible Knife Types | Straight edge kitchen knives, including serrated? (probably straight only) |
| Base Material | Plastic with non-slip rubber feet |
| Maintenance | Clean with dry cloth; no lubrication required |
| Safety Features | Finger guard or safe handle design |
| Spare Parts | Diamond rods are replaceable (if available) |
| Repairability | User-replaceable abrasive rods |
| Warranty | Limited lifetime warranty (typical for Chef's Choice) |
| Country of Origin | USA or China (verify packaging) |
Frequently Asked Questions - eXact-V 415 Chef's Choice
User questions about eXact-V 415 Chef's Choice
0 question about this device. Answer the ones you know or ask your own.
Ask a new question about this device
Download the instructions for your Knife sharpener in PDF format for free! Find your manual eXact-V 415 - Chef's Choice and take your electronic device back in hand. On this page are published all the documents necessary for the use of your device. eXact-V 415 by Chef's Choice.
USER MANUAL eXact-V 415 Chef's Choice
natural_image
Black-and-white photo of a Cheft Choice eXact V 415 tool kit with multiple tools and accessories (no readable text or symbols on main body)Chef'sChoice® eXact-V® 415
Diamond Hone ^® Sharpener
As an owner of the Chef'sChoice® eXact-V® Diamond Hone® Sharpener you have the world's most advanced V-type knife sharpener.
You will find that the accurate dual angle control technology and precision diamond plating of ultrafine diamonds incorporated in the eXact-V® creates sharper and more durable edges than conventional V-sharpeners. The novel use of two sharpening angles the first with coarse grit followed by a slightly larger angle with ultrafine diamonds can quickly create double-bevel facets along the edge for unmatched sharpness of your favorite sporting, camping or home knives.

Figure 1.
Description of the eXact-V®
The eXact-V Diamond Hone Sharpener shown fully assembled (page 2) consists of a support base (2) which doubles as a storage case for the knife guiding assembly (3) and the two sharpening rods (4). Raised hand-guards (5) are provided in order to protect the hand that steadies an end of the base while the other hand is sharpening the knife. For your safety the use of these guards is highly recommended and they can be conveniently folded down flat against the base when not in use.
The knife guiding frame (3) mounted slidingly on its support post (6) can be readily deflected sideways to the left or right by the sharpening action of the knife blade, but normally it is restrained by a leaf spring mechanism (7) in a center position. A red spring tensioner (8) mounted on the support post (6) can be raised up to increase the spring tension which in turn increases the sharpening force and the force needed to slide the guiding frame from its center rest position.
In order to sharpen the knife edge the face of the knife blade is alternately placed in intimate contact with the left or the right vertical frame guiding surfaces (9) and moved down that surface while the knife edge contacts and slides down the inclined abrasive surface (10).
Each of the two abrasive rods (4) has a coarser grit diamond abrasive coated pad (Coarse) on one side and an ultra fine diamond abrasive (Fine) coated pad on the other. These rods can be readily pulled out of the supporting base and reversed which exchanges the diamond grit size from Coarse to Fine and simultaneously changes the sharpening angle on each rod by 4 degrees. The change in angle allows you to create a strong double bevel facet (resembling a Gothic Arch design) on each side of the edge and hence a more durable edge.
The knife is sharpened by first making a number of alternating guided pulls across and down the two Coarse diamond pads. The blade face must be aligned with the vertical guide surface (9) on the right side as shown and then on the left side. The abrasive rods are then rotated in order to sharpen the edge further on the Fine abrasives to develop a razor sharp edge.
See following section “How to Sharpen” for detailed instructions.
Assembly of Sharpener
The sharpening components of the eXact-V® are conveniently stored within the supporting base which acts as their carrying case (Figure 2) which is sized to fit easily into a drawer, in your glove compartment, camping gear, or with your fishing tackle. The bottom cover (Figure 2) of the supporting base is easily removed by inserting a finger under the opening (2) at the end of the bottom cover (1) and removing it as shown. Then the knife guiding assembly (3) can be removed from the carrying case by pulling it upward carefully until it is released from its retaining clips. Then the two sharpening rods (4) can be removed similarly by pulling upward by their small ends (socket ends) until they release from their retaining clips. Figure 3 shows the supporting base (2), the two sharpening rods (4), the knife guiding mechanism (3), and the bottom cover (1) after removal of these components.
Refer to Figure 1 which shows the fully assembled sharpener with the knife guiding assembly (3) and the two sharpening rods (4) mounted on the supporting base.

Figure 2.
The knife guiding assembly (3) can be mounted on the supporting base (2) simply by inserting the bottom end of its post (6) into the single larger rectangular hole near the rear of the base. Insert the post into that hole until it is fully seated and snaps fully into a retaining clip at the bottom of that hole. The post will fit into that opening only if the knife guiding frame (3) is on the front side of the post.
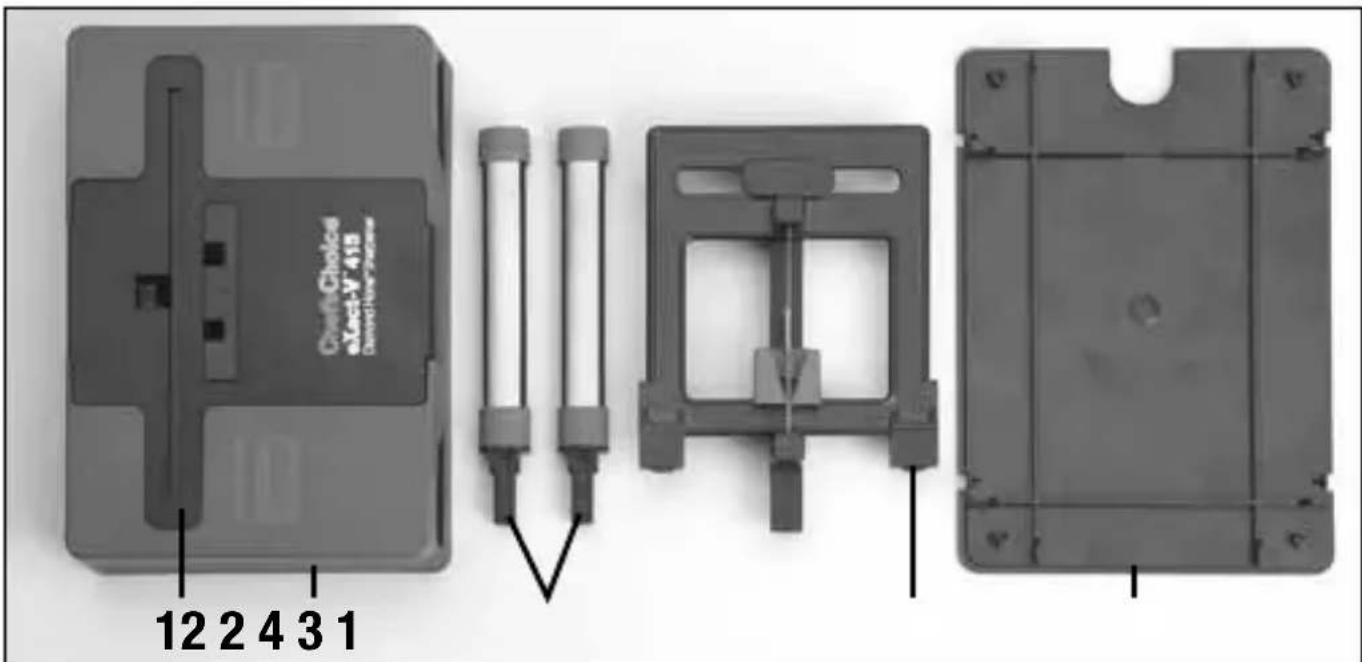
Figure 3.
The spring assembly will then be on the same side of the post adjacent to the two abrasive rods. As the post is inserted the wheels along the bottom of the sliding guide frame (3) must be aligned with and be inserted into the “grooved track” (12) across the top of the supporting base (Fig.3). Check to make certain that after assembly the sliding frame moves freely left or right and returns to center by pressing a finger against either vertical guide surface.
Note that the designations “Coarse” and “Fine” molded into the top and bottom caps of each sharpening rod. These notations designate the coarseness or fineness of the diamond abrasive on that same side of each rod. Insert the rods at an angle into the two small square holes located immediately in front of the knife guiding frame assembly, with the Coarse diamond abrasive sides facing each other. Always orient the abrasive rods so that the same type diamond abrasives face each other. After initially sharpening with the Coarse diamonds you will want to reverse each rod and finish sharpening with the Fine diamonds as described later.
Each hand guard can be raised by first lightly pulling the guard in the direction of the arrow on the guard, lifting it slightly and then pushing it to engage a slot that will hold it in the raised position. You will want to replace the bottom cover (1) which has small rubber feet that resist movement of the sharpener as you sharpen the knife.
For instruction on storing the sharpening components see page 7.
How to Sharpen Your Knife
The eXact-V® Diamond Hone Sharpener is designed to put a razor sharp edge on your favorite hunting and household knives. It is important to follow the instructions carefully for best results.
Start by confirming that the “Coarse” sides of the abrasive rods face each other. You will want to sharpen first with the “Coarse” abrasive. Raise one of the hand guides to protect your hand that steadies the sharpener. Holding the knife as shown in Figure 1 place the face of the blade flat against and in intimate contact with the right guide surface (9) of the guide frame (3). Move the blade forward as far as practical (toward the abrasive rod) in order to sharpen the full blade length. Then slowly push the blade downward into contact with the abrasive rod and simultaneously pull the blade toward you while retaining the blade face in good alignment with the guide surface (9). As you move the knife downward in contact with the abrasive rod the guide surface will move to the left. Keep the face of the blade in good contact with the guide surface. Move the knife slowly and deliberately until you gain experience and confidence with this
motion. Always insure intimate contact of the blade face with the guide through each sharpening stroke.
Pull the blade alternately along and down the right guide face and then the left guide face in order to sharpen alternately the right and left facets along the blade edge. For knives with relatively small facets on the edge, make a total of about 20 pulls along the abrasive rods alternating pulls on the left and right abrasive rods, always using the guiding surface to retain accurate alignment of the blade. The edge must be sharp enough to cut paper well before taking the next step. If the edge does not cut paper well make another 20 total pulls and test the edge again. If the knife still is not sharp increase the sharpening pressure by raising the spring tensioner (8) and continue the sharpening process until the edge will cut paper well.
The sharpener is not designed to produce knives or to sharpen blades that do not already have established facets along the edge. If that is the case or if the knife is excessively dull, it will save time to first sharpen it with a power sharpener at an angle of 20^ or less on each side of the edge. Then proceed in accordance with the procedure described above.
After sharpening with the “Coarse” abrasive side of the abrasive rods, lower the spring tensioner. Remove both rods, rotate and reinsert them so that the “Fine” abrasives face each other. Use the knife guiding surfaces to align the blade faces precisely, and make 20 total pulls of the blade with the knife edge in sliding contact with the ultra fine abrasives, always alternating left and right sides of the blade edge and holding the face of the blade in intimate contact with the guiding surface. Only light downward pressure is needed against the abrasive surface. Test the edge by cutting paper and as necessary make additional pulls along the “Fine” abrasives until you can cut the paper smoothly and with ease.
Do not attempt to sharpen very large blades such as machetes, hedge clippers, or scissors of any kind. Such blades will, if too heavy, damage the eXact-V and because the sharpening angles for scissors and shears are commonly very different from knife edges, their cutting edges will be seriously damaged.

natural_image
Close-up of hands using a handheld tool to press or install electronic components on a dark base (no visible text or symbols)
natural_image
Close-up of hands using a tool to cut or adjust a mechanical component (no visible text or symbols)
natural_image
Close-up of hands using a folding knife to cut a metal object on a stand (no visible text or symbols)Figure 4. Figure 5. Figure 4a.
If you wish to produce a knife edge that's better for cutting fibrous material such as meat, cardboard, etc. you may prefer to use only the coarse grit which will leave the edge a little rougher for that extra “bite”.
While we do not recommend using this sharpener like a conventional V sharpener without the angle control, that is an option (see Fig. 5). Obtaining a very sharp edge is difficult without a guide. If you have a collector's knife and do not wish to lay the blade face against a guiding surface this option may be of interest. Another alter-native to avoid contacting a knife's face is to cover the blade face with Scotch tape but leaving the edge facets exposed. That will eliminate any mild burnishing that may otherwise occur. If you use the abrasive rods without the guide, hold the blade face as vertical as possible as you pull the blades and slide the edge down the abrasive rods. First use the “Coarse” grit for alternating pulls followed by the “Fine” grit. Generally use relatively light pressure. Use of the hand guards is highly recommended.
Sharpening of very thick blades such as hunting knives may take a little longer if their facets adjacent the edge are very large. With extra large faceted edges it is a good idea to make certain the facets on the blade are each initially at 20^ or less. If not you will save time if you presharpen the blade with a power sharpener at 20^ or less. Subsequently you will find the eXact-V sharpener will give you an excellent edge.
Storage of Sharpener Components
To store the sharpening components, remove the bottom cover 1 and clip the two sharpening rods lengthwise into position as shown in Figure 6. Insert the top ends of these rods under the two retainers as you lower and press the socket end of each rod between the retaining clips.
You can remove the blade guide assembly from the support base by pushing with one finger to move the retaining lock tab (12) under the sharpener adjacent the post mounting hole, as in Figure 7. Move this locking tab as shown as you pull up steadily on the mounting post and the post will release. Lower the spring

natural_image
Interior view of a mechanical device with two cylindrical components and internal compartments (no visible text or symbols)
natural_image
Interior view of a mechanical device showing internal components and housing (no visible text or symbols)Figure 6. Figure 7.
tensioner (8) on the knife guiding assembly to its bottom position. Note that the right side of the knife guiding assembly must fit between the lock tab (12) and the two standing ribs on the right. Insert the guiding assembly on top of the rods with the spring assembly facing up. Insert the bottom end of the assembly's post between the two large snaps (adjacent the top end of the sharpening rods), then lower and press the top end of the assembly down and into position as shown in Figure 7. When this is completed the bottom cover will fit and snap securely in place onto the bottom. You can lower the opened hand guards by pulling them slightly upward, laying them flat and then sliding forward to a locked position.

Figure 8.
Care of Sharpener
The abrasive elements should always be used totally dry. Always wash and dry knives before sharpening if they contain any food, oil or other material that can be transferred onto the diamond abrasive surfaces.
If, however the abrasive surfaces become loaded with any foreign material, the rods can be removed and their surfaces cleaned with a tooth brush and a mild detergent/water solution. Clean the surfaces well and allow to dry completely.
Periodically clean the exterior surfaces of the sharpener with a soft damp cloth to remove dust and any filings created by sharpening.
This product may be covered by one or more EdgeCraft patents and/or patents pending as marked on the product.
© EdgeCraft Corporation 2012 A12 F602500
Limited Warranty: Used with normal care, this EdgeCraft product is guaranteed against defective material and workmanship for a period of one (1) year from the date of original purchase (“Warranty Period”). We will repair or replace, at our option, any product or part that is defective in material or workmanship without charge if the product is returned to us postage prepaid with dated proof of purchase within the Warranty Period. This warranty does not apply to commercial use or any product abuse. ALL IMPLIED WARRANTIES, INCLUDING IMPLIED WARRANTIES OF MERCHANTABILITY AND FITNESS FOR A PARTICULAR PURPOSE, ARE LIMITED TO THE WARRANTY PERIOD. EDGECRAFT CORPORATION SHALL NOT BE LIABLE FOR ANY INCIDENTAL OR CONSEQUENTIAL DAMAGES. Some states do not allow limitations on how long an implied warranty lasts and some states do not allow exclusions or limitation of incidental or consequential damages, so the above limitations or exclusions may not apply to you. This Limited Warranty gives you specific legal rights, and you may also have other rights which vary from state to state.



Brand : Chef's Choice
Model : eXact-V 415
Category : Knife sharpener