
Digital Camera 300 - Digital Camera ACER - Free user manual and instructions
Find the device manual for free Digital Camera 300 ACER in PDF.


| Product Type | Digital Camera |
| Brand | Acer |
| Model | Digital Camera 300 |
| Image Sensor | 3.0 Megapixel CCD |
| Optical Zoom | 3x |
| Digital Zoom | 4x |
| Lens | f/2.8 - f/4.8 |
| Focus Range | Normal: 50 cm to infinity; Macro: 10 cm |
| Shutter Speed | 1/2000 - 1 sec |
| ISO Sensitivity | Auto, 100, 200, 400 |
| White Balance | Auto, Daylight, Cloudy, Fluorescent, Incandescent |
| Exposure Compensation | ±2 EV in 1/3 steps |
| Storage | SD/MMC card slot |
| File Format | JPEG, AVI |
| Display | 1.5-inch TFT LCD |
| Viewfinder | Optical |
| Flash | Built-in (Auto, Red-eye, Fill, Off) |
| Self-timer | 2 sec, 10 sec |
| Power | 2x AA batteries (Alkaline or NiMH) |
| Dimensions | 95 x 66 x 36 mm |
| Weight | 150 g (without batteries) |
| Interface | USB 1.1 |
| Video Out | NTSC/PAL |
Frequently Asked Questions - Digital Camera 300 ACER
User questions about Digital Camera 300 ACER
0 question about this device. Answer the ones you know or ask your own.
Ask a new question about this device
Download the instructions for your Digital Camera in PDF format for free! Find your manual Digital Camera 300 - ACER and take your electronic device back in hand. On this page are published all the documents necessary for the use of your device. Digital Camera 300 by ACER.
USER MANUAL Digital Camera 300 ACER
Acer Digital Camera 300 Electronic User's Manual

natural_image
White digital camera 300 with visible lens and control buttons (no text or symbols on body)Introduction to Acer Digital Camera 300 1
Touring Your Camera 2
Preparing the Camera for Using 4
Installing batteries and neck strap 4
Installing digital camera software 5
Using Your Camera 6
The digital camera mode 6
The PC camera mode 18
The video camera mode 25
Using the cradle 30
Installing the cradle 30
Troubleshooting Tips 33
Service Information 35
Technical support 35

Copyright
Copyright (c) 2001 by Acer Communictions & Multimedia Inc. (Acer CM). All rights reserved. No part of this publication may be reproduced, transmitted, transcribed, stored in a retrieval system or translated into any language or computer language, in any form or by any means, electronic, mechanical, magnetic, optical, chemical, manual or otherwise, without prior written permission from Acer CM. Brands and product names are trademarks or registered trademarks of their respective companies.
Disclaimer
Acer CM makes no warranty of any kind with regard to this material, including, but not limited to, the implied warranties of merchantability and fitness for a particular purpose. Acer CM assumes no responsibility for any error that may appear in this document. Acer CM makes no commitment to update nor to keep current the information contained in this document.
Taking care of your camera
- Do not use your camera over the following environmental range: temperature: O C to 40 C, relative humidity: 45% \~ 85%.
- Do not use or store your camera in environments listed below:
Direct sunlight
High humidity and dusty places.
Next to the air conditioner, electric heater or the other heat sources.
In a closed car that is directly under the sun.
Avoid shaky places.
- If your camera becomes wet, wipe it with dry cloth as soon as possible.
- Salt of seawater may cause severe camera damage.
- Do not use organic solvents, such as alcohol, etc., to clean your camera.
- If the lens or viewfinder is dirty, please use the lens brush or soft cloth to clean the lens. Do not touch the lens with your fingers.
- To prevent electrical shock, do not attempt to disassemble or repair your camera by yourself.
- Water may cause a fire or electric shock. Therefore, please store your camera in a dry place.
- Do not use your camera outdoors when it is raining or snowing.
- Do not use your camera in the water.
- If the foreign substance or water gets in your camera, please turn the power off immediately and disconnect the batteries and the transformer. Remove the foreign substance or water, and send it to the maintenance center.
- Transfer the data to the computer as soon as possible to avoid losing your image data.
Introduction to Acer Digital Camera 300
Acer Digital Camera 300 is equipped with the following features:
- Small size for easy carriage and convenience of use
- High resolution: 640 x 480 pixels in digital camera mode; selectable 640 x 480, 352 x 288, 320 x 240 or 176 x 144 pixels in PC camera mode
• 24-bit true color representation for high image fidelity - Onboard 8MB memory to store up to 95 \~128 images in digital camera mode
- Mode selectable flash light
• Built-in self-timer - Fixed focus: 8 inch(0.2m) for macro mode, and 2ft.(0.6m) to infinity from camera for normal mode
• Electronic shutter
- Easy recognizable LCD screen for camera and image handling
- USB interface for easy and quick connection to PC
• Automatic power-off system
• 3 operation modes:
Digital camera mode for taking photos
PC camera mode for using the camera as an image capturing device for PC
Video camera mode for capturing motion clips with a PC
Touring Your Camera
Front

Rear

acer
Touring Your Camera
The status display

Preparing the Camera for Using
Installing batteries and neck strap
1 Open the battery compartment cover and insert two AAA alkaline batteries into the compartment. Note the polarity of the batteries when you install.

2 Refer to the illustration below to install the neck strap.

3 Now you are ready to use your camera!
acer
Preparing the Camera for Using
Installing digital camera software
1 Insert the digital camera software CD-ROM into your CD-ROM drive. The following software installation menu will appear on computer screen automatically.
Click this item to install digital camera software
Click this item to install Presto! Mr.Photo Gold
Click this item to install Presto! Image Folio-
Click this item to install Presto! VideoWorks
Click this item to open Electronic user guide
Click this item to install NetMeeting
Click this item to install Acrobat Reader
![Welcome to Acer Digital Camera 300 Driver and Software Installation Disk! Digital Camera 300 Driver and Software Installation Disk Digital Camera 300 Driver Mr. Photo Gold ImageFolie VideoWorks User Guide NetMeeting Acrobat Reader [ Exit ] Welcome! Please Click on each item to start installing the software program of your choice. acer](/content/2026/05/1008378/images/9a6c1aefb6c64098529533c72c429c934da108695313ade243dedcacbd556496.jpg)
Note: If the software installation menu did not appear, open Windows Explore and double-click the "Autorun.exe" icon in the CD-ROM directory.
2 Click Digital Camera 300 Driver first to install digital camera software. Follow the on-screen instructions to proceed.
3 When you are done installing the digital camera software, you have the choice to go back to the software installation menu and click other items to install the bundled software programs.
Using Your Camera
Acer Digital Camera 300 provides 3 different operation modes: Digital camera mode, PC camera mode, and video camera mode. With these modes, you can not only use Digital Camera 300 to take photos, but capture and show images in various ways.
The digital camera mode
In digital camera mode, you can take photos, view and download them from your camera and save them as files.
Taking pictures
1 Turn on the power of the camera by pressing the POWER button. The camera beeps once and enters camera mode. The status of camera will appear on the status display.
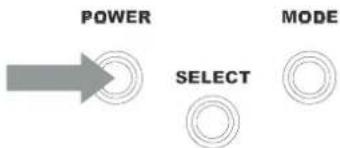
flowchart
graph LR
    A["Power"] --> B["SELECT"]
    B --> C["MODE"]
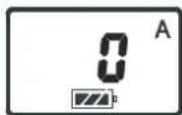
A : This icon indicates that the flash light is in Auto mode. You can choose to turn it off. See "Turning on/off the flash light" on page 13.
: The counter that indicates the number of photos taken. You can choose to let the counter display in another way. See "View picture counter" on page 16.
acer
Using Your Camera
: Indicates the battery status. If the battery power becomes low, the battery icon will become empty.
2 Look through the viewfinder to determine the object to be taken. Make the object appear in the center of the viewfinder.
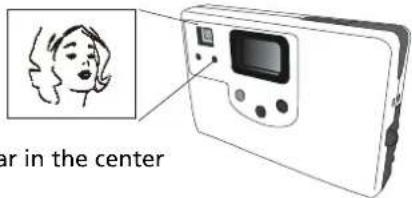
Make the object appear in the center of the viewfinder.
3 Press the shutter. The image will be taken and the BUSY indicator will flash, indicating that the camera is saving the image to memory.
4 When the indicator becomes off, you are ready to take the next photo. The memory of camera allows you to take up to 95 \~ 128 photos.
Note: Do not press the POWER button when the BUSY indicator flashes.
After the shutter is pressed, hold the camera still until the BUSY indicator becomes OFF to prevent blurred images.
To save battery power, if the camera power is turned on and not used for 2 minutes, it will be turned off automatically.
Turning off the camera
Press and hold the POWER button of the camera. The camera beeps once and the power will be turned off.
Managing photos in camera
Deleting the last photo taken
1 Press the MODE button 4 times. The icon ☑ flashes on the status display.
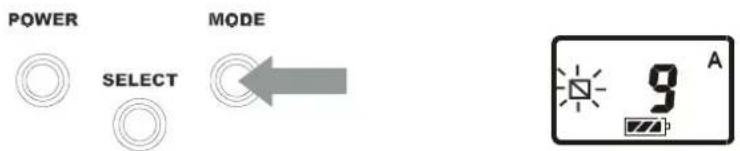
2 Press and hold the shutter for 1 second. The last photo taken will be deleted.
Deleting all photos
1 Press the MODE button 5 times. The icon flashes on the status display.

2 Press and hold the shutter for 1 second. All photos in camera memory will be deleted.
acer
Using Your Camera
Downloading photos from camera
1 Turn on the power of the camera by pressing the POWER button.
2 Refer to the illustration below to connect the camera to PC using the USB cable. When connected, the number of images in camera memory will appear on the status display.

natural_image
Diagram of a digital camera with an attached USB cable, showing no text or symbols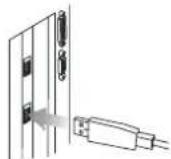
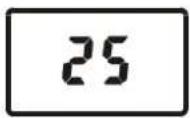
3 Power on your computer. Click the Start button on Windows Taskbar, and choose Pro-
grams > Acer DC 300 > DC300 Digital Camera. Or, right-click on the icon on Windows Taskbar and select "Digital Camera" in the submenu that appears.


on

acer
Using Your Camera
The image preview window will appear on your computer screen and start creating thumbnails of the photos in the camera.
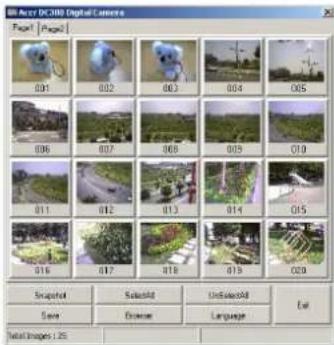
4 If there are more than 20 photos in the camera, the image thumbnails will appear on different pages. Click on the tab on top of each page to switch among the pages.
5 Choose the thumbnail of the photo you want to download. You can:
- Click on each thumbnail to select a photo separately. Click on the thumbnail again and the photo is not selected.
- Click on the Select All button to select all photos on a page.
- Click on the Unselect button to cancel selecting photos.
6 Click Save. A Save as dialogue box will appear. Specify the file name and location and click Save. If you have selected multiple photos, you will be prompted to enter a prefix for the file name of the photos. The image files will be named in the format of (prefix)001, (prefix)002.... For example, if you entered "Mypic" as the prefix, the images in camera will be saved using the names "Mypic001", "Mypic002"...
acer
Using Your Camera
Deleting photos in camera in the image preview window
1 Select the photo(s) you want to delete in the image preview window.
2 Click on the Delete button. The photo(s) will be deleted from your camera.
acer
Using Your Camera
Using the image browser
Click on the Browser button in the image preview window. The Image Browser window shown below will appear. You can use it to browse the photos in your camera.

natural_image
Aerial view of a residential area with green lawns and surrounding apartment buildings, captured via a browser window (no visible text or symbols on the main scene)In the Image Browser window, you can:
Click the button to go to the previous photo.
Click the button to go to the next photo.
Click the button to zoom in on the photo.
Click the button to zoom out on the photo.
Options
Using the flash light
Your camera is equipped with a flash light. It is recommended that you use the flash within the best working range as illustrated below.

Turning on/off the flash light
1 Press the MODE button. The icon appears and flashes on the status display.
POWER

MODE
SELECT


acer
Using Your Camera
2 Press the SELECT button to select from the following. The one selected will flash.
A Auto flash light Flash light OFF

3 Now you are ready to take pictures.
Note: If the macro function is turned on, the flash light will be disabled. It takes about 11 seconds for the flash light to recharge for the next shot. During charging, the FLASH indicator blinks. Charging is completed when the FLASH indicator becomes off.
acer
Using Your Camera
Using the macro function
If you need to shoot objects at a very close distance (from 8 inches to 2 feet), turn on the macro function before shooting.

To turn on, slide the Macro switch to the "macro on" position. The MACRO indicator will be on.


Note: If the macro function is turned on, the flash light will be disabled.
To turn off the macro function, slide the switch to the position marked 🎨.
acer
Using Your Camera
View picture counter
The picture counter provides 2 display modes. You can view picture counter by the number of pictures taken or by the number of photos allowed in the remaining memory space.
View picture counter by the number of pictures taken
Normally, the picture counter shows the number of pictures taken (or the number of pictures in camera memory). For example, if you have taken 20 pictures (or, there are 20 images in camera memory), the counter shows "20".
If there are 102 pictures in camera memory, an "1" will appear at the lower right corner of the status display, and "2" appears on the picture counter.
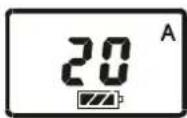

View picture counter by number of photos allowed in the remaining memory space
1 Press the MODE button twice until the picture counter flashes.
POWER

SELECT
MODE


2 Press the SELECT button until "REMAIN" appears above the counter.

3 Now you are ready to press the shutter and take pictures.
acer
Using Your Camera
Enabling self-timer
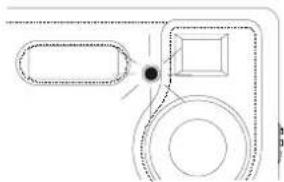
The self-timer function allows you to let the camera take pictures 10 seconds after the shutter is pressed. To enable self-timer:
1 Press the MODE button 3 times. The self-timer icon will flash.
POWER

MODE
SELECT


2 Press the shutter and the camera will start generating beep sound. The icon flashes and the self-timer activation indicator blinks.
natural_image
Pure technical line drawing of a mechanical component with no text or symbols3 After10 seconds, the camera will take picture automatically.
acer
Using Your Camera
The PC camera mode
In PC camera mode, you can use Digital Camera 300 as a motion image capturing device for your PC. You can use it for video conferencing, capturing snapshots and so on.
Using Digital Camera 300 as a PC camera
1 Refer to the illustration below to connect the camera to PC using the USB cable. "PC" will appear on the status display.

natural_image
Diagram of a digital camera with an attached USB cable, showing no text or symbols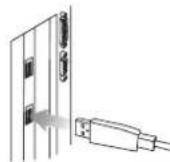

2 Power on the computer. Click the Start button on Windows Taskbar, and choose Programs > Acer Digital Camera 300 > Acer Digital Camera 300 App. Or, right-click on the icon on Windows Taskbar and select "PC Camera" in the submenu that appears.

acer
Using Your Camera
3
The PC Camera window will appear showing the video.

Taking snapshots
1 In the PC Camera window, click the Snapshot button. The image will be captured and a Snapshot Browser window will appear showing the captured image.

natural_image
Scenic landscape photo with rolling hills and cloudy sky (no text or symbols visible)If you want to capture multiple images, click the Snapshot button several times.
2 Click the button 📋 to save current snapshot in the Snapshot Browser window, or the button 📋 to save all snapshots.
acer
Using Your Camera
Rotating video
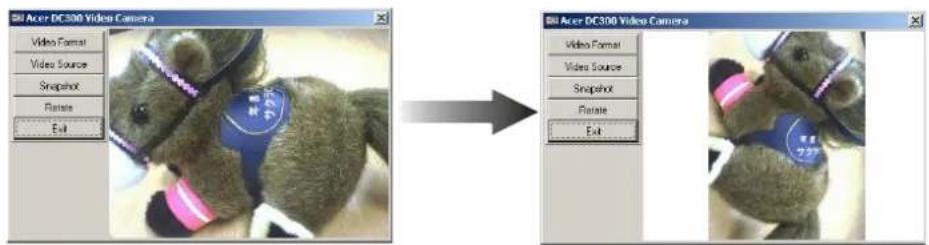
In the PC Camera window, click the Rotate button. The video will be rotated 90 degrees counter-clockwise. This is convenient for you to place the camera in different angles and maintain the correct orientation of video.
Video settings
Video format
Click the Video Format button in the PC Camera window. The following Video Format window will appear.

Items Function/meaning
| Resolution Click in the drop-down listbox to select different resolution for viewing in the PC Camera window. | |
| Pixel depth and compression | Selects the pixel depth and compression of the image in the PC Camera window. |
| Size Shows corresponding size of the captured image file according to the selection in Resolution and Pixel depth/compression options. | |
acer
Using Your Camera
Video source
Click the Video Source button in the PC Camera window. The following Video Source window will appear.
Options in the Capture Source tab

This tab allows you to select a video input source. If you have multiple devices installed in your system, device names will appear in the drop-down listbox and you can click to choose one of them to use with the digital camera driver.
acer
Using Your Camera
Options on the Device Settings tab
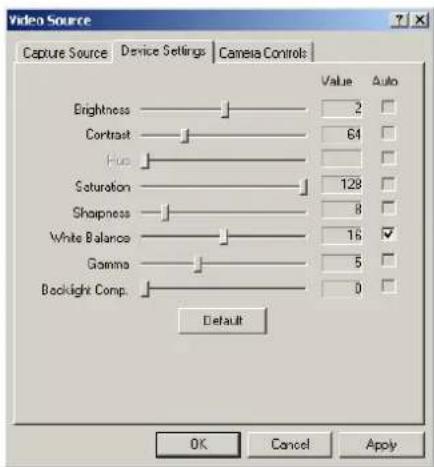
On this tab, you can adjust the saturation, brightness, contrast and sharpness..., etc. of the image in PC mode. Drag the slider of each item to adjust.
Click Default button to reset the settings to default values.
acer
Using Your Camera
Options in the Camera Controls tab

On this tab, you are able to access other advanced video settings of your digital camera. Drag the slider of each item to adjust.
acer
Using Your Camera
The video camera mode
The video camera mode allows you to capture motion video and save it as a video file. Note: Make sure the Presto! VideoWorks software is installed. If not, please install it first.
Using Digital Camera 300 as a video camera
1 Refer to the illustration below to connect the camera to PC using the USB cable. "PC" will appear on the status display.
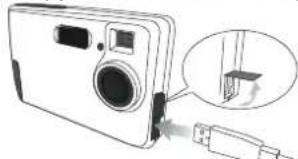
natural_image
Diagram of a digital camera with an inset showing a close-up of the lens (no text or symbols present)

2 Power on the computer. Click the Start button on Windows Taskbar, and choose Programs, Presto! VideoWorks 4.x, then Presto! VideoWorks. The following VideoWorks main screen will appear.

acer
Using Your Camera
3 Click Capture and select Select image source in the submenu that appears.
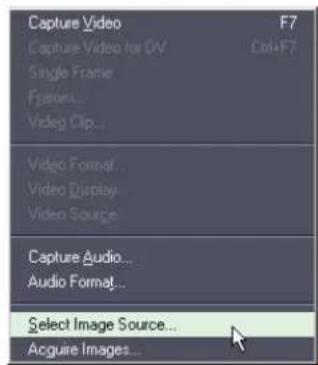
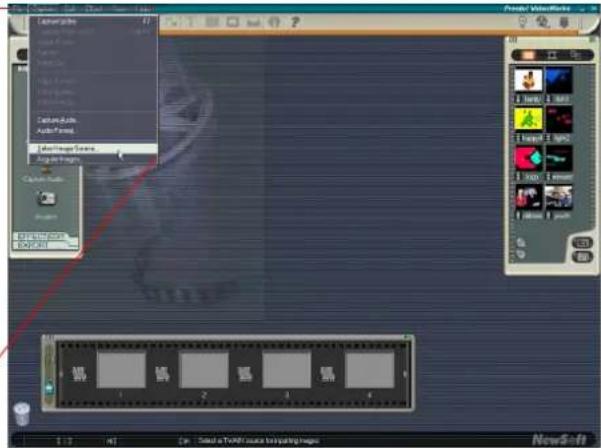
4 The Select Source dialogue box will appear. Click to highlight Acer DC300 Video Camera and click Select.

acer
Using Your Camera
5 Click Capture Video.
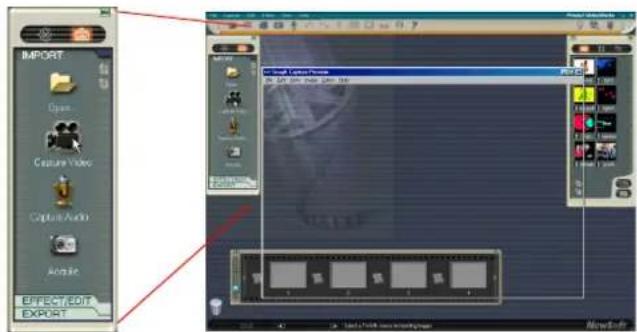
6 The video capturing window will appear on the center of the screen. Click the icon

to continue.

acer
Using Your Camera
7 The following dialogue box will appear.

Click in the Frame rate box to specify the number of frame rate. The larger the number of frame rate is set, the smoother the video is captured and played back. However, the file size also becomes larger if you set higher frame rate.
Click the Capture time limit checkbox and specify the length of time in the box if you want to limit the capture time beforehand.
The default path of the captured video file is shown in the Captured file name box. If you want to save the captured video file to another location, click Browse... button to select a new path.
Click the Video... button for more options, including the video output size and compression.
Click the OK button to continue.
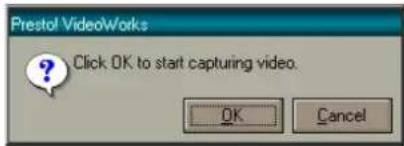
8 The following dialogue box will appear. Click OK to start capturing video.
acer
Using Your Camera
When capturing is in progress, the status will appear on the bottom of the screen.

10 The Capture window will appear after video capturing is done. You can click the button to playback the video clip.

11 Now you are ready to use VideoWorks to work on the video clip (such as adding special effects to the clip..., etc.) and share it with your friends and family. For details, please look under the Help menu of VideoWorks.
Note: In Video Camera mode, you can press and hold the POWER button for two seconds to activate the image browser and download the photos in camera.
acer
Using the cradle
Using the cradle
The cradle that comes with your digital camera allows you to fix the camera on various surfaces for different applications.
Installing the cradle
Insert the screw on the cradle into cradle the installation hole on the bottom of the camera. Rotate the cradle clockwise until the cradle is appropriately fixed.

acer
Using the cradle
Placing the camera on top of computer monitor

natural_image
Line drawing of a desktop computer with a mounted case (no text or symbols)
natural_image
Line drawing of a flat-screen TV with a mounted camera on top (no text or symbols)Placing the camera on a notebook computer
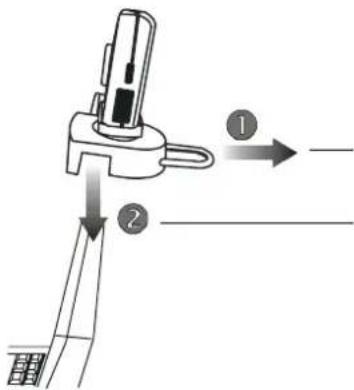
Pull the metal ring outward.
Clip the cradle on the LCD screen of notebook computer.
acer
Using the cradle

natural_image
Line drawing of a laptop computer with a camera on top (no text or symbols)
natural_image
Line drawing of a laptop computer with a smartphone attached (no text or symbols)acer
Troubleshooting Tips
Troubleshooting Tips
The LCD panel remains blank when I press the POWER button and can't take pictures.
Check that the battery is correctly inserted. If it is old, replace it.
The camera can not take a picture.
When the FLASH indicator is on, it takes up about 15 seconds to charge the flash light for the next shot. During this time the camera is busy and cannot take pictures. Wait until the indicator becomes OFF.
Cannot download all my images from my camera to PC.
The RAM memory installed in your computer may not have sufficient storage space. Close all software programs and proceed to download your images. If the problem persists, download images in batches and store each batch in your hard drive before proceeding to the next batch. Make sure all the images you want are stored prior to clearing the camera memory.
I have connected the camera to the computer, but the Digital Camera 300 driver says "Device not ready!".
Make sure that the batteries are installed correctly and there is enough power in them.
Check if the camera power is turned on. If not, turn it on and then connect the camera to the computer again.
acer
Troubleshooting Tips
In Windows 2000, when I unplug the camera from my computer while running Acer Dgitial Camera 300 driver, the computer freezes.
Unplugging the camera from your computer while running the Digital Camera 300 driver will cause the computer to become unstable. Do not unplug the camera from your computer when the camera or driver is in use.
Service Information
Technical support
If you encountered problems using Digital Camera 300 and the camera driver program, please send an E-mail (containing detailed descriptions of the problem you came upon, the hardware and software environment of your system) to the following addresses:
USA: support-sc@apa.acer.com
Europe: service@acerperipherals.nl
Taiwan: service-tw@acercm.com.tw
China: service@aps.com.cn
Asia and other countries: IMGservice@acercm.com.tw
For free driver program updates, product information and news release, please visit the following web address:
http://www.acerCM.com
For questions about the bundled application, please consult the following web addresses:
http://www.adobe.com (Adobe Active Share)
http://www.newsoft.com
(Presto! Mr. Photo Gold, Presto! Image Folio, Presto! Video Works)
- Acer Digital Camera 300 Electronic User's Manual
- Copyright
- Disclaimer
- Taking care of your camera
- Introduction to Acer Digital Camera 300
- Touring Your Camera
- acer
- Preparing the Camera for Using
- Installing digital camera software
- Using Your Camera
- The digital camera mode
- Taking pictures
- Turning off the camera
- Managing photos in camera
- Deleting the last photo taken
- Deleting all photos
- Downloading photos from camera
- Deleting photos in camera in the image preview window
- Using the image browser
- Options
- Using the flash light
- Turning on/off the flash light
- Using the macro function
- View picture counter
- View picture counter by the number of pictures taken
- View picture counter by number of photos allowed in the remaining memory space
- Enabling self-timer
- The PC camera mode
- Using Digital Camera 300 as a PC camera
- 3
- Taking snapshots
- Rotating video
- Video settings
- Video format
- Video source
- Options in the Capture Source tab
- The video camera mode
- Using Digital Camera 300 as a video camera
- Click Capture and select Select image source in the submenu that appears.
- The Select Source dialogue box will appear. Click to highlight Acer DC300 Video Camera and click Select.
- Click Capture Video.
- The video capturing window will appear on the center of the screen. Click the icon
- The following dialogue box will appear.
- The following dialogue box will appear. Click OK to start capturing video.
- Using the cradle
- Installing the cradle
- Troubleshooting Tips
- Service Information
- Technical support
Brand : ACER
Model : Digital Camera 300
Category : Digital Camera