SGR750 - Mill Baumr-AG - Free user manual and instructions
Find the device manual for free SGR750 Baumr-AG in PDF.


| Product Type | Stump Grinder |
| Brand | Baumr-AG |
| Model | SGR750 |
| Engine Type | 4-Stroke, Gasoline |
| Fuel Type | Regular Unleaded 95+ RON |
| Fuel Capacity | 6.5 L |
| Oil Capacity | 1.1 L |
| Recommended Oil | 10W-30, 10W-40, 15W-30, or 15W-40 non-synthetic |
| Start System | Recoil Pull Start |
| Brake Type | Disk, Lever-Activated |
| Drive System | Triple V-Belt |
| Clutch Type | Centrifugal Heavy-Duty Commercial |
| Maximum Blade Speed | 4000 rpm |
| Cutting Depth | 305 mm below ground level |
| Cutting Teeth | 12 with Tungsten Carbide Tips |
| Wheel Size | Pneumatic 12.4" |
| Product Weight | 100 kg |
| Gross Weight | 125 kg |
| Assembly Required | Yes |
| Safety Features | Dead Man's Grip, Parking Brake, Guards |
| Maintenance Interval | Lubricate bearings every 10 hours; check belt tension daily |
Frequently Asked Questions - SGR750 Baumr-AG
User questions about SGR750 Baumr-AG
0 question about this device. Answer the ones you know or ask your own.
Ask a new question about this device
Download the instructions for your Mill in PDF format for free! Find your manual SGR750 - Baumr-AG and take your electronic device back in hand. On this page are published all the documents necessary for the use of your device. SGR750 by Baumr-AG.
USER MANUAL SGR750 Baumr-AG
natural_image
Orange industrial tiller machine with 'SGR750' branding, parked on grass in a forest setting (no readable text beyond branding)Colours, designs, and appearances may vary
User Manual
[Revision 6.0 April 2023]
READ THIS MANUAL CAREFULLY BEFORE USE – FAILURE TO DO SO MAY RESULT IN INJURY, PROPERTY DAMAGE AND MAY VOID WARRANTY. • KEEP THIS MANUAL FOR FUTURE REFERENCE. • Products covered by this manual may vary in appearance, assembly, inclusions, specifications, description, and packaging.
The product is NOT supplied with engine oil, although traces of oil from the manufacturing process may be present. It is essential to add adequate engine oil of the correct type to the engine before use. Failure to add engine oil will void the product warranty.
Safety
Safety messages are designed to alert you to possible dangers or hazards that could cause death, injury or equipment or property damage if not understood or followed. Safety messages have the following symbols:

You WILL be KILLED or SERIOUSLY INJURED if you do not follow instructions.
It is vital that you read and understand this user manual before using the product, including safety warnings, and any assembly and operating instructions. Keep the manual for future reference.
Safety precautions and recommendations detailed here must be fully understood and followed to reduce the risk of injury, fire, explosion, electrical hazard, and/or property damage.
Safety information presented here is generic in nature – some advice may not be applicable to every product. The term "equipment" refers to the product, be it electrical mains powered, battery powered or combustion engine powered.
- Before Use - If you are not familiar with the safe operation/handling of the equipment or are in any way unsure of any aspect of suitability or correct use for your application, you should complete training conducted by a person or organization qualified in safe use and operation of this equipment, including fuel/electrical handling and safety.
- Do NOT operate the equipment in flammable or explosive environments, such as in the presence of flammable liquids, gases or dust. The equipment may create sparks or heat that may ignite flammable substances.
- Keep clear of moving parts.
- Equipment may be a potential source of electric shock or injury if misused.
- Do NOT operate the equipment if it is damaged, malfunctioning or is in an excessively worn state.
- Do NOT allow others to use the equipment unless they have read this manual and are adequately trained.
- Keep packaging away from children - risk of suffocation! Operators must use the equipment correctly. When using the equipment, consider conditions and pay due care to persons and property.
General Work Area Safety
• Work areas should be clean and well it.
- Do not operate the equipment if bystanders, animals etc are within operating range of the equipment or the general work area.
- If devices are provided for connecting dust extraction / collection facilities, ensure these are connected and used properly. Dust collection can reduce dust-related hazards.

You CAN be KILLED or SERIOUSLY INJURED if you do not follow instructions.
General Personal Safety
- Wear appropriate protective equipment when operating, servicing, or when in the operating area of the equipment to help protect from eye and ear injury, poisoning, burns, cutting and crush injuries. Protective equipment such as safety goggles, respirators, non-slip safety footwear, hard hat, hearing protection etc should be used for appropriate equipment / conditions. Other people nearby should also wear appropriate personal protective equipment. Do not wear loose clothing or jewellery, which can be caught in moving parts. Keep hair and clothing away from the equipment.
- Stay alert and use common sense when operating the equipment. Do not overreach. Always maintain secure footing and balance.
- Do not use the equipment if tired or under the influence of drugs, alcohol or medication.
- This equipment is not intended for use by persons with reduced physical, sensory or mental capabilities.
General Fuel Safety
- Petrol/fuel/gasoline is extremely flammable – keep clear of naked flames or other ignition sources.
- Do not spill fuel. If you spill fuel, wipe it off the equipment immediately – if fuel gets on your clothing, change clothing.
- Do NOT smoke near fuel or when refuelling.
- Always shut off the engine before refuelling.
- Do NOT refuel a hot engine.
- Open the fuel cap carefully to allow any pressure build-up in the tank to release slowly.
• Always refuel in well ventilated areas. - Always check for fuel leakage. If fuel leakage is found, do not start or run the engine until all leaks are fixed.
General Carbon-Monoxide Safety
- Using a combustion engine indoors CAN KILL IN MINUTES. Engine exhaust contains carbon-monoxide – a poison you cannot smell or see.
- Use combustion engines OUTSIDE only, and far away from windows, doors and vents.

You CAN be INJURED if you do not follow instructions or equipment damage may occur.
General Equipment Use and Care
- The equipment is designed for domestic use only.
- Handle the equipment safely and carefully.
- Before use, inspect the equipment for misalignment or binding of moving parts, loose components, damage or any other condition that may affect its operation. If damaged, have the equipment repaired by an authorised service centre or technician before use.
- Prevent unintentional starting of the equipment - ensure equipment and power switches are in the OFF position before connecting or moving equipment. Do not carry equipment with hands or fingers touching any controls. Remove any tools or other items that are not a part of the equipment from it before starting or switching on.
- Do not force the equipment. Use the correct equipment for your application. Equipment will perform better and be safer when used within its design and usage parameters.
- Use the equipment and accessories etc. in accordance with these instructions, considering working conditions and the work to be performed. Using the equipment for operations different from those intended could result in hazardous situations.
- Always keep equipment components (engines, hoses, handles, controls, frames, housings, guards etc) and accessories (cutting tools, nozzles, bits etc) properly maintained. Keep the equipment clean and, where applicable, properly lubricated.
- Store the equipment out of reach of children or untrained persons. To avoid burns or fire hazards, let the equipment cool completely before transporting or storing. Never place or store the equipment near flammable materials, combustible gases or liquids etc.
- The equipment is not weather-proof, and should not be stored in direct sunlight, at high ambient temperatures or locations that are damp or humid.
- Do not clean equipment with solvents, flammable liquids or harsh abrasives.
- For specific equipment safety use and care, see Equipment Safety.
General Electrical Safety
- Inspect electrical equipment, extension cords, power bars, and electrical fittings for damage or wear before each use. Repair or replace damaged equipment immediately.
- Ensure all power sources conform to equipment voltage requirements and are disconnected before connecting or disconnecting equipment.
- When wiring electrically powered equipment, follow all electrical and safety codes.
- Wherever possible, use a residual current device (RCD).
- High voltage / high current power lines may be present. Use extreme caution to avoid contact or interference with power lines. Electrical shock can be fatal.
General Electrical Safety
- Electrically grounded equipment must have an approved cord and plug and be connected to a grounded electrical outlet.
- Do NOT bypass the ON/OFF switch and operate equipment by connecting and disconnecting the electrical cord.
- Do NOT use equipment that has exposed wiring, damaged switches, covers or guards.
- Do NOT use electrical equipment in wet conditions or in damp locations.
- Do NOT use electrical cords to lift, move or carry equipment.
- Do NOT coil or knot electrical cords, and ensure electrical cords are not trip hazards.
General Service Information
- The equipment must be serviced or repaired at authorised service centres by qualified personnel only.
- Replacement parts must be original equipment manufacturer (OEM) to ensure equipment safety is maintained.
- Do NOT attempt any maintenance or repair work not described in this manual.
- After use, the equipment and components may still be hot – allow the equipment to cool and disconnect spark plugs and/or electrical power sources and/or batteries from it before adjusting, changing accessories or performing repair or maintenance.
- Do NOT adjust while the equipment is running.
- Perform service-related activities in suitable conditions, such as a workshop.
- Replace worn, damaged or missing warning/safety labels immediately.
Introduction
- This manual is a valuable document. It describes your new machine. Read the manual carefully before attempting to use the machine. Following the instructions (use, service, maintenance, etc.) can considerably increase the lifespan of your machine and even increase its resale value.
- Please contact your dealer for more information.
- If you sell your machine, make sure to give the operator's manual to the new owner.
Use
The stump grinder is used to remove tree stumps. By moving the cutting wheel in sweeping movements laterally over the top and front of the stump, you can gradually grind it away. Read the chapter "Safety Instructions" before you use the machine for the first time.
Insure Your Machine
Contact your insurance company to check on insurance coverage for your new machine. You should have all-inclusive insurance for liability, fire, damage, and theft.
Safety Instructions
- WARNING! Under no circumstances may the original design of the machine be modified without written approval from the manufacturer. Such modifications not only affect the performance and durability of the machine, but many even pose a safety risk for users and those in the vicinity. Unauthorised modifications to the design of the machine may absolve the manufacturer from liability for any resulting personal injury or property damage. Modifying the machine without written approval from the manufacturer may void the guarantee.
- The stump grinder can be dangerous if used improperly or without due care and can lead to serious accidents, in the worst cases even fatal accidents. It is very important that you read this operator's manual and understand the instructions before you attempt to use the machine.
- Do not use the machine until you have read the operator's manual carefully and understand the instructions given. All maintenance work or adjustment not described in this manual must be performed by an authorised service workshop.
- CAUTION: Lubricate the cutting wheel bearings BEFORE first use. Re-lubricate the cutting wheel bearings after every 10 hours of use. Failure to properly lubricate and maintain the cutting wheel bearings may void product warranty.
General Use
The objective of this manual is to help you use your machine safely and to give you information about how to maintain your machine. Please read the manual carefully before attempting to use the machine.
If after reading the operator's manual you are still unsure about the safety risks associated with use of the machine, you should not use the machine. Please contact your dealer for more information.
These safety instructions only address the basics for safe use. It would be impossible in the safety instructions to describe all possible risk situations that could arise when using the machine. You can, however, prevent accidents by always using common sense.
- Read this manual carefully and make sure you understand it before using the machine or performing any maintenance. If the user cannot read this manual, it is the responsibility of the machine owner to explain the contents to the user.
- Follow all safety instructions. Failure to may result in injury to yourself or others.
- Accident prevention regulations, other general safety regulation, occupational safety rules and traffic regulation must be followed without fail.
- All users shall be trained in use of the machine. The owner is responsible for training users.
- Engage an authorised workshop for all service and repair not described in this manual.
- Learn how to use the machine and its controls safely and learn to recognise the safely decals.
- Only use the machine for removing tree stumps; it is not intended for any other use.
- Check that the machine is in serviceable condition prior to use.
- Only use the machine in daylight or in other well-lit conditions. Keep the machine a safe distance from holes or other irregularities in the ground. Pay attention to other possible risks.
- Only allow the machine to be used by adults who are familiar with its use.
- Never allow children or persons no trained in the use of the machine to use or service it. Local laws may regulate the age of the user.
- People and animals can distract you, causing you to lose control of the machine. For this reason, you should always concentrate and focus on the task at hand.
- Never leave the machine unsupervised while the engine is running.
• Make sure that other people are nearby when you are using the machine so that you can call for help should an emergency arise.
- The machine is tested and approved only with the equipment originally provided or recommended by the manufacturer.
- Warning! The engine can become very hot. To avoid being burned, you must turn off the engine and wait until all parts have cooled before touching the engine.
• Overexposure to vibration may lead to circulatory or nerve damage, particularly in people who have impaired circulation. Contact your doctor if you experience symptoms that could have been caused by overexposure to vibration.
- Examples of common symptoms include numbness, pain, muscle weakness, change of skin colour or an uncomfortable feeling of tingling.
• These symptoms appear most frequently in the fingers, hands, or wrists.
- Important Information! Never use a stump grinder that is damaged or incorrectly adjusted. Never use the stump grinder if any component is missing or if it is not properly assembled. Check that the cutting tools stop rotating when you reduce the throttle. If you find yourself in a situation where you are not sure what to do, always seek expert assistance. DO NOT try to tackle any problem you are not qualified to resolve.
natural_image
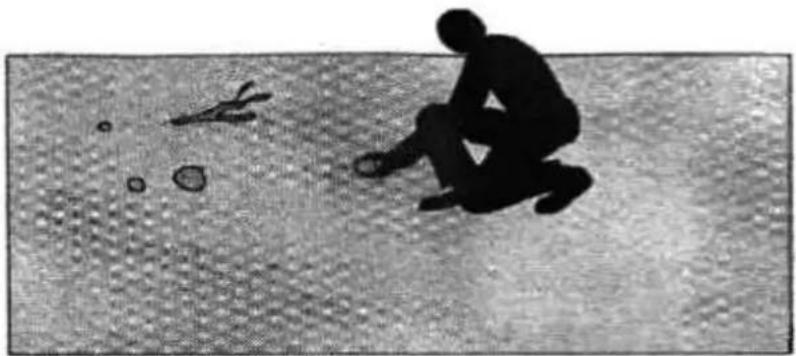
Silhouette of a person crouching on a textured surface with floating objects (no text or symbols)CLEAR THE WORK AREA FIRST BEFORE BEGINNING YOUR WORK
natural_image
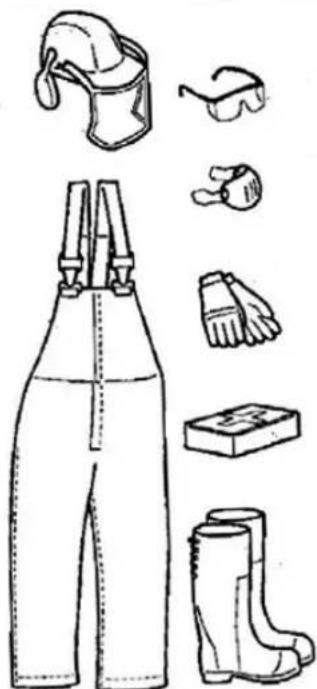
Line drawing of various winter boots and safety gear including hood, gloves, and boots (no text or symbols)USE APPROPRIATE EQUIPMENT
Preparations
- Make sure that you always have first aid equipment at hand when using the machine.
- Make sure nobody that else is in the vicinity of the machine when you start the engine, the drive or run the machine.
- Make sure that animals and people maintain a safe distance from the machine.
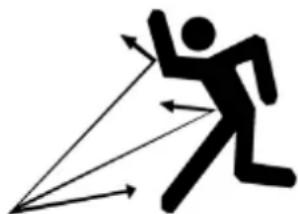
- Clear the area of objects such as stones, toys, steel wire, etc. that could become caught in moving machine parts and thrown out.
- Find and locate all fixed objects in the ground, such as sprinkler systems, poles, water valves, bases for washing lines, etc. Be certain to check for hidden electrical cables or similar in the surface of the lawn. Always run the machine around these objects. Never intentionally run the machine over foreign objects.
- Check the dead man's grip and all guards are fitted and functioning. DO NOT use the machine if it is not working properly.
- Make sure that no clothing, long hair or jewellery can get caught in moving machine parts.
- Use mouth protection, protective gloves with good grip and protective clothing which you can move unrestricted. Also use leg protection to protect your legs from sparks and the cutting tools.
- Never use the machine when barefooted. Always wear protective boots with anti-slip and preferably with steel toes.
- Use a helmet with a full-face visor or a mesh visor and protective glasses. Wear approved ear protection when running the machine. Ask your dealer about approved protective glasses, ear protection and recommended helmets.
- Warning! Always use approved protective clothing and approved protective equipment when using the machine. Protective clothing and protective equipment cannot eliminate the risk of accident but wearing proper clothing and the correct equipment will reduce the degree of injury should an accident occur. Ask your dealer about approved protective clothing and approved protective equipment recommended.
Operating
natural_image
Silhouette of a person in motion with arrows indicating direction (no text or symbols)THROWING OBJECTS

natural_image
Abstract black-and-white graphic of a gear and angular shapes (no text or symbols)ROTATING CUTTERS
natural_image
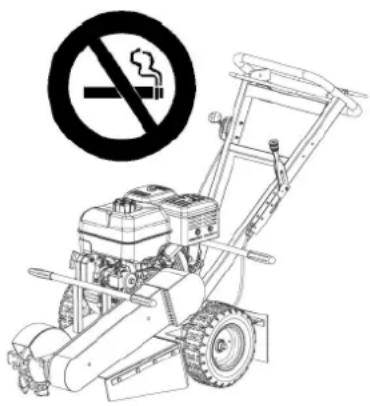
Line drawing of a manual plow with a no-smoking symbol (no text or labels)- DO NOT use the machine on slopes that are more than 10^ .
- DO NOT use the machine if you are tired, have consumed alcohol, or if you are taking other drugs/medication that can affect your vision, judgement or coordination.
- Never use the machine indoors or in spaces lacking proper ventilation.
- Make sure that you have a proper foothold when using the machine, particularly when backing up. Walk, don't run. Never work on wet grass. Poor traction may cause you to slip.
- Keep your hands and feet away from moving parts and the work tools.
- DO NOT use your feet or other parts of your body to gain greater bearing pressure against the stump.
- Smoking, open flames or sparks in the vicinity of the machine are strictly forbidden. Gasoline is extremely flammable and carelessness in handling can result in personal injury of fire.
- Never use a machine with a defective muffler.
- In very warm and dry climates, stump grinder operation poses a risk of forest fires.
- Stop and inspect the equipment if you run over into anything. If necessary, make repairs before beginning again.
- Whatever happens, you should always park the machine on even ground, disengage the drive, activate the parking, turn off the engine and wait until all moving parts have stopped before leaving the operating position behind the machine.
Movement / Transport
- To turn and steer the machine, press down on the handle and turn on the back wheels.
- Turn off the engine and allow it to cool at least 2 minutes before transport.
- Be careful and use safe lifting and moving techniques when loading/unloading the machine.
• We recommend having two people to lift the machine. - Activate the parking brake during transport.
- Fasten the machine properly in place with approved fasteners, such as tension belts, chains or rope. Always check that you are in compliance with applicable traffic regulations before transporting the machine.
Table of Contents
Safety 2
Protective Equipment....8
Personal Equipment 8
Important Information 9
Controls....10
Centrifugal clutch....10
Safety Presence Grip Bar....11
Throttle....11
Brake 12
Assembly....13
Operation....15
Before You Start....15
Starting the Engine 15
Fuel Valve....16
Choke Control....16
Throttle....17
Safety Presence Grip Bar....17
Starter Handle....18
Throttle....18
Procedure for Cutting a Stump....19
Stage 1....19
Stage 2....20
Normal Shut-Down 20
Throttle 20
Brake....21
Fuel Valve 22
Maintenance 23
Cutting Teeth....23
Changing the Cutting Teeth....23
Sharpening the Cutting Teeth....24
Sharpening Steps....24
Brake Adjustment 24
Two-Minute Rule....25
Cleaning and Washing 25
Lubricating Bearings....25
Drive Belts 26
Service Checklist......27
Troubleshooting 28
Stump Grinder
Bäumr-AG®
Storage 30
Winter Storage....30
Service....30
Parts Identification ....31
Additional Safety Warnings 40
Safety Symbols....43
Specifications 45
Protective Equipment
Personal Equipment
Consult your dealer when selecting protective equipment.
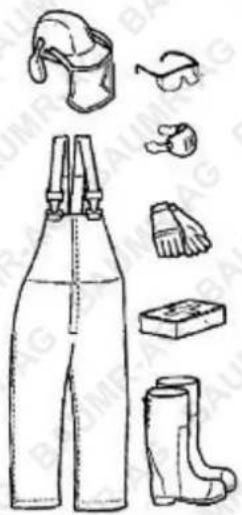
Before using the stump grinder, you may in many cases need to cut back to object with a power saw. Hence, it is appropriate to use personal protective equipment that fulfils requirement for working with both stump grinders and power saws.
The main difference is that you should wear protective glasses when operating the stump grinder while the wire mesh visor gives sufficient protection when using a power saw. Thus, when using the stump grinder, we recommend using both a wire mesh or visor to protect your face and protective glasses.
Alternatively, you can use a face guard, but it scratches more easily and is more susceptible to soiling and fogging.
You are required to wear the following personal protective equipment:
• Protective helmet (hard hat)
- Ear protection
- Face guard
- Protective trousers
- Protective glasses
• Breathing protection (risk of dusty work environment)
- Protective gloves
- First aid kit
• Protective boots or steel-toed shoes.
natural_image
Line drawing of various outdoor gear and boots including hood, goggles, gloves, and boots (no text or labels)Important Information

CAUTION: Lubricate the cutting wheel bearings BEFORE first use. Re-lubricate the cutting wheel bearings after every 10 hours of use. Failure to properly lubricate and maintain the cutting wheel signs may void product warranty.
- Lubricate the cutting wheel bearings BEFORE first use.
- Clear the work area before beginning your work (such as clod, stone, steel bar and so on)
- Change the engine oil after 10 hours.
- Check bolts and nuts are properly adjusted; after 10 hours, tighten them.
- When the engine works without the cutter spindle rotating, move the cutter spindle away from work area to avoid belt worn.
- Check the edge before and after operating. Replace it when damaged.
- Check the fuel tank carefully before and after operating. Make sure there is enough fuel.
After the first 10 hours:
- Change the engine oil.
- Lubricate the cutting wheel bearings.
- Check that the clutch is operating well.
- Check that belts and chains are properly adjusted.
- Tighten screws and nuts.
Spare parts available for purchase, scan QR code below:


Controls

Warning! Gasoline is highly flammable. Observe caution and fill the tank outdoors. (See the Safety Instructions). • Do not bind the bar to the handle. It is there for your safety.
Read the safety instructions before fuelling. • Keep the fuel and fuel tank clean. Avoid filling the machine with dirty fuel. Make sure the fuel cap is properly tightened and the gasket is not damaged, particularly before washing the machine. • SAE10W-30 is recommended for general use. • This stump grinder is recommended for general use. • If the engine “bolts” at normal load it can be damaged. Change the fuel. If this does not help, contact an authorised service workshop. • Do not fill the tank completely; leave space for the fuel to expand as it warms up.
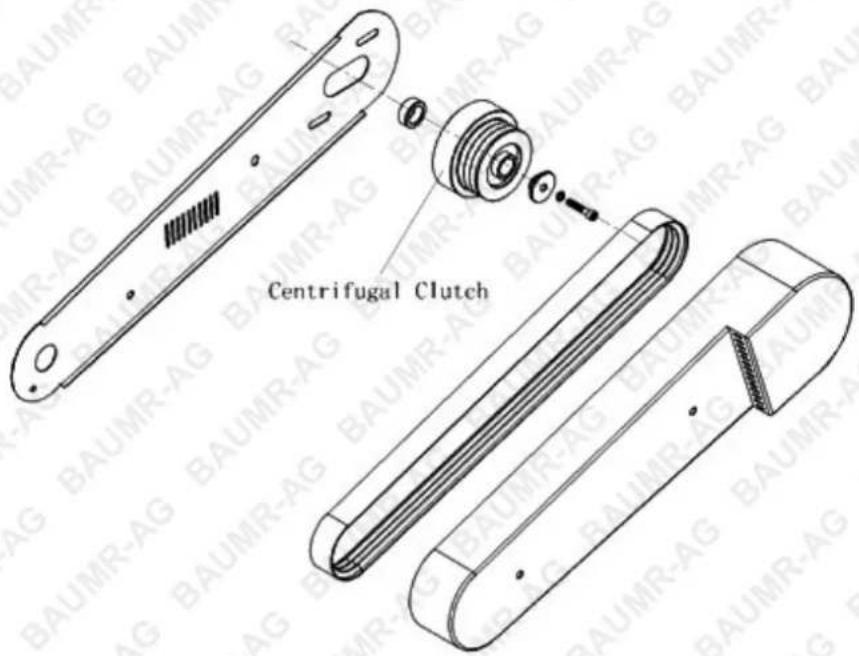
Centrifugal clutch
The engine is equipped with a centrifugal clutch that is connected to the crankshaft. When the engine speed increases, the drive for cutting wheel engages automatically. The centrifugal clutch is maintenance-face; it is not possible for the user to make adjustments.
Safety Presence Grip Bar
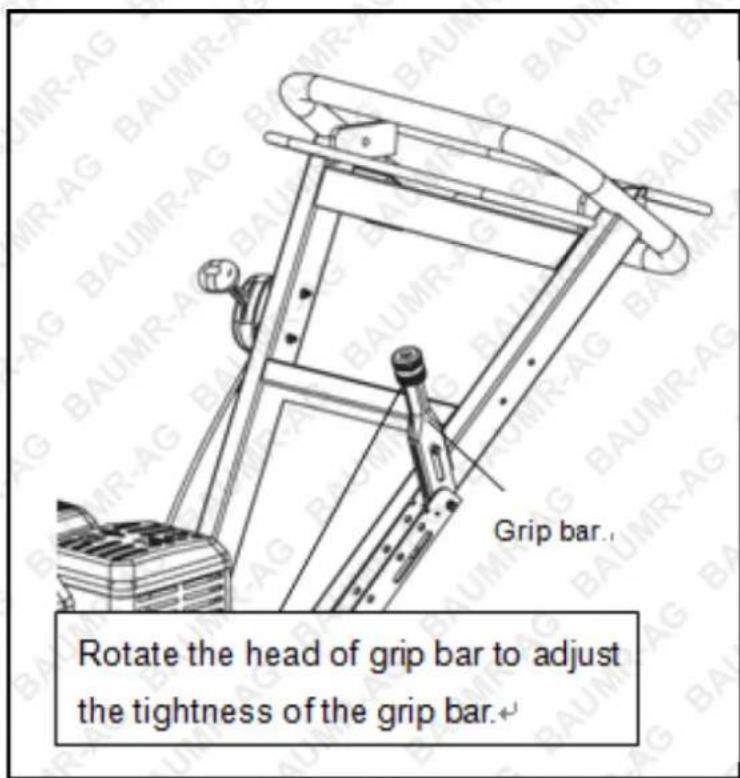
The bar must be held against the handle for the engine to run. If you release the grip, the ignition system short-circuits and the engine stops.
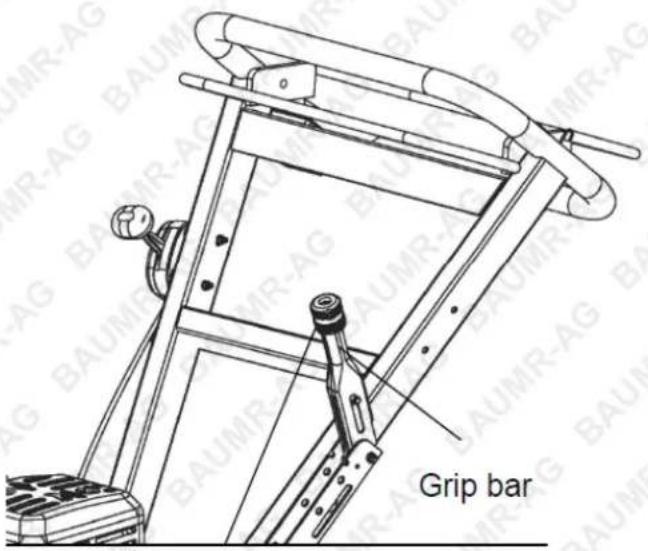
Rotate the head of grip bar to adjust the tightness of the grip bar.
WARNING! Do not bind the bar to the handle. It is there for your safety.
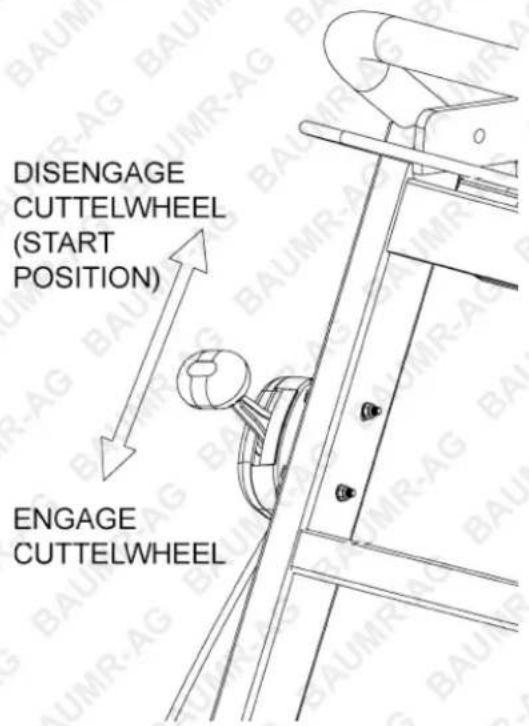
Throttle
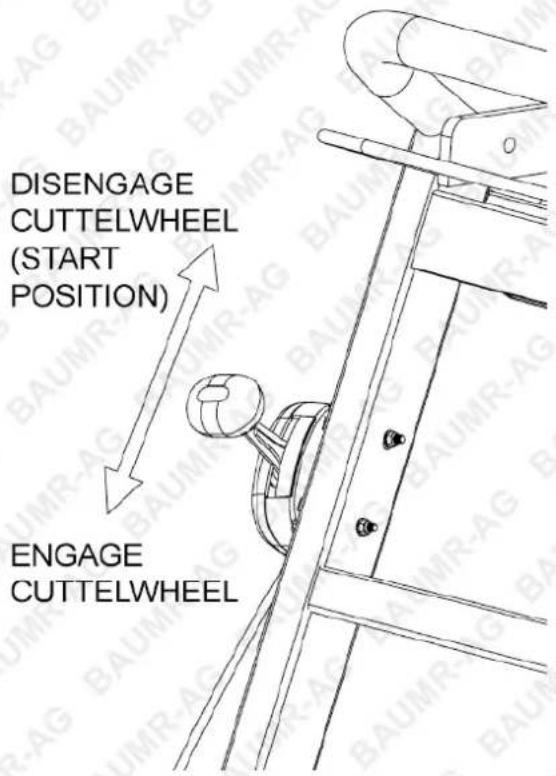
The lever controls engine speed. With the lever down, the engine runs at idle, and functions as start position. When the engine speed increases, the centrifugal clutch drive automatically engages the cutting wheel.
Brake
Warning! Never operate a machine with a defective brake.
The lever activates a disk brake on the left wheel when it is pulled backwards. The brake should always be activated when operating the grinder, when it is parked and when it is being transported.
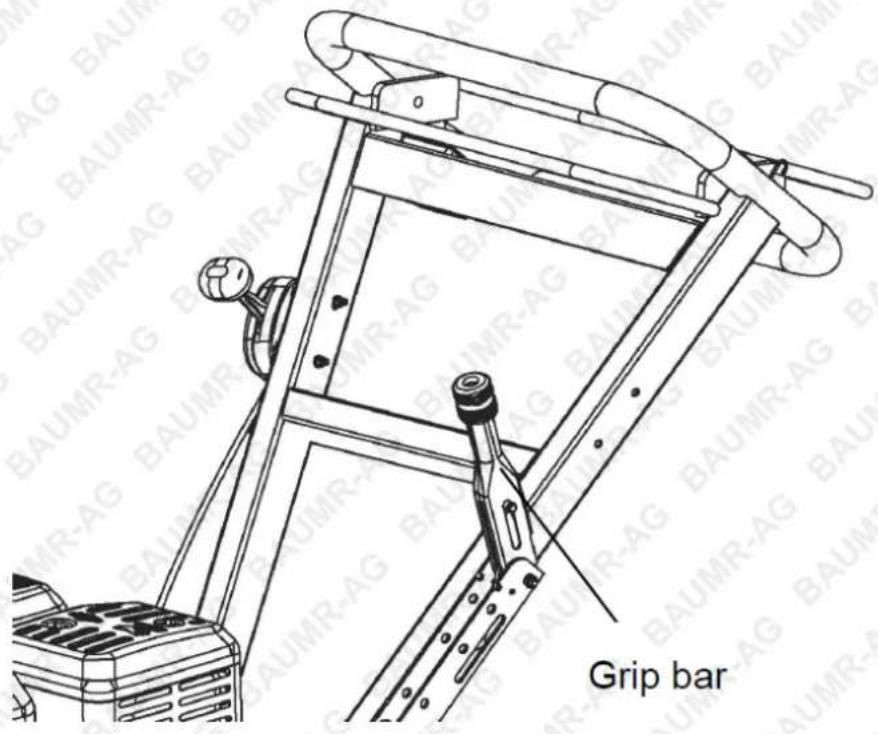
Assembly
- Make sure the throttle lever should be at a minimum position on engine before starting the assembly.
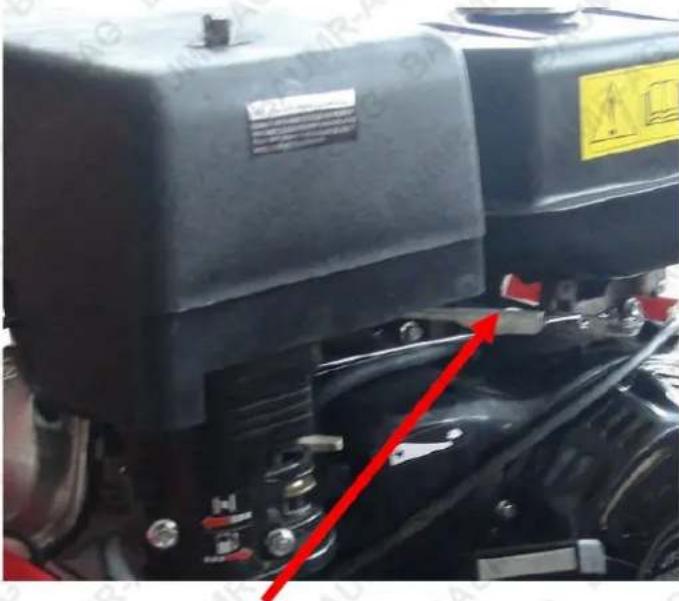
Throttle Lever
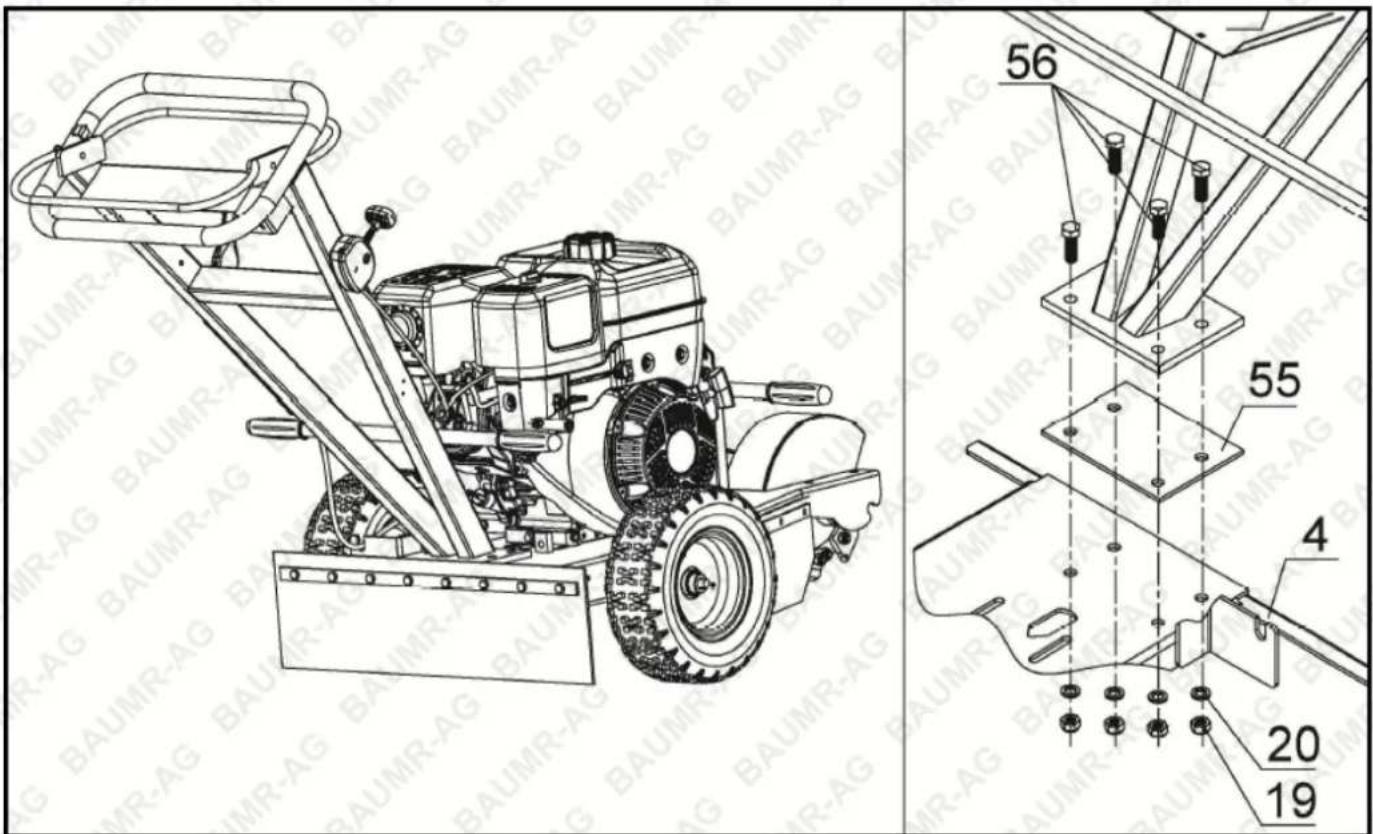
- Remove outer carton sleeve then remove sides and top of crate using hammer or crowbar. Attach gasket (#55) to the chassis assy. (#4), attach lifting handle upon gasket and tighten with hex bolt M12x35 (#56), lock washer ∅12 (#20) and nylon lock nut M12 (#19).
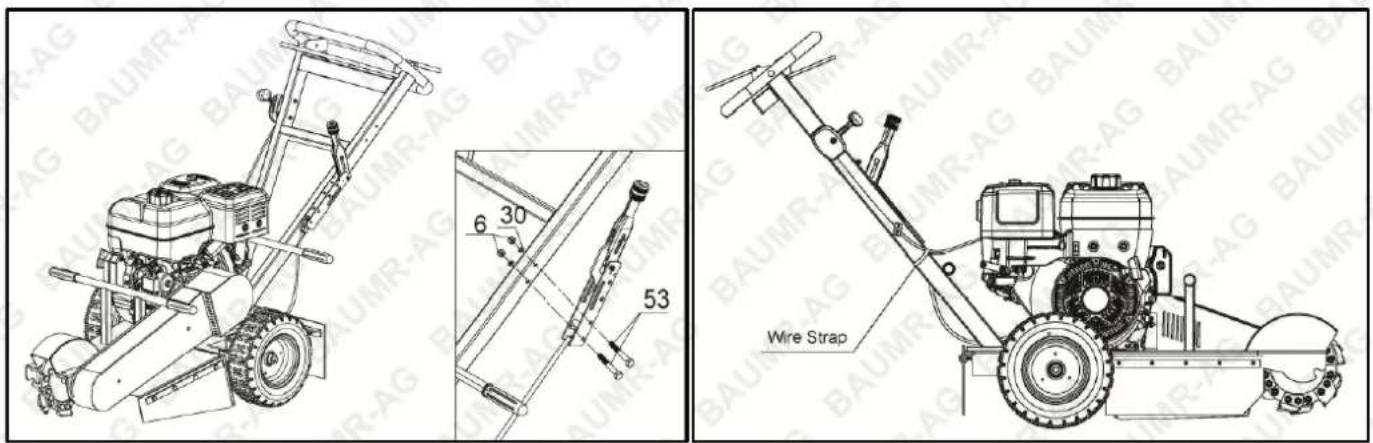
- Remove the nut and washer from brake cable and reinstall with brake cable to the lifting handle. Fix the wires to the lifting handle, then use white strap to tie up the rest wire to the lifting handle.
Operation
Before You Start

CAUTION: Lubricate the cutting wheel bearings BEFORE first use. Re-lubricate the cutting wheel bearings after every 10 hours of use. Failure to properly lubricate and maintain the cutting wheel bearings may void product warranty. Augers and auger tips are consumable parts and are not covered under warranty.
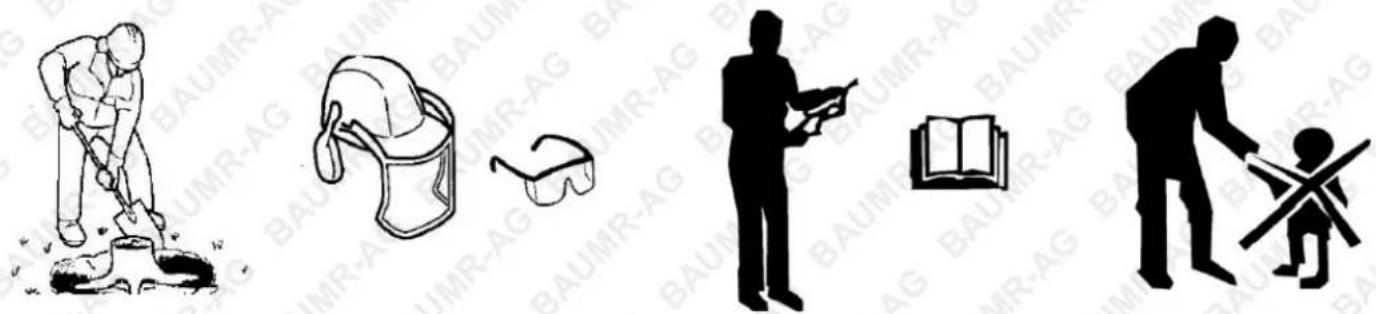
Dig away the earth and remove any stones near the tree stump that may interfere with your work. Check that the ground is free of foreign objects, such as electrical cables, barbed wire, etc. Cut or trim the stump as necessary using a power saw.
- Review all the machine's safety decals.
- Use a hard hat, ear, and eye protection. A mesh visor alone does not provide sufficient eye protection, supplement with protective glasses.
• Make sure that you are familiar with safety regulations and shutdown procedures described previously in this manual.
• Make sure that all guards are in place and in good condition.
• Make sure that the cutting wheel bearings are lubricated.
• Make sure that the blades and cutters are in place and in good condition.
• Make sure that the work area and cutter in particular and free from metallic objects such as wire, nails, etc. that could be thrown out and injure persons in the vicinity and damage the equipment.
• Make sure that everyone, including children and animals, maintain a distance of at least 50 feet (15m) from the machine. Debris can be thrown out and injure people and animals.
Starting the Engine
Check that all daily maintenance as described in the maintenance schedule has been performed. Check that there is sufficient fuel in the tank.
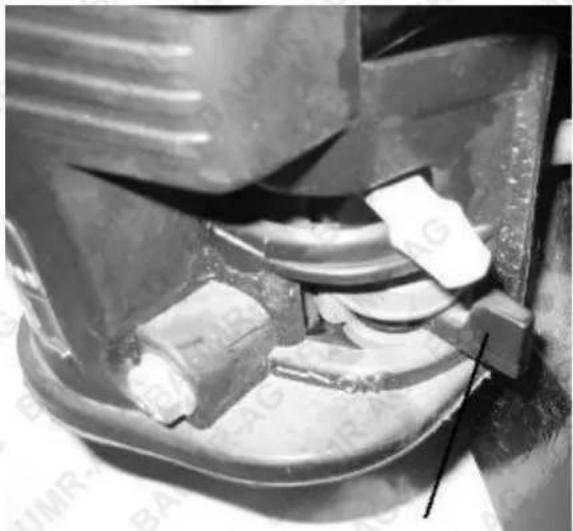
Fuel Valve
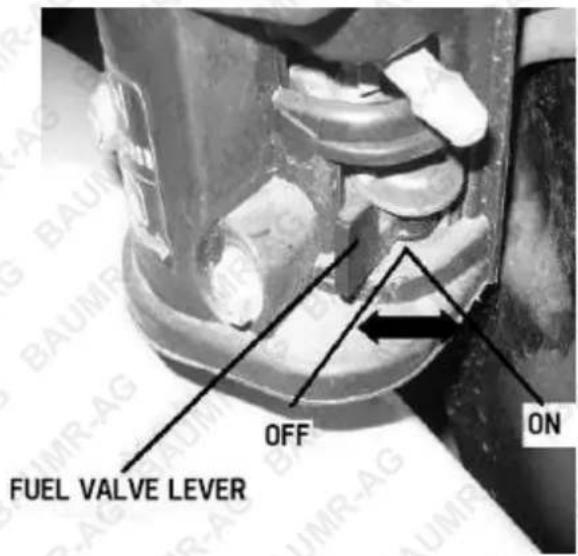
Open the fuel valve. Place the lever all the way to the right.
natural_image
Close-up of a mechanical component with visible parts and a black arrow pointing to a specific part (no text or symbols)FUEL VALVE
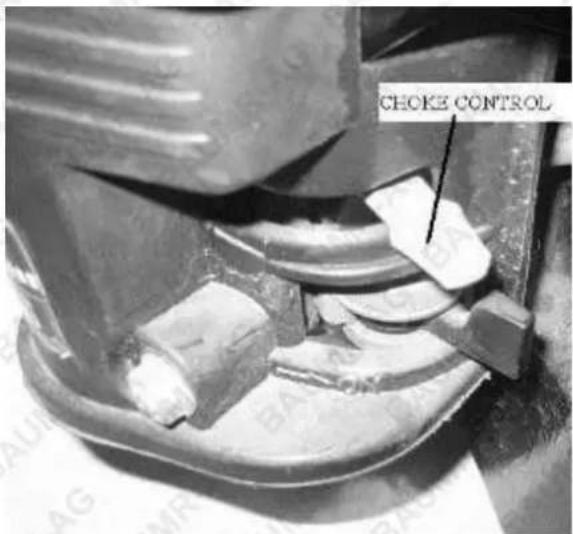
Choke Control
When starting the engine warm, the lever should be in the right position; see the illustration.
When starting the engine cold or partially warm, place the lever completely or partly to the left. Move the lever back to the right once the engine starts. When the engine is cold, it may be best to move the lever back in several stages. Find the position where the engine runs smoothly.
Throttle
Set the throttle on the handle to the SLOW (START)/DISENGAGE position.
Safety Presence Grip Bar
Hold in the safety presence grip bar against the handle.
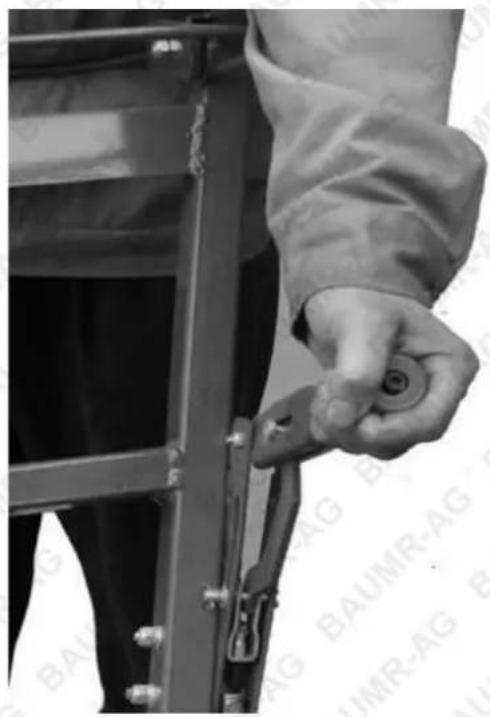
natural_image
Close-up of a person adjusting a metal ladder with a tool, no visible text or symbolsStarter Handle
The dead man's grip must be pressed in when starting the engine. Misuse of the starter handle ca damage the starter. DO NOT twist the starter cord around your hand. Pull out the handle slowly until the gears mesh. Then give a sharp pull on the starter handle. DO NOT pull out the starter cord completely and DO NOT let go of the starter handle when extended.
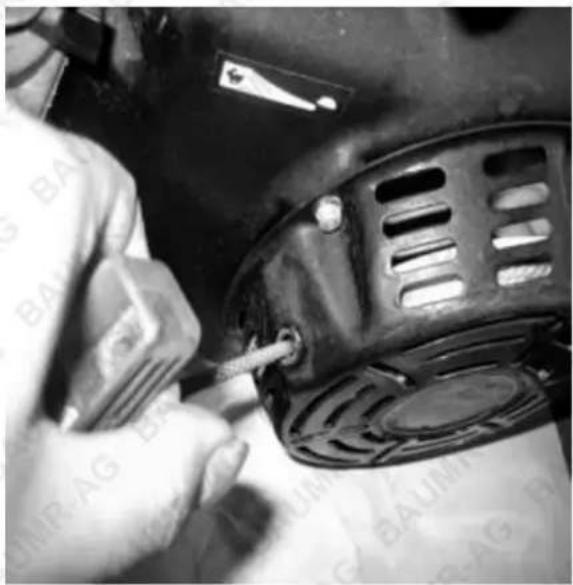
natural_image
Close-up of a person using a tool to adjust or install a mechanical component, no visible text or symbols.Throttle
Keep the throttle at idle. When the throttle is increased, the cutting wheel will begin rotating.
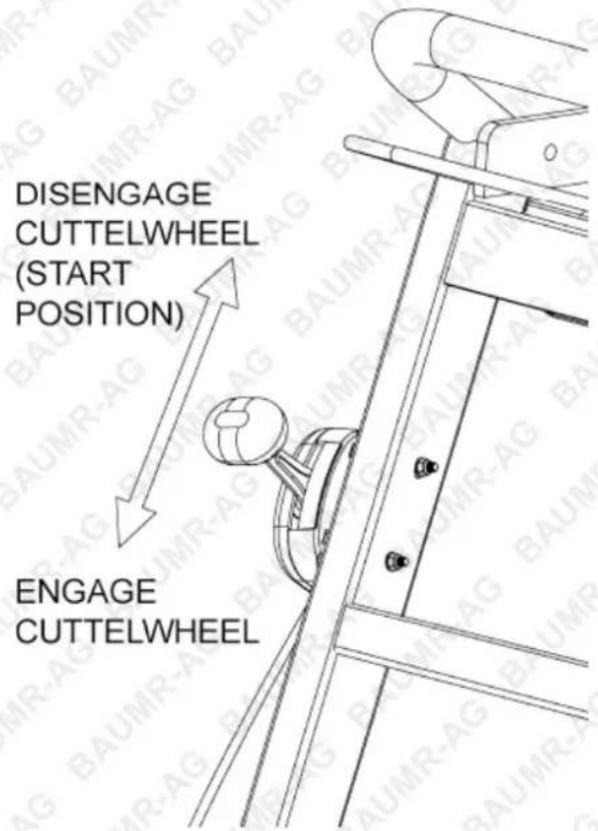
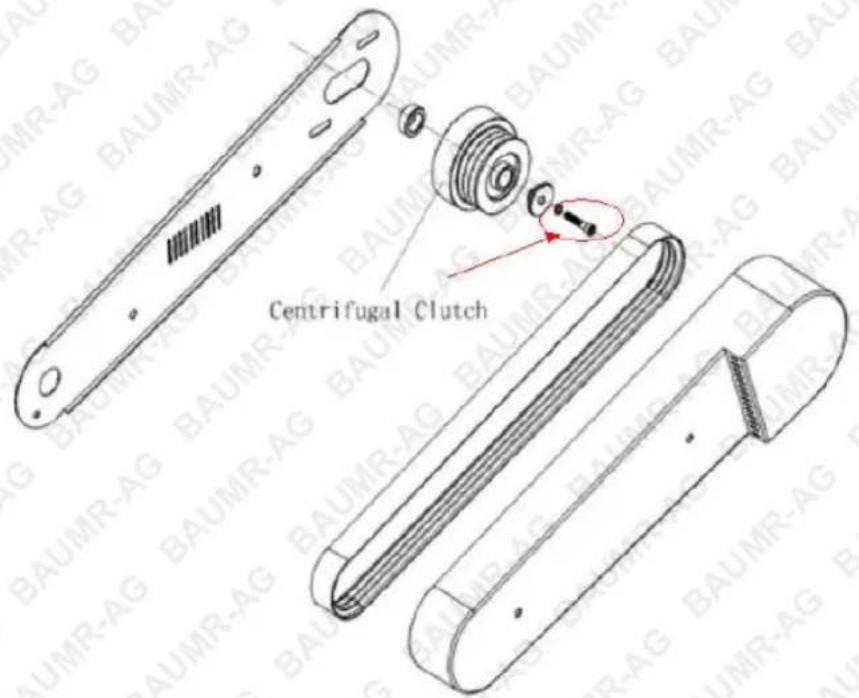
IMPORTANT! Before operating the stump grinder, check if the M8x50 Screw is secured tightly in the Centrifugal Clutch.
Procedure for Cutting a Stump
Stage 1

Warning! Never leave operating position when cutting WHEEL is rotating! Keep everyone and all animals away when cutting WHEEL is rotating.
Important Information
Before operating the stump grinder, review “Machine Control” and “Other Machine Components” presented earlier in the “Operation” section, for a refresher on the function and use if each control and component.
Operating on Hills: Be very careful when operating the stump grinder on hills because the machine can slip or move unexpectedly. NEVER use the machine on grades of 10 percent or more.
Transport: Secure the machine with tensioning belts, chains or other approved materials.
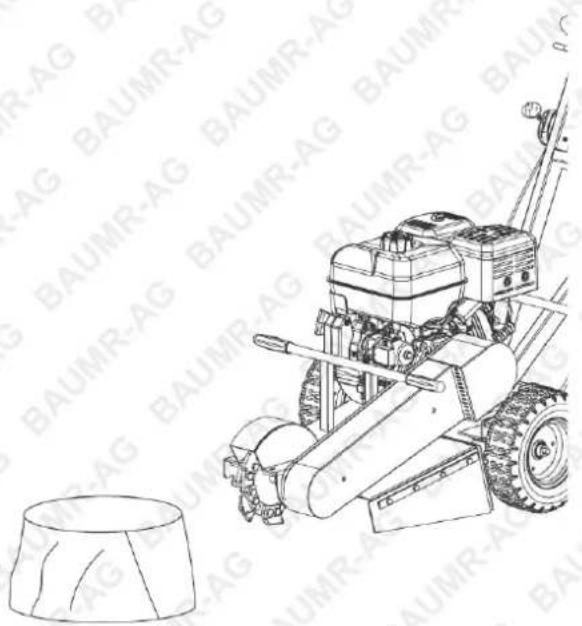
- Place the stump grinder into position with cutting wheel near the front-top edge of stump.
- Set brake to lock position.
- Set throttle to (START) DISENGAGE position.
- Start engine.
- Allow engine to warm up at idle for two minutes.
natural_image
Line drawing of a small agricultural machine with a cylindrical base and mounted components, shown against a patterned background (no text or symbols)- Move throttle up to the ENGAGE position (this will engage the cutting wheel and rotate it).
- Swing the cutting blade to one side, then lower it approximately 12 " to 1" into the front-top corner of the stump. Swing the cutting blade back and forth, lowering the cutting blade approximately 12 " to 1" before each sweep, until you have removed the front portion of the stump to ground level.

Warning! A rotating cutting WHEEL is very DANGEROUS! Stay at the operating position and be sure that the WHEEL comes to a complete stop before doing anything else. To
make operating easier, cut stump to same level as ground.
- Raise the cutting wheel until centre of it is just above top of stump.
- With the cutting wheel off to one side, advance the machine horizontally by releasing and resetting the brake. Advance the machine forward to engage the cutting wheel into the stump so that when swept across the stump it will remove 12 " to 1" of stump with each sweep.
- Sweep the cutting wheel across the stump, cutting away 12 " to 1" of stump.
- Advance the cutting wheel 12 " to 1" and sweep across stump in opposite direction.
- Continue sweeping the cutting wheel left and right across stump, advancing it before each sweep, cutting 12 " to 1" depth of stump with each sweep.
- Continue cutting until top level of stump is removed, making sure not to cut stump deeper than ground level during this first stage.
- Turn throttle to the (START) DISENGAGE position, wait ten seconds for the cutting wheel to stop rotating then release brake and retract machine from stump.
- Pull machine away from stump, and rake chips away from stump.
Stage 2
- Place the machine into position with the cutting wheel near the front-top edge of the stump.
- Set the brake to the lock position.
- Move the throttle up to the ENGAGE position.
- Complete cutting the stump by repeating the previous steps until the stump is cut to desired depth.
- Stop the machine.
Normal Shut-Down
Throttle
Set the throttle to SLOW/DISENGAGE. If the engine has been running full out, let it run easily for about 30 seconds to one minute at low speed. DO NOT let front of unit touch ground until you are sure cutting wheel has stopped turning.
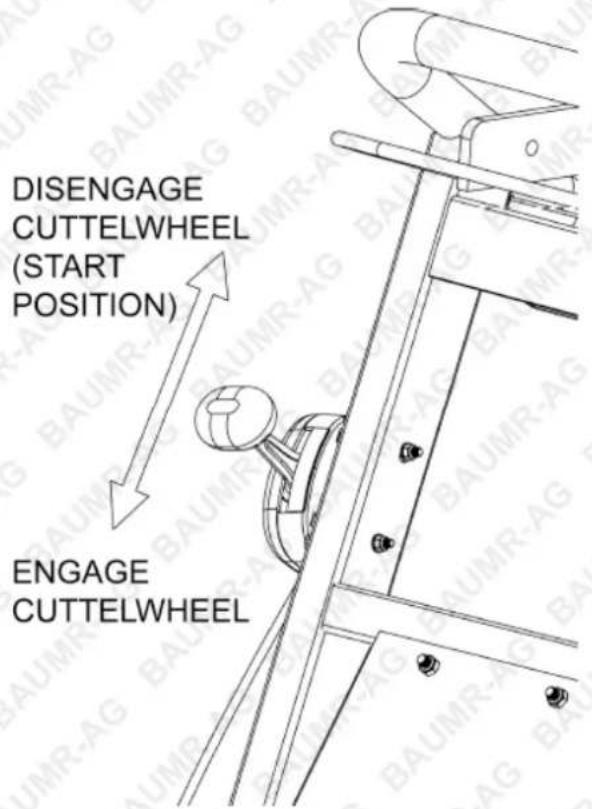

Warning! A rotating cutting WHEEL is very DANGEROUS! Stay at the operating position and be sure that the WHEEL comes to a complete stop before doing anything else.
Brake
Activate the brake by pulling the lever.
Fuel Valve
Close the fuel valve. Turn the lever all the way to the left (see illustration). Release the safety presence bar. Wait until the cutting wheel stops. Make sure that the cutting wheel is resting against the ground and has stopped completely before doing anything.
Maintenance
Cutting Teeth
Among the most critical elements of the machine are the cutting teeth. It is also the most subject to damage and wear. During cutting, teeth not only make contact with the stump, but also encounters numerous assortments of abrasives and objects, such as dirt, stones, and occasionally a large rock or buried scrap.
The loss of and wear of cutting teeth can significantly impair the efficiency and performance of the machine. Therefore, it is important to make frequent observations of the condition of all cutting teeth and replace or sharpen any damaged or worn teeth. Read all of the following instructions before beginning to change cutting teeth.
natural_image
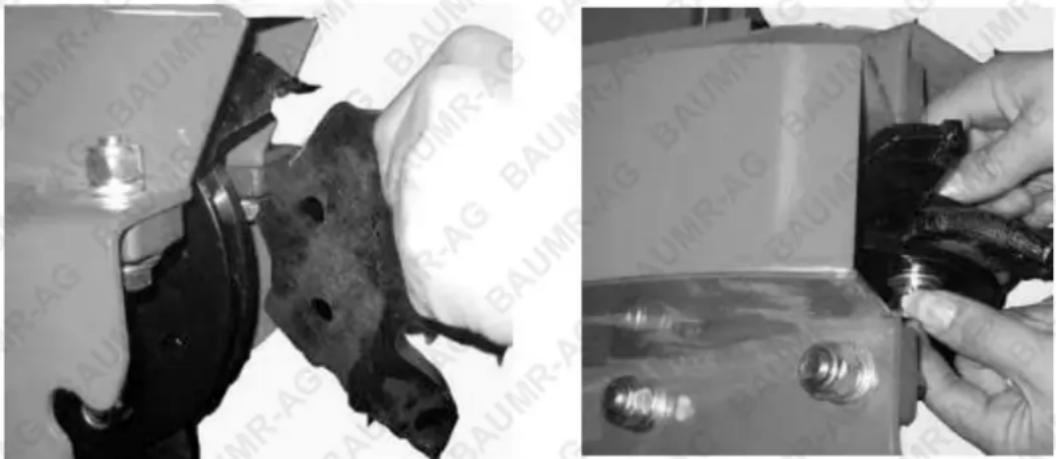
Two-panel black-and-white photo showing a car brake component being cleaned and processed, with no visible text or symbols.- Place the tooth in position against the side of the cutting wheel.
- Slide the 2 fixing bolts through the tooth and cutting wheel. One bolt is longer and must also pass through the tooth on the opposite side of the cutting wheel.
- Attach a flat washer, lock washer and nut to the bolts and tighten securely. Check that all cutting teeth bolts are securely tightened.
Changing the Cutting Teeth
- Clean all dirt from the cutting wheel and teeth.
- Check the cutting teeth for cracks, chips, and damage. Replace damaged or unserviceable cutting teeth
- Remove the 2 bolts securing the cutting tooth - be careful not to let any parts drop when they become loose.
- Re-install the tooth and securely tighten using the fixing bolts. Ensure that the teeth align with wheel rotation and that the longer bolt is used where it must fix teeth on both sides of the cutting wheel.
Sharpening the Cutting Teeth
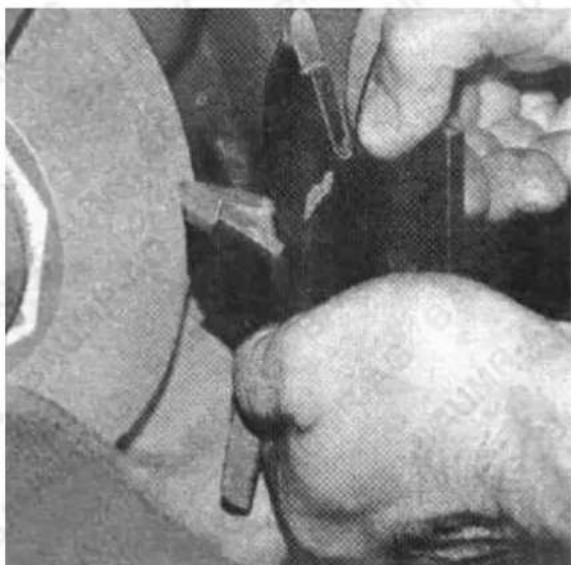
Do not allow cutting teeth to wear too much before sharpening. The cutting teeth must be removed from the machine before sharpening.
natural_image
Close-up of hands using a tool to cut or repair a piece of material (no visible text or symbols)NOTE: Sharpening carbide cutting teeth requires a special process.
Sharpening Steps
For sharpening, you will need a 6- or 8-inch bench grinder, an aluminium-oxide general purpose grinding wheel, a [green] silicon-carbide wheel and a single-point wheel dresser.
Then follow these steps:
- Use the single-point wheel dresser to create a 12 " groove in the middle- of the silicon-carbide wheel to accommodate the radius of cutting tooth carbide tip.
- Hold the tooth vertical and inverted so that the carbide tip faces up. Do not grind the face of the carbide.
- Use the aluminium-oxide wheel to grind away some of the steel from the front of the tooth below carbide tip, exposing the front of the carbide tip. Do not allow the cutting edge of the carbide tip to touch the grinding wheel, as this will ruin the tip.
- Hold the tooth vertical, with carbide tip facing up and carefully and gradually grind away the dulled portion of the carbide tip against the silicon-carbide wheel, maintaining a 30-degree front cutting angle. Push the tooth into the grinding wheel – do not lift the tooth into the wheel.
- Depending on the tooth dullness, you may need to go back and forth between the aluminium oxide wheel and the silicon-carbide wheel until you have restored a sharp cutting edge. As you become more familiar with sharpening, you will be able to do it quickly.
By keeping your stump grinder sharp, you will take a lot of wear-and-tear off of the machine. Sharp teeth increase effectiveness of the machine, reduces working time, and minimises wear and tear.
Brake Adjustment
For fine adjustment, loosen set screw on side of brake lever knob. Adjust clockwise to tighten brake; adjust anti-clockwise to loosen brake. (Wheel should lock completely, tighten set screw). For coarse adjustment, turn adjusting nuts on brake cable fitting at brake cable mount.
Two-Minute Rule
The machine may be tipped backward or on its side to facilitate access for cleaning or service, but no longer than 2 minutes. If the machine is held in this position for too long, the engine can be damaged by gasoline draining into the crankcase. Should this happen, perform an engine oil change before starting the engine again.
Cleaning and Washing
Regular cleaning and washing will increase the machine's life span. Make it a habit to clean the machine directly after use before the dirt sticks. Check before reusing that the fuel tank lid is properly in place to avoid getting water in the tank. Use caution when using high-pressure spray because warning decals, instruction signs and the engine can be damaged. Do not exceed 70 bar/1000 PSI water pressure when cleaning.
Lubricate the machine after cleaning. This is particularly important if the machine is to be stored.
Lubricating Bearings
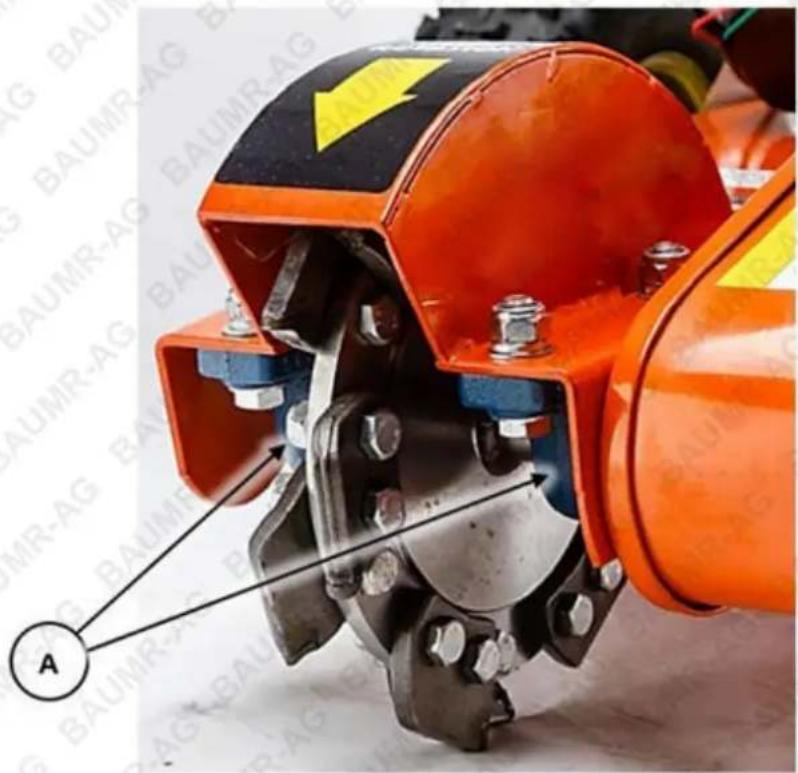
Lubricate the cutting wheel bearings BEFORE first use. Re-lubricate the cutting wheel bearings after every 10 hours of use. Failure to properly lubricate and maintain the cutting wheel bearings may void product warranty. Use a suitable grease gun (not supplied) and automotive wheel bearing grease (not supplied). Attach the grease gun to the grease nipple on the bearing holder (A) and pump in 1 or 2 squeezes of grease. Always grease both bearings on either side of the cutting wheel.
PUMP GREASE IN SLOWLY TO PREVENT DAMAGE TO THE BEARING SEALS. USE EXTREME CAUTION WHEN USING A HIGH PRESSURE OR HIGH-VOLUME GREASE GUN.
Drive Belts
The drive system of the stump grinder is composed of a 9J Joined Narrow V-belt. The stump grinder's V-belt tension should be checked daily.

BEFORE BEGINNING TO CHECK OR ADJUST BELT: SHUTDOWN THE MACHINE, BE SURE THAT ALL MOVING PARTS HAVE COME TO A COMPLETE STOP. EXTREME CAUTION MUST BE USED TO AVOID DEATH OR SERIOUS INJURY. STAY CLEAR OF EY, CLUTCH AND CUTTING WHEEL WHEN THEY ARE MOVING.
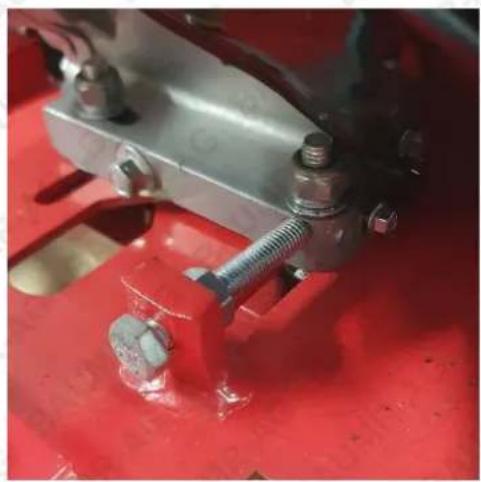
To adjust belt tension, loosen the 2 bolts behind clutch. Also loosen the 4 engine mounting bolts. Turn square head adjusting bolt on frame clockwise to tighten belt, anti-clockwise to loosen belt. (Make sure to tighten all bolts after proper belt adjustment is achieved). To check belt tension, you should be able to depress the belt down about 1/4 - 3/8" (6 -10 mm) from the original position.
TO EXTEND BELT LIFE, PROPER TENSION MUST BE MAINTAINED. A LOOSE BELT WILL CAUSE EXCESSIVE CUTTING WHEEL SLIPPAGE AND BELT FAILURE. A BELT THAT IS TOO TIGHT CAN CAUSE BEARING, SHAFT AND BELT FAILURE.
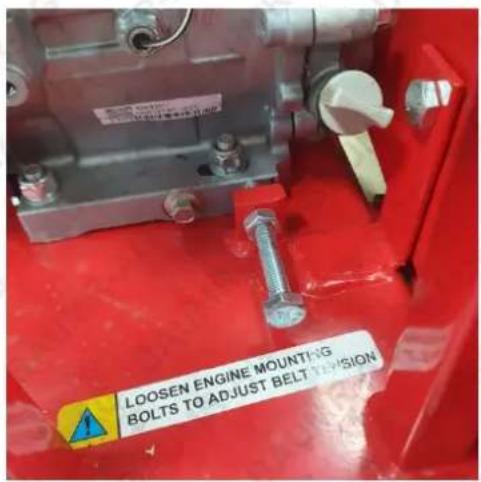
Front tensioning bolt
natural_image
Close-up of a metal clamp bracket with bolts and a bolt inserted into a red safety plate (no text or symbols visible)Rear tensioning bolt
Service Checklist
- Break the packaging and make sure the machine has not been damaged in transport.
• Where applicable, assembly accompanying components. - Check that the machine design corresponds to the customer order.
- Check that the right amount of oil is in the engine and transmission.
- Check and adjust air pressure in the tyres (25PSI max.).
- Check that the working equipment is properly set.
- Check that the drive pulleys and sprockets are aligned.
- Lubricate the cutting wheel bearings and the machine as described in the lubrication schedule.
• Fill the fuel tank and start the engine. - Check that the machine and working equipment do not move in neutral.
- Check that all operating instruments.
- Check decals and information attached to the unit.
- Check the engine speed (RPM), see Technical Data.
- Check for leakage.
Troubleshooting
Symptom Cause Action
| The engine will not start | Fuel valve closed. Open the fuel valve. | |
| User error | Choke valve open.Engine switch in OFF position. | Close the chock with cold engine.Turn engine switch to ON |
| Fuel system | Fuel tank empty.Machine stored without observing proper procedure from chapterWinter Storage.Contamination, water or ice in fuel system.Carburettor problems. | Fill with fuel.Clean tank, sludge reservoir and empty carburettor.Fill the tank with fresh fuel.Clean tank, sludge reservoir, fuel lines and carburettor fill the tank with fresh fuel. |
| Spark plug | Wrong spark plug type.Build-up on electrodes.Short circuit.Gasoline or oil on the spark plug. | Replace the spark plug.Check electrode gap and clean or replace spark plug.Replace the spark plug.Clean the spark plug. Air the engine out.Start with full throttle. |
| No spark after service | Faulty engine switch, cable or ignition. | Contact an authorised service workshop. |
| Low compression authorised | Serious interior engine damage or faulty valves. | Contact a service workshop. |
| Engine is gutless or unevenly | ||
| Air filter | Clogged air filter. | Clean or replace the air filter. |
| Fuel system | Machine stored without observing proper procedure from chapterWinter Storage. | Clean tank, sludge reservoir and empty carburettor.Fill the tank with proper fuel. |
| (Blue exhaust)(Voluminous blue-white exhaust) | Tank filled with 2-cycle mixed oil. Tank filled with diesel. | Clean tank, sludge reservoir and empty carburettor.Fill the tank with proper fuel. Open choke valve.Clean or replace the air filter. |
| (Black exhaust) | Choke left on. Clogged air filter. Carburettor problems. | Contact an authorised service workshop. |
| Ignition system | Wrong spark plug type.Build-up on electrodes.Short circuit.Faulty ignition unit. | Replace the spark plug.Check electrode gap and clean or replace spark plug.Contact an authorised service workshop. |
Problem Possible solutions
| Belt coming off. | Pulleys not aligned.Belt tension is insufficient. Adjust belt tension. |
| Belt engages late or slips. | Tighten the belt as described in the operator's manual.Reduce cutting depth. |
| Belt not staying tight after adjustment. | Check for damage on the axle, pulley or key. Make sure that the setscrews are properly tightened.Replace damaged parts. |
| The cutting wheel does not rotate | Engine speed is insufficient to activate the centrifugal clutch.Belt tension is insufficient. Adjust belt tension.Clutch is worn-replace shoes and springs, and/or clutch bearings. |
| The cutting wheel continues to rotate. | Check that the throttle is disconnected.Check for damage on the throttle cable.Check that the throttle cable is properly mounted on the throttle valve.The engine speed is not under 1000 rpm, which is required to disengage the centrifugal clutch.Inspect springs on clutch shoes. If tension on clutch shoes is not enough to pull shoes back, replace spring and clutch shoes. |
| The parking brake is slipping | Adjust the brake tension in the manner described in the operator's manual.Check for damage on the brake rod or lever.Check for wear on the brake pads. Replace as necessary. |
Storage
Winter Storage
At the end of the season, the machine should be readied for storage (or if it will not be in use for longer than 30 days). Fuel allowed to stand for long periods of time (30 days or more) can leave sticky residues that can plug the carburettor and disrupt engine function.
Fuel stabilizers are an acceptable option as regards sticky residues during storage. If alkylate gasoline (Aspen) is used, stabilizers are unnecessary because this fuel is stable. However, you should avoid switching between regular and alkylate gasoline as sensitive rubber components can harden. Add stabilizer to the fuel in the tank or in the storage container. Always use the mixing ratios specified by the manufacturer of the stabilizer. Run the engine for at least 10 minutes after add in the stabilizer so that it reaches the carburettor. DO NOT empty the fuel tank and the carburettor if you have added stabilizer.

Warning! NEVER store an engine with fuel in the tank indoors or in poorly ventilated spaces where fuel vapour can come in contact with open flame, sparks or a pilot light such as in a boiler, hot water tank, clothing drier, etc. handle the fuel with caution. It is very flammable and careless use can cause serious damage to person and property. Drain the fuel into an approved container outdoors and far away from open flame. NEVER use gasoline for cleaning. Use a de-greaser and warm water instead.
Service
When ordering spare parts, please specify the purchase year, model, type, and serial number.
Always use genuine Parts.
An annual check-up at an authorised service workshop is a good way to ensure that your machine performs its best the following season.
- Inspect the paint to prevent rust.
- Inspect the machine for worn or damaged parts and tighten any nuts or screws that may have become loose.
- Change the engine oil; dispose it properly.
- Open the fuel valve. Empty the fuel tank and the carburettor.
- Close the fuel valve.
- Remove the spark plug and pour about a tablespoon of engine oil in the cylinder. Turn over the engine so that the oil is evenly distributed and then refit the spark plug. Put the engine in the compression phase where the triangle mark on the sleeve of the starter is aligned with the upper hole in the starter. Note: Compression phase occurs every second revolution.
- Lubricate all grease nipples, joints and cables.
- Store the machine in a clean, dry place and cover it for extra protection.
- Cover the cutting wheel and teeth with a thin coat of oil to avoid rust.
Parts Identification
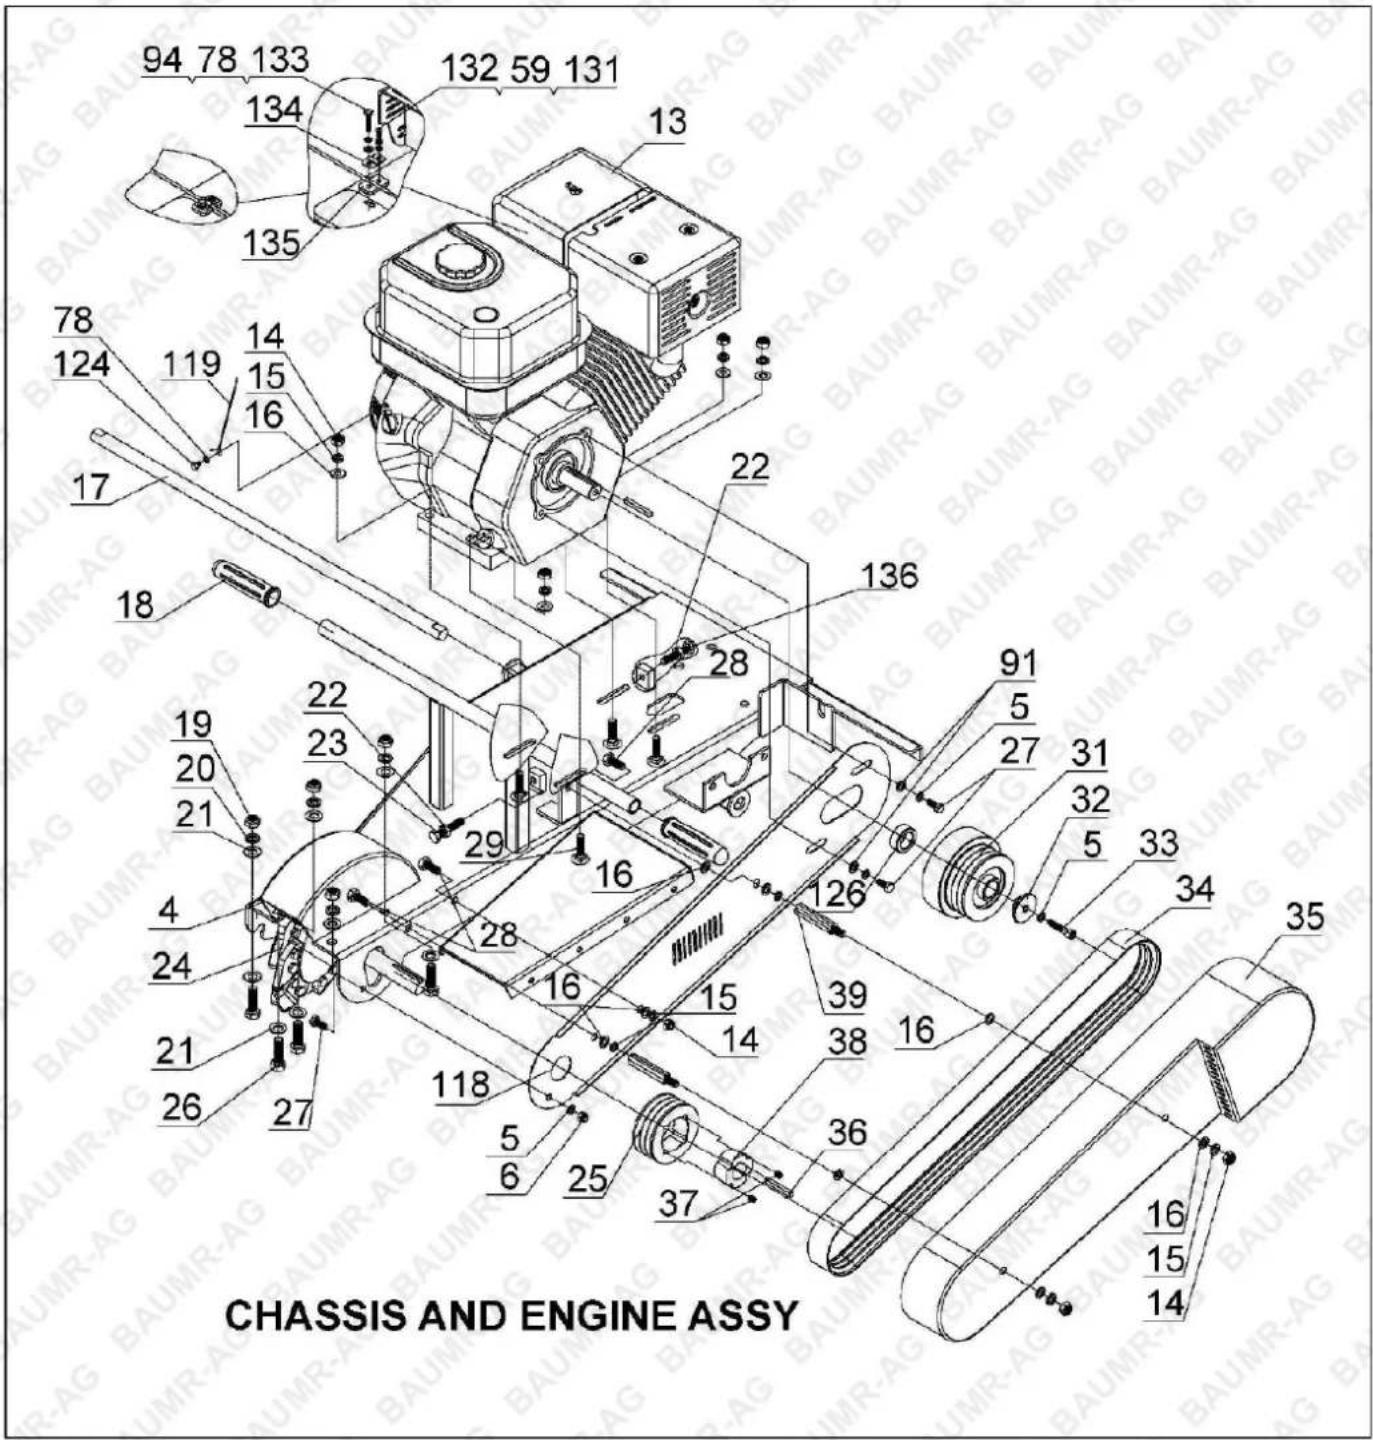
| Part # | Description | Qty | Part # | Description | Qty |
| 4 | Chassis Assy. | 1 | 33 | Hexagonal Socket Head Cap Screw M8x50 | 1 |
| 5 | Spring Washer ∅8 | 4 | 34 | 9J Joined Narrow V-Belt | 1 |
| 6 | Lock Nut Nylon M8 | 1 | 35 | Outer Belt Guard | 1 |
| 13 | Engine | 1 | 36 | Flat Key 6x50 | 1 |
| 14 | Lock Nut Nylon M10 | 7 | 37 | Hexagon Socket Set Screw M10x16 | 2 |
| 15 | Spring Washer ∅10 | 9 | 38 | Pulley Locker | 1 |
| 16 | Flat Washer ∅10 | 12 | 39 | Bolt | 2 |
| 17 | Axle | 1 | 59 | Spring Washer ∅5 | 1 |
| 18 | Handle Cover | 2 | 78 | Spring Washer ∅6 | 3 |
| 19 | Lock Nut Nylon M12 | 4 | 91 | Large Washer ∅8 | 2 |
| 20 | Spring Washer ∅12 | 4 | 94 | Flat Washer ∅6 | 1 |
| 21 | Flat Washer ∅12 | 8 | 118 | Inner Belt Guard | 1 |
| 22 | Hex Nut M10 | 2 | 119 | Start Switch Assy. | 1 |
| 23 | Hex Bolt M10x80 | 1 | 124 | Hex Bolt M6x12 | 1 |
| 24 | Blade And Shaft Assy. | 1 | 126 | Centrifugal Clutch Bushing | 1 |
| 25 | Belt Pulley | 1 | 131 | Flat Washer ∅5 | 1 |
| 26 | Hex Bolt M12x40 | 4 | 132 | Screw M5x10 | 1 |
| 27 | Hex Bolt M8x20 | 3 | 133 | Hex Bolt M5x30 | 1 |
| 28 | Hex Bolt M10x25 | 3 | 134 | Cover Plate | 1 |
| 29 | Step Bolt M10x45 | 4 | 135 | Press Plate | 1 |
| 31 | Centrifugal Clutch | 1 | 136 | Hex Bolt M10x50 | 1 |
| 32 | Axle Sleeve | 1 |
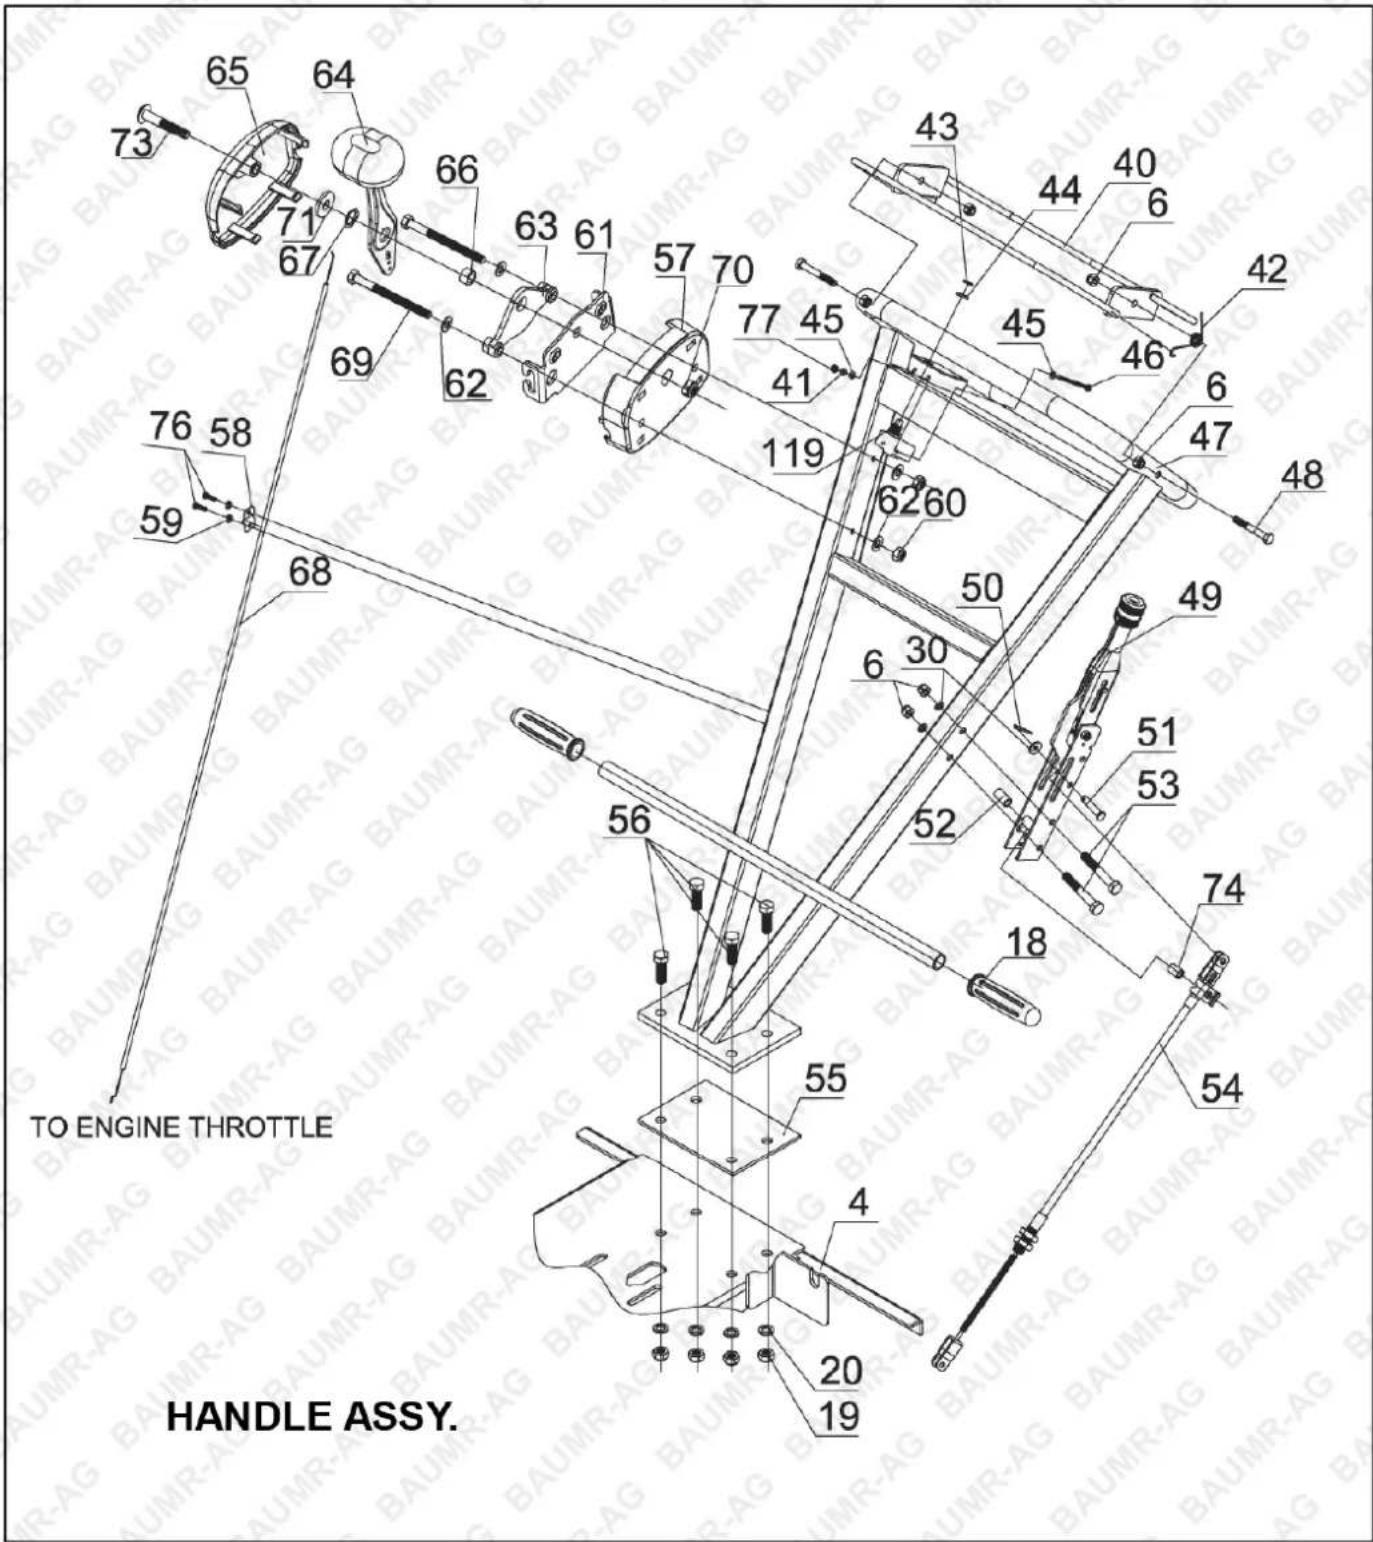
| Part # | Description | Qty | Part # | Description | Qty |
| 4 | Chassis Assy. | 1 | 56 | Hex Bolt M12x35 | 4 |
| 6 | Lock Nut Nylon M8 | 6 | 57 | Bottom of Control Box | 1 |
| 18 | Handle Cover | 2 | 58 | Pressure Plate | 1 |
| 19 | Lock Nut Nylon M12 | 4 | 59 | Spring Washer ∅5 | 2 |
| 20 | Lock Washer ∅12 | 4 | 60 | Lock Nut Nylon M5 | 4 |
| 30 | Flat Washer ∅8 | 3 | 61 | Pressure Plate | 1 |
| 40 | Lifting Handle syphone Assy. | 1 | 62 | Flat Washer ∅5 | 4 |
| 41 | Spring Washer ∅4 | 2 | 63 | Nylon Diaphragm | 1 |
| 42 | Torsional Spring | 1 | 64 | Adjusting Handle | 1 |
| 43 | Hex Nut Nylon M12 | 2 | 65 | Top of Control Box | 1 |
| 44 | Lock Washer | 2 | 66 | Bushing | 1 |
| 45 | Flat Washer ∅4 | 4 | 67 | Bowl Type Spring Clip | 1 |
| 46 | Cross Recess Head Screw M4x70 | 2 | 68 | Adjusting Control Wire Assy. | 1 |
| 47 | Lifting Handle Assy. | 1 | 69 | Hex Bolt M5x60 | 2 |
| 48 | Hex Bolt M8x65 | 2 | 70 | Nylon Lock Nut M6 | 3 |
| 49 | Brake Cable | 1 | 71 | Large Flat Washer ∅6 | 3 |
| 50 | Cotter ∅2 x16 | 1 | 73 | Cross Head Tapping Screw ∅6 x30 | 1 |
| 51 | Handle Bolt A | 1 | 74 | Bushing | 1 |
| 52 | Handle Bush | 1 | 76 | Cross Recessed Pan Head Tapping Screw ∅5 x12 | 2 |
| 53 | Hex Bolt M8x70 | 2 | 77 | Nylon Lock Nut M4 | 2 |
| 54 | Brake Cable Assy. | 1 | 119 | Switch | 1 |
| 55 | Gasket | 1 |
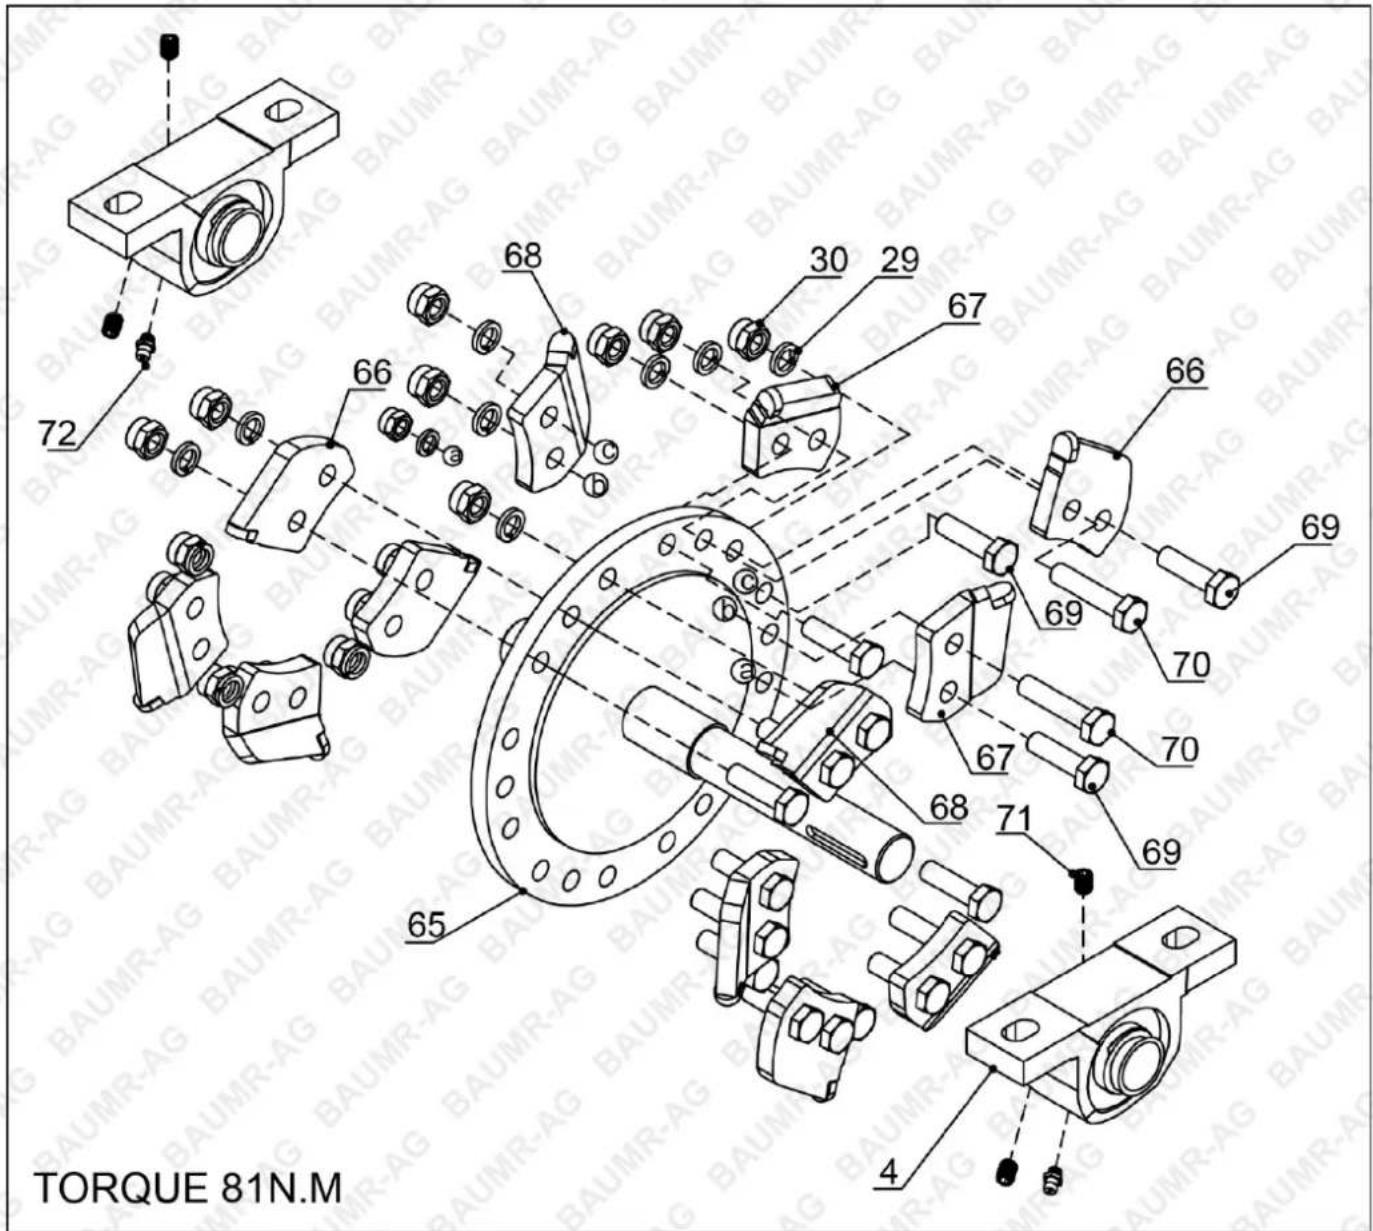
| Part # | Description | Qty | Part # | Description | Qty |
| 4 | Bearing UCP205 | 2 | 68 | Trencher Blade B | 4 |
| 29 | Lock Washer ∅10 | 18 | 69 | Hex Bolt M10x35 | 12 |
| 30 | Nylon Lock Nut M10 | 18 | 70 | Hex Bolt M10x45 | 6 |
| 65 | Cutter Spindle | 1 | 71 | Screw M6x8 | 4 |
| 66 | Trencher Blade C | 4 | 72 | Oil Cup | 2 |
| 67 | Trencher Blade A | 4 |
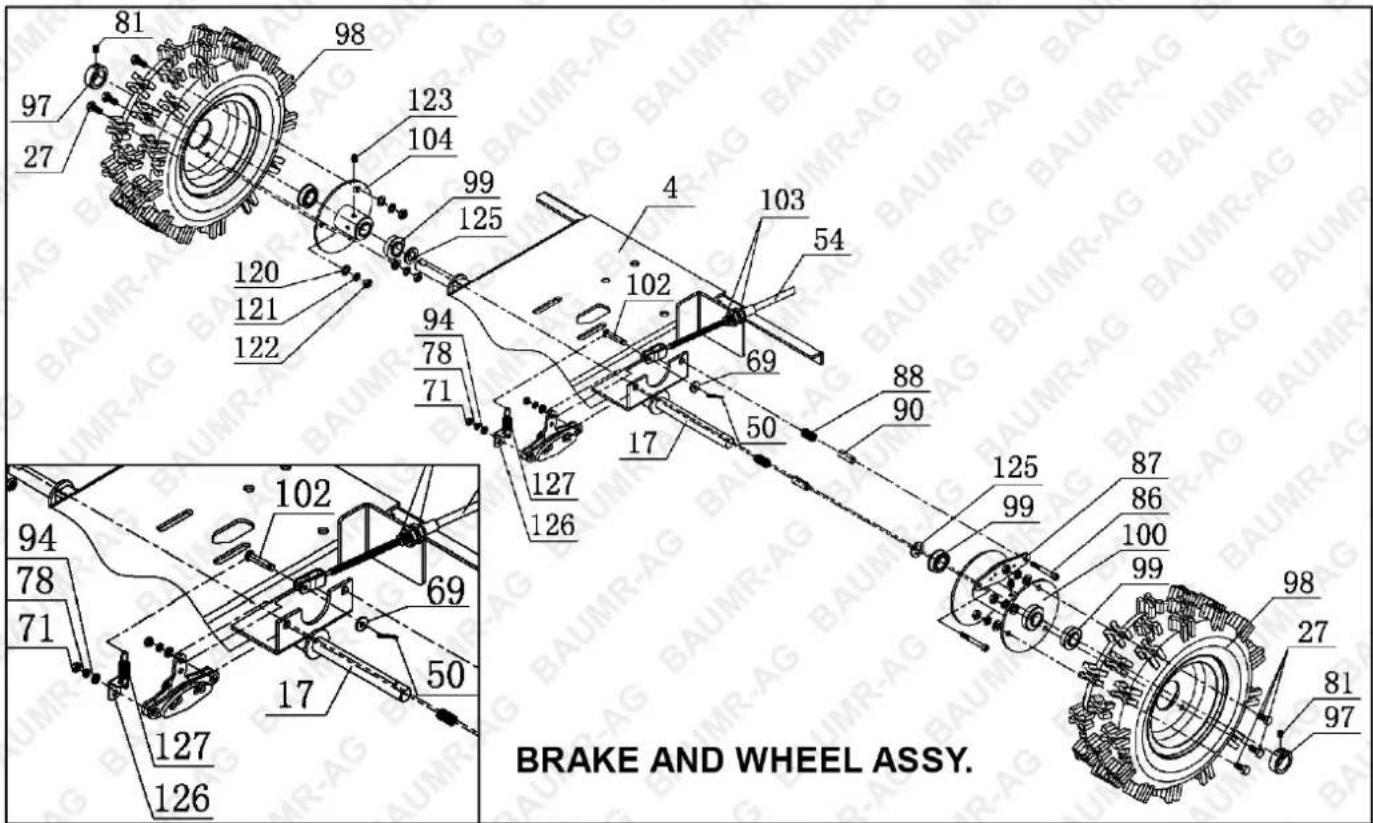
| Part # | Description Qty | Part # | Description Qty | ||
| 4 Chassis Assy. 1 98 Wheel Assy. 2 | |||||
| 17 | Axle | 1 | 99 | Deep Groove Ball Bearing 6202 | 4 |
| 27 | Hex Bolt M8x20 | 6 | 100 | Bearing Block A Assy. | 1 |
| 50 | Cotter ∅2 x16 | 1 | 101 | Brake Mounting Plate A Assy, | 1 |
| 54 | Brake Cable Assy. | 1 | 102 | Brake Bolt | 1 |
| 69 | Large Washer ∅6 | 1 | 103 | Hex Nut M12 | 2 |
| 71 | Lock Nut Nylon M6 | 2 | 104 | Bearing Block B Assy. | 1 |
| 78 | Spring Washer ∅6 | 2 | 120 | Flat Washer ∅8 | 6 |
| 81 | Hexagon Socket Set Screw M6x8 | 2 | 121 | Spring Washer ∅8 | 6 |
| 86 | Hexagonal Socket Head Cap Screw M6x50 | 2 | 122 | Hex Nut M8 | 6 |
| 87 | Brake Mounting Plate Assy, | 1 | 123 | Oil Cup M6 | 2 |
| 88 | Spring A | 2 | 125 | Flat Washer ∅16 | 2 |
| 90 | Bush | 2 | 126 | Moving Plate C | 1 |
| 94 | Flat Washer ∅6 | 2 | 127 | Tension Spring | 1 |
| 97 | Axle Fastness Set | 2 | |||
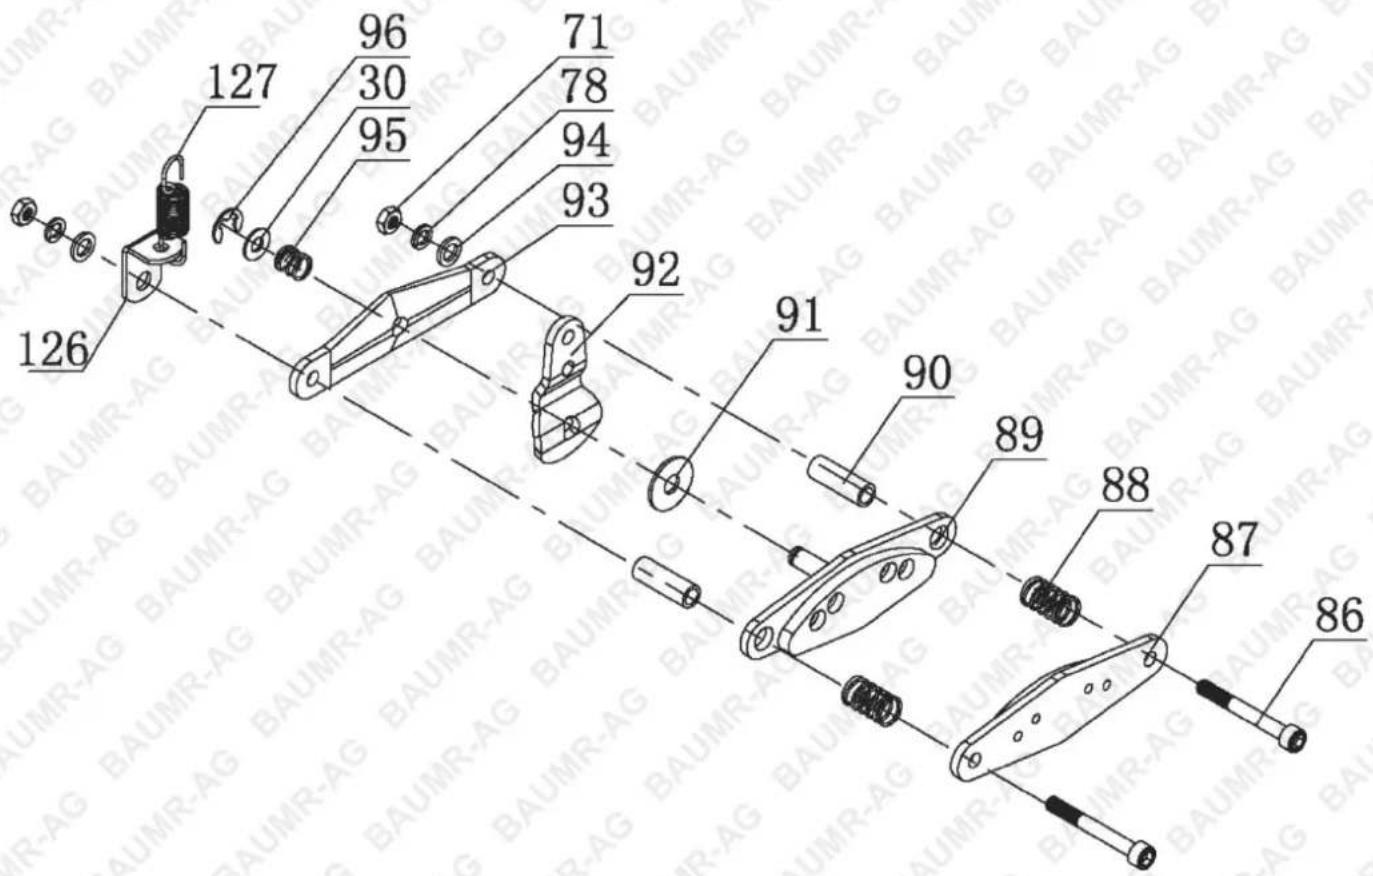
| Part # | Description | Qty | Part # | Description | Qty |
| 1 | Hex Bolt M8x25 | 20 | 7 | Side Flap Support | 1 |
| 2 Rear Flap Support 1 8 Side Flap | 1 | ||||
| 3 | Rear Flap | 1 | 9 | Side A Flap | 1 |
| 4 | Chassis Assy. | 1 | 10 | Side A Flap Support | 1 |
| 5 | Spring Washer ∅8 | 20 | 11 | Side B Flap | 1 |
| 6 | Lock Nut Nylon M8 | 20 | 12 | Side B Flap Support | 1 |
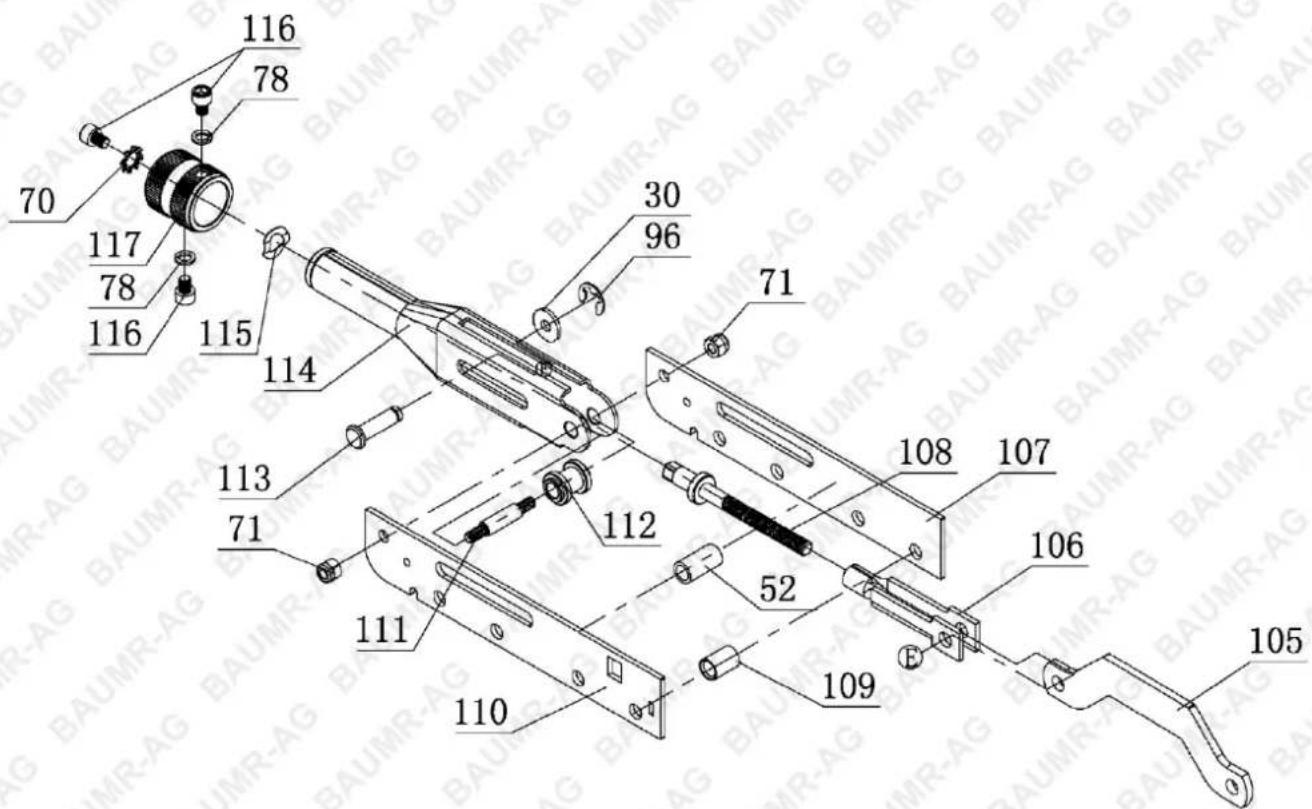
BRAKE HANDLE ASSY.
| Part # | Description | Qty | Part # | Description | Qty |
| 30 | Flat Washer ∅8 | 1 | 109 | Bush | 1 |
| 52 | Handle Bush | 1 | 110 | Tie Plate A | 1 |
| 70 | External Teeth Lock Washer ∅6 | 1 | 111 | Tie Bar | 1 |
| 71 | Lock Nut Nylon M6 | 2 | 112 | Tie Bar A | 1 |
| 78 | Spring Washer ∅6 | 2 | 113 | Bolt | 1 |
| 96 | Split Washer ∅6-E | 1 | 114 | Handle Assy. | 1 |
| 105 | Tie Bar | 1 | 115 | Wave Single Coil Spring Lock Washers ∅10 | 1 |
| 106 | Adjusting Hook Assy. | 1 | 116 | Hexagonal Socket Head Cap Screw M6x8 | 3 |
| 107 | Tie Plate | 1 | 117 | Tiller Grip | 1 |
| 108 | Adjusting Bolt | 1 |
Additional Safety Warnings
Storage
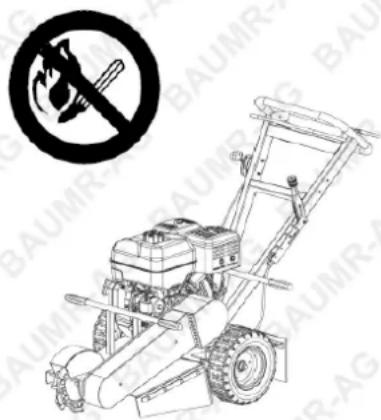
natural_image
Line drawing of a small agricultural tiller with a no-smoking symbol above it (no text or labels)NEVER STORE OR OPERATE THE MACHINE NEAR AN OPEN FLAME
natural_image
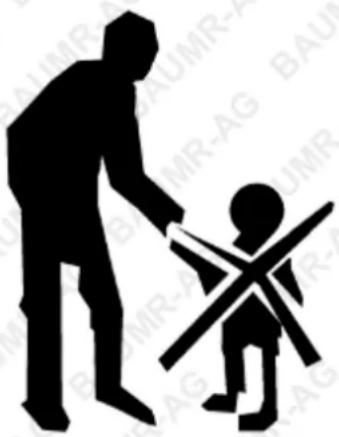
Silhouette of a person walking with a child crossing a cross symbol (no text or symbols present)KEEP CHILDREN AWAY FROM THE MACHINE
- Allow the engine to cool before storing the machine. Never store the machine near an open flame.
- Store the machine with the fuel valve closed.
- Store the machine and fuel in such a way that there is no risk that leaking fuel or fumes can come in contact with flames or sparks from electrical machine, electric engines, relays, switches, boilers or anything similar.
- Store the machine in a locked space away from children and adults untrained in use of the machine.
Children
- Serious accidents can occur if you fail to be on guard for children in the vicinity of the machine.
- Never assume that children will stay put where you last saw them.
- Keep children away from the machine.
- Keep children away from the work area and under close supervision by another adult.
- Never allow children to operate the machine.
- Be particularly careful near corners, bushes trees or other objects that block your view.
Fuel System
- Warning! Gasoline and gasoline fumes are poisonous and extremely flammable. Be especially careful when handling gasoline, as carelessness can result in personal injury or fire.
- Only store fuel in containers approved for that purpose.
- Never remove the fuel cap and fill the fuel tank when the engine is running.
• Always stop the engine when refuelling. - Do not smoke when filling the gasoline tank and do not pour gasoline in the vicinity of sparks or open flame.
- Never fill the fuel tank indoors.
- Before starting the machine after refuelling, it should be move at least 10 feet (3 M) from the location where it was filled.
- Turn off the fuel supply for storage or transport.
- If leaks arise in the fuel system, the engine must not be started until the problem has been resolved.
- Check the fuel level before each use and leave space for the fuel to expand, because the heat from the engine and the sun can otherwise cause the fuel to expand and overflow.
- Avoid overfilling. If you spill gasoline on the machine, wipe up the spill and wait until it has evaporated before starting the engine. If you spill gasoline on your clothing, change your clothing.
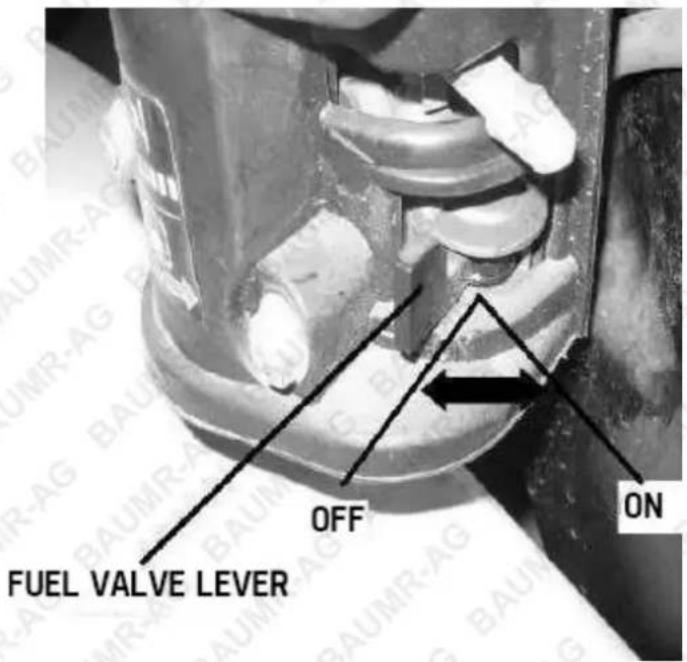
CLOSE THE FUEL VALVE
Maintenance
- Never adjust with the engine still running.
- Disengage the drive units, shut off the engine and wait until all moving parts come to a complete stop before adjusting, performing maintenance or cleaning the machine.
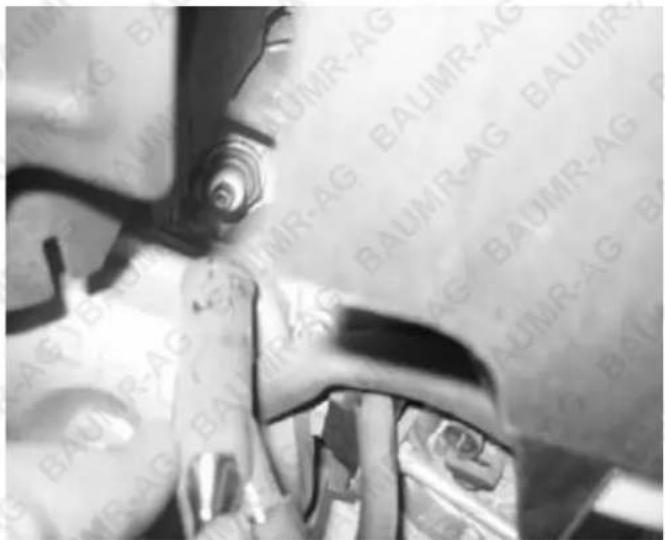
- Disconnect the spark plug cable before beginning repair work.
natural_image
Close-up of a car's seatbelt with visible tire and dashboard (no text or symbols)REMOVE THE SPARK PLUG CABLE
- Keep all components in serviceable condition and make sure all nuts, bolts, etc. are tight. Replace worn or damaged decals.
- Be careful when checking work tools. Use gloves when performing maintenance work.
- Never allow persons not trained in the use of the machine to perform service on it.
• Always park the machine on even ground before performing maintenance or making adjustments. - Do not disassemble the engine. This can invalidate your engine warranty. Contact your dealer if you have any questions regarding service or guarantee matters. Follow all maintenance instructions.
- Do not change the setting of governors and avoid running the engine with overly high RPM. If you run the engine too fast, you risk damaging the machine components.
- Do not modify the safety equipment. Check regularly to be sure it works properly. The machine must not be run with defective of disassembled safety equipment.
-
The muffler is designed to maintain sound levels at an approved level and keep direct exhaust away from the user. Exhaust gases from the engine are extremely hot and may contain sparks that can cause fires or burn the user.
-
Never use a machine with a defective muffler.
- Reduce the risk of fire by removing grass, leaves and other debris that may get caught in the machine.
- WARNING! WAIT UNTIL ALL MOVING PARTS ARE COMPLETELY STILL BEFORE PERFORMING MAINTENANCE ON THE MACHINE. TURN OFF THE ENGINE AND REMOVE THE SPARK PLUG CABLE.
- BE AWARE THAT THE EQUIPMENT MAY INCLUDE HAZARDOUS COMPONENTS, SUCH AS BLADES, HOT SURFACES AND MOVING PARTS.
- MOVING BLADES CAN CAUSE SERIOUS INJURY AND EVEN DEATH IF USED IMPROPERLY OR WITHOUT SUFFICIENT PPE.
- DO NOT USE THIS EQUIPMENT ON UNEVEN SURFACES AND ALWAYS MAINTAIN GOOD BALANCE WHEN USING THIS EQUIPMENT. FAILURE TO DO SO MAY CAUSE SERIOUS INJURY.
- MAINTAIN A SECURE GRIP OF THE TRIGGER ASSEMBLY AT ALL TIMES.
! DANGER !
Using an engine or wood/charcoal/gas fuelled appliance indoors CAN KILL YOU IN MINUTES.
Engine exhaust and wood/charcoal/gas fumes contain carbon monoxide. This is a poison you cannot see or smell.
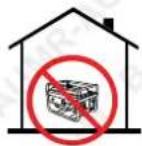
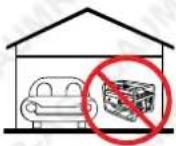
NEVER use inside a building, home, garage, boat, caravan or tent EVEN IF doors and windows are open.
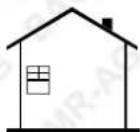
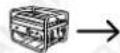
Only use OUTSIDE and far away from windows, doors, and vents.
Avoid other hazards - READ MANUAL BEFORE USE.
GENERAL:
- Do not operate in a hazardous location. Such areas include where there is a risk of explosion of petrol fumes, leaking gas or explosive dusts.
- Do not operate in a confined area where exhaust gases or wood/charcoal/gas fumes could reach dangerous concentrations.
PRODUCTS FEATURING AN ENGINE
- Follow all warnings in the section titled "GENERAL".
- Explosion hazard - never smoke while refuelling.
• Take care not to spill fuel. When refuelling the engine, ensure that the engine has been allowed to cool. Prevent spilling of fuel as this may also ignite with a hot engine. - Never refuel while engine is running.
GENERATORS
- Follow all warnings in the sections titled "GENERAL" and "PRODUCTS FEATURING AN ENGINE".
- The output of this generator is potentially lethal. The generator should not be connected to a fixed electrical installation except by an appropriately licensed person.
- Not weatherproof – protect your machine. This machine is not weatherproof and should not be exposed to direct sunlight, high ambient temperature, damp conditions, wet conditions or high humidity conditions.
Safety Symbols
The product may have safety warning labels attached to it, explained below. Understand the symbols on your product and their meanings. If any stickers become unreadable, unattached etc., replace them.
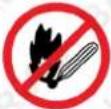 Flammable Material HazardFlammable liquids, gases or substances etc may present.Avoid ignition sources and open flames. Danger of fire. Flammable Material HazardFlammable liquids, gases or substances etc may present.Avoid ignition sources and open flames. Danger of fire. |  Read User ManualRead and fully understand product safety warnings, operation, procedures etc before using the product. Read User ManualRead and fully understand product safety warnings, operation, procedures etc before using the product. |  Use Hand ProtectionWear appropriate hand protection and take due care as the product or use of the product may present hand hazards. Use Hand ProtectionWear appropriate hand protection and take due care as the product or use of the product may present hand hazards. |  EXHAUST FUMESCarbon-Monoxide HazardDo not use the product in confined areas or without adequate ventilation. Carbon-monoxide poisoning can be fatal. EXHAUST FUMESCarbon-Monoxide HazardDo not use the product in confined areas or without adequate ventilation. Carbon-monoxide poisoning can be fatal. |
 Electrocution / Electrical Shock HazardHigh voltage or high current electricity may be present or required by the product. Take due care when handling electrical products, cables, plugs and leads. Electrical shock can be fatal. Electrocution / Electrical Shock HazardHigh voltage or high current electricity may be present or required by the product. Take due care when handling electrical products, cables, plugs and leads. Electrical shock can be fatal. |  Toxic Fumes / Dust HazardUsing the product or by-products from use may produce fumes, smoke or particles that could be harmful if inhaled. Wear appropriate breathing protection and have adequate ventilation. Toxic Fumes / Dust HazardUsing the product or by-products from use may produce fumes, smoke or particles that could be harmful if inhaled. Wear appropriate breathing protection and have adequate ventilation. |  Explosive Material HazardCombustible liquids, gases or substances etc may be present.Avoid ignition sources and open flames. Danger of explosion. Explosive Material HazardCombustible liquids, gases or substances etc may be present.Avoid ignition sources and open flames. Danger of explosion. |  Cutting / Amputation HazardThe product may have blades, edges or mechanical devices that can cause severe cut injury to fingers, limbs etc. Take due care when handling and using the product. Cutting / Amputation HazardThe product may have blades, edges or mechanical devices that can cause severe cut injury to fingers, limbs etc. Take due care when handling and using the product. |
 Crush HazardThe product may have blades, edges or mechanical devices that can cause severe crush injury to fingers, limbs etc. Take due care when handling and using the product. Crush HazardThe product may have blades, edges or mechanical devices that can cause severe crush injury to fingers, limbs etc. Take due care when handling and using the product. |  Single Operator OnlyThe product must be operated by a single person only. More than one person operating the product may introduce additional hazards. Single Operator OnlyThe product must be operated by a single person only. More than one person operating the product may introduce additional hazards. |  Use Face ProtectionWear appropriate full-face protection and take due care as the product or use of the product may present face and eye hazards. Use Face ProtectionWear appropriate full-face protection and take due care as the product or use of the product may present face and eye hazards. |  Use Foot ProtectionWear appropriate foot protection and take due care as the product or use of the product may present foot hazards. Use Foot ProtectionWear appropriate foot protection and take due care as the product or use of the product may present foot hazards. |
 Use Eye / Ear / Head ProtectionWear appropriate eye and / or ear and / or head protection and take due care as the product or use of the product may present eye, hearing and head hazards. Use Eye / Ear / Head ProtectionWear appropriate eye and / or ear and / or head protection and take due care as the product or use of the product may present eye, hearing and head hazards. |  Running HazardDo not run on or near the product as doing so may present a fall hazard. Running HazardDo not run on or near the product as doing so may present a fall hazard. |  Diving HazardDo not dive into the product as doing so may present a neck / head injury hazard. Diving HazardDo not dive into the product as doing so may present a neck / head injury hazard. |  Adult Supervision RequiredAlways supervise children and other users of a product to prevent drowning or injury. Adult Supervision RequiredAlways supervise children and other users of a product to prevent drowning or injury. |
 Skin Penetration / Puncture HazardThe product may produce pressure, emit liquids or objects that can cause severe injury to fingers, limbs, blood etc. Take due care when handling and using the product. Skin Penetration / Puncture HazardThe product may produce pressure, emit liquids or objects that can cause severe injury to fingers, limbs, blood etc. Take due care when handling and using the product. | 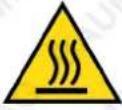 Hot Surface HazardBe aware that the product may produce high temperatures and hot surfaces that can cause burn injuries. Hot Surface HazardBe aware that the product may produce high temperatures and hot surfaces that can cause burn injuries. |  Flying Debris HazardBe aware that the product or use of the product may present hazards produced by flying debris. Wear appropriate clothing and protective devices. Flying Debris HazardBe aware that the product or use of the product may present hazards produced by flying debris. Wear appropriate clothing and protective devices. |  Moving Parts HazardBe aware that the product contains or uses mechanical devices that move or rotate. Always wait for moving parts to stop fully before handling the product, adjusting, maintenance etc. Moving Parts HazardBe aware that the product contains or uses mechanical devices that move or rotate. Always wait for moving parts to stop fully before handling the product, adjusting, maintenance etc. |
 Carbon-Monoxide HazardDo not use the product in confined areas or without adequate ventilation. Carbon-monoxide poisoning can be fatal. Carbon-Monoxide HazardDo not use the product in confined areas or without adequate ventilation. Carbon-monoxide poisoning can be fatal. |  Pull HazardBe aware that the product contains or uses mechanical devices that can pull in objects and can cause severe injury to fingers, limbs etc. Take due care when handling and using the product. Pull HazardBe aware that the product contains or uses mechanical devices that can pull in objects and can cause severe injury to fingers, limbs etc. Take due care when handling and using the product. |  Slope / Fall Injury HazardBe aware that using the product on sloping surfaces or in slippery conditions may present additional dangers from falls and contact with blades, moving parts, hot surfaces etc. Slope / Fall Injury HazardBe aware that using the product on sloping surfaces or in slippery conditions may present additional dangers from falls and contact with blades, moving parts, hot surfaces etc. | 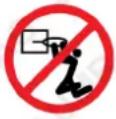 "Slam Dunk" WarningDo NOT attempt "slam dunk" manoeuvres as this may result in severe injury due to falling, product breakage or collapse etc. "Slam Dunk" WarningDo NOT attempt "slam dunk" manoeuvres as this may result in severe injury due to falling, product breakage or collapse etc. |
 Electrocution / Electrical Shock Hazard - OutdoorHigh voltage or high current electricity may be present or required by the product. Do NOT use in rain, damp or wet conditions. Electrical shock can be fatal. Electrocution / Electrical Shock Hazard - OutdoorHigh voltage or high current electricity may be present or required by the product. Do NOT use in rain, damp or wet conditions. Electrical shock can be fatal. | 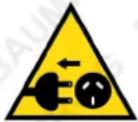 Electrocution / Electrical Shock Hazard - DisconnectHigh voltage or high current electricity may be present or required by the product. Always disconnect the product from the electrical supply before handling the product, adjusting, maintenance etc. Electrocution / Electrical Shock Hazard - DisconnectHigh voltage or high current electricity may be present or required by the product. Always disconnect the product from the electrical supply before handling the product, adjusting, maintenance etc. |  Power Line Electrocution HazardHigh voltage / high current power lines may be present. Use extreme caution to avoid contact or interference with power lines.Electrical shock can be fatal. Power Line Electrocution HazardHigh voltage / high current power lines may be present. Use extreme caution to avoid contact or interference with power lines.Electrical shock can be fatal. | 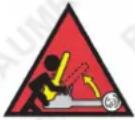 "Kick-Back" HazardHigh level of "kick-back" hazard that can cause the machine to suddenly rotate towards operator.Kick-back injury can be fatal. "Kick-Back" HazardHigh level of "kick-back" hazard that can cause the machine to suddenly rotate towards operator.Kick-back injury can be fatal. |
 Winch Operator Position HazardDo NOT stand between winch and load. Do NOT use winch to move people. Winch Operator Position HazardDo NOT stand between winch and load. Do NOT use winch to move people. | 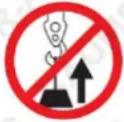 Winch Lift HazardDo NOT LIFT load vertically. Use machine to PULL only. Winch Lift HazardDo NOT LIFT load vertically. Use machine to PULL only. |  Cable HazardEnsure that load bearing cable is not kinked or knotted. Cable HazardEnsure that load bearing cable is not kinked or knotted. | 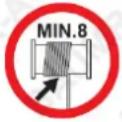 Winch Cable HazardEnsure that there is a minimum number of cable coils on winching mechanism. Winch Cable HazardEnsure that there is a minimum number of cable coils on winching mechanism. |
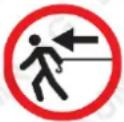 Winch Hook HazardCarry hook to load – do NOT throw or run. Winch Hook HazardCarry hook to load – do NOT throw or run. |  Flash / Blinding HazardWear appropriate eye protection for welding. Direct exposure to weld arcs may cause permanent eye injury. Flash / Blinding HazardWear appropriate eye protection for welding. Direct exposure to weld arcs may cause permanent eye injury. |  Laser HazardLaser may be in use – do NOT look directly at laser or allow others to. Laser HazardLaser may be in use – do NOT look directly at laser or allow others to. |
Specifications
| Fuel Type | Regular Unleaded 95 +RON |
| Fuel Capacity 6.5L | |
| Oil Capacity 1.1L | |
| Engine Oil Type | 10W-30, 10W-40, 15W-30 OR 15W-40 non-synthetic engine oil (not included with purchase) |
| Start System Recoil Pull Start | |
| Brake Type | Disk-Lever activated |
| Drive System | Triple V-Belt |
| Maximum Blade Speed | 4000rpm |
| Clutch | Centrifugal Heavy-duty commercial system |
| Cutting Depth | 305mm below ground level |
| Teeth set | 12 with tungsten carbide tips |
| Wheels Pneumatic 12.4" | |
| Product Weight 100kgs | |
| Gross Weight 125kgs | |
Note: Assembly required

Some experts believe that the incorrect or prolonged use of almost any product may cause serious injury or death. To help reduce your risk of serious injury or death, refer to the information below. For more information, see www.datastreamserver.com/safety
- Consult all documentation, packaging, and product labelling before use. Note that some products feature documentation available online. It is recommended to print and retain the documentation.
■ Before each use, check the product for loose/broken/damaged/missing parts, wear, or leaks (if applicable). Never use a product with loose/broken/damaged/missing parts, wear, or leaks.
■ Products must be inspected and serviced (if applicable) by a qualified technician every 6 months. This is based on average residential use by persons of average size and strength, and on a property of average metropolitan size. Use beyond these recommendations may require more frequent inspections/servicing.
■ Ensure that all users of the product have completed a suitable industry recognised training course before being allowed access to the product.
The product has been supplied by a general merchandise retailer that may not be familiar with your specific application or description of application. Be sure to attain third-party approval from a qualified specialist for your application before use, regardless of any assurances from the retailer or its representatives.
This product is not intended for use where fail-safe operation is required. As with any product (for example, automobile, computer, toaster), there is the possibility of technical issues that may require the repair or replacement of parts, or the product itself. If the possibility of such failure and the associated time it may take to rectify could in any way inconvenience the user, business, or employee, or financially affect the user, business, or employee, then the product is not suitable for your requirements. This product is not intended for use where incorrect operation or a failure of any kind, including but not limited to, a condition requiring product return, replacement, parts replacement, or service by a technician may cause financial loss, loss of employee time or an inconvenience requiring compensation.
If this product has been purchased in error when considering the information presented here, contact the retailer directly for details of their returns policy, if required.

edisons
.com.au
©2023 Baumr-AG. All rights reserved. No part of this document, including descriptive content, concepts, ideas, diagrams, or images may be reproduced or transmitted in any form or by any means, electronic or mechanical, including photocopying, scanning, or recording, or any information storage and retrieval system, without express permission or consent from the publisher.
- User Manual
- Safety
- General Work Area Safety
- General Personal Safety
- General Fuel Safety
- General Carbon-Monoxide Safety
- General Equipment Use and Care
- General Electrical Safety
- General Service Information
- Introduction
- Use
- Insure Your Machine
- Safety Instructions
- General Use
- Preparations
- Operating
- Movement / Transport
- Table of Contents
- Safety 2
- Protective Equipment....8
- Important Information 9
- Controls....10
- Assembly....13
- Operation....15
- Maintenance 23
- Troubleshooting 28
- Bäumr-AG®
- Storage 30
- Parts Identification ....31
- Additional Safety Warnings 40
- Specifications 45
- Protective Equipment
- Personal Equipment
- Important Information
- After the first 10 hours:
- Controls
- Centrifugal clutch
- Safety Presence Grip Bar
- Throttle
- Brake
- Assembly
- Operation
- Before You Start
- Starting the Engine
- Fuel Valve
- Choke Control
- Starter Handle
- Procedure for Cutting a Stump
- Stage 1
- Stage 2
- Normal Shut-Down
- Maintenance
- Cutting Teeth
- Changing the Cutting Teeth
- Sharpening the Cutting Teeth
- Sharpening Steps
- Brake Adjustment
- Two-Minute Rule
- Cleaning and Washing
- Lubricating Bearings
- Drive Belts
- Service Checklist
- Troubleshooting
- Storage
- Winter Storage
- Service
- Parts Identification
- Additional Safety Warnings
- Children
- Fuel System
- REMOVE THE SPARK PLUG CABLE
- ! DANGER !
- GENERAL:
- PRODUCTS FEATURING AN ENGINE
- GENERATORS
- Safety Symbols
- Some experts believe that the incorrect or prolonged use of almost any product may cause serious injury or death. To help reduce your risk of serious injury or death, refer to the information below. For more information, see www.datastreamserver.com/safety
- edisons
Brand : Baumr-AG
Model : SGR750
Category : Mill