R27A-V2 - Intercom Akuvox - Free user manual and instructions
Find the device manual for free R27A-V2 Akuvox in PDF.


| Product Type | IP Video Door Station |
| Model | R27A-V2 |
| Brand | Akuvox |
| Dimensions (H x W x D) | 130 mm x 90 mm x 25 mm |
| Weight | 150 g |
| Power Supply | Power over Ethernet (PoE) IEEE 802.3af or 12 V DC |
| Power Consumption | < 5 W |
| Camera Resolution | 2 MP (1920 x 1080) |
| Viewing Angle | 120° (diagonal) |
| Night Vision | IR LEDs up to 5 m |
| Audio | Full-duplex, echo cancellation, noise suppression |
| Network Interface | 10/100 Mbps Ethernet, RJ45 |
| Protocols | SIP, RTSP, HTTP, DHCP, DNS, NTP |
| Operating Temperature | -20 °C to 50 °C |
| Ingress Protection | IP65 (weatherproof) |
| Material | Aluminum alloy, tempered glass |
| Mounting | Flush mount or surface mount |
| Indoor Monitor Compatibility | Compatible with Akuvox indoor monitors and SIP clients |
| Key Features | Video call, remote unlock, motion detection, tamper alarm |
| Spare Parts & Repairability | Replacement camera module, microphone, speaker available; rated 7/10 for repairability |
| Cleaning & Maintenance | Wipe with a soft, dry cloth; avoid abrasive cleaners |
| Certifications | CE, FCC, RoHS |
Frequently Asked Questions - R27A-V2 Akuvox
User questions about R27A-V2 Akuvox
0 question about this device. Answer the ones you know or ask your own.
Ask a new question about this device
Download the instructions for your Intercom in PDF format for free! Find your manual R27A-V2 - Akuvox and take your electronic device back in hand. On this page are published all the documents necessary for the use of your device. R27A-V2 by Akuvox.
USER MANUAL R27A-V2 Akuvox
Thank you for choosing Akuvox's products. In user manual, we provides all functions and configurations you want to know about R27X. Please verify the packaging content and network status before setting. This manual applies to firmware 27.0.2.170.
Content
1. Overview......1
1.1. Product Description....1
1.2. Features....2
1.3. Keypad....4
2. Configuration......5
2.1. Administrator interface....5
2.1.1 System Information....5
2.1.2 Admin Settings....5
2.1.3 System Setting....6
2.2.User interface....7
2.2.1 Public Pin Modif....7
2.2.2 Add User Cards....7
2.2.3 Add Private Pin....7
3. Basic Using....8
3.1. Make a call....8
3.2. Receive a call....8
3.3. Unlock....8
4. Web......9
4.1. Obtain IP address....9
4.2. Login the web....9
4.3. Status....10
4.3.1 Basic....10
4.4. Intercom....11
4.4.1 Basic....11
4.4.2 Advanced....12
4.4.3 Relay....13
4.4.4 Input....14
4.4.5 Live Stream....15
4.4.6 RTSP....16
4.4.7 ONVIE....17
4.4.8 Motion....17
4.4.9 Card Setting(R27A only)....18
4.4.10 Action....20
4.5. Account....21
4.5.1 Basic....21
4.5.2 Advanced....23
4.6. Network....26
4.6.1 Basic....26
4.6.2 Advanced....27
4.7. Phone....28
4.7.1 Time/Language....28
4.7.2 Call Feature....29
4.7.3 Voice....30
4.7.4 Dial Plan....31
4.7.5 Multicast....32
4.7.6 Call log....33
4.7.7 Door log....34
4.8. Upgrade....34
4.8.1 Basic....34
4.8.2 Advanced....35
4.9. Security....37
4.9.1 Basic....37
1. Overview
1.1. Product Description

R27A R27V
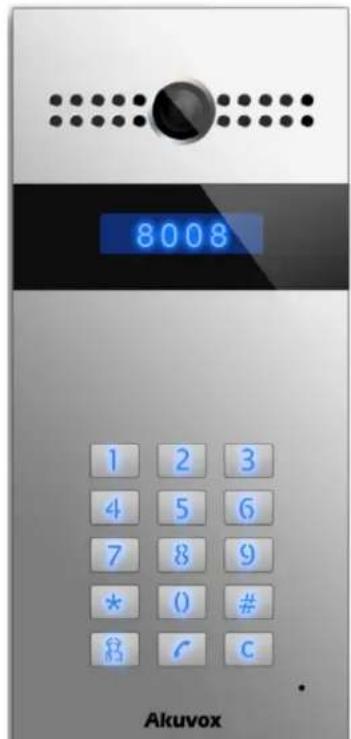
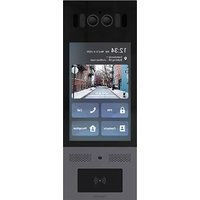
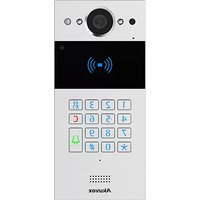
Akuvox R27X is a SIP-compliant, hands-free and video outdoor phone. It can be connected with your Akuvox IP Phone for remote unlock control and monitor. You can operate the indoor handset to communicate with visitors via voice and video, and unlock the door if you wish. User can also use RF card to unlock the door( R27AC only). It's applicable in villas, office and so on.
1.2. Features
Highlight
● Vandal resistant body, with a flush button
● Wild-angle camera:120°
● POE(IEEE802.3af, Power-over-Ethernet)
- Two-way audio communication over IP network with Echo cancel feature
- Complies with SIP Standard for easy integration in each SIP PBXes
- Complies with ONVIF standard for easy integration with any network surveillance system
Physical&Power
● Body material: all-aluminum
● Camera: 3M pixels, automatic lighting
● Numeric keypad with extra buttons
● Infrared Sensor: Support
● Wiegand port: Support
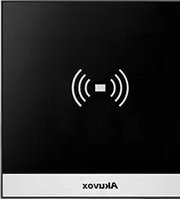
● RF Card Reader:13.56MHz & 125kHz
● Output Relay: 3 output relays for door opener
● 802.3af Power-Over-Ethernet
● 12V DC connector(if not using POE)
● Water proof&Dust proof: IP65
● Installation: Flush-mounted & Wall-mounted
● Flush-mounted DIM:280x130x68mm
● Wall-mounted DIM:280x130x38mm
SIP Endpoint
- SIP v1(RFC2543), SIP v2(RFC3261)
● Audio codecs: G.711a, G.711μ, G.722, G.729 - Video codecs: H264
● Speech Quality: 7kHz Audio - Echo Cancellation
● Voice Activation Detection
● Comfort Noise Generator
Video
● Resolution: up to 720p
● Maximum image transfer rate:720p-30pfs
● High intensity IR LEDs for picture lighting during dark hours with internal light sensor
- Compatible with 3.Party.Video components,e.g.NVRs.
▶ Door Entry Feature
● Relay control individually by DTMF tones
● Camera permanently operational
● White Balance: Auto
● Auto-night mode with LED illumination
● Minimum illumination: 0.1LUX
Network Features
● 1x10/100Mbps Ethernet Port
- Protocols support: IPv4, HTTP, HTTPS, FTP, SNMP, DNS, NTP, RTSP, RTP, TCP, UDP, ICMP, DHCP, ARP
1.3. Keypad
| Key | Description | |
 | Numeric Key | |
 | Manage Center Key | |
 | Dialing Key | |
 | Delete Key | |
2. Configuration
2.1. Administrator interface
Press *2396# to enter administrator interface. Administrator interface provides some advanced permissions to administrators, including System Information, Admin Settings and System Settings.
2.1.1 System Information
Press 1 to enter System Information to check IP address ,Mac address and Firmware version of the door phone.
2.1.2 Admin Settings
2.1.2.1 Admin card setting
Add admin card
Enter Admin Card Setting interface, press 1 to quick add admin card. When you see "Please Swipe Admin Card...", please place admin card in the RF card reader area. After the screen shows "An admin card is added +1", it means adding successfully.
Clean admin card data
Enter Admin Card Setting interface, press 2 to delete the current admin card. When you see “Please Swipe Admin Card....”, place the added admin card you want to delete in the RF card area. After the screen shows “An admin card is deleted”, it means deleting successfully.
2.1.2.2 Admin Code Setting
Admin code is used to enter administrator interface. The default code is 2396. Enter Admin Code Setting to input 4 digit new admin codes, click Dial key to save.
2.1.2.3 Service Code Setting
Service Code Setting is used to enter user interface. The default code is 3888. Enter service code setting to input 4 digit new user codes, click Dial key to save.
2.1.3 System Setting
2.1.3.1 Network settings
Enter System Setting interface ,press 1 to enter Network setting. Select DHCP mode ,door phone will access network automatically. Choose Static mode, user need to setup IP address, subnet mask and default gateway. Press Dial key when you finish each step.
2.1.3.2 Station No.Settings
User can setup the device ID to limit the unlock permissions.
(This function can not be used now. Akuvox will perfect it in next version)
Enter System setting, press 3 to enter restore interface. After you sure to make the device restore to factory setting, swipe you admin card or enter admin code, then the device will restore.
2.2. User interface
Press *3888# to enter user interface. User interface includes Public Pin Modif, Add User Cards and Add Private Pin. These functions can only be accessed by administrator.
2.2.1 Public Pin Modif
The default public Pin is 33333333. Before you modify public Pin, users need to swipe admin card or enter admin code, then you can enter 8 digit new Public Pin, click Dial key to save.
2.2.2 Add User Cards
User card is used to unlock. Before adding users card, users need to swipe admin card or enter admin code, then you will see “Please Swipe IC Card...”, place user card in the RF card reader. Then the screen will show “Add IC Card +1”, it means adding successfully.
2.2.3 Add Private Pin
Users can also use private pin code to unlock. Before adding private pin, users need to swipe admin card or enter admin code. Then enter a 8 digit private pin, click Dial key to save.
3.Basic Using
3.1. Make a call
In the idle interface, press the account or IP address + Dial key to make a call.
3.2. Receive a call
R27X will auto answer the incoming call by default. If users disable auto answer function, press dial key to answer the incoming call.
3.3. Unlock
Unlock by Pin code: Users can unlock the door by using predefined Public Pin or Private Pin. Press # + 8digit Pin Code + # to unlock, then you will hear "The door is now opened". If users input the wrong Pin code, the screen will show "Incorrect Code".
Unlock by RF Card(Only R27A): Place the predefined user card in RF card reader to unlock. Under normal conditions, the phone will announce “The door is now opened”. If the card has not been registered, the phone will show “Unauthorized”.
Unlock by DTMF Code: During the talking, the president can press the predefined DTMF code to remote unlock the door. ( Please refer to chapter 4.4.4 about DTMF code setting). Then you will also hear “ The door is now opened”.
4. Web
4.1. Obtain IP address
The Akuvox R27X use DHCP IP by default. Press *2396# to enter Administrator interface. Enter System Information to check the phone IP address.
4.2. Login the web
Open a Web Browser, enter the corresponding IP address. Then, type the default user name and password as below to log in:
User name: admin
Password: admin

4.3. Status
4.3.1 Basic
Status, including product information, network information and account information, can be viewed from Status -> Basic.
| Product Information | |
| Model | R27-A |
| MAC Address | 0C:11:05:05:63:AE |
| Firmware Version | 27.0.2.170 |
| Hardware Version | 27.0.0.0.0.0.0.0 |
| Network Information | |
| LAN Port Type | Static IP |
| LAN Link Status | Connected |
| LAN IP Address | 192.168.35.2 |
| LAN Subnet Mask | 255.255.255.0 |
| LAN Gateway | 192.168.35.1 |
| LAN DNS1 | 192.168.35.1 |
| LAN DNS2 | 8.8.8.8 |
| Account Information | |
| Account1 | 1009@192.168.35.250 |
| Registered | |
| Account2 | None@None |
| Disabled | |
| Sections | Description |
| Product Information | To display the device's information such as Model name, MAC address (IP device's physical address), Firmware vers and Hardware firmware. |
| Network Information | To display the device's Networking status(LAN Port),such Port Type(which could be DHCP/Static/PPPoE), Link Status, Address, Subnet Mask, Gateway, Primary DNS server, Secondary DNS server, Primary NTP server and Secondary NTP server(NTP server is used to synchronize time from INTERNET automatically). |
| Account Information | To display device's Account information and Registration status (account username, registered server's address, Register result). |
4.4. Intercom
4.4.1 Basic
Go to the path: Intercom-Basic

| Sections | Description |
| Public Key | Public Key is used to unlock.Key Switch: User can disable or enable this function.Key Value: The default public Key is 33333333. Users modify by yourself. |
| Display Number | This function is used to hide or display the number whe operate in the phone. If you select disable, the phone w show “*” when you dial. |
| Speed Dial | This Feature is used t call out 4 numbers in the same ti After setup the number you need to call, press managecenter key to call . |
| Web Call | To dial out or answer the phone from website. |
| Call Event | This feature is similar with the Input event. Once user m call , it will execute the action.It supports 3 types - FTP,Email,HTTPTo setup the FTP and Email in Action interface, the FTP and Email will receive the capture picture when call out.you choose HTTP mode, enter the URL format: http://htt server IP address/any information(such as http://192.168.35.48/mac=000 ).Then you will chethis information which capture the network packet. |
| Max Call Time | To configure the max call time. |
| Max Dial Time | ● Dial in Time: When other phone calls to R27X, if ring tone is over the Dial in Time without answer. The c be hang up.● Dial out Time: When R27X call to the other party, if ringtone is over the Dial out Time without answer. F will continue to call to no answer call number in or |
4.4.2 Advanced

| Sections | Description |
| AEC Level | AEC(Configurable Acoustic and Line Echo Cancelers) is use to adjust the echo effect during the communication. The default value is 700. Increase the level, the echo control better. |
| Photoresistor | Photoresistor is used to sense the light intensity that R27 will auto enable infrared LED. Users can adjust the photosensitive value by yourself. |
| Tamper Alarm | Enable the Tamper Alarm, if the gravity of R27X changes phone will alarm. The Threshold value is smaller, the fast the reaction of device. |
| Wiegand | Akuvox provides two Wiegand protocol. According to the corresponding wiegand access device to choose the suitable protocol. |
4.4.3 Relay

| Sections | Description |
| Private Key | ● Import or Export the Private Key template. |
| Relay | To configure some settings about unlock● Relay Select: R27X support 3 relays● Relay Type: Different locks use different relay types, defa state or invert state. If you connect the Lock in NO connector, select default state. Otherwise using invert state.● Relay Delay(sec): Allows door remain “open” for certain period The range is from 1 to 10 seconds● DTMF Option: R27X support 1、2、3、4 digits DTMF unlockcode. Please select one type and enter the correspondi code.DTMF: Setup 1 digit DTMF code for remote unlockMultiple DTMF : Setup multiple digits DTMF code for remote unlock.Status: the status will be changed by the relay state. |
| Open Relay via HTTP | User can use a URL to remote unlock the door.Switch: Enable this function. Disable by default.Usage & password : Users can setup the username ; password for HTTP unlock. Null by defaultURL format:http://192.168.1.102/fcgi/do?action=OpenDoor&UserName=&Password=&DoorNum=1 |
4.4.4 Input
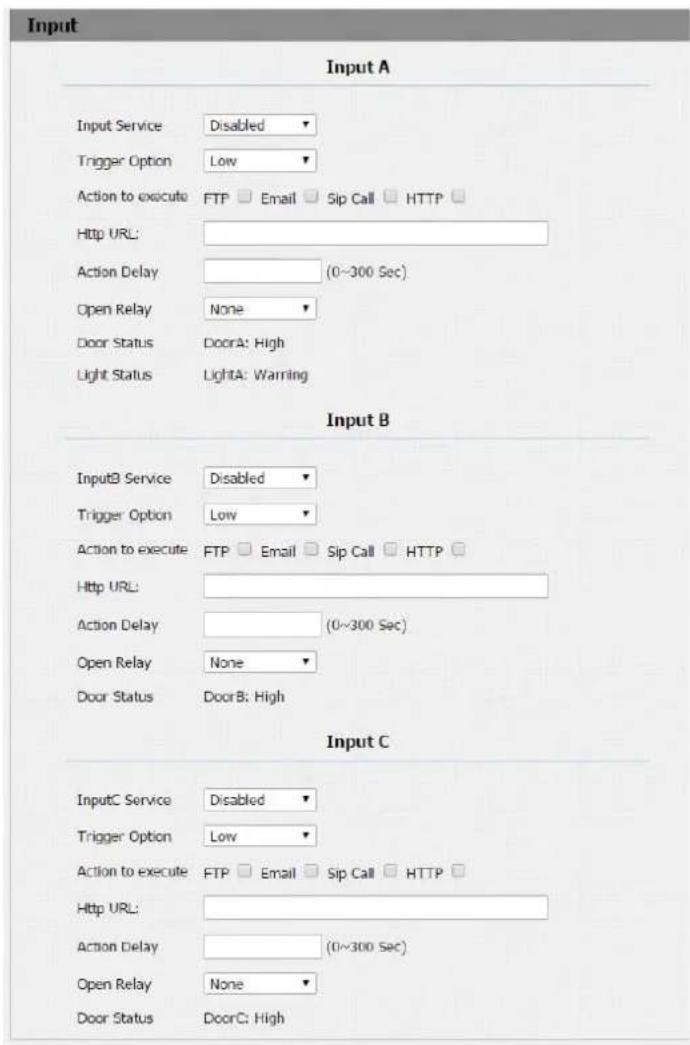
| Sections | Description |
| Input | Input function is used to open the door from inside.● Trigger Option: According to different lock connection to choose different trigger mode. If user connect in normal open contact, select low. If you choose High, please connect in normal close contact.● Action to execute: Choose one or more ways to receive action message.● Http URL: If you tick Http URL ,then enter the Http serv address in the HTTP URL area. When the Input is trigg it will send Http message. URL format: http://http serv IP address/any information (such as http://192.168.35.48/mac=000 ). Then you will check the information which capture the network packet.● Action Delay: Setup the action delay time. After the delay time, the phone will send to the action information in the corresponding way.● Open Relay: To choose a suitable relay for input connec |
4.4.5 Live Stream
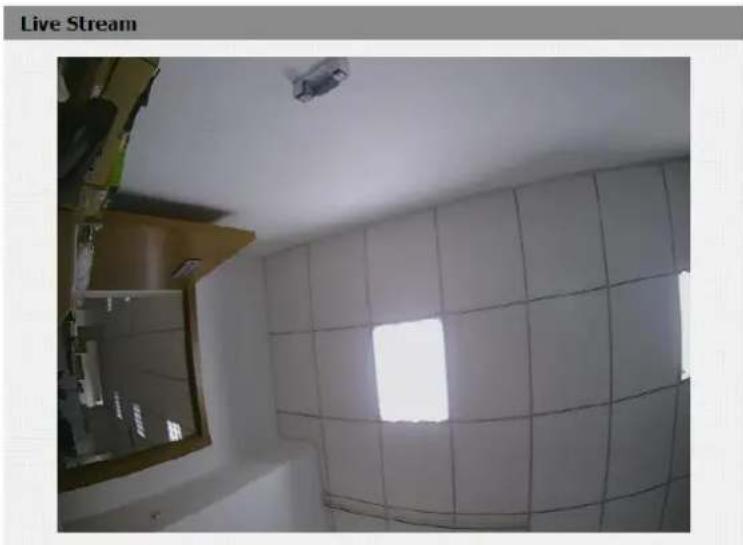
| Sections | Description |
| Live Stream | To check the real-time video from R27X. |
4.4.6 RTSP

| Sections | Description |
| RTSP Basic | To active the RTSP function, then R27X can be monitored |
| RTSP Stream | To enabled RTSP video and select the video codec. R27X supports H264 video codec. |
| H.264 Video Parameters | H264: A video stream compression standard. Different from H263, it provides an approximately identical level of video stream quality but a half bit rate. This type of compressi sometimes called MPEG-4 part 10.To modify the resolution,framerate and bitrate of H264 |
| MPEG4 Video Parameters | MPEG4: it is one of the network video image Compressio standard. It supports the maximum Compression ratio 4000:1. It is an important and common video function w great communication application integration ability and le core program space.To modify the resolution,framerate and bitrate of MPEG4 |
| MJPEG Video Parameters | MJPEG: called Motion Joint Photographic Experts Group. I a video encoding format.in which each image is compress separately by JPEG.MJPEG compression can produce high quality video image and has a flexible configuration in videfinition and Compressed framesTo modify the resolution,framerate and bitrate of MJPEG |
4.4.7 ONVIF
ONVIF
Basic Setting
Onvif Mode
Discoverable

UserName
admin
Password

| Sections | Description |
| Basic Setting | To setup the ONVIF function parameters. It is used to co with the corresponding ONVIF tool.ONVIF Mode: Two modes - Discoverable and Non-discoverable. Discoverable by default. Only Discoverable mode, then Onvif software can search R27XUser Name: To modify the user name you need. Adm by default.Password: To modify the password you want. Admin b default.Note:User name and password is used for authentication |
4.4.8 Motion
Motion Detection
Motion Detection Options
Motion Detection

Action to execute
Action to execute


Http URL:


| Sections | Description |
| Motion Detection | Motion detection is used to record the change of th surrounding environment.● Motion Detection Options: Enable to active thisfunction.● Action to execute: Select a suitable way to receive the motion detection information. (FTP,EMAIL,SIP Call setting please refer to chapter4.4.10) |
4.4.9 Card Setting(R27A only)

| Sections | Description |
| Import/Export Card Data | To import or export the card data file. Only support .xm format. |
| Card Status | ● Normal: Choose Normal mode when reading card.● Card Issuing: Choose Card Issuing mode when writing card. |
| Card Event | This feature is similar with the Input event. Once user u: card to unlock, it will execute the action.It supports 3 types - FTP,Email,HTTPTo setup the FTP and Email in Action interface, the FTP and Email will receive the capture picture when unlocking you choose HTTP mode, enter the URL format: http://http server IP address/any information(such as http://192.168.35.48/mac=000 ).Then you will change this information which capture the network packet. |
| Card Setting | ● IC Key DoorNum: R27X can support to connect 3 relay Choose one and add the valid card for unlock.● IC Key Day: To choose the valid day for the card you added.● IC Key Time: Setup a accurate valid time for the card● IC Key Name: To setup corresponding name for the card● IC Key Code: Place the card in the R27A RF Card Real area, then click Obtain button. After R27A reads the code, click Add, the card information will show in the Door Card Management list. |
| Door Card Management | Valid card information will show in the list. Users can tick current card information then delete one or all in the list |
4.4.10 Action

| Sections | Description |
| Email Notification | ● Sender Email Address: Input the sender email address● Receiver Email Address: Input the receiver email addre● SMTP Server Address: Enter the SMTP server format● SMTP User name: Enter the SMTP● SMTP password: Enter the sender email password● Email Subject: Enter the subject name.● Email content: Enter the content name.● Email test: Click test to make sure the parameters yo enter is right. |
| FTP Notification | ● FTP Server: Enter the FTP server address.● FTP User Name: Enter the FTP server user name.● FTP Password: Enter the corresponding FTP server password.● FTP test: Click test to make sure the parameters you enter is right. |
| SIP Call Notification | When you enable SIP Call function of motion. Enter the number and name in the corresponding area. When the motion is triggered, the device will call out the number automatically. |
4.5. Account
4.5.1 Basic

| Sections | Description |
| SIP Account | To display and configure the specific Account settings.● Status: To display register result.● Display Name: Which is sent to the other call party fo display.● Register Name: Allocated by SIP server provider, used authentication.● User Name: Allocated by your SIP server provide, used for authentication.● Password: Used for authorization. |
| SIP Server 1 | To display and configure Primary SIP server settings.● Server IP: SIP server address, it could be an URL or IP address.● Registration Period: The registration will expire after Registration period, the IP phone will re-register automatically within registration period. |
| SIP Server 2 | To display and configure Secondary SIP server settings.This is for redundancy, if registering to Primary SIP serve fails, the IP phone will go to Secondary SIP server for registering.Note: Secondary SIP server is used for redundancy, it can left blank if there is not redundancy SIP server in user's environment. |
| Outbound Proxy Server | To display and configure Outbound Proxy server settings.An outbound proxy server is used to receive all initiating request messages and route them to the designated SIP server.Note: If configured, all SIP request messages from the IP phone will be sent to the outbound proxy server forcefu |
| Transport Type | To display and configure Transport type for SIP message● UDP: UDP is an unreliable but very efficient transport layer protocol.● TCP: Reliable but less-efficient transport layer protocol.● TLS: Secured and Reliable transport layer protocol.● DNS-SRV: A DNS RR for specifying the location of services. |
| NAT | To display and configure NAT(Net Address Translator) settings.● STUN: Short for Simple Traversal of UDP over NATS, a solution to solve NAT issues.Note: By default, NAT is disabled. |
4.5.2 Advanced

| Sections | Description |
| SIP Account | To display current Account settings or to select which ac to display. |
| Codecs | To display and configure available/unavailable codecs list. Codec means coder-decoder which is used to transfer an signal to digital signal or vice versa.Familiar codecs are PCMU(G711U), PCMA(G711A), G722 (wide-bandth codecs), G729 and so on. |
| Video Codec | To configure the video quality● Codec Name: The default video codec is H264.● Codec Resolution: It can support QCIF, CIF, VGA, 4CIF, 720P.● Codec Bitrate: The lowest bitrate is 128, the highest bitrate is 2048.● Codec payload: From 90-119. |
| Subscribe | To display and configure MWI, BLF, ACD subscription sett● MWI: Message Waiting Indicator which is used to indicate whether there is unread new voice message.● BLF: BLF is short for Busy Lamp Field which is used to monitor the designated extension status.● ACD: Automatic Call Distribution is often used in office for customer service, such as call center. The setting here is to negotiate with the server about expire tin ACD subscription. |
| DTMF | To display and configure DTMF settings.● Type: Support Inband, Info, RFC2833 or their combination.● How To Notify DTMF: Only available when DTMF Type Info.● DTMF Payload: To configure payload type for DTMF.Note: By default, DTMF type is RFC2833 which is the standard. Type Inband uses inband frequency to indicate DTMF tone which is most used to be compatible to traditional telephone server. Type Info use SIP Info messa to indicate DTMF message. |
| Call | To display and configure call-related features.● Max Local SIP Port: To configure maximum local sip p for designated account.● Min Local SIP Port: To configure minimum local sip pc for designated account.● Caller ID Header: To configure which Caller ID format fetch for displaying on Phone UI.● Auto Answer: If enabled, IP phone will beauto-answered when there is an incoming call for designated account.● Ringtones: Choose the ringtone for each account.● Provisioning Response ACK: 100% reliability for all provisional messages, this means it will send ACK even time the IP phone receives a provisional SIP message from SIP server.● User=phone: If enabled, IP phone will send user=phone within SIP message.● PTime: Interval time between two consecutive RTP packets.● Anonymous Call: If enabled, all outgoing call for the designated account will be anonymous number.● Anonymous Call Rejection: If enabled, all incoming anonymous-out call for the designated account will be rejected.● Is escape non Ascii character: To transfer the symbol Ascii character.● Missed Call Log: To display the miss call log.● Prevent SIP Hacking: Enable to prevent SIP from hacking. |
| Session Timer | To display or configure session timer settings.● Active: To enable or disable this feature, If enable, then on going call will be disconnected automatically once the session expired unless it's been refreshed by UAC or UAS.● Session Expire: Configure session expire time.● Session Refresher: To configure who should be response for refreshing a session.Note:UAC means User Agent Client, here stands for IP phone. UAS means User Agent Server, here stands for SI server. |
| BLF List | To display or configure BLF List URI address.● BLF List URI: BLF List is short for Busy Lamp Field List.● BLFList PickUp Code: To set the BLF pick up code.● BLFList Bargeln Code : To set the BLF barge in code. |
| Encryption | To enable or disabled SRTP feature.● Voice Encryption(SRTP): If enabled, all audio signal (technically speaking it's RTP streams) will be encrypted for more security. |
| NAT | To display NAT-related settings.● UDP Keep Alive message: If enabled, IP phone will send UDP keep-alive message periodically to router to kee NAT port alive.● UDP Alive Msg Interval: Keepalive message interval.● Rport: Remote Port, if enabled, it will add Remote Pointo outgoing SIP message for designated account. |
| User Agent | One can customize User Agent field in the SIP message; user agent is set to specific value, user could see the information from PCAP. If user agent is not set by defau user could see the company name, model number and firmware version from PCAP |
4.6. Network
4.6.1 Basic

| Sections | Description |
| LAN Port | To display and configure LAN Port settings.DHCP: If selected, IP phone will get IP address, Subne Mask, Default Gateway and DNS server address from DHCP server automatically.Static IP: If selected, you have to set IP address, Subr Mask, Default Gateway and DNS server manually. |
4.6.2 Advanced
Network-Advanced
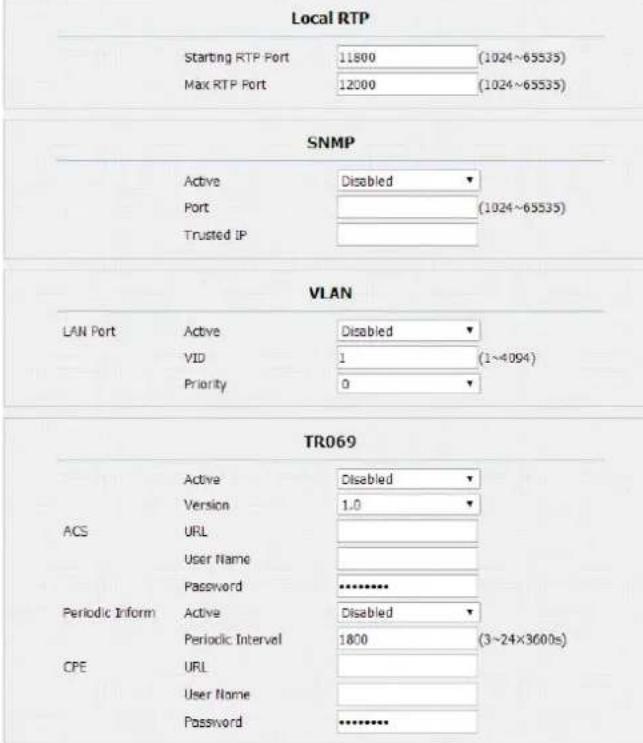
| Sections | Description |
| Local RTP | To display and configure Local RTP settings.Max RTP Port: Determine the maximum port that RTP stream can use.Starting RTP Port: Determine the minimum port that F stream can use. |
| SNMP | To display and configure SNMP settings.Active: To enable or disable SNMP feature.Port: To configure SNMP server's port.Trusted IP: To configure allowed SNMP server address, could be an IP address or any valid URL domain narNote: SNMP (Simple Network Management Protocols) is Internet-standard protocol for managing devices on IP networks. |
| VLAN | To display and configure VLAN settings.Active: To enable or disable VLAN feature for designat port.VID: To configure VLAN ID for designated port.Priority: To select VLAN priority for designated port.Note: Please consult your administrator for specific VLAN settings in your networking environment. |
| TR069 | To display and configure TR069 settings.● Active: To enable or disable TR069 feature.● Version: To select supported TR069 version (version 1.1 or 1.1).● ACS/CPE: ACS is short for Auto configuration servers a server side, CPE is short for Customer-premise equipment as client side devices.● URL: To configure URL address for ACS or CPE.● User name: To configure username for ACS or CPE.● Password: To configure Password for ACS or CPE.● Periodic Inform: To enable periodically inform.● Periodic Interval: To configure interval for periodic inform.Note: TR-069(Technical Report 069) is a technical specification entitled CPE WAN Management Protocol (CWMP).It defines an application layer protocol for remot management of end-user devices. |
4.7. Phone
4.7.1 Time/Language
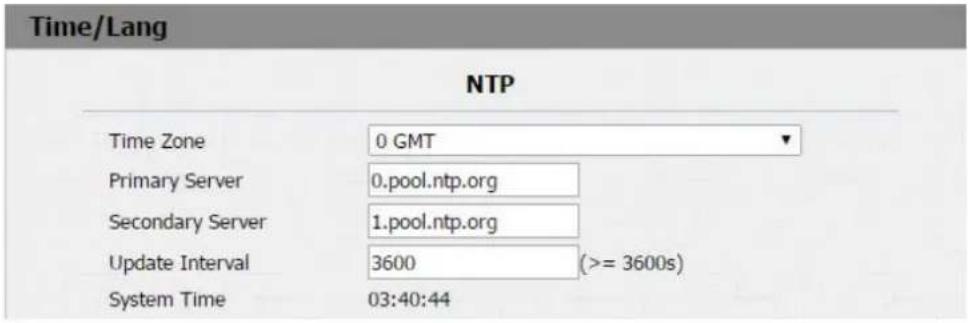
| Sections | Description |
| NTP | To configure NTP server related settings.Time Zone: To select local Time Zone for NTP server.Primary Server: To configure primary NTP server address.Secondary Server: To configure secondary NTP server address, it takes effect if primary NTP server is unreachable.Update interval: To configure interval between two consecutive NTP requests.Note: NTP, Network Time Protocol is used to automaticalsynchronized local time with INTERNET time, since NTP server only response GMT time, so that you need to spe the Time Zone for IP phone to decide the local time. |
4.7.2 Call Feature

| Sections | Description |
| Mode | Mode: Select the desired mode. |
| DND | DND (Do Not Disturb) allows IP phones to ignore any incoming calls.● Return Code when DND: Determine what response code should be sent back to server when there is an inco call if DND on.● DND On Code: The Code used to turn on DND on server's side, if configured, IP phone will send a SIP message to server to turn on DND on server side if press DND when DND is off.● DND Off Code: The Code used to turn off DND on server's side, if configured, IP phone will send a SIP message to server to turn off DND on server side if press DND when DND is on. |
| Intercom | Intercom allows user to establish a call directly with the callee.● Active: To enable or disable Intercom feature.● Intercom Mute: If enabled, once the call established, t callee will be muted. |
| Others | ● Return Code When Refuse: Allows user to assign speci code as return code to SIP server when an incoming is rejected.● Auto Answer Delay: To configure delay time before an incoming call is automatically answered.● Auto Answer Mode: To set video or audio mode for a answer by default.● Direct IP: Direct IP call without SIP proxy. |
4.7.3 Voice

| Sections | Description |
| Mic Volume | To configure Microphone volume, from 1-15.8 by default. |
| Speaker Volume | To configure Speaker Volume,from 1-15,8 by default. |
| Open Door Warning | When the door is opened, users will hear that opendoc prompt voice. If you disable it, you won’t hear the announcement. |
| RingBack Upload | During the calling, user will hear the ringback tone before other party answer. User can upload the suitable RingBad Tone by yourself. Please note the file format and size. |
| Opendoor Tone Upload | Choose a suitable opendoor warning tone to upload. Please not the file format and size. |
4.7.4 Dial Plan

| Sections | Description |
| Rules Management | For easy management, users can export and import the replace rule file directly. (The export file format is .tgz, u need to unzip it, then check the .XML file. The Import format is .XML) |
| Rules | Allow user to select Replace rule or Dial-now to display edit. |
| Rules Modify | Allow user to modify selected rules information, for repla rule, you can modify related accounts, prefix and replace Such as: Account:1Prefix: 100Replace: 110Then user dial 100 with account1 , the phone will call o actually. |
4.7.5 Multicast

| Sections | Description |
| Multicast Setting | To display and configure the Multicast setting.● Paging Barge: Choose the multicast number ,the ran; is 1-10.● Paging priority Active: Enable o disable the multicast |
| Priority List | To setup the multicast parameters.● Listening Address: Enter the IP address you need to listen.● Label: Input the label for each listening address. |
4.7.6 Call log
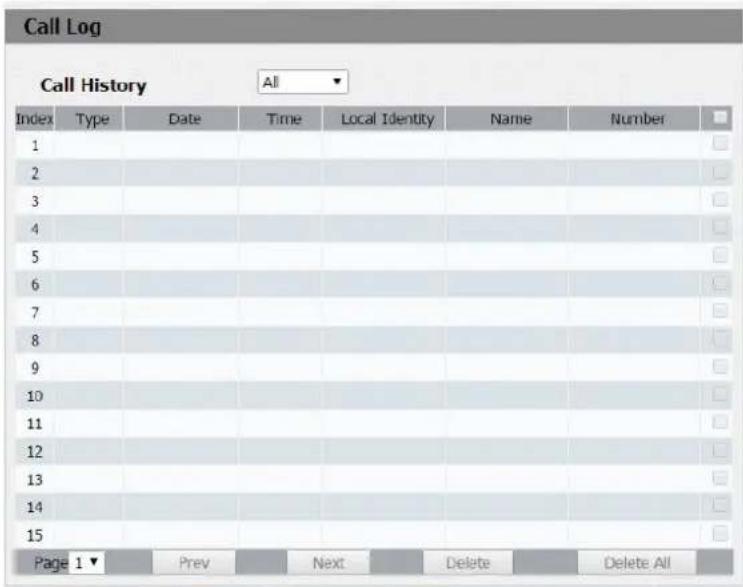
| Sections | Description |
| Call History | To display call history records.Available call history types are All calls, Dialed calls, Rece calls, Missed calls, Forwarded calls.Users can check the call history in detail. Tick the number delete or delete all logs. R27X supports 100 call logs. |
4.7.7 Door log

| Sections | Description |
| Door Log | To display unlock history. This interface can only show the card unlock history now.Users can check the unlock information in detail. User can delete one or all logs. The maximum door log is 500. |
4.8. Upgrade
4.8.1 Basic
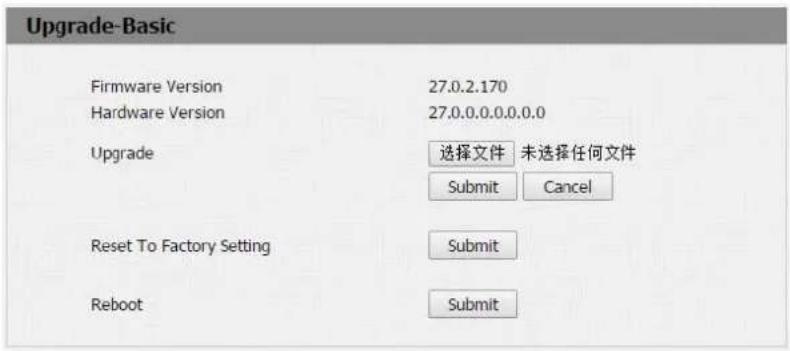
| Sections | Description |
| Upgrade | To select upgrading zip file from local or a remote serveautomatically.Note: Please make sure it's right file format for right mo |
| Firmware version | To display firmware version, firmware version starts with MODEL name. |
| Hardware Version | To display Hardware version. |
| Reset to Factory Setting | To enable you to reset IP phone's setting to factory sett |
| Reboot | To reboot IP phone remotely from Web UI. |
4.8.2 Advanced
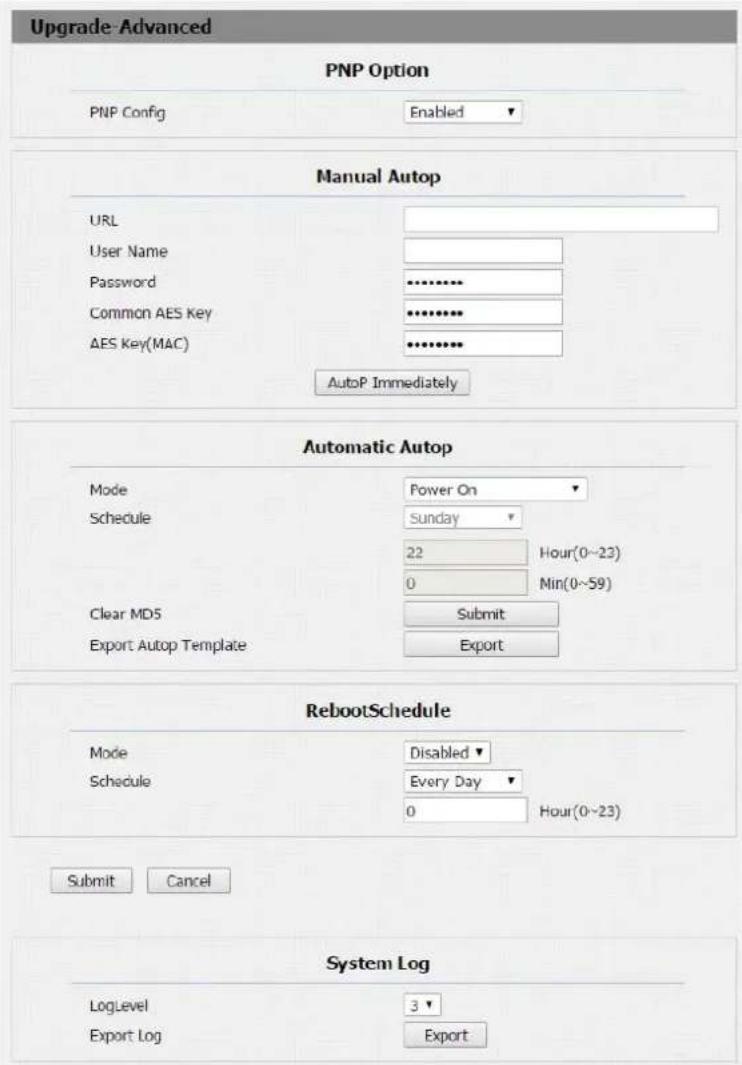
| Sections | Description |
| PNP Option | To display and configure PNP setting for Auto Provisioning.● PNP: Plug and Play, once PNP is enabled, the phone will send SIP subscription message to PNP server automatic to get Auto Provisioning server's address.By default, this SIP message is sent to multicast address 224.0.1.75(PNP server address by standard). |
| Manual Autop | To display and configure manual update server's settings.● URL: Auto provisioning server address.● User name: Configure if server needs an username to access, otherwise left blank.● Password: Configure if server needs a password to acces otherwise left blank.● Common AES Key: Used for IP phone to decipher comm Auto Provisioning configuration file.● AES Key (MAC): Used for IP phone to decipher MAC-oriented auto provisioning configuration file(for example, file name could be 0c1105888888.cfg if IP phone's MAC address is 0c1105888888).Note:AES is one of many encryption, it should be configure only configure file is ciphered with AES, otherwise left blan |
| Automatic Autop | To display and configure Auto Provisioning mode settings.This Auto Provisioning mode is actually self-explanatory.For example, mode "Power on" means IP phone will go to do Provisioning every time it powers on. |
| System Log | To display system log level and export system log file.● System log level: From level 0~7.The higher level means the more specific system log is saved to a temporary file. By default, it's level 3.● Export Log: Click to export temporary system log file to local PC. |
4.9. Security
4.9.1 Basic

| Sections | Description |
| Web Password Modify | To modify user's password.● Current Password: The current password you used.● New Password: Input new password you intend to use● Confirm Password: Repeat the new password. |


- CONTENT
- OVERVIEW......1
- CONFIGURATION......5
- BASIC USING....8
- WEB......9
- OVERVIEW
- PRODUCT DESCRIPTION
- FEATURES
- HIGHLIGHT
- PHYSICAL&POWER
- SIP ENDPOINT
- VIDEO
- DOOR ENTRY FEATURE
- NETWORK FEATURES
- KEYPAD
- CONFIGURATION
- ADMINISTRATOR INTERFACE
- 2.1.1 SYSTEM INFORMATION
- 2.1.2 ADMIN SETTINGS
- 2.1.2.1 ADMIN CARD SETTING
- ADD ADMIN CARD
- CLEAN ADMIN CARD DATA
- 2.1.2.2 ADMIN CODE SETTING
- 2.1.2.3 SERVICE CODE SETTING
- 2.1.3 SYSTEM SETTING
- 2.1.3.1 NETWORK SETTINGS
- 2.1.3.2 STATION NO.SETTINGS
- USER INTERFACE
- 2.2.1 PUBLIC PIN MODIF
- 2.2.2 ADD USER CARDS
- 2.2.3 ADD PRIVATE PIN
- 3.BASIC USING
- MAKE A CALL
- RECEIVE A CALL
- UNLOCK
- WEB
- OBTAIN IP ADDRESS
- LOGIN THE WEB
- STATUS
- 4.3.1 BASIC
- INTERCOM
- 4.4.1 BASIC
- 4.4.2 ADVANCED
- 4.4.3 RELAY
- 4.4.4 INPUT
- 4.4.5 LIVE STREAM
- 4.4.6 RTSP
- 4.4.7 ONVIF
- ONVIF
- BASIC SETTING
- 4.4.8 MOTION
- MOTION DETECTION
- MOTION DETECTION OPTIONS
- ACTION TO EXECUTE
- 4.4.9 CARD SETTING(R27A ONLY)
- 4.4.10 ACTION
- ACCOUNT
- 4.5.1 BASIC
- 4.5.2 ADVANCED
- NETWORK
- 4.6.1 BASIC
- 4.6.2 ADVANCED
- PHONE
- 4.7.1 TIME/LANGUAGE
- 4.7.2 CALL FEATURE
- 4.7.3 VOICE
- 4.7.4 DIAL PLAN
- 4.7.5 MULTICAST
- 4.7.6 CALL LOG
- 4.7.7 DOOR LOG
- UPGRADE
- 4.8.1 BASIC
- 4.8.2 ADVANCED
- SECURITY
- 4.9.1 BASIC
Brand : Akuvox
Model : R27A-V2
Category : Intercom