VL-HM - Bike Accessories Valk - Free user manual and instructions
Find the device manual for free VL-HM Valk in PDF.


| Product Type | Bike Computer |
| Brand | Valk |
| Model | VL-HM |
| Dimensions | 4.5 × 3.0 × 1.5 cm |
| Weight | 25 g |
| Display Type | LCD |
| Power Source | CR2032 battery |
| Functions | Speed, distance, time, odometer |
| Water Resistance | IPX4 |
| Mounting | Handlebar bracket |
| Compatibility | Universal, wheel size adjustable |
| Wireless | Yes (sensor included) |
| Battery Life | Approx. 1 year |
| Maintenance | Clean with dry cloth; replace battery when low |
| Safety | Use reflective gear; mount securely |
| Spare Parts | Battery, sensor, bracket available |
| Repairability | Battery replaceable; sensor replaceable |
| Warranty | 2 years |
Frequently Asked Questions - VL-HM Valk
User questions about VL-HM Valk
0 question about this device. Answer the ones you know or ask your own.
Ask a new question about this device
Download the instructions for your Bike Accessories in PDF format for free! Find your manual VL-HM - Valk and take your electronic device back in hand. On this page are published all the documents necessary for the use of your device. VL-HM by Valk.
USER MANUAL VL-HM Valk
Colours and sizes may vary
User Manual
[Revision 1.0 August 2021]
READ THIS MANUAL CAREFULLY BEFORE USE – FAILURE TO DO SO MAY RESULT IN INJURY, PROPERTY DAMAGE AND MAY VOID WARRANTY. • KEEP THIS MANUAL FOR FUTURE REFERENCE. • Products covered by this manual may vary in appearance, assembly, inclusions, specifications, description, and packaging.
HELMET INSTRUCTIONS:
The helmet you have just purchased provides protection, whether on or off the road. To ensure proper use of this helmet, familiarise yourself with its features, fit and care by carefully reading through this manual before wearing your new helmet.
WARNING:
- No helmet can protect the wearer against all possible impacts.
- The helmet is designed to be retained by a strap under the lower jaw.
- To be effective, a helmet must fit and be worn correctly. To check for correct fit, place helmet on head and make any adjustments indicated. Securely fasten retention system. Grasp the helmet and try to rotate it to the front and rear. A correctly fitted helmet should be comfortable and should not move forward to obscure vision or rearward to expose the forehead.
-
No attachments should be made to the helmet except those recommended by the helmet manufacturer.
-
The helmet is designed to absorb shock by partial destruction of the shell and liner. This damage may not be visible. Therefore, if subjected to a severe blow, the helmet should be destroyed and replaced even if it appears undamaged.
-
The helmet may be damaged and rendered ineffective by petroleum and petroleum products, cleaning agents, paints, adhesives and the like, without the damage being visible to the user.
-
A helmet has a limited lifespan in use and should be replaced when it shows obvious signs of wear.
-
This helmet should not be used by children while climbing or doing other activities where there is a risk of hanging or strangulation if the child gets trapped whilst wearing the helmet.
THE PROPER FIT:
STEP 1:
The helmet fits correctly when the fit pads hold it firmly but comfortably in place. Different thicknesses are provided for that purpose. Pads are held in place by hook and loop style fasteners. Try any combination of the different thicknesses provided until the helmet fits firmly and comfortably. All fitting adjustments MUST be made with the helmet in the proper position. Failure to do so will result in a poor fit.
This will allow the helmet to move out of position or come off in an accident. For proper position, please refer to Diagram A.
DIAGRAM A

CORRECT
INCORRECT
STEP 2:
Always wear a helmet low in the front to protect the forehead as in the "correct" figure.
STEP 3:
The front and rear straps should join at a point slightly below and in front of the ears. See Diagram B. To adjust the position of the straps hold one end of the buckle in one hand and slide the slide adjuster up or down as necessary with the other hand correctly positioned.
To adjust the front or rear strap individually hold the strap to be adjusted and slide the slide adjuster in the appropriate direction.
DIAGRAM B

STEP 4:
Always wear the helmet with the chin strap buckle fastened and the strap pulled tight. Make sure the strap is well back against the throat, NOT on the point of the chin. Straps worn in the point of the chin increase the chance of the helmet coming off in an accident. See Diagrams C and D on how to fasten and release the buckle.
DIAGRAM C

DIAGRAM D

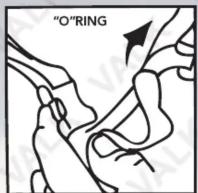
Make sure the loose end of the strap passes through the rubber "O" ring. If it does not, the strap may slide loose and the helmet can come off accidentally. See Diagram F.
DIAGRAM F
STEP 5:
Before using the helmet, make sure it fits correctly, the straps are correctly adjusted and the chin strap is tight enough. Put the helmet on in the correct position. Fasten the chin strap and pull it tight.
CHECK THE FIT:
Grab the helmet with both hands and twist it to the left and to the right. If the helmet fits right, the skin on the forehead will move as the helmet moves. If it does not, the helmet is too loose. Return to Step 1.
CHECK THE STRAPS:
Grab the helmet with both hands and try to move it by rolling the helmet forward and backward as far as you can. If you can roll it off the head completely in either direction, roll it forward so far that it blocks vision or backwards far enough to expose the forehead it doesn't fit right. Repeat Steps 3 and 4 until helmet movement is minimal.
WARNING:
If you cannot adjust your helmet to fit as required by Step 5, DO NOT USE THIS HELMET. Replace it with a different size.
STEP 6:
Once you are satisfied that the helmet fits correctly and that all straps are properly adjusted and tightened, take a short ride. Pay attention to overall comfort and helmet stability while riding. Make any minor adjustments to the fit pads and straps to improve the comfort stability.
CLEANING YOUR HELMET:
Use only mild soap and water to clean the helmet, straps and pads. DO NOT use chemicals. Do not use solvents, paints and hydrocarbons.
STORING YOUR HELMET:
After each use, allow the helmet to air dry and then store in a cool, dry place. Excessive heat can damage the helmet. In direct sunlight, the back ledge of car, behind rear window and other places that can get hot enough, will cause heat damage. Damaged helmets will appear to have uneven or bubbly surfaces.
DO NOT USE HEAT-DAMAGED HELMETS.

VALK

Some experts believe that the incorrect or prolonged use of almost any product may cause serious injury or death. To help reduce your risk of serious injury or death, refer to the information below. For more information, see www.datastreamserver.com/safety
- Consult all documentation, packaging and product labelling before use. Note that some products feature documentation available online. It is recommended to print and retain the documentation.
■ Before each use, check the product for loose/broken/damaged/missing parts, wear or leaks (if applicable). Never use a product with loose/broken/damaged/missing parts, wear or leaks.
■ Products must be inspected and serviced (if applicable) by a qualified technician every 6 months. This is based on average residential use by persons of average size and strength, and on a property of average metropolitan size. Use beyond these recommendations may require more frequent inspections/servicing.
■ Ensure that all users of the product have completed a suitable industry recognised training course before being allowed access to the product.
If this product has been purchased in error when considering the information presented here, contact the retailer directly for details of their returns policy, if required.
The product has been supplied by a general merchandise retailer that may not be familiar with your specific application or description of application. Be sure to attain third-party approval from a qualified specialist for your application before use, regardless of any assurances from the retailer or its representatives.
This product is not intended for use where fail-safe operation is required. As with any product (for example, automobile, computer, toaster), there is the possibility of technical issues that may require the repair or replacement of parts, or the product itself. If the possibility of such failure and the associated time it may take to rectify could in any way inconvenience the user, business or employee, or financially affect the user, business or employee, then the product is not suitable for your requirements. This product is not intended for use where incorrect operation or a failure of any kind, including but not limited to, a condition requiring product return, replacement, parts replacement or service by a technician may cause financial loss, loss of employee time or an inconvenience requiring compensation.

©2021 Valk. All rights reserved. No part of this document, including descriptive content, concepts, ideas, diagrams or images may be reproduced or transmitted in any form or by any means, electronic or mechanical, including photocopying, scanning or recording, or any information storage and retrieval system, without express permission or consent from the publisher.


- HELMET INSTRUCTIONS
- WARNING
- THE PROPER FIT
- STEP 1
- STEP 2
- STEP 3
- STEP 4
- STEP 5
- CHECK THE FIT
- CHECK THE STRAPS
- STEP 6
- CLEANING YOUR HELMET
- STORING YOUR HELMET
- SOME EXPERTS BELIEVE THAT THE INCORRECT OR PROLONGED USE OF ALMOST ANY PRODUCT MAY CAUSE SERIOUS INJURY OR DEATH. TO HELP REDUCE YOUR RISK OF SERIOUS INJURY OR DEATH, REFER TO THE INFORMATION BELOW. FOR MORE INFORMATION, SEE WWW.DATASTREAMSERVER.COM/SAFETY
Brand : Valk
Model : VL-HM
Category : Bike Accessories