
T150A - Gramophone Crosley - Free user manual and instructions
Find the device manual for free T150A Crosley in PDF.


| Product Type | Gramophone Turntable |
| Brand | Crosley |
| Model | T150A |
| Dimensions (W x D x H) | 12.5 x 10.2 x 5.3 in (31.8 x 25.9 x 13.5 cm) |
| Weight | 7.9 lbs (3.6 kg) |
| Power Supply | AC 100-240V, 50/60Hz, output 5V DC 1A |
| Turntable Speeds | 33 1/3, 45 RPM |
| Built-in Speakers | Full range stereo, 2 x 3 watts |
| Bluetooth | Built-in Bluetooth receiver for wireless streaming |
| Audio Outputs | RCA line out (auxiliary) |
| Stylus Type | Ceramic stereo stylus (replaceable) |
| Drive Mechanism | Belt-driven |
| Tonearm | Adjustable counterweight, auto-return |
| Cabinet Material | Wood veneer with metal accents |
| Care Instructions | Clean with a soft, dry cloth; replace stylus every 500 hours |
| Safety Precautions | Keep away from moisture and heat sources; unplug during cleaning |
| Replacement Parts | Stylus (model ST-01), drive belt (model DB-01) |
| Repairability | User-replaceable stylus and belt; professional service for electronics |
| Warranty | 1 year limited warranty |
| Included Accessories | AC adapter, 45 RPM adapter, instruction manual |
Frequently Asked Questions - T150A Crosley
User questions about T150A Crosley
0 question about this device. Answer the ones you know or ask your own.
Ask a new question about this device
Download the instructions for your Gramophone in PDF format for free! Find your manual T150A - Crosley and take your electronic device back in hand. On this page are published all the documents necessary for the use of your device. T150A by Crosley.
USER MANUAL T150A Crosley
natural_image
Line drawing of a vintage desktop computer with two speakers and a circular dial (no text or symbols)Questions, problems, missing parts?
Before returning to the store, call Customer Service
8 a.m. – 6 p.m., EST, Monday – Friday
1-888-CROSLEY
www.crosleyradio.com
Safety Instructions
Read and understand this entire manual before using this product. Keep these instructions for future reference.
- Do not use this product near water.
- This product should be operated only by the type of power source indicated on the marking label or in this instruction manual.
- Do not defeat the safety purpose of the polarized plug. A polarized plug has two blades with one blade wider than the other. This plug will fit into the power outlet only one way. If you are unable to insert the plug fully into the outlet try reversing the plug. If the plug should still fail to fit, contact your electrician.
- Protect the power cord from being walked on or pinched particularly at plugs, convenience receptacles, and the point where they exit from the product.
- Do not overload wall outlets, extension cords, or integral convenience receptacles as this can result in a risk of fire or electric shock.
- Never push objects of any kind into this product through openings as they may touch dangerous voltage points or short-out parts that could result in a fire or electric shock. Never spill liquid of any kind on the product.
- Do not attempt to service this product yourself as opening or removing covers may expose you to dangerous voltage or other hazards. Refer all servicing to qualified service personnel.
- Changes or modifications to this unit not expressly approved by the party responsible for compliance could void the user's authority to operate the equipment.
- Do not use attachments not recommended by the product manufacturer as they may cause hazards.
- A product and cart combination should be moved with care. Quick stops, excessive force, and uneven surfaces may cause the product and cart combination to overturn.
- Slots and openings in the cabinet are provided for ventilation and to ensure reliable operation of the product and to protect it from overheating. Do not block or cover these openings.
- Unplug the product during lightning storm or when unused for long periods of time.
Items in this package
Before throwing away any packaging materials, please check thoroughly and make sure you find the following items that come along with this package:
- Turntable
- Turntable Slip Mat
- 45 RPM adapter
- Speaker wire
- Power adaptor
Please contact Crosley customer service if there is any accessory missing from the package. Retain the original packaging materials for exchange or return purposes.
Specifications
| Power | AC power adaptor, DC output 12V 1.5A |
| Power consumption 35W | |
| Speaker | 4", 4Ω, 15W x 2 |
| Turntable speed 33 | ^1/_3 , 45 RPM |
| Replacement needle Crosley NP5 | |
Note:
- Design and specifications are subject to change without notice.
Product Description
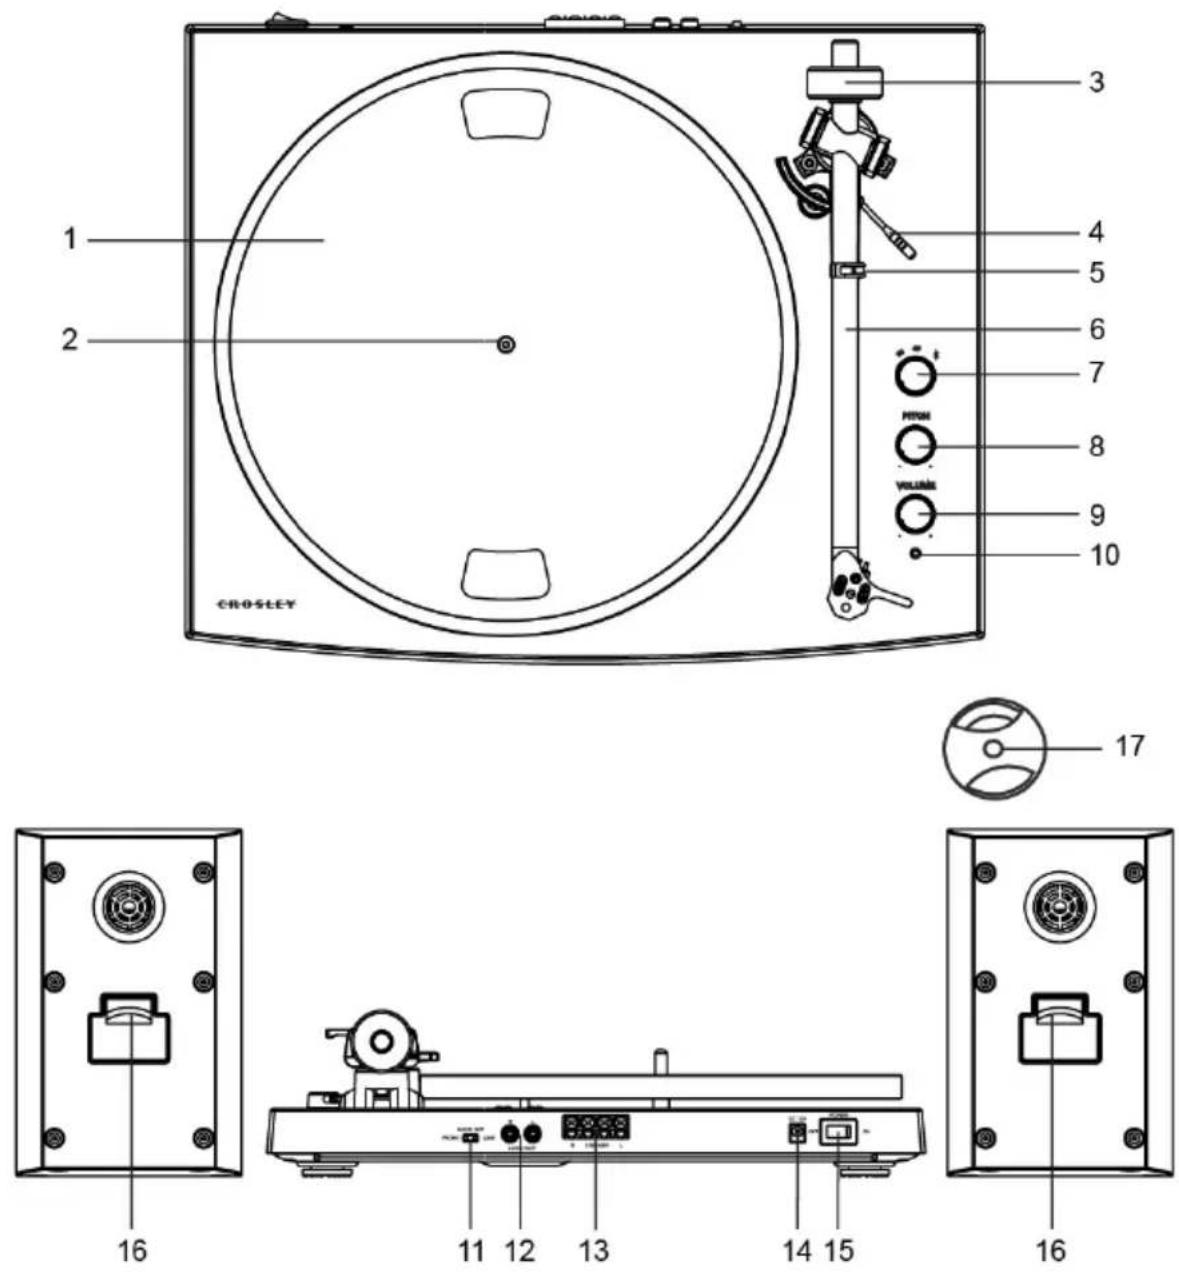
- Turntable Platter
- Turntable Spindle
- Tonearm Counter Weight
- Cue Lever
- Tonearm Rest
- Tonearm
- Function Knob
- Pitch Control
-
Volume Knob
-
Power Indicator
- Phono/Line Switch
- RCA Jacks
- Speaker Output Terminals
- Power Jack
- Power Switch
- Speaker Input Terminals
- 45 RPM Adapter
Initial Setup
Essential Setup
-
Place the unit on a flat and level surface. The selected location should be stable and free from vibration.
-
Remove the tie-wrap that is holding the tonearm.
-
Install the turntable platter and drive belt accordingly
-
Place the slip mat on top of the turntable platter.
-
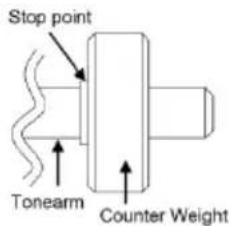
Slide Tonearm Counterweight onto the rear shaft of tonearm and push it as close to the stop point as possible. This will automatically set the needle's down force to be in range for the factory fitted needle (3.5g-4g).
-
Use the Speaker Wire to connect the left and right speakers' Input Terminals to the turntable's Output Terminals correspondingly. Make sure the left and right channels are connected correctly.
-
Connect AC adaptor to the Power Jack of the unit.
Note: Do not plug the AC power adaptor to power outlet before all the assembly is completed. Before turning the power on, make sure again all the connection settings are correct. Always turn off the power when connecting or disconnecting.
Turntable Platter and Belt Setup
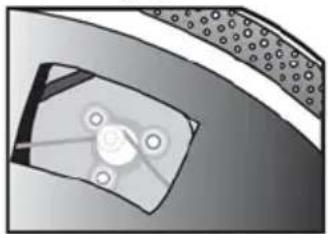
- Install the drive belt over the inner ring under the platter and make sure it won't fall off during the setup.
- Place the platter through the turntable spindle, then rotate the platter until you see the drive motor pulley through the window at the top right corner.
- Carefully grab the drive belt and put it around the slot of motor pulley.
natural_image
Diagram of a mechanical component with circular features and a central hub (no text or symbols)Phono/Line Switch
For increased flexibility of use, this unit has a built-in stereo phono pre-amplifier. If you prefer to use the phono input of your stereo system or your standalone phono pre-amplifier, set the Phono/Line switch to the PHONO position.
Otherwise, please set it to LINE position and make connection to the AUX input or other high-level input on your stereo system.
Stereo System Connection
RCA Jacks
- The RCA Jacks of this unit are shared as both the Phono output jacks and the Line output jacks. They are determined by the Phono/Line Switch.
- When used as a line output, the jacks output analog line-level signals and could be connected directly with a pair of active speakers or the appropriate input of your stereo system. When used as a Phono output, they should be connected to the phono pre-amp or the phono input of the stereo system.
- The Red plug connects with the Right channel and the White plug connects with the Left channel.
Note:
- If the Phono/Line switch is set at LINE position but RCA jacks connected to the stereo system's phono input, the sound might be distorted due to input overload and could damage your stereo system.
- If the Phono/Line switch is set at PHONO position but RCA jack connected to the stereo system's line input, the volume will be very low due to lacking signal pre-amplification.
- RCA Jack is not designed to be connected directly to the passive/unpowered speakers and if it does, the volume will be very low.
Spring clip speaker terminals
The spring clip speaker terminals deliver amplified, speaker-level signals as output and should be connected with the passive speakers.
Turntable Operation
- Press the Power Switch to turn on the power.
- Rotate the Function Knob to either 33^1/3 or 45 RPM mode to select the turntable speed accordingly. Use the 45 RPM Adapter if necessary
- Place the record on the turntable.
- Remove the stylus protector from the stylus assembly.
Note: To avoid stylus damage, make certain the included stylus guard is in place whenever the turntable is being moved or cleaned. - Lift up the Tonearm and move it over the record where play is desired to begin. Gently put down the Tonearm and begin the playback.
- When the record is finished playing, gently lift up the Tonearm and move it back to the Tonearm Rest. To suspend the playback, repeat the same steps.
Pitch Control
The turntable speed can be increased or decreased by approximately 10% by rotating the Pitch Control Knob. To increase the speed, turn the Pitch Control Knob clockwise. To decrease the speed, turn the knob counter-clockwise.
Needle Replacement
Removing Needle
- Gently pull down the front edge of the needle.
- Pull needle forward.
- Pull out and remove.

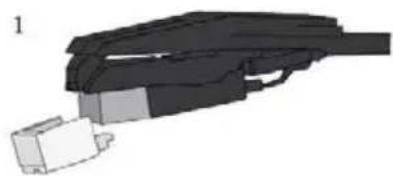
Installing Needle
- Position the needle with its tip facing down.
- Line up the back of the needle with the cartridge.
- Insert the needle with its front end at a downward angle and gently lift the front of the needle upward until it snaps into place.
natural_image
3D mechanical component diagram showing a cylindrical assembly with internal components (no text or symbols)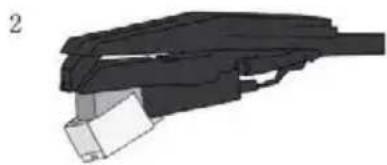
natural_image
3D rendered mechanical component with layered structure and a small rectangular element (no text or symbols visible)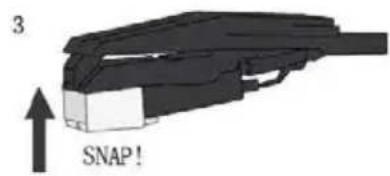
Bluetooth Operation
- Turn the Function Knob to Bluetooth mode ⚙, the Power Indicator will start flashing blue.
- Turn on the Bluetooth feature of your audio device, search for "CROSLEY T150" and pair.
- Once your device is successfully paired with the unit, you will hear a short confirmation sound from the unit.
- Play and stream music from your device to the unit.
Note: Bluetooth version - 4.2
Turntable Maintenance
- Do not touch the stylus tip with your fingers. Avoid bumping the stylus on the turntable mat or a record's edge.
- Clean the stylus frequently with a soft brush with a back-to-front motion only.
- Clean the records to get rid of dust or grease with a record cleaning brush and record cleaning solution.
- Clean the turntable cabinet with a slightly damped microfiber cloth.
Note: Do not use cleanser other that contains alcohol, benzene or any other harsh chemicals, which might damage the paint and finish of the turntable.
** Crosley offers a product line of different cleaning accessories. Please ask your retailer or check out our website www.crosleyradio.com for more cleaning product information.
Troubleshooting
There is no power
• Power adaptor is not connected correctly.
- No power at the power outlet.
Power is on, but the platter does not turn
- Turntable's drive belt has slipped off.
• Turntable is under Bluetooth Mode.
Turntable is spinning, but there is no sound, or sound not loud enough
• Stylus protector is still on.
FCC Statements
FCC Caution:
- This device complies with Part 15 of the FCC rules/ Industry Canada license-exempt RSS standard(s). Operation is subject to the following two conditions:
(1) This device may not cause harmful interference, and (2) This device must accept any interference received, including interference that may cause undesired operation.
- This device and its antenna(s) must not be co-located or operating in conjunction with any other antenna or transmitter.
- Changes or modifications to this unit not expressly approved by the party responsible for compliance could void the user authority to operate the equipment.
FCC Radiation Exposure Statement:
This equipment complies with FCC radiation exposure limits set forth for an uncontrolled environment. This equipment should be installed and operated with minimum distance 20cm between the radiator & your body.
Note:
This equipment has been tested and found to comply with the limits for a Class B digital device, pursuant to Part 15 of the FCC Rules. These limits are designed to provide reasonable protection against harmful interference in a residential installation. This equipment generates, uses, and can radiate radio frequency energy and, if not installed and used in accordance with the instructions, may cause harmful interference to radio communications. However, there is no guarantee that interference will not occur in a particular installation. If this equipment does cause harmful interference to radio or television reception, which can be determined by turning the equipment off and on, the user is encouraged to try to correct the interference by one or more of the following measures:
- Reorient or relocate the receiving antenna.
- Increase the separation between the equipment and receiver.
- Connect the equipment into a circuit different from that to which the receiver is connected.
- Consult the dealer or an experienced radio TV technician for help.
- Safety Instructions
- Items in this package
- Specifications
- Note:
- Product Description
- Initial Setup
- Essential Setup
- Turntable Platter and Belt Setup
- Phono/Line Switch
- Stereo System Connection
- RCA Jacks
- Spring clip speaker terminals
- Turntable Operation
- Pitch Control
- Needle Replacement
- Removing Needle
- Installing Needle
- Bluetooth Operation
- Turntable Maintenance
- Troubleshooting
- There is no power
- Power is on, but the platter does not turn
- Turntable is spinning, but there is no sound, or sound not loud enough
- FCC Statements
- FCC Caution:
Brand : Crosley
Model : T150A
Category : Gramophone