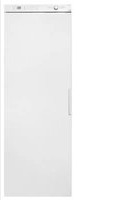
DC7573 - Tumble dryer ASKO - Free user manual and instructions
Find the device manual for free DC7573 ASKO in PDF.


| Product Type | Tumble Dryer |
| Brand | Asko |
| Model | DC7573 |
| Capacity | 8 kg |
| Drying System | Heat Pump |
| Energy Efficiency Class | A++ |
| Dimensions (H x W x D) | 850 x 595 x 600 mm |
| Weight | 50 kg |
| Power Consumption | 2000 W |
| Voltage / Frequency | 230 V / 50 Hz |
| Noise Level | 65 dB(A) |
| Drying Programs | Cotton, Synthetic, Delicate, Wool, Extra Dry, Cupboard Dry, Iron Dry |
| Sensor Drying | Yes, moisture sensor |
| Reverse Tumbling | Yes |
| Drum Material | Stainless steel |
| Control Type | Electronic with LED display |
| Door | Reversible |
| Condenser Cleaning | Self-cleaning condenser |
| Filter | Lint filter with cleaning indicator |
| Delay Start | Up to 24 hours |
| Child Lock | Yes |
| Warranty | 2 years |
Frequently Asked Questions - DC7573 ASKO
User questions about DC7573 ASKO
0 question about this device. Answer the ones you know or ask your own.
Ask a new question about this device
Download the instructions for your Tumble dryer in PDF format for free! Find your manual DC7573 - ASKO and take your electronic device back in hand. On this page are published all the documents necessary for the use of your device. DC7573 by ASKO.
USER MANUAL DC7573 ASKO
Operating Instructions
Dryer cabinet
DearCustomer,
ThankyouforchoosingthisqualityproductfromASKO.
We hopeitwillmeetyouexpectationsandfulfilyourneeds formanyyearstocome.Scandinaviandesigncombinesclean lines, everydayfunctionalityandhighquality. Thesearekey characteristicsofallourproductsandthereasontheyare greatlyappreciatedthroughouttheworld.
Togetthemostoutofyournewmachine, were recommend that youreadtheoperatinginstructionsbeforeusingthemachine.
Theoperatinginstructionsalsoincludeinformationonhow youcanhelpprotecttheenvironment.
ASKO DC7573, 7583
Contents
| 3Safety instructions | 20Care | |
| 3Safety | 20Cleaning | |
| 3Interrupting a program | 20When th | |
| 3Packing material | 21Troubles | |
| 3Recycling | 21The ma | |
| To minimize the risk of fire in a dryer cabinet, the following should be observed: | 21Overheat | |
| 21Drying t | ||
| 4 The garments do not dry, or are | ||
| 5Description of the dryer cabinet | ||
| 6Control panel | ||
| 7Assembly area | ||
| 8Electrical requirement | ||
| 8User liability | ||
| 8Electrical connection | ||
| Energy consumption and drying | ||
| 9Connected to the ventilation | ||
| Evacuation of the moist air can be performed in two ways: | 24Evacuatic | |
| 9 | ||
| 11Installation | ||
| 11Unpacking | ||
| 11A complete delivery includes | ||
| 11Recommended tools | ||
| 12Assembly set | ||
| 13Positioning | ||
| 13Level adjustment | ||
| 13Fastening | ||
| 14Installing in a built-in cabinet | ||
| 15Connect to the ventilation | ||
| 16Door hanging | ||
| 16Rehanging the door | ||
| 17Operation | ||
| 17Sort the garments | ||
| 17Garment placement | ||
| Close the dryer cabinet door and switch on the main power switch | ||
| 18Program selection | ||
| 18Selecting Options | ||
| 19Press the Start button | ||
| 19Drying program finished | ||
| 19Once drying has finished | ||
Read the operating instructions keep them in a safe place!
natural_image
Simple line drawing of an open book with no text or symbols visible- Electrical installation, if required, should be carried out by a qualified electrician.
- The dryer cabinet should only be used drying as described in these instructions.
- The dryer cabinet must be installed or s'indoors.
• Repairs and maintenance must be carried by a qualified professional. - Damaged mains cables must only be replaced by a qualified electrician.
- Sufficient ventilation is required to prevent smoke from open fires or fumes from equipment burning other fuels being sucked into the room when the dryer cabinet is running.
- Items that are stained with e.g. cooking acetone, alcohol, petrol, kerosene, stain remover, turpentine, wax and wax remover
should be washed in hot water with extra detergent before they go in the dryer ca
- Items such as foam rubber, latex, plastic,
rubber-coated items and clothes and foam-rubber-filled cushions must not be dried in the dryer cabinet.
- Fabric softener or similar products should be used as per the recommendations of the detergent manufacturer.
- The dryer cabinet is not designed to be by persons (or children) that are physically
mentally handicapped or lack experience and knowledge. Such persons must receive instruction in how to use the dryer cabinet from the person responsible for their safety.
- Children must be watched to ensure they do not play with the dryer cabinet.
- Keep the area around the evacuation duct free from dust and dirt.
do
ct free
and Clean the inside of the dryer cabinet regular
WARNING!

Never stop a dryer cabinet before the program is completed unless you immediately remove all the laundry and spread it out so that the he disappear.
Safety
• The machine must not be used for drying it for that have been dry-cleaned at home or fabri that may contain residues of flammable liquids
The dryer cabinet is protected by an overheating cut out. This shuts off the machi out the temperature gets too high.
Interrupting a program
aced you can stop a drying program by:
- Open the door. The dryer cabinet will then automatically.
- Press the main power switch. d Press the Stop button for three seconds.
When you want to resume drying, simply close the door and press the Startbutton.
The drying result may be too damp or too d the program is stopped and restarted.
Packing material
binet. Soft waste materials in accordance with local
guidelines.
Recycling
The dryer cabinet is manufactured and labelled
for recycling. In order to prevent personal injury, the dryer cabinet must be made inoperable after deciding to take it out of service. Contact you
loaded authority for information about where and how or you can recycle it.
and et from
To minimize the risk of fire in dryer cabinet, the following should be observed:
aremovers (some brands), turpentine, waxes and wax removers.
- Items containing foam rubber (also known as latex foam) or similarly textured rubberlike with materials should not be dried in a dryer ca hazard on a heat setting. Foam rubber materials ca cabinet. when heated, produce fire by spontaneous combustion.
- Items that have been spotted or soaked vegetable or cooking oil constitute a fire and should not be placed in a dryer ca. Oil-affected items can ignite spontaneously, especially when exposed to heat sources as in a dryer cabinet. The items become causing an oxidation reaction in the oil. Oxidation creates heat. If the heat cannot escape, the items can become hot enough catch fire. Piling, stacking or storing oil-affeed items can prevent heat from escaping and create a fire hazard. If it is unavoidable fabrics that contain vegetable or cooking have been contaminated by hair care process be placed in a dryer cabinet they should be washed in hot water with extra detergent this will reduce, but not eliminate, the hair. The 'cool down' cycle of dryer cabinet s be used to reduce the temperature of the They should not be removed from the dryer cabinet or piled or stacked while hot.
such • Fabric softeners or similar products should no warm, be used in a dryer cabinet to eliminate the effects of static electricity unless this practice is specifically recommended by the to manufacturer of the fabric softener or product ected • Plastic articles such as shower caps or babi d so waterproof napkin covers should not be placed that in a dryer cabinet. Rubber-backed articles, oil or clothes fitted with foam rubber pads, pillows, ducts galoshes and rubber-coated tennis shoes d first should not be placed in a dryer cabinet. gent - • There has to be adequate ventilation to avoid azard: the back flow of gases into the room from should appliances burning other fuels, including open items. drver fires, when operating the dryer cabinet.
- Items that have been previously cleaned in, washed in, soaked in or spotted with petrol/gasoline, dry-cleaning solvents or otheC
- The exhaust air must not be discharged into, flue which is used for exhausting fumes from appliances burning gas or other fuels
flammable or explosive substances should not
be placed in a dryer cabinet. Highly flaming from the dryer cabinet must not be fed to substances commonly used in domestic through ducts used for equipment that burns gas environments include acetone, denatured or other fuels. alcohol, petrol/gasoline, kerosene, spot
Description of the dryer cabinet
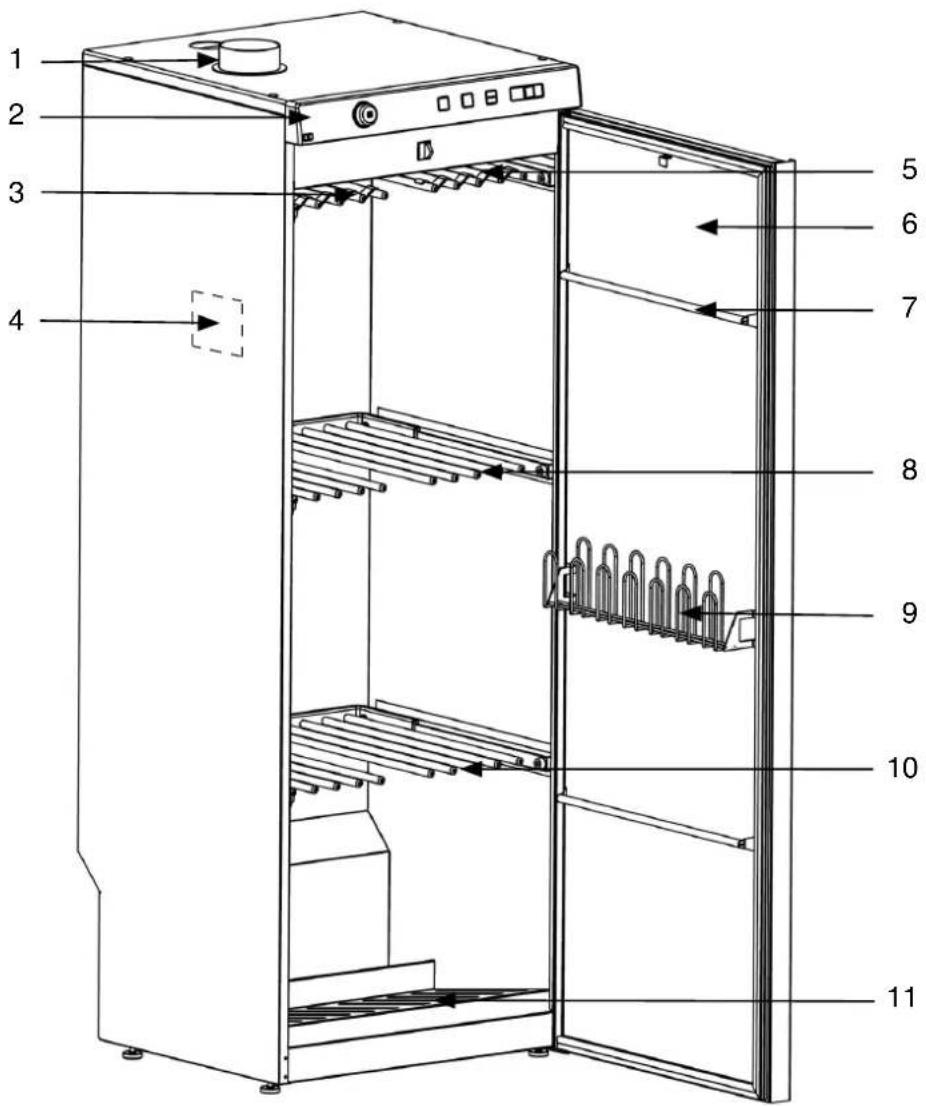
- Door hanger for light goods1. Connector
- Middle hanger section2. Control panel
- Glove hanger3. Hanging hooks
- Lower hanger section4. Type plate (inside)
-
Shoe rack (accessory)5. Upper hanger section
-
Door
Control panel

Display window4Main power switch1
Start5Program selector2
Stop6Options buttons3
Assembly area
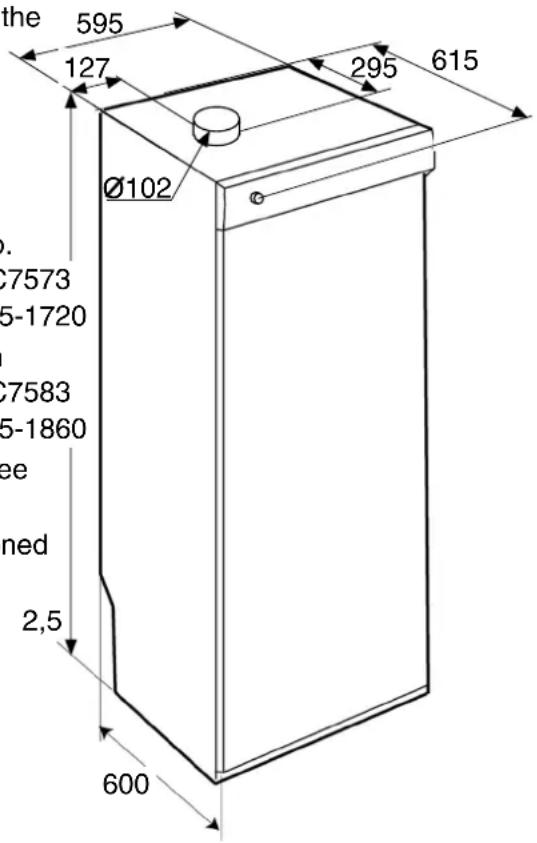
- If the dryer cabinet is to be connected to the 595 exhaust air ventilation this must be available in the premises.
- An earthed power outlet must be available within 2 m of the top section of the dryer cabinet. The dryer cabinet has a 2 m long earthed cable with plug connected at the top. The power outlet must be positioned so that an extension cord is not necessary. 1695-1720
- The power socket should be simple to reach once the dryer cabinet has been installed. DC7583 Observe this even when the dryer cabinet installed in an in-built cabinet or the like. See the section 'Electrical installation'.
- The floor where the cabinet is to be positioned must support a weight of about 60 kg.
- The floor must be flat with a drop of max 2,5 cm below the cabinet.
- The dryer cabinet is only intended for placement indoors with a temperature over 0 °C.
- The dryer cabinet must not be placed in environments where high-pressure washers are used for cleaning.
Electrical requirement
User liability
It is the responsibility of the user to contact qualified electrician if a power outlet as described in this manual is not available.
WARNING!

- Connect to a power outlet with a p earth.
- Do not remove the earth connection.
- Do not use an adapter.
- Do not use an extension cord.
Electrical connection
The dryer cabinet is to be connected to bed-240V, 1-Phase, 50-60Hz and the protective power outlet. The power outlet must be installed and earthed according to applicable regulations.
- The dryer cabinet is delivered ready for active connection with a 2 m long cable with eart plug.
- Do not change the cable and plug supplied with the dryer cabinet. If the plug does not correspond with the power outlet this must be rectified by a qualified electrician.
- The dryer cabinet must be connected using the supplied connection cable and must not be permanently connected!
- The power outlet must be positioned so that the plug can be removed when necessary.
- The connection cable is drawn out at the r of the dryer cabinet on delivery from the factory. If necessary the connection cable car be drawn out of the rear hole in the top
- Check that the connection current corresponds with the data on the type plate and that the main circuit is earthed correctly according to applicable standards. We recommend that the main circuit is fitted with a residual current device.
- The connection is to make up its own fuse group.
- The manufacturer relinquishes all responsibility if the electrical connection is not made according to the method set out in these operating instructions.
If this appliance is supplied from a cord extens set or electrical portable outlet device, the cord extension ser or electrical portable outlet device must be positioned so that it is not subject to splashing or ingress of moisture.
Connect to the ventilation
Evacuation of the moist air can performed in two ways:
-
beist air out
-
Air intake
-
Waste air from the dryer cabinet is led to an evacuation duct or an outlet in the wall using the vent hose supplied. Recommended!
- Ventilation out into the room where the cabinet is positioned.
Ventilation out into the room where the dryer cabinet is positioned
- Preferably open the door or window in the room for the best ventilation.
- When the dryer cabinet is built-in, the supplied ventilation hose (only some markets) is replaced with a permanent ventilation pipe with a diameter of 100 mm.
- The distance between the top edge of the ventilation pipe and the ceiling must not be less than 300 mm.
- The ventilation pipe must reach outside of the cabinet is positioned. Dryer cabinet freestanding in-built cabinet.
- Ensure a good air supply to the dryer cabinet's air intake.
- The ventilation holes in the dryer cabinet must not be blocked.
Ventilation out into the room where the dryer of the cabinet is positioned. Dryer cabinet freestanding
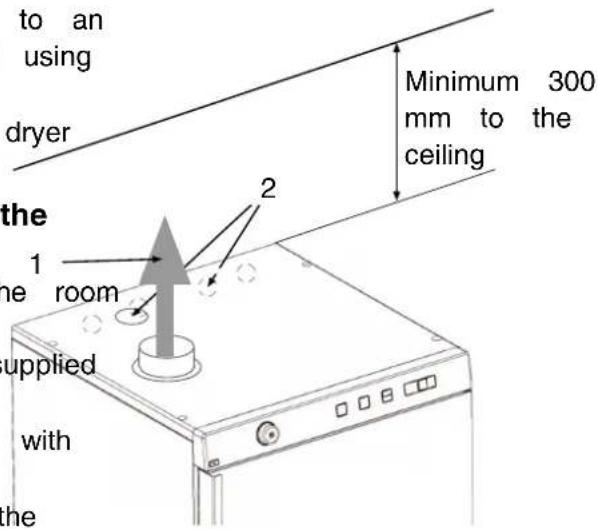
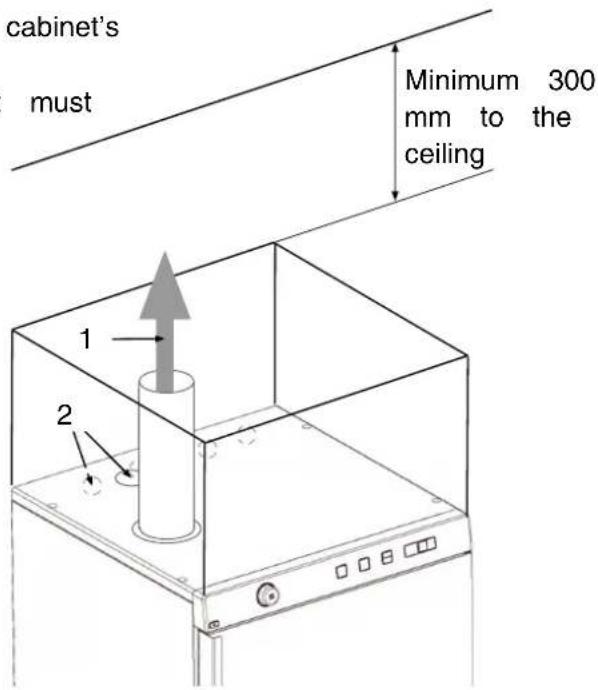
Ventilation out into the room where the dryer cabinet is positioned. Dryer cabinet in-built in tailored in-built cabinet.
Connect to the ventilation
Connection to the evacuation duct
When the cabinet is ohm45t rair/hour is evacuated. Make sure that air can enter to replace the moist air that has been
Permanently fitted to the evacuation duct (only some markets)
the Thero exhaust air duct valve must be replaced ventilat transition section (not supplied).
WARNING!

Do not fit valves that can be found in the property's ventilation system inside the dryer cabinet.
- The dryer cabinet must not be connected to the duct for flue gases.
- Only the supplied evacuation hose may be Transition section used (on markets where this is supplied).
The dryer cabinet can be connected to the evacuation duct in two ways:
With draught check
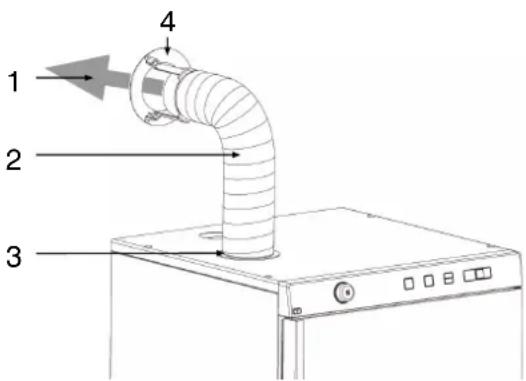
The building valve is replaced by the draught check (supplied with the delivery).
Do not fit valves that can be found in the property's ventilation system inside the dryer cabinet.
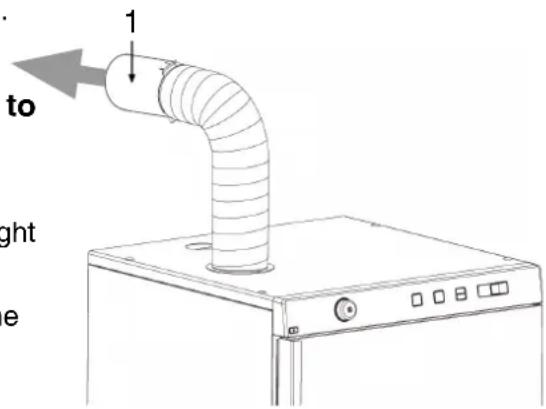
- Moist air out
- Hose.
- Connector
- Draught check
The dryer cabinet is permanently fitted to the evacuation duct
The dryer cabinet is connected to the evacuation duct with the draught check
Installation
Unpacking
WARNING!

- The cabinet can easily tip over if not screwed in position. At least two persons should handle the dryer cabinet.
- Packing material such as plastic and cellular plastic should be kept inaccessible to children. Observe the risk of suffocation to small children when they come into contact with plastic materials.
- Remove all packing material; do not use sharp tools that can damage the product.
- Check that the dryer cabinet has not been damaged during transport.
- After unpacking, check that the dryer cabinet shows no sign of faults. Damage, faults and the possibility of missing parts must be reported immediately to the dealer.
A complete delivery includes
- Cabinet with fan unit
- Assembly set
- Set of documents
Recommended tools
- Spirit level
- Measuring-tape
- Portable drill
- Screwdriver
- Drill diam. 8 mm
- Pen
- Protective gloves (if used)
Installation
Assembly set
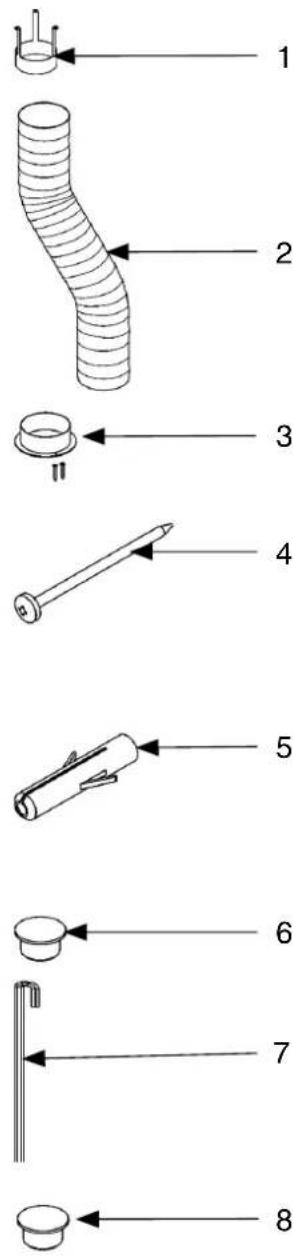
- Draught check (some markets) x 1
- Ventilation hose (some markets) x 1
- Connector with two securing screws x 1
- Securing screws for securing against the wall x 2
- Plastic plug x 2
- Cover plug for the cabinet feet x 4
- Allen key x 1
- Cover plug for the securing screws x 2
Installation
Positioning
- Place the dryer cabinet in the intended position.
- Open the door and adjust the level of cabinet so that it stands firmly on all
WARNING!

The dryer cabinet must be screwed to the v As the cabinet is top heavy there is a risk tipping forwards.
Level adjustment
- Check using a spirit level that the cabinet stands level.
- Use the supplied Allen key and adjust all four feet through the holes in the dryer cabinet's bottom plate (use pliers if necessary).
- Insert the four cover plugs (found in the document bag) in the holes.
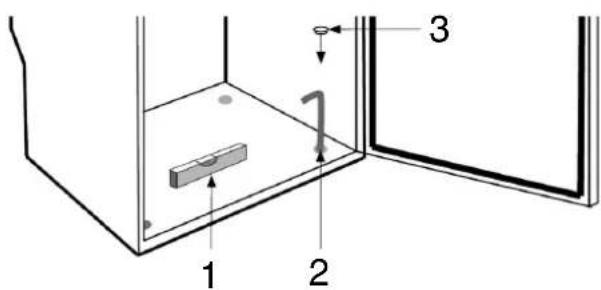
- Spirit level
- Allen key
- Cover plug x 4
Fastening
- Place the dryer cabinet in the intended position, open the door and pull out the top the dryer section.
Our Market. out the drill holes on the wall through two pre-drilled holes on the rear panel of the dryer cabinet. - Pull forward the cabinet and drill the holes wall the securing screws in the wall. Use the risk of it enclosed plastic plugs or other anchors if necessary.
- Slide back the cabinet and screw in position with the enclosed screws.
- Fit the cover plugs.
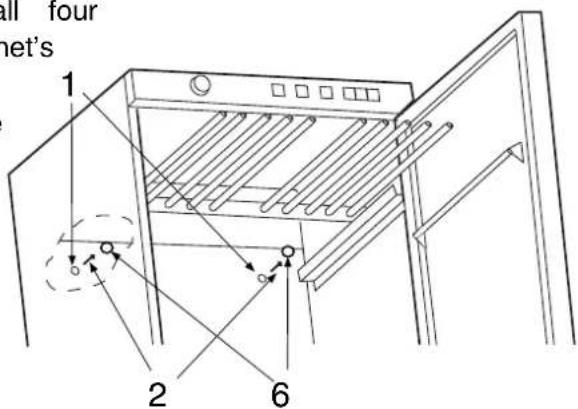
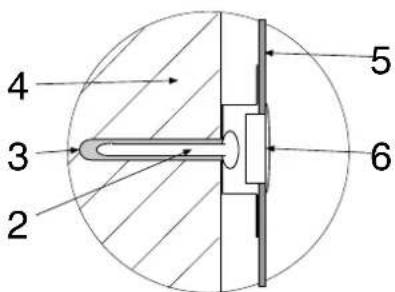
- Predrilled holes
- Securing screws
- Plastic plug
- Wall behind the dryer cabinet
- Rear panel of the dryer cabinet
- Cover plug
Installing in a built-in cabinet
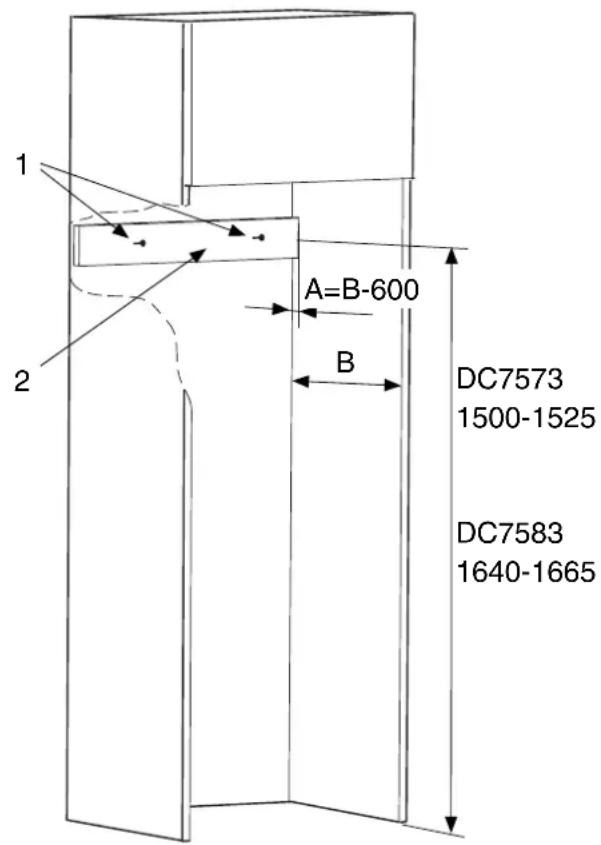
Figure 1
- Open the door. Align the dryer cabinet horizontally according to the directions in the section "Level adjustment".
- Pull out the top hanger section and mark the hole position with a pen on the wall behind
- Slide back the hanger section, close the door and pull out the dryer cabinet again. If the assembly depth "B" is the same as the deck of the dryer cabinet you can go directly to 10 below.
- Cut a wooden batten (2) with the thickness and length between 500-575 mm. It must be as thick as the difference between the assembly depth "B" and 600 mm. If the assembly depth "B" is 620 mm then the ba thickness "A" must be 20 mm.
- Screw the wooden batten into position with t screws (1) on the wall behind the dryer ca so that it is at the same height as the m holes, as set out in point 6.
NOTE!
Do not position the screws for the wooden batten in the same position as the assembly holes marked on the wall for the dryer cab. Ensure that the wooden batten is screwed firmly to the wall.
The dryer cabinet has a depth of 600 mm. Use screws and possibly plugs of a suitable length to match the material of the built-in cabinet to wall.
- Plegr the connection cable into the power out and ensure that the cable is not crushed a can be easily pulled out.
- Measure the assembly depth "B" where the ^11 Slide in the dryer cabinet in the built-in cab dryer cabinet is to be mounted (see figure 1). Make sure that the rear wall of the dryer
-
If the assembly depth "B" is greater than 600 mm a wooden batten (2) with the thickness of A cabinet or the wooden batten (2). Also check that the front of the dryer cabinet aligns with the building in the delivery.
-
Slide the dryer cabinet into position so that the front aligns with the built-in cabinet. Keep the door closed. 12 Pull out the top hanger section and screw cabinet into position using the supplied securing screws and fit the cover plugs (see
-
There should be an air gap of at least 10 ^th from 3). above the dryer cabinet (see figure 2) in order to get optimum performance from the dryer cabinet.
Installing in a built-in cabinet
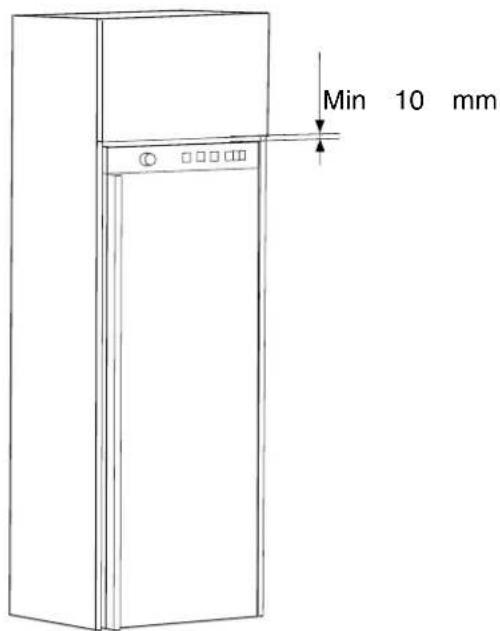
Figure 2
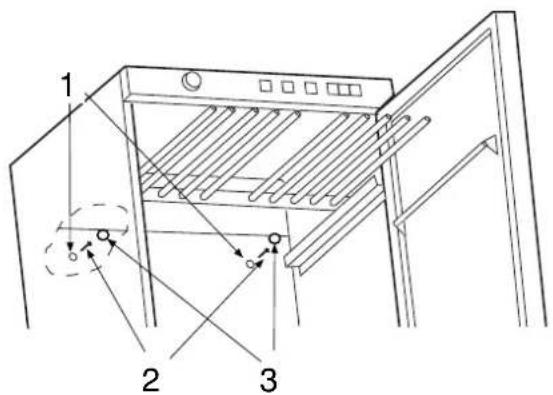
Figure 3
- Predrilled holes
- Securing screws
- Cover washers
Connect to the ventilation
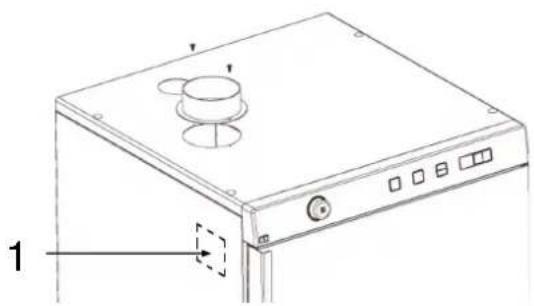
If the dryer cabinet is in-built, fit the connecto through the ventilation opening in the top section of the built-in cabinet. The dryer cabinet is the fitted in its intended position.
- Place the connector over the hole in the di cabinet's top panel, align the screw holes ar secure the connector.
- Connect the fixed ventilation pipe if the dry cabinet is built-in or press on the supplied (some markets) flexible hose. Also see the section "Ventilation option".
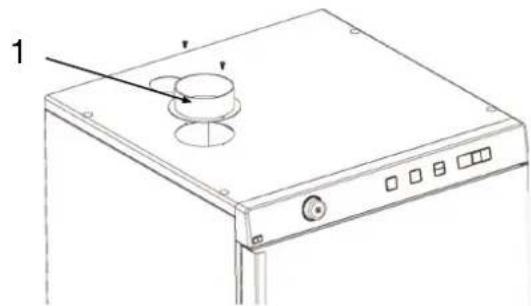
natural_image
Line drawing of a kitchen appliance with a lid and control panel (no text or symbols)- Connector
Door hanging
WARNING!

Be aware of the risk of strain injuries. At least two persons should handle the dryer cabinet.
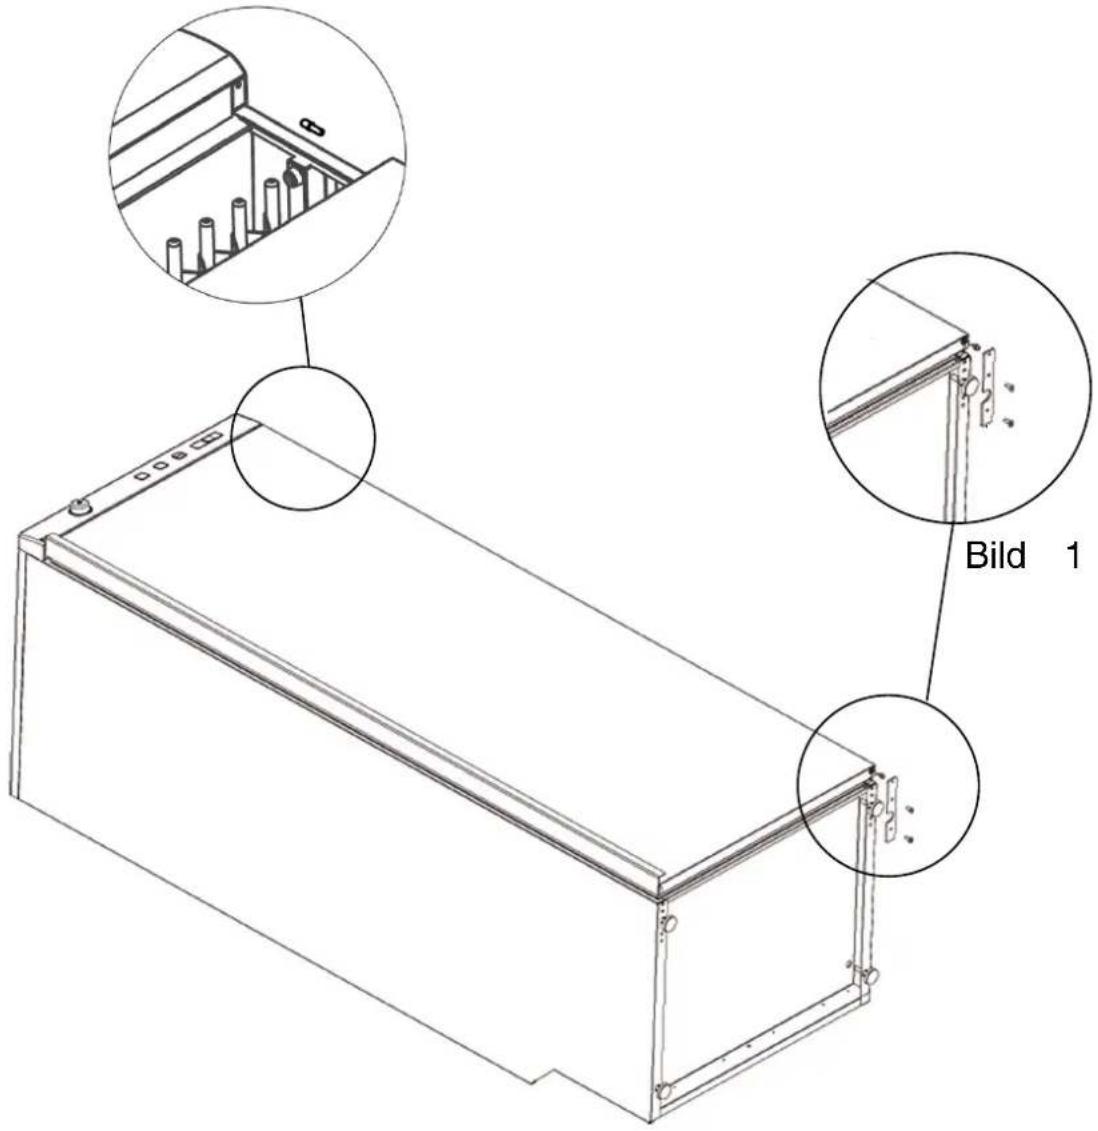
Rehanging the door
- Place the dryer cabinet on its back.
- Loosen the hinge plate, see figure 1.
- Lift off the door, loosen the glove hanger and the switch plate from the main power glove hanger a half-turn and fit in the same fastening hole.
- Move the switch plate to the other end of the door.
- Loosen the rivet on the hinge plate and move it to the opposite side.
- Loosen the hinge pin on the upper hinge and place it on the opposite side.
- Rotate the door, align the rivet and secure the hinge plate.
Operation
Sort the garments
- Remove any dry garments from the cabinet to reduce the drying time for remaining garments.
- Attempt to dry garments of the same type of fabric to produce an even result. Otherwise, with a mixed load, there is a risk that the garments will be dry.
Garment placement
- The cabinet has three sections with extendable hangers. Each section has a number of hangers that garments hung on.
- Do not place garments horizontal on hangers.
- Hang long garments closest to the cabinet walls and short garments in towards the centre. This improves the drying result.
- Fold up the two lowermost hanger sections when long garments are to be dried.
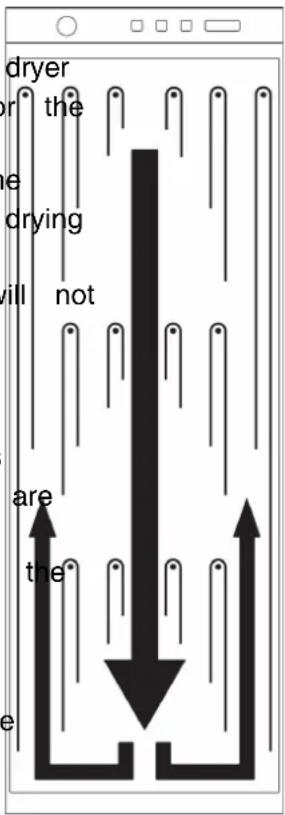
- Hang gloves, hats, scarves and the drying result is mainly dependent on how on the hanger strips on the inside garments are hung. The figures above show the door. airflow in the dryer cabinet. If the airflow in t
- Pull forward the hanger hooks on the middle of the dryer cabinet is obstructed or upper hanger section to facilitate blocked this can impair the drying result. Zones hanging the garments. Pull these back can be formed in the dryer cabinet where when not in use. garments will not dry.
- Do not overload the dryer cabinet. When the cabinet is cold the door seals may garments become creased and the close completely. However, this is fully drying result uneven. If possible, leave compensated for when the cabinet is operated some space between garments instead with heating as the door seals expand.
- If there is a risk that some garments may run you should leave space around these.
- Avoid drying heavy articles of clothing
with light garments as they have very
different drying times.
WARNING!
Read the safety instructions before using the
cabinet.
The drying result is mainly dependent on how garments are hung. The figures above show that airflow in the dryer cabinet. If the airflow in t
middle of the dryer cabinet is obstructed or blocked this can impair the drying result. Zones can be formed in the dryer cabinet where garments will not dry.
When the cabinet is cold the door seals may close completely. However, this is fully compensated for when the cabinet is operated with heating as the door seals expand.
nts may
Read the safety instructions before using the cabinet.
WARNING!

3 Close the dryer cabinet door and switch on the main power switch.
Operation
4 Program selection
4 Always follow the garment's washing instructions if these are stated. Select program to suit the most delicate garment. softener or antistatic agent are used during washing the manufacturer's instructions for t use of these products must be followed.
You select a program by turning the program selector. An LED lights up beside the selected
program. Select the desired options using the Drying option buttons. Start by pressing the Start/Staying button.
Drying results depend, among others, on the shown on the display. Max twelve hours drying ambient temperature, ventilation of the drying time.
room and hanging. Use trial and error to which program is the best.
Guidelines as to what specific programs can used for:

Auto extra dry
This program is for garments that are particularly the appropriate program. difficult to dry e.g. jeans with very thick seams.

Auto dry
Switch off the heating just before Auto extr Use trial and error to find out what works Use one of these two programs when you garments to be completely dry.

Auto normal dry
These programs shut off the heat once the garments are dry, but not too “dry”.

Warm towels
Program to heat garments or fabrics to a comfortable temperature in an energy optimise method, only so much energy is needed to maintain the heat. Just imagine a warm dress gown or ski boots, gloves and hats in the

Timed dry
Drying with heat. You can decide on a fixed time yourself. Recommended when drying shoes and boots or the like. Select the time by pre the button with the clock symbol. The time is shown on the display. Max six hours drying ti
Cold dry
Selecting Options
By selecting options, you can tailor drying programs to suit the requirements of your garments. The machine remembers which options you choose for each program and uses them one exception: Delayed Start) the next time you
Select the appropriate program.

Temperature
You can choose a lower temperature in all programs except Cold dry.
- Select a lower temperature by pressing the want button by the symbol
- The lamp by the button comes on when the option is selected.

Revitalise
This option means that the fan will run for the seconds per minute over two hours once the
drying program has finished. The option is recommended when you do not have the option of removing the clothes from the dryer cabinet directly after drying. Cannot be selected with Co dry winter.
- Select Revitalise by pressing the button by 1 symbol.
- The lamp by the symbol lights when Revitali is selected.
Operation

Time saver
Loading or removing garments
You can stop the dryer cabinet after starting a
The program is shortened by about 12 minptogram by opening the door. Hang in or rem You can choose Time saver with all programarments, close the door again and press the except Revitalise. Startbutton. A new estimate of the remaining
- Press the button by the symbol.
- The lamp by the symbol lights when Timinutes.
saver is selected.

Drying program finished
The text "End" appears on the display wh the program is finished.


Delayed Start
Backlighting button
First select which program you want to use and then select Delayed Start by pressing the button
by the symbol. The display shows Delayed S
in whole hours. Press the button to select ba
delayed start of 1 to 24 hours. The lamp ^eB
button lights when Delayed Start is selected.
Press the Start button, the machine counts
1 hour at a time and starts after the selected
This option cannot be used with the Timed _small Air fluff programs.
Once drying has finished
Turn off the main power switch. Remove
the ^delay clothes and close the door to prevent
Children from climbing into the machine.

Press the Start button
Remaining drying time
An estimate of the remaining drying time
will be shown on the display a few minutes after
the drying program starts. For example, "1:35"
means that it will take approximately 1 hour and
35 minutes for the garments to dry.
The actual remaining time may be longer than the
estimated time shown on the display. The
remaining time is then shown as "0:15" until the
garments are sufficiently dry. If you selected Time
saver the display will show "0:05" instead.
Stopping or changing a program
Press and hold the Stopbutton for three seconds.
NOTE!
The program will not be affected if you change the program selector after the program has started.
Care
Cleaning
High-pressure washers must not be used!
- The cabinet panels can be cleaned using a mild soap solution and damp cloth.
- Dust collects easily around the air intake on top of the cabinet. This can cause disturbances which in turn can result in downtime.
- In order to avoid these problems vacuum clean around the air intake and the top of the cabinet at least once a year or more frequently depending on the environment where the cab.
When the dryer cabinet is not used
During short or long periods
Always remove the dryer cabinet's plug.
When the cabinet is to be moved
- Pull out the plug.
- Secure the door using strong tape.
Troubleshooting
The machine will not start
Check
- that the door is closed correctly.
- that the main power switch is on.
- that the machine is not programmed to start at a specific time (e.g. 13.30)
• that the plug is connected. - that the fuses (circuit breakers) in your house are intact. Swap two circuit breakers over to make sure. You cannot always tell from the outside if a circuit breaker is broken.
- that the overheating cut-out has not been triggered (see below).
Overheating cut-out
The overheating cut-out shuts off the dryer cabinet if the temperature is too high.
- The overheating cut-out will reset automatically once the machine has cooled down.
Drying takes too long
- Poorly spun or very wet washing.
- The dryer cabinet is positioned in an area where the ambient temperature is too low.
The garments do not dry, or are too dry
- The door has been opened while the program is running, which disrupts the moisture monitoring function.
- The garments may not have been hung correctly, obstructing the air flow. See “Garment placement” in the “Operation” chapter.
- Wrong program selected, choose another program, see the chapter "Operation".
- Poorly spun wash or very wet washing.
- The ventilation pipe/hose is too long. The length should not exceed 1 m.
- Normal operation requires installation in a room with a temperature above 0 °C.
Error messages
If F2 flashes on the display, the maximum permitted program time has been reached. Read "Drying takes too long" in the "Troubleshooting" chapter to find out what to do.
Service
Make sure you know the model designation, type designation, and serial number before contacting service.
The model designation and serial number can be found on the type plate, which is placed on the inside of the cabinet.
natural_image
Line drawing of a kitchen appliance with a lid and control panel (no text or symbols)Article no. xxxxxxxx Serial no. xxxxxxxx Model xxxxxx
- Type plate (on the inside of the dryer cabin
- Article number
- Serial number (12 digits)
- Model
Technical information
Technical data
approx. 3,5 kg wash (cotton)Capacity:
Up to 21 gram/minDrainage capacity:
1-Phase, 220-240V, 50-60Hz, 10AElectrical connection:
35 WMotor:
2000WHeater output:
YesOverheating protection:
180 hourFan capacity
16 mHanger length:
Size:
Height
DC7573: 1700 mm
DC7583: 1840 mm
Adjustable
DC7573: 1695 mm-1720 mm
DC7583: 1835 mm-1860 mm
595 mm.Width
Depth
600 mm without handle,
620 with handle.
Weight: approx. 62 kg
Colour: White, titanium or grey
Sound level: max 56.5 dB(A) (IEC60704-2-6)
Technical information
Energy consumption and drying times
Drying of sup wash *)
| Energy consumptionSettings hrs:min | HeatDrying time in |
normal temperature1:100.6
ture.
low temperature1:000.3 kW
-8:000.06 kWh/kgCold dry
*) Stated values apply for 3,5 kg wash and 1600 rpm spin. Values vary depending on s materials in the load.
Evacuation/Supply air
When the cabinet is ohmø15t air/hour is evacuated.
Manufacturing standards
See the cabinet's type plate.
Air gap when in-built
Minimum 10 mm between the dryer cabinet and in-built (above and behind the dryer cabi
Your notes
Your notes
Your notes
Quick guide
Fabrics
- Sort and hang fabrics of the same together to ensure that they dry as evenly as possible.

Press the Start button
2 Turn on the main power
- Drying program finished 'End' appears on the display when the program is finished. If the Revitalise
Hang up the laundry
- Close the door.
option has been selected, the fan will run for three seconds per minute for two hours after the drying program is finished.
4 Select a program and any options
- Turn the program selector to the required program.
- Select any options and settings.
7 Once drying has finished
- Turn off the mains power switch and close the door.
- Operating Instructions
- Dryer cabinet
- Contents
- Read the operating instructions keep them in a safe place!
- WARNING!
- Safety
- Interrupting a program
- Packing material
- Recycling
- To minimize the risk of fire in dryer cabinet, the following should be observed:
- Description of the dryer cabinet
- Control panel
- Assembly area
- Electrical requirement
- User liability
- Electrical connection
- Connect to the ventilation
- Evacuation of the moist air can performed in two ways:
- Ventilation out into the room where the dryer cabinet is positioned
- Connection to the evacuation duct
- Permanently fitted to the evacuation duct (only some markets)
- The dryer cabinet can be connected to the evacuation duct in two ways:
- With draught check
- Installation
- Unpacking
- A complete delivery includes
- Recommended tools
- Assembly set
- Positioning
- Level adjustment
- Fastening
- Installing in a built-in cabinet
- NOTE!
- Door hanging
- Rehanging the door
- Operation
- Sort the garments
- Garment placement
- Close the dryer cabinet door and switch on the main power switch.
- Program selection
- Auto extra dry
- Auto dry
- Auto normal dry
- Warm towels
- Timed dry
- Cold dry
- Selecting Options
- Temperature
- Revitalise
- Time saver
- Loading or removing garments
- Drying program finished
- Delayed Start
- Backlighting button
- Once drying has finished
- Press the Start button
- Remaining drying time
- Stopping or changing a program
- Care
- Cleaning
- When the dryer cabinet is not used
- Troubleshooting
- The machine will not start
- Check
- Overheating cut-out
- Drying takes too long
- The garments do not dry, or are too dry
- Error messages
- Service
- Technical information
- Technical data
- Energy consumption and drying times
- Evacuation/Supply air
- Manufacturing standards
- Air gap when in-built
- Your notes
- Quick guide
- Fabrics
- Turn on the main power
- Hang up the laundry
- Select a program and any options
- Once drying has finished
Brand : ASKO
Model : DC7573
Category : Tumble dryer