
28060E - Ladder INTEX - Free user manual and instructions
Find the device manual for free 28060E INTEX in PDF.


| Product Type | Above-Ground Pool Ladder |
| Model | 28060E |
| Brand | Intex |
| Material | Heavy-duty resin and galvanized steel |
| Dimensions (L x W x H) | Approx. 49 x 19 x 41 inches |
| Weight Capacity | Up to 300 lbs |
| Number of Steps | 3 |
| Step Depth | 4 inches |
| Mounting Type | Hooks over pool wall |
| Compatible Pool Height | 48-inch deep pools |
| Safety Features | Slip-resistant steps, handrails, safety gate |
| Installation | Tool-free assembly, no drilling required |
| Maintenance | Rinse with fresh water, store indoors in winter |
| Color | Gray and white |
| Warranty | 90-day limited warranty |
| Repairability | Replacement steps and brackets available |
| Accessories | Pool ladder pad, locking pin |
Frequently Asked Questions - 28060E INTEX
User questions about 28060E INTEX
0 question about this device. Answer the ones you know or ask your own.
Ask a new question about this device
Download the instructions for your Ladder in PDF format for free! Find your manual 28060E - INTEX and take your electronic device back in hand. On this page are published all the documents necessary for the use of your device. 28060E by INTEX.
USER MANUAL 28060E INTEX
IMPORTANT SAFETY RULES
Read, Understand, and Follow all Instructions Carefully before Installing and using this Product.
Pool Ladder
Owner's Manual For: 36in (91 cm), 42in (107 cm) models
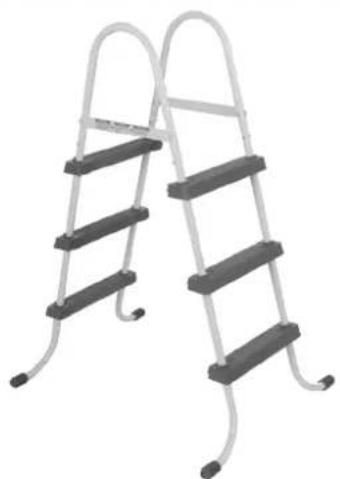
natural_image
Two identical metal ladder ladders with adjustable arms and legs, no text or symbols visible.For illustrative purposes only.
Don't forget to try these other fine Intex products: Pools, Pool Accessories, Inflatable Pools and In-Home Toys, Airbeds and Boats available at fine retailers or visit our website. Due to a policy of continuous product improvement, Intex reserves the right to change specifications and appearance, which may result in updates to the instruction manual, without notice.
INTEX®
IMPORTANT!
DO NOT RETURN PRODUCT TO STORE
To purchase parts and accessories or to obtain non-technical assistance, Visit
www.intexcorp.com
For technical assistance and missing parts call us toll-free (for U.S. and Canadian Residents):
1-800-234-6839
Monday through Friday, 8:30am to 5:00pm Pacific Time
190-*PO-R0-1404
TABLE OF CONTENTS
Warnings.... 3
Parts References.... 4
Setup Instructions.... 5-7
General Aquatic Safety.... 7
Pool Safety Sign.... 8
IMPORTANT SAFETY RULES
Read, Understand and Follow All Instructions Carefully Before Installing and Using this Product.
WARNING
• Supervise children and those with disabilities at all times.
• Always assist children when they use the ladder to avoid falls and/or serious injury.
• Never dive or jump from this ladder.
- Locate the ladder on a level, solid base.
• One person on this ladder at a time.
• Maximum load: 300 lbs (136 kg). Complies with NF P90-317 strength requirements.
• Face the ladder at all times for entry/exit of pool.
- Remove and secure ladder when pool is not occupied.
• Do not swim under, through or behind ladder.
- Check all nuts and bolts regularly to ensure ladder stays sturdy.
- If swimming at night use artificial lighting to illuminate all safety signs, ladders, pool floor and walkways.
• Assembly and disassembly by adults only.
- This ladder is designed and manufactured for a specific pool wall height and/or deck of the pool. Do not use with other pools.
- The non-respect of the maintenance instruction may result in huge risk for health, particularly for children.
• Only use this ladder for the purposes described in this manual.
FAILURE TO FOLLOW THESE WARNINGS MAY RESULT IN BROKEN BONES, ENTRAPMENT, PARALYSIS, DROWNING OR OTHER SERIOUS INJURY.
These product warnings, instructions and safety rules provided with the product represent some common risks of water recreation devices and do not cover all instances of risk and danger. Please use common sense and good judgment when enjoying any water activity.
PARTS REFERENCE
Before assembling your product, please take a few minutes to check the contents and become familiar with all the parts.
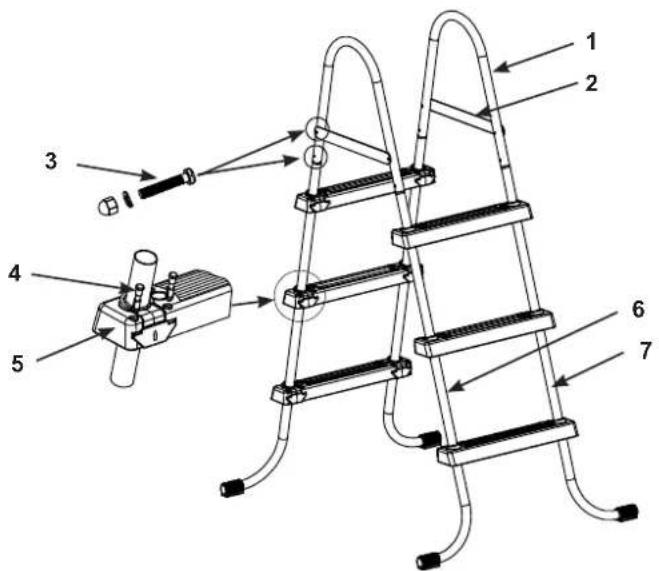
36in (91 cm) & 42in (107 cm) models
NOTE: Drawings for illustration purpose only. Actual product may vary. Not to scale.
| REF. NO. | DESCRIPTION | QUANTITY | SPARE PART NO. | |||
| #58910 | #11406 #58 | 907 #11435 | ||||
| 1 | U-SHAPED TOP RAIL | 2 | 11402E | 11407E | 11402 | 11407 |
| 2 | TOP BRACE | 2 | 11403 | 11408 | 11403 | 11408 |
| 3 | LONG FASTENER (WITH 2 EXTRA) | 10 10810 | 10810 | 10810 | 10 | |
| 4 | STEP MOUNTING PIN (WITH 2 EXTRA) | 26 | 10349 | 10913 | 10349 | 10913 |
| 5 | STEP | 6 | 10348 | 10914 | 10348 | 10914 |
| 6 | J-SHAPED SIDE LEG (MARKED “A”) | 2 | 11404A | 11409A | 11405A | 11436A |
| 7 | J-SHAPED SIDE LEG (MARKED “B”) | 2 | 11404B | 11409B | 11405B | 11436B |
LADDER SETUP
TOOLS REQUIRED: One (1) Phillips screwdriver
One (1) pair of pliers or a small adjustable wrench
IMPORTANT: Do not fully tighten fasteners until last assembly operation.
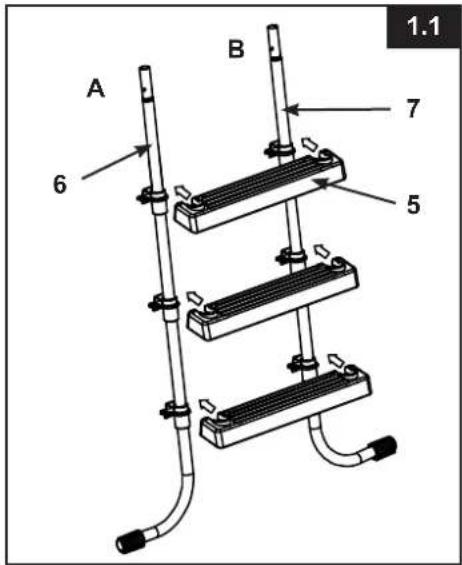
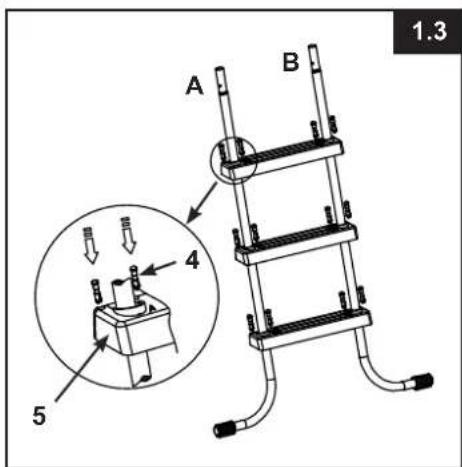
1. STEP INSTALLATION (refer to figures 1.1 through 1.3):
The pool ladder legs have the step mounting fixtures installed at the factory. Slip the step (5) onto the mounting fixture, matching the direction of the arrow on the back of the mounting fixture with the top of the step. Ensure the back of the step is flush with the mounting fixture otherwise the step will be installed upside-down.
IMPORTANT: Ensure the J-shaped legs are pointing outwards before installing the steps. During assembly, the "A" legs fit into the "A" step holes, and "B" legs fit into "B" step holes.
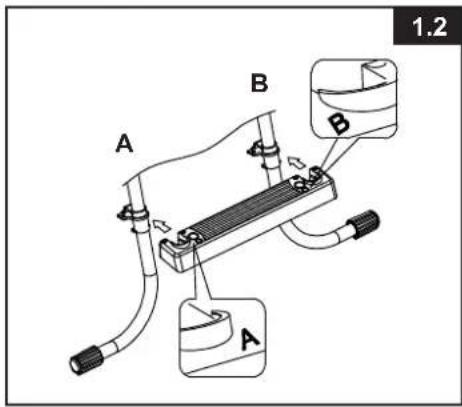
Push the step mounting pins (4) into the holes securing the step to the mounting fixture.
IMPORTANT: Make sure all pins are securely locked.
LADDER SETUP (continued)
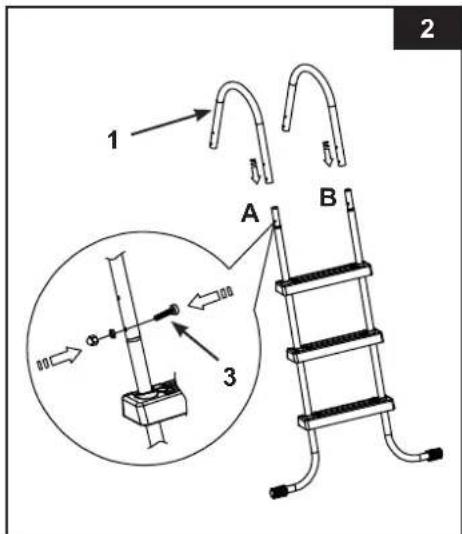
2. U-SHAPED TOP RAIL INSTALLATION (refer to figure 2):
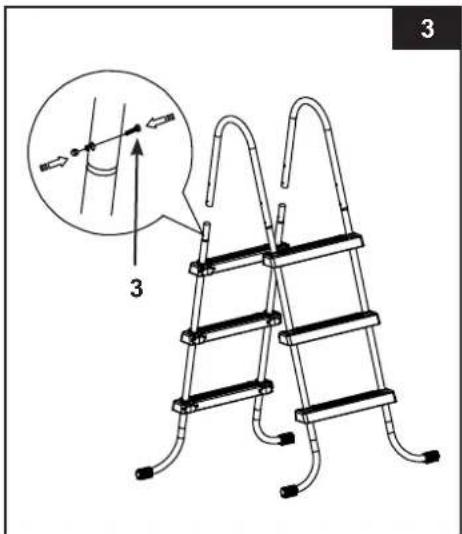
- INSTALLATON OF THE REMAINING LADDER SIDE (refer to figure 3):
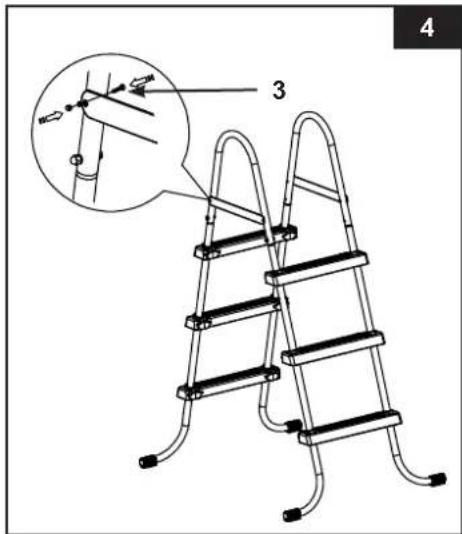
- TOP BRACE INSTALLATION – ONE SIDE AT A TIME (refer to figure 4):
natural_image
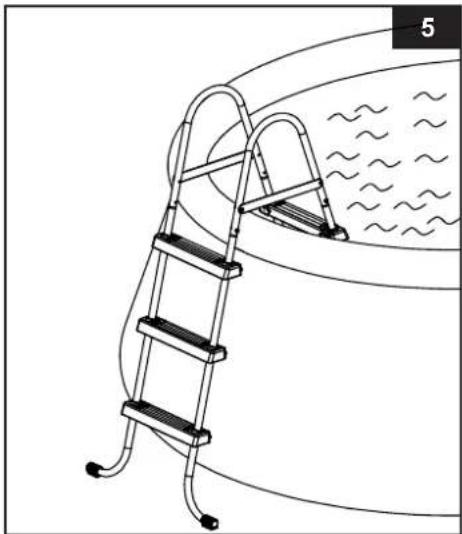
Line drawing of a ladder-style water feature with wavy water level, no text or symbols presentWith all parts now in place, verify that all fasteners/screws are fully tightened and apply downward pressure to each step to be sure they are fully anchored in place. If your ladder came with a ladder barrier, proceed to instructions for ladder barrier installation, otherwise proceed to placing the ladder over the side wall of your pool, with one side of the ladder located inside the pool and the other side outside of the pool - see figure 5.
LADDER SETUP (continued)
WARNING
- Locate ladder on a level, solid base and make sure the ladder is stable and safe to climb.
- Remove and secure ladder away from the pool when the pool is not in use to prevent unauthorized, unintentional or unsupervised pool entry.
- Check all nuts and bolts regularly and before each use to ensure the ladder is sturdy. See maintenance instructions.
6. MAINTENANCE:
Regularly check all nuts, bolts, step mounting fixtures and step mounting pins to ensure all parts are secured properly and the ladder is sturdy. Bring the ladder indoors and store in a safe and dry area, preferably between 32 degrees Fahrenheit (0 degrees Celsius) and 104 degrees Fahrenheit (40 degrees Celsius).
GENERAL AQUATIC SAFETY
Water recreation is both fun and therapeutic. However, it involves inherent risks of injury and death. To reduce your risk of injury, read and follow all product, package and package insert warnings and instructions. Remember, however, that product warnings, instructions and safety guidelines cover some common risks of water recreation, but do not cover all risks and dangers.
For additional safeguards, also familiarize yourself with the following general guidelines as well as guidelines provided by nationally recognized Safety Organizations:
- Demand constant supervision. A competent adult should be appointed as a “lifeguard” or water watcher, especially when children are in and around the pool.
- Learn to swim.
• Take the time to learn CPR and first aid. - Instruct anyone who is supervising pool users about potential pool hazards and about the use of protective devices such as locked doors, barriers, etc.
- Instruct all pool users, including children what to do in case of an emergency.
• Always use common sense and good judgement when enjoying any water activity.
• Supervise, supervise, supervise.
For additional information on safety, please visit
- The Association of Pool and Spa Professionals: The Sensible Way to Enjoy Your Aboveground/Onground Swimming Pool www.nspi.org
• American Academy of Pediatrics: Pool Safety for Children www.aap.org
• Red Cross www.redcross.org
• Safe Kids www.safekids.org
• Home Safety Council: Safety Guide www.homesafetycouncil.org
• Toy Industry Association: Toy Safety www.toy-tia.org
SAFETY IN YOUR POOL
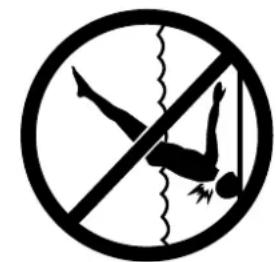
Safe swimming depends on constant attention to the rules. The “NO DIVING” sign within this manual can be posted near your pool to help keep everyone alert to the danger. You may also wish to copy and laminate the sign for protection from the elements.
SAVE THE CARTON FOR STORAGE AND THE INSTRUCTIONS FOR RE-ASSEMBLY
POST THIS WARNING NEAR YOUR POOL
! WARNING
NO DIVING OR JUMPING
SHALLOW WATER
DIVING MAY RESULT IN PERMANENT INJURY OR DEATH
natural_image
Prohibition sign showing a person diving with water and a diagonal line crossing, no text present- Be Safe. Swim with a friend.
• Children must be accompanied by an adult.
- Don’t swim when using alcohol or drugs.
- Be familiar with the pool before swimming.
- No running, jumping, or horseplay in or around pool.
- No glass in pool area.

natural_image
Symbol of a person falling with a diagonal line crossing through it, enclosed in a circle (no text or numbers present)TO AVOID SERIOUS INJURY ALL POOL USERS MUST KNOW AND FOLLOW THESE SAFETY RULES.
- IMPORTANT SAFETY RULES
- Pool Ladder
- IMPORTANT!
- DO NOT RETURN PRODUCT TO STORE
- TABLE OF CONTENTS
- WARNING
- PARTS REFERENCE
- LADDER SETUP
- TOOLS REQUIRED: One (1) Phillips screwdriver
- STEP INSTALLATION (refer to figures 1.1 through 1.3):
- LADDER SETUP (continued)
- U-SHAPED TOP RAIL INSTALLATION (refer to figure 2):
- MAINTENANCE:
- GENERAL AQUATIC SAFETY
- SAFETY IN YOUR POOL
- POST THIS WARNING NEAR YOUR POOL
- ! WARNING
- NO DIVING OR JUMPING
- SHALLOW WATER
Brand : INTEX
Model : 28060E
Category : Ladder