CAP288 - Baby monitor CAPiDi - Free user manual and instructions
Find the device manual for free CAP288 CAPiDi in PDF.


| Product Type | Baby Monitor |
| Brand | CAPiDi |
| Model | CAP288 |
| Technology | Digital DECT |
| Range | Up to 300 meters outdoors |
| Power Supply (Parent Unit) | Rechargeable battery (Li-ion) and AC adapter |
| Power Supply (Baby Unit) | AC adapter (battery backup optional) |
| Battery Life (Parent Unit) | Approximately 10 hours |
| Dimensions (Parent Unit) | 120 x 70 x 30 mm |
| Dimensions (Baby Unit) | 100 x 60 x 40 mm |
| Weight (Parent Unit) | 150 g |
| Weight (Baby Unit) | 100 g |
| Display | None (audio only) |
| Audio Features | Two-way talk-back, sound level indicator, lullabies |
| Additional Functions | Nightlight on baby unit, temperature sensor, out-of-range alarm |
| Frequency Range | 1.9 GHz (DECT) / 6.0 GHz (optional) |
| Security | Encrypted transmission, low radiation |
| Cleaning and Maintenance | Wipe with a soft, dry cloth; do not use water or cleaning agents |
| Spare Parts and Repairability | Replacement batteries available; contact CAPiDi support for other parts |
| Manual Information | Free user manual in English (PDF, 9 pages) |
Frequently Asked Questions - CAP288 CAPiDi
User questions about CAP288 CAPiDi
0 question about this device. Answer the ones you know or ask your own.
Ask a new question about this device
Download the instructions for your Baby monitor in PDF format for free! Find your manual CAP288 - CAPiDi and take your electronic device back in hand. On this page are published all the documents necessary for the use of your device. CAP288 by CAPiDi.
USER MANUAL CAP288 CAPiDi
CAPiDi®
CAPiDi®
Thank you for purchasing our CAP288 digital baby monitor. Your unit has been manufactured and checked under the strictest possible quality control to ensure that each monitor leaves the factory in perfect condition. In the unlikely event you find any defects or have any problem, please contact our dealer or service center. Please read this manual carefully to obtain maximum performance and extended service life from the unit.
FEATURES
• Full digital technique operating in the 863-870MHz with zero interference
• Automatic hop and search for free channel
- Operating range 800m in open space
- Low radiating power (only 10% of normal DECT or 50% of ECO DECT)
- Low battery alert on both baby and parent unit
• Digitally adjustable microphone sensitivity
• Audio and visual alert for out of range
• Digital volume control
• LED sound level meter/battery level meter
• Li battery for both parent unit and baby unit
- Exchangeable front cover with customized trendy design
WARNING
The CAP288 should not be regarded as a medical device. Premature babies or those considered to be at risk should be under the supervision of your doctor or health personnel.
Direct supervision of your baby at a regular interval by a responsible adult is strongly recommended in addition to using the CAP288.
CAPiDi®

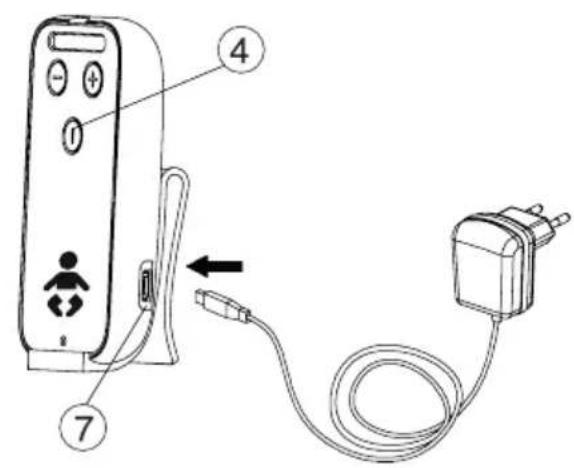
POWER SUPPLY
Baby Unit (BU) and Parent unit (PU)
- Operation from Li battery
The Li polymer battery pack is partially charged up and already installed in the unit. Once switched on, the unit is operational.
- Charging up the Li battery
Connect the output plug of supplied 5V AC adapter to USB port ⑦ ⑰. The power on indicator ④ ⑪ will light up red during charging (no matter the unit is witched on or not). Once the battery is fully charged up (normally it takes around 4 hours), the indicator ④ ⑪ will go off or turn steady green in case the unit is switched on. Either you can disconnect the AC adapter or keeping connecting it will cause no damage to the battery. In the later case, when the battery is being consumed and voltage falls to a certain level, the AC adapter will automatically start charging up the battery again.
Note: Before using the unit for the first time, charge up the Li polymer battery for at least four hours with the unit in switched off mode.
If the unit cannot be switched on by long press of power button ① or ⑧ check if the battery has totally run low, in case not, use a pointed object to press the reset button ⑱ and then try again.
CAPiDi®

PARENT UNIT

CONTROLS LAYOUT
1 Power ON/OFF button
2 Mic sens up button
3 Mic sens down button
4 Power/battery low indicator
5 LED level meter
6 Microphone
7 USB port
8 Power ON/OFF button
9 Volume up button
10 Volume down button
11 Power/battery low indicator
12 LED level meter
13 Vibration button
14 Link indicator
15 Vibration indicator
16 Speaker
17 USB port
18 Reset button
CAPiDi®
PAIRING
This process is to match the PU with BU so that they can communicate with each other while no other devices (even baby monitor of identical model) can interfere with you or receiving your signal.
The PU and BU are already paired when they are shipped from factory. However, in case you still encounter interference, perform pairing again to achieve better privacy
- Press and hold the Mic sens up button ② of BU.
- Switch on the unit by long press of Power button ① ① for 3 sec. The power indicator ① ④ should start flashing green rapidly. Release both buttons.
- Press and hold the Volume up button + ⑨ of PU.
- Switch on the unit by long press of Power button ①⑧. The power indicator ①⑪ should start flashing green rapidly. Release both buttons.
- Now press again Mic sens up button ①② of BU, if pairing is successful, two beep sound will be heard in PU. The power indicator ④ and ⑪ of both BU and PU should show steady green while both LED level meters ⑤⑫ will show full level.
- The baby monitor is now ready for operation and probably a feedback noise will be heard in speaker ⑯ of PU.
- In case the PU and BU cannot communicate with each other, repeat pairing process again.
CAPiDi®
- Place the BU about 1 m from the crib with the microphone⑥ facing towards the baby. Switch on the unit by long press of power button ①① for 2 sec, the power indicator ①④ will show steady green. If this indicator starts flashing green, the battery level becomes low and need to be recharged using the supplied AC adapter.
At the same time, the LED level meter ⑤ will show the battery status for around 5 sec. More LED light up means the battery is more full. Momentarily press of the power button ①① at anytime can show the battery status. To switch off the unit, long press the power button ①① again for over 2 sec.
-
Adjust the microphone sensitivity using the Mic sens button + - ② ③ such that the unit will be set to transmit whenever the microphone ⑥ picks up a sound at your desirable loudness level. The LED level meter ⑤ will change as these buttons are pressed, more number of LED light up means the microphone is more sensitive to sound (maximum is 5 LED and minimum is 1 LED). Press + button ② to increase and - button ③ to reduce microphone sensitivity.
-
Once BU is in transmit mode, the LED level meter ⑤ will start flashing along with the sound being picked up by microphone ⑥. The unit will return standby mode a few seconds after the microphone ⑥ stops picking up any sound and the LED level meter ⑤ goes off.
CAPiDi®
-
Switch on the unit by long press of power button ①⑧. The power indicator will show steady green. If this indicator starts flashing green, the battery level becomes low and need to be recharged using the supplied AC adapter. At the same time, the LED level meter will show the battery status for around 5 sec. More LED light up means the battery is more full. Momentarily press of the power button ①⑧ at anytime can show the battery status. To switch off the unit, long press the power button ①⑧ again for over 2 sec.
-
Place the PU at a reasonable distance away from BU to avoid feedback. Too close a distance will create a screeching sound at the speaker ⑯.
-
Once the PU receives a signal, the LEDs in the level meter 12 will light up and the link indicator 14 will show up green. The louder the baby's voice, the more number of LED will be lighted up. This feature is useful to alert the parents of baby's cry in case the volume of speaker 16 is turned low or off to keep the environment quiet. When the BU stops transmitting, the LED level meter 12 and link indicator 14 will go off consecutively.
-
The speaker volume can be adjusted using the volume up/down button ④ - ⑨ 10. The LED level meter ⑫ will change as these buttons are pressed. More LEDs light up means higher volume (maximum 5 LED). When no LED lights up, the speaker ⑯ is totally muted. Press button ⑦ to increase and button -⑩ to reduce volume.
-
Once the PU is beyond the communication range of the BU for over 30 sec, an out of range alarm will be heard together with LED level meter ⑫ start flashing and link indicator ⑭ show red to alert the parents. The alarm will only go off when the PU falls back within the communication range of BU.
N.B. This alarm will also be heard in case the BU is switched off, or its battery has run down.
- This unit is equipped with a vibration alert. Short press the vibration button ⑬ and the vibration indicator ⑭ will be lighted up. Once the received baby's voice is loud enough, the vibrator starts to function. This feature is useful when the parent is working under noisy environment (e.g. vacuum cleaning). To save battery power, it is recommended not to use the vibration alert frequently. To switch off vibration, short press the vibration button ⑮ again and the ⑰ indicator ⑮ goes off.
CAPiDi®
REMOVE CLIP
Both the BU and PU can be carried around using the belt clip.
To remove the clip, follow diagram as shown :

REPLACE FRONT COVER
The front cover of this baby monitor is exchangeable to be equipped with your own customized design pattern. To replace front cover, see picture.
- Use the attached card or a creditcard on the side as the drawing shows.
- Turn the card until the front easily detaches.
- Press the new front, leave the protective film in place.
- Be sure to press the new front properly.
- Remove the protective film.
The fronts are stuck hard as they should do for security reasons.

CAPiDi®
PRECAUTIONS
- Use only the supplied AC adapters, use of other adapters may cause damage to the CAP288 baby monitor.
- Disconnect the AC adapter from the wall outlet when the monitor is not to be operated.
- The BC-56 is best performed within a temperature range of 0°C to +50°C And the lowest operating temperature is -10°C
- Do not leave the monitor expose to strong sunlight for a long time or nearby any heat source, moisture and excessive environment.
- Do not open the cabinet, no serviceable parts inside.
STANDARD ACCESSORIES
a. Baby unit
b. Parent unit
c. 5V AC adapters x 2

a

b

C

Brand : CAPiDi
Model : CAP288
Category : Baby monitor