
iZi Comfort - Child car seat BESAFE - Free user manual and instructions
Find the device manual for free iZi Comfort BESAFE in PDF.


| Product Type | Child Car Seat - Group 0+/1 (0-18 kg) |
| Brand | BeSafe |
| Model | iZi Comfort |
| Weight Range | 0 to 18 kg (approx. birth to 4 years) |
| Installation Method | ISOFIX with support leg or vehicle belt |
| Orientation | Rearward-facing (0-18 kg) |
| Dimensions (H x W x D) | 66 x 44 x 54 cm approx. |
| Weight | Approx. 10.5 kg |
| Harness Type | 5-point harness with adjustable height |
| Side Impact Protection | Integrated SIP+ system |
| Headrest Adjustment | 10 positions, one-hand operation |
| Recline Positions | Multiple recline positions for comfort |
| Cover Material | Breathable, removable and washable fabric |
| Cleaning Instructions | Hand wash cover at 30°C; do not bleach, tumble dry, or iron |
| Safety Standards | ECE R44/04 and/or UN R129 (i-Size) compliant |
| Spare Parts Availability | Contact BeSafe or authorized retailers: harness, covers, pads |
| Repairability | Do not repair yourself; contact manufacturer for inspection |
| Warranty | 2 years (check local regulations) |
| Additional Features | Memory foam inserts for newborns, adjustable leg support |
| Manual Languages | Multiple languages available via manual download |
Frequently Asked Questions - iZi Comfort BESAFE
User questions about iZi Comfort BESAFE
0 question about this device. Answer the ones you know or ask your own.
Ask a new question about this device
Download the instructions for your Child car seat in PDF format for free! Find your manual iZi Comfort - BESAFE and take your electronic device back in hand. On this page are published all the documents necessary for the use of your device. iZi Comfort by BESAFE.
USER MANUAL iZi Comfort BESAFE
natural_image
Line drawing of a baby car seat with straps and seatbelt (no text or symbols)
ECE R44 04
GROUP WEIGHT AGE
19-18 kg 9m-4y
BeSafe®
Thank you for choosing BeSafe iZi Comfort.
BeSafe has developed this seat with much care, to protect your child during the next phase of her or his life.
It is important that you read this user manual BEFORE installing your seat. Incorrect installation could endanger your child.
Contents
Vital information 3
Preparing to install 4
Forward-facing belt installation 5
Removing the seat 7
Positioning of the child 7
Sleeping position 9
Removing and refitting the cover 10
Cleaning instructions 12
Warning: potential misuse 12
Important advice 13
Guarantee 14
Point of sale information 14
Vital information
- It is NOT ALLOWED to mount the seat in a front passenger seat WITH AN ACTIVATED AIRBAG.
- iZi Comfort can be installed only forward-facing with a 3-point car belt, approved to UN/ECE Regulation No. 16 or other equivalent standards.
- iZi Comfort is approved in group 1, forward-facing from 9-18 kg.
- The harness straps must always be locked when the child is in the seat.
- The harness straps must be tightened without slack and not twisted.
- The seat cover contains magnets in the areas with the orange indications. Magnets can influence electronic equipment like pacemakers.
- When the child weighs over 18 kg or the shoulder height grows above the highest position of the shoulder straps, the child must change to a group 2/3 seat.
- After an accident, the seat must be replaced. Although it may look undamaged, if you were to have another accident, the seat may not be able to protect your child as well as it should.
- Prevent the seat from becoming trapped or weighed down by luggage, seats and/or slamming doors.
- Before every use, make sure the harness is not damaged or twisted.
- Make sure you can fit no more than one finger between the harness and your baby (1cm).
- If in doubt, consult either the child restraint manufacturer or the retailer.

!
Preparing to install Forward-facing belt installation
Crucial parts It is NOT ALLOWED to mount the seat in a front

passenger seat WITH AN ACTIVATED AIRBAG.

1- When mounting in the back seat of the vehicle, push the front seat of the vehicle forward as much as possible. When mounting in the front seat of the vehicle, adjust the back rest in an upright position.
2- Put the child seat on the seat of the vehicle. Unlock the belt clamps (1).

3- Release the release handle at the back of the head rest and push the head rest down while keeping the head rest upright (2).
4- Pull the hip belt around the bottom base of the seat and click the car belt in the buckle (3).
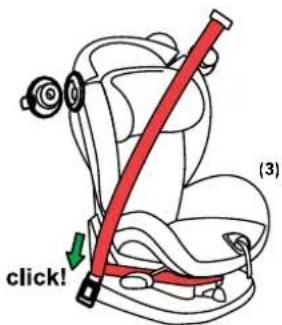
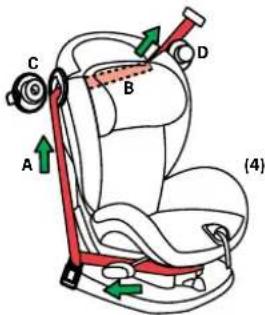
5- Put the shoulder belt through the belt clamps. Make sure the belt is not twisted (4).
6- Push the seat firmly into the car seat.
7- Tight installation is most important for forward facing seats. Tension the belts as follows: Pull the shoulder belt upwards (A). Have a firm grip on the shoulder belt in the seat area (B). Close the clamp on the inner side (C). Pull upper belt part on the door side and close clamp D (4).
8- Push the belt tensioner in the arrow direction to tension the 3-point car belt (5).
9- Make sure the 3-point car belt is as tight as possible. Repeat the procedure if the car belt is not tight.
10- Push the head rest in the correct position (refer to 'Positioning of the child' on page 7). The seat is now ready to use.

natural_image
Diagram showing a red object pressing down on layered curved surfaces with a green arrow indicating direction (no text or symbols)Removing the seat
1- Loosen the tension in the car belt by releasing the belt tensioner.
2- If the seat is installed in the back seat of the vehicle, push the front seat of the vehicle forward as much as possible.
3- Unlock the belt clamps and unlock the car belt.
4- Remove the car belt and remove the seat from the vehicle.
Positioning of the child
1- Position of the shoulder straps: Check that the shoulder strap slots are levelled with your child's shoulders (6).

flowchart
graph TD
    A["correct"] --> B["too low"]
    B --> C["too high"]
    style A fill:#f9f,stroke:#333
    style B fill:#ccf,stroke:#333
    style C fill:#cfc,stroke:#333
2- The height of the shoulder straps and the head rest can be adjusted by releasing the release handle at the back of the head rest and pulling the head rest up or down while keeping the head rest upright (7).

3- Pull the shoulder straps up while pressing the button of the central adjuster (8).

natural_image
Diagram of a car seatbelt being inserted into a seatbelt, showing green arrows indicating force direction (no text or symbols)4- Open the harness buckle.
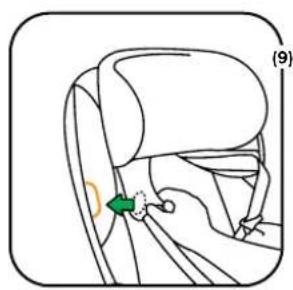
5- Position the shoulder straps over the orange marking at sides of the seat to keep the harness open while you position the child (9).
natural_image
Diagram of a car seatbelt with a green arrow indicating the angle of change (no text or symbols present)6- When the child is positioned, place the shoulder straps over the child's shoulders and close the buckle: CLICK! (10)

natural_image
Diagram of a mechanical or anatomical component with a green arrow indicating a specific point, no text or symbols present.7- Pull the harness strap through the central adjuster in the direction of the green arrow straight up-/forwards. Continue pulling until the harness is a comfortable but firm fit (11).

natural_image
Diagram of a mechanical or fluidic component with a tool and arrow, no visible text or symbolsMake sure that the harness straps are always locked and tightened when the child is in the seat.
!
Sleeping position
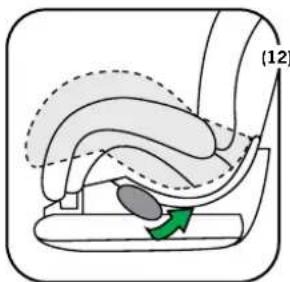
- The seat has 4 reclining positions. - By turning the reclining knob, the seat can be put in another position (12).
Removing and refitting the cover
- There are 2 versions of the fabric cover. If there are velcro squares (see green arrow (13/14)), follow the steps of alternative 1. If there are no velcro squares go to alternative 2.


natural_image
Diagram of a mechanical component with two green arrows indicating specific features (no text or symbols present)Removing the cover: alternative 1
1- Pay attention when you remove the cover, as fitting the cover is done in the opposite way.
2- Start to take off the lower seat part (15).
3- The cover of the head rest can be taken off separately by disconnecting the hooks at the backside and pulling off the fabric to the front.
Refit the cover
1- Pull the head rest in the highest position. Mount the head rest cover and connect the hooks at the back side. Pull the harness straps through the holes. Connect the loose bottom part of the head rest fabric with the plastic part under the head rest.
2- Pull the harness straps through the opening of the seat cover and lock the harness buckle. Pull the crotch strap through the opening of the seat part.
3- Mount the top part and then the shoulder parts. Mount the seat part and bring the seat cover under the rear parts of the sidewalls.

natural_image
Anatomical illustration of an insect head and thorax (no text or labels)Removing the cover: alternative 2
1- Pay attention when you remove the cover, as fitting the cover is done in the opposite way.
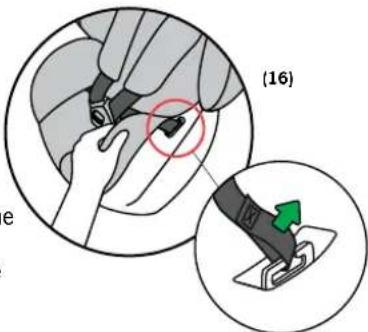
2- To remove the seat cover, the harness straps must be released at both sides. See red circle. Start to take off the lower seat part and unhook both harness straps from the metal belt hooks (16).
3- The cover of the head rest can be taken off separately by disconnecting the hooks at the backside and pulling off the fabric to the front.
Refit the cover
1- Pull the head rest in the highest position. Mount the head rest cover and connect the hooks at the back side. Pull the harness straps through the holes. Connect the loose bottom part of the head rest fabric with the plastic part under the head rest.
2- Pull the harness straps through the opening of the seat cover and lock the harness buckle. Pull the crotch strap through the opening of the seat part.
3- Pull the loops of the harness straps from the bottom of the seat part through the openings to the hooks in the bottom of the seat. Hook both harness straps on the metal belt hooks and pull the straps firmly to ensure that they are correctly installed.
- Make sure that the harness straps are fixed in the right way, after fitting the cover.
Cleaning instructions
- The cover of the seat must be washed according to the instructions on the inside of the cover (17).

- DO NOT use any aggressive cleaning products; these may harm the construction material of the seat.
Warning: potential misuse
! • It is NOT ALLOWED to mount the seat in a front passenger seat WITH AN ACTIVATED AIRBAG.
• Install only with 3-point car belts, approved to UN/ECE Regulation No. 16 or other equivalent standards (18).


Important advice
- DO NOT attempt to dismantle, modify or add any part to the seat. Warranty will expire if non-original parts or accessories are used.
- DO NOT use anything, such as a cushion, to raise the child seat off the passenger seat of the vehicle. In an accident the seat will not be able to protect your child in the right way.
- Never leave your child unattended in the seat.
- Make sure all passengers are informed about how to release your child in case of emergency.
- An unoccupied child seat should always be fastened in the vehicle.
- Make sure luggage or other objects are properly secured. Unsecured luggage may cause severe injuries to children and adults in case of accidents.
- Never use the seat without the cover. The cover is a safety feature and may only be replaced by an original BeSafe cover.
- Under the fabric cover we use EPS foam. Do not push or pull too hard against the foam, since you might damage the foam.
- Do not use any aggressive cleaning products; these may harm the construction material of the seat.
- BeSafe advises that child seats should not be bought or sold second-hand.
- KEEP this user manual for later use with the seat.
- DO NOT use the seat for longer than 5 years. Due to ageing, the quality of the material may change.
- DO NOT use at home. It has not been designed for home use and can only be used in a vehicle.
!
Practical advice
When the child seat is mounted in the car check all the areas where the child seat might touch the interior. We recommend using a (BeSafe) protection cover in these places to avoid cuts, marks or discolouration on the interior of the vehicle, especially in vehicles with leather or wooden interior.
Guarantee
- All BeSafe products are carefully designed, manufactured and tested. All of our BeSafe child seats are tested periodically out of our continuous production in our test laboratory. Furthermore they are tested by independent test institutes.
- Should this product prove faulty within 24 months of purchase due to materials or manufacturing fault, except covers and harness straps, please return it to the original place of purchase.
- The guarantee is only valid when you use your seat appropriately and with care. Please contact your dealer, he will decide if the seat will be returned to the manufacturer for repair. Replacement or return cannot be claimed. The guarantee does not get extended through repair.
- The guarantee expires: when there is no receipt, when defects are caused by wrong and improper use, when defects are caused by abuse, misuse or negligence.
Point of sale information
Notice for FORWARD-FACING installation
- This is a universal Child Restraint System. It is approved to regulation No. 44.04 series of amendments for general use in vehicles, fitted with 3-point car belts, approved to UN/ECE Regulation No.16 or other equivalent standards.
Next car seat
- The BeSafe iZi Up is a group 2/3 seat which can be used for children from 15 till 36 kg, which covers the age group from 4 till 12 years.
Notes
universal 9-18 kg

04443620
HTS BeSafe as
N-3535 Krøderen, Norway - www.besafe.eu
BeSafe®


- Thank you for choosing BeSafe iZi Comfort.
- Contents
- Vital information
- Preparing to install Forward-facing belt installation
- Removing the seat
- Positioning of the child
- Sleeping position
- Removing and refitting the cover
- Removing the cover: alternative 1
- Refit the cover
- Removing the cover: alternative 2
- Cleaning instructions
- Warning: potential misuse
- Important advice
- Practical advice
- Guarantee
- Point of sale information
- Notice for FORWARD-FACING installation
- Next car seat
- Notes
Brand : BESAFE
Model : iZi Comfort
Category : Child car seat