Obsidian 600 - Home Theater Wharfedale - Free user manual and instructions
Find the device manual for free Obsidian 600 Wharfedale in PDF.


| Product Type | Home Theater System |
| Brand | Wharfedale |
| Model | Obsidian 600 |
| Number of Channels | 5.1 |
| Total Power Output | 500W RMS |
| Frequency Response | 30Hz - 20kHz |
| Connectivity | HDMI (ARC), Optical, Coaxial, Bluetooth 5.0, USB |
| Supported Audio Formats | Dolby Digital, DTS, Dolby Atmos |
| Dimensions (Main Unit) | 430 x 340 x 155 mm |
| Weight (Main Unit) | 7.2 kg |
| Power Supply | AC 100-240V, 50/60Hz |
| Remote Control | Included (CR2025 battery) |
| Subwoofer | Wireless 8" subwoofer |
| Speaker Configuration | Floorstanding L/R, Center, Surround, Subwoofer |
| Wall-Mountable | Yes (surround speakers) |
| Warranty | 2 years |
Frequently Asked Questions - Obsidian 600 Wharfedale
User questions about Obsidian 600 Wharfedale
0 question about this device. Answer the ones you know or ask your own.
Ask a new question about this device
Download the instructions for your Home Theater in PDF format for free! Find your manual Obsidian 600 - Wharfedale and take your electronic device back in hand. On this page are published all the documents necessary for the use of your device. Obsidian 600 by Wharfedale.
USER MANUAL Obsidian 600 Wharfedale
Obstician 500 House Cinema Pass_L, Page 1 2011-4-12 16:30:36
USER INSTRUCTIONS: OBSIDIAN 600 HOME CINEMA PACK
SPECIFICATIONS - FRONT, CENTRE AND REAR SPEAKERS
| Model | OBSIDIAN TOWER | OBSIDIAN CENTRE | OBSIDIAN SURROUND |
| Format | Floorstanding (front) | Centre channel | Surround channel |
| Enclosure type | 3-way reflex | 2-way reflex | 2-way reflex |
| Driver complement | |||
| Bass | 1x200mm | — | — |
| Bass/mid | 2x130mm | 2x100mm | 1x100mm |
| Tweeter | 1x25mm | 1x25mm | 1x25mm |
| Sensitivity (SPL/M @ 2.83V) | 88dB | 88dB | 86dB |
| Nominal impedance | 6 ohms | 6 ohms | 6 ohms |
| Frequency response +/-3dB | 30Hz - 20kHz | 70Hz - 20kHz | 65Hz - 20kHz |
| Crossover frequency | 320Hz / 2.4kHz | 4.5kHz | 4.3kHz |
| Power handling capacity | 30 - 150w | 15 - 100w | 15 - 80w |
| Dimensions (H x W x D) mm | 1068x198x341 | 140x400x225 | 250x140x225 |
| Height on feet/spikes (mm) | 1108 | — | — |
| Net Weight (kg/pcs) | 23kg | 5.3kg | 3.1kg |
AUTHORISED SERVICE CENTRES
1
Wharfedale International Ltd.
TAG House, Sovereign Court,
Erfmine Business Park,
Hunungden, Cambe DE20
Carlos PEZO 6AU. England
England.
Tel: +44 (0)1450 447700
Fax: +44 (0)1480 43176
COMPLIANCE
This Whartedale product complies with the relevant clauses enshrined in the following standards and directives in force at the time of the introduction of the product.
- EU Directives: 89/336/EC, 72/23/EEC; Safety: EN00065 (CB Scheme): Emissions: EN55013, EN61000 Immunity: EN55020:2002.
• USA: UL 6500:2002
CANADA: CAN/CSA-E60065-00
For information on other authorised service centres worldwide contact
Whartedale International in the U.K.
A worldwide distributor list is available on the Wharfedale website:
www.wharledale.co.uk
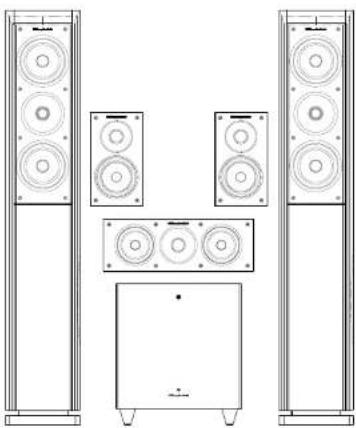
OBSIDIAN 600
HOME CINEMA PACK
OBSIDIAN TOWER
OBSIDIAN CENTRE
OBSIDIAN SURROUND
natural_image
Line drawing of a multi-tiered audio amplifier setup with speakers and a control unit (no text or symbols)Wharfedale
IAG House, Sovereign Court, Ermine Business Park, Huntington, Cambs, PE29 6XU, UK Tel: +44(0)1480 447700 Fax: +44(0)1480 431767 http://www.wharledale.co.uk IAG reserve the right to alter design and specification without notice. All rights reserved. GIAG Group Ltd. Wharledale is a member of the International Audio Group. CODE:WH10-WN0013
Wharfedale
BRITAIN'S MOST FAMOUS LOUDSPEAKERS
User's Manual







Obstician 500 House Cinema Pass_2.Page 1 2011-4-12 17:1:52
USER INSTRUCTIONS: OBSIDIAN 600 HOME CINEMA PACK
IMPORTANT SAFETY INFORMATION
Read these instructions.
Keep these instruct
Heed all warnings.
Follow an instructions.
Do not use this apparatus. CleanPolywith dry cloth
Do not block any ventilation openings
Install in accordance with the manufacturer's instructions.
Do not install near any heat sources such as radiators, heat registers, stoves, or other apparatus (including amplifiers) that produce heat.
Do not defeat the safety purpose of the polarized or grounding type plug. A polarized plug has two blades with one wider than the other. A grounding type plug has two blades and a third grounding prong. The wider blade or the third prong is provided for your safety. If the provided plug does not fit into your outlet, consult an electrician for replacement of the obsolete outlet.
Protect the power cord from being walked on or pinched, particularly at plugs, convenience receptacles, and the point where they exit from the apparatus.
Use only attachments/accessories specified by the manufacturer.
Use only with a cart, stand, tripod, bracket, or table specified by the manufacturer, or sold with the apparatus. When a cart is used, use caution when moving the cart/ apparatus combination to avoid injury from tip-over.
Unplug this apparatus during lightning storms or when unused for long periods of time.
Refer all servicing to qualified service personnel. Servicing is required when the apparatus has been damaged in any way, such as power-supply cord or plug is damaged, liquid has been spilled or objects have fallen into the apparatus, the apparatus has been exposed to rain or moisture, does not operate normally, or has been dropped.
Warning: To reduce the risk of fire or electrical shock, do not expose this product to rain or moisture. The product must not be exposed to dripping and splashing and no object filled with liquids such as a vase of flowers, should be placed on the product.
No naked flame sources such as candles should be placed on the product.
Caution: Changes or modifications not expressly approved by the manufacturer could void the user's authority to operate this device.
Warning: The mains power switch for this appliance is located on the rear panel. To permit free access to this switch, the apparatus must be located in an open area without any obstructions.
NOTE: This equipment has been tested and found to comply with the limits for a Class B digital device, pursuant to part 15 of the FCC Rules. These limits are designed to provide reasonable protection against harmful interference in a residential installation. This equipment generates, uses and can radiate radio frequency energy and, if not installed and used in accordance with the instructions, may cause
GENERAL GUIDANCE
DO NOT connect the mains power to any signal input terminal.
DO NOT change any connections without first switching off the power to all the components in your AV system. ALWAYS turn down the system master volume control, before turning the equipment on or off.
DO NOT use your amplifier at its maximum volume setting. The resulting distortion may damage your loudspeakers and subwoofer. The position of the Volume Control on your amplifier is NOT a reliable guide as to 'how
harmful interference to radio communications. However, there is no guarantee that interference will not occur in a particular installation. If this equipment does cause harmful interference to radio or television reception, which can be determined by turning the equipment off and on, the user is encouraged to try to correct the interference by one or more of the following measures.
• Reorient or relocate the receiving antenna.
• Increase the separation between the equipment and receiver.
- Connect the equipment into an outlet on a circuit different from that to which the receiver is connected.
• Consult the dealer or an experienced radio/TV technician for help
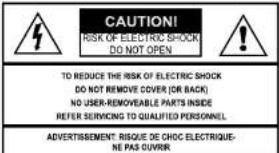

This symbol indicates that there are important operating and maintenance instructions in the literature accompanying this unit.
This symbol indicates that dangerous voltage constituting a risk of electric shock is present within this unit.
ESSENTIAL INFORMATION FOR UK USERS
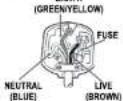
The power cord on your subwoofer may be supplied with a plug incorporating a fuse, the value of which is indicated on the pin face of the plug. Should the fuse need to be replaced, an ASTA or BSI approved BS1362 fuse must be used of the same rating. If the plug is cut off it must NOT be re-used. Dispose of any such plug safely. There is a danger of electric shock if a cut-off plug is inserted into a mains socket.
The wires in the mains lead are coloured in accordance with the following code: Green and Yellow - Earth: Blue - Neutral: Brown - Live.
As the colours of the wires in the mains lead may not correspond with the markings identifying the terminals in the replacement mains plug, proceed as follows:
The wire coloured Blue must be connected to the terminal marked with the letter 'N' or coloured Black. The wire EARTH
coloured Brown must be connected to the terminal marked with the letter 'L' or coloured Red. The wire coloured Green and Yellow must be connected to the terminal marked with the letter 'E', or coloured Green, or Green and Yellow, or marked with the Earth symbol
loud your equipment will play. Allow your system ample "headroom". Do not operate the SW100 or the D9 SR closer than 450mm from the TV to avoid distorting the picture. If this occurs, switch the TV set off. After 15 minutes switch on again colour balance should now be restored.
To minimise hum and mains interference ensure that low level (line level) signal cables are well screened. Avoid routing low-level signal cables close to or parallel with mains power wiring.
USER INSTRUCTIONS: OBSIDIAN 600 HOME CINEMA PACK
TROUBLESHOOTING
If your system is not working properly please work through this checklist before returning a unit to your dealer. Before investigating a problem, always switch off the system at the mains.
| Symptom | Possible Cause |
| No Sound | System not switched on; Speaker cables shorting terminals out; Wrong source selected |
| Sound lacks bass contentBass reproduction indistinct | Front loudspeakers out of phase.Subwoofer not switched on; Subwoofer phase incorrect; Subwoofer crossover control too low |
| Excessive bass distortion at low volumes | Subwoofer level set too high; LFE level set too high; Subwoofer incorrectly wired |
| Excessive or distorted bass at high levels | System level set too high; Bass control set too high; Speakers too close to room corners |
| Distorted or rattling sounds at high levels | System level too high; Objects on speakers/subwoofer; Objects too close to subwoofer |
| Popping or thumping from the subwoofer | System level set high; Subwoofer level set too high; LFE level set too high |
| Indistinct sound; Poor localisation of effects. Poor localisation of dialogue | One or more loudspeakers is out of phase(Read the manual for correct connection procedure) |
| Television picture colour is distorted | Subwoofer too close to TV (Switch off system and TV. Move units away. Leave 15 mins. Switch on) |
CARE AND MAINTENANCE
If you play the speakers with the grilles off exercise great care. NEVER touch the drive units which are easily damaged.
The loudspeaker cabinets can be cleaned with a barely damp cloth or with a spray furniture polish and a soft cloth. Apply the spray sparingly to the cloth and then polish the cabinet. Never apply spray directly to the cabinet.
Be especially careful when cleaning the front and surround speakers that you do not disturb the speakers on their mountings.
GUARANTEE & SERVICE
In the unlikely even that your unit develops a fault, return it to your Wharfedale dealer using the original packing to ensure safe shipping. The terms of your guarantee may vary in different countries but in all cases the guarantee excludes:
All damage caused through accident, misuse, wear and tear, neglect, incorrect installation, adjustment or repair by unauthorised personnel.
Liability for damage or loss occurring in transit to or from the purchaser. Wharfedale will not be liable for any consequential damage, loss or injury, arising from or in conjunction with this equipment.
In 1932, when Gilbert Briggs founded the Wharfedale Wireless Works, his company was at the leading edge of an exciting new technology which was dedicated to bringing the pleasure of music and entertainment to a wide range of people. As the technology advanced Wharfedale gave many music lovers their first taste of High Fidelity, mounting a series of live sound demonstrations which excited the audio world and heralded the era of the modern hi-fi loudspeaker.
Today Wharfedale still takes the same uncompromising approach to the design and manufacture of every loudspeaker system, using high quality components and state-of-the-art testing to ensure consistently high performance. And that means that you can continue to count on the quality of all Wharfedale products.
Wharfedale
Loudspeaker Manufacturers since 1932

Obstician 500 House Cinema Pass_3.Page 1 2011-4-12 17:20:56
USER INSTRUCTIONS: OBSIDIAN 600 HOME CINEMA PACK
INTRODUCTION
The Obsidian Home Cinema Pack consists of:
• Two floorstanding speakers
• One centre channel speaker
• Two surround speakers
PRELIMINARIES
UNPACKING THE SPEAKERS
Carefully remove each loudspeaker from its packing carton. Be especially careful when removing the polythene bag. DO NOT attempt to lift the loudspeaker by the polythene bag.
Check each unit and, in the event of damage, contact your dealer.
Retain the packing for future use. If you decide to dispose of the packing, please do so with regard to any recycling regulations in your area.
Retain the instructions. If you pass a product to a third party, please include the instructions.
ANCILLARY EQUIPMENT
The Obsidian 600 Home Cinema Pack is compatible with most modern audio-visual equipment - but a loudspeaker is only as good as the signal it gets. Your amplifier should have ample reserves of power - a low powered amplifier could easily run out of steam and the resulting distortion is unpleasant to listen to and could damage your speakers. A larger amplifier will usually sound better and enhance the reliability and performance of your loudspeakers. Always turn down the volume if the music starts to sound distorted.
INSTALLATION
Before connecting your system consider where you will place the speakers in the room. Before making a final decision please experiment until you find the most suitable position.
The DIA speakers are intended for wall, stand or shelf mounting. Their bass extension depends on proximity to a wall, though they should be kept away from room corners. Ideally they should be mounted 1-2 metres above the floor and 2-4 metres apart, central to the listening position.
Front and Effects Channels
The front loudspeakers are placed on either side of the television screen, 2 to 3 metres apart. The speakers should be angled slightly so they are aimed towards the listeners. As the rear surround channels are the effects channels the reproduced sound should be as room filling as possible. We recommend placing the speakers in a high position, behind the listener's head. If the rear wall is more than 1 metre behind the listening seat, position the units on the side walls. If the walls are a long way from the listening seat, consider stand mounting the loudspeakers. Most of the dialogue comes from the centre loudspeaker. Speech should appear to highlight them from the actors' mouth. Operating height is importantly ideal and cent and centre channel speakers should be at the same height. For this reason the centre channel speaker is best operated above the television monitor.
TERMINALS AND CONNECTORS
Cables from the AV processor to the front speakers should be the same length. Cables to the rear speakers should also ideally be the same length. (If you are connecting the SWSUBvia the high level inputs you will need to cut the cable into seven lengths.)
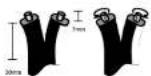
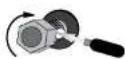
Split the cable at each end to a depth of 30mm. Strip about 7mm of insulation from each end and lightly twist to gather the strands. All the loudspeakers use screw terminals. Unscrew each terminal fully to expose the mounting hole in the lower part of the terminal.
Insert the bared end of the cable into the hole and re-tighten the terminal securely. Ensure there are no loose strands touching adjacent terminals
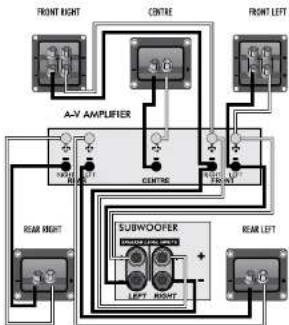
Connect the loudspeakers as shown in the connecting diagrams on Page 5.
Ensure that the red speaker terminal is wired to the red (+) amplifier output terminal and that the black speaker terminal is wired to the black (-) amplifier output terminal.
It is convenient to use the striped core to connect the positive + RED terminals.

USER INSTRUCTIONS: OBSIDIAN 600 HOME CINEMA PACK
POSITIONING THE CENTRE SPEAKER
The Obsidian Centre should be located on a stable, flat surface to avoid any movement of the loudspeaker at high sound levels.
We recommend that the Centre is mounted on top of the television, with the front grille level with or slightly in front of the screen. This will reduce sound reflections from the top of the TV cabinet. Alternatively, the Centre may be placed below the screen.
The television should be positioned centrally between the front loudspeakers and the front face of the Centre should ideally be in line with the front loudspeakers.
THE SW SUBWOOFER (OPTIONAL)
Before connecting check the voltage marked on the amplifier panel is correct for your mains supply.
• 230 volt products - 220 volts to 240 volts • 115 volt products - 110 volts to 120 volts
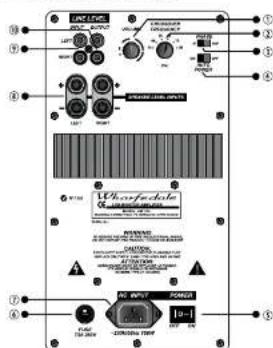
③ Volume Control
② Crossver Frequency Control
③ Phase Control
④ Auto Power Switch
③ Power ON/OFF Switch
POSITIONING THE SW SUBWOOFER
Although the unit may be placed almost anywhere in the room, we recommend you place it in front of and central to the listening position. We suggest you initially position the subwoofer about 20cm (8 inches) from the wall. Placing it close to the wall will increase the bass; placing it across a room corner will increase the bass further; possibly at the expense of clarity. Do not place the subwoofer close to surfaces or objects that may rattle. The floor under the subwoofer should be sound. Experiment with locations and sources before making a final decision.
④ Mains Power Fuse
② IEC Mains Input Socket
① Speaker Level Inputs
⑤ Line Level Inputs
⑧ Line Level Outputs
5.1 LOUDSPEAKER CONNECTIONS
Standard connections for Digital AV processors are shown below FRONT, CENTRE AND REAR CHANNELS
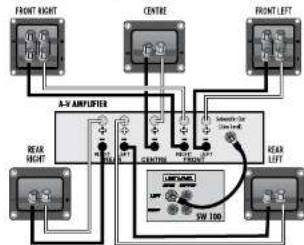
Connect the Front, Centre and Rear loudspeakers as shown below. Ensure that the red, positive, (+) terminal on the speaker is connected to the corresponding red (+) terminal on the amplifier and the same for the black, negative, (-) terminals. Connections should be firm with no loose strands touching adjacent terminals.
CONNECTING THE SW SUBWOOFER
If your AV processor has a line level or LFE subwoofer output you should use this connection. You will need a to purchase a 'single mono' screened RCA phone lead from your dealer. Connect this lead from the Subwoofer output of the processor to the Left line input of the SW 100 Subwoofer.
flowchart
graph TD
    A["FRONT RIGHT"] --> B["A-3 AMPLIFIER"]
    C["CENTRE"] --> B
    D["FRONT LEFT"] --> B
    E["REAR RIGHT"] --> B
    F["REAR LEFT"] --> B
    G["5W 100"] --> B
    H["Switchout Bus"] --> B
    I["Ground"]
SUB SUBWOOFER LEVEL CONNECTIONS
Use the connection method shown below only if your amplifier does not have a dedicated subwoofer output. Connect the Front, Centre and Rear loudspeakers as shown. Connect a second pair of loudspeaker cables from the amplifier to the 'SPEAKER LEVEL INPUT' terminals of the subwoofer.
flowchart
graph TD
    A["FRONT RIGHT"] --> B["A-V AMPLIFIER"]
    C["FRONT LEFT"] --> B
    D["FRONT RIGHT"] --> E["SUBWOOFER"]
    F["FRONT LEFT"] --> E
    G["FRONT RIGHT"] --> H["SUBWOOFER"]
    I["FRONT LEFT"] --> H
    B --> J["FRONT RIGHT"]
    B --> K["FRONT LEFT"]
    B --> L["FRONT RIGHT"]
    B --> M["FRONT LEFT"]
    B --> N["FRONT RIGHT"]
    B --> O["FRONT LEFT"]
    B --> P["FRONT RIGHT"]
    B --> Q["FRONT LEFT"]
    B --> R["FRONT RIGHT"]

Obsidian 500 House Cinema Pack_4.Page 1 2011-4-12 17:22:25
USER INSTRUCTIONS: OBSIDIAN 600 HOME CINEMA PACK
SETTING UP THE OBSIDIAN 600 HOME CINEMA PACK SETTING LOUDSPEAKER SIZES
Most digital AV Processors require you to specify the size of speakers in various channels. These are usually 'Large' or 'Small'.
Set all the channels to 'Small'. This will route bass effects from all channels to the subwoofer. You should also set the 'Subwoofer' option on the processor to 'On' or 'Yes'.
NOTE: Choosing 'Large' will result in lower power handling, reduced bass and degraded dialogue quality.
SETTING UP THE SW SUBWOOFER
Check that all system connections are correct. Set the SW SUB WOOFER power switch to OFF
Turn the system Volume Control to minimum. Connect the supplied subwoofer power lead to the IEC power socket on the subwoofer and connect the mains plug to the wall socket.
Set the subwoofer volume control to the mid position (120'clock) before proceeding.
VARIABLE CROSSOVER: This control should initially be set to 55 Hz. PHASE SWITCH: The Phase switch should be initially set to 0". AUTO SWITCH: The Auto switch should be initially set to OFF.
FINE TUNING THE SW SUBWOOFER
Switch on the SW100 power switch and check that the power indicator on the front of the cabinet glows. Now switch on the system. Play a programme with extended bass and set the system volume to a moderate level. Adjust the subwoofer volume control to produce the desired level of bass. Do not overdo things!
PHASE SWITCH: If the bass is indistinct or lacks depth, the Phase switch may need adjustment. Set the switch to 0° and listen carefully to some music with extended bass. If there is insufficient bass output from the sub-woofer set the Phase switch to 180°. Select the position which produces the most natural, extended bass.
CROSSOVER ADJUSTMENT: This enables the system to be set up for optimum bass performance. The higher settings are for use with small loudspeakers such as the 09.0; if you choose too low a setting there will be a 'hole' in the bass response.
AUTO SWITCH: In normal mode the subwoofer is permanently on. Setting the AUTO switch to ON automatically turns the subwoofer on when a signal is detected and turns it off (Standby Mode) after a period of inactivity. We recommend the AUTO switch is set to ON.
In AUTO mode the indicator on the front of the subwoofer will glow RED when the unit is in Standby mode and GREEN when operational. If your subwoofer is disconnected from the mains power, or the Power switch is "Off", the indicator will be extinguished.
SETTING SYSTEM LEVELS
Once the loudspeaker settings have been finalised your AV processor should be put into its "Test" or "Set-Up" mode. (see the instructions supplied with your equipment). You will hear a noise signal moving from
loudspeaker to loudspeaker. Adjust the level controls until all channels are reproduced at the same level.
Even though you adjust all the channels to produce equal loudness, on actual programme material the surround channel may be lower than the front. Do not readjust the surround level.
You will need to adjust the subwoofer output level from the processor. Avoid setting too high a level or you will swamp the sound with bass and limit the subwoofer's ability to respond to sudden large bass signals.
It is also important to set a sensible level going into the subwoofer from the AV processor. The subwoofer volume control should ideally be between 12 and 3 o'clock when the system is playing moderately loudly.
Note: As all channels are set to 'Small' the subwoofer must be on when the system is playing otherwise there will be reduced bass, and no LFE.
DELAY SETTINGS
Many AV processors feature adjustable delay settings to enable surround and dialogue information to arrive at the listener at the same time as the Front channels, even when the listening seat is in a non-ideal position.
Rear Delay: If the listening position is equidistant from the Front and Rear speakers, a low delay setting should be set. The closer the listener is to the Rear speakers the higher should be the delay setting used.
Centre Delay: If the Centre speaker is level with (or slightly behind) the Front speakers, set the delay to zero. If the Centre speaker is forward of the Front speakers, increase the delay.
LFE
The Low Frequency Effects channel was originally an additional bass channel with its own dedicated subwoofer. In other words, the LFE channel is not a regular subwoofer channel. Because all the speakers are set to Small, the LFE channel will be combined with the bass from other channels and all this feeds into the subwoofer. When you set the LFE level from your AV processor, use care as the LFE channel may contain powerful low frequencies which, although normal in a cinema, may overload a domestic subwoofer.
If, during a programme, you hear popping or thumping noises coming from the subwoofer, immediately turn the AV Processor's volume level down and then back off the LFE level. If this does not cure the problem, back off the volume level at the subwoofer.
Please read the relevant sections of your AV amplifier manual and familiarise yourself with the various issues. If you are still unsure, consult your dealer for help.
SYSTEM PHASE
It is essential for all speakers to be connected correctly with the RED + and BLACK - terminals of the speakers connected to the corresponding RED + and BLACK - terminals of the AV amplifier ('in phase'). Failure to do this will cause poorly focussed sound with poor bass localisation and muddled treble ('out of phase'). If the sound is not as clear as it could be, check all speaker connections carefully before proceeding further.
FURTHER INFORMATION ON HOME CINEMA TOPICS CAN BE FOUND AT THESE WEBSITES
www.dolby.com
www.dtsonline.com
www.thx.com
Page 6
USER INSTRUCTIONS: OBSIDIAN 600 HOME CINEMA PACK
THE HOME THEATRE ENVIRONMENT
5.1 SYSTEM
The vast majority of AV entertainment is encoded in 5.1 surround sound. It is virtually impossible to find any commercial media encoded in any 6.1 or 7.1 format that is not also encoded in 5.1.
The 5.1 format encompasses:
Two Front channels (Left and Right) These channels carry the main information, effects and music.
One Centre channel, largely for dialogue
Two Rear channels, (Left and Right), almost exclusively for ambience and effects.
One Subwoofer (the '1') for low frequency effects and deep bass.
A typical 5.1 setup is shown opposite.
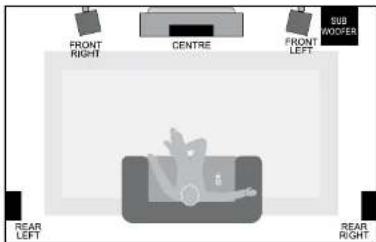
THE 5.1 HOME THEATRE ENVIRONMENT
Front Channels
The front channel loudspeakers are placed on either side of the television screen, 2.5 to 3.5 metres apart. The speakers should be angled slightly so they are aimed towards the listeners.
Rear Channels
As the rear channels are the "effects" channels the reproduced sound should be as room filling as possible. To aid this we recommend placing the speakers in a high position, slightly behind the listener's head. Positioned high, the rear speakers give a good rear perspective combined with a diffused sound field. Two possible placements are indicated in the diagram above.
Note: If the rear wall is more than 1 metre behind the listening seat, the side wall position should be used. If the side or rear walls are inconveniently located, consider stand mounting the loudspeakers.
Centre Channel
In the cinema most of the dialogue comes from the middle loudspeaker. This ensures that the speech appears to originate from the actors' mouths and not displaced to one side.
For best results the front and centre channel speakers should be operated at the same height. For this reason the centre channel speaker should normally be operated on top of the television monitor. Ideally the front faces of the centre and Front loudspeakers should be in line, though this may not be practicable in many cases.
Subwoofer
As the ear is unable to detect the direction from which deep bass originates, this allows freedom in positioning the subwoofer. Varying the distance from the wall will alter the amount of bass, the level increasing as the unit is moved closer to the wall. Some prefer to place the subwoofer against a corner of the room. This arrangement gives more bass at the possible expense of clarity.
EXPANDING YOUR HOME CINEMA SYSTEM
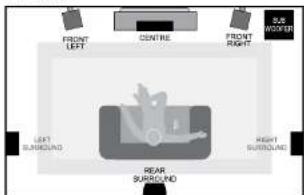
Recently, there has been a proliferation of multi-channel formats. Dolby Labs, DTS and THX all offer a range of 6.1 and 7.1 formats which extend the 5.1 principle by adding one or two extra rear effects channels.
To enable you to take advantage of these formats, the Obsidian SR is available from your dealer in single packs (1) as well as pairs.
Although the precise configuration of these systems will depend on the
capabilities of your processor and you should be guided by those instructions, we would make some observations.
For most 6.1 and 7.1 formats, and especially Dolby EX, to work properly, the listening seat should not be very close to the rear wall.
Optimising the time delay so that information from all speakers arrives at the listening seat coherently is critical.
THX adjustments need to be followed to the letter
6.1 SYSTEM
- USER INSTRUCTIONS: OBSIDIAN 600 HOME CINEMA PACK
- SPECIFICATIONS - FRONT, CENTRE AND REAR SPEAKERS
- AUTHORISED SERVICE CENTRES
- 1
- COMPLIANCE
- OBSIDIAN 600
- HOME CINEMA PACK
- IMPORTANT SAFETY INFORMATION
- GENERAL GUIDANCE
- ESSENTIAL INFORMATION FOR UK USERS
- TROUBLESHOOTING
- CARE AND MAINTENANCE
- GUARANTEE & SERVICE
- INTRODUCTION
- PRELIMINARIES
- UNPACKING THE SPEAKERS
- ANCILLARY EQUIPMENT
- INSTALLATION
- Front and Effects Channels
- TERMINALS AND CONNECTORS
- POSITIONING THE CENTRE SPEAKER
- THE SW SUBWOOFER (OPTIONAL)
- POSITIONING THE SW SUBWOOFER
- LOUDSPEAKER CONNECTIONS
- CONNECTING THE SW SUBWOOFER
- SUB SUBWOOFER LEVEL CONNECTIONS
- SETTING UP THE OBSIDIAN 600 HOME CINEMA PACK SETTING LOUDSPEAKER SIZES
- SETTING UP THE SW SUBWOOFER
- FINE TUNING THE SW SUBWOOFER
- SETTING SYSTEM LEVELS
- DELAY SETTINGS
- LFE
- SYSTEM PHASE
- FURTHER INFORMATION ON HOME CINEMA TOPICS CAN BE FOUND AT THESE WEBSITES
- THE HOME THEATRE ENVIRONMENT
- SYSTEM
- The 5.1 format encompasses:
- THE 5.1 HOME THEATRE ENVIRONMENT
- Front Channels
- Rear Channels
- Centre Channel
- Subwoofer
- EXPANDING YOUR HOME CINEMA SYSTEM
- SYSTEM
Brand : Wharfedale
Model : Obsidian 600
Category : Home Theater