
WQP8-9347 - Dishwasher BUSH - Free user manual and instructions
Find the device manual for free WQP8-9347 BUSH in PDF.


| Brand | Bush |
| Model | WQP8-9347 |
| Type | Freestanding / Built-in Dishwasher |
| Dimensions (W x D x H) | 445 x 540 x 820 mm |
| Capacity | 8 place settings |
| Power Input | 1760-2100 W |
| Electrical Supply | 220-240 V, 50 Hz, 13 A fuse |
| Water Pressure | 0.04 - 1.0 MPa |
| Max Water Consumption (Economy) | 11 L per cycle |
| Hot Water Connection Max | 60°C |
| Programs | Heavy, Normal, Economy, Rinse, Rapid |
| Delay Start | 1-24 hours |
| Upper Basket Adjustment | Height adjustable |
| Folding Spikes | Yes (lower basket) |
| Cutlery Basket | Removable, with separate compartments |
| Water Softener | Yes, adjustable salt consumption |
| Rinse Aid Dispenser | Adjustable (6 levels) |
| Filter System | Main, coarse, and fine filters |
| Safety Features | Child lock (via supervision), auto shut-off, overflow protection |
| Warranty | 12 months |
| Accessories Included | Inlet hose, drain hose, salt funnel, measuring spoon, measuring cup |
Frequently Asked Questions - WQP8-9347 BUSH
User questions about WQP8-9347 BUSH
0 question about this device. Answer the ones you know or ask your own.
Ask a new question about this device
Download the instructions for your Dishwasher in PDF format for free! Find your manual WQP8-9347 - BUSH and take your electronic device back in hand. On this page are published all the documents necessary for the use of your device. WQP8-9347 by BUSH.
USER MANUAL WQP8-9347 BUSH
natural_image
Technical line drawing of a mechanical enclosure or enclosure with mounting feet and internal components (no text or symbols)Important – Please read these instructions fully before installing or using
These instructions contain important information which will help you get the best from your appliance and ensure safe and correct installation, use and maintenance. If you need help or have damaged or missing parts, call the Customer Helpline: 0845 600 4632
Safety Information 2
Parts 3
Installation 4-9
Aesthetic panel installation 4-6
Water supply connection 7
Drain hose connection 7
Position the appliance 7
Water pressure 8
Electrical connection 9
User Instructions 10-17
Before first use 10-12
Loading your dishwasher 13-15
Wash cycle table 16
Using your appliance 17
Care and Maintenance 18
General 18
Trouble Shooting 19
Error codes 19
Technical Specifications 20

natural_image
Technical line drawing of a multi-chamber appliance with mounting feet and internal components (no text or symbols)Product codes
WQP8-9347
Before use During use
The installation of this appliance is best carried out by 2 people.
- Dispose of all packaging carefully and responsibly.
- The appliance is designed for indoor use only and must be protected from rain, moisture and extreme temperature variations.
- This appliance is designed for household use. Do not use the appliance for industrial and commercial use, or any other purpose.
- The appliance MUST be positioned on a firm level base.
- Do not place the appliance near a heat source or in direct sunlight.
- Only suitable household utensils should be placed in the dishwasher. Avoid utensils that are non-heat-resistant, metal decorated, etc.
- Do not use detergent not designed for dishwasher. This may damage the appliance.
- Do not spray water on the appliance. It may cause electrical parts failure or electric shock.
- Do not stand or sit on the door when it is open. It may cause deformation or failure of your dishwasher. The appliance could tip forward.
- Do not put any heavy objects on top of the appliance. It will damage the appliance.
- This appliance is fitted with a safety function that automatically stops the operation of the dishwasher when it is exposed to heavy disturbance on its mains.
- The appliance is to be connected to the water supply using new hose set and that old hose set should not be used.
- The door should not be left in open position since this could present a tripping hazard.
-
This appliance must be positioned so that the plug is accessible.
-
This appliance is not intended for use by persons (including children) with reduced physical, sensory or mental capabilities, or lack of experience and knowledge, unless they have been given supervision or instruction concerning use of the appliance by a person responsible for their safety. Children should be supervised to ensure that they do not play with the appliance.
- This appliance is not intended for use by young children or infirm persons unless they have been adequately supervised by a responsible person to ensure that they can use the appliance safely. Young children should be supervised to ensure that they do not play with the appliance.
- Do not touch the visual heating element during or immediately after use.
- Do not operate your dishwasher unless all enclosure panels are properly in place. Open the door carefully if the dishwasher is operating, there is a risk of water squirting out.
- WARNING: Knives and other utensils with sharp points must be loaded in basket with their points down or placed in a horizontal position. Avoid damage to the door seal.
- Load plastic items so that they do not come into contact with the visible heating element.
- Dishwasher detergents are strongly alkaline, they can be extremely dangerous if swallowed. Avoid contact with skin and eyes and keep children away from the dishwasher when the door is open.
- The door should not be left open, since this could increase the risk of tripping.
- Keep detergents away from children.
- Do not attempt to repair the appliance yourself. Contact the Customer Helpline: 0845 600 4632.
Please familiarize yourself with the parts and accessories listed below

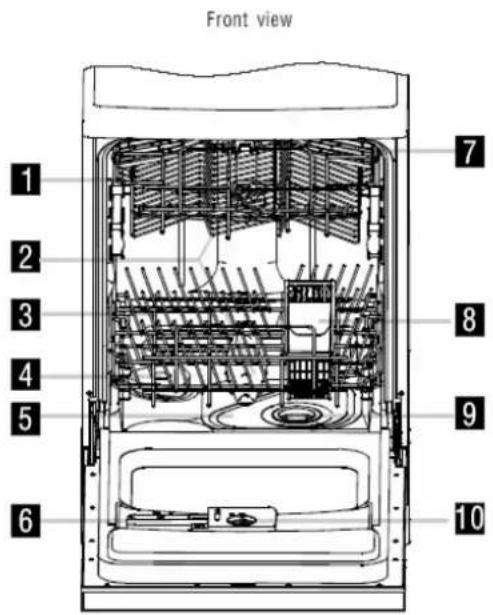
- Upper basket
- Spray arms
- Lower basket
- Salt container
- Main filter
- Detergent dispenser
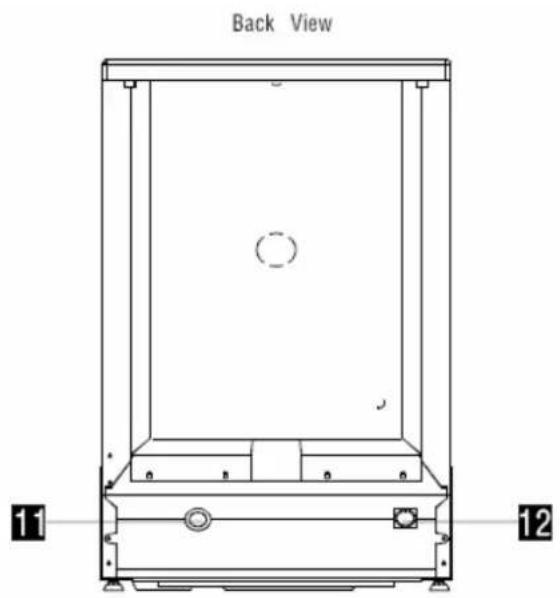
- Cup shelf
- Cutlery basket
- Coarse basket
- Rinse aid dispenser
- Drain pipe connector
- Inlet pipe connector
Accessories included

Instructions x 1
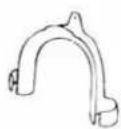
Hose x 1
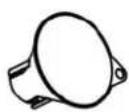
Salt Filler x 1

Measuring Spoon x 1

Measuring Cup x 1
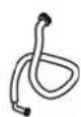
Inlet Hose x 1
Installation
Aesthetic panel installation
Cabinet dimensions

Note: Less than 5mm between the top of washer and cabinet and the outer door to cabinet.
50mm minimum space when door is opened.
The aesthetic panel should be processed in accordance with the illustrated dimensions (unit: mm)


Aesthetic panel installation
-
Install the hook on the aesthetic wooden panel and put the hook into the slot of the outer door of dishwasher.
-
After positioning of the panel, fix the panel onto the outer door by screws and bolts.
a. Take away the cover
b. Pin up the screw
c. Get back the cover
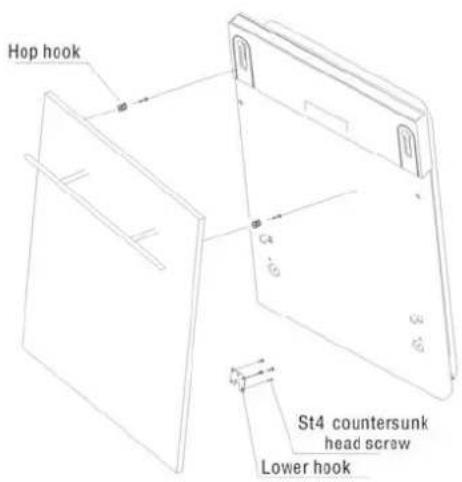

Aesthetic panel installation

- Install the furniture door to the outer door of the dishwasher using the brackets provided. Refer to the template for positioning of the brackets.
- Adjust the tension of the door springs by using an Allen key turning in a clockwise motion to tighten the left and right door springs. Failure to do this could cause damage to your dishwasher (Illustration 2).
- Connect the inlet hose to the cold water supply.
- Connect the drain hose. Refer section "Water supply connection" at page 7.
- Connect the power cord.
- Affix the condensation strip under the work surface of cabinet. Please ensure the condensation strip is flush with edge of work surface.
- Place the dishwasher into position.
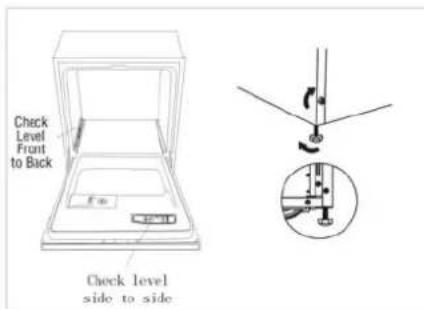
- Level the dishwasher. The rear feet can be adjusted from the front of the dishwasher by turning the screws on the left and right hand side of the cabinet (Illustration 5A). To adjust the front feet, use a wrench and turn the front feet until the dishwasher is level (Illustration 5B).
- The dishwasher must be secured in place. There are two ways to do this:
a. Normal work surface-secure to the work surface by using two woodscrews ensuring the dishwasher weight is not being hit by the surface (Illustration 6).
b. Marble or granite work top-secure the bracket to the side panel of the dishwasher and secure
the dishwasher to the furniture housing. Put the rubber cap over the screw (Illustration 7).
Note: When level the dishwasher, please pay attention not to let the dishwasher tip over.
Water supply connection

Caution: 2 people are required to unpack and handle the appliance, it is recommended that gloves are worn.
- Carefully remove all packaging materials including the foam base, dispose of correctly.
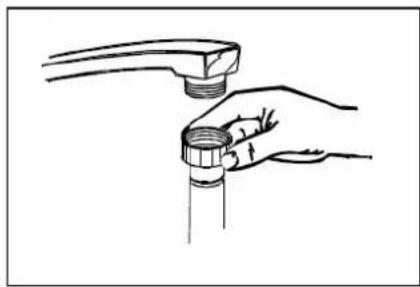
- Connect the cold water supply hose to a threaded 3/4 ” connector and make sure that it is fastened tightly in place.
- If the water pipes are new or have not been used for an extended period of time, let the water run to make sure that the water is clear. This will prevent the water inlet to be blocked and damage the appliance.
- It can also connect the machine to a hot water supply where it does not exceed 60°C.
Drain hose connection
- Make a hooked end at the end of drain hose with the plastic U-bend fitting (provided). The hooked end should be dropped into a drainage standpipe between 40cm and 100cm from the floor level.
- The free end of the hose must not be immersed in water to avoid the flow back.
- You may connect the water inlet hose onto the kitchen sink tap. You must obtain a correct adaptor to match the inlet hose connector for a secure connection. However, permanent plumbing is recommended.
- If leakage is observed, immediately shut off the water supply and check the hose connections fully. Tighten connections if necessary.
Position the appliance
- The dishwasher must be installed on a solid level surface.
- Position the appliance in the desired location. The back should rest against the wall behind it, and the sides along the adjacent cabinets or wall. The water supply and drain hoses can be positioned either to the left or right side to facilitate proper installation.
- To level the dishwasher, adjust the 4 level screws (feet) under the dishwasher.
natural_image
Line drawing of a hand holding a faucet with a pipe fitting (no text or symbols)
natural_image
Two types of U-shaped pipe fittings, one straight and one with coiled ends (no text or symbols)
Water pressure
For best operating results, incoming water pressure should be between 0.04 and 1 Mpa.
Your dishwasher cleans by spraying a mixture of hot clean water and detergent (under pressure) against the soiled surface of dishes. The water is pumped through a rotating spray arm, drained through a filter removing food and soiled particles and pumped back through the spray arm.
To prevent dishwasher damage, the temperature of the incoming water supply should not exceed 60^ C.
Note: Hard water conditions will adversely affect the performance of your dishwasher. To minimise this condition, it is recommended to periodically operate/rinse the dishwasher in empty condition using 1 cup of white vinegar (at least once a week).

Important: Once you open the water
supply (even if it is closed immediately thereafter), the water inlet hose will be pressurised.
Electrical connection

Any electrical work that is required to this appliance MUST be carried out by ified electrician.

Warning: THIS APPLIANCE MUST BE HED
Before making any electrical connections, ensure that:
- Electrical safety is only guaranteed when the earth system of your house is in accordance with the related local regulations.
- Do not bend, stretch or pull the supply cable to avoid electric shock.
- Ensure the power socket is suitable for the maximum power of the appliance (fuses in the power circuit must be 13 amp).
- The supply voltage should be the same as that indicated in the technical specifications and the appliance rating plate.
- The appliance should be earthed and in compliance with the applicable law.
- When installed, the power socket must be within easy reach.
- If the socket outlets in your home are not suitable for the plug supplied with this unit check with a qualified electrician for replacement.
- The use of adapters, multiple connectors or extension cables are not recommended.
- The appliance must be connected to a 220-240 volt 50Hz AC supply by means of a three pin socket, suitably earthed and protected by a 13 amp fuse.
- Should the fuse need to be replaced, a 13 amp fuse approved to BS1362 must be used.
- The plug contains a removable fuse cover that must be refitted when the fuse is replaced. If the fuse cover is lost or damaged, the plug must not be used until a replacement cover has been fitted or the plug is replaced.
- A damaged plug should be cut off as close to the plug body as possible, the fuse should be removed and the plug disposed of safely.
Plug replacement (UK & Ireland only)
Should you need to replace the plug; the wires in the power cable are coloured in the following way:
Blue – Neutral 'N'
Brown – Live 'L'
Green & Yellow – Earth 'E'
As the colours of the wires in the power cable may not correspond with the coloured markings identifying the terminals in your plug, and proceed as follows:
The green & yellow wire must be connected to the terminal in the plug that is marked with the letter E or by the earth symbol.
The blue wire must be connected to the terminal that is marked with the letter N.
The brown wire must be connected to the terminal that is marked with the letter L.
If power supply cord is damaged, it must replaced by the manufacturer or its service agent or a similar qualified person in order to avoid a hazard.

User Instructions
Before first use
Before using your appliance for the first time:
- Set the water softener
- Pour 1 / 2 litre of water inside the salt container and then fill with dishwasher salt
• Fill the rinse aid dispenser - Fill in detergent
Water Softener
The dishwasher is designed with a softener to eliminate the minerals and lime from the water supply. The hardness of the water supply varies from place to place and will affect the dishwasher performance. The amount of salt consumed can be adjusted based on the hardness of the water used. This is intended to optimise and customize the level of salt consumption.
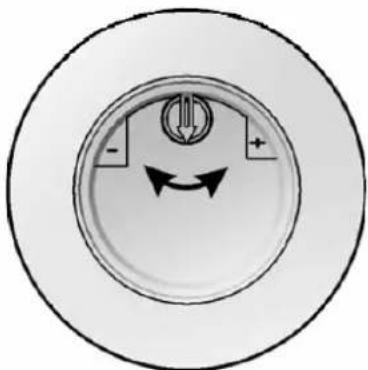
Adjusting salt consumption
- Unscrew and remove the cap from the salt container.
- There is a ring on the container with an arrow. Rotate the ring in anticlockwise direction from “-” sign towards “+” sign, based on the table at right.
Loading the salt into softener
-
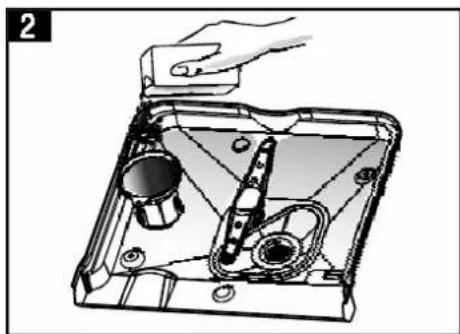
Remove the lower basket and then unscrew and remove the cap from the salt container. (Fig 1)
-
Fill 1L of water into the salt container.
-
Place the funnel end (supplied) into the hole and add around 1kg of salt. It is normal if a small amount of water coming out from salt container. (Fig 2)
-
Screw the cap tightly back clockwise.
-
Immediately after filling the salt, a washing cycle should be started (soak or rapid program suggested). Otherwise the filter system or pump may be damaged by salty water.

Important:
- Only use dishwasher salt
- Add the salt again when the salt warning light at control panel is on.
- It takes time to dissolve the salt so the salt warning light may still come on even the salt container is filled.
natural_image
Circular diagram with a central symbol and directional arrows, no readable text or labels| Water hardness (° Clarke) | Selector position | Salt consumption (gram/cycle) | Autonomy (cycle/ 1kg) |
| 0 ~ 10 / 0 | / | ||
| 10 ~ 28 - | 20 50 | ||
| 28 ~ 56 Mid | 40 25 | ||
| 56 ~ 75 + | 60 16 |

natural_image
Illustration of a hand holding a device with a cylindrical component inside a rectangular frame (no text or symbols visible)Before first use
Rinsing Aid
A rinsing aid is specially formulated to rinse away food and detergent residues that can be left behind on your dishes. Use regularly, a rinse aid will automatically provide you with cleaner dishes every time you wash.
Loading the rinsing aid
- Turn the dispenser cap to 'open' arrow and lift it out.
- Fill the rinsing aid slowly into the container until it just reaches the bottom of the filling cap
- Replace the cap by turning to 'close' arrow.
There is a rinse-aid indicator on the dispenser
Full
3/4 Full
1/2 Full
- 1/4 Full – Require refill
○ Empty – Require refill
Adjusting rinsing aid dispenser
The rinse aid dispenser has six scales. Always start with the dispenser set on "4". If spots and poor drying is a problem, increase the amount of rinse aid dispensed by removing the dispenser lid and rotating the dial to "5". You could adjust the dial to the next higher lever until your dishes are spot-free.

Note:
Increase the dose if there are drops of water or lime spots on the dishes after wash. Reduce the dose if there are sticky whitish stains on your dishes or a bluish film on glassware or knife blades.

natural_image
Close-up of a hand holding a small electronic device with ports and indicator lights (no visible text or symbols)
natural_image
Close-up of a kitchen sink with a hand near the door (no visible text or symbols)
natural_image
Close-up of a hand holding a plastic bag attached to a white electronic device panel (no visible text or symbols)

Before first use
Detergent
Use only detergent specifically made for use in dishwashers, as other types may damage the dishwasher.
The dispenser must be filled before the start of each wash cycle following the instructions provided in the wash cycle table. Your dishwasher uses less detergent and rinse aid than conventional dishwasher. Generally, only one tablespoon of detergent is sufficient for a normal wash load. Heavily soiled items need more detergent. Always add the detergent just before the start of the dishwasher, otherwise it could get damp and will not dissolve properly.
Loading the detergent
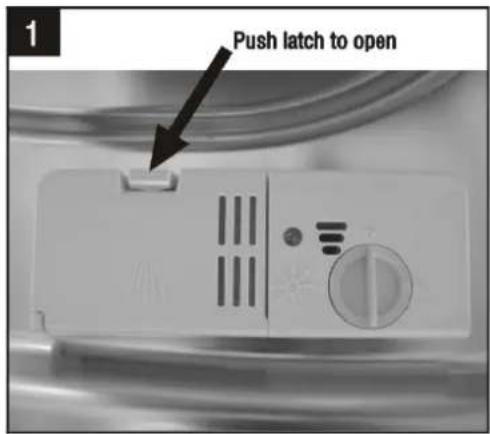
- The detergent dispenser (recessed area) located at the inside of the door.
- Open the lid by pressing the release button.
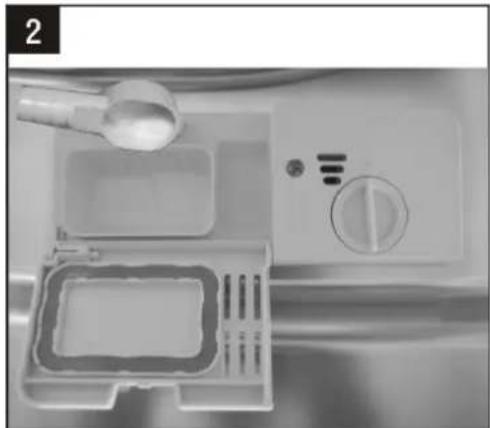
- Pour the detergent. The marking indicates the dosing levels:
A – Detergent for main wash cycle. 'MIN' means approximately 20g of detergent.
B – Detergent for pre-wash cycle, approximately 5g of detergent. - Close the lid until it locks in place.
Note: follow the detergent manufacturer's guidelines. Dishwasher detergent is corrosive! Keep it out of reach of children.
natural_image
Interior view of a kitchen appliance with a washer and control panel (no visible text or symbols)
Loading your dishwasher
Preparing your dishes prior washing
- Scrape off all food residuals from the dishes.
- Remove excessive quantities of oil or grease.
• Empty any liquids from glasses and cups. - Dishes with dried-on foods are more difficult to wash and may not come clean in a normal wash cycle.
- Arrange all items with recessed or curved sections on a slant to drain water away.
- Cups, pots and glasses etc should be placed upside down.
Loading the upper basket
The upper basket is designed to hold more delicate and lighter dishware such as glasses, coffee and tea cup and saucers, plates, small bowls and shallow pans (as long as they are not too dirty). Position the dishes and cookware so that they do not get moved by the spray of water.
Adjusting the upper basket
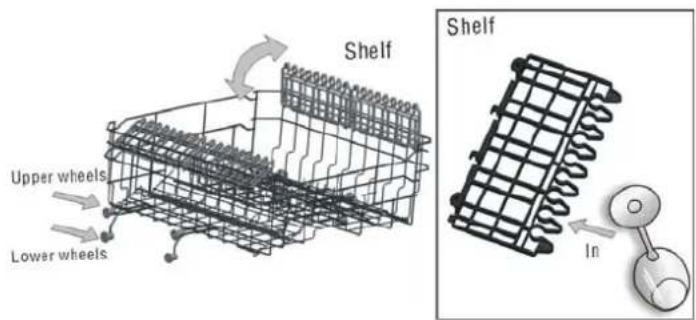
The height of the upper basket can be adjusted in order to create more space for large utensils both for the upper/lower basket. The height of the upper basket can be adjusted by placing the wheels on different height of the rails. Long items, serving cutlery, salad servers and knives should be placed on the shelf so that they do not obstruct the rotation of the spray arms. The shelf can be folded back or removed when not in use

1 Cups
2 Small serving bowl
3 Large serving bowl
4 Glasses
5 Saucers
6 Dish

natural_image
Mechanical assembly diagram showing two views of a mechanical component with no visible text or symbolsLoading your dishwasher
Loading the lower basket
- Put large items which are most difficult to clean into the lower basket.
- Locate sharp items so that they are not likely to damage the door seal.
- Load sharp knives with the handles up to reduce the risk of injuries.
- Do not load plastic items unless they are marked "dishwasher safe" or the equivalent.
- Do not load glasses over the dish rack pins. Glasses loaded over dish rack pins are not properly supported and are likely to get damaged.
- Items with wooden or bone handles and items joined together with glue are unsuitable as they cannot resist hot water.
Folding spikes
For better stacking of pots and pans, the spikes can be folded down as shown in right.
Cutlery basket
Cutlery should be placed in the cutlery basket with the handles at the bottom. If the rack has side baskets, the spoons should be loaded separately into the appropriate slots, especially long utensils should be placed in horizontal position at the front of the upper basket as shown.

1 Oval platter
2 Dinner plates
3 Soup plates
4 Dessert dishes
5 Silverware basket

natural_image
Close-up of a white wire cage with diagonal hatching and a hand adjusting the panel (no text or symbols visible)
natural_image
Close-up of a metallic object with a textured surface and a curved handle, possibly a tool or component (no visible text or symbols)
1 Forks
2 Soup spoons
3 Dessert spoons
4 Teaspoons
5 Knife
6 Serving spoon
7 Gravy ladle
8 Serving fork

▲WARNING!
Do not let any item extend through bottom.
User Instructions
Loading your dishwasher
NOTE: For ease of loading/unloading large size dinner plates from the dish rack it may be necessary to remove the cutlery basket. When loading/unloading is complete, return the cutlery basket to its original position.
Warning
- Do not touch the heating element during or immediately after use.
- Do not tamper with controls.
- Do not abuse, sit or stand on the open door or dish-rack of the dishwasher. The machine may topple over.
- Protect cables and hoses from high temperatures.
- To reduce the risk of injury, do not allow children to operate or play with the dishwasher.
User Instructions
Wash cycle table
| Program | Cycle selection information | Description of cycle | Detergent pre/main | Run time (min) | Energy (Kwh) | Water (L) | Rinse Aid |
 | For the heaviest soiled loads, such as pots,pans,casserole dishes and dishes that have been sitting with dried food on them for a while. | Pre-wash Pre-wash(50°C) Wash (60 °C) Rinse Rinse (70 °C) Drying | 4/20g | 135 | 1.19 | 13 | ★ |
| Strong | |||||||
 | For normally soiled loads, such as pots, plates,glasses and lightly soiled pans. standard daily cycle. | Pre-wash Pre-wash Wash (50 °C) Rinse Rinse (70 °C) Drying | 4/20g | 146 | 0.92 | 13 | ★ |
| Normal | |||||||
 | For lightly soiled loads,such as plates,glasses,bowls and lightly soiled pans. | Pre-wash Wash (45 °C) Rinse Rinse (60 °C) Drying | 20g | 121 | 0.74 | 11 | ★ |
| Economy (IEC-EN 50242) | |||||||
 | For dishes that need to be rinsed and dried only. | Wash(45 °C) Rinse Rinse (60 °C) Drying | 113 | 0.71 | 8.5 ★ | ||
| Rinse | |||||||
 | A shorter wash for lightly soiled loads that do not need drying. | Wash (40 °C) Rinse Rinse (55 °C) | 15g | 22 | 0.37 | 6 | |
| Rapid |
Using your appliance
To operate the dishwasher:
- Make sure the water inlet and drain hoses are correctly and securely connected.
- Push the door release button to open the door.
- Fill the detergent, water softener and rinsing aid to the dishwasher.
- Draw out the lower and upper basket. Load the dishes on the dish rack and cutlery inside the cutlery basket. Make sure that the rotating spray arm can turn freely all the way round. If necessary remove any obstacles.
- Open the water supply.
- Select the desired washing program by pressing the Program button. Close the door firmly. The dishwasher will start to work in 3 seconds.
- The dishwasher is designed to stop if the door is opened accidentally during operation.
- The dishwasher stops automatically at the end of the program. You will hear 8 sec. buzzer sound. The power pilot light will remain illuminated until the power is switched off.
- After washing, dishes should be allowed to cool down for about 15 minutes as they are hot to handle. Dishes will cool quicker if the door is opened slightly.
- Empty the lower basket first and then the upper one. This will avoid water dripping from the upper basket onto the dishes in the lower one.
- After unloading the dishes, remove and clean the filter and return to its position.
Note: This is normal when you noted small amount of water being pumped-out from the drain hose prior to the start of a wash cycle. This is because the pump retains a small amount of water from the previous cycle.
Program Selection Change
You can modify the washing program when the dishwasher just runs for a short time. Otherwise, the detergent may have already been released, and the appliance may have already drained the wash water. If this is the case, the detergent dispenser must be refilled.
Press the button of the desired program more than 3 seconds until it's indicator is on, the machine will operate in new program after 10 seconds.
Note: If you open the door during the washing cycle, the machine will pause. When you close the door, the machine will resume operation after 10 seconds.
The program lights show the state of the dishwasher:
All program lights off – Stand by
One of the program lights on – Pause
One of the program lights blinking – Run
Delay function
After selecting the wash cycle program, you can set the desired delay start time by pressing the delay button. You can select 1-24h from the program. The dishwasher will start operation after the selected delay time is elapsed.
Care and Maintenance
General

Important: Always unplug the appliance from the power socket during cleaning andenance.
- Never use any sharp instruments or abrasive substances, soap, household cleaner, detergent or wax polish for cleaning.
- Clean the external surfaces with a damp soft cloth only. Never use abrasive products or solvents as it may damage the dishwasher.
- One of the factors that cause odour is the food that remains trapped in the seals. Periodic clean the seal with a damp sponge will prevent this from occurring.
The filter system consists of a main filter, coarse filter and fine filter.
- Main filter (1) - Food and soil particles trapped in this filter are pulverized by a special jet on the lower spray arm and washed down the drain.
- Coarse filter (2) - Larger items such as pieces of bones that could clog the drain are trapped in the coarse filter. To remove an item caught in this filter, gently squeeze the taps on the top of this filter and lift it out.
- Fine filter (3) - This filter holds soil and food residues in the sump area and prevents it from being re-deposit on the dishes during a cycle.

Cleaning the filter
- Remove the filter from the bottom.
- Clean the filter thoroughly under the running water tap.
- Return the filter to its position

Warning: Under no circumstances may the dishwasher be used without filters.
Cleaning the spray arms
It is necessary to clean the spray arms regularly as hard water chemicals will clog the spray arm jets and bearings.
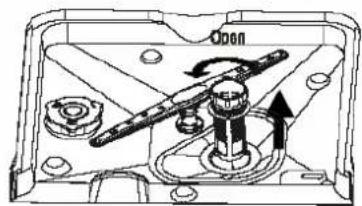
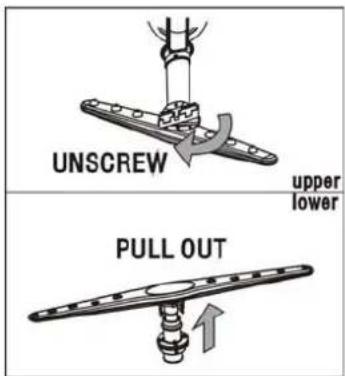
- Remove the upper spray arm by screw off the nut clockwise and then remove the arm.
- Remove the lower spray arm by pulling out the spray arm upward.
- Wash the arms in soapy and warm water and use a soft brush to clean the jets.
- Replace them after rinsing them thoroughly.
Not use for long period
If you are not using the dishwasher for a long period of time it is recommended to remove the plug, turn off the water supply and leave the door ajar to prevent odors from forming within the dishwasher.
Moving the dishwasher
If you need to move the dishwasher, try to keep it in vertical position. Avoid over tilting during the transportation.
Trouble Shooting
In the unlikely event of difficulties with your appliance please follow the trouble shooting guide below. If the problem persists, contact the retailer if the machine is still under guarantee. If the machine is out of guarantee, contact an approved service agent on 0845 600 4632.
| Problem Possible cause Solution | ||
| Dishwasher does not start | ·The mains plug is not plugged in.·Door is not closed.·Water supply is not turned on. | ·Insert the mains plug.·Close the door.·Turn on the water supply. |
| Dishwasher does not load water | ·Low water supply pressure.·The water supply hose is crimped or bent.·Filter is clogged. | ·Check the water pressure.·Ensure the hose is not crimped or bent.·Clean the filter. |
| Dishes not clean ·Improper or over loading.·Spray arm not rotating freely.·Not enough detergent and/or improper detergent is used.·Improperly prepared dishes. | ·Arrange dishes so spray action reaches all surfaces. Do not overload the dishwasher.·Make sure nothing (i.e. cutlery) is obstructing spray arm rotation.·Use proper dishwasher detergent.·Remove excessive food and liquids from dishes before loading. | |
| Dishwasher does not drain | ·The drain hose is crimped or bent. | ·Ensure the hose is not crimped or bent. |
| Noise ·Spray arm is knocking against an item in basket.·Items of crockery are loose in the wash cabinet. | ·Interrupt the program and re-arrange the items which are obstructing the spray arm.·Interrupt the program and re-arrange the items of crockery. | |
| Unsatisfactory drying result | ·Improper loading.·Too little rinse aid.·Dishes are removed too soon.·Wrong program has been selected. | ·Load as suggested in instructions.·Increase the rinse aid amount or refill the rinse aid dispenser.·Do not empty the dishwasher immediately after wash.·Washing temperature is lower in short program. Choose a program with a long washing time. |
| Error codes | Description | Possible causes | |
| E1 | Longer inlet time. | Faucets is not opened, or water intake is restricted,or water pressure is too low. | |
| E3 | Longer heating time,but not reaching required temperature | Malfunction of temperature sensor or of heating element. | |
| E4 | Overfilled. Too much inlet water. . | ||
| E6 | Failure of temperature sensor Open | circuit or break of temperature sensor | |
| E7 | Failure of temperature sensor Short | circuit or break of temperature sensor | |

Warning:
- If overflow occurs, turn off the water supply before contacting the customer helpline.
- If there is water in the base pan because of overfill or small leak, the water should be removed before restarting the dishwasher.
Technical Specifications
| Model WQP8-9347 | |
| Power input | 1760-2100W |
| Max. water consumption (Economy wash) 11L | |
| Water pressure | 0.04 ~ 1Mpa |
| Dimension | W445 x D540 x H820 mm |
| Hot water connection | Max 60°C |
| Capacity | 8 setting |
We apologise for any inconvenience caused by any minor inconsistencies in these instructions, which may occur as a result of product improvements and development.

This appliance complies with the following EEC directives: 2006/95/EEC Low voltage directive 2004/108/EEC EMC directive
Disposal information
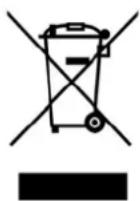
The symbol on the product or its packaging indicates that this product may not be treated as household waste. Instead it should be handed over to the applicable collection point for the recycling of electrical and electronic equipment. By ensuring this product is disposed of correctly, you will help prevent potential negative consequences for the environment and human health, which could otherwise be caused by inappropriate waste handling of this product. For more detailed information about recycling this product, please contact your local council office, your household waste disposal service or the shop where the product was purchased.

PRODUCT GUARANTEE
This product is guaranteed against manufacturing defects for a period of

Year
This product is guaranteed for twelve months from the date of original purchase.
Any defect that arises due to faulty materials or workmanship will either be replaced, refunded or repaired free of charge where possible during this period by the dealer from whom you purchased the unit.
The guarantee is subject to the following provisions:
- The guarantee does not cover accidental damage, misuse, cabinet parts, knobs or consumable items.
- The product must be correctly installed and operated in accordance with the instructions contained in this manual.
- It must be used solely for domestic purpose.
- The guarantee will be rendered invalided if the product is re-sold or has been damaged by inexpert repair.
- Specifications are subject to change without notice.
- The manufacturer disclaims any liability for the incidental or consequential damages.
- The guarantee is in addition to, and does not diminish your statutory or legal rights.
- In the event of a problem with the product within the guarantee period call the Customer Helpline on 0845 600 4632.
Guarantor: Home Retail Group
489 - 499 Avebury Boulevard
Central Milton Keynes
MK9 2NW
- Important – Please read these instructions fully before installing or using
- Safety Information 2
- Parts 3
- Installation 4-9
- User Instructions 10-17
- Care and Maintenance 18
- Trouble Shooting 19
- Technical Specifications 20
- Product codes
- Before use During use
- Please familiarize yourself with the parts and accessories listed below
- Accessories included
- Installation
- Aesthetic panel installation
- Water supply connection
- Drain hose connection
- Position the appliance
- Water pressure
- For best operating results, incoming water pressure should be between 0.04 and 1 Mpa.
- Electrical connection
- Before making any electrical connections, ensure that:
- Plug replacement (UK & Ireland only)
- User Instructions
- Before first use
- Water Softener
- Adjusting salt consumption
- Loading the salt into softener
- Important:
- Rinsing Aid
- Loading the rinsing aid
- Adjusting rinsing aid dispenser
- Note:
- Detergent
- Loading the detergent
- Loading your dishwasher
- Preparing your dishes prior washing
- Loading the upper basket
- Adjusting the upper basket
- Loading the lower basket
- Folding spikes
- Cutlery basket
- ▲WARNING!
- Warning
- Using your appliance
- To operate the dishwasher:
- Program Selection Change
- Delay function
- Care and Maintenance
- General
- Important: Always unplug the appliance from the power socket during cleaning andenance.
- Cleaning the filter
- Cleaning the spray arms
- Not use for long period
- Moving the dishwasher
- Trouble Shooting
- Warning:
- Technical Specifications
- Disposal information
- PRODUCT GUARANTEE
Brand : BUSH
Model : WQP8-9347
Category : Dishwasher