
MXL006 - Satellite receiver Maxview - Free user manual and instructions
Find the device manual for free MXL006 Maxview in PDF.


| Product Type | Satellite Receiver |
| Brand | Maxview |
| Model | MXL006 |
| Dimensions (W x D x H) | 225 x 150 x 45 mm |
| Weight | 0.4 kg |
| Power Supply | DC 12V, 1A (adapter included) |
| Power Consumption | Max 8 W |
| Supported Satellite Standards | DVB-S, DVB-S2 |
| Input Frequency Range | 950 - 2150 MHz |
| Video Output Resolution | Up to 1080i |
| Output Ports | HDMI, Composite AV (RCA), Coaxial S/PDIF |
| Input Ports | F-type satellite input |
| USB Port | 1 x USB 2.0 for media playback & recording |
| Supported Audio Decoding | MPEG-1/2/4, Dolby Digital |
| Channel Memory | Up to 4,000 channels |
| DiSEqC Support | DiSEqC 1.0, 1.2, USALS |
| Remote Control | Infrared remote (included) |
| Operating Temperature | 0°C to 40°C |
| Maintenance | Wipe with dry cloth; avoid liquids |
| Safety Warnings | Do not expose to rain or moisture; ensure adequate ventilation |
| Spare Parts Availability | Remote control and power adapter available via Maxview support |
| Reparability | No user-serviceable parts; contact authorized service center |
Frequently Asked Questions - MXL006 Maxview
User questions about MXL006 Maxview
0 question about this device. Answer the ones you know or ask your own.
Ask a new question about this device
Download the instructions for your Satellite receiver in PDF format for free! Find your manual MXL006 - Maxview and take your electronic device back in hand. On this page are published all the documents necessary for the use of your device. MXL006 by Maxview.
USER MANUAL MXL006 Maxview
OPTIONAL ACCESSORIES ALSO AVAILABLE FROM
MAXVIEW
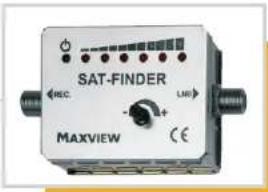
B2031
OMNISAT SAT-FINDER
■ Essential for locating your digital satellite signal
■ Designed to help align satellite dish to the satellite with varying audible tone and ascending visual LED display
■ Signal sensitivity control for ease of satellite dish adjustment and alignment
■ Suitable for use with all satellite systems
■ Comes complete with flylead and full instructions
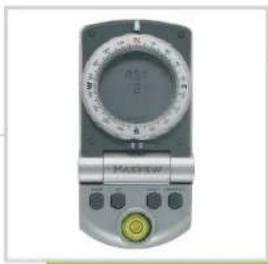
natural_image
Front view of a handheld analog meter with dual dials and control buttons (no visible text or symbols)B2030
OMNISAT DIGITAL COMPASS
■ Satellite alignment zone to help locate the direction of the satellite signal for all the main European satellites
■ Back lit digital LCD display for low light viewing
■ Distortion feature to identify magnetic fields causing possible error to compass accuracy
■ For use as navigation compass
with digital LCD readout in 1 degree increments
■ Direction hold mode and path finder mode
■ Can be calibrated to maintain accuracy when placed near ferrous objects
Bubble level
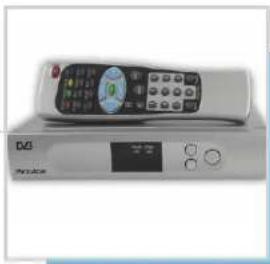
natural_image
Front view of a white remote control device with a digital display and control buttons (no visible text or symbols)MXL014
FREE TO AIR SATELLITE RECEIVER
■ Digital Video Broadcasting (DVB) receiver, for receiving Digital Satellite broadcasts.
■ Ideal for non-conditional access, free to air TV and radio programmes.
■ RECEIVES OVER 200 TV & RADIO CHANNELS (BBC, ITV)
■ Compact size, measures only 210mm x 135mm x 40mm.
■ Super fast video text
■ Channel list editor
■ Includes remote controls with batteries
12V power supply, cigarette adaptor and instructions
For more information on our vast range of leisure products, please request a copy of our leisure catalogue.
MAXVIEW
Maxview Limited (UK) Common Lane Setchey King's Lynn Norfolk PE33 0AT England Customer Helpline +44 (0)1553 811000 e-mail cust_serv@maxview.co.uk website www.maxview.co.uk Maxview reserve the right to change specifications without prior notice.
MAXVIEW


OMNISAT
CAMPING KIT
MXL006

2 YEARS
GUARANTEE



FOR USE IN UK & CENTRAL EUROPE
USER GUIDE
VISIT: www.maxview.co.uk to see our set up guide video!
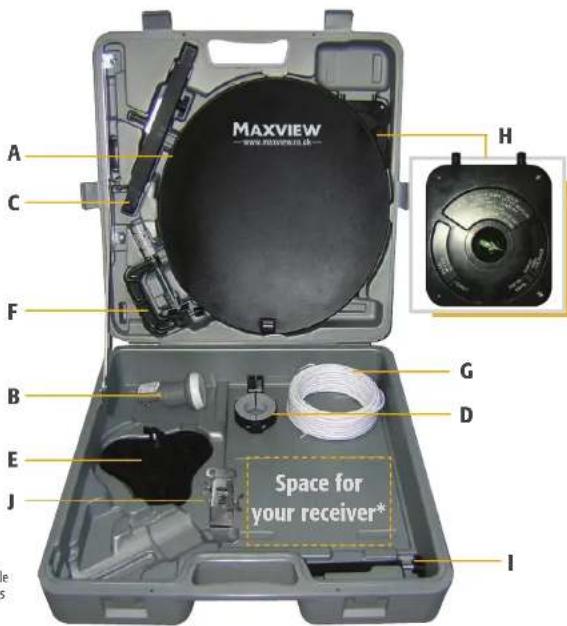
* Free to Air satellite receiver available from Maxview MXL014
FIRST TIME SET UP GUIDE
When using the MXL006 Camping Kit for the first time we recommend following this guide.
1
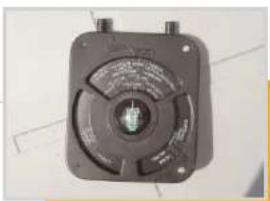
natural_image
Close-up of a black square electronic device with a central knob and two side ports (no visible text or symbols)Choose a level surface with an unobstructed view to the south.
Use the Satellite Compass to determine the direction of south.
The Green arrow in the compass ball always points to south.
2
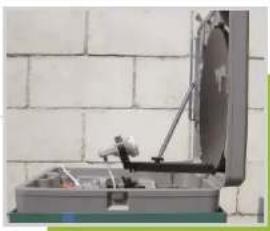
natural_image
Exterior view of a mechanical device mounted on a concrete block wall (no visible text or symbols)With the Camping Kit Case placed on a level
surface and pointing south, fix the Lid (containing the Dish) in a Vertical position by tightening the wingnut.
3
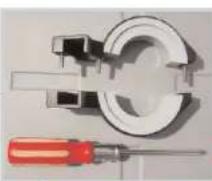
natural_image
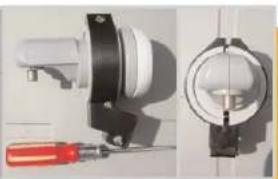
Close-up of a mechanical device with a screwdriver and a circular component, no visible text or symbolsLoosen screws in the LNB Holder with the screwdriver provided.
Insert the LNB into the LNB Holder, note the angle and position of the LNB.
Tighten screws in the LNB Holder.
4
natural_image
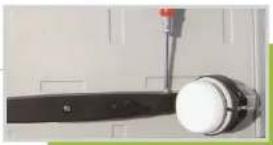
Close-up of a white and black mechanical component with a red pin, mounted on a wall (no visible text or symbols)Place the LNB Holder into the LNB Arm at the end marked "LNB".
Tighten screws to fix the LNB Holder to the LNB Arm.
VISIT: www.maxview.co.uk/acatalog/OMNISAT_PORTABLE_DISH_KITS.html to see our set up guide video!
ABC1
BBC1 + variants
BBC2 + variants
BBC3
BBC4
BBC Choice
BBC I
BBC 18, 9, 10 BBC News 24
BBC News 24 BBC One + variants
BBC One + varia BBC Parliament
BBC
CDDC CREERIES
Channel TV
Disney Channel
Disney Channel + 1
DW TV
E4
E4 UK +1
日
Fancy A Flutter
Film Four
Film Four Weekly
Film Four +1
FX UK +2
Going Places TV
Grampian TV
11V 2
TV 3
TV News Channel
HIV1 + Vana lativ UK + 1
Jellx UK +1 Van 8 Motors
Men & Motors Mora & Bromo
More 4 hours Playhouse Dist
RTE Network 2
RTE One
Scottish IV
Sky Active + variants
Sky Box Office 36, 37, 38, 39, 41, 42, 43, 55
Sky Sports in Pubs
Sky Sports Extra
Sky Travel Active
Sky Travel Channel
Sky Travel Extra
Sky Travel Shop
Sky Travel +1
Solitaire
Teletext on 4
TG4
The Amp
The Betting Zone
Toon Disney
TV3
N.B These TV channel lists were correct at time of print (5/06). Please visit www.ses-astra.com if you require more up to date channel lists
DISH ALIGNMENT IN SOUTHERN EUROPE
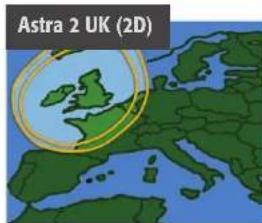
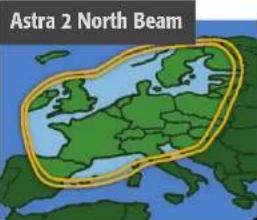
Programmes on the ASTRA 2 cluster of satellites are beamed down to create three footprints, NORTH, SOUTH and UK. All FREE TO AIR and SKY programmes are received in these footprints.
Whilst travelling in the UK, you should be within all three of the footprints and with the right equipment, you should not have any problems with receiving all of the ASTRA transponders.
Outside of the UK, problems of reception and aligning the dish can start to occur. The default frequency of the SKY 'Digibox' is set to a transponder on the north beam. As you travel south and move out of the north footprint, you may need to change the default transponder of the 'Digibox' to match the south beam.
To change the default transponder setting, you will first need to access the hidden 'INSTALLER SETUP' menu. First press the 'SERVICES' button on you SKY remote and the '4' to access 'SYSTEM SETUP'. Although it is not displayed, you will need to press '0' then '1' then 'SELECT' to access the 'INSTALLER SETUP' menu, then '2' to enter 'DEFAULT TRANSPONDER'.
The display will then show, from top to bottom:-
Frequency (GHz), Polarisation, Symbol Rate (Nbaud), FEC and Save new settings.
Select ' FREQUENCY (GHz) and by typing in the relevant numbers, change the settings from '11.778' to 11.720'. Using the arrow keys, change the Polarisation setting from 'V' to 'H'. When the changes have been made you will then need to 'SAVE NEW SETTINGS'.
Press 'BACK UP' to return to main screen.
ASTRA SATELLITE FOOTPRINTS & SATELLITE TV CHANNELS
A1 UK Adventure 1 Animal Planet +1 Artsworld At the Races BB Game Bloomberg TV UK Boomerang Euro
Box Office Preview British Eurosport Channel 4 variants Chelsea TV CNBC Discovery Home & Health +1 EeZeeTV Eurosport 2
Five
Fox News Channel Game Network Gems TV Gold Hallmark Entertainment Network Kerrang Kiss TV Life TV Magic Manchester United TV MiTV National Geographic Channel National Geographic Channel +1 Open Paramount 2 Premiership Plus Private Blue Q Reality TV UK Record International TV Sci-Fi Channel Sky Box Office + variants
Sky Movies + variants Sky One Sky One Mix Sky Sports + warrants Sky Vegas Live Smash! Hits Spice PPV Sports Extra Highlight Sports Extra Statistics/Fanzone The Box The Community Channel The Hits The Pub Channel TV Megastore TV Travel Shop TV Warehouse TV5 Europe UKTV Documentary +1 UKTV Food +1 UKTV G2+1 UKTV Gold+1 UKTV History +1
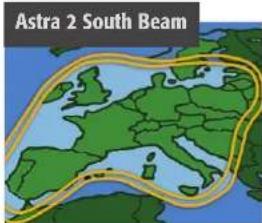
A1 UK Animal Planet ARY Digital B4U Movies B4U Music Bangla TV BBC Interactive 1 to 7 BBC News Interactive BBC Sport BBCi 2 - 7 Bid up TV Biography Channel Bomerang Europe Bravo Bravo UK +1 Cartoon Network + variants
Challenge TV Challenge TV+1 CNN International Cow & Chicken Create and Craft with Ideal World Discovery Channels: Discovery Civilizations Discovery Home & Health +1 Discovery Home & Leisure Discovery Kids Discovery Science Discovery Travel & Living Europe Discovery Wings Discovery +1 FX Games Lounge
Goplay TV Quiz Call Travel
History +1 hr QVC Trouble
iBuy S4C UK Bright Ideas
Ideal World S4C2 UK Drama
Ideal World Vitality Samurai Jack UK Food
Jetix UK Set Max UK Gold
Living Sky Bet UK Gold 2
Living TV 2 Sky Box Office 56, 57, 58 UK History
Live TV Sky Box Office Events UK Horizons
Manchester United TV Sky Movies 7, 9 UK Horizons + 1
Men & Motors Sky Movies Cinema 1, 2 UK Living + 1
Movie Quiz Sky News UK Style
MTV Sky News Dual Mosaic 1, 2, 3 UK Style Gardens
MTV 2 Sky News Octant UKTV Drama + 1
MTV Base Sky One VH-1
MTV Dance Sky Sports 1, 2, 3 VH-1 Classic
MTV Hits Sky Venue VH-2
MTV Interactive Sony Entertainment TV Asia Zee + variants
MTV Ireland Speed Auction TV 18+ Movies + variants
MTV UK Star News
MuTV Star Plus
Nick Jr TCM
Nickelodeon +variants Teachers TV
Nicktoons Teletext Holidays
Pepsi Twang The Paramount Comedy Channel
Powerpuff Girls Thomson TV
Premiership Plus TMF
Premiership Plus in Pubs Tom & Jerry
Price-drop TV Tootami
5
natural_image
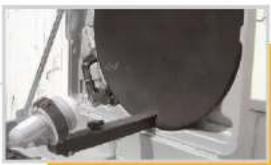
Close-up of a mechanical device with a large circular component mounted on a base, no visible text or symbols.With the Dish fixed inside the grey case insert the LNB Arm into the Dish.
6
natural_image
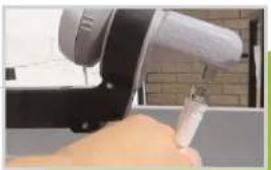
Close-up of a hand using a handheld tool to apply material, with no visible text or symbols.Attach one end of the Coaxial Cable to the LNB and the other end to the input of your Maxview MXL014 FTA Satellite Receiver.
7
Satellite ASTRACEAST LNI Freq: 0750 18600 Video PID 5400 Trans Freq: 10773 Audio PID 5401 Symbol Rate: 22000 PCR PID 5400 Polarity H Text PID 5402 DiBEGC 2/4 Sub PID MIP1 Version 10.9.30 Signal Intensity 33 Signal Quality 10
Follow the MXL014 Quick Start Guide to select an ASTRA 2 satellite channel and enable the built-in Sat Finder.
8
natural_image
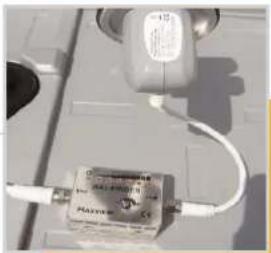
Close-up of a white electronic device with a coiled cable and label, mounted on a surface (no readable text or symbols)If using another receiver we strongly recommend the use of the Maxview Sat Finder.
Attach the Flylead provided with Sat Finder between the LNB and Sat Finder.
Attach the Coaxial Cable between the receiver and Sat Finder.
With the receiver and TV turned on adjust the Sat Finder so that a low frequency sound is audible.
9
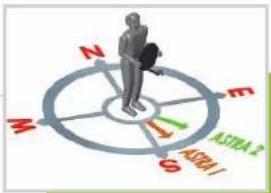
Very slowly rotate the complete camping kit from South to South-East.
The tone of the Sat Finder will rise in pitch and a picture will be shown on the TV.
If the tone rises in frequency but you cannot receive a signal then you have probably found the ASTRA 1 satellite. Continue turning the dish East.
The tone will lower in frequency then rise again when you have found ASTRA 2.
If no picture is found adjust the elevation angle of the Lid and repeat search from South to South-East.
GENERAL SET UP GUIDE
MOUNTING OPTIONS
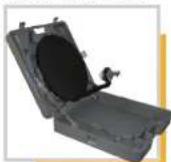
Case
The system can be used in its case, placed directly on the ground or on a table.
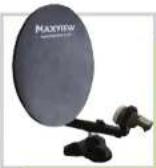
Suction stand
The antenna can also be simply placed on a flat smooth surface such as painted vehicle body panels.
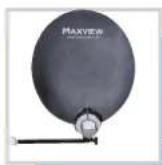
Wall mount
The wall mount can be fixed to any types of strong wall.
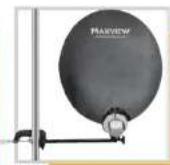
G-clamp
Can be used to mount to masts, caravan jockey wheels, larry wing mirrors etc.
1
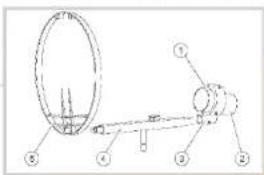
Installation of LNB and LNB arm
Loosen the screws on the LNB bracket (3).
Insert LNB (2) in the LNB bracket (1) as shown
Tighten the screws of the LNB bracket slightly.
Insert the LNB bracket into the supporting arm (4).
■ Tighten the screws of the LNB bracket.
Insert the supporting arm into the antenna (5)
2
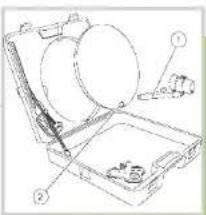
Installation in a case
Open the lid of the case and tighten the wing nut to secure it
Ensure antenna is secured to the case
Insert the support arm (1) with LNB into the opening of the antenna (2)
NB - Adding some weight in the box will help balance
the dish and stop any wind tipping it over
3
natural_image
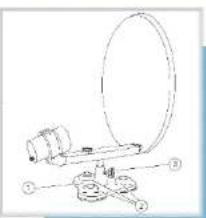
Technical line drawing of a mechanical device with a circular component and labeled parts (no text or symbols present)Installation of suction stand on horizontal surface
Place the suction foot (1) onto a smooth, clean and even surface, e. g. your car roof.
■ Moisten suction feet to improve suction force
Tighten the three screw plugs (2) in a clockwise direction. This generates
a vacuum at the rubber seats, which fixes the suction foot onto the surface.
Insert the supporting arm with attached dish and LNB
(see LNB installation section 1) into the mounting hole of the suction foot.
■ Tighten the wing nut on the suction foot (3).
IMPORTANT - Maxview do not recommend verticle
installation with the use of the suction stand
WARNING - If you have mounted the antenna on a vehicle roof, you must dismantle it before travelling.
4
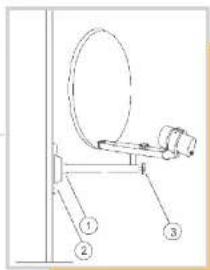
Installation on a wall with the wall mount
Place the wall bracket (1) at a position, where it should be installed
Mark the position of four fixing holes, drill the four holes and insert wall plugs
■ Position the wall bracket and tighten it with four screws
Insert the extension rod in the wall bracket
Insert both coach bolts through the wall bracket
Fasten nuts on the coach bolts and tighten until the extension rod is fixed into the wall bracket
Insert antenna assembly into extension rod and tighten wingnut (3)
IMPORTANT - Not for permanent fixing
WARNING - Always follow manufacturer's operating and safety instructions before using power tools and/or equipment
5
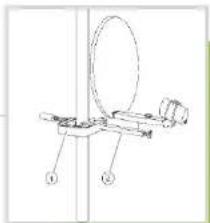
Installation on a mast with G-clamp
Attach G-clamp (I) onto a mast
Insert the extension rod (2) in the mounting hole of the G-clamp and tighten wing nut
Insert the supporting arm with attached dish and LNB (see LNB installation section)
■ Tighten the wing nut on the extension rod
WARNING - Make sure all the dish parts and G-clamp are tightly and properly secure
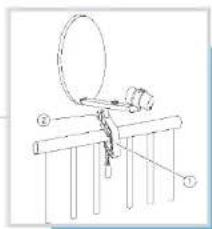
Installation on a balcony with G-clamp
Attach G-clamp (1) on balcony
Insert the supporting arm with attached dish and LNB (see LNB installation section 1)
Tighten the wing nut on the extension rod
IMPORTANT INFORMATION
- Please use this product responsibly
- Keep away from children and animals
- Take care not to cause obstruction with the antenna and cable
- Do not position the system where it could fail and cause injury
- This product is supplied with a 2-year warranty.
It does not cover faults caused by incorrect installation or misuse
- OPTIONAL ACCESSORIES ALSO AVAILABLE FROM
- MAXVIEW
- B2031
- OMNISAT SAT-FINDER
- B2030
- OMNISAT DIGITAL COMPASS
- MXL014
- FREE TO AIR SATELLITE RECEIVER
- OMNISAT
- CAMPING KIT
- MXL006
- USER GUIDE
- FIRST TIME SET UP GUIDE
- DISH ALIGNMENT IN SOUTHERN EUROPE
- ASTRA SATELLITE FOOTPRINTS & SATELLITE TV CHANNELS
- Five
- 5
- 6
- 7
- 8
- 9
- GENERAL SET UP GUIDE
Brand : Maxview
Model : MXL006
Category : Satellite receiver