
GRL360IBBNG - Barbecue EDGESTAR - Free user manual and instructions
Find the device manual for free GRL360IBBNG EDGESTAR in PDF.


| Product Type | Built-In Gas Barbecue Grill |
| Brand | EdgeStar |
| Model | GRL360IBBNG |
| Fuel Type | Natural Gas (NG) or Liquid Propane (LP) convertible |
| Number of Main Burners | 3 |
| BTU Output (Main Burners) | 45,000 - 60,000 BTU/hr |
| Cooking Area | Approximately 600 sq. in. |
| Grate Material | Heavy-duty cast iron with porcelain coating |
| Ignition System | Electronic spark ignition |
| Construction Material | 304 stainless steel housing and lid |
| Dimensions (W x D x H) | 36 in. x 22 in. x 46 in. (91.4 x 55.9 x 116.8 cm) |
| Weight | Approximately 120 lbs (54.4 kg) |
| Cut-Out Required | 35.5 in. x 21.5 in. x 12 in. deep |
| Side Burner | Not included |
| Rotisserie Kit | Compatible (sold separately) |
| Warranty | Limited lifetime on stainless steel, 5 years on burners |
| Cleaning Instructions | Clean grates with warm soapy water; wipe exterior with mild cleaner |
| Safety Features | Flame tamer, safety gas shut-off valve, heat-resistant handles |
| Included Accessories | Natural gas conversion kit, assembly hardware, user manual |
Frequently Asked Questions - GRL360IBBNG EDGESTAR
User questions about GRL360IBBNG EDGESTAR
0 question about this device. Answer the ones you know or ask your own.
Ask a new question about this device
Download the instructions for your Barbecue in PDF format for free! Find your manual GRL360IBBNG - EDGESTAR and take your electronic device back in hand. On this page are published all the documents necessary for the use of your device. GRL360IBBNG by EDGESTAR.
USER MANUAL GRL360IBBNG EDGESTAR
natural_image
Line drawing of a portable outdoor grill with control panel and gauze (no text or symbols)Grill Models:
Built-in BBQ Grills
GRL270IBNG / GRL270IBLP
GRL300IBNG / GRL300IBLP
GRL360IBBNG / GRL360IBBLP
GRL420IBBNG / GRL420IBBLP
Freestanding BBQ Grills
GRLCART270IBNG / GRLCART270IBLP
GRLCART300IBNG / GRLCART300IBLP
GRLCART360IBBNG / GRLCART360IBBLP
GRLCART420IBBNG / GRLCART420IBBLP
Owner's Manual
Important Safety Information
Improper handling can cause serious damage to the EdgeStar grill and/or injury to the user. This grill is designed for domestic use only. Do not use the unit for industrial or commercial use. Do not use in any enclosed areas, including buildings and garages. Any other use may invalidate the warranty. Please review the rating label located on the bottom of the drip tray for technical data related to this unit.
Please read and follow the safety information listed below to reduce the risk of fire, electric shock, or injury.
DANGER:

If you smell gas:
- Shut off gas to the appliance.
- Extinguish any open flame.
- Open lid.
- If odor continues, keep away from the appliance and immediately call your gas supplier or your fire department.
WARNING:

- Do not store or use gasoline or other flammable liquids or vapors in the vicinity of this or any other appliance.
- An LP cylinder not connected for use shall not be stored in the vicinity of this or any other appliance.

Important: Your gas grill is to be used outdoors only.

PROTECT CHILDREN: Keep children away from the grill during use and until the grill has cooled after you are finished using it. Do not allow children to operate the grill.
Important Safety Information

Gas and Electrical Safety
- This gas grill must be installed in accordance with all local codes. In addition, the gas grill(s) must be installed in accord with the following codes, as applicable:
• National Fuel Gas Code, ANSI Z223.1 / NFPA 54
• Natural Gas and Propane Installation Code, CSA B149.1
• Propane Storage and Handling Code, CSA B149.2
- Where applicable, a standard electrical supply (115V, 60Hz) must be used for lights, rotisserie motor(s), and all other apparatus that need to be plugged in. Electrical supplies must be properly grounded in accordance with the National Electrical Code, ANSI / NFPA 70. Compliance with local codes and ordinances is required.
- Never use dented, rusty, or damaged propane tanks.
- Always have an ABC fire extinguisher nearby. Never attempt to use water to extinguish a grease fire.
- Check the tubes that lead into the burner for any blockage from insects, spiders, or food grease.
• Liquid petroleum (LP) or propane is highly flammable. Treat with care. - Do not repair gas tanks yourself; seek repair from an authorized repair person.
- Do not repair damaged gas connectors, tank valves, or supply hoses.
- Store gas tanks in an upright, contained, and secure area. Do not leave filled tanks in a hot car or car or car trunk.
- Check for gas leaks. If you detect a leak, immediately turn off the gas and do not attempt to ignite the grill until the leak is fixed.
- Never light cigarettes or matches, or expose open flames in the presence of a gas leak.
- Do not exceed the power outlet ratings.
- Keep any electrical supply cord and the fuel supply hose away from any heated surfaces.
• To protect against electric shock, do not immerse power cords or plugs in water or other liquids. - Use outlets that cannot be turned off by a switch or pull chain.
- Do not operate any apparatus or accessories with power plugs missing the ground plug, a damaged cord, or a loose socket. Do not bypass, cut, or remove the grounding plug.
- Unplug the unit if it is not going to be used for an extended period of time.
• Never plug or unplug the unit with wet hands. - Do not use extension cords or power strips with this unit. You may need to contact your electrician if it is necessary to use a longer cord or if you do not have a grounded outlet. Do not modify the power cord's length or share the outlet with other appliances.
- Do not start or stop the unit by switching the circuit's power on and off.
• If the power cord is damaged, it must be replaced by the manufacturer or a qualified technician. - Never repair the unit while it is plugged in.
- Immediately unplug the unit if it makes strange sounds, emits smells or smoke comes out of it, and contact customer service.
- You should never attempt to repair the unit yourself. Contact customer service for service options if the unit needs service.
- Never use charcoal or any other non-approved or solid fuel sources. This manual covers grills fueled by gas (LP and NG) only.
Important Safety Information

General Safety
- To prevent back and other types of injuries, use at least two people to move and install the grill(s) and grilling equipment.
- This appliance is not intended for use by persons, including children, with reduced physical, sensory or mental capabilities, unless they have been given supervision or instruction concerning the use of the appliance by the person(s) responsible for their safety.
• Install the gas grill(s) in a well-ventilated area. - Do not place hot or warm items into the cooler before they cool down to room temperature.
- This grill should not be installed indoors or in a garage, RV, under a carport, etc. Keep away from surfaces that can catch fire.
- This grill should be installed in a well-ventilated area. It is recommended that it is protected from direct rain, sleet, snow, and / or moisture.
• This grill is not intended to be used by children.
• Children should be supervised to ensure that they do not play with this product.
• Never allow children to crawl inside the grill. - Do not use this appliance near combustibles such as gasoline, benzene, thinner, etc.
• Take care when working with the gas grill as there will be extremely hot surfaces. - Only use in an upright position on a flat, level surface and provide proper ventilation.
- Do not pinch or kink the power supply line between the unit and cabinet.
- Do not leave any cleaning solutions in the unit.
- Do not use solvent-based cleaning agents or abrasive solutions to clean the unit as they may damage the interior and exterior.
- Do not place any other appliances on top of the unit.
- Do not turn the unit upside down, on its side or at an angle off level.
- The Consumer Product Safety Commission recommends keeping the grill at least 10 feet away from your house or any building.
- Maintain all clearance requirements detailed in this user's manual.
- Follow all food safety and handling requirements required by local codes. Do not let food sit [unrefrigerated] for more than one hour before or after cooking.
• Never leave the grill unattended while cooking.
• Never cook without the drip tray in place.

NOTE: This owner's manual is provided for reference use only. Specifications may change without prior notice. Refer to the product label on your grill for the latest technical information.
Propane Gas Safety
PROPANE GAS SAFETY

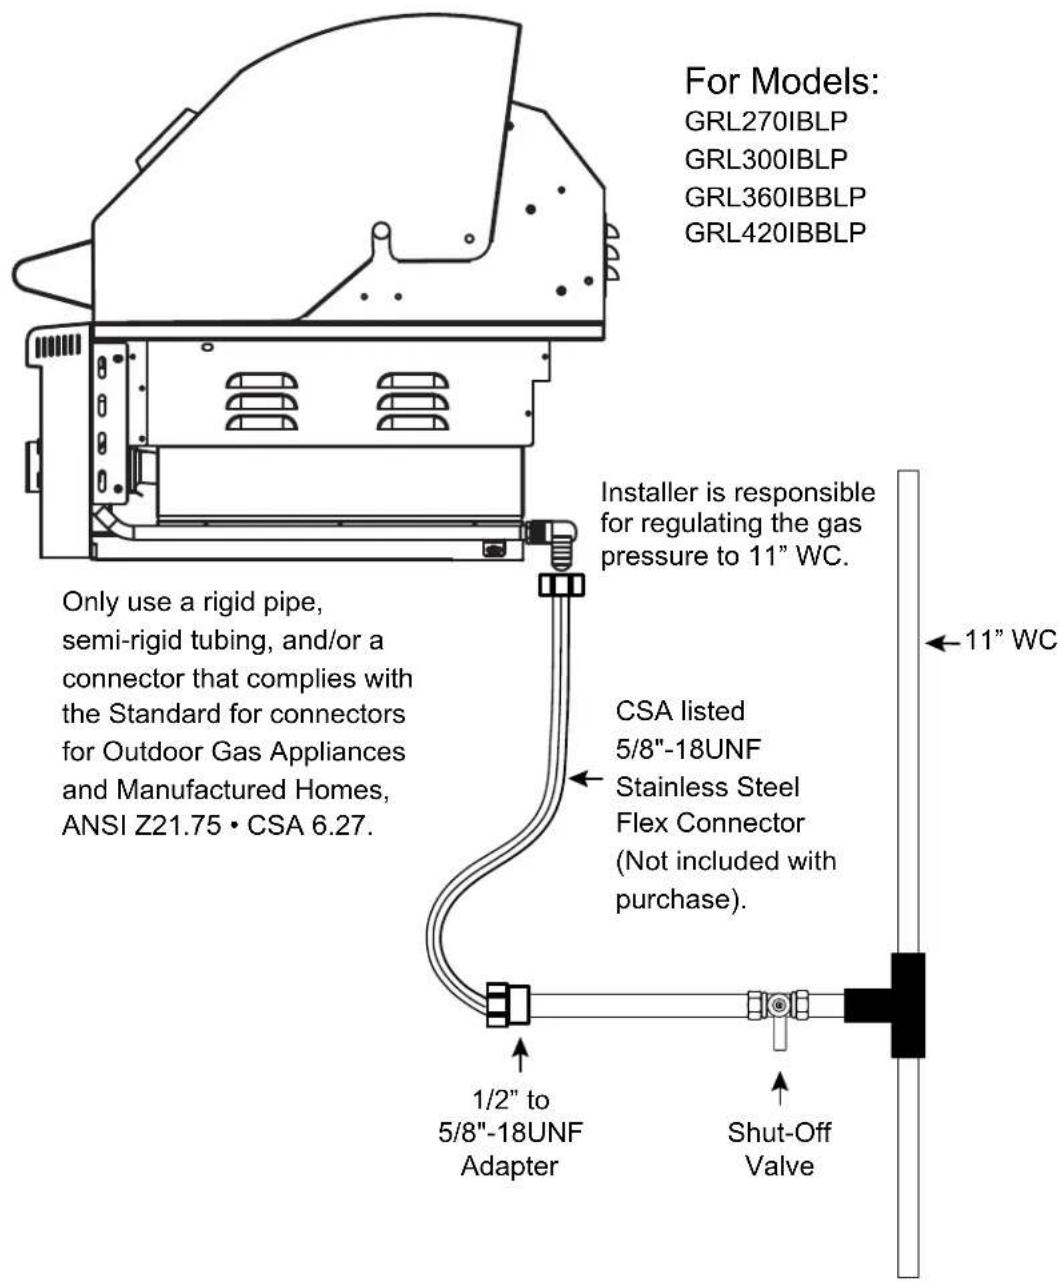
- Your propane gas grill (models GRL****LP) is designed to operate on propane gas only at a pressure regulated at 11 inches water column (WC) when equipped with the correct propane orifices on the valves and a propane regulator on the supply line.
- EdgeStar LP grills are designed to be used with a standard 20 lb. (9.1kg) Department of Transportation (DOT) approved LP cylinder. No tanks larger than 20 lbs. are to be used. The tank must be marked in accordance with the latest DOT specification for LP gas tanks: Specifications for LP gas Cylinders (DOT CFR49).
- Burners must be inspected and cleaned before each use.
Beware of Spiders

Spiders and small insects occasionally spin webs or make nests in the burners during warehousing, transit, and/or after long period of not using the grill. These webs can lead to a gas flow obstruction, which could result in a fire in and around the burner tubes. This type of fire is known as “flashback” and can cause serious damage to your grill and create an unsafe operating condition for the grill user. Although an obstructed burner tube is not the only cause of “flashback,” it is the most common cause. Frequent inspection of the burners is necessary.

WARNING:

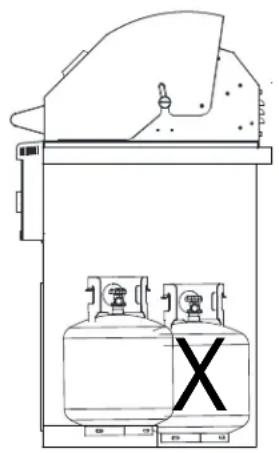
- Do not store a spare LP gas cylinder under or near this appliance.
- Never fill the cylinder beyond 80 percent full.
- If the information above is not followed exactly, a fire causing death or serious injury may occur.
CAUTION:

- Never store an LP gas cylinder inside a building or in the vicinity of any gas-burning appliance.
• Always keep LP gas cylinders fastened in an upright position. - Never connect an unregulated LP gas cylinder to the grill.
- Do not subject LP gas cylinders to excessive heat.
Natural Gas Safety
NATURAL GAS SAFETY

- Your natural gas grill (models GRL****NG) is designed to operate on natural gas only at a pressure regulated at 4 inches water column (WC) when equipped with the correct natural gas orifices on the valves and a natural gas regulator on the supply line.
- Burners must be inspected and cleaned before each use.
Beware of Spiders

Spiders and small insects occasionally spin webs or make nests in the burners during warehousing, transit, and/or after long period of not using the grill. These webs can lead to a gas flow obstruction, which could result in a fire in and around the burner tubes. This type of fire is known as “flashback” and can cause serious damage to your grill and create an unsafe operating condition for the grill user. Although an obstructed burner tube is not the only cause of “flashback,” it is the most common cause. Frequent inspection of the burners is necessary.

WARNING:
- Never connect the grill to an unregulated natural gas supply.
- Check with your gas company or with local building codes for instructions on how to set up a proper gas supply line.
- Use a licensed and knowledgeable installer to connect the gas lines to your grill.
- Pipe sealing compound or pipe thread tape that is suitable for use with natural gas must be used on all male pipe thread. Apply compound or tape to at least the first three threads when making the connection.
- The grill must be isolated from the gas supply piping system by closing its individual manual shutoff valve during any pressure testing of the gas supply line at test pressures less than or equal to 12 PSI (3.5 kPa).
- Turn off your gas grill when the gas supply is being tested at low pressures. This appliance must be isolated from the gas supply piping system by closing its individual valve.

EDGESTAR®
Table of Contents
Important Safety Information 2
Gas and Electrical Safety 3
General Safety 4
Propane Gas Safety 5
Natural Gas Safety....6
First-Time Operating Instructions 8
Introduction......8
Parts Identification 9
Grill Dimensions 13
Island / Cabinet Cutout Dimensions 17
Maintaining Adequate Ventilation 18
Unpacking the Gas Grill....18
Installing the Gas Grill 19
Installation Location....19
Types of Installation....19
Liquid Propane (LP) Cylinder Specifications 20
Liquid Propane (LP) Installation and Requirements: 21
To Connect the LP Gas Supply: 22
Using an LP Gas Supply in an Enclosure 24
Using an LP Pipe Line....25
Natural Gas (NG) Installation and Requirements: 26
To Connect the NG Gas Supply: 26
Checking for Gas Leaks 28
Electrical Requirements....29
Recommended Grounding Method 30
Plugging in the Lights 30
Included Cooking Components 31
Operation....32
Lighting the Burner(s)....33
Manually Lighting the Burner(s) 34
Operating the Rotisserie and Rotisserie Burner 35
Manually Lighting the Rear Burner 36
Flare-Ups....36
Cleaning and Maintenance....37
Cleaning the Main Burner(s) 37
Cleaning the Infrared Burner(s)....38
Inspecting / Adjusting the Air Shutter....39
Cleaning the Cooking Grates 39
Cleaning the Ceramic Briquette Flame Tamers....39
Cleaning the Drip Tray....40
Exterior Cleaning....40
Caring for Stainless Steel....40
Cart Dimensions....41
Cart Assembly Instructions 45
Specifications 48
EdgeStar Limited Warranty 49
First-Time Operating Instructions
Before use, make sure all packaging labels and materials are all removed from the unit and be sure to keep track of all included parts and pieces before discarding packaging materials. It is advised that you keep the original box and packaging materials in case you are ever to move or ship the appliance in the future.
The instruction manual should be read in full before use.
Introduction
Thank you for purchasing this EdgeStar gas grill. We hope that this purchase will be the beginning of a lasting and rewarding relationship between you and EdgeStar. We will provide the customer support and exemplary products necessary to nurture that relationship.
This manual contains important information regarding the proper installation, use, and maintenance of your gas grill. Following this manual will ensure that your product will work at its peak performance and efficiency.
Please save the original product packaging in case you need to safely transport your gas grill.
For Your Records:
Please write down the model number and serial number below for future reference. Both numbers are located on the ratings label on the bottom of the drip tray and are needed to obtain warranty service. You may also want to staple your receipt to this manual as it is the proof of your purchase, and is also needed for service under your warranty.
Model Number: ____
Serial Number: ____
Date of Purchase: ____
For a more efficient experience, please do the following before contacting customer service:
- If you received a damaged product, immediately contact the retailer or dealer who sold the product.
- Read and follow this instruction manual carefully to help you install, use, and maintain your gas grill.
- Read the troubleshooting section of this manual. It will help you diagnose and solve common issues.
- Visit us on the web at https://www.edgestar.com to register your product, download product guides, additional troubleshooting resources and up-to-date information. You can also find an interactive self-diagnostic tool at https://support.edgestar.com
- If you need warranty service, our friendly customer service representatives are available via email at service@edgestar.com or by telephone at 1 (866) 319-5473.
Parts Identification
GRL270IBNG / GRL270IBLP
GRL300IBNG / GRL300IBLP
(Two Burner Gas Grills)
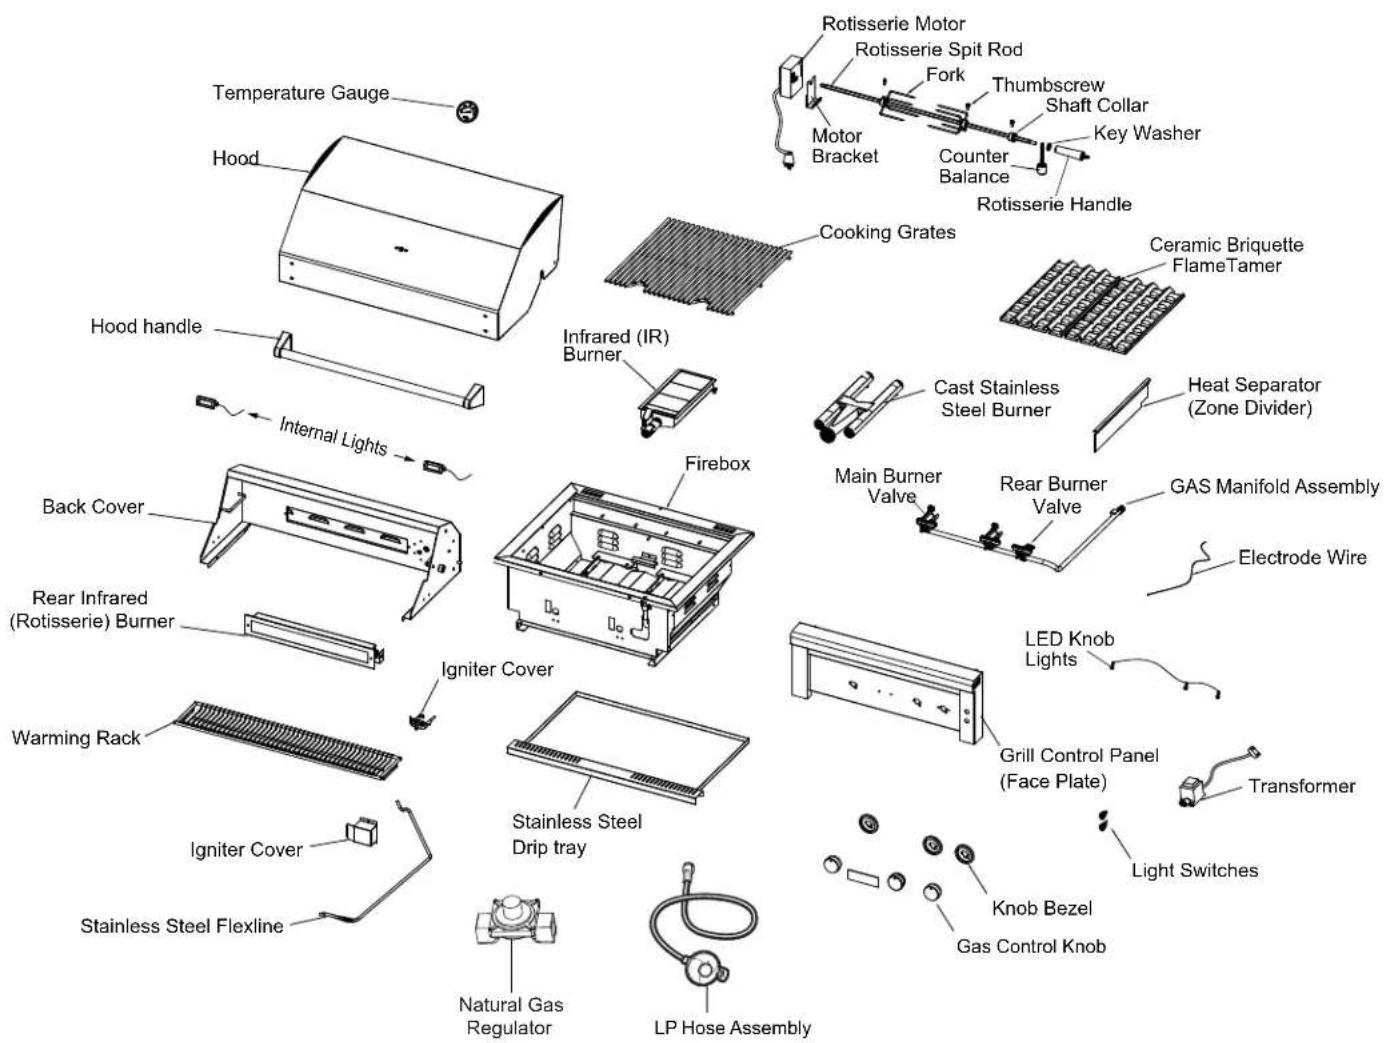
| Part Name Quantity Included | |
| Temperature Gauge 1 | |
| Hood 1 | |
| Handle 1 | |
| Internal Lights 2 | |
| Back Cover 1 | |
| Rear Infrared Burner 1 | |
| Warming Rack 1 | |
| Infrared Igniter Cover 1 | |
| Igniter Cover 1 | |
| Stainless Steel Flexline 1 | |
| Stainless Steel Drip Tray 1 | |
| Firebox 1 | |
| Infrared (IR) Burner 1 | |
| Cast Burner 1 | |
| Gas Control Knob | 3 |
| Knob Bezel | 3 |
| Light Switch | 2 |
| Control Panel (Face Plate) | 1 |
| Transformer | 1 |
| Electrode Wire | 1 |
| LED Lights | 3 |
| Main Burner Valve | 1 |
| Rear Infrared Burner Valve | 1 |
| Gas Manifold Assembly | 1 |
| Heat Separator (Zone Divider) | 1 |
| Flame Tamer | 1 |
| Cooking Grates | 2 |
| Rotisserie Motor | 1 |
| Motor Bracket | 1 |
| Rotisserie Spit Rod | 1 |
| Fork | 2 |
| Thumbscrew 4 | |
| Shaft Collar | 1 |
| Key Washer | 1 |
| Rotisserie Handle | 1 |
| Counter Balance | 1 |
| LP Hose Assembly | 1 ( Only LP Use ) |
| Natural Gas Regulator | 1 ( Only NG Use ) |
GRL360IBBNG / GRL360IBBLP
GRL420IBBNG / GRL420IBBLP
(Three Burner Gas Grills)
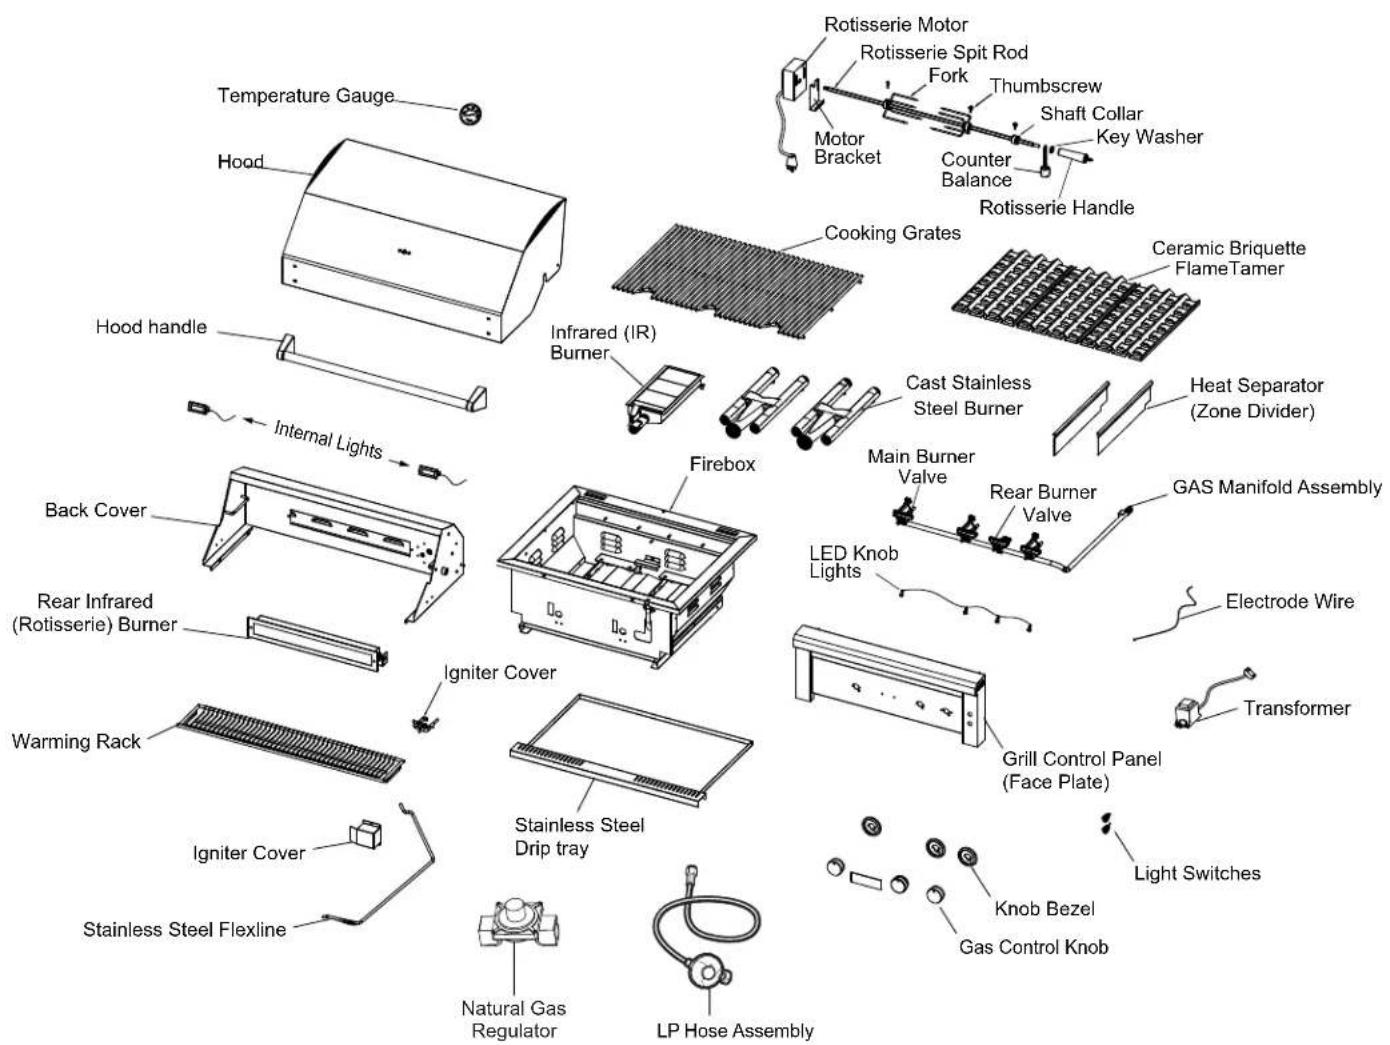
| Part Name Quantity Included | |
| Temperature Gauge 1 | |
| Hood 1 | |
| Handle 1 | |
| Internal Lights 2 | |
| Back Cover 1 | |
| Rear Infrared Burner 1 | |
| Warming Rack 1 | |
| Infrared Igniter Cover 1 | |
| Igniter Cover 1 | |
| Stainless Steel Flexline 1 | |
| Stainless Steel Drip Tray 1 | |
| Firebox 1 | |
| Infrared (IR) Burner 1 | |
| Cast Burner 2 | |
| Gas Control Knob | 4 |
| Knob Bezel | 4 |
| Light Switch | 2 |
| Control Panel (Face Plate) | 1 |
| Transformer | 1 |
| Electrode Wire | 1 |
| LED Lights | 4 |
| Main Burner Valve | 2 |
| Rear Infrared Burner Valve | 1 |
| Gas Manifold Assembly | 1 |
| Heat Separator (Zone Divider) | 2 |
| Flame Tamer | 2 |
| Cooking Grates | 3 |
| Rotisserie Motor | 1 |
| Motor Bracket | 1 |
| Rotisserie Spit Rod | 1 |
| Fork | 2 |
| Thumbscrew 4 | |
| Shaft Collar | 1 |
| Key Washer | 1 |
| Rotisserie Handle | 1 |
| Counter Balance | 1 |
| LP Hose Assembly | 1 ( Only LP Use ) |
| Natural Gas Regulator | 1 ( Only NG Use ) |
Grill Dimensions
GRL270IBNG / GRL270IBLP
Front
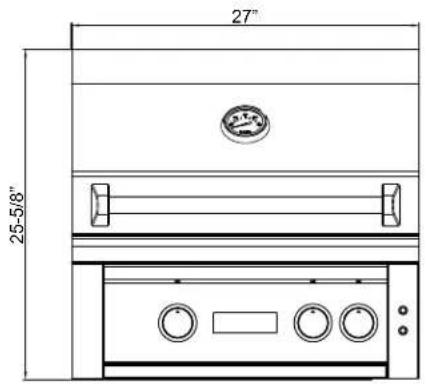
Back
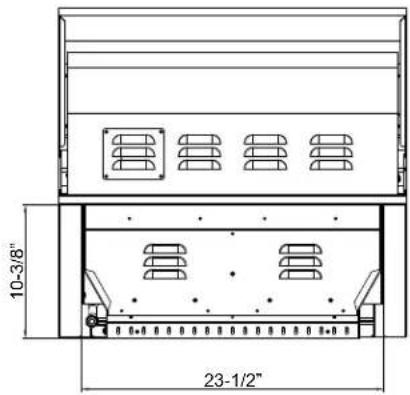
Right
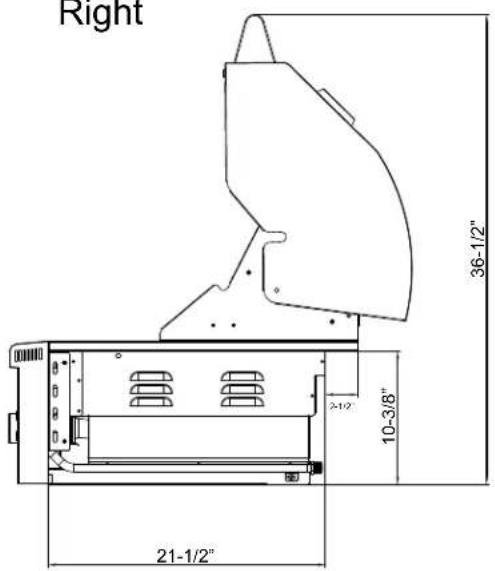
Left
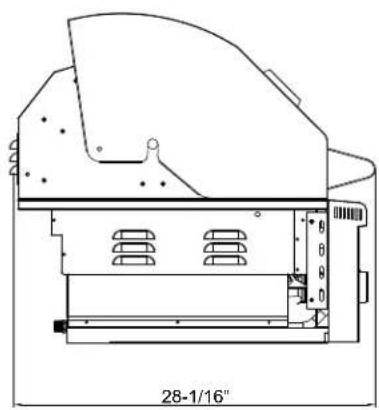
natural_image
Technical line drawing of a mechanical component with no visible text or symbolsGRL300IBNG / GRL300IBLP
Front
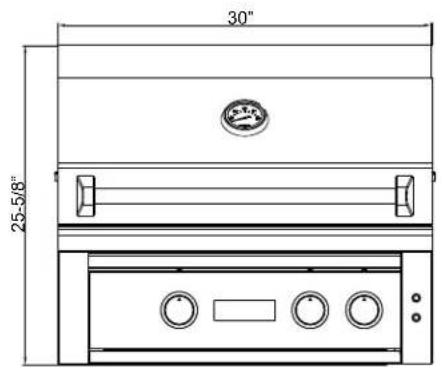
Back
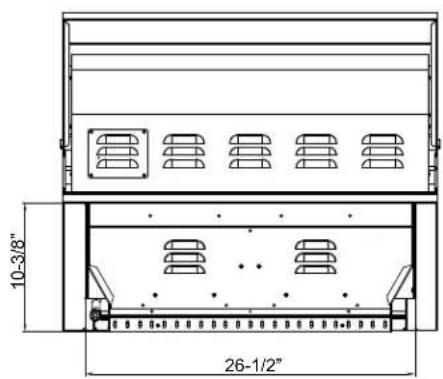
Left
natural_image
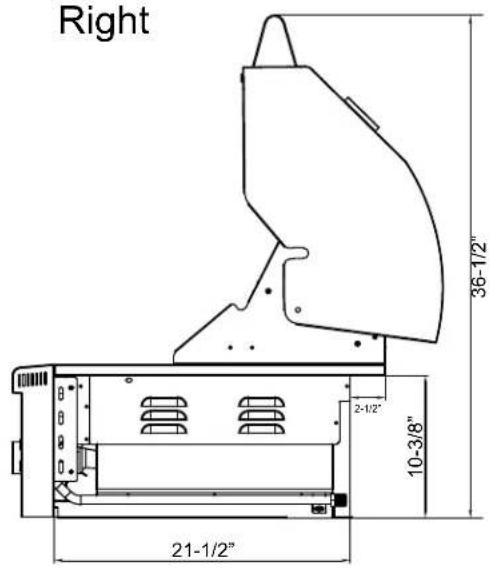
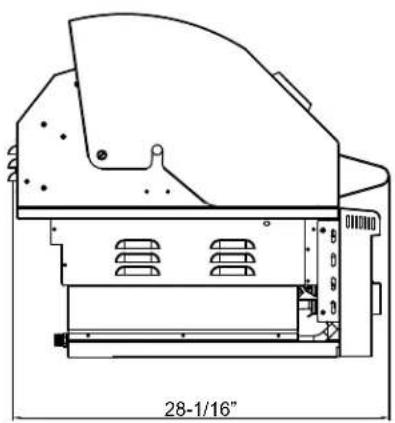
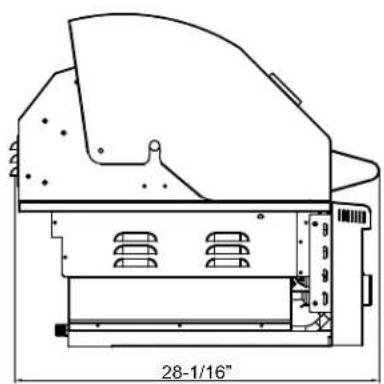
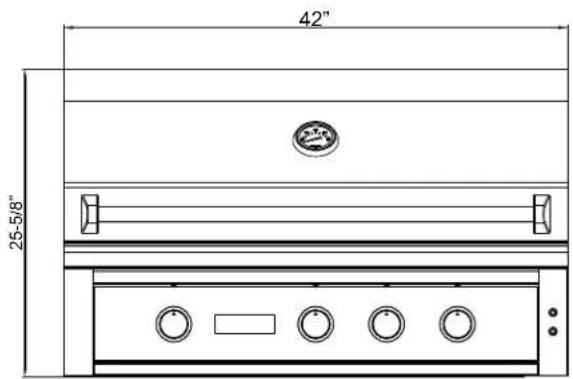
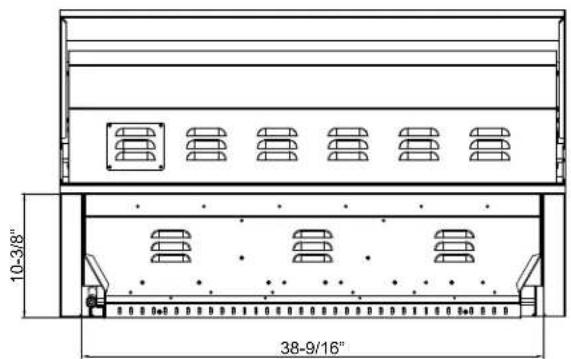
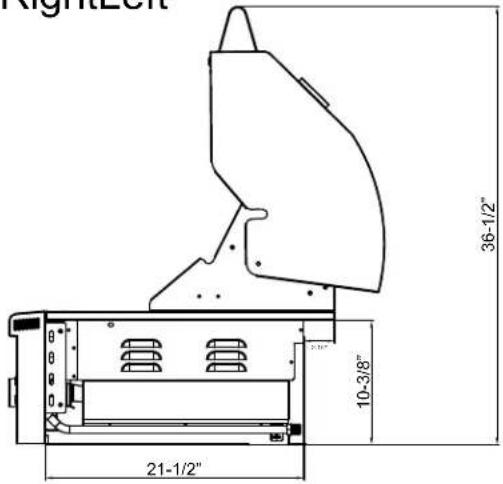
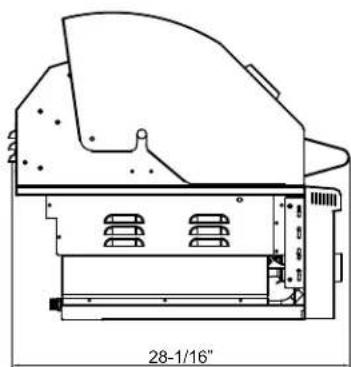
Technical line drawing of a mechanical component with no visible text or symbolsGRL360IBBNG / GRL360IBBLP
FrontBack
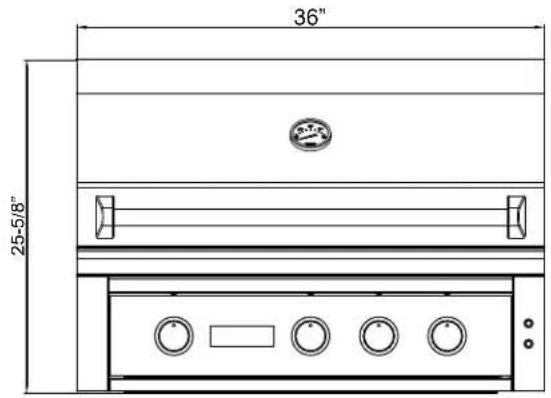
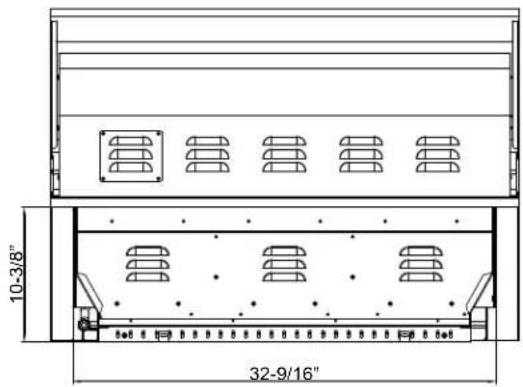
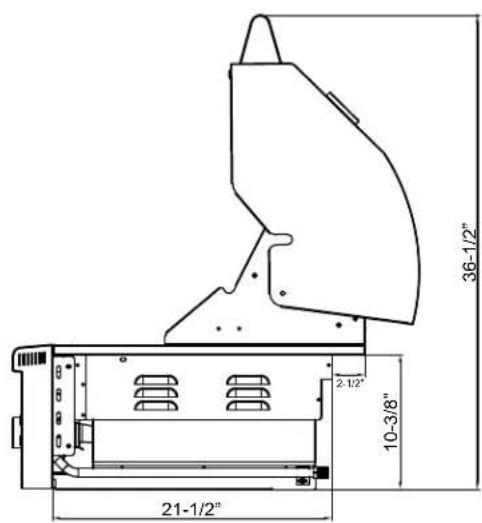
LeftRight
natural_image
Technical line drawing of a mechanical component with no visible text or symbolsGRL420IBBNG / GRL420IBBLP
FrontBack
RightLeft
natural_image
Technical line drawing of a mechanical component with no visible text or symbolsIsland / Cabinet Cutout Dimensions
- Do not store extra propane or butane tanks in proximity to your gas grill.
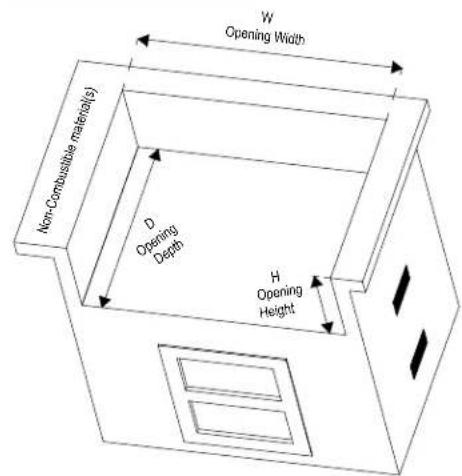
- All BBQ islands must be manufactured from non-combustible material(s).
- Minimum clearance to combustible construction material(s) is 24" from the back and sides.
- Built-in islands and cabinets must be equipped with vents to allow for proper ventilation and combustion. 4" x 6" ventilation areas or larger are required. Vents should have screens to prevent animals, critters, and foreign objects from entering the cabinet.
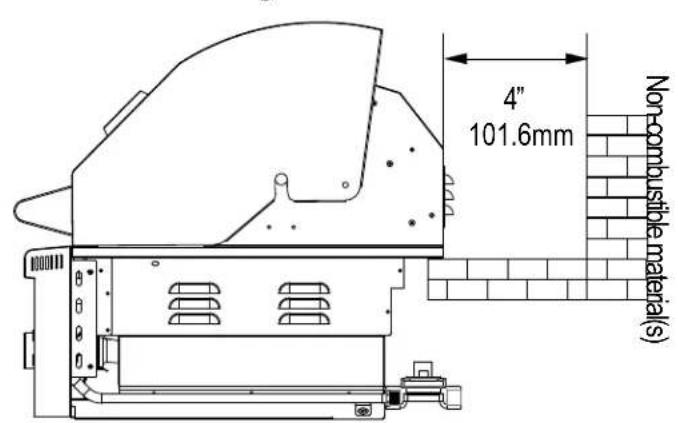
- For proper built-in installation, there must be a minimum of 4" of counter clearance space available behind the grill in order for the grill hood to be able to fully open and properly clear. Please see the image below.
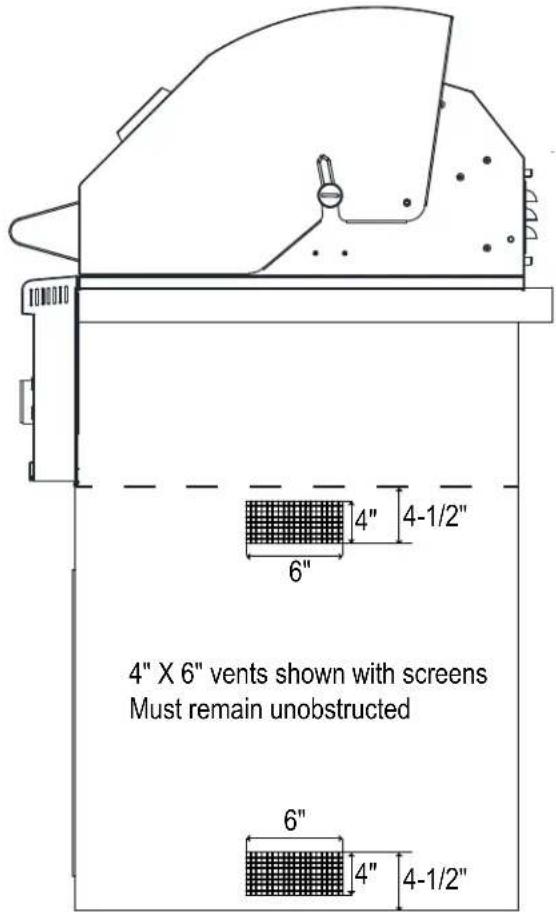

NOTE: Each vent must be at least 20 sq inches in size and have access to outside/fresh air. Two vents on each side will facilitate and improve airflow and ventilation.
| Model Opening | Width (W) | Opening Depth (D) | Opening Height (H) |
| GRL270 Series 23 ^1/_2 " 24" 10 ^1/_2 " | |||
| GRL300 Series 26 ^1/_2 " 24" 10 ^1/_2 " | |||
| GRL360 Series 32 ^1/_2 " 24" 10 ^1/_2 " | |||
| GRL420 Series 38 ^1/_2 " 24" 10 ^1/_2 " |
Maintaining Adequate Ventilation
When building a gas grill into outdoor cabinetry or an island, it is important to maintain proper ventilation. Ventilation is required to prevent the build-up of gas, which could ultimately lead to improper performance of the gas grill; damage to the grill; fire, explosion, or injury to the user. Always make sure that there is proper ventilation and that all flammable materials are placed at least 24 inches away from the grill on all side.
Be sure to clean the grill vents of all dirt, debris, insects, and spider webs.
Additionally, the grill functions best when protected from outdoor elements. The grill should be placed in a location that does not get direct rainfall. Wind can greatly affect the performance of any gas grill. Be advised that it can affect the ability of the grill to maintain a flame. When substantial wind enters the rear exhaust of the grill, it can create a gas build-up, which poses a fire risk.
Unpacking the Gas Grill

WARNING: Use two more people to move and install the gas grill. Failure to do so can result in back or other injury. Carefully remove the packaging materials. Remove any shipping tape and glue from your gas grill before using. Do not use sharp instruments, rubbing alcohol, flammable fluids, or abrasive cleaners to remove tape or glue. These products can damage the surface of your gas grill.

Important: Do not remove any safety, warning, or product information labels from your gas grill.
Check the rating label on your grill to ensure that the fuel source is appropriate for your application before trying to connect any gas lines.
Installing the Gas Grill

Tip: Gather the model and serial number from the product label and write them down before installing the gas grill(s).
Notes About Installation
- The gas grill should be installed in accordance with all local code requirements in addition to the National Fuel Gas Code, ANSI Z223.1 / NFPA 54.
• Installation by a professional is highly recommended for proper placement and functionality.
In the state of Massachusetts, installation and repairs MUST be performed by a qualified or licensed contractor, plumber, or gas fitter qualified or licensed by the State of Massachusetts.
- This gas grill is not intended to be installed in or on boats or recreational vehicles (RVs).
• Make sure that there are no kinks and no twisting in gas supply hoses.
Installation Location
- Ensure the gas grill is positioned safely away from anything that can catch fire. Under no circumstances should this gas grill be installed indoors or in a garage. Additionally, it should not be located under a carport, in a work shop, etc.
- The gas grill should also be placed in a location that is strong enough to support its total weight. A firm level surface is required.
- Do not install the gas grill within 24 inches of wood stockpiles, gyprock, paper, or plants. Place the grill in an area where it can have a minimum of 24 inches clearance from combustible materials, including gasoline, flammable liquids or flammable vapors.
- Adequate ventilation must be maintained for the grill to function properly. This will ensure gas does not build up.
- Keep the grill protected from inclement weather conditions, including direct rain and high winds.
- Once the gas grill is installed, you must still be able to access the gas supply line, regulator, gas cylinder, and shut off valves.
Types of Installation
This manual covers an EdgeStar gas grill series that includes models using either a Liquid Propane (LP) or a Natural Gas (NG) fuel source. Select your appropriate fuel type and follow the relevant installation instructions, as follows.
In each case, there must be adequate ventilation and access for service.

WARNING: Inspect all gas tanks, gas supply hoses, and regulators each time you connect or disconnect the fuel source. Always turn off the gas supply when the gas grill is not in use.
Liquid Propane (LP) Cylinder Specifications
- Any LP gas supply cylinder used with this grill must be approximately 12 inches in diameter, and 18 inches high. The maximum fuel capacity is 80% and is approximately 20 pounds of propane.
- The LP cylinder must have a shut-off valve (see picture below) terminating in a Type 1 LP.
- A Type 1 compatible cylinder with a Type 1 cylinder valve has a back-check valve which does not permit gas flow until a positive seal has been established.
- The cylinder must be arranged for vapor withdrawal. It must also include a collar to protect the cylinder valve. A safety relief device having direct communication with the vapor space of the cylinder must be provided. This will expel high pressure gas if the cylinder is overfilled or overheats which could result in fire or explosion otherwise.
- All LP gas cylinders used with this appliance shall be constructed and marked in accordance with the specifications for LP gas cylinders of the U. S. Department of Transportation (DOT) or the National Standard of Canada, CAN/CSA-B339, Cylinders, Spheres and Tubes for Transportation of Dangerous Goods; and Commission, as applicable; and shall be provided with a listed overfilling prevention device.
- Read labels on the LP Gas Supply Cylinder.
- New cylinders are always shipped empty for safety.
- Allow only qualified LP gas dealers to fill or repair your LP gas supply cylinder. Inform the gas dealer if it is a new or used cylinder to be filled.
- After filling, have the gas dealer check for leaks and to check that the relief valve remains effective and in good repair.
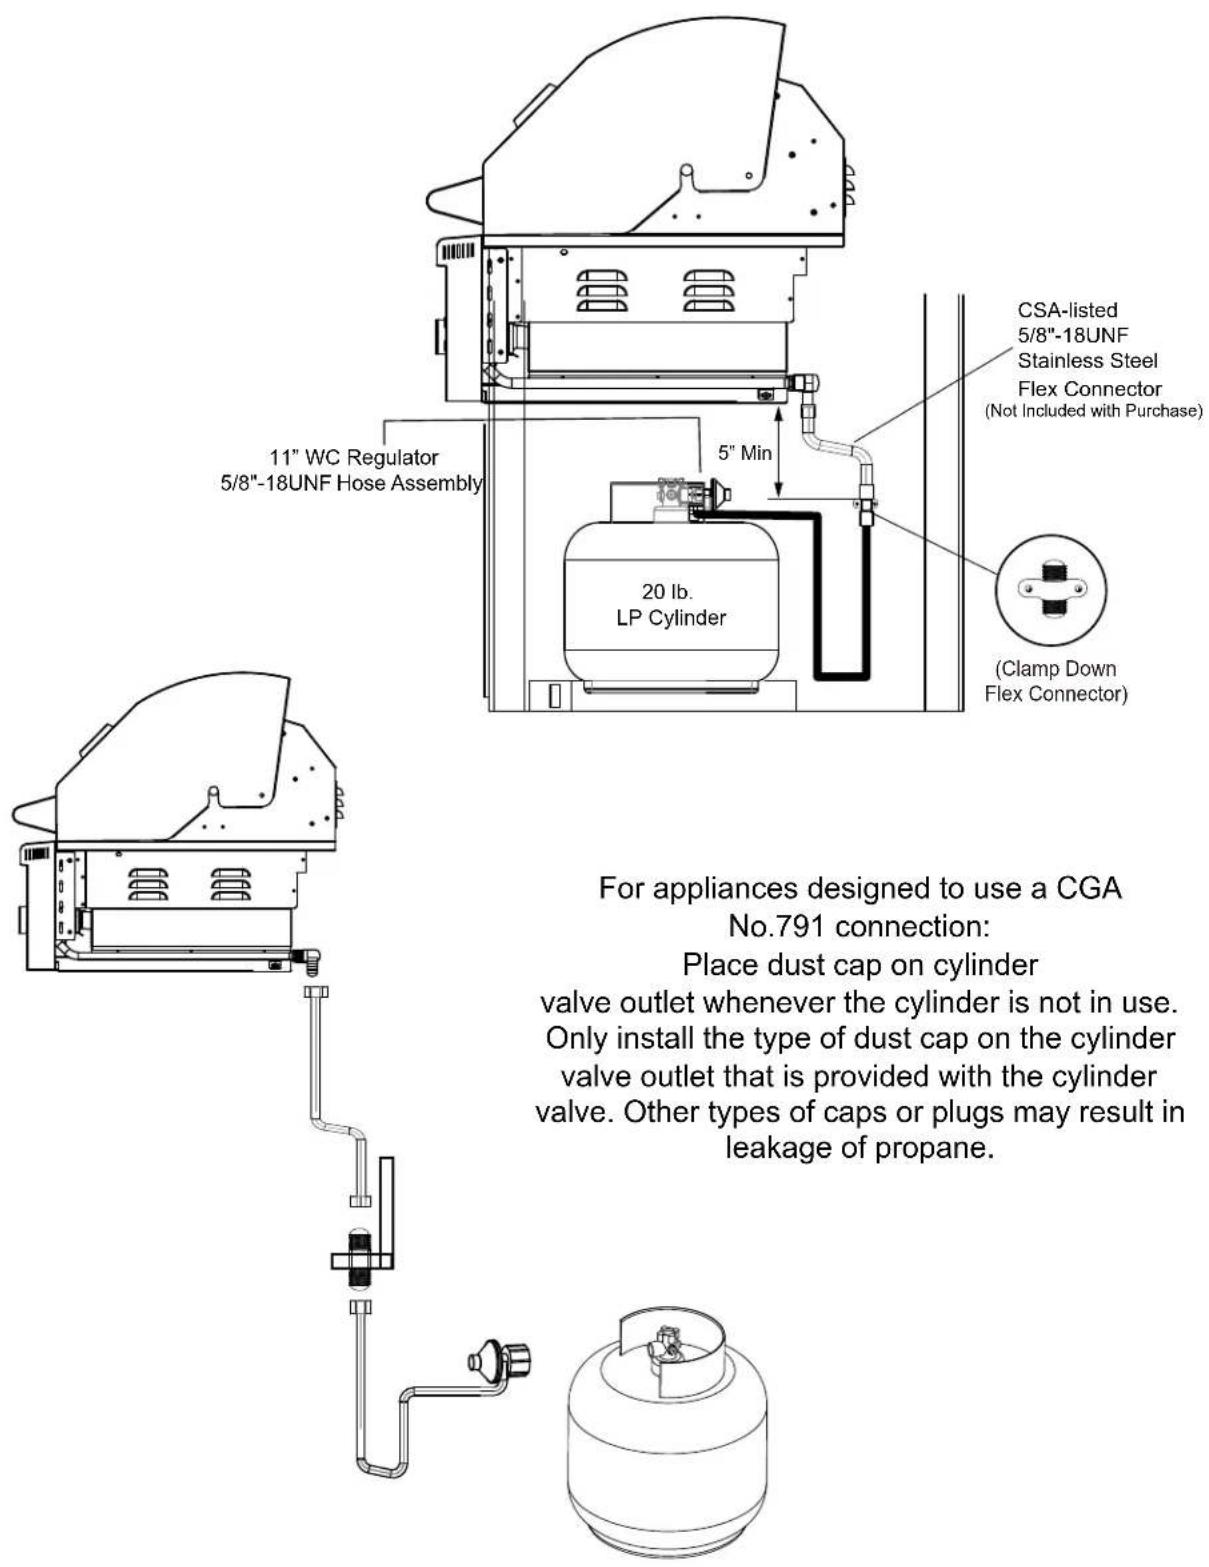
For appliances designed to use a CGA No.791 connection:
Place dust cap on the cylinder valve outlet whenever the cylinder is not in use. Only install the type of dust cap on the cylinder valve outlet that is provided with the cylinder valve. Other types of caps or plugs may result in leakage of propane.
- LP cylinders must be upright for vapor withdrawal and include a collar to protect the LP cylinder valve. Always keep LP cylinders in upright position during use, transit or storage.
- Storage of an outdoor cooking gas appliance indoor is permissible only if the cylinder(s) is (are) disconnected and removed from the outdoor cooking gas appliance.
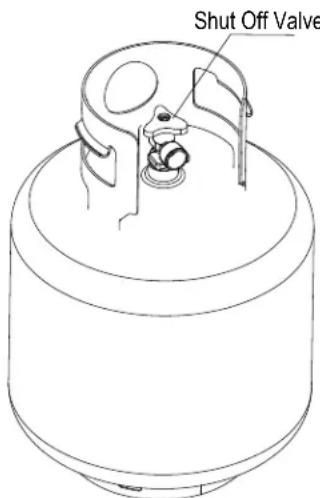
LP cylinder in upright position for vapor withdrawal
Liquid Propane (LP) Installation and Requirements:
- Grills operated with a DOT approved 20 lb. LP tank must be installed with the supplied LP regulator.
- EdgeStar LP Grills are designed to be used with a properly set up LP pipe line or standard 20 lb. Department of Transportation (DOT) approved LP tank. No tanks larger than 20 lbs. are to be used. The tank must be marked in accordance with the latest DOT specification for LP gas tanks: Specifications for LP gas Cylinders (DOT CFR49).
- If connecting to a LP pipe line, ensure the LP supply line is fitted with a shut-off valve that can be easily accessed in the event that shutoff at the source is required.
- LP tanks must come with a protective collar to guard the cylinder threads.
• The standard fitting connection for LP tanks is 3/8".
• LP tanks must be filled by a qualified professional and must not ever be overfilled.
• An Overfill Prevention Device (ODP) must be used at all times. - This grill is to be used in residential applications only. Propane tank pressure should be 11 inches water column.
- When using an LP tank, pressure relief devices and valves shall be in direct contact with the vapor space of the cylinder when in normal use.
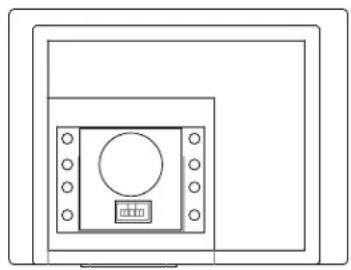
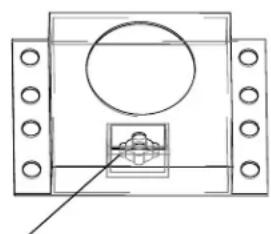
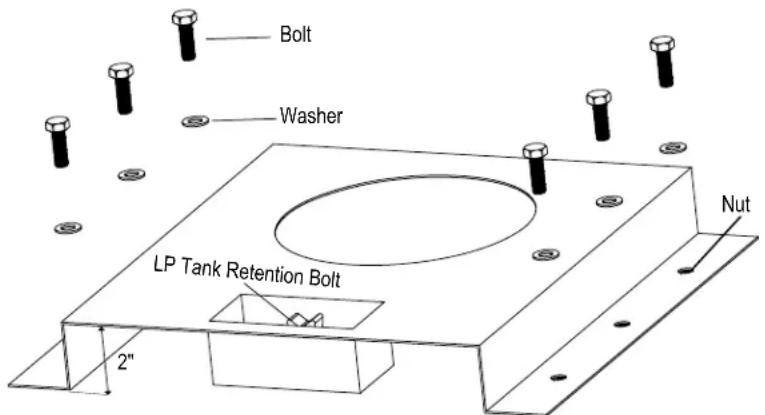
- LP tanks must always be secured and anchored in an upright position when in use. An LP tank base and retention bolt must be used (not included).
LP Gas Tank Retention (Top-down view)
natural_image
Simple line drawing of a square frame with a central circular element and bolt holes, no text or symbols present.LP Tank Base
natural_image
Technical line drawing of a mechanical component with mounting holes and a central circular feature (no text or symbols)LP Tank Retention Bolt
The LP tank base should be fastened securely to the bottom of the island / cabinet using a combination of bolts, washers, and nuts. Ensure that a minimum of 2" of clearance is maintained between the floor and the LP cylinder. Once the LP tank base is secured, place the primary LP tank in place and tighten the retention bolt until the tank is snug.
To Connect the LP Gas Supply:
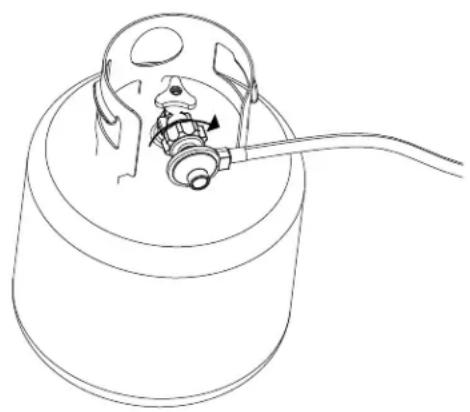
- Ensure the 20 lb. LP tank valve, or LP supply shut-off valve if connecting to an LP pipe line, is fully closed and in the off position. To do so, make sure the tank handle is turned all the way clockwise. You should not hear a hissing noise or smell propane.
- All gas control (burner) knobs must be in the off position.
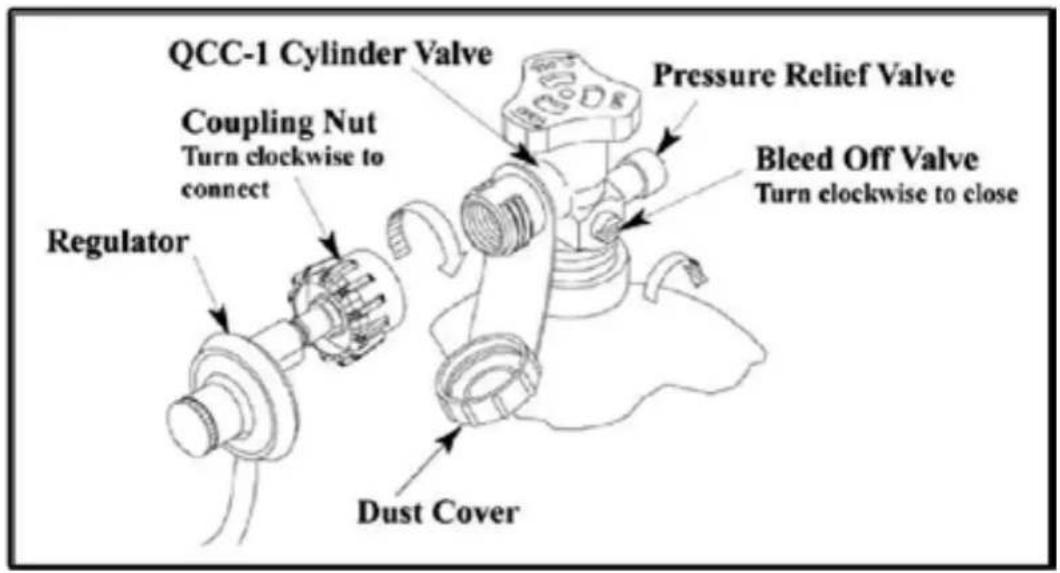
- Align the 3/8" brass coupling nut with the LP tank threads; turn the coupling nut clockwise by hand. Note that the fittings have flared ends and do not require any modifications or sealant. Do not overtighten the coupling nut connection as it may cause damage or strip the threading.
- Open the LP tank valve by turning the handle counterclockwise.
- Using a soapy water mixture in a spray bottle, check for leaks at all joints and connection points. Bubbles should not form in the soapy water mixture. See the section titled, "Checking for Gas Leaks" in this manual for further instructions and details.
- Once you have confirmed that all connections are secure and there are no gas leaks, turn the burner control valves on the unit to the "HIGH" position for about 20 seconds to allow the air in the system to purge before attempting to light the burners. Wait 5 minutes after completing this before lighting the burners.
- Once the system has purged, you are free to proceed with normal use of the grill. All connection points must be free from gas leaks before first use of the gas grill.
- A reminder to always close the LP tank valve [by turning the handle clockwise] when the grill is not in use.
WARNINGS:

• Always leak-test the connection after refilling or exchanging LP cylinders.
- Do not store or use gasoline or other flammable liquids or vapors in the vicinity of this or any other appliance.
- Turn off LP supply at cylinder when appliance is not in use.
- An LP cylinder not connected for use shall not be stored in the vicinity of this or any other appliance.
- Do not place more than one (1) LP cylinder in the construction space or cart.
- The grill and its shut-off valve must be disconnected from the supply piping system prior to any pressure testing of the system that exceeds 0.5 psi (3.5 kPa).
natural_image
Line drawing of a mechanical component with a cylindrical body and attached rod (no text or symbols)To Disconnect the LP Gas Supply:
- The tank valve should be in the "OFF" position If not, turn the knob clockwise until it stops.
- Make sure all burner valves are in the "OFF" position.
- Turn the coupling nut anticlockwise until the coupler is loose
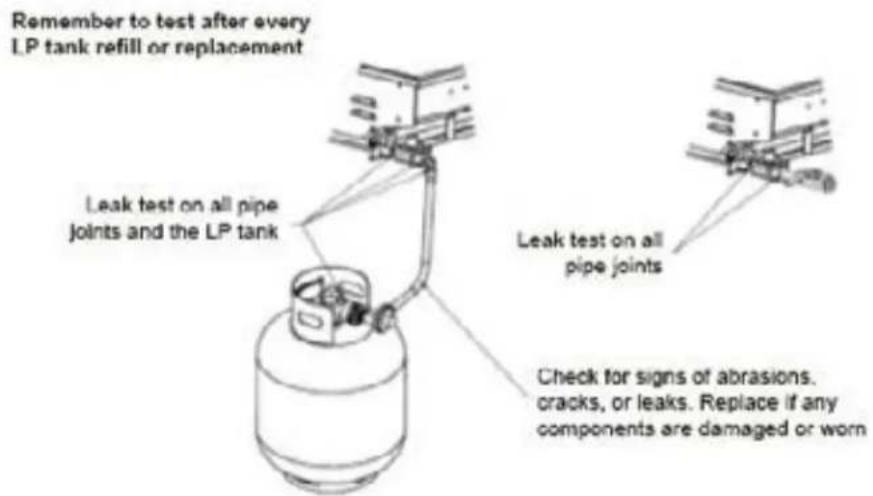

Important: Replacement pressure regulators and hose assemblies must be those specified by the outdoor cooking gas appliance manufacturer.
Using an LP Gas Supply in an Enclosure
Using an LP Pipe Line
Natural Gas (NG) Installation and Requirements:
- Ensure that the natural gas supply line is fitted with a shut-off valve that can be easily accessed in the event that shutoff at the source is required.
- Grills operated with NG fuel must be installed with the NG regulator supplied with your EdgeStar grill.
- EdgeStar NG grills are equipped with an NG regulator set to 4 inches water column. This regulator is for NG only.
- The standard fitting connector for an NG supply is 1/2".
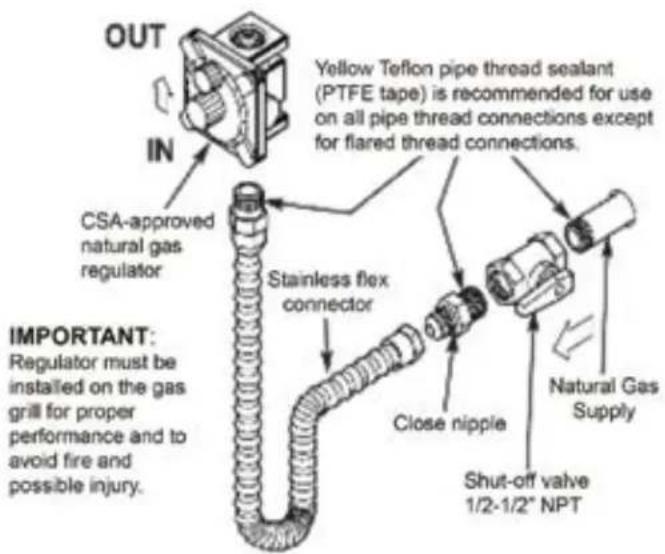
- Use a quality natural gas flex connector (not included) to mate to the included NG regulator. CSA, UL, or ETL certified connecting lines are recommended. Stainless steel flex connectors are also recommended.
- The flex connector should be an appropriate length for your setup. Do not use a connector that is too short and requires you to stretch it too far to make the connection.
- Flex connectors should come with a standard 12 " connection for NG fittings.
- Flex connectors should be placed carefully in a location where they are not at risk of being cut, punctured, or kinked.
- Yellow Teflon pipe thread sealant (PTFE tape) is recommended for use on all pipe thread connections with the exception of flared threads, which will have a secure connection.
To Connect the NG Gas Supply:
- Ensure the NG shut-off valve is fully closed. You should not hear a hissing noise or smell natural gas.
- All gas control (burner) knobs must be in the off position.
- Fasten the 12 " flex connector – already installed to the NG supply shut-off valve – to the included NG regulator. Use Yellow Teflon pipe thread sealant (PTFE tape) for non-flared connections. No sealant is required for flared connections. Do not overtighten the regulator connection as it may cause damage or strip the threading.
- Open the NG shut-off valve.
- Using a soapy water mixture in a spray bottle, check for leaks at all joints and connection points. Bubbles should not form in the soapy water mixture. See the section titled, "Checking for Gas Leaks" in this manual for further instructions and details.
- Once you have confirmed that all connections are secure and there are no gas leaks, you may proceed with normal use of your grill. All connection points must be free from gas leaks before first use of the gas grill.
- A reminder to always close the shut-off valve when the grill is not in use.
The use of a rigid pipe, semi-rigid tubing, and / or a connector that complies with the Standard for connectors for Outdoor Gas Appliances and Manufactured Homes, ANSI Z21.75 • CSA 6.27.
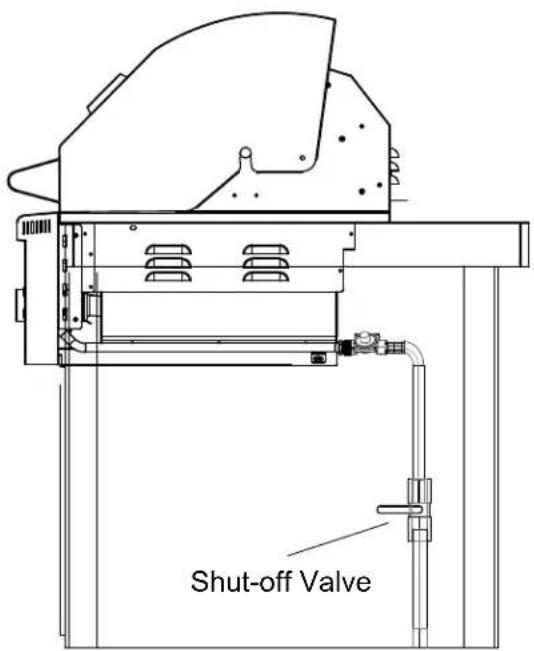
NEVER use the grill without leak testing this connection!
Natural gas regulator model: GR120 Gas pressure: 4" water column
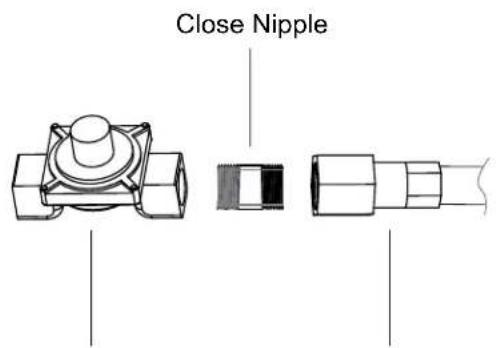
NG Regulator Natural Gas Supply Line
Checking for Gas Leaks
At least once every six months, and any time a tank is disconnected and reconnected, perform a leak test. Additionally, any time any components including the gas supply lines or the regulator are replaced, perform a leak test. Never use the grill without testing for gas leaks first.

WARNING: Do not test for gas leaks with an open flame. When testing for leaks, make sure all gas control knobs are in the off position.
To perform the leak test:
- Create a mixture of soapy water that is one part soap to one part water. Place the solution in a spray bottle.
-
Turn the gas on – again, ensuring that the gas control knobs of your grill are off.
-
On Natural Gas (NG) systems, turn the on the gas supply's main feed valve and make sure the shut-off valve is open.
• On Liquid Propane (LP) systems, turn the cylinder knob counterclockwise to open.
- Spray the soapy water mixture on the joints of the gas delivery system. If you see blowing bubbles, there is a leak present, which needs to be fixed prior to operating your grill.
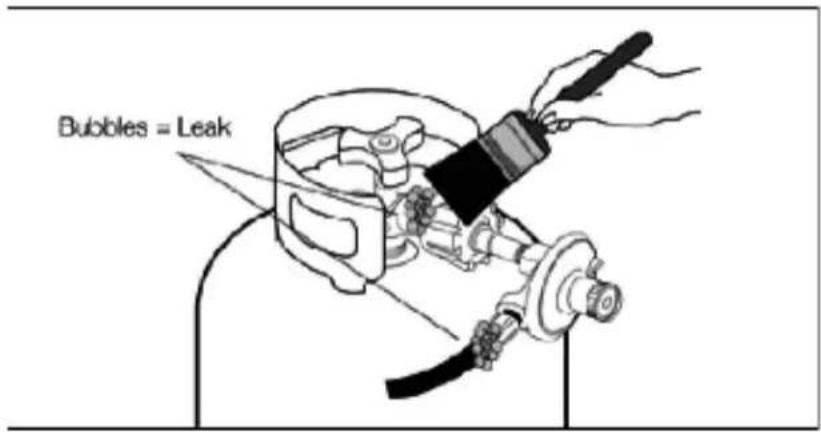
Electrical Requirements

ELECTRIC SHOCK HAZARD!
- Plug into a grounded 3-prong outlet.
- Never remove the grounding prong from the plug.
- Never use an adapter to bypass the grounding prong.
• DO NOT use an extension cord. - Failure to follow these instructions can result in fire, electrical shock, or death.
Before you install your gas grill into its final location, it is important to make sure you have the proper electrical connection. A standard electrical supply (115V AC, 60Hz), properly grounded in accordance with the National Electrical Code and local codes and ordinances, is required.
Check with a qualified electrician if you are not sure whether or not your electrical connection is properly grounded.
The fuse (or circuit breaker) size must be 15 Amps. It should be a GFI breaker suitable for outdoor use. It is recommended that a separate circuit be provided. Use receptacles that cannot be turned off by a switch or pull chain.
If permitted by national and local codes, and the installation requires a separate ground wire, a qualified electrician must determine the appropriate ground path.
In addition to the above, always observe the below warnings:
• To protect against electric shock, do not immerse cord or plugs in water or other liquid.
- Unplug from the outlet when not in use and before cleaning. Allow to cool before putting on or taking off parts.
- Do not operate any outdoor cooking gas appliance with a damaged cord, damaged plug, or after the appliance malfunctions or has been damaged in any manner. Contact EdgeStar for repair.
- Do not let the cord hang over the edge of a table or touch hot surfaces.
- Do not use an outdoor cooking gas appliance for purposes other than intended.
- When connecting, first connect the plug to the outdoor cooking gas appliance. Then, plug the appliance into the outlet.
- Use only a Ground Fault Interrupter (GFI) protected circuit with this outdoor cooking gas appliance.
- Use extension cords with a 3-prong grounding plug rated for the power of the equipment and approved for outdoor use with a “W-A” marking.
Recommended Grounding Method
For your personal safety, this appliance must be grounded. It is equipped with a power supply cord having a 3-prong grounding plug. To minimize possible shock hazard, the cord must be plugged into a mating 3-pronged wall socket, and grounded in accordance with the National Electrical Code and local codes and ordinances. If a mating wall socket is not available, it is the personal responsibility of the customer to have a properly grounded, 3-prong wall receptacle installed by a qualified electrician.
Disconnect the electrical components from the power supply by removing the power plug from the wall socket.

WARNING:
- Do not touch the power plug when your hands are wet.
- Never unplug the unit by pulling on the plug.
- DANGER – Do not store grill until it has cooled down. Failure to do so could result in fire resulting in property damage, personal injury, or death.
Plugging in the Lights
This EdgeStar series of gas grill includes internal lighting so the cooking surface is always visible to the user. It also includes stylish and functional backlighting for the knobs and switches. These lights require a 120V AC power supply to function. Please review the electrical requirements in this manual carefully.
Connecting the lights is a simply plug-and-play procedure. The included transformer (packed separately) comes with a 3-prong 120V AC plug. The grill has a 2-prong connecting wire pre-attached (reference the Parts Identification section of this manual). Plug the 2-prong wire into the transformer. Ensure that the connection is secure.
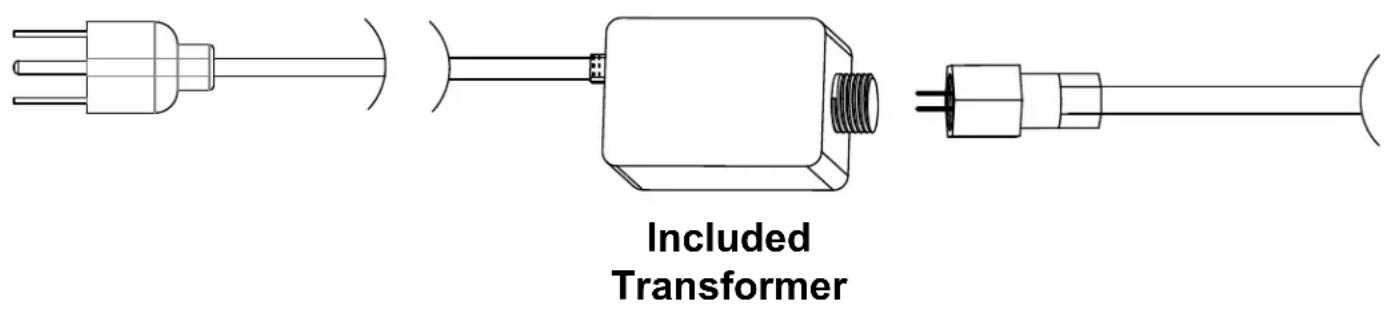
Included Cooking Components

CAUTION: The included ceramic flame tamers are only meant for use with the main cast burners. Do not install the ceramic flame tamers over the included infrared burner(s) as they will be damaged. For information on purchasing additional / substitute burners, please visit www.edgestar.com.
Before using the EdgeStar gas grill for the first time, be sure to thoroughly wash [by hand] the included ceramic flame tamers, the cooking grates, the warming rack, and the rotisserie forks under hot water with soap. Do not wash these components in your dishwasher. Allow them to dry before reinstalling in the grill.
For an even heat and cooking experience, this series of grills includes ceramic briquette flame tamers. Install the ceramic flame tamers above the main cast burners. There are cast pegs in the firebox on which the flame tamers rest.
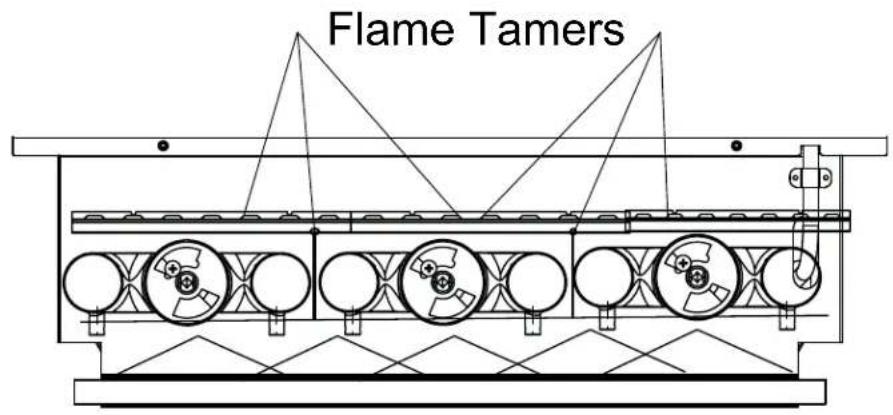

NOTE: This EdgeStar series of grills also includes stainless steel zone dividers that are placed between each burner. These help to maintain the temperature in each "zone" – the grilling surface area above each burner. Though not pictured here, ensure that these are installed before putting the flame tamers in place.
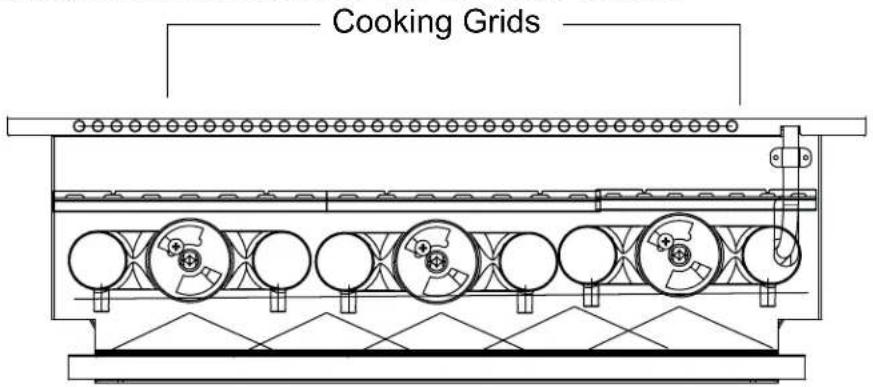
The cooking grids (grates) can now be installed over the flame tamers:
Operation

Important: You must always have the grill hood open when lighting the gas grill. Otherwise, you risk build-up of gas and possible fire or explosion.

Important: To avoid risk of injury, always keep your face and body as far away as possible from the grill when lighting. As you proceed to operate the grill, note that surfaces may be hot and pose a burn hazard. Take care around the grill and make sure to never leave it unattended. Children should not operate the grill.
For an optimal grilling experience, this EdgeStar series of gas grills includes a combination of infrared burners and cast burners, referred to hereafter as “main burner(s).” Additionally, this EdgeStar grill series comes standard with a rotisserie burner. Instructions for using these burners are in the following sections.

Important: Once the burners are lit, leave them on the “High” setting and close the grill hood for 5 minutes before cooking anything. This will allow the grill to preheat and burn off any foreign matters or food objects left in the grill.
Lighting the Burner(s)
-
Make sure you have observed all safety warnings in this manual. Follow the instructions for connecting the gas supply. NEVER turn on the grill without testing for leaks first. Keep all body parts as far away from the grill as possible. Never smoke while lighting the grill.
-
Open the grill hood.
-
With all gas control (burner) knobs in the OFF position, open the gas supply.
-
For each burner you wish to operate, push the gas control (burner) knob in, and rotate counterclockwise to the "High" position marking on the knob.
-
The Piezo-style ignition system will create a loud clicking noise as it produces a spark to ignite the gas. You will be able to hear and see as the gas ignites; flames will become visible through the cooking grates and ceramic briquette flame tamers.
-
Close the lid and allow the burners to run on HIGH for about five minutes to burn off extra gas and residue.
-
Open the lid and adjust the burner knobs to your desired cooking temperature.
If the burners fail to light:
- If the burner does not light on the first try, repeat immediately. On your second attempt, if the burner does not light within five (5) seconds, turn the burner knob(s) completely off. Do not try again for a minimum of five (5) minutes as the gas dissipates.
- After five (5) minutes, you may proceed to try to light the burner again using the procedures outlined above.
- Once you successfully light the first burner, you may proceed to light the other burner(s), as needed.
- If, after a few rounds of trying to light the burner using the Piezo-style ignition, the burner still does not light consider using the manual ignition method in the following section.
- Once you are done using the grill, push the burner knobs in, and rotate clockwise to the "Off" position. You may hear a popping sound when the burners are turned off, which is normal.
- Immediately turn off your gas supply.
"Flashback" may occur in or around the burner tubes. Flashback is commonly recognized by a "whooshing" sound. If this occurs, immediately turn off all burners and shut off the gas supply to the grill. Allow grilling components to cool fully before handling them. Remove the burners and brush them with a soapy water mixture to rid them of all foreign materials, dirt, debris, and food waste. Only reinstall them after they have been thoroughly cleaned.
Manually Lighting the Burner(s)

Important: If you have tried lighting your burners using the Piezo-style system, wait at least five (5) minutes before manually lighting the burners. Leave the hood open and allow gas to dissipate to avoid a possible hazard.
- Make sure you have observed all safety warnings in this manual. Follow the instructions for connecting the gas supply. NEVER turn on the grill without testing for leaks first. Keep all body parts as far away from the grill as possible. Do not lean over the grill.
- Open the grill hood.
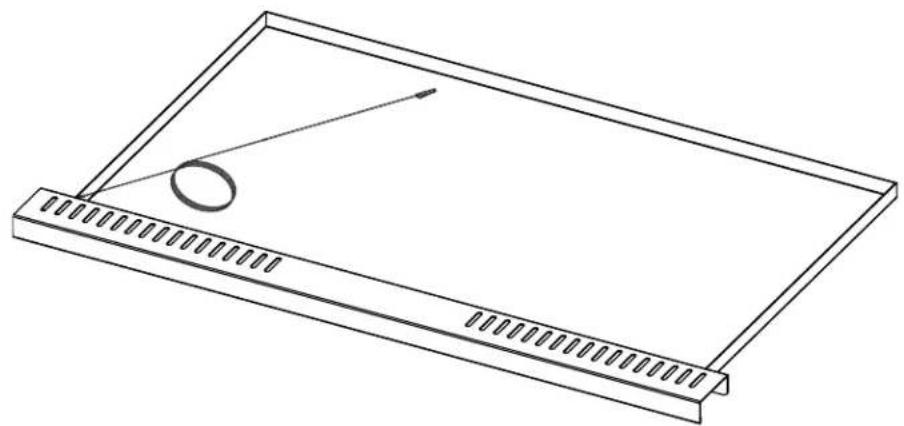
- Pull out the stainless steel drip tray. On the drip tray, there is a clip extension to hold a match. See the image below.
natural_image
Line drawing of a rectangular tray with a circular object on top and a diagonal line extending from the center (no text or symbols)-
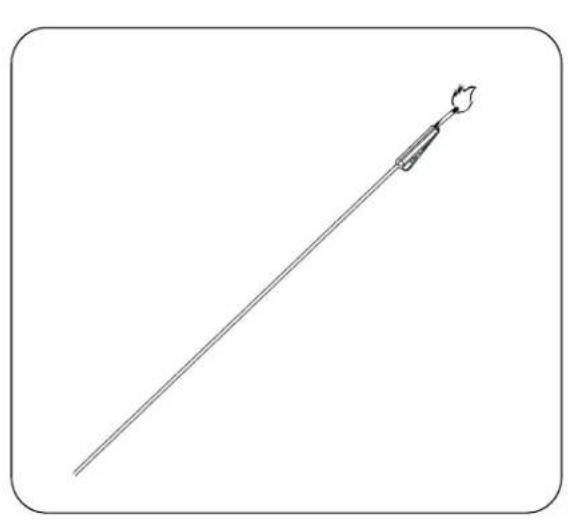
Attach a standard match to the clip.
-
Strike the match to light it. Guide the lit match under the grill cooking grate for the burner you are looking to light.
natural_image
Simple line drawing of a long, straight tool with a flame-like tip at the end (no text or symbols)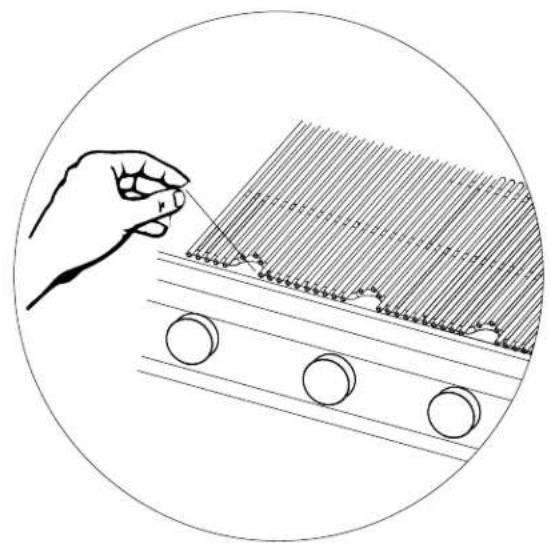
natural_image
Illustration of a hand using a tool to draw or wire through a grid-like structure, with three circular components nearby (no text or symbols)- Push the gas control (burner) knob in, and rotate counterclockwise to the "High" position marking on the knob.
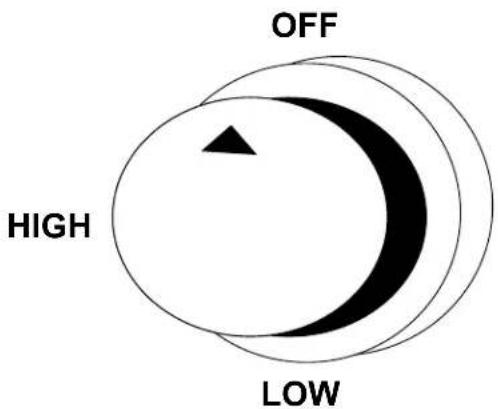
- Repeat steps 4-6 for each main burner you need to light.
- Close the lid and allow the burners to run on "High" for about five (5) minutes to burn off extra gas and residue.
- Open the lid and adjust the burner knobs to your desired cooking temperature.
- Safely dispose of the match(es) and replace the manual lighting clip extension on the drip tray.

CAUTION:
- Do not leave the grill unattended while it is in use.
- Do not attempt to move the grill while it is in use.
- Do not disconnect the gas supply while the grill is in use.
- Turn the gas supply off after you are done using the grill.
- If you are unable to manually light your burners after several attempts, turn off the gas and contact EdgeStar service or an authorized technician.
Operating the Rotisserie and Rotisserie Burner
The rotisserie burner runs along the rear interior of the grill. It provides consistent low heat for an even cook.
- Do not operate the rotisserie burner with the hood closed. This may damage the grill.
• Always make sure the warming rack is removed when using the rotisserie.
To turn on the rotisserie burner:
- Make sure you have observed all safety warnings in this manual. Follow the instructions for connecting the gas supply. NEVER turn on the grill without testing for leaks first. Keep all body parts as far away from the grill as possible.
- Open the grill hood.
- Slowly turn the knob counterclockwise.
Manually Lighting the Rear Burner

Important: If you tried lighting the rear burner with the burner knob and were unable, wait at least five (5) minutes before manually lighting the burner. Leave the hood open and allow gas to dissipate to avoid a possible hazard.
- Make sure you have observed all safety warnings in this manual. Follow the instructions for connecting the gas supply. NEVER turn on the grill without testing for leaks first. Keep all body parts as far away from the grill as possible.
- Open the grill hood. Ensure that the warming rack is removed.
- Use a fireplace style of [long] match and hold an open flame to the right side of the rear burner where the flame normally starts when igniting the rear burner. NEVER use a standard match or cigarette lighter as these pose a fire risk and you must keep your hands as far away from flames as possible.
- Push the gas control (burner) knob in, and rotate counterclockwise to the "High" position marking on the knob.
- The rear burner should ignite. If it does not light after about five (5) seconds, turn the knob to the off position, and wait at least five (5) minutes before trying again to manually light it.
Flare-Ups
Flare-ups can occur when fats and oils drip from the contents being grilled down onto the burners. Flare-ups can be a good thing, imparting a fire/smoke-infused flavor into the contents being grilled. However, if flare-ups become excessive, turn the gas to a lower setting.

CAUTION:
- If a grease fire occurs, do NOT use water to attempt to put it out. Turn all burners off and close the lid. If the fire persists, use an ABC extinguisher.
- If the burners go out during operation, turn off all burner knobs and shut the gas valve at its source. Keep the lid open for at least five minutes with the gas supply off before attempting to re-light the burners. Do not touch the cooking grates or any internal parts of the grill as they may burn you.
Cleaning and Maintenance

CAUTION: Always ensure that the gas supply is fully turned off prior to performing any cleaning and maintenance on your grill. Never attempt to clean parts of the grill while they are still hot.
Periodic cleaning and proper maintenance will ensure efficiency, top performance, and long life. Additionally, proper preventive maintenance is required for your own safety. We recommend to maintain and clean the grill at least twice a year.
- Use a pipe cleaner or wire to clear any blockages in the tubes that lead into the burners. Examples of blockages include food grease, outdoor debris, and residue from insects.
- Keep your outdoor gas grill area clear and free from combustible materials, gasoline, and other flammable vapors and liquids.
- Do not obstruct the flow of combustion and ventilation air. Keep all objects away from vents.
Cleaning the Main Burner(s)

Tip: After every use of your grill, once you are done, turn the burners to the HIGH setting for up to five (5) minutes to burn off food residue, drippings, and grease. Do NOT leave the burners on for more than five minutes and do not leave the grill unattended during this time.
- After ensuring that the gas is shut off and the burner is cool to handle, remove the burner from the firebox. To do so, remove each cotter pin from the cast peg. See the drawing below.
![Remove the cotter pin from the cast peg [on the burner] before lifting the burner. Cast peg on burner](/content/2026/05/1002550/images/c3aa57fa17875f6020b0773776dbe3a0a6ddfbd1cf1f7d50540b8d22235546a4.jpg)
EDGESTAR®
-
Use a bristled brush and run it through the orifices of the burner several times.
-
Go over the exterior of the burner with a wire brush several times to loosen debris and residue. You may also wipe it with a terry cloth or damp rag without using any chemicals. For stubborn scale, you may use a scraper.
-
Look at all burner ports (the small openings) and run a pipe cleaner or thin wire through them. Go over the exterior of the burner with a wire brush several times to loosen debris and residue.
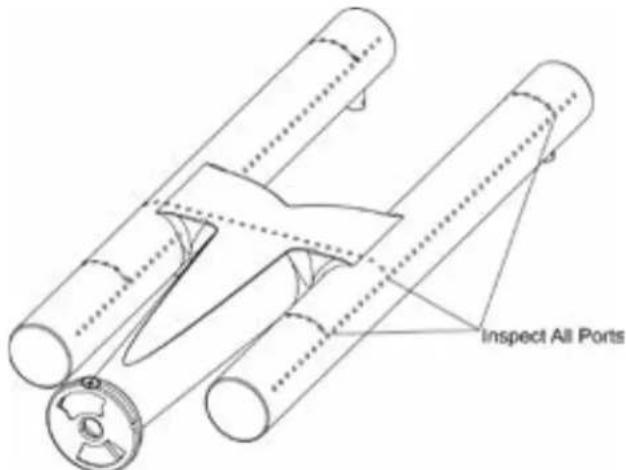
-
Analyze the burner for corrosion and any damage caused by corrosion.
-
Inspect ignition and burner orifices for corrosion and built-up of other residues.
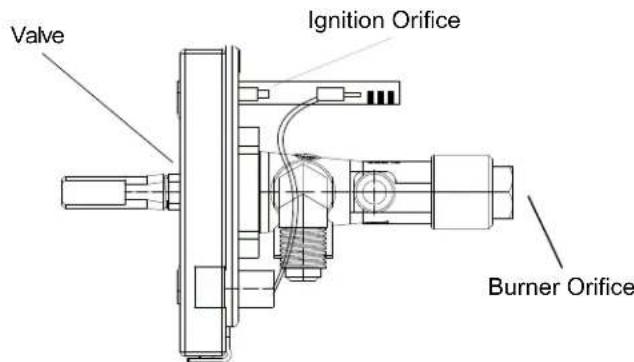
Cleaning the Infrared Burner(s)
The most effective way to clean your infrared burner(s) is to allow it to burn on the HIGH setting for five to 10 minutes. The infrared burner achieves high temperatures and will burn off most food and debris.
You may also use a wire brush to scrub away hardened grease and debris. You may remove each infrared burner from the firebox using the instructions on the prior page. Cotter pins must be removed from the cast pegs.
Inspecting / Adjusting the Air Shutter
If necessary, the gas to air mixture feeding to the main cast burners can be adjusted. With the main burner removed from the firebox, loosen the screw shown in the image below. Rotate the shutter clip. Tighten the screw and reinstall the burner.
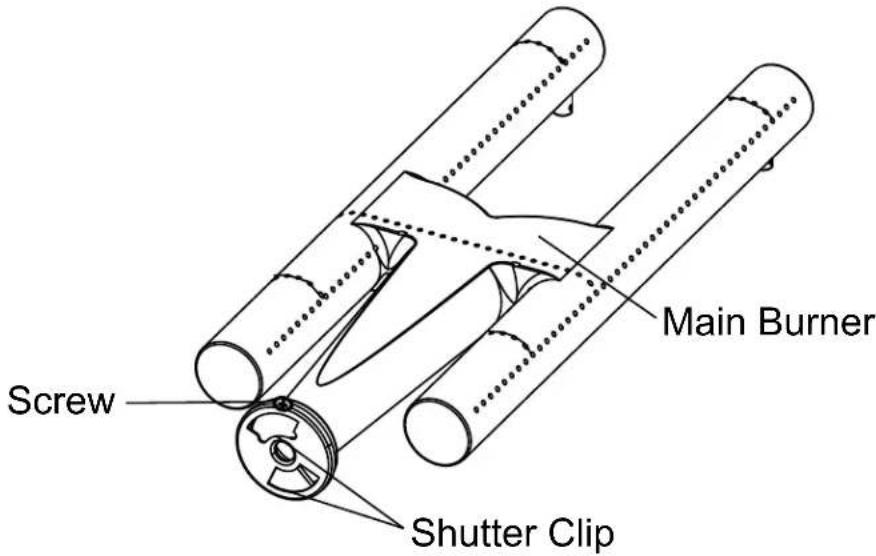

NOTE: Before adjusting the air shutter, ensure that the burner has been cleaned.

NOTE: The ideal flame coming off of the main burner is 1" – 1-1/2" tall. The color should be blue with yellow peaks. If the air shutter is closed too far, the flames will be much taller and yellow in color. This is because the gas running to the burners is not mixing with enough air.
Cleaning the Cooking Grates
Before and after using the grill, always allow the burners to heat up for five minutes with the hood closed and no contents on the cooking grates. Additionally, you will also need to clean the grates with a soap and water mixture. If you are cleaning the grates after using the grill, allow the grates to fully cool before handling them.
Cleaning the Ceramic Briquette Flame Tamers
Over time, the ceramic briquette flame tamers may will become dirty from grease, dirt, drippings, and debris. Periodic cleaning is required. Use a warm soapy water mixture and scrub the briquettes with a sponge and wipe with a terry cloth. If necessary, use a wire brush to loosen excess debris build-up. Always full dry the flame tamers before reinstalling them.
Cleaning the Drip Tray
The removable drip tray will collect grease as you use your grill. Inspect the drip tray frequently to ensure that grease and debris do not build up. The drip tray can be wiped with a warm soapy water mixture and a terry cloth. Use a wire brush, if necessary, to loosen hardened grease.

WARNING: Grease build-up poses a fire hazard. Clean the drip tray regularly.
Exterior Cleaning
The stainless steel grill exterior may be cleaned with a mild detergent and lukewarm water solution such as two tablespoons of baking soda to one quart of water.
Do not use solvent based or abrasive cleaners. Use a soft sponge and rinse with clean water. Wipe with a soft clean towel to prevent water spotting. Stainless steel can discolor when exposed to chlorine gas and moisture. Clean stainless steel with a cloth dampened with a mild detergent and warm water solution. Never use an abrasive or caustic cleaning agent. Maintenance of your stainless steel grill is important to extend the life of your grill. Stainless steel can and will rust and corrode if not cleaned properly and regularly.
Caring for Stainless Steel
Grills near swimming pools, high humidity areas, and coastal areas are particularly susceptible to stainless steel rusting. Moisture, high heat, salt / salt water, and chlorine in particular can cause damage. Your EdgeStar grill is constructed using high quality stainless steel, but take extra precautions to maintain the quality aesthetic and well-being of your grill. Additional steps for caring for your stainless steel grill are below:
• Clean up all grease spills and foreign materials that adhere to your grill as soon as possible.
- If using household cleaners made specifically for stainless steel, take care to wipe in the same direction as the graining / brushing of the stainless steel.
- When cleaning the area around your grill – floors, cabinetry, other appliances – take care to protect your grill when using other abrasive cleaning materials and sealants. Do not let these materials come into contact with your grill. If they do, clean them immediately with a warm soapy water mixture.
- If possible, use a cover designed for grills to shelter your grill from the elements. However, make sure the grill is not still hot or wet before covering the grill.
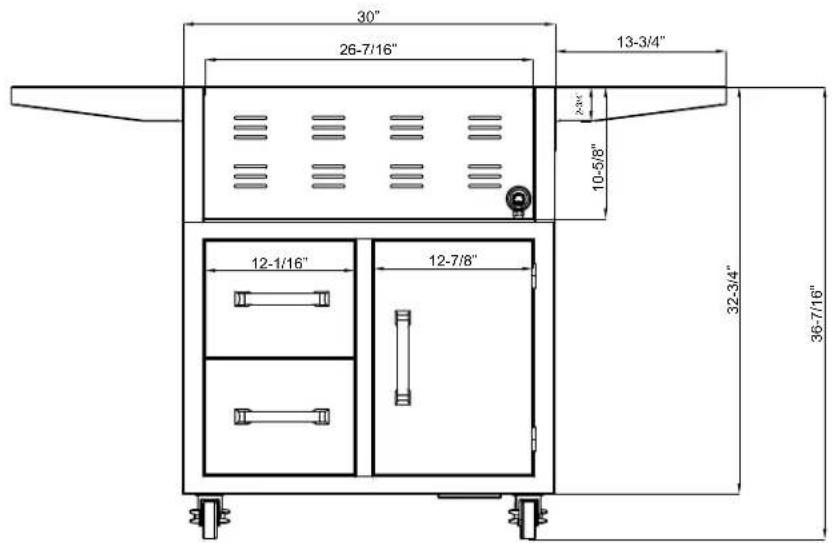
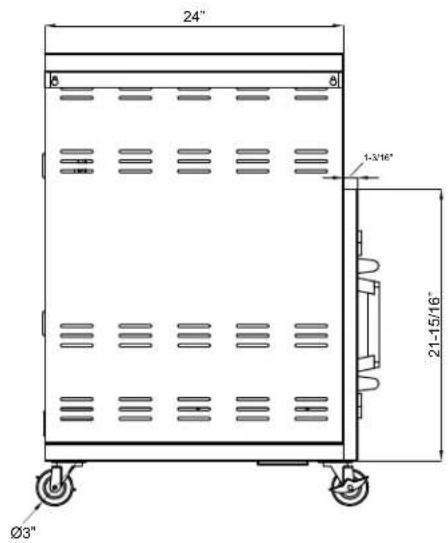
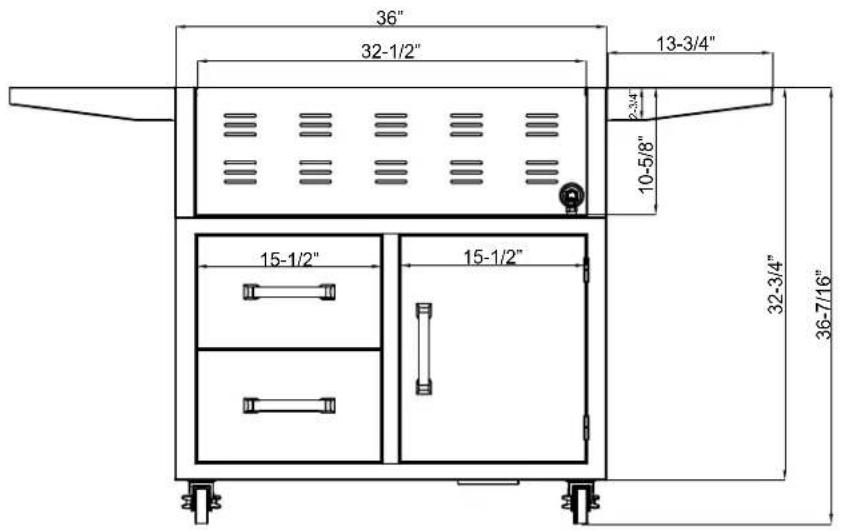
Cart Dimensions
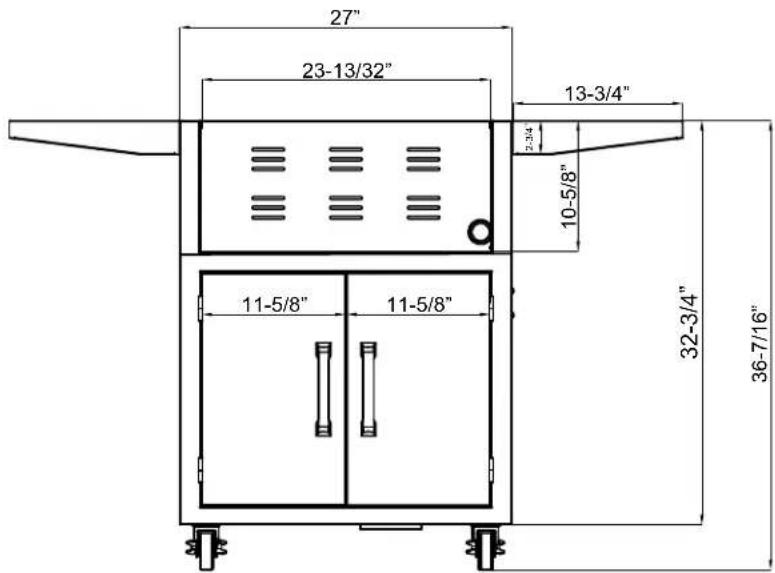
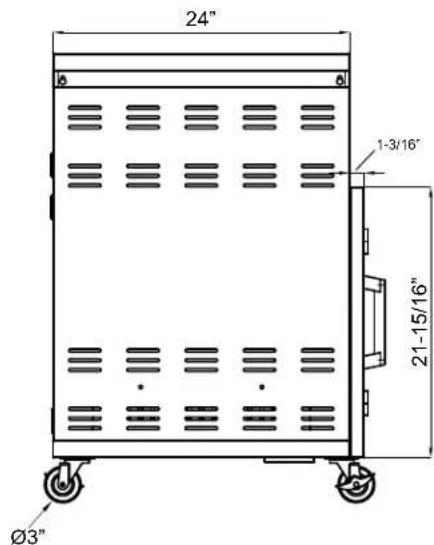
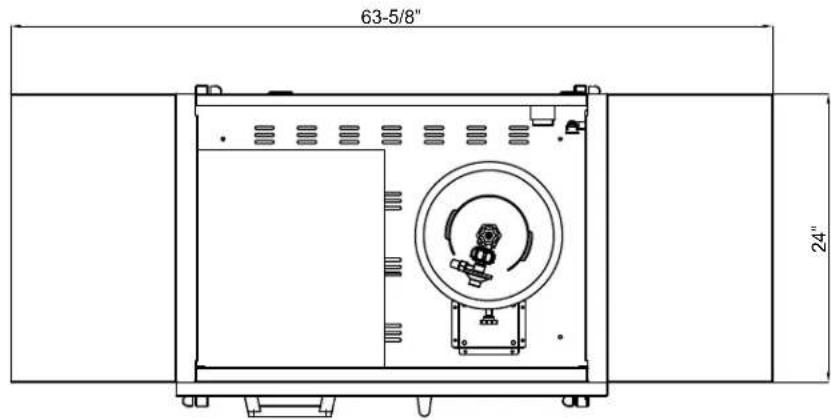
Your EdgeStar grill may be used in a freestanding installation when installed with a cart. Cart dimension cutouts are detailed on the following pages.
Cart for GRL270IBNG / GRL270IBLP (27" Grill Models)
Front
Left
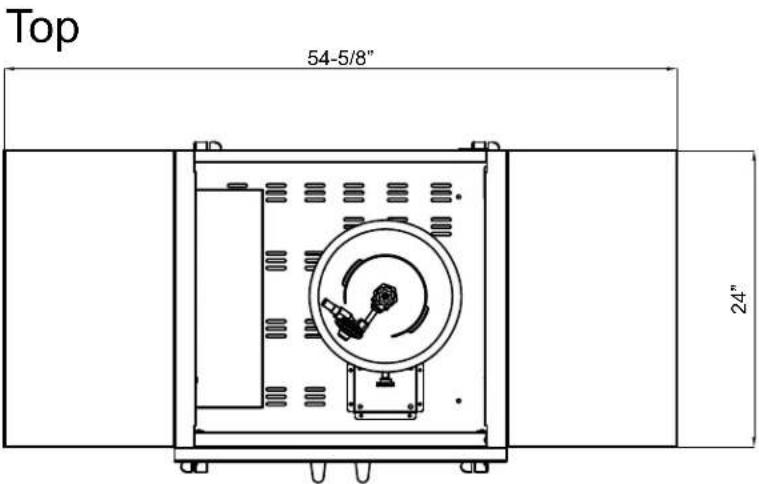
Cart for GRL300IBNG / GRL300IBLP (30" Grill Models)
Front
Left
Top
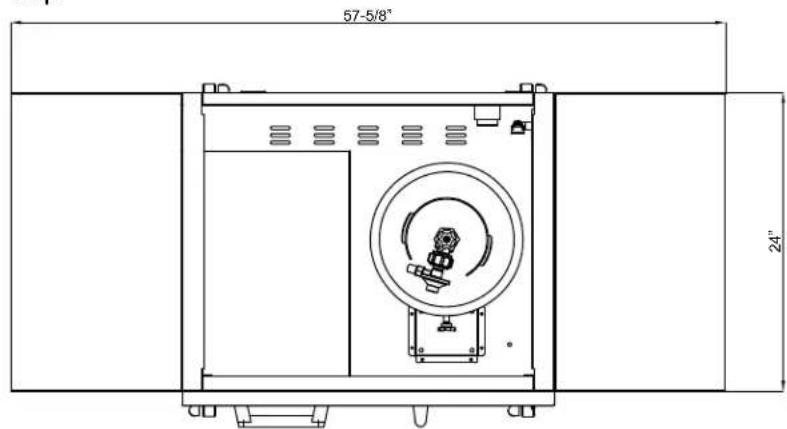
Cart for GRL360IBBNG / GRL360IBBLP (36" Grill Models)
FrontLeft
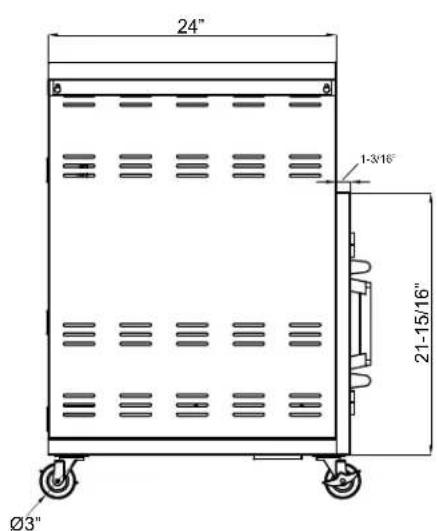
Top
Cart for GRL420IBBNG / GRL420IBBLP (42" Grill Models)
FrontLeft
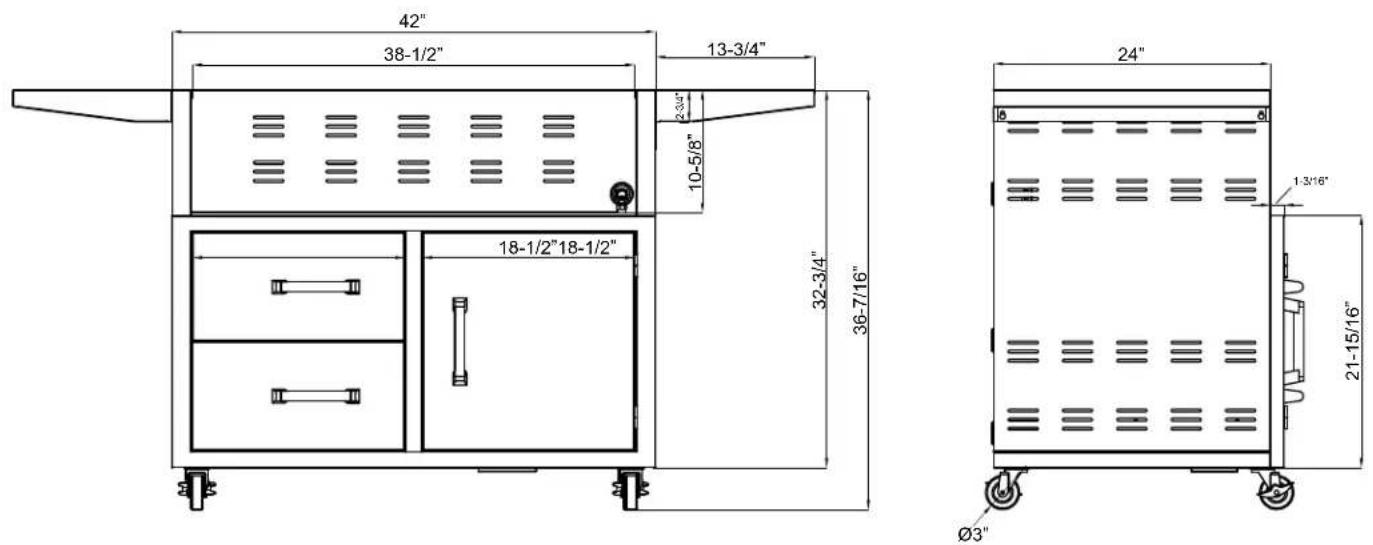
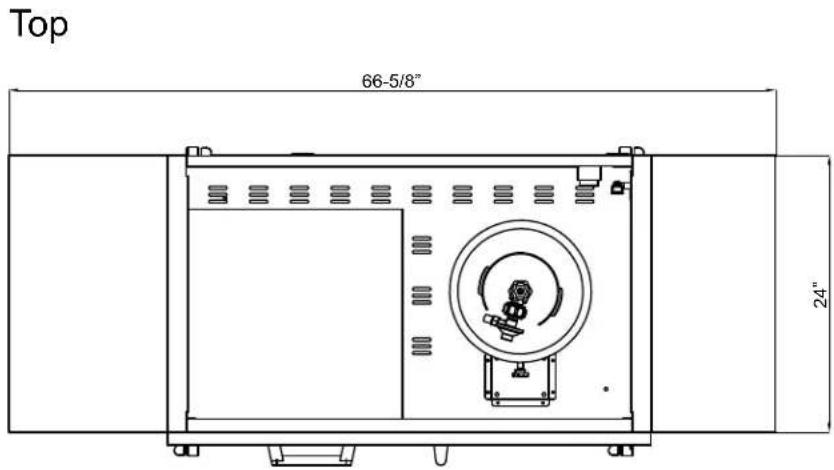
Cart Assembly Instructions
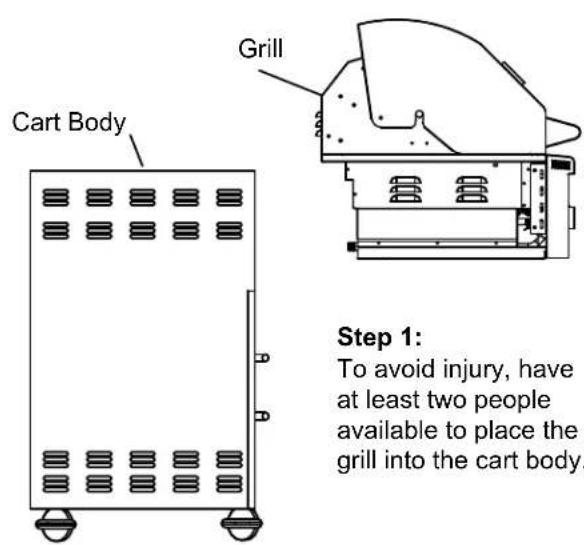
Note: Ensure the swivel casters are in the locked position in order to prevent the cart from moving and causing injury.
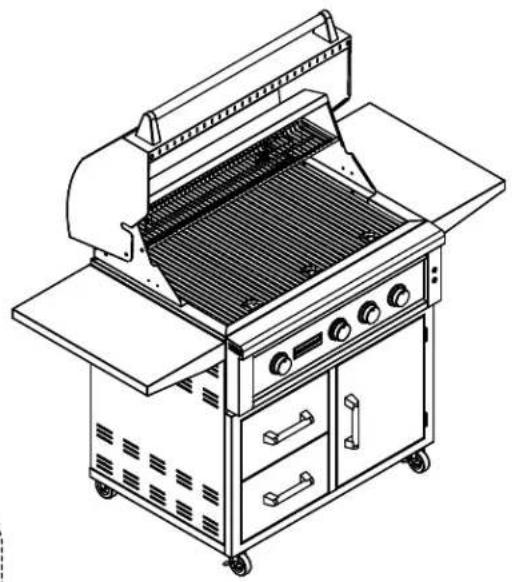
natural_image
Line drawing of a portable electric grill with grating and control panel (no text or symbols)Step 2:
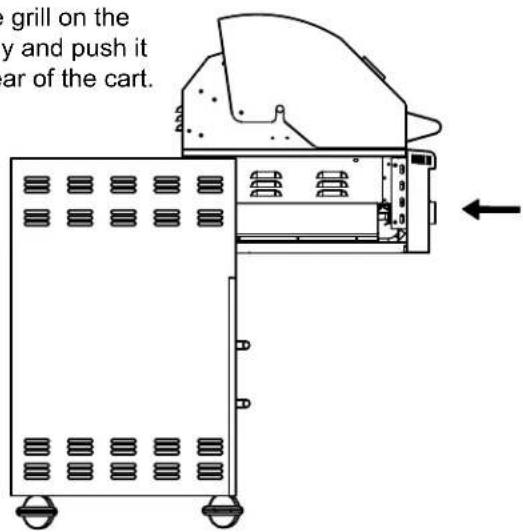
Rest the grill on the cart body and push it to the rear of the cart.
natural_image
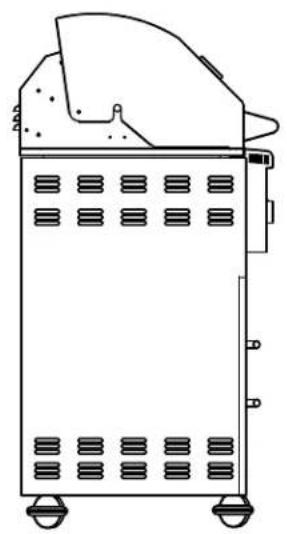
Line drawing of a portable industrial machine with ventilation grilles and wheels (no text or symbols)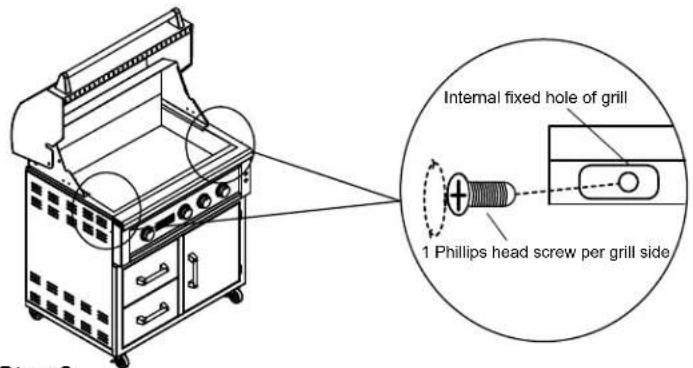
Step 3:
With the grill and cart aligned, use one Phillips head screw on each side of the grill to secure the grill in place.
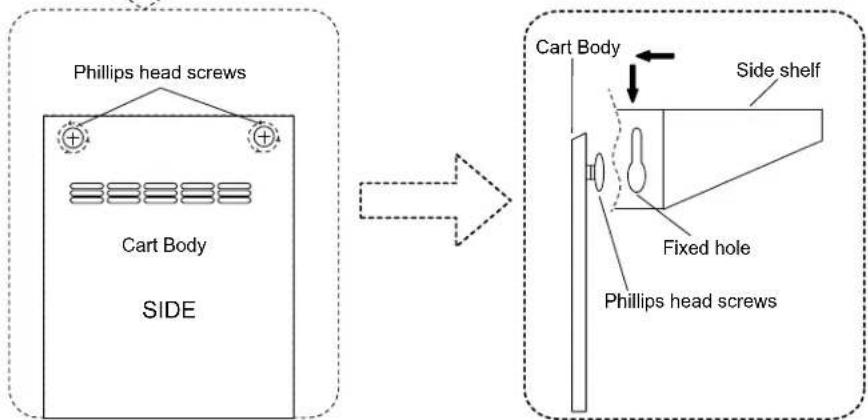
Attach the left and right shelves to cart body with 2 phillips head screws per shelf.
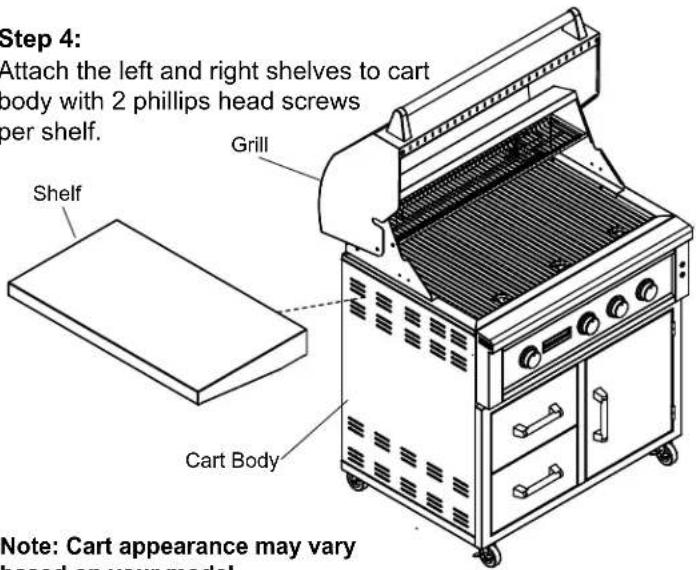
Note: Cart appearance may vary based on your model.
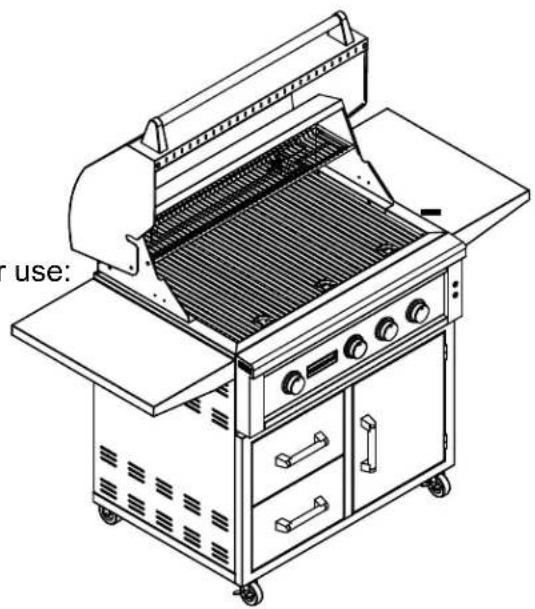
NG Hose Assembly for outdoor use:
NG Hose Model: DH24
NG Connector Model: QH2
(Not included with purchase)
natural_image
Line drawing of a 3D electric grill with grating and control panel (no text or symbols)Natural Gas (NG) Installation: Liquid Propane (LP) Installation:
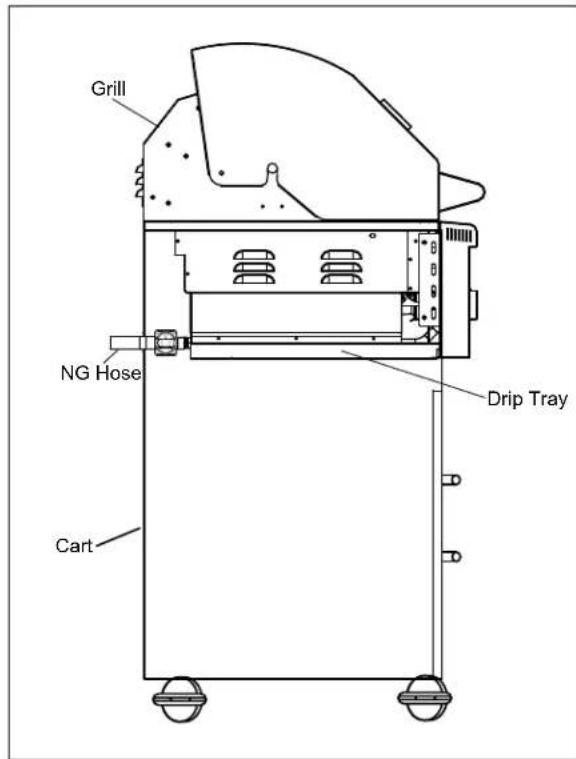
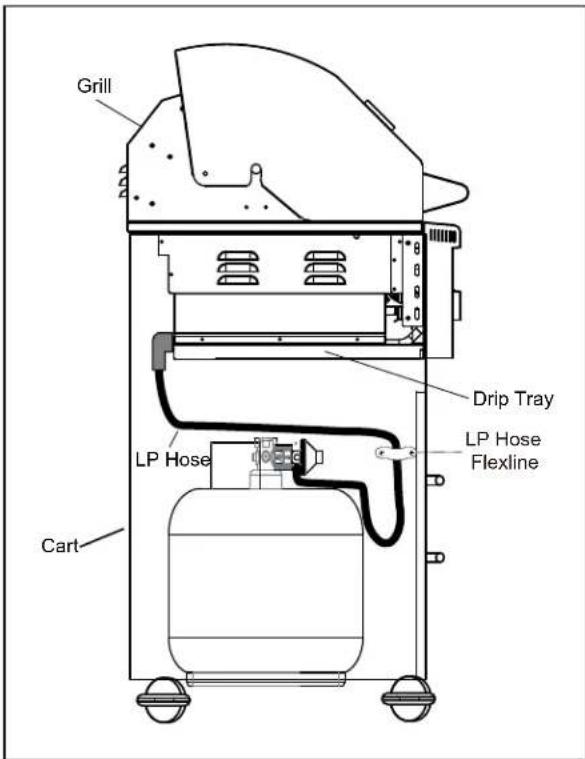

WARNING: Minimum clearance from sides and back of the unit to combustible construction: 24 inches from sides and 24 inches from the back.
Specifications

NOTE: Technical data and performance information are provided for reference only. Specifications are subject to change. Check the rating label on the gas grill for the most accurate information.
| Model Number GRL | 270IB** GRL300IB** | GRL360IBB** GRL | 420IBB** | |
| Included Burners | Infrared (1)Cast (1) | Infrared (1)Cast (1) | Infrared (1)Cast (2) | Infrared (1)Cast (2) |
| Ignition Piezo Style | Piezo Style Piezo Style | Piezo Style | ||
| Main Grilling Area(Inches) | 22^3/16" W x 19^7/8" D | 25^5/8" W x 19^7/8" D | 31^5/8" W x 19^7/8" D | 37^3/16" W x 19^7/8" D |
| RotisserieIncluded Yes Yes Yes | Yes | |||
| Stainless Grade 304 | 304 304 304 | |||
| Flame Tamer | Ceramic Briquettes | Ceramic Briquettes | Ceramic Briquettes | Ceramic Briquettes |
| Zone Dividers Included? | Yes Yes Yes Yes | |||
| Width(Inches) | 27" 30" 36" 42" |

NOTE: Specifications are subject to change. Check the rating label on the gas grill for the most accurate information.
EdgeStar Limited Warranty
WHAT IS COVERED:
LABOR: For a period of NINETY (90) DAYS from the date of original purchase, labor will be performed free of charge at an authorized EdgeStar repair facility. At its option, EdgeStar will repair the product with new or remanufactured parts, or exchange the defective product with a new, refurbished, or remanufactured product. If a product is replaced, it will carry the remaining warranty of the original product. After the ninety (90) day period, EdgeStar will no longer be responsible for labor charges incurred. All defective products and parts covered by this warranty will be repaired or replaced on a mail-in basis to an EdgeStar authorized repair facility.
PARTS:
- Ignition: One (1) year
• Lighting, electronics, & wiring: One (1) year
• Main burners: Three (3) years
• Rotisserie burner: Three (3) years
• Infrared burner: Two (2) years - Valves: One (1) year
• Ceramic briquette flame tamer(s): One (1) year
• Body, including hood, drip tray, firebox, and main body of the grill: Three (3) years
For the periods of time specified above following the date of original purchase, EdgeStar will supply new, rebuilt, or refurbished parts free of charge. EdgeStar may request a defective part be returned in exchange for the replacement part. All replacement parts or products will be new, remanufactured, or refurbished. All products and parts replaced by EdgeStar under warranty service become the property of EdgeStar. Discoloration and surface corrosion do not qualify as defects.
This warranty applies to the original purchaser only, and only covers defects in workmanship experienced during operation of the product under normal service, maintenance, and usage conditions. This warranty applies to the purchase and use of this product in residential settings within the United States of America.
WHAT IS NOT COVERED:
The following limitations apply to the coverage of this warranty. This warranty does not cover:
• Labor charges for installation, setup or training to use the product.
- Shipping damage, and any damage caused by improper packaging for shipment to an authorized service center, and any damaged caused by improper voltage or any other misuse, including abnormal service, handling, or usage.
• Cosmetic damage such as scratches and dents.
• Normal wear and tear on parts or replacement of parts designed to be replaced, e.g. filters, cartridges, batteries.
• Service trips to deliver, pick-up, or repair, install the product, or to instruct in proper usage of the product.
- Damages or operating problems resulting from misuse, abuse, operation outside environmental specifications, uses contrary to instructions provided in the owner's manual, accidents, acts of God, vermin, fire, flood, improper installation, unauthorized service, maintenance negligence, unauthorized installation or modification, or rental or commercial use.
• Labor, service transportation, and shipping charges incurred 91 days or more after the date of original purchase.
- The use of EdgeStar products in commercial or rental settings.
- Optional accessories, attachments, and appearance items.
• Products that have been modified to perform outside of specifications without the prior written permission of EdgeStar.
- Products lost in shipment, or theft.
- Products sold AS IS or from an unauthorized reseller.
• Products that have had their serial numbers removed or defaced. Products with serial numbers that have been invalidated.
OBTAINING WARRANTY SERVICE:
If you believe your product is defective, contact EdgeStar Customer Support for troubleshooting assistance and warranty service at 1-866-319-5473. Please have your serial number and proof of purchase available. Once an EdgeStar authorized representative has confirmed that your product is defective and eligible for warranty service, the product must be returned to an EdgeStar repair facility. The purchaser is solely responsible for prepaying all shipping related costs to and from the repair facility. EdgeStar is not responsible for damage resulting from shipper mishandling or improper packaging. Do not return a defective product to the place of purchase. Products received without a return authorization number will be refused.
THIS WARRANTY IS IN LIEU OF ANY OTHER WARRANTY, EXPRESSED OR IMPLIED, INCLUDING WITHOUT LIMITATION, ANY WARRANTY OF MERCHANTABILITY OR FITNESS FOR A PARTICULAR PURPOSE. TO THE EXTENT ANY IMPLIED WARRANTY IS REQUIRED BY LAW, IT IS LIMITED IN DURATION TO THE EXPRESS WARRANTY PERIOD ABOVE. NEITHER THE MANUFACTURER NOR ITS DISTRIBUTORS SHALL BE LIABLE FOR ANY INCIDENTAL, CONSEQUENTIAL, INDIRECT, SPECIAL, OR PUNITIVE DAMAGES OF ANY NATURE, INCLUDING WITHOUT LIMITATION, LOST REVENUES OR PROFITS, OR ANY OTHER DAMAGE WHETHER BASED IN CONTRACT, TORT, OR OTHERWISE. SOME STATES DO NOT ALLOW THE EXCLUSION OF INCIDENTAL OR CONSEQUENTIAL DAMAGES, SO THE ABOVE EXCLUSION MAY NOT APPLY TO YOU. THIS WARRANTY GIVES YOU SPECIFIC LEGAL RIGHTS. YOU MAY HAVE OTHER RIGHTS THAT VARY FROM STATE TO STATE.
This page left blank intentionally.
EDGESTAR®

- Grill Models:
- Owner's Manual
- Important Safety Information
- DANGER:
- WARNING:
- Gas and Electrical Safety
- General Safety
- Propane Gas Safety
- Beware of Spiders
- CAUTION:
- Natural Gas Safety
- EDGESTAR®
- Table of Contents
- First-Time Operating Instructions
- Introduction
- For Your Records:
- Parts Identification
- GRL360IBBNG / GRL360IBBLP
- GRL420IBBNG / GRL420IBBLP
- Grill Dimensions
- GRL270IBNG / GRL270IBLP
- GRL300IBNG / GRL300IBLP
- Island / Cabinet Cutout Dimensions
- Maintaining Adequate Ventilation
- Unpacking the Gas Grill
- Installing the Gas Grill
- Notes About Installation
- Installation Location
- Types of Installation
- Liquid Propane (LP) Cylinder Specifications
- Liquid Propane (LP) Installation and Requirements:
- To Connect the LP Gas Supply:
- WARNINGS:
- To Disconnect the LP Gas Supply:
- Using an LP Gas Supply in an Enclosure
- Natural Gas (NG) Installation and Requirements:
- To Connect the NG Gas Supply:
- Checking for Gas Leaks
- Electrical Requirements
- ELECTRIC SHOCK HAZARD!
- Recommended Grounding Method
- Plugging in the Lights
- Included Cooking Components
- Operation
- Lighting the Burner(s)
- If the burners fail to light:
- Manually Lighting the Burner(s)
- Operating the Rotisserie and Rotisserie Burner
- Manually Lighting the Rear Burner
- Flare-Ups
- Cleaning and Maintenance
- Cleaning the Main Burner(s)
- Cleaning the Infrared Burner(s)
- Inspecting / Adjusting the Air Shutter
- Cleaning the Cooking Grates
- Cleaning the Ceramic Briquette Flame Tamers
- Cleaning the Drip Tray
- Exterior Cleaning
- Caring for Stainless Steel
- Cart Dimensions
- Cart for GRL270IBNG / GRL270IBLP (27" Grill Models)
- Cart for GRL300IBNG / GRL300IBLP (30" Grill Models)
- Cart for GRL360IBBNG / GRL360IBBLP (36" Grill Models)
- Cart for GRL420IBBNG / GRL420IBBLP (42" Grill Models)
- Cart Assembly Instructions
- Specifications
- EdgeStar Limited Warranty
- WHAT IS COVERED:
- PARTS:
- WHAT IS NOT COVERED:
- OBTAINING WARRANTY SERVICE:
Brand : EDGESTAR
Model : GRL360IBBNG
Category : Barbecue