
Coronis MDCG-5221 - Monitor Barco - Free user manual and instructions
Find the device manual for free Coronis MDCG-5221 Barco in PDF.


| Product Type | Medical Diagnostic Color Monitor |
| Brand | Barco |
| Model | Coronis MDCG-5221 |
| Display Size | 21.3 inches (diagonal) |
| Resolution | 1600 x 1200 (2 MP) |
| Brightness | 1100 cd/m² (typical) |
| Contrast Ratio | 1100:1 (typical) |
| Viewing Angle | 178° horizontal / 178° vertical |
| Pixel Pitch | 0.270 mm |
| Display Colors | 1.07 billion colors (10-bit LUT) |
| Calibration | DICOM GSDF calibrated, built-in front sensor |
| Video Inputs | DVI-D, DisplayPort, HDMI |
| USB Ports | 1 upstream, 2 downstream |
| Power Consumption | 55 W (typical), < 0.5 W standby |
| Power Supply | AC 100-240 V, 50/60 Hz, internal |
| Dimensions (W x H x D) | With stand: 472 x 410 x 205 mm; Without stand: 472 x 366 x 80 mm |
| Weight | 7.5 kg (with stand), 5.6 kg (without stand) |
| VESA Mount | 100 x 100 mm |
| Safety Standards | IEC 60601-1, Medical electrical equipment |
| Cleaning | Use a soft, lint-free cloth slightly dampened with mild soap solution. Do not use alcohol or abrasive cleaners. |
| Spare Parts | Backlight unit, power supply board, front sensor module – available from Barco service |
| Repairability | Designed for field-replaceable units (FRU) by certified technicians. User-replaceable parts: none. |
Frequently Asked Questions - Coronis MDCG-5221 Barco
User questions about Coronis MDCG-5221 Barco
0 question about this device. Answer the ones you know or ask your own.
Ask a new question about this device
Download the instructions for your Monitor in PDF format for free! Find your manual Coronis MDCG-5221 - Barco and take your electronic device back in hand. On this page are published all the documents necessary for the use of your device. Coronis MDCG-5221 by Barco.
USER MANUAL Coronis MDCG-5221 Barco
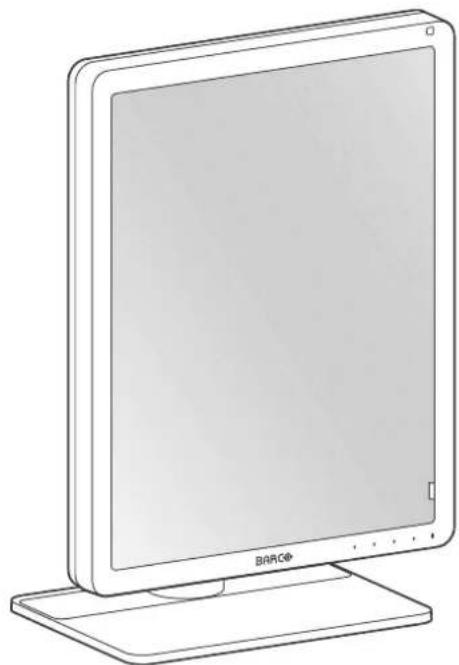
Coronis 5MP LED Display
natural_image
Line drawing of a flat-screen computer monitor with a base (no text or symbols visible)User Guide
MDCG-5221
Barco NV
Beneluxpark 21, 8500 Kortrijk, Belgium
www.barco.com/en/support
www.barco.com
Registered office: Barco NV
President Kennedypark 35, 8500 Kortrijk, Belgium
www.barco.com/en/support
www.barco.com
Table of contents
1 Welcome! 5
1.1 About the product....6
1.2 What's in the box....6
1.3 Product overview....7
2 Installation 9
2.1 Display position adjustment 10
2.2 Cable connections....11
2.3 VESA-mount installation 13
2.4 First time starting up 14
3 Daily operation....17
3.1 Recommendations for daily operation 18
3.2 Key indicator lights 18
3.3 Standby switching....19
3.4 Bringing up the OSD menus 19
3.5 Navigating through the OSD menus 19
3.6 I-Luminate 20
4 Advanced operation....21
4.1 OSD menu language 22
4.2 OSD menu automatic close function....22
4.3 Power LED....22
4.4 Key indicator lights 23
4.5 Power lock function....23
4.6 DPMS mode....23
4.7 Hibernate 24
4.8 I-Luminate default mode 24
4.9 Luminance target 25
4.10 Viewing modes 25
4.11 Display functions 25
4.12 Ambient Light Compensation (ALC) 26
4.13 Reading rooms 26
4.14 Continuous ALC 27
4.15 Embedded QA 27
4.15.1 About Embedded QA....28
4.15.2 DICOM status report....28
4.15.3 DICOM compliance check 28
4.15.4 DICOM calibration 29
4.15.5 Reset DICOM calibration....29
4.15.6 DICOM error threshold 29
4.16 Display orientation....30
4.17 Video input signals 30
4.18 Video encoding modes 30
4.19 Grayscale conversion modes....31
4.20 EDID timings....32
4.21 EDID format 32
4.22 Display info 32
4.23 Display status....33
5 Repacking instructions....35
5.1 Foot protection buffer 36
5.2 Repacking overview 37
6 Cleaning your display 39
6.1 Cleaning instructions 40
7 Important information....41
7.1 Safety information....42
7.2 Environmental information....43
7.3 Regulatory compliance information....45
7.4 EMC notice 46
7.5 Explanation of symbols....49
7.6 Legal disclaimer....51
7.7 Technical specifications....52
7.8 Open source license information 54
Welcome!
1
1.1 About the product
Overview
Thank you for choosing this Coronis 5MP LED Display!
Coronis 5MP LED Display is the industry-leading display system for grayscale radiology imaging. It delivers optimum diagnostic precision and workflow efficiency for high-resolution PACS imaging, CT, MRI, chest radiology, angiography, etc.
50 more shades of gray
Barco's high-bright LED backlights render more Just Noticeable Differences to help you see more shades in gray. By making subtle details more noticeable more quickly, Coronis 5MP LED Display reduces windowing and leveling time so you can read more studies each day.
Perfect images
Barco's image-enhancing technologies — designed for the unique characteristics of LED backlit medical displays — ensure perfect image quality at all times. PPU-LED removes panel noise and renders uniform DICOM images from center to corner. An Intelligent Multi Sensor Technology system (I-MST) combines Barco's patented I-Guard front-of-screen sensor with backlight, ambient light and temperature sensors to optimize image quality and keep it consistent over time.
Green performance
Using energy-efficient LED backlights, Barco's Coronis 5MP LED Display is as low in power consumption and is high in brightness. Additionally, Barco's LED backlights are mercury-free, produce less heat, and last longer. This allows Barco to guarantee a 5-year backlight warranty.
Worryfree DICOM compliance
Barco's Coronis 5MP LED Display is bundled with MediCal QAWeb for automated calibration and QA, ensuring continuous diagnostic quality and maximum uptime of your workstation. MediCal QAWeb allows yo to continue working while automated QA checks are being executed. The system also includes a secure online web service for remote, centralized image quality management.
I-Luminate™
One push 'hot light' brightness boost for inspection of subtle details or comparing with film-based priors.

CAUTION: Read all the important safety information before installing and operating your Coronis 5MP LED Display. Please refer to the dedicated chapter in this user guide.
1.2 What's in the box
Overview
• MDCG-5221 display
- User guide
- System disc
- Documentation disc
- DisplayPort cable
- Mains cables
• External power supply
- USB cable
If you ordered a Barco display controller, it's also in the box together with its accessories. A dedicated guide is available on the documentation disc.

Keep your original packaging. It is designed for this display and is the ideal protection during transport and storage.
1.3 Product overview
Front
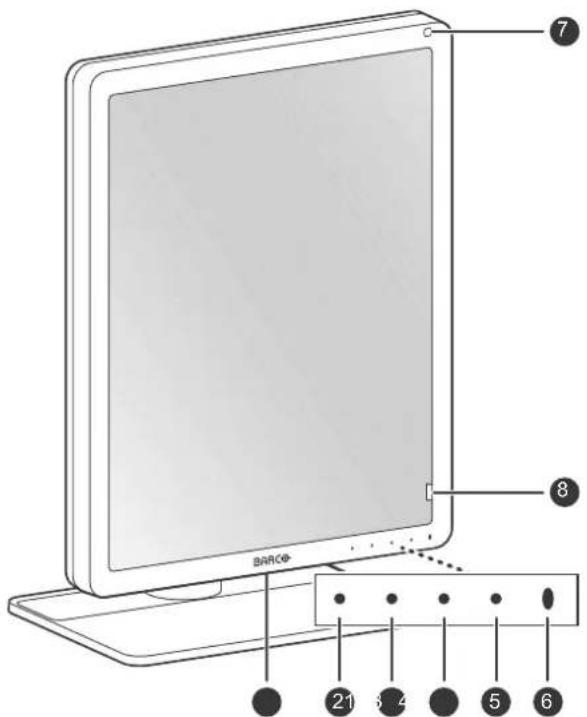
Image 1-1
- USB-A 2.0 downstream connector
- I-Luminate/Left key
- Right key
- Menu key
- Standby key
-
Power status LED
-
Off: Display not powered, or display operational but power LED function disabled in OSD (see "Power LED", page 22)
• Steady white: Display operational - Slow blinking amber: Display in suspend mode (requires DPMS mode to be enabled in the OSD menu, see "DPMS mode", page 23)
- Fast blinking amber: Display in standby mode (requires DPMS mode to be enabled in the OSD menu, see "DPMS mode", page 23)
-
Steady amber: Display switched off via the standby key, or display in hibernate mode (requires DPMS mode and Hibernate to be enabled in the OSD menu, see "DPMS mode", page 23 and "Hibernate", page 24)
-
Ambient light sensor
-
Front sensor
Back
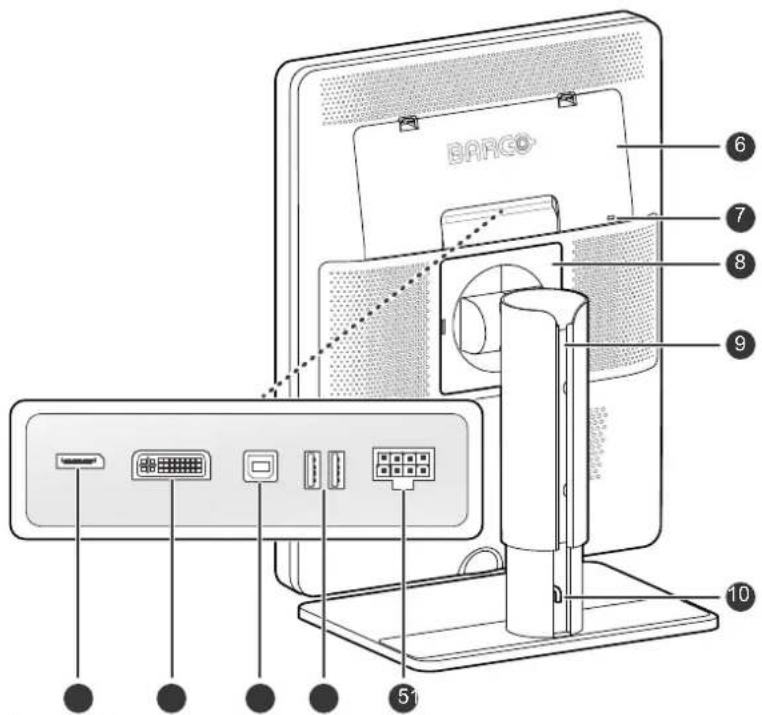
Image 1-2
- DisplayPort video input
- DVI video input
- USB-B 2.0 upstream connector
- USB-A 2.0 downstream connectors (2x)
- +24 VDC power input
- Connector compartment cover
- Kensington security lock
- VESA mount cover plate
- Cable duct
- Foot lock clip
Installation
2

Prior to installing your Coronis 5MP LED Display and connecting all necessary cables, make sure have a suitable display controller physically installed in your computer. If you are using a Barco display controller, please consult the user guide delivered with it to do this.
For a list of compatible display controllers, please refer to the latest version of the compatibility matrix available on my.barco.com (MyBarco > My Support > Healthcare > Compatibility Matrices > Barco Systems Compatibility Matrices).
2.1 Display position adjustment
To adjust the display position
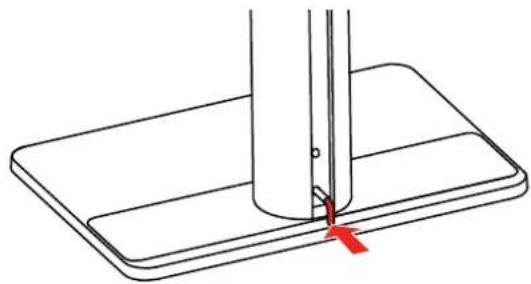
- Pull out the red foot lock clip from the hole at the back of the foot.
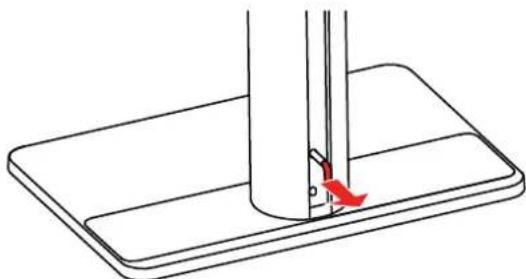
natural_image
Diagram of a mechanical assembly with a rod inserted into a base plate, showing a red arrow indicating force direction (no text or symbols present)Image 2-1
- You can now safely tilt, swivel, pivot, raise and lower the display as desired.
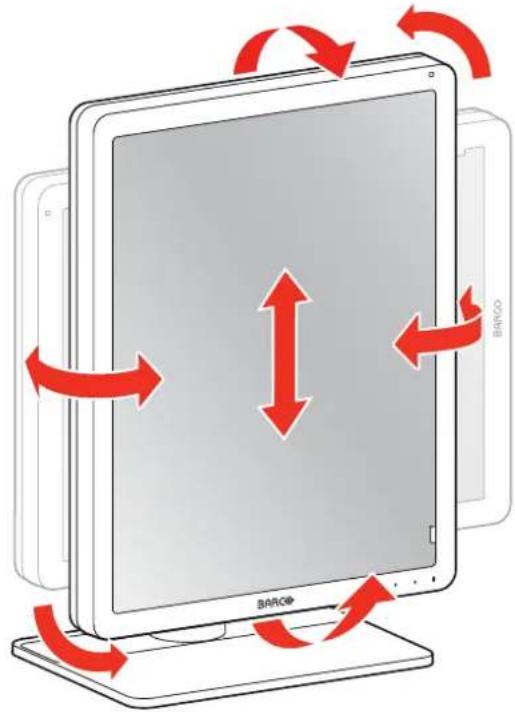
Image 2-2

WARNING: The display must be in its highest position before it can be properly pivoted.

Store the foot lock clip in the storage hole in case the display needs to be transported later.
natural_image
Technical line drawing of a mechanical assembly with a cylindrical component inserted into a base plate (no text or symbols)Image 2-3

If, after installing the display of the system, you change the panel orientation while an image is the screen, the result depends on the graphic board and the resolution of the image. In some of the image will be rotated automatically, in other cases it will not be rotated (e.g., when pixels w be lost after rotation). If necessary, change the image resolution in the display control panel and restart the system after changing the orientation.
2.2 Cable connections
To connect the cables
- Open the connector compartment. Do this by gently pushing the two lips on top of the cover, after which it can be removed from the display.
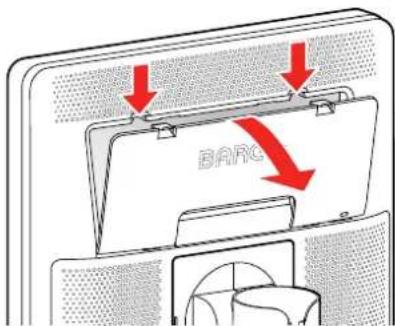
Image 2-4
- Connect a video source from your workstation to the corresponding video inputs on the display. Caution: Connect only one of the two video inputs. Connecting both inputs simultaneously will result in driver errors.
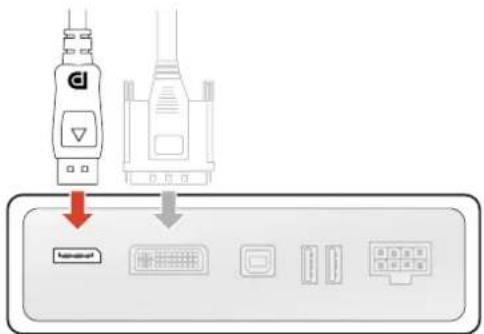
Image 2-5
- Connect the workstation's USB host to the USB upstream connector on the display if you want to make use of QAWeb or any of the display USB downstream connectors (e.g. to connect a keyboard, mouse touch pad or other peripheral).
Installation
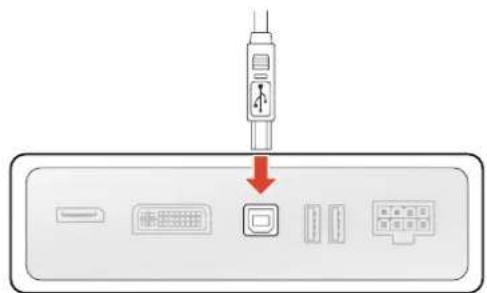
Image 2-6
- Connect the supplied external DC power supply to the power input on the display.
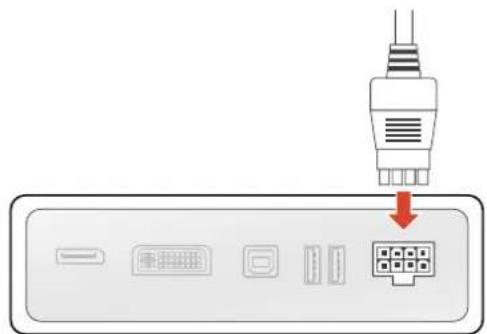
Image 2-7
- Route all cables through the cable duct in the stand of your display. For better strain-relief and shielding of the cables, fix the cables with the cable straps at the inside of the connector compartment.
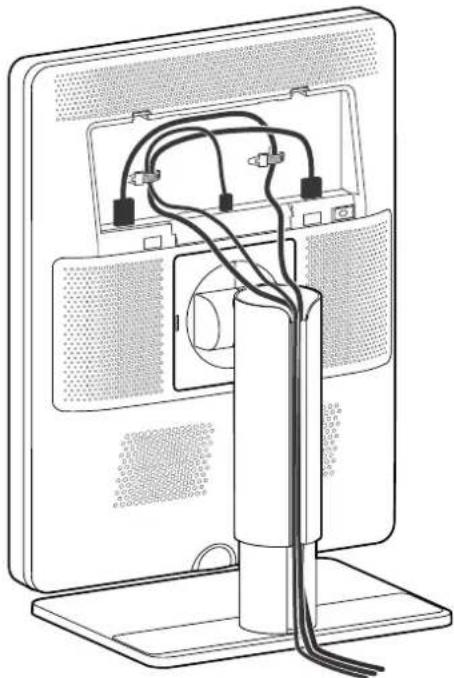
natural_image
Diagram of a computer monitor with cable routing and ventilation slots (no text or labels)Image 2-8
- Close the connector compartment cover. You will hear a "click" sound when the cover is in position.
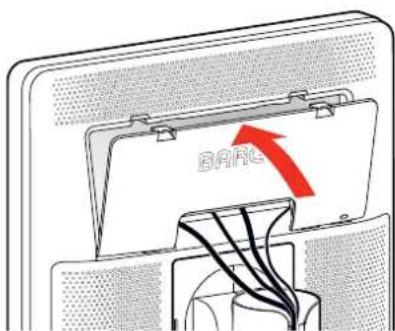
Image 2-9
- Connect the external DC power supply to a grounded power outlet by using one of the power cables included with the display.
2.3 VESA-mount installation

CAUTION: Use suitable mounting apparatus to avoid risk of injury.

WARNING: Never move a display attached to an arm by pulling or pushing the display itself. Instead, make sure that the arm is equipped with a VESA approved handle and use this to move display. Please refer to the instruction manual of the arm for more information and instructions.

WARNING: Use an arm that is approved by VESA (according to the VESA 100 mm standard). Use an arm that can support the weight of the display. Refer to the technical specifications of the display for the applicable weight.
Overview
The panel, standard attached to the tilt & swivel foot, is compatible with the VESA 100 mm standard. So be used with an arm stand according to the VESA 100 mm standard.
Therefore, the tilt & swivel foot must be removed from the panel.
- Put the display in the lowest position and lock the height mechanism.
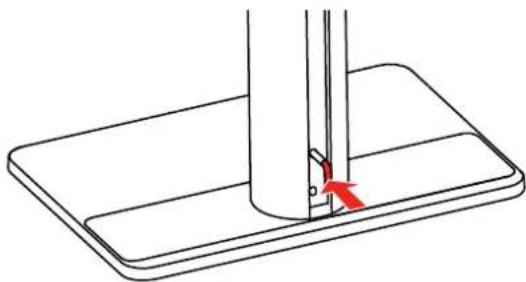
natural_image
Diagram of a mechanical assembly with a cylindrical component and a base plate, showing a red arrow indicating direction (no text or symbols)Image 2-10
-
Put the display face down on a clean and soft surface. Be careful not to damage the panel screen.
-
Remove the plastic cover with a flathead screw driver.
Installation
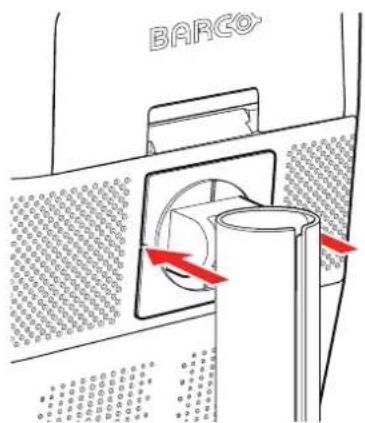
Image 2-11
- Slide the plastic cover over the neck of the foot.
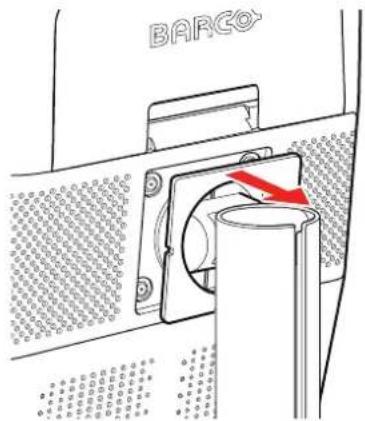
Image 2-12
- Remove the four screws fixing the foot while supporting the foot.
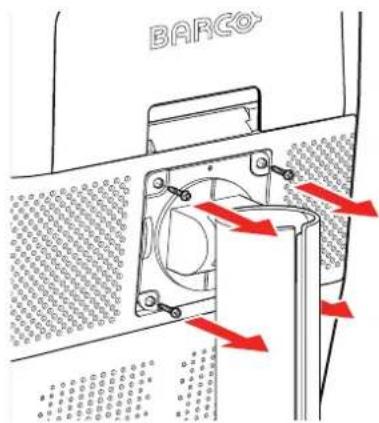
Image 2-13
- Attach the arm stand firmly to the panel using 4 screws M4 x 8 mm.
2.4 First time starting up
Overview
You are now ready to start up your Coronis 5MP LED Display for the first time.
- Switch on your Coronis 5MP LED Display as described in "Standby switching", page 19.
- Turn on the computer connected to your display.
If you have properly installed your display and display controller, the Windows start-up messages will appear once the boot procedure is finished.

Your Coronis 5MP LED Display will be running in a basic video mode at a default refresh rate first time starting up. If you are using a Barco display controller, please consult the user guide delivered with it to install the drivers, software and documentation. When this is done, your display will automatically detect the connected video input signal(s) and apply the correct video mode and refresh rate.
Daily operation
3
3.1 Recommendations for daily operation
Optimize the lifetime of your display
Enabling the Display Power Management System (DPMS) of your display will optimize its diagnostic lifetime by automatically switching off the backlight when the display is not used for a specified period of time. E default, DPMS is enabled on your display, but it also needs to be activated on your workstation. To do to "Power Options Properties" in the "Control Panel".

Barco recommends setting DPMS activation after 20 minutes of non-usage.
Use a screen saver to avoid image retention
Prolonged operation of an LCD with the same content on the same screen area may result in a form of retention.
You can avoid or significantly reduce the occurrence of this phenomenon by using a screen saver. You can activate a screen saver in the "Display properties" window of your workstation.

Barco recommends setting screen saver activation after 5 minutes of non-usage. A good screen saver displays moving content.
In case you are working with the same image or an application with static image elements for several h continuously (so that the screen saver is not activated), change the image content regularly to avoid image retention of the static elements.
Understand pixel technology
LCD displays use technology based on pixels. As a normal tolerance in the manufacturing of the LCD, a limited number of these pixels may remain either dark or permanently lit, without affecting the diagnostic performance of the product. To ensure optimal product quality, Barco applies strict selection criteria for its panels.

To learn more about LCD technology and missing pixels, consult the dedicated white papers available at www.barco.com/healthcare.
Enhance user comfort
Every Barco multi-head display system is color matched with the highest specifications in the market.

Barco recommends keeping color-matched displays together. Furthermore, it is important to use all displays of a multi-head configuration at the same rate to preserve color matching throughout the economic lifetime of the system.
Maximize quality assurance
The 'MediCal QAWeb' system offers online service for high-grade Quality Assurance, providing maximum diagnostic confidence and uptime.

Barco recommends to install MediCal QAWeb Agent and apply the default QAWeb policy at least. This policy includes calibration on regular intervals. Connecting to MediCal QAWeb Server offers even more possibilities. Learn more and sign up for the free MediCal QAWeb Essential level at www.barco.com/QAWeb.
3.2 Key indicator lights
About the key indicator lights
By default, the indicator lights of the keys will be dimmed which makes the keys unavailable at that month. To make the keys illuminate and available for further actions touch one of the keys. As a result, all key
illuminated and are now available for further actions. However, if no further actions are taken within the following 5 seconds, the keys will dim again.

The I-Luminate/Left key is always lit and available for activation of the I-Luminate feature. Please refer to "I-Luminate", page 20 for more information.
3.3 Standby switching
About standby switching

The connected power supply also provides a switch that can be used to turn the power complete off. To use the display, please make sure to switch on this power supply. This can be done by pushing the on/off switch on the power supply into the “|” position.
Switching on the display while it is in standby mode or vice versa can be done by:
- Illuminate the keys as previously described.
- While the keys are illuminated, touch the standby key for approximately 2 seconds.
As a result, the display will switch on or will switch to standby mode.

In case of a power outage recovery, your display will always start-up in the power mode it was before the power interruption (i.e. standby or on). This protects your display against inadvertent image retention problems.
3.4 Bringing up the OSD menus
How to bring up the OSD menus
The OSD menu allows you to configure different settings to make your Coronis 5MP LED Display fit your needs within your working environment. Also, you can retrieve general information about your display and current configuration settings through the OSD menu.
Bringing up the OSD menus can be done by:
- If not already done so, switch on the display as previously described.
- Illuminate the keys as previously described.
- While the keys are illuminated, touch the menu key.
As a result, the OSD main menu comes up. However, if no further actions are taken within the following seconds, the OSD will disappear again.




The OSD menu auto-exit function can be disabled in the OSD menu. Please refer to "OSD menu automatic close function", page 22 for detailed instructions on how to do this.
3.5 Navigating through the OSD menus
How to navigate through the OSD menus
Navigating through the OSD menus can be done by:
- Use the left/right keys to move through the (sub)menus, change values or make selections.
• To go into a submenu or confirm adjustments and selections, use the menu key. - Use the standby key to cancel adjustments or exit a (sub)menu.
- Exit all OSD menus at once by touching the standby key for approximately 2 seconds.

The key icons are displayed above the keys, adapted to the function that it is used for (menu dependent).

I-Luminate is not available while the OSD menu is activated.
Overview key icons

Left, Right

Menu

Enter

Cancel

Standby (IEC 60417-5009)
3.6 I-Luminate
About I-Luminate
When the display is in power on mode and the OSD menu is not shown, I-Luminate can be activated by touching the I-luminate/left key.
Unlike other Barco products, especially designed for tomography, in the MDCG-5221, I-Luminate supports one mode: Full-screen luminance boost.
When touching the I-Luminate key, the display will enter the I-Luminate mode, for approximately 1 minute. Touch the I-Luminate key again to immediately switch back to normal mode.
Advanced operation
4
4.1 OSD menu language
About the OSD menu language
By default, the OSD menu comes up in English. However, there's a wide range of other languages available for the OSD menu of your Coronis 5MP LED Display.
To change the language of the OSD menu:
- Bring up the OSD main menu.
- Navigate to the Configuration > User Interface > Menu menu.
- Enter the Language submenu.
- Select one of the available languages and confirm.
4.2 OSD menu automatic close function
About the OSD menu automatic close function
By default, the OSD menu will disappear automatically after approximately 90 seconds of inactivity. However, this function can be disabled so that the OSD menu remains on the screen until manually closed.
To enable/disable the OSD menu automatic close function:
- Bring up the OSD main menu.
- Navigate to the Configuration > User Interface > Menu menu.
- Enter the Automatic Close submenu.
- Select Enabled/Disabled as desired and confirm.
4.3 Power LED
About the power LED
To prevent distractions, the power LED is dimmed by default when the display is switched on and used normal operation. This behavior can be changed so that the power LED will light up during normal opera. Below is an overview of the different power LED states, in ascending order of power consumption:
Display status
| Off ^2 | Dimmed |
| Hibernate ^3 / Soft off | Steady amber |
| Suspend mode | Slow blinking amber |
| Standby mode | Fast blinking amber |
| Normal operation Dimmed (power LED disabled in OSD, default setting) | |
| Steady white (power LED enabled in OSD) | |
To enable/disable the power LED:
- Bring up the OSD main menu.
- Navigate to the Configuration > User Interface > Indicator Lights menu.
-
Enter the Power Status submenu.
-
Select Enabled/Disabled as desired and confirm.
4.4 Key indicator lights
About the key indicator lights
By default, after lighting up, the key indicator lights will dim again if no further actions are taken within 5 seconds following 5 seconds. However, this behavior can be changed so that the key indicator lights are always d always off.
To configure the key indicator lights
- Bring up the OSD main menu.
- Navigate to the Configuration > User Interface > Indicator Lights menu.
- Enter the Keys submenu.
- Select Automatic/Always On/Always Off as desired and confirm.

The I-Luminate key is always lit and cannot be turned off.
4.5 Power lock function
About the power lock function
By enabling the power lock function, the Coronis 5MP LED Display is forced to remain switched on. This means that it can't be switched to stand-by mode manually until the power lock function is disabled again.
To enable/disable the power lock function:
- Bring up the OSD main menu.
- Navigate to the Configuration > User Interface > Controls menu.
- Enter the Power Lock submenu.
- Select Enabled/Disabled as desired and confirm.
4.6 DPMS mode
About DPMS mode
Enabling the Display Power Management System (DPMS) mode on your display will optimize its diagnostic lifetime by automatically switching off the backlight when the display is not used for a specified period of By default, DPMS mode is enabled on your display, but it also needs to be activated on your workstation do this, go to the "Power options properties" window of your workstation.

Barco recommends setting DPMS activation after 20 minutes of non-usage.

When DPMS mode is enabled on your display, an additional OSD power saving function becomes available: hibernate. Please refer to "Hibernate", page 24 for more information on hibernation and how to enable this function.
To enable/disable DPMS mode on your display:
-
Bring up the OSD main menu.
-
Navigate to the Configuration > Power Management menu.
- Enter the DPMS Mode submenu.
- Select Enabled/Disabled as desired and confirm.
4.7 Hibernate
About hibernate
When hibernate is enabled, not only the backlight will be switched off, but also other functionalities will be disabled to further reduce power consumption to a minimum. This happens after a specific period of time which can be manually adjusted.

Hibernate can only be enabled on your display when the DPMS mode is enabled first. Therefore, please refer to "DPMS mode", page 23 to do this.

Please connect your keyboard or mouse to your PC rather than to the display's USB ports when hibernate is enabled.
To enable/disable hibernation on your display:
- Bring up the OSD main menu.
- Navigate to the Configuration > Power Management menu.
- Enter the Hibernate submenu.
- Select Enabled/Disabled as desired and confirm.
To specify the hibernate time-out:
- Bring up the OSD main menu.
- Navigate to the Configuration > Power Management menu.
- Enter the Hibernate Timeout submenu.
- Set the time-out value as desired and confirm.
4.8 I-Luminate default mode
About the I-Luminate default mode
The I-Luminate default mode defines the default activated mode during the I-Luminate boost. This mode is Screen The boost mode is applied on the screen display.
To enable/disable I-Luminate:
- Bring up the OSD main menu.
- Navigate to the Configuration > I-Luminate menu.
- Enter the Default mode submenu.
- Select Enabled / Disabled as desired and confirm.
4.9 Luminance target
About the luminance target
The luminance target of your Coronis 5MP LED Display is adjustable over a predefined range. When you change the luminance target, the display will adjust its backlight to reach the target.
To set the luminance target:
- Bring up the OSD main menu.
- Navigate to the Configuration > Calibration menu.
- Enter the Luminance Target submenu.
- Set a luminance target value as desired and confirm.

The default, factory DICOM calibrated luminance value is available in the technical specifications table. The guaranteed backlight lifetime is valid for this setting.
4.10 Viewing modes
About viewing modes
The Coronis 5MP LED Display can be used in two viewing modes:
- Diagnostic: This mode provides the full calibrated luminance and is intended for using the display for diagnostic purposes.
- Text: In this mode, the luminance is reduced to approximately half of the luminance. This is intended for using the display with office applications such as word processing.
Please note that text mode is not persistent, once powered off, the unit will restart in diagnostic mode

To quickly switch the viewing mode without having to enter the OSD menu, touch the key at the same time during normal operation.
left and r

The diagnostic mode should always be selected when the Coronis 5MP LED Display is intended be used in a diagnostic environment.
To select a viewing mode:
- Bring up the OSD main menu.
- Navigate to the Configuration > Calibration menu.
- Enter the Viewing Mode submenu.
- Select Diagnostic/Text as desired and confirm.
4.11 Display functions
About display functions
Native, uncorrected panels will display all grayscale/color levels with luminance increments that are not optimal for crucial diagnostic information. Studies have shown however, that in medical images certain grayscale/color parts contain more diagnostic information than others. To respond to these conclusions, display functions have been defined. These functions emphasize on these parts containing crucial diagnostic information by correcting the native panel behavior.
The available display functions for your Coronis 5MP LED Display are:
- Native: If you select Native, the native panel behavior will not be corrected.
- Dynamic Gamma 1.8 or 2.2: These are gamma functions that are shifted to take into account the non-zero luminance of an LCD panel when driven with a "black" signal. They are especially useful in CT applications to improve the perception of low Hounsfield values.
• DICOM: DICOM (Digital Imaging and Communications in Medicine) is an international standard that was developed to improve the quality and communication of digital images in radiology. In short, the DICOM display function results in more visible grayscales in the images. Barco recommends selecting the DICO display function for most medical viewing applications. - User: This display function will be automatically selected when display functions are defined by MediCal QAWeb.
- Gamma 1.8 or 2.2: Select one of these display functions in case the display is to replace a CRT display with a gamma of 1.8 or 2.2 respectively.

The settings of the display must be adapted to suit the requirements of the visualization software case of doubt, please contact the vendor of the visualization software.
To select a display function:
- Bring up the OSD main menu.
- Navigate to the Configuration > Calibration menu.
- Enter the Display Function submenu.
- Select one of the available display functions and confirm.
4.12 Ambient Light Compensation (ALC)
About ALC

Ambient Light Compensation (ALC) can only be enabled on your display when the DICOM display function is selected. Therefore, please refer to "Display functions", page 25 to correctly set the display function.
When ALC is enabled, the DICOM display function will be recalculated taking a preset ambient light corre value into account. This value is determined by the selected reading room. Therefore, it is also important select a realistic reading room when enabling ALC. This can be done by following the instructions in "Reading rooms", page 26.
- Bring up the OSD main menu.
- Navigate to the Configuration > Calibration > Ambient Light menu.
- Enter the Ambient Light Compensation submenu.
- Select Enabled/Disabled as desired and confirm.
4.13 Reading rooms
About reading rooms

Reading rooms can only be selected when the DICOM display function is selected. Therefore, please refer to "Display functions", page 25 to correctly set the display function.
The American Association of Physicists in Medicine (AAPM) composed a list of pre-defined reading rooms. Each of these reading rooms are defined by following parameters:
• the maximum light allowed in this type of room
- the preset ambient light correction value for this reading room
These parameters are stored in your display and determine the preset ambient light correction value to ta into account to recalculate the DICOM display function when Ambient Light Compensation (ALC) is enabled. Please refer to "Ambient Light Compensation (ALC)", page 26 to enable ALC.
The available reading rooms for your Coronis 5MP LED Display are:
- CR/DR/ MAMMO: Corresponds to light conditions in diagnostic reading rooms for computed radiology, digital radiology or mammography. This setting has the lowest maximum ambient light.
- CT/MR/NM: Corresponds to light conditions in diagnostic reading rooms for computed tomography, magnetic resonance or nuclear medicine scans.
• Staff Office: Corresponds to light conditions in office rooms.
• Clinical Viewing Room: Corresponds to light conditions in diagnostic reading rooms for clinical viewing.
• Emergency Room: Corresponds to light conditions in emergency rooms. - Operating Room: Corresponds to light conditions in operating rooms. This setting has the highest maximum ambient light.
To select a reading room:
- Bring up the OSD main menu.
- Navigate to the Configuration > Calibration > Ambient Light menu.
- Enter the Reading Room submenu.
- Select one of the available reading rooms and confirm.
4.14 Continuous ALC
About Continuous ALC

Continuous ALC can only be selected when the DICOM display function is selected. Therefore, please refer to "Display functions", page 25 to correctly set the display function.
Enabling continuous ALC will continuously recalculate the DICOM display function taking the averaged ambient light into account.
To select continuous ALC:
- Bring up the OSD main menu.
- Navigate to the Configuration > Calibration > Ambient Light menu.
- Enter the Continuous ALC submenu.
- Select Enabled/Disabled as desired and confirm.
4.15 Embedded QA
Overview
• About Embedded QA
• DICOM status report
• DICOM compliance check
• DICOM calibration
- Reset DICOM calibration
• DICOM error threshold
4.15.1 About Embedded QA
About
Embedded QA allows you to run a display calibration or compliance test directly from the display using the OSD menus described in the next sections. Embedded QA will use the front sensor / I-Guard to measure necessary luminance levels for either a calibration or compliance test. Various settings for both actions can be selected from the display's OSD menu. The last results of both actions can be consulted from the OSD.
Embedded QA or MediCal QAWeb?
Embedded QA is not a replacement for the Barco MediCal QAWeb solution.
Although Embedded QA is a reliable option to perform a simple calibration or compliance test, Barco still highly recommends MediCal QAWeb as the solution of choice for calibration and QA. Medical QAWeb brir many benefits such as centralized asset management, the ability to schedule tasks, remote management, automated reporting, alerting and specific support of regional QA standards such as DIN 6868-57, JESRA AAPM TG18. That's why MediCal QAWeb Agent acts as the master for all supported displays from the moment it is installed and running. MediCal QAWeb Agent will take over from Embedded QA and overwri any settings which were applied by Embedded QA.
4.15.2 DICOM status report
About DICOM status report
Following information is available:
DICOM Compliance Status (status since last compliance check)
• Compliance status: Shows if the current DICOM curve is compliant or not.
• Maximum error: Shows the maximum error of the current DICOM curve. This is the deviation compared to a perfect DICOM.
- Error threshold: Shows the error threshold. This is the maximum error allowed before a DICOM calibration is required.
• Time elapsed since latest compliance check: Shows the backlight runtime since last compliance check.
- Display Function: Shows the current display function.
- Ambient light compensation: Shows the ambient light compensation status.
- Reading Room: Shows the selected reading room.
• Luminance: Shows the measured luminance.
- Black luminance: Shows the measured black luminance.
DICOM Calibration Status
- No calibration executed yet: No other information is visible
- Calibration executed: When the calibration is executed, the following extra information is shown: Time elapsed since latest calibration, Display Function, Ambient Light Compensation and Reading Room.
Current DICOM Settings
- Display Function: Shows the current display function.
- Ambient Light Compensation: Shows the ambient light compensation status.
- Reading room: Shows the selected reading room.
To retrieve the DICOM status report:
- Bring up the OSD main menu.
- Navigate to the Configuration > Calibration > Embedded QA menu.
- Select DICOM Status Report to make the information visible on the screen.
4.15.3 DICOM compliance check
About DICOM compliance check
The DICOM compliance check will measure the DICOM curve of your display in different steps. After measurement, the DICOM status report is shown.
To start DICOM compliance check:
- Bring up the OSD main menu.
- Navigate to the Configuration > Calibration > Embedded QA menu.
- Select DICOM Compliance Check to start the compliance check.
Warning: Pressing a key during the compliance check will abort the check.
4.15.4 DICOM calibration
About DICOM calibration
The DICOM calibration will add a correction to the current DICOM curve to approach the perfect DICOM as well as possible.
To start DICOM calibration:
- Bring up the OSD main menu.
- Navigate to the Configuration > Calibration > Embedded QA menu.
- Select DICOM calibration to start the calibration.
Warning: Pressing a key during calibration will abort the calibration, previous values will be restored.
Note: After calibration, the compliance check will start automatically.
4.15.5 Reset DICOM calibration
About reset DICOM calibration
It is possible to restore the original (not corrected) DICOM curve.
To reset the DICOM calibration:
- Bring up the OSD main menu.
- Navigate to the Configuration > Calibration > Embedded QA menu.
- Enter the DICOM Preferences submenu.
- Select Reset DICOM Calibration to restore the original (not corrected) DICOM curve.
4.15.6 DICOM error threshold
About DICOM error threshold
The threshold to define the DICOM compliance can be modified in steps of 5% starting from 5 to 30%. the maximum deviation is not bigger than the selected threshold, the compliance check will be OK.
To set the DICOM error threshold:
- Bring up the OSD main menu.
- Navigate to the Configuration > Calibration > Embedded QA menu.
-
Enter the DICOM Preferences submenu.
-
Set Error Threshold as desired and confirm.
4.16 Display orientation
About Display orientation
Your display automatically detects its physical orientation (portrait or landscape) and, by default, automatic adjusts the image orientation to this. This means that when your display is physically rotated, the image rotate along.
The OSD menu however, allows to overrule this behavior and force the image orientation to portrait or landscape regardless of the physical orientation of the display. This may be especially useful when operati your display with the screen facing upwards.
To set the Display orientation
- Bring up the OSD main menu.
- Navigate to the Configuration > Image Sources menu.
- Enter the Display Orientation submenu.
- Select Landscape/Portrait/Automatic as desired and confirm.
4.17 Video input signals
About input signals
The available input signals for your display are:
DisplayPort 1 The input corresponding to the DisplayPort connector.
DVI 1 The input corresponding to the DVI connector.
Automatic Selection The input is automatically selected.
To manually select a video input signal:
- Bring up the OSD main menu.
- Navigate to the Configuration > Image Source menu.
- Enter the Image Source submenu.
- Select one of the available input signals and confirm.
4.18 Video encoding modes
About video encoding modes
Video encoding modes specify how the color and luminance information is encoded in the video signal. In consumer displays, this is usually done by a limited 8-bit encoding mechanism. Your Coronis 5MP LED Display however, features 10-bit encoding enabling it to better match the DICOM defined grayscale range. Such an extensive range is necessary to comply with the guidelines set forward by the latest medical guidelines.
The available video encoding modes for your display are listed below.

Please note that the display controller connected to your display might not always support all the video encoding modes.
Standard This mode uses the standard 8 bit encoding
mechanism.
HDR1 This mode features 10-bit video encoding following
the High Dynamic Range (HDR) standard, usually used on color displays.
HDR2 HDR2 is a Barco specific mode featuring 10-bit video
encoding following the High Dynamic Range (HDR) standard but allowing full refresh rate (which is not always possible with HDR1). This mode is usually used on color displays.
Dual 10 (only with Barco display controller) Dual 10 is a Barco specific 10-bit video encoding mode which is usually used on grayscale displays and which allows full refresh rate.
Automatic When selecting this option, your Coronis 5MP LED
Display will automatically assign the correct video encoding settings to the connected video input signals.
To manually select a video encoding mode:
- Bring up the OSD main menu.
- Navigate to the Configuration > Image Source > Input Settings menu.
- Enter the DisplayPort or DVI submenu according to the input.
- Enter the Video Encoding submenu.
- Select one of the available video encoding modes and confirm.
4.19 Grayscale conversion modes
About grayscale conversion modes
Grayscale conversion modes specify how color generated on the display controller is converted to grayscale in your display.
The available grayscale conversion modes are:
No Conversion
Use Red Channel This mode is intended for grayscale displays where
gray is sent over the red channel.
Use Green Channel This mode is intended for grayscale displays where
gray is sent over the green channel.
Use Blue Channel This mode is intended for grayscale displays where
gray is sent over the blue channel.
Use All Channels This mode is intended for grayscale displays where
gray is sent over the red, green and blue channel.
This is done by means of a standard conversion
mechanism where 30% red, 59% green and 11% blue
are used to generate gray.
To manually select a grayscale conversion mode:
- Bring up the OSD main menu.
- Navigate to the Configuration > Image Source > Input Settings menu.
- Enter the DisplayPort or DVI submenu according to the input.
- Enter the Grayscale Conversion submenu.
- Select one of the available color conversion modes and confirm.
4.20 EDID timings
About EDID timings
Following EDID timings are available for your Coronis 5MP LED Display:
Refresh Rate Allows to manually select the refresh rate of the image
source video input signal depending on the maximum refresh rate of the display controller connected to your display.
Color Depth Allows to change the color depth to 8 or to 10 bit.
To manually set EDID timings:
- Bring up the OSD main menu.
- Navigate to the Configuration > Image Source > Input Settings menu.
- Enter the DisplayPort or DVI submenu according to the input.
- Enter the EDID submenu.
- Select Refresh Rate or Color Depth.
- Select one of the available settings and confirm.
4.21 EDID format
About EDID format
Your Coronis 5MP LED Display describes its capabilities to the display controller by means of display identification data. This data contains timings, display size, pixel mapping info, etc. and is needed to make sure that the video source can be correctly displayed.
Display identification data is structured in a standard VESA format. Depending on the configuration setup of your system, a different format can be used.
The Coronis 5MP LED Display supports following EDID formats:
- E-EDID V1.4: E-EDID is a mature and more commonly used format. It is supported by most display controllers and operating systems.
- DisplayID V1.3: DisplayID is designed to replace E-EDID and supports more advanced communication between your Coronis 5MP LED Display and its display controller. Since not all display controllers and operating systems support DisplayID already, it should only be selected if all components are DisplayID compatible.
To select the EDID format
- Bring up the OSD main menu.
- Navigate to the Configuration > Image Source > Input Settings menu.
- Enter the EDID format submenu.
- Select one of the available settings and confirm.
4.22 Display info
About display info
Your display serial number, native resolution, firmware versions, etc. are available in a dedicated submenu the OSD menu.
To retrieve info about your display:
- Bring up the OSD main menu.
- Navigate to the About this Display menu to make the information visible on the screen.
4.23 Display status
About display status
The Status submenu of the OSD menu provides info on the current status of your display (runtimes, temperatures, etc.), the status of the connected image sources (video encoding mode, timings, etc.) and the current calibration status of your display (display function, luminance, ALC, etc.).
To retrieve the status of your display:
- Bring up the OSD main menu.
- Navigate to the Status menu.
- Enter the Display, Image Sources or Calibration submenu as desired.
Repacking instructions
5

WARNING: Before repacking the display, follow the instruction to replace the foot protection buffer to prevent damage to the display.
5.1 Foot protection buffer
To replace the foot protection buffer
- Place the display on a stable surface.
- Put the display in the lowest position and fasten the height mechanism, see "VESA-mount installation", page 13.
- Very important: Tilt the panel away from the foot before changing the orientation.
- Turn the panel counterclockwise to put the panel in landscape orientation, see "Display position adjustment", page 10.
- Place the connector compartment cover in the foot protection buffer.
- Slide the foot protection buffer over the foot of the display.
- Tilt the panel back to the foot.
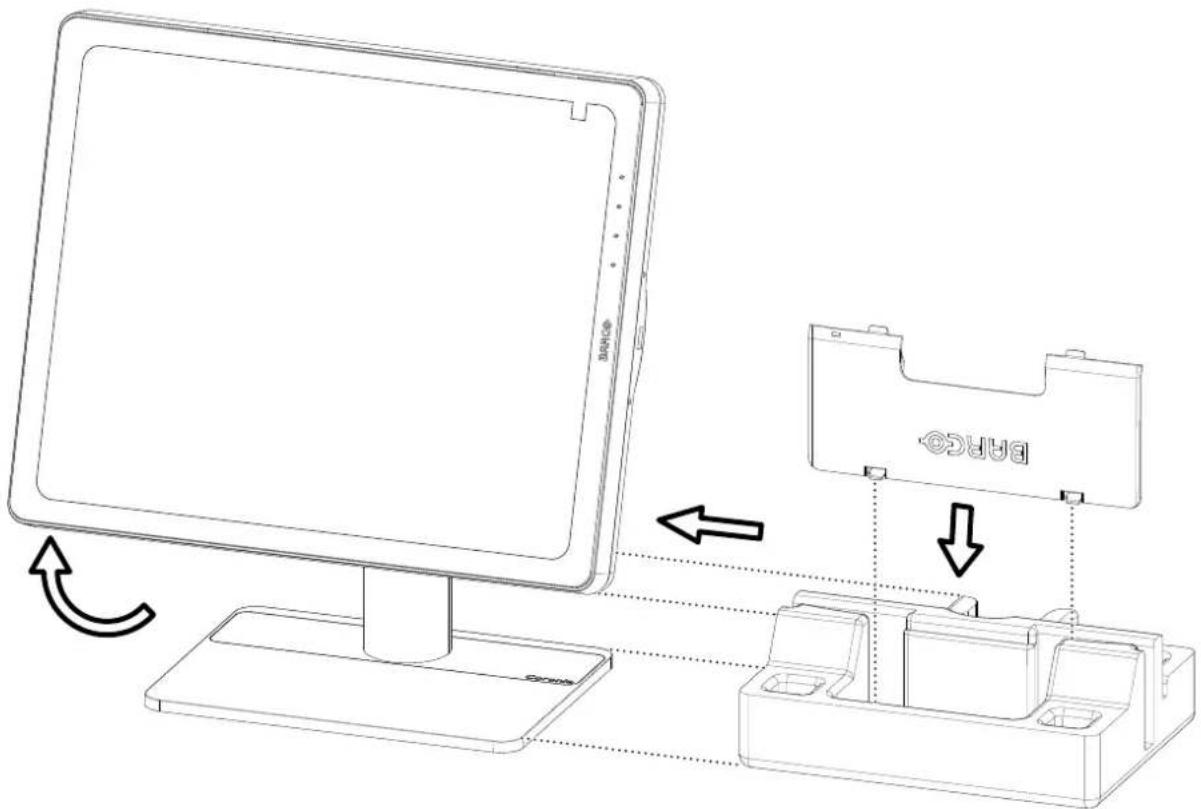
Image 5-1
5.2 Repacking overview
Overview
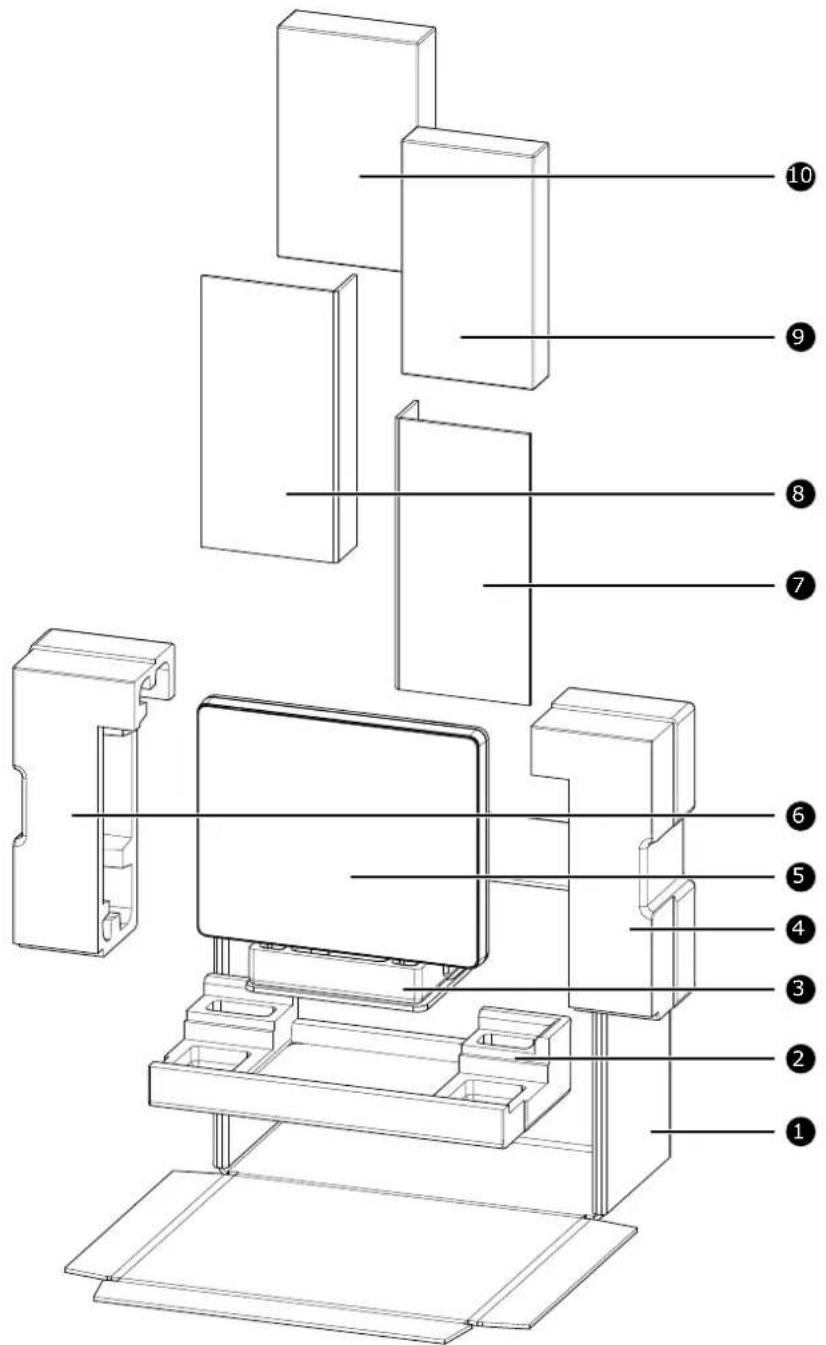
Image 5-2
- Box
- Bottom buffer
- Foot protection buffer
- Right protection buffer
- Display
- Left protection buffer
- Display controller box buffer
- Accessory box buffer
Repacking instructions
- Accessory box (Power supply, cables)
- Display controller box
Cleaning your display
6
6.1 Cleaning instructions
To clean the display
Clean the display using a sponge, cleaning cloth or soft tissue, lightly moistened with a recognized cleaning product for medical equipment. Read and follow all label instructions on the cleaning product. In case of about a certain cleaning product, use plain water.
Do not use following products:
• Alcohol/solvents at higher concentration > 5%
• Strong alkalis lye, strong solvents
- Acid
• Detergents with fluoride
• Detergents with ammonia
• Detergents with abrasives
- Steel wool
- Sponge with abrasives
- Steel blades
- Cloth with steel thread

CAUTION: Take care not to damage or scratch the front glass or LCD. Be careful with rings or other jewelry and do not apply excessive pressure on the front glass or LCD.

CAUTION: Do not apply or spray liquid directly to the display as excess liquid may cause damage to internal electronics. Instead, apply the liquid to a cleaning cloth.
Important information
7
7.1 Safety information
General recommendations
Read the safety and operating instructions before operating the device.
Retain safety and operating instructions for future reference.
Adhere to all warnings on the device and in the operating instructions manual.
Follow all instructions for operation and use.
Electrical Shock or Fire Hazard
To prevent electric shock or fire hazard, do not remove cover.
No serviceable parts inside. Refer servicing to qualified personnel.
Do not expose this apparatus to rain or moisture.
Modifications to the unit
Do not modify this equipment without authorization of the manufacturer.
Type of protection (electrical):
Display with external power supply: Class I equipment.
Degree of safety (flammable anesthetic mixture)
Equipment not suitable for use in the presence of a flammable anesthetic mixture with air or with oxygen nitrous oxide.
Non-patient care equipment
- Equipment primarily for use in a health care facility that is intended for use where contact with a patient is unlikely (no applied part).
• The equipment shall not be used with life support equipment. - The user should not touch the equipment, nor its signal input ports (SIP)/signal output ports (SOP) and the patient at the same time.
Power connection – Equipment with external 24 VDC power supply
- Power requirements: The equipment must be powered using the delivered medical approved 24 VDC (SELV power supply.
- The medical approved DCE(=) power supply must be powered by the AC mains voltage.
• The power supply is specified as a part of the ME equipment or combination is specified as a ME system. - To avoid the risk of electric shock, this equipment must only be connected to a supply mains with protective earth.
- The equipment should be installed near an easily accessible outlet.
- The equipment is intended for continuous operation.
Transient over-voltage
If the device is not used for a long time, disconnect it from the AC inlet to avoid damage by transient voltage.
To fully disengage the power to the device, please disconnect the power cord from the AC inlet.
High magnetic environment
• The device shall not be used in the high magnetic environment of an MRI scanner.
- The installer shall assess the magnetic environment before installation or use of the device.
Power cords:
- Utilize a UL-listed detachable power cord, 3-wire, type SJ or equivalent, 18 AWG min., rated 250 V min., provided with a hospital-grade type plug 5-15P configuration for 120V application, or 6-15P for 240V application.
- Do not overload wall outlets and extension cords as this may result in fire or electric shock.
- Mains lead protection (U.S.: Power cord): Power cords should be routed so that they are not likely to be walked upon or pinched by items placed upon or against them, paying particular attention to cords at and receptacles.
- Use a power cord that matches the voltage of the power outlet, which has been approved and complies with the safety standard of your particular country.
Water and moisture
Never expose the display to rain or moisture.
Never use the display near water - e.g. near a bathtub, washbasin, swimming pool, kitchen sink, laundry in a wet basement.
Ventilation
Do not cover or block any ventilation openings in the cover of the set. When installing the device in a or another enclosed location, heed the necessary space between the set and the sides of the cupboard.
Installation
Place the device on a flat, solid and stable surface that can support the weight of at least 3 devices. I an unstable cart or stand, the device may fall, causing serious injury to a child or adult, and serious da the device.
Malfunctions
Disconnect the equipment's power cord from the AC inlet and refer servicing to qualified service technicians under the following conditions:
- If the power cord or plug is damaged or frayed.
• If liquid has been spilled into the equipment. - If the equipment has been exposed to rain or water.
- If the equipment does not operate normally when the operating instructions are followed. Adjust only those controls that are covered by the operating instructions since improper adjustment of other controls may result in damage and will often require extensive work by a qualified technician to restore the product normal operation.
- If the equipment has been dropped or the cabinet has been damaged.
- If the product exhibits a distinct change in performance, indicating a need for service.
National Scandinavian Deviations for CL. 1.7.2
7.2 Environmental information
Disposal Information
Waste Electrical and Electronic Equipment

This symbol on the product indicates that, under the European Directive 2012/19/EU governing waste from electrical and electronic equipment, this product must not be disposed of with other municipal waste. Please dispose of your waste equipment by handing it over to a designated collection point for the recycle
waste electrical and electronic equipment. To prevent possible harm to the environment or human health fi uncontrolled waste disposal, please separate these items from other types of waste and recycle them responsibly to promote the sustainable reuse of material resources.
For more information about recycling of this product, please contact your local city office or your municipa waste disposal service.
For details, please visit the Barco website at: http://www.barco.com/AboutBarco/weee
Turkey RoHS compliance

[Republic of Turkey: In conformity with the WEEE Regulation]
中国大陆 RoHS
Chinese Mainland RoHS
According to the “Management Methods for the Restriction of the Use of Hazardous Substances in Electrical and Electronic Products” (Also called RoHS of Chinese Mainland), the table below lists the names and contents of toxic and/or hazardous substances that Barco’s product may contain. The RoHS of Chinese Mainland is included in the MCV standard of the Ministry of Information Industry of China, in the section “Limit Requirements of toxic substances in Electronic Information Products”.
| 零件项目(名称)Component name | 有毒有害物质或元素Hazardous substances and elements | |||||
| 铅Pb | 汞Hg | 镉Cd | 六价铬Cr6+ | 多溴联苯PBB | 多溴二苯醚PBDE | |
| 印制电路配件Printed Circuit Assemblies | x o o o | o | o | |||
| 液晶面板LCD panel | x o o o | o | o | |||
| 外接电(线)缆External Cables | x o o o | o | o | |||
| 内部线路Internal wiring | o | o o o o | o | |||
| 金属外壳Metal enclosure | o | o o o o | o | |||
| 塑胶外壳Plastic enclosure | o | o o o o | o | |||
| 散热片(器)Heatsinks | o | o o o o | o | |||
| 电源供应器Power Supply Unit | x o o o | o | o | |||
| 风扇Fan | o | o o o o | o | |||
| 文件说明书Paper Manuals | o | o o o o | o | |||
| 光盘说明书CD manual | ○ ○ ○ ○ | ○ ○ | ||||
This table is prepared in accordance with the provisions of SJ/T 11364.
o: 表示该有毒有害物质在该部件所有均质材料中的含量均在 GB/T 26572 标准规定的限量要求以下.
o: Indicates that this toxic or hazardous substance contained in all of the homogeneous materials for this is below the limit requirement in GB/T 26572.
x: 表示该有毒有害物质至少在该部件的某一均质材料中的含量超出 GB/T 26572 标准规定的限量要求.
x: Indicates that this toxic or hazardous substance contained in at least one of the homogeneous material used for this part is above the limit requirement in GB/T 26572.
All Electronic Information Products (EIP) that are sold within Chinese Mainland must comply with the "Electronic Information Products Pollution Control Labeling Standard" of Chinese Mainland, marked with the Environmental Friendly Use Period (EFUP) logo. The number inside the EFUP logo that Barco uses (please refer to the photo) is based on the "Standard of Electronic Information Products Environmental Friendly Use Period" of Chinese Mainland.

7.3 Regulatory compliance information
Intended use
The display is intended to be used for displaying and viewing digital images for review and analysis by the medical practitioners. It is designed for radiology and digital mammography applications.
Indications for use
• The display is not in contact with patients.
- The display is not in the same environment as the patient.
- The display is intended to be used in a dedicated diagnostic reading room.
Caution (USA): Federal law restricts this device to sale by or on the order of a physician. (Details & exemptions are in the Code of Federal Regulations Title 21, 801 Part D).
Contra-indications
Not applicable
Intended users
Barco diagnostic and mammography displays are intended to be used for primary diagnosis by trained medical practitioners. The device is initially set up by trained integrators or medical IT staff.
Manufacturing country
The manufacturing country of the product is indicated on the product label ("Made in ...").
Importers contact information
To find your local importer, contact one of Barco's regional offices via the contact information provided on our website (www.barco.com).
FCC class B
This device complies with Part 15 of the FCC Rules. Operation is subject to the following two conditions: this device may not cause harmful interference, and (2) this device must accept any interference received, including interference that may cause undesired operation.
This device has been tested and found to comply with the limits for a Class B digital device, pursuant to 15 of the FCC Rules. These limits are designed to provide reasonable protection against harmful interferer in a residential installation. This device generates, uses and can radiate radio frequency energy and, if no installed and used in accordance with the instructions, may cause harmful interference to radio communications. However, there is no guarantee that interference will not occur in a particular installation. This device does cause harmful interference to radio or television reception, which can be determined by turning the device off and on, the user is encouraged to try to correct the interference by one or more following measures:
• Reorient or relocate the receiving antenna.
- Increase the separation between the device and receiver.
- Connect the device into an outlet on a circuit different from that to which the receiver is connected.
- Consult the dealer or an experienced radio/TV technician for help.
Changes or modifications not expressly approved by the party responsible for compliance could void the user's authority to operate the equipment.
FCC responsible: Barco Inc., 3059 Premiere Parkway Suite 400, 30097 Duluth GA, United States, Tel: +1 678 475 8000
Canadian notice
CAN ICES-1/NMB-1
7.4 EMC notice
General information
This device is for use in professional healthcare facility environments only.
With the installation of the device, use only the delivered external cables and power supply or a spare p provided by the legal manufacturer. Using another can result in a decrease of the immunity level of the

WARNING: Use of this equipment adjacent to or stacked with other equipment should because it could result in improper operation. If such use is necessary, this equipment equipment should be observed to verify that they are operating normally.
be avoided and the c

WARNING: Use of accessories, transducers and cables other than those specified or provided by the manufacturer of this equipment could result in increased electromagnetic emissions or decreased electromagnetic immunity of this equipment and result in improper operation.

WARNING: Portable RF communications equipment (including peripherals such as antenna cables and external antennas) should be used no closer than 30 cm (12 inches) to any part of the Co 5MP LED Display, including cables specified by the manufacturer. Otherwise, degradation of the performance of this equipment could result.
Electromagnetic emissions
The Coronis 5MP LED Display is intended for use in the electromagnetic environment specified below. The customer or the user of the Coronis 5MP LED Display should assure that it is used in such an environi
| Emissions test | Compliance | Electromagnetic environment – Guidance |
| RF emissionsCISPR 11 | Group 1 The Coronis 5MP LED | Displayuses RF energy only for its internal function. Therefore, its RF emissions are very low and are not likely to cause any interference in nearby electronic equipment. |
| RF emissionsCISPR 11 | Class B The Coronis 5MP LED | Display issuitable for use in all establishments, including domestic establishments and those directly connected to the public low-voltage power supply network that supplies buildings used for domestic purposes. |
| Harmonic emissionsIEC 61000-3-2 | Class D | |
| Voltage fluctuations/ flicker emissionsIEC 61000-3-3 | Complies |
This Coronis 5MP LED Display complies with appropriate medical EMC standards on emissions to, and interference from surrounding equipment. Operation is subject to the following two conditions: (1) this device may not cause harmful interference, and (2) this device must accept any interference received, including interference that may cause undesired operation.
Interference can be determined by turning the equipment off and on.
If this equipment does cause harmful interference to, or suffer from harmful interference of, surrounding equipment, the user is encouraged to try to correct the interference by one or more of the following mea
- Reorient or relocate the receiving antenna or equipment.
- Increase the separation between the equipment and receiver.
- Connect the equipment into an outlet on a circuit different from that to which the receiver is connected.
- Consult the dealer or an experienced technician for help.
Electromagnetic immunity
The Coronis 5MP LED Display is intended for use in the electromagnetic environment specified below. The customer or the user of the Coronis 5MP LED Display should assure that it is used in such an environ
| Immunity test | IEC 60601 test levels | Compliance level | Electromagnetic environment – guidance |
| Electrostatic discharge (ESD)IEC 61000-4-2 | ± 8 kV contact± 2 kV, ± 4 kV, ± 8 kV air | ± 8 kV contact±kV2 ±kV15± 4 kV, ± 8 kV air | Floors should be wood, concrete or ceramic tile. If floors are covered with synthetic material, the relative humidity should be at least 30% |
| Electrical fast transient/ burstIEC 61000-4-4 | ± 2 kV for power supplines± 1 kV for input/ output lines100 kHz repetition frequency | ± 2 kV for power supplines± 1 kV for input/ output lines100 kHz repetition frequency | Mains power quality should be that of a typical commercial or hospital environment |
| SurgeIEC61000-4-5 | Line to line: ± 0.5 kV, kVLine to ground: ± 0.5 1 kV, ± 2 kV | Line to line: ± 0.5 kV,kVLine±to ground: ± 0.5 1 kV, ± 2 kV | Mains power quality should be that of a typical commercial or hospital environment |
| Voltage dips, short interruptions and voltage variations on power sup input linesIEC 61000-4-11 | 0% residual voltage for period at 0°, 45°, 90°, d195°, 180°, 225°, 270° and 315°0% residual voltage for period at 0°70% residual voltage for 25 periods at 0°Voltage interruptions: 0% residual voltage for 250 periods at 0° | 0% residual voltage for period at 0°, 45°, 90°, 135°, 180°, 225°, 270° and 315°0% residual voltage for period at 0°70% residual voltage for 25 periods at 0°Voltage interruptions: 0% residual voltage for 250 periods at 0° | Mains power quality should be that of a typical commercial or hospital environment. If the user of the Coronis 5MP LED Display requires continued operation during power mains interruptions, it is recommended that theCoronis 5MP LED Display be powered from an uninterruptible power supply or a battery |
| Power frequency (50/60 Hz) magnetic fieldIEC 61000-4-8 | 30 A/m Not applicable | 6 | Power frequency magnetic fields should be at levels characteristic of a typical location in a typical commercial or hospital environment |
| Conducted RFIEC 61000-4-6 | 3 Vrms (6 Vrms in ISM bands)150 kHz to 80 MHz | 8 Vrms (6 Vrms in ISM bands) | |
| Radiated RFIEC 61000-4-3 | 3 V/m80 MHz to 2.7 GHz | 3 V/m |
Immunity to RF wireless communications equipment
| Test frequency (MHz) | Band (MHz) | Service Modulation | Maximum power (W) | Distance (m) | Immunity test level (W m) |
| 385 380 | - 390 TETRA | A 400 Pulse modulation 18 Hz | 1.8 0.3 | 27 | |
| 450 430 | - 470 GMRS | S 460, FRS 460 | FM ± 5 kHz deviation 1 kHz sine | 2 0.3 | 28 |
| 710 704 | - 787 LTE | Band 13, 17 | Pulse modulation 217 Hz | 0.2 0.3 | 9 |
| 745 | |||||
| 780 | |||||
| 810 800 | - 960 GSM | 800/900, TETRA 800, iDEN 820, CDMA 850, LTE Band 5 | Pulse modulation 18 Hz | 2 0.3 | 28 |
| 870 | |||||
| 930 | |||||
| 1720 170 | 0 - 1990 | GSM 1800, CDMA 1900, GSM 1900, DECT, LTE Band 1/3/4/25, UMTS | Pulse modulation 217 Hz | 2 0.3 | 28 |
| 1845 | |||||
| 1970 | |||||
| 2450 240 | 0 - 2570 | Bluetooth, WLAN, 802.11 b/g/n, RFID 2450, LTE Band 7 | Pulse modulation 217 Hz | 2 0.3 | 28 |
| 5240 510 | 0 - 5800 | W LAN 802.11 a/n | Pulse modulation 217 Hz | 0.2 0.3 | 9 |
| 5500 | |||||
| 5785 |
7.5 Explanation of symbols
Symbols on the device
On the device or power supply, you may find the following symbols (nonrestrictive list):
 | Indicates compliance with Part 15 of the FCC rules (Class A or Class B) |
 | Indicates the device is approved according to the UL regulations |
 | Indicates the device is approved according to the UL regulations for Canada and US |
 | Indicates the device is approved according to the UL regulations for Canada and US |
 | Indicates the device is approved according to the UL Demko regulations |
 | Indicates the device is approved according to the CCC regulations |
 | Indicates the device is approved according to the VCCI regulations |
 | Indicates the device is approved according to the KC regulations |
 | Indicates the device is approved according to the BSMI regulations |
 | Indicates the device is approved according to the PSE regulations |
 | Indicates the device is approved according to the EAC regulations |
 | Caution: Federal law (United Stated of America) restricts this device to sale by or on the order of a licensed healthcare practitioner. |
 | Indicates the USB connectors on the device |
 | Indicates the DisplayPort connectors on the device |
 | Indicates the legal manufacturer | |
 | Indicates the manufacturing date | |
 | Indicates the temperature limitation for the device to safely operate within specs | |
 | Indicates the device serial number | |
 | Indicates the device part number or catalogue number | |
 | Warning: dangerous voltage | |
 | Caution | |
| KKD4] | Consult the operating instructions | |
 | Indicates this device must not be thrown in the trash but must be recycled, according to the European WEEE (Waste Electrical and Electronic Equipment) directive | |
 | Indicates Direct Current (DC) | |
 | Indicates Alternating Current (AC) | |
 | Stand-by | |
 | Equipotentiality | |
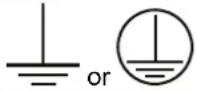 | Protective earth (ground) |
Symbols on the box
On the box of the device, you may find the following symbols (nonrestrictive list):
 | Indicates a medical device that can be broken or damaged if not handled carefully when being stored. |
 | Indicates a medical device that needs to be protected from moisture when being stored. |
 | Indicates the storage direction of the box. The box must be transported, handled and stored in such a way that the arrows always point upwards. |
 | Indicates the maximum number of boxes to be stacked on each other. |
 | Indicates that the box should be carried with two persons. |
 | Indicates that the box should not be cut with a knife, a cutter or any other sharp o |
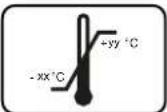 | Indicates the temperature limits to which the medical device can be safely exposed when being stored. |
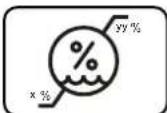 | Indicates the range of humidity to which the medical device can be safely exposed when being stored. |
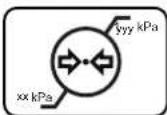 | Indicates the range of atmospheric pressure to which the medical device can be safel exposed when being stored. |
7.6 Legal disclaimer
Disclaimer notice
Although every attempt has been made to achieve technical accuracy in this document, we assume no responsibility for errors that may be found. Our goal is to provide you with the most accurate and usable documentation possible; if you discover errors, please let us know.
Barco software products are the property of Barco. They are distributed under copyright by Barco NV or Inc., for use only under the specific terms of a software license agreement between Barco NV or Barco and the licensee. No other use, duplication, or disclosure of a Barco software product, in any form, is authorized.
The specifications of Barco products are subject to change without notice.
Trademarks
All trademarks and registered trademarks are property of their respective owners.
Copyright notice
This document is copyrighted. All rights are reserved. Neither this document, nor any part of it, may be reproduced or copied in any form or by any means - graphical, electronic, or mechanical including photocopying, taping or information storage and retrieval systems - without written permission of Barco.
© 2019 Barco NV all rights reserved.
Patent protection
Please refer to www.barco.com/about-barco/legal/patents
7.7 Technical specifications
Overview
| Screen technology Dual domain IPS, Normally Black | |
| Active screen size (diagonal) | 541 mm (21.3") |
| Active screen size (H x V) | 459.8 x 375.3 mm (18.1" x 14.77") |
| Aspect ratio (H:V) 5:4 | |
| Resolution 5 MP (2560 x 2048 pixels) | |
| Pixel pitch 0.165 mm | |
| Gray imaging Yes | |
| Bit depth 10 bit | |
| Viewing angle (H, V) 178° | |
| Uniformity correction PPU | |
| I-Luminate Yes | |
| Ambient light presets | Yes, reading room selection |
| Ambient light sensor | Yes |
| Front sensor | Yes |
| Maximum luminance | 1200 cd/m2 |
| DICOM calibrated luminance | 600 cd/m2 |
| Contrast ratio (panel typical) | 1200:1 |
| Response time ((Tr + Tf)/2) | 12.5 ms |
| (typical) | |
| Housing color | RAL 9003 / RAL 9004 |
| Video input signals | DVI DisplayPort |
| USB ports | 1x USB 2.0 upstream (endpoint)3x USB 2.0 downstream |
| Power rating | 24 VDC, 4 A; 5 VDC, 0.5 A |
| Power requirements | This device shall only be powered by the following medical approved power supply:Sinpro, type CPU110-201Ratings marked on the medical power supply:Input rating: 100–240 VAC, 1.5–0.6 A, 47-63 HZOutput rating: 24 VDC, 4.58 A; 5 VDC, 0.5 A |
| Power consumption | 46 W (nominal)< 0.5 W (hibernate)< 0.5 W (standby) |
| Dimensions with stand (W H x D) | Portrait: 407 x 523~623 x 235 mmLandscape: 493.5 x 479~579 x 235 mm |
| Dimensions w/o stand (W x D) | 407 x 494 x 84 mm |
| Dimensions packaged (W x D) | 676 x 565 x 317 mm |
| Net weight with stand 13.25 kg | |
| Net weight w/o stand 8.25 kg | |
| Net weight packaged 19.61 kg (without optional accessories) | |
| Tilt -10° to +30° | |
| Swivel -45° to +45° | |
| Pivot 0° to 90° | |
| Height adjustment range 100 mm | |
| Mounting standard VESA (100 mm) | |
| Screen protection Protective, anti-reflective glass cover | |
| Recommended modalities All digital images, including digital mammography | |
| Certifications FDA 510(K) K133984 for General RadiologyCE1639 (MDD 93/42/EEC; A1:2007/47/EC class IIb product)CCC (China), KC (Korea), PSE (Japan), BIS (India), EAC (Russia Kazakhstan, Belarus, Armenia and Kyrgyzstan)Safety specific:IEC 60950-1:2005 + A1:2009EN 60950-1:2006 + A1:2010 + A11:2009 + A12:2011 + A2:2013IEC 60601-1:2005 + A1:2012EN 60601-1:2006 + A1:2013 + A12:2014ANSI/AAMI ES 60601-1:2005 + R1:2012CAN/CSA C22.2 No. 60601-1:14EMI specific:IEC 60601-1-2:2014 (ed4)EN 60601-1-2:2015 (ed4)FCC part 15 Class BICES-001 Level BVCCI (Japan)Environmental:China Energy Label, EU RoHS, China RoHS, REACH, Canada Health,WEEE, Packaging Directive | |
| Supplied accessories User guideDocumentation discSystem discVideo cable (1 x DisplayPort)USB 2.0 cableMains cables (UK, European (CEBEC/KEMA), USA (UL/CSA; adaptor plug NEMA5-15P), Chinese (CCC))External power supply | |
| Optional accessories Graphics board | |
| QA software MediCal QAWeb | |
| Warranty | 5 years, including 45000 hrs backlight warranty |
| Operating temperature 0 °C to 40 °C (15 °C to 30 °C within specs) | |
| Storage temperature -20 °C to 60 °C | |
| Operating humidity 8% to 80% (non-condensing) | |
| Storage humidity 5% to 85% (non-condensing) | |
| Operating pressure 50 kPa minimum | |
| Storage pressure 50 to 106 kPa | |
7.8 Open source license information
Open source license information
This product contains software components released under an Open Source license. You acknowledge living up to the conditions of each separate Open Source Software license.
A list of the Open Source Software components used is available in the applicable EULA, through the “My Barco” section of the Barco website or through other (online) means.
Copyright on each Open Source Software component belongs to the respective initial copyright holder, each additional contributor and/or their respective assignee(s), as may be identified in the respective Open Source Software documentation, source code, README file, or otherwise. You shall not remove or obscure or otherwise alter the respective copyrights.
EACH SEPARATE OPEN SOURCE SOFTWARE COMPONENT AND ANY RELATED DOCUMENTATION ARE PROVIDED "AS IS" WITHOUT EXPRESS OR IMPLIED WARRANTY INCLUDING, BUT NOT LIMITED TO, THE IMPLIED WARRANTIES OF MERCHANTABILITY AND FITNESS FOR A PARTICULAR PURPOSE. IN NO EVENT SHALL THE COPYRIGHTHOLDER OR ANY OTHER CONTRIBUTOR BE LIABLE FOR DIRECT, INCIDENTAL, SPECIAL, EXEMPLARY OR CONSEQUENTIAL DAMAGES, EVEN IF ADVISED OF THE POSSIBILITY OF SUCH DAMAGES, HOWEVER CAUSED AND ON ANY THEORY OF LIABILITY. MORE INFORMATION/DETAILS IS TO BE FOUND IN EACH SPECIFIC OPEN SOURCE LICENSE.
With respect to GPL, LGPL or similar licenses with regard to corresponding source code access and automatic license terms applicability:
- You acknowledge living up to the conditions of each such specific applicable Open Source Software license. You are responsible for your own additions, changes or modifications without any recourse or claim towards Barco whatsoever. You further acknowledge that any such additions, changes or modifications may impair the ability of Barco – at Barco's sole discretion - to continue to provide service, warranties, software updates, fixes, maintenance, access or such similar abilities, without any recourse or claim towards Barco whatsoever.
- Barco offers to provide the corresponding source code, and shall make the corresponding source code available to you via email or download link, except where the applicable license entitles you to require Barco to provide you the corresponding source code on a tangible medium, in which case Barco will charge you for the actual costs of performing such distribution, such as the cost of media, shipping and handling. You may exercise this option upon written request to Barco N.V, attn. legal department, President Kennedypark 35, 8500 Kortrijk (Belgium). This offer is valid for a period of three (3) years from the d the distribution of this product by Barco.

- Coronis 5MP LED Display
- Table of contents
- Welcome! 5
- Installation 9
- Daily operation....17
- Advanced operation....21
- Repacking instructions....35
- Cleaning your display 39
- Important information....41
- Welcome!
- 1
- About the product
- Overview
- more shades of gray
- Perfect images
- Green performance
- Worryfree DICOM compliance
- I-Luminate™
- What's in the box
- Product overview
- Back
- Installation
- 2
- Display position adjustment
- To adjust the display position
- Cable connections
- To connect the cables
- VESA-mount installation
- First time starting up
- Daily operation
- 3
- Recommendations for daily operation
- Optimize the lifetime of your display
- Use a screen saver to avoid image retention
- Understand pixel technology
- Enhance user comfort
- Maximize quality assurance
- Key indicator lights
- About the key indicator lights
- Standby switching
- About standby switching
- Bringing up the OSD menus
- How to bring up the OSD menus
- Navigating through the OSD menus
- How to navigate through the OSD menus
- Overview key icons
- I-Luminate
- About I-Luminate
- Advanced operation
- 4
- OSD menu language
- About the OSD menu language
- To change the language of the OSD menu:
- OSD menu automatic close function
- About the OSD menu automatic close function
- To enable/disable the OSD menu automatic close function:
- Power LED
- About the power LED
- To enable/disable the power LED:
- Key indicator lights
- To configure the key indicator lights
- Power lock function
- About the power lock function
- To enable/disable the power lock function:
- DPMS mode
- About DPMS mode
- To enable/disable DPMS mode on your display:
- Hibernate
- About hibernate
- To enable/disable hibernation on your display:
- To specify the hibernate time-out:
- I-Luminate default mode
- About the I-Luminate default mode
- To enable/disable I-Luminate:
- Luminance target
- About the luminance target
- To set the luminance target:
- Viewing modes
- About viewing modes
- To select a viewing mode:
- Display functions
- About display functions
- To select a display function:
- Ambient Light Compensation (ALC)
- About ALC
- Reading rooms
- About reading rooms
- To select a reading room:
- Continuous ALC
- About Continuous ALC
- To select continuous ALC:
- Embedded QA
- About Embedded QA
- About
- Embedded QA or MediCal QAWeb?
- DICOM status report
- About DICOM status report
- DICOM Calibration Status
- Current DICOM Settings
- To retrieve the DICOM status report:
- DICOM compliance check
- About DICOM compliance check
- To start DICOM compliance check:
- DICOM calibration
- About DICOM calibration
- To start DICOM calibration:
- Reset DICOM calibration
- About reset DICOM calibration
- To reset the DICOM calibration:
- DICOM error threshold
- About DICOM error threshold
- To set the DICOM error threshold:
- Display orientation
- About Display orientation
- To set the Display orientation
- Video input signals
- About input signals
- To manually select a video input signal:
- Video encoding modes
- About video encoding modes
- To manually select a video encoding mode:
- Grayscale conversion modes
- About grayscale conversion modes
- To manually select a grayscale conversion mode:
- EDID timings
- About EDID timings
- To manually set EDID timings:
- EDID format
- About EDID format
- To select the EDID format
- Display info
- About display info
- To retrieve info about your display:
- Display status
- About display status
- To retrieve the status of your display:
- Repacking instructions
- 5
- Foot protection buffer
- To replace the foot protection buffer
- Repacking overview
- Cleaning your display
- 6
- Cleaning instructions
- To clean the display
- Important information
- 7
- Safety information
- General recommendations
- Electrical Shock or Fire Hazard
- Modifications to the unit
- Type of protection (electrical):
- Degree of safety (flammable anesthetic mixture)
- Non-patient care equipment
- Power connection – Equipment with external 24 VDC power supply
- Transient over-voltage
- High magnetic environment
- Power cords:
- Water and moisture
- Ventilation
- Malfunctions
- National Scandinavian Deviations for CL. 1.7.2
- Environmental information
- Disposal Information
- Turkey RoHS compliance
- 中国大陆 RoHS
- Regulatory compliance information
- Intended use
- Indications for use
- Contra-indications
- Intended users
- Manufacturing country
- Importers contact information
- FCC class B
- Canadian notice
- EMC notice
- General information
- Electromagnetic emissions
- Electromagnetic immunity
- Explanation of symbols
- Symbols on the device
- Symbols on the box
- Legal disclaimer
- Disclaimer notice
- Trademarks
- Copyright notice
- Patent protection
- Technical specifications
- Open source license information
- Open source license information
Brand : Barco
Model : Coronis MDCG-5221
Category : Monitor