
Viron V18 - Pool pump ASTRALPOOL - Free user manual and instructions
Find the device manual for free Viron V18 ASTRALPOOL in PDF.


| Product Type | Pool Pump |
| Brand | AstralPool |
| Model | Viron V18 |
| Category | Pool Pump |
| Power Supply | 230 V / 50 Hz |
| Power Consumption | 1.1 kW |
| Max Flow Rate | 18 m³/h |
| Max Head | 10 m |
| Max Operating Pressure | 2.5 bar |
| Water Temperature Range | 5 °C to 40 °C |
| Dimensions (L x W x H) | 550 x 250 x 300 mm |
| Weight | 20 kg |
| Connection Size | 50 mm (2") |
| Material | Reinforced thermoplastic |
| Motor Type | Single-phase induction motor |
| Speed Settings | Single speed |
| Protection Rating | IP55 |
| Noise Level | 70 dB(A) |
| Certifications | CE, TUV |
| Installation Type | In-ground or above-ground |
| Warranty | 2 years |
| Maintenance | Clean strainer basket regularly; check seals annually |
| Spare Parts | Available from AstralPool dealers |
Frequently Asked Questions - Viron V18 ASTRALPOOL
User questions about Viron V18 ASTRALPOOL
0 question about this device. Answer the ones you know or ask your own.
Ask a new question about this device
Download the instructions for your Pool pump in PDF format for free! Find your manual Viron V18 - ASTRALPOOL and take your electronic device back in hand. On this page are published all the documents necessary for the use of your device. Viron V18 by ASTRALPOOL.
USER MANUAL Viron V18 ASTRALPOOL
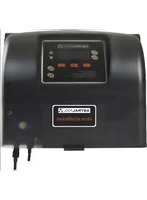
Viron Salt Chlorinator With Bluetooth
INSTALLATION AND
OPERATING INSTRUCTIONS

The appliance is not intended for use by young children or infirm persons without supervision. Please ensure that young children are supervised to ensure that they do not play with the appliance.
Controller must be installed according to AS 3000 wiring rules.
If the supply cord is damaged it must be replaced by AstralPool or its service agent or a similar qualified person in order to avoid a hazard.
This product is NOT suitable for use on Indoor swimming pools. We recommend the installation of a Viron e-Q Chlorinator with Ph and Chlorine sensors.

For full warranty terms and conditions and to register your warranty, simply visit www.astralpool.com.au/warranty and complete your details. Or scan the QR code and be taken directly to the registration page.
Record your equipment details here for quick reference:
Model No.:
Serial No.:
1.0 Introduction...... 4
2.0 Installation.... 4
2.1 Mounting the Controller.... 4
3.0 Starting your Chlorinator.... 5
3.1 Operating functions accessed through the Maintenance Program.... 5
3.2 Installing and using Bluetooth 6
3.3 Set Up and Control using the Chlorinators buttons.... 7
3.4 Setting Timers.... 8
3.5 Timer Recommendations.... 8
4.0 Operation using the Chlorinator buttons....9
4.1 Adjusting Chlorine Output....9
5.0 General Operation/Pool Chemistry.... 10
5.1 Setting the right Chlorine output and Operation times.... 10
5.2 Stabiliser.... 10
5.3 pH Level.... 10
5.4 Total Alkalinity.... 10
5.5 Salt Level.... 10
5.6 Acid Handling.... 10
5.7 Cell Maintenance.... 11
6.o Swimming Pool Applications and the use of Cyanuric Acid 12
7.0 Fault indication and troubleshooting.... 12
8.o Warranty.... 13
1.0 INTRODUCTION
Congratulations on your purchase of the Viron series salt chlorinator. The correct pH balance of your pool water significantly increases the effectiveness of the chlorine in the water and if not maintained at the correct level, can cause harm to the interior finish of your swimming pool or spa and reduce the disinfection time of the chlorine.
The purpose of the Viron series chlorinators is to significantly reduce the level of daily and weekly maintenance required to keep your pool and spa sparkling clean and healthy to swim in.
These installation and operating instructions will guide you through installation, operation and maintenance of your new chlorinator. Regular maintenance will ensure many years of trouble free operation.
2.0 INSTALLATION
2.1 Mounting the Controller: Choose a location that is preferably out of direct sunlight, near the filter system. The controller should be located 1 metre above ground level to prevent rain splash back or sprinkler system damage to the underside of the controller. The controller must be mounted on a vertical surface/wall. If mounted on a post, a flat sheet 20mm larger than the controller housing must be used.
a. Mount the wall bracket using the screws provided on a secure wall.
b. Glue Chlorinator cell into line as per drawing below after filter, heater and solar (if installed).
c. Plug filter pump 3 pin plug into underside of Controller.
d. Connect 4 wire cell cable ensuring matching colours.
e. The cell must be installed with the barrel unions underneath and the cell should be horizontal. Both 40mm and 50mm fittings have been provided. Make sure that the 'o'rings are correctly fitted and the unions are done up tightly. Flow direction through the cell is critical – refer to label on housing.
f. Hang Controller on wall bracket and plug power supply lead into 3 pin 10 amp outlet.

flowchart
graph TD
    A["Water from pool"] --> B["Filter"]
    B --> C["Heater"]
    C --> D["From Filter/Pump"]
    D --> E["Pipe Centres 108mm"]
    E --> F["Pool Return"]
    style A fill:#f9f,stroke:#333
    style B fill:#ccf,stroke:#333
    style C fill:#cfc,stroke:#333
    style D fill:#fcc,stroke:#333
    style E fill:#cff,stroke:#333
    style F fill:#ffc,stroke:#333
Your Chlorinator can be controlled using the Chlorinators screen & buttons, or by using an App on a compatible smartphone or tablet using Bluetooth.
Initial Installation, to set up variable speed pumps etc, needs to be performed using the Chlorinators screen & buttons, but most other functions can be performed using either the Chlorinator or the App.
Your Chlorinator Controller operation can be divided into 4 areas;
a. MAINTENANCE – selects specialised functions of your chlorinator and initial set up of Chlorinator to suit your pool and spa.
b. SET – selects changes in Chlorine Production and pH of your pool and spa water.
c. CLOCK & TIMER buttons – sets current time and filtration, chlorine production and pH monitoring and adjustment times.
d. Pool and Spa Mode – Allows selection of pool mode where controller will produce chlorine suitable for pool and Spa Mode, where chlorine production and acid dosing is reduced to suit a smaller volume of water in the spa.
3.1 OPERATING FUNCTIONS ACCESSED THROUGH THE MAINTENANCE PROGRAM
Press MAINT
To backwash your filter press BACKWASH and then the up or down arrows to select the backwash time. You can press ABORT at any time to finish the backwash. To rinse the filter, you can select BACKWASH again and then select the time. Using this feature will ensure your sand filter is backwashed for the correct time. Note: Ensure pump is off when changing the position of the backwash valve on your filter. As a guide, sand filters should be backwashed for 2 to 3 minutes, and then rinsed for 1 minute.
From MAINT press NEXT and INSTALL will be shown
INSTALL allows the unit to be set up for your pool or spa and to pair your phone with the Chlorinators Bluetooth connection.
Select INSTALL and you will be asked to ACCEPT the appropriate Language for your Chlorinator (English is the Default)
Then you will be asked if you want to INSTALL CHLORINATOR This should only be selected in the initial start up of your Chlorinator
a. TIMER ENABLED – this function will turn your timer on or off. If the chlorinator is not connected to an external timer clock or Genus Remote Control system Press ACCEPT. If an external timeclock is used to operate the chlorinator and filter pump then change to disabled.
b. FAST COMMS – set standard to YES, this option will only need to be changed if using an older version Hurlcon controller (no touchscreen)
c. VARIABLE SPEED PUMP – select YES if you have an AstralPool 3 speed pump. (AND YOU HAVE EITHER A CONNECT LITE – 11603,11604 OR A BLDC COMMS INTERFACE – 10015). This will allow you to program the speed of the pump as part of the timer setting in the chlorinator, Otherwise Select NO for all other pumps.
d. This will allow you to program the speed of the pump as part of the timer setting in the chlorinator.
e. PUMP FLOW CHECK – If active this function will monitor the flow sensor inside the chlorinator cell. If the presence of water flow is not detected for over 5 minutes, power to the pump outlet will be shut down to prevent your pump running dry.
f. ENABLE LIGHT – Your Viron chlorinator has an output to operate a single AstralPool ARC LED light.
g. CELL REVERSAL PERIOD – Standard setting is 4 hours. This should not be changed without consulting with your local AstralPool dealer or service department.
h. REVERSE CELL? – This feature can be used to perform a manual reverse of your chlorinator cell – designed for use by your pool technician only.
i. RESET SYSTEM? – SELECT NO (This option will revert your chlorinator back to factory settings. It should only be used if your Viron series chlorinator enters an error that cannot be cleared).
Cycle through POOL MODE button to select Auto, Manually ON or Manually OFF.
AUTO will allow the unit to operate your filter pump, chlorine production on the timer periods you have selected. If you have not changed the timer periods, the default timer turns the filter pump and unit on at 08:00 hours for a period of 4 hours and then again at 16:00 hours for a further period of 4 hours. This is the default setting from the factory.
3.2 INSTALLING AND USING BLUETOOTH
From MAINT press NEXT and INSTALL will be shown, press NEXT, Select INSTALL and ACCEPT the current Language. INSTALL CHLORINATOR will be shown, press NEXT and INSTALL BLUETOOTH will be shown. Press ACCEPT and the 4 digit BLUETOOTH ACCESS CODE will be shown. This code needs to be retained and entered into the ChlorinatorGo App.
The "ChlorinatorGo" App can be downloaded from the Apple App store or from The Google Play store.
Once the App is installed and opened, press on the "+" symbol and enter the ACCESS CODE from above and press save. You can then enter a name for your Chlorinator.
From the front page of your App, press on the name of your chlorinator and your phone will connect to the chlorinator and display the HOME page.

From this page you can turn the Chlorinator On, Off or to Auto, select Pool or Spa Mode and set the pump speed (if a compatible AstralPool pump is installed)
You can then select the LIGHTS page (if a compatible Connect LITE or Connect LITE+ is installed) or select the TIMERS page (if Timers Enabled" was selected during Installation)

The Chlorine set point and other Maintenance tasks can be selected from the SETTINGS page.
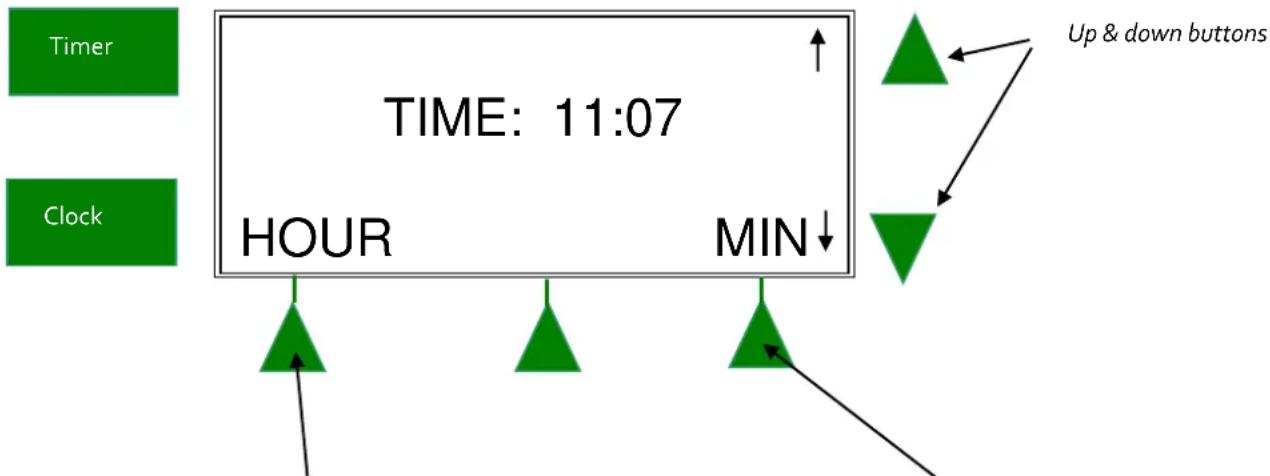
a. Press "Pool Mode" button until Manually Off appears and then Press "Clock" Button
b. Select "Day" and use buttons adjacent to LCD screen to set the current time. The clock is a 24 hour clock.
flowchart
graph TD
    A["Timer"] --> B["TIME: 11:07"]
    C["Clock"] --> B
    B --> D["HOUR"]
    B --> E["MIN"]
    D --> F["Up & down buttons"]
    E --> F
    style A fill:#99ccff,stroke:#333
    style C fill:#99ccff,stroke:#333
    style B fill:#cccccc,stroke:#333
    style D fill:#ffffff,stroke:#333
    style E fill:#ffffff,stroke:#333
    style F fill:#ffffff,stroke:#333
Select hour and use up or down buttons to change hour. Select Min and use up or down buttons to change the minute
3.4 SETTING TIMERS
Your Viron Series chlorinator has 4 timers per day enabling you to set different periods in which your filtration pump, pH control and chlorine production will operate. Timers are set by entering a start time, and a RUN time for how long you want to operate. To set timers, do the following:
a. Press the TIMER button.
b. Press HOUR button to set the hour for the timer selected and use the Up/Down arrows to change the time.
c. Press MIN button to select the minutes for the timer selected and use the Up/Down arrows to change the time. Press the NEXT button to select the RUN time or another time and set as required. Note: The RUN time represents the number of hours you want the unit to operate for.
d. When finished, press the NEXT button a number of times to scroll through the other times until you return to normal display. This saves your new settings.
e. Select Auto Sanitising by pressing the POOL mode button. The POOL mode button has three settings, manually ON which turns on system indefinitely, manually OFF which turns system off indefinitely, and AUTO mode which sets the controller on timer clock mode. In AUTO mode the LCD screen will display the date and pool sanitiser message.
See also section 3.2 Installing and using Bluetooth
3.5 TIMER RECOMMENDATIONS:
AstralPool recommend that you use two timers, one for the morning and one for the evening and typically for periods of 2-5 hours for each. Your Viron Series chlorinator is most effective if running in the early morning or evening when it is cooler (strong sunlight consumes more chlorine). As a default, the control is set to come on at 08:00 hours and 16:00 hours both for periods of 4 hours.

flowchart
graph TD
    A["Timer"] --> B["POOL SANITISING OFF UNTIL 16:00"]
    C["Clock"] --> B
    B --> D["SET"]
    B --> E["MAINT"]
4.0 OPERATION USING THE CHLORINATOR BUTTONS
During operation, adjustments are made by the SET button.

flowchart
graph TD
    A["Timer"] --> B["POOL SANITISING ON UNTIL 20:00"]
    C["Clock"] --> B
    B --> D["SET MAINT"]
    D --> E["↑"]
    D --> F["↓"]
4.1 ADJUSTING CHLORINE OUTPUT
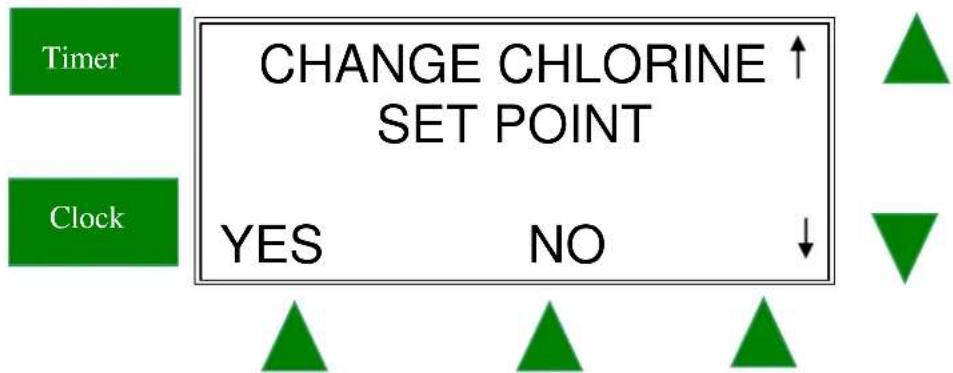
Press the SET button to change the chlorine output and the pH of your Pool
flowchart
graph TD
    A["Timer"] --> B["CHANGE CHLORINE SET POINT ↑"]
    C["Clock"] --> D{YES}
    C --> E{NO}
    D --> F["↑"]
    E --> G["↓"]
Press YES to change the output
flowchart
graph TD
    A["SET POINT"] --> B["6"]
    B --> C["ACCEPT"]
    style A fill:#99ccff,stroke:#333
    style B fill:#66ccff,stroke:#333
    style C fill:#99ccff,stroke:#333
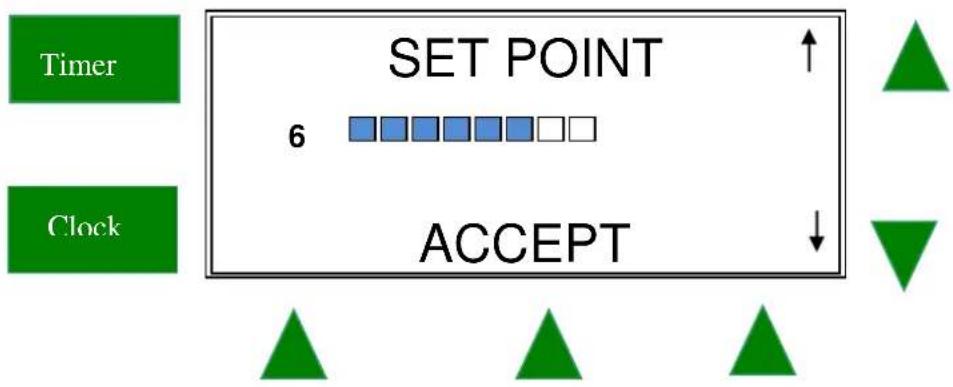
Use the up and down buttons to change the Set Point between o and 8. o chlorine output should only be used when there is no salt in the water. In summer, the chlorine should be set between 6 and 8 and you should regularly check your chlorine level in your swimming pool to determine if the output should be increased or decreased. Rely on your pool professional for advice on the recommended chlorine level in your pool.
As a guide the free chlorine level should be between 1.0 ppm and 3.0 ppm. See also section 3.2 Installing and using Bluetooth5.0 General Operation/Pool Chemistry
5.1 Setting the Right Chlorine Output and Filtration Time
Your Viron series chlorinator must be run every day to ensure that your pool is correctly sanitised. As the sun dissipates chlorine, running times are higher in the summer compared to the winter. AstralPool recommend that you initially run your chlorinator at maximum output on level 8.
Summer
You should set your chlorinator to operate for 8 to 10 hours per day. Ideally, run it for 4-5 hours in the morning (say 8-12pm) and 4-5 hours in the evening (say 6.00-11pm). In extremely hot weather it may be necessary to extend the running time if you find that the free chlorine level is too low.
Winter
You should set your chlorinator to operate for 6 to 8 hours per day. Again, running it in the morning and evening is preferable. A lower chlorine output level may be selected.
Checking Chlorine Level.
Ideally, check your chlorine level after the morning operating period. The free chlorine residual level should be somewhere between 1 and 3 parts per million. Increase or decrease the output of the chlorinator to get the right residual chlorine level. It may also be necessary to adjust the operating period if you are running at minimum or maximum output.
5.2 Stabiliser
Sunlight rapidly dissipates the amount of free chlorine in your pool. Chlorine stabiliser greatly reduces this effect. Without stabiliser, you may need to run your chlorinator and filtration system up to 16 hours per day or longer. Keep the Stabiliser reading between 30 and 60ppm.
5.3 pH Level
You should keep you pH level between 7.0 and 7.4 for fibreglass pools and 7.2 to 7.8 for other pools.
5.4 Total Alkalinity
The ideal range is between 80 and 120 ppm.
5.5 Salt Level
Salt level should be maintained around 4,000ppm but should never be allowed to fall below 3,000ppm. Although salt is not consumed by the chlorinator, salt is lost during backwashing, and when your pool overflows due to rain or splashing. The correct salt level is important to cell life and the effective operation of your chlorinator. A typical pool of around 50,000 litres requires 200kg of salt to initially set-up the pool to 4,000ppm.
A low salt level warning is indicated on your Viron chlorinator if the salt level drops. If Low Salt is indicated, check again in 24 hours and then if it is still indicated, add two 25kg bags of salt to the shallow end of your pool. Run the filtration system for approx. 6 hours to help mix the salt in the pool. It can take up to a day for the salt to fully dissolve. If the low salt light is still on, then you should get your pool water tested. If the Salinity is above 4000ppm then you may need to have your Chlorinator checked.
Warning: Some people recommend that you put salt directly in the skimmer box. This is a very bad practice as it allows very high concentrations of salt to be passed through your filtration and other pool equipment.
5.6 Acid Handling
Hydrochloric Acid should be handled with extreme care. Refer to Material Safety Data Sheets on Hydrochloric Acid. Do not inhale Acid fumes. Do not spill and handle with extreme care during transport. Use protective gloves and goggles. In the case of spillage wash down with fresh water immediately. Keep out of reach of children.
5.7 CHLORINATOR MAINTENANCE AND TROUBLESHOOTING
If the supply cord is damaged, it must be replaced by Astralpool or its service agent or a similarly qualified person in order to avoid a hazard.
Cell Maintenance
Your Viron Chlorinator has an automatic cleaning feature that under normal conditions, will keep the cell plates clear of deposits of salt and calcium.
Viron Series cells have a positive charge sensor that monitors the flow and salt levels of the water. This sensor is designed to be fail safe. DO NOT ATTEMPT TO ABRASIVELY CLEAN THE FLOW SENSOR, THE FLOW SENSOR IS COATED WITH SPECIAL RARE EARTH MATERIAL AND IF DAMAGED FROM ABRUSIVE CLEANING BY REMOVAL OF THIS COATING WILL RESULT IN CORRUSION TO THE SENSOR PLEASE REFER TO BELOW "CELL CLEANING INSTRUCTIONS" DAMAGE TO THE SURFACE OF THE FLOW SENSOR FROM INCORRECT CLEANING WILL NOT BE COVERED BY WARRANTY
Cell Cleaning Instructions:
- close applicable valves
- disconnect the Chlorinator from the Mains by removing the 3 pin plug
- disconnect the cell wires
- undo the barrel nuts connecting the cell to your filtration system
- turn the cell upside down (inlet and outlet on top) and fill the cell with a mix of 1 part Hydrochloric acid to 10 parts water and leave standing for a few minutes. As an alternative, you may use an approved commercial Cell cleaning solution
- repeat if necessary and then rinse well in clean water
- do not abrasively clean the Flow Sensor to clean, ensure flow sensor surface is not damage. Damage to the surface or removal of the coating from abrasive cleaning of the flow sensor will not be covered by warranty
- re-install the cell ensuring o-rings are correctly located and barrel nuts are tightened to prevent leaks
- re-connect cell wires with wing nuts supplied making sure the blue wire is connected to the blue terminal. Incorrect connection may damage your chlorinator control. Tighten wing-nuts to ensure the electrical connection is sound
- Return all valves to their normal positions, re connect power to the Chlorinator and turn on at power point.
WARNING: Follow safety instructions provided with the Hydrochloric acid or cleaning solution. When handling Hydrochloric Acid, the use of eye protection, mask and gloves are highly recommended. Extreme caution should be taken whenever handling Hydrochloric Acid or Cell Cleaning Solution.
6.0 Swimming Pool Applications and the use of Cyanuric Acid
USE OF A SUN SCREEN CHEMICAL (CYANURIC ACID) FOR OUTDOOR POOLS IS RECOMMENDED. CHECK WITH YOUR LOCAL POOL SHOP AND USE THE CORRECT DOSAGE. ENSURE YOUR POOL WATER IS WELL BALANCED WITH THE CORRECT pH, TDS, TA AND STABILISER LEVELS AND FREE FROM PHOSPHATES.
7.0 Fault Indication and trouble shooting
| Fault Indication | Potential Cause | Remedy |
| No Flow | Pump turned off/disconnected or valves closedSense wire disconnected from cell | Ensure valves/pump onConnect sense wire to cell |
| Low salt | Salt level in pool has dropped too lowPool water temperature is lowCell has failed | See section 5.5 aboveIncrease salt level or raise water temperatureCall a technician |
| Display blank | No Power to ControllerFuse blown | Plug in controller and ensure mains power availableCall a technician |
| Low/No chlorine production | Cables not connected to cellTimer period too shortChlorine output level too lowFilter needs backwashingPool stabiliser too lowSalt level too lowWater Temperature below 15 degExcessive Salt Level (Above 10,000 ppm) | Connect cablesIncrease timer periodIncrease chlorine outputBackwash filterGet Stabiliser between 30 and 60 ppmIncrease salt to above 4000ppmIncrease water temperature or salt levelChlorinator cuts out on overload, reduce salt level to 4000 ppm |
Maintenance of your Chlorinator
Maintenance Schedule: Your new product incorporates moving parts and withstands high velocity water with chemicals in it. Some of these parts will wear in the normal course of use and require regular checks and maintenance. Performing these checks and maintenance will identify parts that have worn and require repair/replacement before further serious damage is sustained. A small amount of regular care and attention to your pool equipment will help ensure long life and trouble free performance.
To protect against extremes of temperature, your unit is vented to allow expensive electronics to cool. Ants and some insects are often attracted to the warmer, dry environment inside the enclosure. We recommend that, with power turned off, you spray a surface insecticide on the surfaces surrounding the control to prevent ant and insect ingress. Repeat every three months or as necessary.
| Timing | Maintenance Check | Service action (if required) |
| Fortnightly | Check cell for calcium build up | Soak cell in mixture of 10 parts water to 1 part acid. Use a soft brush only if required |
| Check water chemistry | Balance pH in pool and adjust output of unit to ensure satisfactory production of chlorine. | |
| Check cable connections to cell | Adjust pins by separating if not held firmly in place. Ensure no water contact is occurring with pins | |
| Three Monthly | Check cell connections for leaks | Isolate Pump, turn power off, clean and grease O rings or replace if necessary Spray a surface insecticide on the surfaces around the unit to prevent ant and insect ingress. |
| Six Monthly | Check chlorine levels and pump operating hoursPrevent insect ingress to controller | Adjust timer and output depending on demand for current season.Turn controller off, use an insect spray and spray onto walls around controller. Do not spay directly into unit. |
Important note: Regular maintenance is important to ensure long life and trouble free performance of your pool equipment. If unable to perform the maintenance yourself, contact your local AstralPool office who will arrange a trained service technician to perform the maintenance for you.
Record your Equipment details here for quick reference:
Model No.: ____
Serial No.: ____

INST463

sales@astralpool.com.au
www.astralpool.com.au
Fluidra Group Australia PTY LTD
219 Woodpark Road
Smithfield, N.S.W. 2164
Australia
ABN. 87 002 641 965


- Viron Salt Chlorinator With Bluetooth
- INSTALLATION AND
- OPERATING INSTRUCTIONS
- INTRODUCTION
- INSTALLATION
- OPERATING FUNCTIONS ACCESSED THROUGH THE MAINTENANCE PROGRAM
- Press MAINT
- From MAINT press NEXT and INSTALL will be shown
- INSTALLING AND USING BLUETOOTH
- SETTING TIMERS
- TIMER RECOMMENDATIONS:
- OPERATION USING THE CHLORINATOR BUTTONS
- ADJUSTING CHLORINE OUTPUT
- Setting the Right Chlorine Output and Filtration Time
- Summer
- Winter
- Checking Chlorine Level.
- Stabiliser
- pH Level
- Total Alkalinity
- Salt Level
- Acid Handling
- CHLORINATOR MAINTENANCE AND TROUBLESHOOTING
- Cell Maintenance
- Cell Cleaning Instructions:
- Swimming Pool Applications and the use of Cyanuric Acid
- Maintenance of your Chlorinator
Brand : ASTRALPOOL
Model : Viron V18
Category : Pool pump