
AZ-RS128 - Mp3 player AIWA - Free user manual and instructions
Find the device manual for free AZ-RS128 AIWA in PDF.


| Product Type | MP3 Player |
| Brand | Aiwa |
| Model | AZ-RS128 |
| Dimensions | Approximately 4.5 x 2.5 x 0.8 inches |
| Weight | Approximately 45 g (with battery) |
| Power Source | 1 x AAA battery (not included) or USB power |
| Battery Life | Up to 10 hours of continuous playback |
| Display | LCD screen with backlight |
| Storage | Built-in 8 GB memory (expandable via microSD card up to 32 GB) |
| Audio Formats Supported | MP3, WMA, WAV, FLAC |
| Playback Functions | Play, pause, next/previous track, repeat, shuffle, equalizer presets |
| Recording | Voice recording via built-in microphone |
| Connectivity | USB 2.0, 3.5mm headphone jack, microSD slot |
| Radio | FM tuner with up to 20 presets |
| Care and Cleaning | Wipe with a soft dry cloth; do not use liquids or solvents |
| Safety Precautions | Do not disassemble, avoid extreme temperatures, keep away from water |
| Spare Parts and Repairability | Battery and microSD slot user-replaceable; other repairs by qualified personnel |
| General Information | Designed for personal audio enjoyment; compatible with Windows, Mac, and Linux |
Frequently Asked Questions - AZ-RS128 AIWA
User questions about AZ-RS128 AIWA
0 question about this device. Answer the ones you know or ask your own.
Ask a new question about this device
Download the instructions for your Mp3 player in PDF format for free! Find your manual AZ-RS128 - AIWA and take your electronic device back in hand. On this page are published all the documents necessary for the use of your device. AZ-RS128 by AIWA.
USER MANUAL AZ-RS128 AIWA
Portable USB Memory Player with FM Radio
Operating Instructions
pavit
AZ-RS1/RS128/RS256
WARNING
To prevent fire or shock hazard, do not expose the unit to rain or moisture.
Do not install the appliance in a confined space, such as a bookcase or built-in cabinet.
To prevent fire, do not cover the ventilation of the apparatus with news papers, table cloths, curtains, etc. And don't place lighted candles on the apparatus.
To prevent fire or shock hazard, do not place objects filled with liquids, such as vases, on the apparatus.
Certain countries may regulate disposal of the battery used to power this product. Please consult with your local authority.
The validity of the CE marking is restricted to only those countries where it is legally enforced, mainly in the countries EEA (European Economic Area).
For the customers in the USA Owner's Record
The model number and the serial number are located at the rear. Record the serial number in the space provided below. Refer to these numbers whenever you call upon your Aiwa dealer regarding this product.
Model No. ____ Serial No. ____
If you have any questions about this product, you may call;
Aiwa Customer Information Service Center 1-800-289-2492 or
http://www.us.aiwa.com/.
Declaration of Conformity
Trade Name: AIWA
Model No.: AZ-RM256 AZ-RM128
Responsible Party: Sony Electronics Inc.
Address: 16450 W. Bernardo Dr, San Diego, CA 92127 U.S.A.
Telephone No.: 858-942-2230
This device complies with part 15 of the FCC rules. Operation is subject to the following two conditions: (1) This device may not cause harmful interference, and (2) this device must accept any interference received, including interference that may cause undesired operation.
AZ-RS1: No "pavit"
AZ-RS128: AZ-RM128 (one 128-MB "pavit")
AZ-RS256: AZ-RM256 (one 256-MB "pavit")
This device complies with Part 15 of the FCC Rules. Operation is subject to the following two conditions: (1) This device may not cause harmful interference, and (2) this device must accept any interference received, including interference that may cause undesired operation.
NOTE
This equipment has been tested and found to comply with the limits for a Class B digital device, pursuant to Part 15 of the FCC Rules. These limits are designed to provide reasonable protection against harmful interference in a residential installation. This equipment generates, uses, and can radiate radio frequency energy and, if not installed and used in accordance with the instructions, may cause harmful interference to radio communications. However, there is no guarantee that interference will not occur in a particular installation. If this equipment does cause harmful interference to radio or television reception, which can be determined by turning the equipment off and on, the user is encouraged to try to correct the interference by one or more of the following measures:
– Reorient or relocate the receiving antenna.
– Increase the separation between the equipment and receiver.
- Connect the equipment into an outlet on a circuit different from that to which the receiver is connected.
- Consult the dealer or an experienced radio/TV technician for help.
You are cautioned that any changes or modifications not expressly approved in this manual could void your authority to operate this equipment.
CAUTION
You are cautioned that any changes or modifications not expressly approved in this manual could void your authority to operate this equipment.
Table of Contents
Overview
What you can do with your player .... 4
Main features 5
Getting started
Step 1: Check the package contents. ..... 6
Step 2: Insert a battery. 7
Locating controls 9
Basic operations
Listening to music 11
-
Connect the headphones...... 11
-
Insert the "pavit" into the player...... 11
-
Start playback. 12
▶ Playback options ......15
Changing the sound quality (M.D.S.E) ..... 15
Playing a track repeatedly (REP1) / Playing all tracks in random order (SHUF)...... 15
▶ Listening to the radio......16
Listening to the radio.... 16
Presetting radio stations.... 17
▶ Available features...... 19
Using the stopwatch 19
Using the countdown timer 20
Locking the controls (HOLD) 21
Turning off the beep sounds (BEEP) ...... 21
▶ Changing the settings of the player....22
Changing the display pattern 22
Changing the backlight setting 22
Changing the display language.... 23
▶ Additional information ......24
Precautions 24
Cleaning.... 24
Troubleshooting 25
Specifications 27
Index ...... Back cover
Before using this player, install the application software on your computer using the supplied CD-ROM, and send some music data to the player.
What you can do with your player
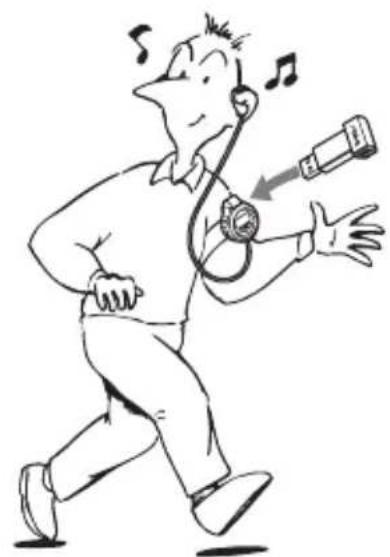
AZ-RS1/RS128/RS256 is a portable USB memory player with FM radio specially designed for use with a USB storage media called “pavit.” You can send MP3 files on your computer to the “pavit,” insert the “pavit” into the player, and carry your favorite songs anywhere. In addition to playing music data (MP3), you can listen to FM broadcasts with this player.
1 Send your favorite songs to the "pavit."
Use the supplied “Music Transfer pavit Edition” software to send MP3 files from your computer to the “pavit.”

natural_image
Cartoon illustration of a person using a desktop computer with a monitor and tower (no text or symbols)2 Enjoy music anywhere with your player!
natural_image
Cartoon illustration of a person running while holding a microphone and singing into the ear (no text or symbols present)What is "pavit"?
The “pavit” is a compact, lightweight, new-generation USB storage media* with a large storage capacity. Although the “pavit” is dedicated to “pavit”-compatible devices, it can also be used as an external storage media for your computer, since it connects directly to the USB port, a standard interface for personal computers.
Main features
- Compact size, lightweight, highly portable, with skip-proof operation
- The player is equipped with an FM radio tuner. You can listen to FM broadcasts in addition to playing music data (MP3).
- Up to 240 minutes of music can be stored in a 256-MB “pavit” and 120 minutes in a 128-MB “pavit.”*
- MP3 files on your computer are sent to the “pavit” by simple and easy operations using the supplied “Music Transfer pavit Edition” software.
- The “pavit” connects directly to the USB port on your computer for high-speed data transfer.
- You can also store a variety of data other than MP3 files in the new-generation USB storage media “pavit.”
* The time length varies according to the bit rate used when encoding MP3 files. The times indicated here are for 128-kbps MP3 files.
Notes
- Music you record is limited to private use only. Any other use requires the permission of the copyright holders.
- Sony is not liable for incomplete data transfer or damaged data due to problems of this product or your computer.
Step 1: Check the package contents.
Check the accessories enclosed in the package.
- Portable USB memory player with FM radio (1)

natural_image
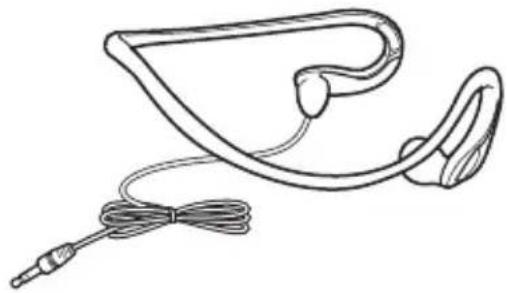
Line drawing of a portable electric heater with buttons and ventilation slots (no text or symbols)- Stereo headphones (1)
natural_image
Line drawing of a medical or electronic device with a coiled cable and earpiece (no text or symbols)• Headphone extension cord (1)

natural_image
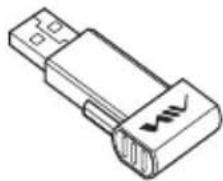
Line drawing of a coiled cable with two connectors (no text or symbols)- USB storage media "pavit"* (1)
natural_image
Isometric line drawing of a USB connector with a stylus symbol on its side (no text or labels)• CD-ROM (Music Transfer pavit Edition) (1)

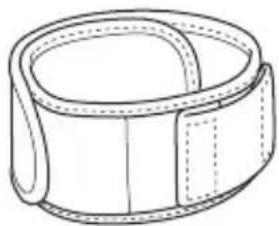
- Arm band (1)
natural_image
Simple line drawing of a wristband with dashed outlines (no text or symbols)- Operating instructions for the Portable USB Memory Player with FM Radio (this manual)
- Operating instructions for the application software Music Transfer pavit Edition (1)
- Quick start guide (1)
Step 2: Insert a battery.
Insert one LR03 (size AAA) alkaline battery into the battery compartment as illustrated below.
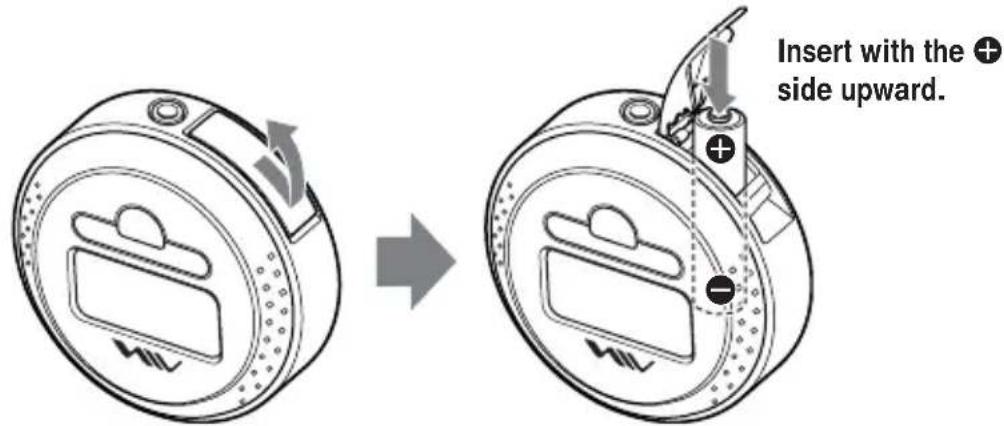
Battery duration
Approximately 10 hours (continuous music data playback, with Sony LR03 (size AAA) alkaline battery)
When the battery is drained, playback stops and the power is turned off automatically.
Operations of the buttons and switches may also become disabled. Even if you try to turn on the power in this state, nothing will be displayed and you cannot start playback. Replace the battery with a new one.
When you turn on the power after replacing the battery, playback starts from the track whose playback was interrupted by battery drain.
When to change the battery
The battery level indication in the display changes as follows:

flowchart
graph LR
    A["Power Supply"] --> B["Battery State"]
    B --> C["Battery State"]
    C --> D["Battery State"]
    D --> E["Charging Direction"]
Change the battery when the battery level indication becomes “.”
Notes
- The indicator sections of “☐” roughly show the remaining battery power. One section does not always indicate one-third of the battery power.
- Depending on the operating condition, the indicator sections of “☐” may increase or decrease.
(Continued)
To remove the battery
Turn the player upside down to draw out the battery.

The cover of the battery compartment is designed to prevent the battery from dropping.
Notes on dry batteries
- Do not throw batteries into fire.
- Do not carry batteries with coins or other metallic objects. It can generate heat if the positive and negative terminals of the battery are accidentally contacted by a metallic object.
- When the player is not to be used for a long time, remove the battery.
- If battery leakage occurs, wipe off any deposit in the battery compartment, and insert a new battery. In case the deposit adheres to you, wash it off thoroughly.
Locating controls
Player (front/side) Player (rear)


1Display
2“pavit” slot
3 ◀◀◀/▶▶▶ (SKIP/DOWN/UP) buttons
4 ▶ ■* (PLAY/STOP)/POWER button
5 VOL (volume) -/+ * buttons
6PRESET button
7MENU button
8 (headphones) jack
9 TUNER* button
10HOLD/BEEP switch
11REP1 (repeat 1)/SHUF (shuffle) switch
[12]M.D.S.E (MP3 Digital Sound Enhancer) switch
13Clip
* T he button has a tactile dot.
(Continued)
Display

1 "pavit" insertion indicator
The "pavit" is inserted in the player correctly.
☐: The “pavit” is not inserted in the player.
②Operation status indication
Displays the icon for music data playback, radio, stopwatch or countdown timer.
3Play mode indication
SHUF : Playing all tracks in random order
④1: Playing a track repeatedly
“PRESET” displayed in the radio preset mode.
4 M.D.S.E indication
Displayed only during music data playback.
“PRESET” displayed in the radio preset mode.
5 Volume indication
Roughly shows the current volume level.
6 Battery level indication
Roughly shows the remaining power of the battery. If “flashes, the battery is depleted.
7 Character information display
Displays the title, file name of music data, etc.
During radio reception, displays the band and frequency.
8 Track number/elapsed playing time indication
Displays the preset numbers in the radio preset mode.
Listening to music
First, send MP3 files to the “pavit” from your computer using the supplied “Music Transfer pavit Edition” software. Refer to the separate manual “Music Transfer pavit Edition” about how to send MP3 files to the “pavit.”
1. Connect the headphones.
Connect the headphones to the Ⓞ (headphones) jack on the player.

natural_image
Line drawing of a frying pan with a handle and lid, no text or symbols present2. Insert the "pavit" into the player.
When the power is turned on, the "pavit" insertion indicator "will appear in the display.
If there are no music data in the “pavit,” the “pavit” insertion indicator becomes

Align this projection with the groove inside the "pavit" slot.
(Continued)
3. Start playback.
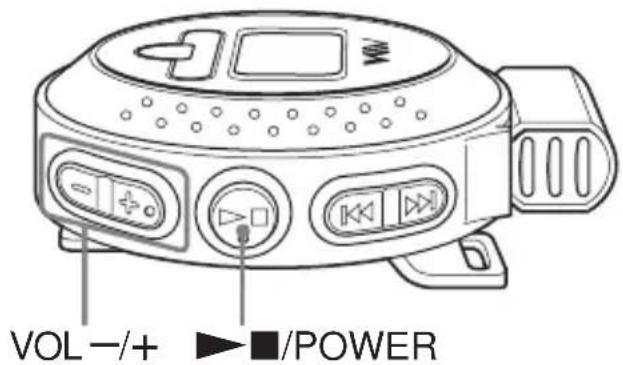
①Press and hold ▶■/POWER.
The power is turned on, a short beep is heard in the headphones (when the HOLD/BEEP switch is set to BEEP ON), and playback starts.
②Press VOL -/+ to adjust the volume.
Music data (tracks) are played in the order of the Playlist you created using “Music Transfer pavit Edition.”
During play mode, the track information* and elapsed playing time are displayed. Playback stops after the last track has been played.
* Displayed when the track has ID3 TAG information. If the track does not have ID3 TAG information, the file name is displayed. (ID3 TAG is a format to include textual information, such as title, album name and artist name, in MP3 files.)
If playback does not start
If the HOLD function is set to on, release the HOLD function (page 21).
Other operations
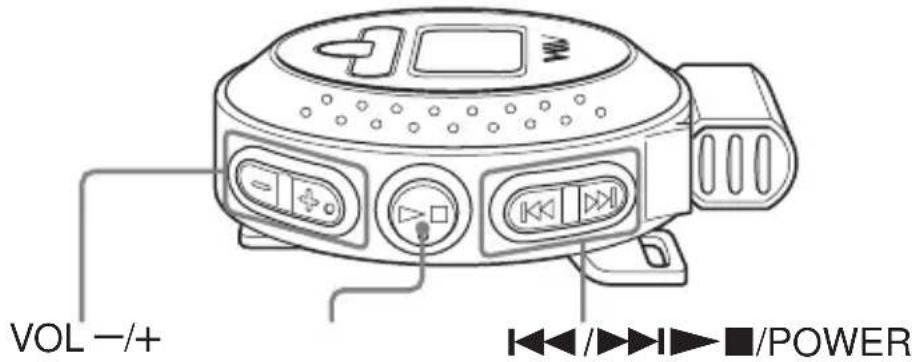
| To Do this | |
| Go to the beginning of the next track Press | ▶▶1. *1 |
| Go to the beginning of the current track Press | ◀◀. |
| Go to the beginning of preceding tracks | Press ◀◀ repeatedly. *1To quickly locate the desired track, press and hold ◀◀ until you find it. *2 |
| Go to the beginning of succeeding tracks Press | ▶▶I repeatedly. *1To quickly locate the desired track, press and hold ▶▶ until you find it. *2 |
| Adjust the volume Press VOL - /+. | Press and hold VOL -/+ to quickly turn down or up the volume. |
| Stop playback Press ▶■/POWER. | *3 |
| Turn off the power | Press and hold ▶■/POWER. |
*1 A short beep sounds for each track. When the first track is reached, the player emits a different beep sound.
*2 While holding down the button, a short beep sounds for each track. When the first track is reached, the player emits a different beep sound and playback of the first track will start.
*3 The power will be turned off automatically if the player is not operated for about 10 seconds while playback is stopped.
To remove the "pavit"
Always turn off the power before you remove the “pavit.” The music data or the “pavit” itself might be destructed if you remove the “pavit” with the player’s power turned on.
(Continued)
To start playback from the first track
Playback starts from the position where it was last stopped.
To start playback from the first track, press and hold ◀◀◀ or ▶▶◀ to return to the first track (page 13).
Playback will also start from the first track when:
- y ou remove the "pavit" and insert a different "pavit."
- you reset the player (page 25).
To wear the player on your arm
Wrap the supplied arm band around your arm, etc., and then attach the player to the arm band using the clip.

natural_image
Line drawing of a wristwatch with a magnified inset showing the top view (no text or symbols)Using the headphone extension cord
The headphone extension cord makes it easy to use the player while carrying it in your pocket or bag.
1 Connect the plug of the headphone extension cord to the Ⓞ (headphones) jack on the player.
2 Connect the headphones to the headphone extension cord.
Note
To prevent the wire from breaking, do not pull on the headphone cord when you connect or disconnect the headphones.

Changing the sound quality (M.D.S.E)
The M.D.S.E (MP3 Digital Sound Enhancer) allows you to enjoy clear digital sound and a resonant bass.
Set the M.D.S.E switch to ON.
“M.S.E. appears in the display.
To return to the normal sound
Set the M.D.S.E switch to OFF.
Playing a track repeatedly (REP1) / Playing all tracks in random order (SHUF)
| To | Set the REP1/SHUF switch to |
| Play the current track repeatedly*1 | REP1(“←1 is displayed.) |
| Play all tracks in random order*2 | SHUF(“SHUF displayed.) |
*1 After the track has been played 10 times repeatedly, playback stops.
*2 Playback stops when all the tracks in the "pavit" have been played.
To return to normal play mode
Set the REP1/SHUF switch to OFF.
Listening to the radio
You can listen to FM broadcasts with and without inserting the “pavit” in the player.
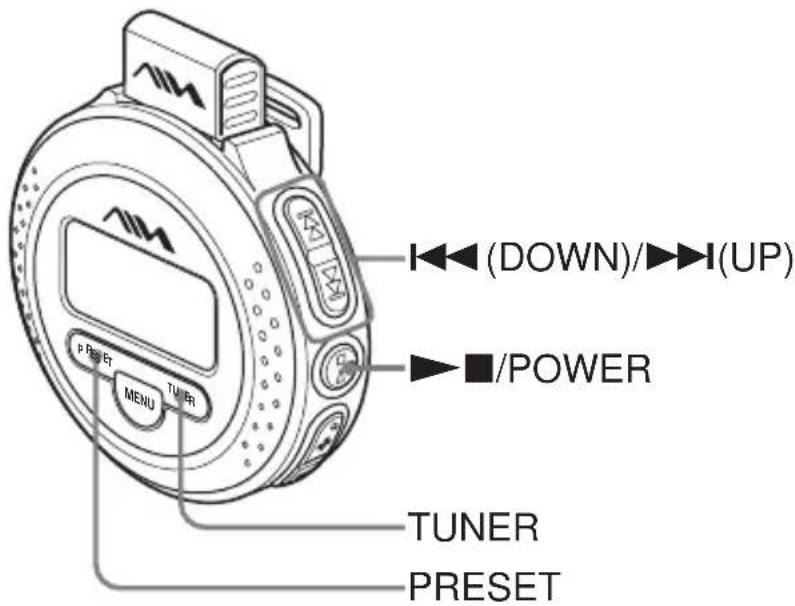
1 Press and hold ▶■/POWER until the player is turned on.
If the radio was selected when you turned off the player last time, or if the "pavit" is not inserted in the player, the radio will be selected automatically when you turn on the player.
2 Press TUNER repeatedly to select "FM 1" or "FM 2."
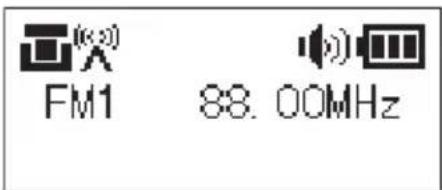
3 Press and hold I◀◀ (DOWN) or ▶▶I (UP) for about one second.
The player starts scanning the frequencies and stops when it finds a receivable station.
If you press ◀◀◀ (DOWN) or ▶▶◀ (UP) repeatedly, the frequency changes step by step.
To turn off the radio
Turn off the power by holding down ▶■/ POWER until “SEE YOU” appears in the display.
If you press ▶■/POWER, music data will be played from the position where the playback was last stopped.
To enhance detection of receivable stations
If there are stations that you want preset but cannot do it automatically because their signals are not strong enough, change the setting of “AUTO STOP LEVEL” to “HIGH” in order to enhance detection of receivable stations.
1 Press MENU.
2 Press ◀◀◀ (DOWN) or ▶▶◀ (UP) repeatedly to select “AUTO STOP LEVEL.”
3 Press MENU.
4 Press ◀◀◀ (DOWN) or ▶▶▶ (UP) to select “HIGH*.”
In case the same station is preset on two or more preset numbers because its signal is too strong, set the “AUTO STOP LEVEL” to “LOW.”
5 Press MENU.
* T he default setting at the time of purchase is "MID."
Note
Changing the setting of "AUTO STOP LEVEL" does not change the reception sensitivity.
To improve the reception
The headphone cord functions as the FM antenna. Extend the cord to improve the reception.

natural_image
Illustration of a digital pressure meter with a digital display and connected cable (no text or symbols visible)Presetting radio stations
You can preset up to 20 FM radio stations, 10 stations each for FM 1 and FM 2.
To preset stations automatically (Auto preset)
1 Perform steps 1 and 2 of "Listening to the radio" (page 16) to select the band.
2 Press PRESET.
“PRESET the preset numbers appear in the display.
3 Press and hold PRESET for more than 2 seconds.
“PRESET is flashing, and the player starts scanning for stations from the lower frequencies.

The first received station is preset on the preset number 1, and then the player starts scanning for the next receivable station.
If you press ▶■/POWER or TUNER during auto presetting, the player stops scanning and exits the auto preset mode, and music data playback starts or the radio is switched to the other band.
(Continued)
To preset a station manually (Manual preset)
If there is a station that cannot be preset automatically, you can preset it manually by the following procedure.
Before starting, you must exit the auto preset mode (“PRESET the preset numbers should not be displayed).
1 Press TUNER repeatedly to select “FM 1” or “FM 2.”
2 Tune in the station you want to preset.
3 Press and hold PRESET for more than 2 seconds.
“PRESET the preset numbers flash in the display.
4 Within 10 seconds, press ◀◀◀ or ▶▶▶ repeatedly to select the preset number you want to store the station on. The selected preset number starts flashing.
5 Within 10 seconds, press PRESET.
To tune in a preset station
1 Press TUNER repeatedly to select "FM 1" or "FM 2."
2 Press PRESET to display the preset numbers.
3 Press ◀◀◀ or ▶▶▶I repeatedly to select the preset number of the station you want to tune in.
To clear all preset stations
Turn off the power, remove the “pavit” from the player, and press and hold ▶■/POWER for more than 10 seconds.
The preset stations return to those at the time of purchase.
Using the stopwatch
You can use the player as a stopwatch. The stopwatch has a lap time feature enabling you to calculate a gap from a previous stored time.
You can use the stopwatch both while playing music data and listening to the radio.
1 During music data playback or radio reception, press MENU.
2 Press ◀◀◀ or ▶▶▶I repeatedly to select “STOPWATCH,” and then press MENU.
3 Press MENU.
Time count starts.
To stop the stopwatch
Press MENU.
To resume the time count, press MENU again.
To reset the stopwatch
After stopping the stopwatch by pressing MENU, press PRESET.
To display the lap time
Press PRESET at the point you need to check the lap time.
The current time is stored in the memory and the lap time (the time length from the previous stored time) is displayed.
The time count continues while the lap time is displayed.
To update the lap time, press PRESET again.
To exit the stopwatch mode
Press and hold MENU for more than 2 seconds.
The icon for stopwatch “changes to that for music data playback or radio.
Tip
The stopwatch can count up to 99 minutes 59 seconds 99 centiseconds. To continue the time count from then on, you need to reset the stopwatch.
Using the countdown timer
The alarm can be set to go off after the specified time period has passed. You can specify the time by the minute, from 1 to 99 minutes.
1 During music data playback or radio reception, press MENU.
2 Press I◀◀ or ▶▶▶I repeatedly to select “COUNTDOWN,” and then press MENU.
3 Press I◀◀ or ▶▶▶I repeatedly to specify the time length (1 to 99 minutes) until the alarm goes off, and then press MENU.
Countdown starts and the display changes to that for music data playback or radio.
“G is displayed during countdown.
When the time reaches zero, music data playback or radio reception is interrupted and the alarm sounds for one minute in the headphones.
Then, after the alarm stops, "G
disappears and music data playback or radio reception continues.
To turn off the alarm
Press any button on the player.
To cancel the countdown timer
Press and hold MENU for more than 2 seconds.
“G disappears.
Tip
If you press MENU to select countdown during countdown, the remaining time will be approximately displayed in minutes.
To exit, press MENU again.
The display changes to that for music data playback or radio.
Locking the controls (HOLD)
When carrying the player in a bag, the HOLD function can be used to prevent accidental pressing of the buttons.
Slide the HOLD/BEEP switch in the direction of the arrow.
“flashes for a while, and all operation buttons except for the switches on the rear side are disabled.
To release the HOLD function
Slide the HOLD/BEEP switch in the direction opposite to the arrow.
Turning off the beep sounds (BEEP)
Set the HOLD/BEEP switch to OFF.
To turn on the beep sounds
Set the HOLD/BEEP switch to ON. It is recommended you set the HOLD/BEEP switch to ON, as many operations can be confirmed by beep sounds.
Changing the display pattern
You can select from the following three display patterns:
| Setting | Items to be displayed |
| Title | Title of the song |
| Title+Artist | Title of the song and artist name |
| Title+Album | Title of the song and album name |
Title, artist name and album name are displayed when the track has ID3 TAG information. If the track does not have ID3 TAG information, the file name is displayed.
1 During music data playback or radio reception, press MENU.
2 Press I◀◀ or ▶▶▶I repeatedly to select “DISPLAY,” and then press MENU.
3 Press I◀◀ or ▶▶▶ to select the display pattern you want, and then press MENU.
To return to the menu screen
Select "BACK" in step 3.
Changing the backlight setting
You can change the lighting time of the backlight for the display.
1 During music data playback or radio reception, press MENU.
2 Press ◀◀◀ or ▶▶◀I repeatedly to select “BACKLIGHT,” and then press MENU.
3 Press ◀◀◀ or ▶▶◀I repeatedly to specify the lighting time (5, 10, 15 or 20 seconds) of the backlight, and then press MENU.
To return to the menu screen
Select "BACK" in step 3.
If you do not want to turn on the backlight
Select “OFF” in step 3. Depending on the surrounding light, the visibility of the display may improve if you turn off the backlight.
Note
Regardless of the BACKLIGHT setting, the backlight turns off when the battery level indication becomes “☐”
Changing the display language
You can select the language to be used for displaying the menu from:
Japanese, English, German, French, Italian and Spanish.
1 During music data playback or radio reception, press MENU.
2 Press ◀◀◀ or ▶▶▶I repeatedly to select “LANGUAGE,” and then press MENU.
3 Press ◀◀◀ or ▶▶▶I repeatedly to select the language, and then press MENU.
To return to the menu screen
Select "BACK" in step 3.
Note
The ID3 TAG text will not change into a different language by this operation.
Precautions
General
Never place the player in a place:
• under direct sunlight or near heat sources
• in a car with its windows closed (especially in summer)
- w here it will be subjected to excessive moisture such as in a bathroom
• where there is much dust
- near magnets or magnetized items such as speakers or a TV
Headphones
Road Safety
Do not use headphones while driving, cycling, or operating any motorized vehicle. It may create a traffic hazard and is illegal in many areas. It can also be potentially dangerous to play your player at a high volume while walking, especially at pedestrian crossings. You should exercise extreme caution or discontinue use in potentially hazardous situations.
Preventing hearing damage
Avoid using the headphones at a high volume. Hearing experts advise against continuous, loud and extended play. If you experience a ringing in your ears, reduce the volume or discontinue use.
Consideration for others
Keep the volume at a moderate level. This will allow you to hear outside sounds and to be considerate to the people around you.
Warning
If there is lightning when you are using your player, take off the headphones immediately.
Battery
- When the battery is drained, remove the battery from the player.
- When the player is not to be used for a long time, remove the battery.
In case of failure of this player, consult your Aiwa dealer without opening the casing. If failure occurs while the “pavit” is inserted in the player, it is recommended not to remove the “pavit” from the player to ensure an early solution to the problem.
Cleaning
Clean your player's casing with a soft cloth slightly moistened with water or a mild detergent solution.
Note
Do not use any type of abrasive pad, scouring powder or solvent such as alcohol or benzene as it may mar the finish of the casing.
Cleaning the headphone plug
If the headphone plug is dirty, it may cause noise or sound skipping. To ensure good sound quality, clean the headphone plug periodically with a soft, dry cloth.
If you have any questions or problems concerning your player, please consult your nearest Aiwa dealer.
Troubleshooting
If you experience any of the following difficulties while using your player, use this troubleshooting guide to help you to remedy the problem. Should any problem persist, consult your nearest Aiwa dealer.
For trouble concerning operations while connected to your computer, also refer to “Troubleshooting” in the separate manual “Music Transfer pavit Edition.”
Operation
| Symptom | Cause/Remedy |
| There is no sound. | →The volume level is set to the minimum level.Increase the volume (page 12).→The “pavit” is not inserted in the player correctly.Reinsert the “pavit” and check if the “pavit” insertion indicator“■is displayed (page 11).→The headphone plug is dirty.Clean the headphone plug with a soft dry cloth. |
| The buttons do not work. | →The HOLD function is set to on.Release the HOLD function (page 21).→The player contains moisture condensation.Let your player sit for a few hours at room temperature.→The battery is exhausted.Replace the battery with a new one (page 7). |
| The display becomes hard to see or nothing is displayed. | →The player contains moisture condensation.Let your player sit for a few hours at room temperature.→The battery is exhausted.Replace the battery with a new one (page 7). |
| The volume will not increase. | →The HOLD function is set to on.Release the HOLD function (page 21). |
| The sound is distorted. | →The bit rate used when encoding the MP3 files was low.Send MP3 files encoded with higher bit rates to the “pavit.” |
| There is no sound output from the right headphone. | →The headphone plug is not fully connected.Connect the headphone plug fully. |
| Playback stops suddenly. | →The battery is exhausted.Replace the battery with a new one (page 7). |
| There is noise in the playback sound. | →The music data itself contains noise.Noise may have been introduced when creating music data due to the conditions of the computer. Create the music data again. |
| Erroneous display. | →The player is not functioning normally.Remove the “pavit” from the player, and then press and hold►■/POWER for more than 10 seconds to reset the player.→Send the music data to the “pavit” again, as the data stored in the “pavit” may have been destructed. |
| The “pavit” insertion indicator becomes “■ | →The “pavit” does not have any music data, or the music data stored in the “pavit” may be destructed.Send the music data to the “pavit” again. |
(Continued)
Battery
| Symptom | Cause/Remedy |
| Battery life is short. | →The operating temperature is below 0°C (32°F).Battery life becomes shorter in cold temperatures due to battery characteristics. This is not a malfunction. |
Radio
| Symptom | Cause/Remedy |
| The audio is weak or contains noise. | →The battery is exhausted.Replace the battery with a new one (page 7).→Move the player away from electric products (TV, cellular phone, etc).→The headphone plug is not fully connected.Connect the headphone plug fully, since the headphone cord functions as the FM antenna. |
| The player tunes in to a station with much noise or where there is no station. | →Set the “AUTO STOP LEVEL” to “LOW” (page 17). |
Other
| Symptom | Cause/Remedy |
| The “pavit” cannot be inserted into the player. | →The “pavit” is being inserted backwards.Insert the “pavit” in the correct orientation. |
| The player gets warm. | →The player gets warm if it is used for an extended period of time.This is not a malfunction. |
| The “pavit” which has been used on another device does not work. | →The “pavit” has been formatted on a computer or other device.Make a backup copy of any important data in the “pavit,” such as by copying it to the hard disk of your computer. Then reformat the “pavit,” using the supplied Music Transfer pavit Edition software.As Music Transfer pavit Edition is not compatible with FAT32 file systems, reformat the “pavit” with FAT or FAT16 format. |
Specifications
USB memory player
Supported audio file format
MP3 Bit rate: 8 - 320 kbps* Sampling frequencies: 24/22.05/16/12/ 11.025/8/32/44.1/48 kHz
* 128 kbps or higher bit rate is recommended.
Frequency response
20 - 20,000 Hz (single signal measurement)
Radio
Frequency range
FM 1/FM 2: 87.5 - 108.0 MHz
General
Output
Headphones: Stereo mini-jack
Operating temperature
5^-35^(41^-95^)
Power source
One LR03 (size AAA) alkaline battery:
1.5 V DC · 1
Battery life\*
Music data playback: Approx. 10 hours
Radio reception: Approx. 10 hours
* W hen using a Sony LR03 (size AAA) alkaline battery.
Dimensions
(w/h/d, excluding projecting parts)
Approx. 68 · 77.5 · 30.7 mm
(2^3/4 · 3^1/8 · 1^1/_4 in.)
(w/h/d, including projecting parts)
Mass
Approx. 79.9 g (2.8 oz) (including battery)
Accessories
See page 6.
Optional accessories
USB storage media "pavit"
AZ-RM128P: 128 MB
AZ-RM256P: 256 MB
Design and specifications are subject to change without notice.
Index
A, B
Backlight 22
Battery 7
Beep 21
C
Cleaning 24
Countdown timer 20
D, E
Display 10, 22
F, G
Format 26
H, I, J, K
Headphones
connect 11
extension cord 14
precautions 24
HOLD 21
L
Locking the controls (HOLD) 21
M, N, O
M.D.S.E (MP3 Digital Sound Enhancer) 15
MP3 4,5
P, Q
“pavit” 4, 5
insert 11
remove 13
Playback 11
Preset 17, 18
R
Radio 16
Repeat 15
Reset 25
S
Shuffle 15
Sound 15
Stopwatch 19
T, U
Troubleshooting 25
V, W, X, Y, Z
Volume 12, 13
- Portable USB Memory Player with FM Radio
- WARNING
- To prevent fire or shock hazard, do not expose the unit to rain or moisture.
- For the customers in the USA Owner's Record
- Declaration of Conformity
- NOTE
- CAUTION
- Table of Contents
- Overview
- Getting started
- Basic operations
- What you can do with your player
- Send your favorite songs to the "pavit."
- Enjoy music anywhere with your player!
- What is "pavit"?
- Main features
- Notes
- Step 1: Check the package contents.
- Step 2: Insert a battery.
- Battery duration
- When to change the battery
- To remove the battery
- Notes on dry batteries
- Locating controls
- Display
- Listening to music
- Connect the headphones.
- Insert the "pavit" into the player.
- Start playback.
- If playback does not start
- Other operations
- To remove the "pavit"
- To start playback from the first track
- To wear the player on your arm
- Using the headphone extension cord
- Changing the sound quality (M.D.S.E)
- Set the M.D.S.E switch to ON.
- To return to the normal sound
- Playing a track repeatedly (REP1) / Playing all tracks in random order (SHUF)
- To return to normal play mode
- Listening to the radio
- Press and hold ▶■/POWER until the player is turned on.
- Press TUNER repeatedly to select "FM 1" or "FM 2."
- Press and hold I◀◀ (DOWN) or ▶▶I (UP) for about one second.
- To turn off the radio
- To enhance detection of receivable stations
- To improve the reception
- Presetting radio stations
- To preset stations automatically (Auto preset)
- To preset a station manually (Manual preset)
- To tune in a preset station
- To clear all preset stations
- Using the stopwatch
- To stop the stopwatch
- To reset the stopwatch
- To display the lap time
- To exit the stopwatch mode
- Tip
- Using the countdown timer
- To turn off the alarm
- To cancel the countdown timer
- Locking the controls (HOLD)
- Slide the HOLD/BEEP switch in the direction of the arrow.
- To release the HOLD function
- Turning off the beep sounds (BEEP)
- To turn on the beep sounds
- Changing the display pattern
- Changing the backlight setting
- Changing the display language
- Precautions
- General
- Headphones
- Road Safety
- Preventing hearing damage
- Consideration for others
- Battery
- Cleaning
- Cleaning the headphone plug
- Troubleshooting
- Specifications
- USB memory player
- Supported audio file format
- Frequency response
- Radio
- Frequency range
- Output
- Operating temperature
- Power source
- Battery life\*
- Dimensions
- Mass
- Accessories
- Optional accessories
- Index
- A, B
- C
- D, E
- F, G
- H, I, J, K
- L
- M, N, O
- P, Q
- R
- S
- T, U
- V, W, X, Y, Z
Brand : AIWA
Model : AZ-RS128
Category : Mp3 player