
Vero - Smartphone SANYO - Free user manual and instructions
Find the device manual for free Vero SANYO in PDF.


| Product Type | Smartphone |
| Brand | Sanyo |
| Model | Vero |
| Dimensions | 144 x 72 x 8.5 mm |
| Weight | 150 g |
| Battery Capacity | 2000 mAh, Li-Ion |
| Display | 5-inch IPS LCD, 854 x 480 pixels |
| Operating System | Android 6.0 Marshmallow |
| Processor | Quad-core 1.3 GHz |
| RAM | 1 GB |
| Internal Storage | 8 GB |
| Rear Camera | 8 MP, autofocus, LED flash |
| Front Camera | 2 MP |
| Connectivity | 3G, Wi-Fi 802.11 b/g/n, Bluetooth 4.0, microUSB 2.0 |
| Expandable Storage | microSD, up to 32 GB |
| Sensors | Accelerometer, proximity |
| Cleaning Instructions | Wipe with a soft, dry cloth. Avoid liquids. |
| Safety Warnings | Do not expose to water or extreme temperatures. Use only chargers and batteries approved by Sanyo. |
| Spare Parts & Repairability | Battery is user-replaceable. Other repairs should be done by authorized service centers. Spare parts available from Sanyo distributors. |
Frequently Asked Questions - Vero SANYO
User questions about Vero SANYO
0 question about this device. Answer the ones you know or ask your own.
Ask a new question about this device
Download the instructions for your Smartphone in PDF format for free! Find your manual Vero - SANYO and take your electronic device back in hand. On this page are published all the documents necessary for the use of your device. Vero by SANYO.
USER MANUAL Vero SANYO
SANYO Vero™ by KYOCERA
www.sprint.com
©2010 Sprint. SPRINT and the logo are trademarks of Sprint. Other marks are the property of their respective owners. "SANYO" is a registered trademark of SANYO Electric Co., Ltd. and is used under license. KYOCERA is a registered trademark of Kyocera Corporation. Kyocera manufactures and markets the SANYO line of wireless products.
9/16/10

To find this user guide in Spanish, please visit www.sprint.com and click Support > Devices.
Important Privacy Message – Sprint's policies often do not apply to third-party applications. Third-party applications may access your personal information or require Sprint to disclose your customer information to the third-party application provider. To find out how a third-party application will collect, access, use, or disclose your personal information, check the application provider's policies, which can usually be found on their website. If you aren't comfortable with the third-party application's policies, don't use the application.
Table of Contents
Tip: Looking for something? If you don't see it in the headings listed here, try the Index on page 126.
Introduction ...... i
Your Phone's Menu .... i
Section 1: Getting Started .... 1
1A. Setting Up Service 2
Setting Up Your Phone 2
Activating Your Phone 3
Setting Up Your Voicemail 4
Sprint Account Passwords 4
Getting Help 5
Section 2: Your Phone .... 7
2A. Phone Basics 8
Your Phone 8
Viewing the Display Screen 10
Turning Your Phone On and Off 13
Battery and Charger 13
Navigating Through the Menus 15
Displaying Your Phone Number 16
Making and Answering Calls 16
Entering Text 23
Simple Data Exchange 26
2B. Settings 28
Display Settings 28
Volume Settings 31
Ringer Settings 32
Messaging Settings 34
Airplane Mode 36
TTY Use With Sprint Service 36
Using the Hearing Aid Device Compatibility Function 38
Phone Setup Options 38
Security Settings 40
2C. History 45
Viewing History 45
History Thread 46
History Details 46
History Options 46
Making a Call From History 47
Saving a Number From History 47
Making a New Group Entry From History ..... 47
Deleting History 48
2D. Contacts 49
About Contacts 49
Displaying Contacts Entries 49
Adding a New Contacts Entry 50
Editing a Contacts Entry 50
Adding a Number to a Contacts Entry ..... 51
Creating a Group 51
Editing Groups 51
Finding Contacts Entries 52
Using Contacts Information in Other Applications 53
Assigning Speed Dial Numbers 53
Selecting a Ringer Type for an Entry 54
Assigning a Picture to an Entry 54
Secret Contacts Entries 55
My Name Card 55
Dialing Sprint Services 56
2E. Calendar & Tools 57
Calendar 57
Alarm 60
Calculator 61
World Clock 61
Countdown Timer 61
Stopwatch 62
2F. Voice Services 63
Automatic Speech Recognition (ASR) 63
Managing Voice Memos 66
2G. Camera 68
Taking Pictures 68
Storing Pictures 72
Sending Pictures From Your Phone 73
Printing Pictures From Your Phone 74
2H. Bluetooth 76
About Bluetooth 76
Turning Bluetooth On and Off 76
Making Your Phone Discoverable 76
Bluetooth Menu 77
Pairing Bluetooth Devices 78
Viewing the Trusted Devices List 78
Sending Data via Bluetooth 79
Printing Pictures via Bluetooth 80
Section 3: Sprint Service.... 83
3A. Sprint Service: The Basics 84
Voicemail 84
Messaging 86
Caller ID 89
Call Waiting 90
Making a 3-Way Call 90
Call Forwarding 91
Roaming 91
3B. Web and Data Services 94
Getting Started With Data Services 94
Accessing Messages 97
Downloading Games, Ringers, and More ..... 99
ScanLife 101
Browser Menu 102
Data Services FAQs 105
3C. GPS Navigation 106
GPS Services 106
Sprint Family Locator 107
Section 4: Safety and Warranty Information.... 109
4A. Important Safety Information ..... 110
General Precautions 110
Maintaining Safe Use of and Access to Your Phone 111
Using Your Phone With a Hearing Aid Device 112
Caring for the Battery 114
Radio Frequency (RF) Energy 115
Owner's Record 117
User Guide Proprietary Notice 117
4B. Manufacturer's Warranty ..... 118
Manufacturer's Warranty 118
4C. End User License Agreement ..... 121
End User License Agreement.... 121
Index....126
Introduction
This User Guide introduces you to Sprint® service and all the features of your new phone. It's divided into four sections:
◆ Section 1: Getting Started
◆ Section 2: Your Phone
◆ Section 3: Sprint Service
◆ Section 4: Safety and Warranty Information
WARNING: Please refer to the Important Safety Information section on page 110 to learn about information that will help you safely use your phone. Failure to read and follow the Important Safety Information in this phone guide may result in serious bodily injury, death, or property damage.
Your Phone's Menu
The following table outlines your phone's main menu structure. For more information about using your phone's menus, see "Navigating Through the Menus" on page 15.
| Web |
| Contacts |
| Sprint Family Locator |
| History |
| Missed Alerts |
| Messaging |
| 1: Voicemail |
| 2: Send Message |
| 3: Messages |
| Photos |
| 1: CameraPress the right softkey to view the following options: |
| 1: Picture Mode 2: Zoom3: Self-Timer 4: Fun Tools5: Image Controls 6: CameraSettings7: Review Media 8: Key Guidance9: User Settings |
| 2: My Photos |
| 3: Other Settings |
| 1: Location 2: Status Bar3: Slideshow Interval 4: Help |
| My Stuff |
| 1: Application Manager |
| 2: Games |
| 3: Ringers |
| 4: Screen Savers |
| 5: Applications |
| 6: IM & Email |
| 7: Call Tones |
| My Account |
| 1: Account Details |
| 2: Hear Minutes |
| 3: Hear Balance |
| Settings |
| 1: Display |
| 1: Screensaver 2: Brightness3: Backlight 4: Notification5: Picture ID 6: Power Save Mode7: Clock/Calendar 8: Greeting |
| 2: Volume |
| 1: Incoming Ringer 2: Playback Volume3: Power Up/Down 4: Key Beeps |
| 3: Ringers |
| 1: Incoming Calls 2: Voicemail3: Messages 4: Calendar5: Power Up/Down |
| 4: Text Entry |
| 1: Word Complete 2: Next Word Complete3: Phrase Complete 4: Word Scan5: Word Choice List 6: Input Language7: My Words 8: Help |
| 5: Phone Info |
| 1: Phone#/User ID 2: Memory Status3: Icon Glossary 4: Version5: Advanced 6: My Account |
| 6: Lock Phone |
| 1: Lock Now 2: Change Lock Code3: Lock Code Hint |
| 7: Parental Controls |
| 8: Reset/Delete |
| 1: Reset Settings 2: Reset Phone3: Delete Stuff 4: Change Lock Code |
| 9: Others |
| 1: Accessibility |
| 1: Voice Services 2: TTY3: Font Size 4: Vibrate Type5: Hearing Aid |
| 2: Airplane Mode |
| 3: Alerts |
| 1: Beep Each Minute 2: Out of Service3: Connect |
| 4: Call Setup |
| 1: Abbrev. Dial 2: Call Answer3: Auto-Answer |
| 5: Data |
| 1: Data On/Data Off 2: Net Guard3: Update Data Profile |
| 6: Headset Mode |
| 1: Normal 2: Headset Only |
| 7: Language |
| 1: English 2: Español |
| 8: Location |
| 1: On/Off 2: NMEA Output |
| 9: Roaming |
| 1: Set Mode 2: Call Guard3: Data Roam Guard |
| 0: Navigation Keys |
| 1: Left Navigation 2: Right Navigation(Calendar) (Web)3: Up Navigation 4: Down Navigation(Send Message) (My Stuff) |
| Tools |
| 1: Device Self Service |
| 2: Alarm |
| 3: Calendar |
| 4: Bluetooth |
| 1: On/Off 2: Visibility3: Add New 4: Trusted Devices5: My Bluetooth Info |
| 5: Update Phone |
| 1: Update Firmware 2: Update PRL |
| 6: Voice Services |
| 1: Voice Recognition 2: Voice Memo |
| 7: Assigned Media |
| 8: Calculator |
| 9: Countdown |
| 0: Stopwatch |
| *: World Clock |
| Shopping |
| In Use Menu |
| Press OPTIONS (right softkey) to display the following options: |
| 1: Save/Contact Details 2: Main Menu3: 3-Way Call 4: Contacts5: Voice Memo 6: Phone Info |
Section 1
Getting Started
Sprint

1A. Setting Up Service
Setting Up Your Phone (page 2)
◆ Activating Your Phone (page 3)
♦ Setting Up Your Voicemail (page 4)
♦ Sprint Account Passwords (page 4)
◆ Getting Help (page 5)
Setting Up Your Phone
-
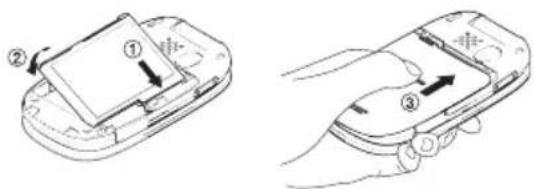
Install the battery.
-
Insert the battery into the opening in the back of the phone, making sure the connectors align (1) and gently press down to secure the battery (2)
■Position the battery cover over the battery compartment and slide it up until it snaps into place ( )③
2 1A. Setting Up Service
- Press to turn the phone on.
■ If your phone is activated, it will turn on, search for Sprint service, and enter standby mode.
■If your phone is not yet activated, see "Activating Your Phone" on page 3 for more information.
- Make your first call.
■Use your keypad to enter a phone number.
■Press TALK
Note: Your phone's battery should have enough charge for your phone to turn on and find a signal, set up your voicemail, and make a call. You should fully charge your battery as soon as possible. See "Charging the Battery" on page 15 for details.
Activating Your Phone
- If you purchased your phone at a Sprint Store, it is probably activated and ready to use.
- If you received your phone in the mail and it is for a new Sprint account or a new line of service, it is designed to activate automatically. To confirm your activation, make a phone call.
- If you received your phone in the mail and it is going to be activated on an existing number on your account (you're swapping phones), you can activate on your computer online or directly on your phone.
Activate on your computer:
▶ Go to www.sprint.com/activate and follow the instructions.
Activate on your phone:
Note: You will need your Sprint PIN to use this activation method.
-
Turn on your new phone. (Make sure the old one is turned off.) Your phone will attempt Hands-Free Activation automatically.
-
Press ACTIVATE (left softkey) to override auto-activation and start the manual activation wizard.
Note: If you don't override Hands-Free Activation, your phone will attempt to auto-activate five times, and then the manual activation wizard will start automatically.
-
Use your navigation key, your keypad, or both to complete each screen of the wizard, and press NEXT (left softkey) to advance through the screens.
-
Continue until you get to a confirmation screen telling you that your phone is now active, and then press return to your phone's main menu.
When you have finished, make a phone call to confirm your activation. If your phone is still not activated, contact Sprint Customer Service at 1-888-211-4727 for assistance.
Tip: Do not press while the phone is being activated. Pressing cancels the activation process.
Note: If you are having difficulty with activation, contact Sprint Customer Service by dialing 1-888-211-4727 from any other phone.
Setting Up Your Voicemail
Your phone automatically transfers all unanswered calls to your voicemail, even if your phone is in use or turned off. You should set up your Sprint Voicemail and personal greeting as soon as your phone is activated. Always use a password to protect against unauthorized access.
- From standby mode, press and hold 1
- Follow the system prompts to:
■Create your password.
■Record your name announcement.
■Record your greeting.
Note: Voicemail Password
Sprint strongly recommends that you create a password when setting up your voicemail to protect against unauthorized access. Without a password, anyone who has access to your phone is able to access your voicemail messages.
For more information about using your voicemail, see "Voicemail" on page 84.
Sprint Account Passwords
As a Sprint customer, you enjoy unlimited access to your personal account information, your voicemail account, and your data services account. To ensure that no one else has access to your information, you will need to create passwords to protect your privacy.
Account User Name and Password
If you are the account owner, you will create an account user name and password when you sign on to www.sprint.com. (Click Need to register for access? to get started.) If you are not the account owner (if someone else receives the bill for your Sprint service), you can get a sub-account password at www.sprint.com.
Voicemail Password
You will create your voicemail password when you set up your voicemail. See "Setting Up Your Voicemail" on this page for more information on your voicemail password.
4 1A. Setting Up Service
Data Services Password
With your Sprint phone, you may elect to set up an optional data services password to control data (Web) access and authorize Premium Service purchases.
For more information, or to change your passwords, sign on to www.sprint.com or call Sprint Customer Service at 1-888-211-4727.
Getting Help
Managing Your Account
Online: www.sprint.com
- Access your account information.
- Check your minutes used (depending on your Sprint service plan).
- View and pay your bill.
- Enroll in Sprint online billing and automatic payment.
●Purchase accessories.
●Shop for the latest Sprint phones.
●View available Sprint service plans and options. - Learn more about data services and other products like games, ringers, screen savers, and more.
From Your Sprint Phone
- Press *to check minute usage and account balance.
- Press *info to make a payment.
- Press *su to access a summary of your Sprint service plan or get answers to other questions.
From Any Other Phone
● Sprint Customer Service: 1-888-211-4727.
● Business Customer Service: 1-800-927-2199.
Sprint 411
Sprint 411 gives you access to a variety of services and information through your phone, including residential, business, and government listings; movie listings or showtimes; driving directions, restaurant reservations, and major local event information. You can get up to three pieces of information per call, and the operator can automatically connect your call at no additional charge.
There is a per-call charge to use Sprint 411, and you will be billed for airtime.
▶Press

1A. Setting Up Service 5
Sprint Operator Services
Sprint Operator Services provides assistance when placing collect calls or when placing calls billed to a local telephone calling card or third party.
▶Press

For more information or to see the latest in products and services, visit us online at www.sprint.com.
6 1A. Setting Up Service
Section 2
Your Phone
Sprint

2A. Phone Basics
◆ Your Phone (page 8)
◆ Viewing the Display Screen (page 10)
♦ Turning Your Phone On and Off (page 13)
♦ Battery and Charger (page 13)
♦ Navigating Through the Menus (page 15)
◆ Displaying Your Phone Number (page 16)
♦ Making and Answering Calls (page 16)
♦ Entering Text (page 23)
◆ Simple Data Exchange (page 26)
Tip: Phone Firmware Upgrades – Updates to your phone's firmware (software) may become available from time to time. Sprint will automatically upload critical updates to your phone. You can also use the menu to check for and download updates. Press OK > Tools > Update Phone > Update Firmware to search for and download available updates.
Your Phone
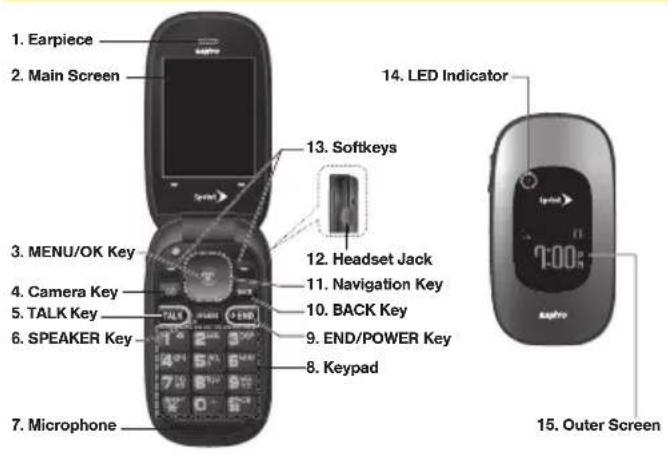
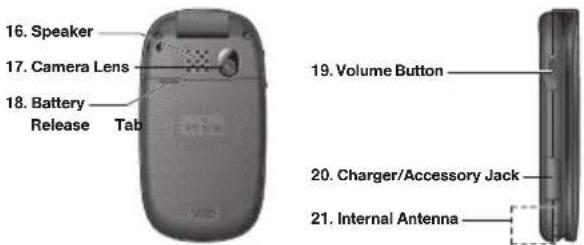
8 2A. Phone Basics
Key Functions
- Earpiece lets you hear the caller and automated prompts.
- Main Screen displays all the information needed to operate your phone, such as the call status, the Contacts list, the date and time, and the signal and battery strength.
- MENU/OK Key lets you access the phone's menus and select the highlighted choice when navigating through a menu.
- Camera Key lets you access the Photos menu. Press and hold to activate the camera mode and take pictures.
- TALK Key allows you to place or receive calls, answer Call Waiting, use 3-Way Calling, or activate Automatic Speech Recognition (ASR).
- SPEAKER Key lets you place or receive voice calls, activate ASR in speakerphone mode, and turn the speakerphone on or off during a call.
-
Microphone allows other callers to hear you clearly when you are speaking to them.
-
Keypad lets you enter numbers, letters, and characters and navigate within menus. You can use the numeric keypad for speed dialing (see "Speed Dialing" on page 22).
- END/POWER Key lets you turn the phone on or off, end a call, or cancel your input and return to idle mode (standby mode or service search mode).
- BACK Key deletes characters from the display in text input mode. When in a menu, pressing it returns you to the previous menu. This key also allows you to return to the previous screen in a data session.
- Navigation Key scrolls through the phone's menu options and acts as a shortcut key from standby mode. These keys can be reassigned to create customized shortcuts. See "Navigation Key Shortcuts" on page 38.
- Headset Jack allows you to plug in an optional headset for convenient, hands-free conversations. CAUTION! Inserting an accessory into the incorrect jack may damage the phone.
- Softkeys let you select softkey actions or menu items corresponding to the bottom left and right lines on the main screen.
- LED Indicator shows the status of your phone and charging at a glance.
2A. Phone Basics 9
- Outer Screen lets you monitor the phone's status and see who is calling without opening the phone.
- Speaker lets you hear the different ringers and sounds. The speaker also lets you hear the caller's voice in speakerphone mode.
- Camera Lens, as part of the built-in camera, lets you take pictures.
- Battery Release Tab lets you open the battery cover to replace the battery.
- Volume Button allows you to adjust the ringer volume whenever your phone is turned on or adjust the voice volume during a call.
- Charger/Accessory Jack allows you to connect a compatible charging cable or USB data cable (not included). CAUTION! Inserting an accessory into the incorrect jack may damage the phone.
- Internal Antenna facilitates reception and transmission. To maximize performance, do not touch the bottom portion of your phone where the internal antenna is located while using the phone.
Viewing the Display Screen
The status bar at the top of your phone's display screen provides information about your phone's status and options. These tables identify the major symbols you'll see on the status bar or other positions of your phone's display screen.
| Tip: To view a list of your phone's icons and descriptions, pressOK>Settings>Phone Info>Icon Glossary. For the camera function icons, see "Camera Icons" on page 72. |
| Service Icons | |
| Signal Strength – Your phone's current signal strength. (More bars = stronger signal.) | |
| No Service – Your phone cannot find a usable signal. | |
| Roaming – Your phone is “roaming” off the Nationwide Sprint Network. | |
| Data Service – Sprint 1xRTT data service is available. When active, the icon is animated. | |
| Data Service Dormant – Data service is currently dormant. | |
| Data Service Unavailable – Data service is currently unavailable. | |
10 2A. Phone Basics
| Status Icons | |
| Battery – Your phone's current battery charge level. (The icon to the left shows the battery is fully charged.) The icon is animated while the battery is charging. | |
| Location On – Your phone's location feature is on and available for location-based services such as GPS Navigation. | |
| Location Off – Your phone's location feature is off. Your location is available only for 911. | |
| Silence All – Your phone's sound is turned off. | |
| Vibrate All – Your phone's sound is turned off but vibrate is turned on. | |
| Ringer Off – Your phone's ringer is turned off. | |
| 1 Beep – A beep sounds when you receive an incoming call, a message, etc. | |
| 1 Beep and Vibrate – 1 Beep and vibrate are set. | |
| Ringer and Vibrate – The volume level is set to between 1 and 8 and vibrate is turned on. | |
| Speaker Mode – Your phone is in speaker mode. | |
| Messaging and Alert Icons | |
| New Messages – You have one or more new messages waiting. | |
| New Voicemail – You have one or more new voicemail messages waiting. | |
| Urgent Messages – You have one or more new urgent messages (including Commercial Mobile Alert System [CMAS] alert message) waiting. | |
| Multiple Alerts - You have different kinds of alerts waiting. | |
| Urgent Multiple Alerts - You have different kinds of alerts (including urgent message) waiting. | |
| Application Alerts - You have alert messages from Java applications activated in the background. | |
2A. Phone Basics 11
| Bluetooth Icons | |
| Visible – Your phone is discoverable by (visible to) other Bluetooth devices. | |
| Connected – Your phone is connected to a Bluetooth device. | |
| Enabled – Your phone's Bluetooth feature is enabled. | |
| Voice Call Icons | |
| Missed Call – You have one or more missed voice calls. | |
| Bluetooth Device – A call is in progress using a Bluetooth device. | |
| Headset – A call is in progress using an optional wired headset. | |
| Car Kit – A call is in progress using an optional car kit device. | |
| Other Icons | |
| TTY - Your phone is connected to a TTY device. | |
| Alarm - An alarm or countdown is set. | |
| Notification - You have event notifications. | |
| HAC Enabled - Your phone's HAC (hearing aid compatibility) setting is enabled. | |
| Multitasking Virtual Machine - Indicates Java applications are running. The number next to the plus sign indicates the number of running applications. | |
12 2A. Phone Basics
Turning Your Phone On and Off
Turning Your Phone On
▶Press

Once your phone is on and finds a signal, it automatically enters standby mode – the phone's idle state. At this point, you are ready to begin making and receiving calls.
If your phone is unable to find a signal after five minutes of searching, a Power Save feature is automatically activated. When a signal is found, your phone automatically returns to standby mode.
In Power Save mode, your phone searches for a signal periodically without your intervention. You can also initiate a search for Sprint service by pressing any key except numbered keys.
Tip: The Power Save feature conserves your battery power when you are in an area where there is no signal.
Turning Your Phone Off
▶Press and hold for two seconds until you see the powering-down animation on the display screen.
Your screen remains blank while your phone is off unless the battery is charging.
Battery and Charger
WARNING: Use only Sprint-approved or Kyocera-approved batteries and chargers with your phone. The failure to use a Sprint-approved or Kyocera-approved battery and charger may increase the risk that your phone will overheat, catch fire, or explode, resulting in serious bodily injury, death, or property damage.
Sprint-approved or Kyocera-approved batteries and accessories can be found at Sprint Stores or through Kyocera; or call 1-866-866-7509 to order. They're also available at www.sprint.com.
Battery Capacity
Your phone is equipped with a Lithium Ion (Li-Ion) battery. It allows you to recharge your battery before it is fully drained. The battery provides up to 5.2 hours of continuous digital talk time.
For a quick check of your battery level, glance at the battery charge indicator located in the upper right corner of your phone's display screen. When there are approximately five minutes of talk time left, the battery icon ( ) turns red and the phone sounds a warning tone.
After an additional five minutes or so, the phone sounds a warning tone three times and then turns off.
Note: Long backlight settings, searching for service, vibrate mode, browser use, and other variables may reduce the battery's talk and standby times.
Tip: Watch your phone's battery level indicator and charge the battery before it runs out of power.
Installing the Battery
▶ See "Setting Up Your Phone" on page 2.
Removing the Battery
- Make sure the power is off so that you don't lose any stored numbers or messages.
- Press the release tab, and apply light pressure while sliding the cover down.
- Lift the battery up and remove it from the phone.
WARNING: Do not handle a damaged or leaking Li-Ion battery as you can be burned.
Charging the Battery
Keeping track of your battery's charge is important. If your battery level becomes too low, your phone automatically turns off, and you will lose any information you were just working on.
Always use a Sprint-approved or Kyocera-approved desktop charger, travel charger, or vehicle power adapter to charge your battery.
- Plug the phone charger into an electrical outlet.
- Plug the other end of the phone charger into the charger/accessory jack located on the lower left side of your phone.
With the Sprint-approved Li-Ion battery, you can recharge the battery before it becomes completely run down.
Navigating Through the Menus
The navigation key on your phone lets you scroll through menus quickly and easily. Many menus feature a scroll bar on the right to help you keep track of your position in the menu.
To navigate through a menu, press the navigation key up or down.
For a diagram of your phone's menu, please see "Your Phone's Menu" on page i.
Selecting Menu Items
As you navigate through the menu, menu options are highlighted. Select any option by highlighting it and pressing [ok] the option is numbered, you can select it by pressing the corresponding number on the phone's keypad.
For example, to open the alarm setting screen:
- Press to access the main menu.
- Select Tools by highlighting it and pressing MENU OK.
- Select Alarm by highlighting it and pressing MENU OK.
For the purposes of this guide, the above steps condense into:
▶ Press MENU OK > Tools > Alarm.
2A. Phone Basics 15
Backing Up Within a Menu
▶Press to go to the previous menu.
▶Press to return to standby mode.
Displaying Your Phone Number
▶ Press 📂 > Settings > Phone Info > Phone#/User ID.
Your phone number and other information about your phone and account will be displayed.
Making and Answering Calls
Making Calls
- Enter a phone number from standby mode. (If you make a mistake while dialing, press to erase the numbers.)
16 2A. Phone Basics
- Press OK. (To make a call when you are roaming and Call Guard is enabled, see "Call Guard" on page 92.)
- Press when you are finished.
Note: If Parental Controls is on and Voice Calls are restricted, you can only place calls to or receive calls from a limited set of phone numbers. (See page 41.)
Tip: To redial your last outgoing call, press TALK, highlight the call, and then press again.
When making calls off the Nationwide Sprint Network, always dial using 11 digits (1 + area code + phone number).
You can also place calls from your phone by speed dialing (page 22), by using Automatic Speech Recognition (page 63), and by using your History listings (page 47).
Dialing Options
When you enter numbers in standby mode, you can see available dialing options by pressing OPTIONS (right softkey). To select an option, highlight it and press OK.
- Save to save a phone number in your Contacts. (See "Saving a Phone Number" on page 20.)
- Contact Details to view the detailed information of a Contacts entry when the number you have entered is already saved in your Contacts.
- P Hard Pause to insert a hard pause. (See “Dialing and Saving Phone Numbers With Pauses” on page 21.)
- T2-Sec. Pause to insert a two-second pause. (See "Dialing and Saving Phone Numbers With Pauses" on page 21.)
Tip: When the left softkey displays SEND MESSAGE, press it to send a message.
Answering Calls
- Make sure your phone is on. (If your phone is off, incoming calls go to voicemail.)
- Press to answer an incoming call. (Depending on your settings, you may also answer incoming calls by pressing other keys. See "Call Answer Mode" on page 39.)
Your phone notifies you of incoming calls in the following ways:
●The phone rings or vibrates.
●The backlight illuminates.
●The screen displays an incoming call message.
If the incoming call is from a number stored in your Contacts, the entry's name is displayed. The caller's phone number may also be displayed, if available.
For other actions when receiving a call, you can select an onscreen menu or press a key:
- Press to answer the call in speaker mode.
■Answer to answer the call. - When connecting via Bluetooth, select Answer with
or Answer with Phone to answer a call with your selected device.
2A. Phone Basics 17
■ Silence to mute the ringer and stop the vibration. Pressing ☐ the volume button has the same effect.
- Send to Voicemail to ignore the call and transfer it to your voicemail.
- Ignore with Text to ignore the call and send a message to the caller.
■Press to ignore the call.
Note: Ignore with Text may not be displayed when calls are from entries identified as No Caller ID, Private (Restricted ID), or Unavailable ID.
Answering a Roam Call With Call Guard Enabled
Call Guard is an option that helps you manage your roaming charges when making or receiving calls while outside the Nationwide Sprint Network. Please see "Roaming" on page 91 for more information about roaming.
▶Press, and then press to answer the call. (See "Call Guard" on page 92 for additional information.)
18 2A. Phone Basics
Ending a Call
▶Press

Missed Call Notification
When an incoming call is not answered, your screen displays the Missed Call log. Press Tato dial the phone number.
To display a Missed Alerts entry from standby mode:
-
Press MENU OK > Missed Alerts.
-
Highlight the entry you wish to view and press MENU .OK
Calling Emergency Numbers
You can always place calls to 911 (dial ^9 …… 18 18 TALK), even if your phone is locked or your account is restricted.
Note: After you have placed an emergency call, your phone automatically enters Emergency mode.
During an emergency call, press OPTIONS (right softkey) to display your options. Highlight an option and press MENU OK.
- Transfer Audio to switch the call to a Bluetooth device (if applicable).
●Contacts to display your Contacts list. - Voice Memo to record the other party's voice.
- Phone Info to display information about your phone.
Tip: Press MY PHONE# (left softkey) to display your phone number during an emergency call.
To exit Emergency mode:
- Press to end a 911 call.
- Press *to exit emergency mode.
Enhanced 911 (E911) Information
This phone features an embedded Global Positioning System (GPS) chip necessary for utilizing E911 emergency location services where available.
When you place an emergency 911 call, the GPS feature of your phone seeks information to calculate your approximate location. Depending on several variables, including availability and access to satellite signals, it may take up to 30 seconds or more to determine and report your approximate location.
Important: Always report your location to the 911 operator when placing an emergency call. Some designated emergency call takers, known as Public Safety Answering Points (PSAPs) may not be equipped to receive GPS location information from your phone.
In-Call Options
Pressing OPTIONS (right softkey) during a call displays a list of available in-call features.
- Transfer Audio to switch the call to a Bluetooth device (if applicable).
- Save to save the current call's phone number in your Contacts.
- Contact Details to display information about the caller stored in your Contacts.
- Main Menu to display the phone's main menu.
● 3-Way Call to open a call with two other parties. - Contacts to display your Contacts list.
- Voice Memo to record the other party's voice.
- Phone Info to display information about your phone.
2A. Phone Basics 19
▶Press the volume button up or down to adjust the receiver volume.
▶ Press MUTE or UNMUTE (left softkey) to switch between the mute or unmute mode. (Muting applies to your voice, not the other party's.)
▶Press to turn the speaker on. Press again to turn it off.
WARNING: Because of higher volume levels, do not place the phone near your ear during speakerphone use.
End-of-Call Options
After you have finished your call, the phone will display an end-of-call message in the Recent History screen (see page 45). "Call ended" and the duration of the call will alternately flash beneath the caller's name (if already in your Contacts) or the caller's number (if available). Press any of the following keys to select an option.
▶Press to call a highlighted entry.
▶ Press MENU to display all history for a highlighted entry.
▶ Press OPTIONS (right softkey) to display the Recent History options. (See “History Options” on page 46 for details.)
20 2A. Phone Basics
▶ Press SEND MESSAGE (left softkey) to send a message.
▶Press to return to standby mode.
▶Press or simply wait 10 seconds to return to where you were before the call (if applicable).
Saving a Phone Number
Your phone can store up to 600 Contacts entries and each entry can contain up to seven phone numbers. (See "2D. Contacts" on page 49.)
- From standby mode, enter a phone number and press OPTIONS (right softkey) > Save. (If this is the first time you are saving an entry to Contacts, skip to step 3.)
- Select New Entry or Existing Entry.
- If you chose New Entry, select a number type, and then enter the new entry name.
- or -
If you chose Existing Entry, select an entry to which you want to save the number, and then highlight a number type and press MENU OK - Press DONE (left softkey) to save the entry.
Finding a Phone Number
You can search Contacts entries for phone numbers that contain a specific string of numbers.
- Enter four or more digits of the number in standby mode. (The more numbers you enter, the more specific the search becomes.)
- All Contacts entries matching the entered numbers will be displayed. Highlight an entry and press TALK to dial the number.
Dialing and Saving Phone Numbers With Pauses
You can dial or save phone numbers with pauses for use with automated systems, such as voicemail or credit card billing numbers.
There are two types of pauses available on your phone:
- Hard Pause sends the next set of numbers when you press SEND TONES (left softkey).
- 2-Sec. Pause automatically sends the next set of numbers after two seconds.
Note: You can have multiple pauses in a phone number and combine two-second and hard pauses.
To dial or save phone numbers with pauses:
- Enter all or part of a number.
- Press OPTIONS (right softkey) > Hard Pause or 2-Sec. Pause.
- Enter additional numbers.
- Press OPTIONS (right softkey) > Save > New Entry or Existing Entry to save the number in your Contacts. (See steps 3 and 4 in "Saving a Phone Number" on page 20.)
- or -
Press Talc dial the number.
- Press SEND TONES (left softkey) to send the additional number if you selected Hard Pause in step 2.
2A. Phone Basics 21
Dialing From the Contacts List
- From standby mode, press CONTACTS (right softkey).
- Highlight the entry you want to call.
- Press to dial the entry's default phone number.
- or -
Press the navigation key left or right to show another number for the entry and press TALK
Plus (+) Code Dialing
When placing international calls, use Plus Code Dialing to automatically enter the international access code for your location (for example, 011 for international calls made from the U.S.).
- Press and hold 0+ to display "+" on your phone screen.
- Enter the country code and phone number, and then press □The phone automatically prepends the access code for international dialing, followed by the country code and phone number.)
22 2A. Phone Basics
Speed Dialing
You can store up to 98 numbers in your phone's speed dial memory to make contacting friends and family easier.
You must assign a speed dial number to the existing phone number beforehand. See “Assigning Speed Dial Numbers” on page 53.
To use speed dial for locations 2-9:
▶From standby mode, press and hold the appropriate key for approximately two seconds.
To use speed dial for locations 10-99:
▶From standby mode, enter a two-digit speed dial number, and then press TALK
The display confirms that the number has been dialed when it shows “Connecting...”.
Note: Speed dialing may not be available when you are roaming; when you are roaming off the Nationwide Sprint Network, you must always dial using eleven digits (1+ area code + number).
Abbreviated Dialing
Abbreviated Dialing is similar to speed dialing. You can use either of the following abbreviated dialing features.
- Contacts Match – Retrieve any number saved in your Contacts by entering the four or more digits of any part of the number.
- Prepend – Prepend the first five or six digits (for example, the area code and prefix) to any four or five digits you enter.
To activate the Prepend feature:
- Press MENO OK > Settings > Others > Call Setup > Abbrev. Dial.
- Select Prepend > On.
- Enter a five- or six-digit number and press MENU OK
To place a call using Abbreviated Dialing:
- Enter the four or more digits of any part of a Contacts entry's phone number to use the Contacts Match feature.
- or -
Enter the last four or five digits of the number to use the Prepend feature.
Note: Contacts Match will not retrieve numbers if you enter 911 or reserved three-digit service numbers such as 411 or 711.
- Press to call the displayed number.
If there are two or more matched numbers in your Contacts, a list is displayed. Highlight the name or the phone number you want to call, and then press TALK to place a call.
Entering Text
Selecting a Text Input Mode
Your phone provides convenient ways to enter letters, numbers, and symbols whenever you are prompted to enter text.
- From the message entry screen, press OPTIONS (right softkey) > Text Mode.
- or -
From other text input screens such as Contacts or Signature, press OPTIONS (right softkey).
2A. Phone Basics 23
2. Select one of the following options:
- Abc to use multi-tap entry – press 2 ^ABC once for “a,” twice for “b”, three times for “c.” (See page 25.)
- T9Word to enter text using a predictive text system that reduces the number of keypresses required while entering a word. (See page 25.)
■123 to enter numbers.
■Symbols to enter symbols.
■Smileys to enter smile icons. - Emoticons to enter “emoticons.” (This is available, for example, when composing a message, or when editing a Schedule or To Do description in Calendar.)
- Paste List to paste copied or cut text (if applicable).
■ Web Shortcuts to enter Web shortcuts (for example, www., http://, or .com). - Text Options to display the text entry options menu (if applicable).
Tip: When entering text, press to change the capitalization style as T9Word > T9WORD > T9word (T9Word mode), or as Abc > ABC > abc (Abc mode). The selected style is displayed in the bottom-right corner of the screen, above the right softkey label (if applicable).
24 2A. Phone Basics
Setting Text Entry Options
The text entry options menu allows you to specify a suitable feature during the text entry process.
- From a screen where you can enter text, press OPTIONS (right softkey) > Text Options.
- or - From standby mode, press MENU OK > Settings > Text Entry.
- Highlight an option and press MENU OK
■ Word Complete to suggest possible words based on letters you have entered when the T9 Text Input mode is enabled.
■ Next Word Complete to automatically display the word that may follow the current text input.
- Phrase Complete to set the phone to predict possible sentence candidates after one word with a space is entered.
■ Word Scan to allow T9 Text Input to suggest words by searching Contacts.
■ Word Choice List to select whether to display or hide the word choice list.
- Input Language to select the language to enter (English or Spanish).
- My Words to edit or delete custom words you have added to the predictive text database.
- Add Word to store words that you frequently use.
Tip: To access the My Words menu from the Settings menu, press ⓄOK > Settings > Text Entry > My Words.
- Select Text to select text for copying, cutting or adding (if applicable).
■ Delete All to delete all text (if applicable).
■Help to view the T9 Text Input instructions.
ABC Mode
In Abc mode, also known as multi-tap entry, you press keys one, two, three, or four times to enter the letters you see on the keypad. For example, press 20nce for "a," twice for "b", or three times for "c"; or press 7once for "p," twice for "q," three times for "r," or four times for "s."
- Select the Abc text input mode. (See "Selecting a Text Input Mode" on page 23.)
- Press the corresponding keys repeatedly until the correct letter appears. (For example, to enter the word "Bill," press twice, three times, three times, and three times again.) (If you
make a mistake, press ☐ erase a single character. Press and hold ☐ erase an entire word.)
By default, the first letter of an entry is capitalized and the following letters are lowercased. After a character is entered, the cursor automatically advances to the next space after two seconds or when you enter a character on a different key.
T9 Text Input
T9 Text Input lets you enter text by pressing keys just once per letter. (To select the T9Word mode when entering text, see "Selecting a Text Input Mode" on page 23.)
T9 Text Input uses an intuitive word database to analyze the letters you enter and create a suitable word. (The word may change as you type.)
-
Select the T9Word text input mode.
-
Press the corresponding keys once per letter to enter a word. A word choice list opens and shows words starting with the letters you have entered thus far. (For example, to enter the word "Bill," press 2… 4 (If you make a mistake, press == erase a single character. Press and hold == erase an entire word.)
2A. Phone Basics 25
If the word you want is not displayed after you have entered all the letters, press the navigation key down to scroll through additional word selections. To accept a word and insert a space, press 📄.
Adding a Word to the T9 Database
If a word you want to enter is not displayed as an option while you are using T9 Text Input, add it to the database.
- While you are in T9Word mode, enter a letter. (A word choice list opens.)
- Scroll down the list and select
. - Enter a word and press SAVE (left softkey). The word will appear as an option the next time you scroll through options during T9 Text Input.
For more information about T9 Text Input, visit the Nuance website at http://www.nuance.com/t9/textinput/.
Simple Data Exchange
This feature makes it easy to select certain information in a message and automatically save it or use it in a related application.
Simple Data Exchange works with these types of information:
- Email addresses
- Street addresses
- Phone numbers
●Web addresses (URLs)
Email Address Options
▶Highlight an email address (or a saved Contacts entry name in the From/To field in the message details screen), press 📄 and select an option:
- Send Message >Message. The messaging application will open and the email address will appear as the message's recipient.
- Share > Message. The application will open and the email address will appear in the message body.
■ Save to Contacts to save the email address in Contacts.
- Contact Details to display the Contacts entry if the email address is already saved in Contacts.
Street Address Options
▶Highlight a street address, press, and select an option:
- Share >Message. The application will open and the address will appear in the message body.
■ Save to Contacts to save the address in Contacts.
Phone Number Options
▶Highlight a phone number (or a saved Contacts entry name in the From/To field in the message details screen), press 📂 and select an option:
■Call to call the phone number.
■Prepend to prepend a number to the phone number.
- Send Message to open the messaging application. The phone number will appear in the To: field.
- Share >Message. The application will open and the phone number will appear in the message body.
■ Save to Contacts to save the phone number in Contacts. - Contact Details to display the Contacts entry if the phone number is already saved in Contacts.
Web Address (URL) Options
▶Highlight a Web address (URL), press, and select an option:
■ Browse to open the browser to the Web page.
- Share >Message. The application will open and the Web address will appear in the message body.
- Save to Contacts to save the Web address in Contacts.
2A. Phone Basics 27
2B. Settings
◆ Display Settings (page 28)
◆ Volume Settings (page 31)
◆ Ringer Settings (page 32)
♦ Messaging Settings (page 34)
♦ Airplane Mode (page 36)
♦ TTY Use With Sprint Service (page 36)
◆ Using the Hearing Aid Device Compatibility Function (page 38)
◆ Phone Setup Options (page 38)
◆ Security Settings (page 40)
Display Settings
Changing the Screen Saver
You can set a screen saver to display while in standby mode.
- Press MENU OK > Settings > Display > Screensaver.
- Select a screen saver option by pressing the navigation key up or down, and select a screen saver.
- If you select Take New Picture, press ⬤ to take a picture, and then press OK (left softkey) to assign it.
Changing the Brightness
You can adjust the brightness on the main screen. When Power Save Mode is on and Backlight Dim is set to Always Dim, you cannot change this setting.
- Press MENO OK > Settings > Display > Brightness.
- Highlight a brightness level and press twice.
Changing the Backlight Time Length
Select how long the main screen and keypad remain backlit after any keypress is made. You can also change the backlight for when a Java application is running in the foreground.
▶ Press MENU OK > Settings > Display > Backlight > Backlight Dim or Backlight Off.
- If you select Backlight Dim, select Always Bright, Always Dim, or a preset length of time to elapse before the screen backlight dims.
- If you select Backlight Off, select a preset length of time to elapse before the screen and keypad backlights turn off. (When you select Always Bright for the Backlight Dim setting above, the keypad backlight will turn off after about one minute.)
To set the backlight for when a JAVA application is running in the foreground:
▶ Press MENU OK > Settings > Display > Backlight > Java Backlight > Default or Continuous.
This setting is switched to the normal backlight setting above after the application is terminated or is sent to the background.
Note: Long backlight settings reduce the battery's talk and standby times.
Setting the Notification Pop-up
This option allows you to enable or disable notification pop-up when you receive a new notification (except for incoming call and alarm).
- Press MENU OK > Settings > Display > Notification.
- Select Enable Pop-up or Disable Pop-up.
Tip: If you select Disable Pop-up, you will see only a notification icon. (The notification pop-up will not appear while an application is running.)
Selecting a Picture ID
You can select an image as a picture ID.
- Press MENU OK > Settings > Display > Picture ID.
- Select Contact, Unsaved Numbers, or Private / Unknown.
■ If you select Contact, select an entry.
2B. Settings 29
- Select a picture ID option by pressing the navigation key up or down, and then select an image.
- If you select Take New Picture, press OK to take a picture, and then press OK (left softkey) to assign it.
Power Save Mode
This feature helps conserve your battery power by automatically adjusting settings for the backlight and keypad light.
- Press OK > Settings > Display > Power Save Mode.
- Select On. (Select Off to deactivate this feature.)
- Read the message and press CONTINUE (left softkey).
Changing the Clock/Calendar Display
Choose which design of clock or calendar you want to display in standby mode.
- Press MENU OK > Settings > Display > Clock/Calendar.
- Highlight a display option and press twice.
Setting a Custom Greeting
You can display your own custom greeting in standby mode.
- Press MENU OK > Settings > Display > Greeting > Custom.
- Enter a custom greeting and press 📋
- Press DONE (left softkey) to save your greeting.
Changing the Phone's Menu Style
Choose the layout of your phone's menu.
- Press to display the main menu.
- Press OPTIONS (right softkey) > List View or Grid View.
Changing the Font Size
Adjust the display and text input font size. This setting does not affect all screens.
From the main menu screen, press OPTIONS (right softkey) > Large Font or Normal Font to change the font size.
- or -
- Press MENOK > Settings > Others > Accessibility > Font Size.
Note: You will see a message the first time you change the font size. After reading the message, press to continue.
- Highlight Normal Font or Large Font. You can see the highlighted font size in the New Size window.
- If you are satisfied with the font size, press SAVE (left softkey).
Display Language
You can choose to display your phone's onscreen menus in English or in Spanish.
-
Press MENU OK > Settings > Others > Language.
-
Select English or Español.
Volume Settings
Adjusting the Phone's Volume Settings
Adjust your phone's volume settings to suit your needs and your environment.
-
Press MENU OK > Settings > Volume.
-
Select Incoming Ringer, Playback Volume, Power Up/Down, or Key Beeps.
■ If you select Power Up/Down, select On or Off. -
If you select Key Beeps, select Tone Volume or Tone Type.
-
Select a volume level or type and press MENU OK
To change the incoming ringer or playback volume:
- Press the volume button up or down for most applications, including playing sounds. A volume setting screen is displayed.
- Press the volume button up or down to select the volume level.
Tip: You can make the incoming ringer vibrate at any volume level by pressing VIBRATE (left softkey) on the volume setting screen.
Silence All
The Silence All option allows you to mute all sounds without turning your phone off.
2B. Settings 31
To activate Silence All:
▶Press and hold the volume button down. (The screen will display "Silence All.")
To deactivate Silence All:
▶ Press the volume button up repeatedly to select a volume level.
Ringer Settings
Ringer Types
Ringer types help you identify incoming calls and messages. You can assign ringer types to individual Contacts entries, types of calls, and messages.
Selecting Ringer Types for Incoming Calls and Messages
- Press MEN OK > Settings > Ringers > Incoming Calls or Messages.
- Select Contacts, Unsaved Numbers, or Private / Unknown.
32 2B. Settings
■ If you select Contacts, select All Contacts, or select One Contact and then select an entry.
- Select a ringer option by pressing the navigation key up or down, and then select a ringer. (See "Getting New Ringers" on this page if you selected Downloaded > Get New.)
Tip: Ringer types can be assigned from the Contacts menu. See "Selecting a Ringer Type for an Entry" on page 54.
Selecting Ringer Types for Voicemail, Calendar, and Power Up/Down
- Press MENU OK > Settings > Ringers.
- Select Voicemail, Calendar, or Power Up/Down.
- Select a ringer option by pressing the navigation key up or down, and then select a ringer.
Getting New Ringers
A wide variety of new ringers is available from the Sprint Digital Lounge, and you can access them right from your phone. (Additional charges may apply, but some are free.)
-
Press MENU OK > Settings > Ringers.
-
Select a ringer type category (Incoming Calls, Voicemail, Messages, etc.) and any applicable subcategories until you arrive at the Select Ringer screen.
- Select Downloaded > Get New. (The Digital Lounge will launch and display the Ringers menu.)
- Use the navigation key and keypad to search through available ringers. When you find one you want, highlight it and press MENU OK
- To purchase the ringer, highlight Buy and press OK. (The ringer will download automatically.)
- When the download is finished, select an option to continue:
■Listen to listen to the ringer.
- Assign to assign the ringer to a call or message type or to a specific contact.
■ Shop to browse for other items to download.
Setting Up Voice Guide
Voice Guide allows you to hear voice prompts and spoken numbers or key names as you press a key, and also to hear menus and options, Contacts names,
email addresses, URLs, etc., as you highlight each item onscreen. (The default setting is Off.)
-
Press ⬆VERU OK > Settings > Others > Accessibility > Voice Services > Voice Guide.
-
Select On or Off.
Note: When the incoming ringer volume is set to Silence All or Vibrate All, and when the playback volume is set to Volume Off, Voice Guide does not work. (See "Volume Settings" on page 31.)
Selecting Vibration Patterns
With this feature, you can select vibration patterns for incoming calls, messages, alarms, and scheduled events.
- Press ☐ > Settings > Others > Accessibility > Vibrate Type.
- Select Incoming Calls, Voicemail, Messages, or Alarm/Calendar.
- Highlight a vibration pattern and press MENU OK
2B. Settings 33
Messaging Settings
Your phone's advanced messaging capabilities let you send and receive different kinds of messages without placing a voice call.
Messaging settings allow you to create a signature with each sent message and your own preset messages.
Setting Reset Envelope
Reset Envelope will clear the envelope icon on the display.
- From standby mode, press MESSAGING (left softkey) > OPTIONS (right softkey) > Reset Envelope.
- Press YES (left softkey).
Setting a Callback Number
With this feature, you can specify the callback number which your recipients see when you send messages.
- From standby mode, press MESSAGING (left softkey) > OPTIONS (right softkey) > Callback Number.
- Select None, My Phone Number, or Other. If you select Other, enter a callback number and press MENU OK.
Adding a Customized Signature
Add a customized signature to each message you send.
- From standby mode, press MESSAGING (left softkey) > OPTIONS (right softkey) > Signature.
- Select On. (If you do not wish to attach a signature to your outgoing messages, select Off.)
- Enter a signature and press MENU OK
Tip: Press OPTIONS (right softkey) > Add Signature to insert your signature on the message entry screen when Signature is set to Off.
Managing Preset Messages
Your phone is loaded with 20 preset messages to help make sending messages easier. Customize or delete these messages, such as "Where are you?," "Let's get lunch," and "Meet me at" to suit your needs, or add your own messages to the list.
To edit, delete, or reset preset messages:
- From standby mode, press MESSAGING (left softkey) > OPTIONS (right softkey) > Preset Messages. The list of preset messages will be displayed.
- To edit or delete a message, or reset all messages to the original text, highlight a message and press OPTIONS (right softkey).
- Select Edit, edit the message, and press MENZ OK.
- or -
Select Delete > YES (left softkey) to delete the message.
$$ - \text { or } - $$
Select Reset all messages > YES (left softkey) to reset all messages.
To change the language of the preset messages:
- From standby mode, press MESSAGING (left softkey) > OPTIONS (right softkey) > Preset Messages.
- Press OPTIONS (right softkey) >Select Language.
- Select English or Spanish.
Setting CMAS Alerts
This phone features an embedded Commercial Mobile Alert System (CMAS), which is a federally supervised cell phone alert service to send out broadcast SMS messages for public warning.
- From standby mode, press MESSAGING (left softkey) > OPTIONS (right softkey) > CMAS Alerts.
- Check the box next to the options you wish to select:
■ Presidential Alerts to deliver a national Presidential alert. (Presidential Alerts is always grayed out [not selectable] and cannot be excluded.)
- Imminent Threat - Extreme to deliver emergency alerts in an extreme emergency situation (an extraordinary threat to life or property).
2B. Settings 35
- Imminent Threat - Severe to deliver emergency alerts in a severe emergency situation (a significant threat to life or property).
- Amber Alerts to deliver alerts related to missing or endangered children.
- CMAS Test Messages to send a test message to make sure that the alert messages can be successfully received.
Airplane Mode
Airplane Mode allows you to use many of your phone's features, such as games and voice memos, when you are in an airplane or in any other area where making or receiving calls or data is prohibited. When you set your phone to Airplane Mode, it cannot send or receive any calls or access online information.
- Press MENU OK > Settings > Others > Airplane Mode.
- Read the disclaimer and press MENU OK
- Select an option from the following:
- On to activate Airplane Mode. Airplane Mode will be deactivated when you turn the phone off.
■ Off to deactivate Airplane Mode immediately.
- On Power-up to activate Airplane Mode the next time the phone is powered on and to keep Airplane Mode activated even when the phone is repeatedly turned on and off.
While in Airplane Mode, your phone's screen will display "Phone Off."
TTY Use With Sprint Service
A TTY (also known as a TDD or Text Telephone) is a telecommunications device that allows people who are deaf, hard of hearing, or who have speech or language disabilities to communicate by telephone.
Your phone is compatible with select TTY devices. Please check with the manufacturer of your TTY device to ensure that it is compatible with digital cell phones. Your phone and TTY device will connect via a special cable that plugs into your phone's headset jack. If this cable was not provided with your TTY device, contact your TTY device manufacturer to purchase the connector cable.
To turn TTY Mode on or off:
- Press OK > Settings > Others > Accessibility > TTY. (You will see an informational message.)
- Press MENU OK.
- Select one of the following options:
- TTY Off to disable TTY mode.
■ TTY VCO to enable TTY mode in Voice Carry Over mode, which allows you to send voice and receive text during a call.
- TTY HCO to enable TTY mode in Hearing Carry Over mode, which allows you to send text and receive voice during a call.
■ TTY Full to enable all TTY settings. You can send and receive text during a call.
To access the state Telecommunications Relay Service (TRS) for assistance with TTY calls:
▶Dial


and

to
operator.
For additional information about Sprint Relay Services and TTY compatibility, call Sprint Relay Customer Service at 800-676-3777 or visit www.sprintrelay.com.
Note: In TTY Mode, your phone will display the TTY icon if a TTY device or an optional headset is connected to your phone.
When enabled, TTY mode may impair the audio quality of non-TTY devices connected to the headset jack.
WARNING: 911 Emergency Calling
Sprint recommends that TTY users make emergency calls by other means, including Telecommunications Relay Services (TRS), analog cellular, and landline communications. Wireless TTY calls to 911 may be corrupted when received by public safety answering points (PSAPs), rendering some communications unintelligible. The problem encountered appears related to software used by PSAPs. This matter has been brought to the attention of the FCC, and the wireless industry and the PSAP community are currently working to resolve this.
reach an
2B. Settings 37
Using the Hearing Aid Device Compatibility Function
Your phone has been tested and rated for hearing aid device compatibility. To use this function effectively, set the hearing aid option to On.
- Press MENU OK > Settings > Others > Accessibility > Hearing Aid.
- Read the disclaimer and press MENU OK
- Select On or Off.
- On to use a hearing aid device with your phone.
-Off to use your phone without a hearing aid device.
For more information about hearing aid device compatibility, see “Using Your Phone With a Hearing Aid Device” on page 112.
Phone Setup Options
Navigation Key Shortcuts
You can use the navigation key to access shortcuts to specific menu items directly from standby mode. You can reassign the default shortcuts to the menu items you choose.
- Press MENU OK > Settings > Others > Navigation Keys.
- Highlight a navigation key direction you wish to reassign and press MENU OK
- Using the navigation key or your keypad, highlight a function.
- Press ASSIGN (left softkey) to save. (For options with submenu levels, such as Settings, you can assign submenu options by navigating to the desired option before pressing ASSIGN.)
Alert Notification
Set your phone to alert you with an audible tone when you change service areas, once a minute during a voice call, or when a call has been connected.
- Press MENU OK > Settings > Others > Alerts.
- Select Beep Each Minute, Out of Service, or Connect.
- Select On or Off.
Call Answer Mode
Select how to answer incoming calls on your phone: whether by pressing □ by pressing any key (except softkeys, volume button, □ and ), □ by opening the phone.
- Press MENU OK > Settings > Others > Call Setup > Call Answer.
- Select Talk Key, Any Key, or Flip Open.
Auto-Answer Mode
Set your phone to automatically pick up incoming calls. Remember, your phone will answer calls in auto-answer mode even if you are not present.
- Press MENU OK > Settings > Others > Call Setup > Auto-Answer.
-
Highlight an option and press MENU OK
-
Hands-free to answer calls automatically when the phone is connected to an optional headset or hands-free device.
■ Speakerphone to answer calls automatically in speakerphone mode. -
Highlight the time you would like your phone to wait before answering and press MENU OK
Headset Mode
Set the sound output destination of incoming ringer on your phone.
- Press MENU OK > Settings > Others > Headset Mode.
-
Highlight an option and press MENU .OK
-
Normal to play the ring tone for incoming calls through both the headset and the speaker.
- Headset Only to play the ring tone for incoming calls only through the headset.
2B. Settings 39
Security Settings
Accessing the Lock Phone Menu
You must enter your lock code to view the Lock Phone menu.
- Press MENU OK > Settings > Lock Phone.
- Enter your lock code and press CONTINUE (left softkey).
Note: The first time you access the Lock Phone menu, you will be advised to change the default lock code by pressing CHANGE (left softkey). Enter and re-enter your new lock code to proceed. For details, see “Changing the Lock Code” on this page.
Tip: If you can't recall your lock code, try using the last four digits of your wireless phone number or check your lock code hint (see "Changing the Lock Code" on this page). If this doesn't work, call Sprint Customer Service at 1-888-211-4727.
Your Phone's Lock Feature
Locking Your Phone
When your phone is locked, you can only make calls to 911 and Sprint Customer Service.
- Press OK > Settings > Lock Phone.
- Enter your lock code and press CONTINUE (left softkey).
- Select Lock Now.
Unlocking Your Phone
- From standby mode, press UNLOCK (left softkey).
- Enter your lock code and press CONTINUE (left softkey).
Changing the Lock Code
- Press MENU OK > Settings > Lock Phone or Reset/Delete.
- Enter your lock code and press CONTINUE (left softkey).
-
Select Change Lock Code.
-
Enter your new lock code and press CONTINUE (left softkey).
- Re-enter your new lock code and press SAVE (left softkey).
Each time you change the lock code, you will be prompted whether to create a lock code hint. Press YES (left softkey) or NO (right softkey) when prompted.
To edit or delete a lock code hint:
-
Press MENU OK > Settings > Lock Phone.
-
Enter your lock code and press CONTINUE (left softkey) >Lock Code Hint.
-
Edit or delete the hint and press MENU .OK
Parental Controls
This feature allows parents to prevent children from using certain functions on the phone.
Activating Parental Controls
- Press MENU OK > Settings > Parental Controls > On/Off > On.
-
Enter your new code and press CONTINUE (left softkey).
-
Re-enter your new code and press SAVE (left softkey).
Repeat the procedure above with each change from Off to On. Also, while set to On, a user will be required to enter the current code to access the Parental Controls menu.
Changing the Parental Control Code
- Press MENU OK > Settings > Parental Controls > Change Parental Control Code.
- Enter your new code and press CONTINUE (left softkey).
- Re-enter your new code and press SAVE (left softkey).
Restricting Voice Calls and Messages
- Press MENU OK > Settings > Parental Controls > Restriction.
- Read the message and press CONTINUE (left softkey).
- Select an option:
■ Voice Calls to restrict incoming and outgoing voice calls except those placed to 911 or Sprint Customer Service.
2B. Settings 41
- Messages to restrict sending messages except to designated recipients.
- Select On/Off >On. Read the message and press OK (left softkey).
- Select Allowed Contacts > All Contacts or Choose Contacts.
■ If you select All Contacts, press MENU OK to confirm.
- If you select Choose Contacts, select
Note: If you select On in step 4, you cannot add, edit, and delete any Contacts or Group entries.
Restricting Web, Camera, and Location Mode
- Press MENU OK > Settings > Parental Controls > Restriction.
- Read the message and press CONTINUE (left softkey).
- Select an option: ■Web to prevent using the browser.
42 2B. Settings
■Camera to prevent using the camera.
■ Force Location On to prevent changing the Location setting from On to Off. (See "GPS Services" on page 106.)
- Select On.
Deleting Phone Content
You can quickly and easily delete all the content that you have created or stored in your phone.
- Press MENU OK > Settings > Reset/Delete.
- Enter your lock code and press CONTINUE (left softkey).
- Select Delete Stuff.
- Highlight an option and press MENU .OK
■Messages to delete all messages.
- Call Logs to delete all call history from the phone.
-
Browser Cookies and Cache to delete all Web cookies and all Web cache memory saved in the phone.
■Downloaded Content to delete all data downloaded to your phone. -
Contacts to delete all of your Contacts including speed dial numbers saved in your Contacts.
■ Voice Memo to delete all voice data and call memos saved in the phone. - My Photos to delete all pictures stored in My Photos.
-
All Stuff to delete everything in all the above categories.
-
Read the message and press DELETE (left softkey).
Resetting Your Phone and Phone Content
This option lets you clear different types of personal information stored on your phone, reset your phone to factory settings, or both.
- Press MENU OK > Settings > Reset/Delete.
- Enter your lock code and press CONTINUE (left softkey).
- Highlight an option and press MENU OK.
- Reset Settings to restore all the factory defaults, including ringer types and display settings. Contacts, History, Calendar, and Messaging are not affected.
- Reset Phone to reset all settings and erase all data on your phone.
- Read the message and press the left softkey (RESET SETTINGS or RESET PHONE).
Security Features for Data Services
Enabling Data Services
To enable data services:
- Press MENU OK > Settings > Others > Data > Data Off.
- Read the message and press the left softkey to sign in.
Disabling Data Services
You can disable data services again without turning off your phone; however, you will not have access to all data services, including Web and messaging.
Disabling data services will avoid any charges associated with these services. While signed out, you can still place or receive phone calls, check voicemail, and use other voice services.
2B. Settings 43
To disable data services:
- Press MENU OK > Settings > Others > Data > Data On.
- Read the disclaimer and press DISABLE (right softkey) to sign out.
Net Guard
When you first connect to the Web, the Net Guard will be displayed to confirm that you want to connect. The Net Guard helps you avoid accidental connections. You can disable the Net Guard in the future by selecting Auto-Connect when you see Net Guard displayed.
To change your Net Guard settings:
▶ Press MENU OK > Settings > Others > Data > Net Guard.
■On to activate the Net Guard.
■Off to deactivate the Net Guard.
Note: When enabled, Net Guard appears only once as long as you have not turned the phone off and on.
44 2B. Settings
2C. History
◆ Viewing History (page 45)
◆ History Thread (page 46)
◆ History Details (page 46)
◆ History Options (page 46)
◆ Making a Call From History (page 47)
◆ Saving a Number From History (page 47)
◆ Making a New Group Entry From History (page 47)
♦ Deleting History (page 48)
Viewing History
History is a list of the last 60 phone numbers (or Contacts entries) for voice calls you placed, accepted, or missed. History makes redialing fast and easy. It is continually updated as new numbers or entries are added to the beginning of the list and the oldest entries are removed from the bottom of the list.
Each entry contains the phone number (if available) and Contacts entry name (if the number is in your Contacts). Duplicate calls (calls from the same number) may appear only once on the list.
▶ Press MENU OK > History.
Shortcut: You can also press from standby mode to display your recent calls.
Note: History records only calls that occur while the phone is turned on. If a call is received while your phone is turned off, it will not be included in history.
If you return a call from the voicemail menu, it will not be included in your phone's history.
History Icons
You can determine if an entry was an incoming, outgoing, or missed call from the icons shown below.
- Incoming Call
- Outgoing Call
- Missed Call
2C. History 45
History Thread
The History thread screen shows all history for a selected entry. You can also keeps track of all the messages you have sent to and received from the selected entry.
To display a History thread:
-
Press MENU OK > History.
-
Highlight an entry and press MENU OK
History Details
To display History details:
- Press MENU OK > History.
- Highlight an entry from the list and press MENU .OK The History thread is displayed.
- Highlight an entry and press MENU OK
The History details screen shows the number type (Mobile, Home, etc.), phone number, and date and time of the call. An onscreen menu is also displayed
according to the type of call. (See “History Options” on this page).
To make a call from the History details screen, press TALK.
History Options
You may see several menu items on the onscreen menu. Press OPTIONS (right softkey) for additional options.
- Call to call the selected entry.
- Send Message to send a message to the selected entry.
● New Group to create a new Group entry. - Contact Details to display information about the entry if it has already been saved in your Contacts.
- Save Contact to save a phone number. (See “Saving a Number From History” on page 47.)
- Delete to delete the entry.
- Delete All to delete all History entries. (See “Deleting History” on page 48.)
- Prepend to add numbers to the beginning of the selected number.
Note: If Parental Controls is on and Voice Calls or Messaging is restricted, you cannot use the New Group or Save Contact menu. (See page 41.)
Making a Call From History
- Press MEM OK > History.
- Highlight an entry and press .TALK
Note: You cannot make calls from History entries identified as No Caller ID, Private (Restricted ID), or Unavailable ID.
Saving a Number From History
Your phone can store up to 600 Contacts entries, and each Contacts entry can store up to a total of seven phone numbers.
- Press MENU OK > History.
- Highlight a History entry and press OPTIONS (right softkey) > Save Contact.
-
Select New Entry or Existing Entry.
-
If New Entry was selected, select a number type, and then enter the new entry name.
- or -
If Existing Entry was selected, select an existing entry to which you want to save the number, and then highlight a number type and press 📋
- Press DONE (left softkey) to save the entry.
Making a New Group Entry From History
You can make and save a new group entry from History.
- Press MENU OK > History > OPTIONS (right softkey) > New Group.
- Read the message and press START (left softkey).
- Select the check box for each member you wish to add and press CONTINUE (left softkey).
Tip: Press OPTIONS (right softkey) > Enter New Address or Contacts to enter a new address or a phone number or to select an entry from your Contacts.
- Enter a group name and press MENU OK > SAVE (left softkey).
2C. History 47
Deleting History
You can delete individual or all entries in your History.
-
Press MENU OK > History.
-
Highlight an entry you wish to delete and press OPTIONS (right softkey) > Delete.
■ Select Delete All to delete all entries.
- If you are certain you want to delete one or all entries from History, press DELETE (left softkey).
48 2C. History
2D. Contacts
◆ About Contacts (page 49)
◆ Displaying Contacts Entries (page 49)
♦ Adding a New Contacts Entry (page 50)
◆ Editing a Contacts Entry (page 50)
♦ Adding a Number to a Contacts Entry (page 51)
♦ Creating a Group (page 51)
♦ Editing Groups (page 51)
◆ Finding Contacts Entries (page 52)
◆ Using Contacts Information in Other Applications (page 53)
♦ Assigning Speed Dial Numbers (page 53)
♦ Selecting a Ringer Type for an Entry (page 54)
- Assigning a Picture to an Entry (page 54)
◆ Secret Contacts Entries (page 55)
◆ My Name Card (page 55)
♦ Dialing Sprint Services (page 56)
About Contacts
Your phone can store up to 600 Contacts entries. Each entry can contain up to seven phone numbers, three email addresses, three IM addresses, and three Web addresses. You can also add Contacts entries to a Group, allowing you to send one message to up to 40 Contacts entries at a time.
Note: If Parental Controls is on and Voice Calls or Messaging is restricted, you cannot add, edit, or delete Contacts entries. (See page 41.)
Displaying Contacts Entries
- From standby mode, press CONTACTS (right softkey).
- Highlight a name to show that entry's main phone number, or highlight a group to show how many members it has.
Viewing History From Contacts
You can view the history of a selected Contacts entry from the Contacts list.
▶ Highlight an entry and press OPTIONS (right softkey) > Contact History.
2D. Contacts 49
Displaying Contacts Details
- From the Contacts list, highlight an entry and press OK.
- Highlight any data field and press .3Menu options for that field will appear, if applicable.
Note: If you select a group in step 1, entries, phone numbers, or email addresses belonging to the group are displayed.
Adding a New Contacts Entry
- From standby mode, press CONTACTS (right softkey) > Add New... > New Contact.
- Enter a name for the new entry and press the navigation key down.
- Enter the phone number for the entry and press OK
- Highlight a label for the entry (Mobile, Home, Work, Pager, Fax, or Other) and press 📋OK.
- Add other information (email address, URL, street address, etc.).
50 2D. Contacts
- Press DONE (left softkey).
After you have saved the number, the new Contacts entry is displayed.
Tip: ICE – In Case of Emergency To make it easier for emergency personnel to identify important contacts, you can list your local emergency contacts under "ICE" in your phone's Contacts list. For example, if your mother is your primary emergency contact, list her as "ICE-Mom" in your Contacts list. To list more than one emergency contact, use "ICE1-____," "ICE2-____," etc.
Editing a Contacts Entry
- Display a Contacts entry (see "Displaying Contacts Entries" on page 49) and press OPTIONS (right softkey) > Edit Contact.
- Highlight the information you wish to edit.
- Add or edit the information and press MENU OK
- Press DONE (left softkey) to save your changes.
Adding a Number to a Contacts Entry
- Display a Contacts entry. (See "Displaying Contacts Entries" on page 49.)
- Press OPTIONS (right softkey) > Edit Contact >
. - Enter the new phone number and press MENU OK
- Highlight a label for the number and press OK
- Press DONE (left softkey) to save the new number.
Creating a Group
You can create a group by assigning Contacts entries as members and then naming the new group.
- From standby mode, press CONTACTS (right softkey) > Add New... > New Group.
- Read the message and press START (left softkey).
- Highlight an entry you want to add to a group and press ☐A check mark will appear in the box next to the selected entry.
Tip: Press OPTIONS (right softkey) > Enter New Address or Recent History to enter a new phone number or address or to select an entry from your history.
- When you have selected all the entries you want to add, press CONTINUE (left softkey).
- Enter a name for the new group and press MENU OK
- Press SAVE (left softkey).
Editing Groups
- From the Contacts list, highlight the group you want to edit.
- Press OPTIONS (right softkey) > Edit Group.
- Change the group name or the group icon and press □OK.
- Press SAVE (left softkey).
Adding Members to a Group
- From the Contacts list, highlight the group to which you want to add members.
- Press OPTIONS (right softkey) > Edit Group > Add More.
2D. Contacts 51
- Read the message and press START (left softkey).
- Highlight an entry you want to add and press MENU OK
- Repeat step 4 to add additional members.
- Press CONTINUE (left softkey) > SAVE (left softkey).
Removing Members From a Group
- From the Contacts list, highlight the group from which you want to remove members.
- Press OPTIONS (right softkey) > Edit Group.
- Highlight a member and press OPTIONS (right softkey) > Remove from Group > YES (left softkey).
- Repeat step 3 to remove additional members.
- Press SAVE (left softkey).
Deleting a Contacts Entry or Group
- From the Contacts list, highlight an entry or a group you want to delete.
- Press OPTIONS (right softkey) > Delete Contact or Delete Group.
- Press DELETE (left softkey) or YES (left softkey).
52 2D. Contacts
Finding Contacts Entries
- From standby mode, press CONTACTS (right softkey).
- Scroll through all the entries.
- or - Enter the first few letters of an entry's name. Contacts with matching letters are listed. (The more letters you enter, the more your search narrows.)
- To display an entry, highlight it and press MENU OK ■Press the navigation key left or right to display other listed entries.
- To dial the entry, highlight the phone number and press TALK.
Tip: You can also find a group the same way as above. Press to display the members of the group.
Using Contacts Information in Other Applications
You can use saved Contacts information in other applications.
To copy information into a message:
- From the Contacts list, highlight an entry and press MENU OK.
- Highlight the information you want to copy, such as phone numbers, email addresses, URLs, or street addresses, and press MENU OK
- Select Share.
- Select Message.
After you select one or more recipients, the text entry screen for the message will open, and the selected text will appear in the body of the message.
Note: For more information about messaging, see "Messaging" on page 86 and "Accessing Messages" on page 97.
Assigning Speed Dial Numbers
Your phone can store up to 98 phone numbers in speed dial locations. (See “Speed Dialing” on page 22.)
To assign a speed dial number to a new phone number:
- Add a phone number to a new or to an existing Contacts entry. (See "Adding a New Contacts Entry" on page 50.)
- Highlight the phone number and press OPTIONS (right softkey) > Set Speed Dial.
- Highlight an available speed dial location and press MENU OK.
- Press to return to the Contacts menu.
To assign a speed dial number to an existing phone number:
- From the Contacts list, highlight an entry and press Ⓥ
- Highlight a number and press OPTIONS (right softkey) > Set Speed Dial.
2D. Contacts 53
- Highlight an available speed dial location and press MENU OK.
Tip: To replace a current assignment, select a location and press REPLACE (left softkey).
To check speed dial assignments:
From the Contacts list, press OPTIONS (right softkey) > Settings > Speed Numbers.
Selecting a Ringer Type for an Entry
Assign a ringer type to a Contacts entry so that you can identify the caller by the ringer type. (See "Ringer Types" on page 32.)
- From the Contacts list, highlight an entry and press MENU OK.
- Select Set Ringers.
- Select Incoming Calls or Message.
- Select Change.
- Select a ringer category, and then select a ringer.
Tip: If you select Downloaded > Get New in step 5, you can purchase and download new ringers right from your phone. For details, see "Getting New Ringers" on page 32 and "Downloading Games, Ringers, and More" on page 99.
Assigning a Picture to an Entry
Assign a picture to display each time a certain contact calls you.
- From the Contacts list, highlight an entry and press MENU OK.
- Highlight and press .
- Select Choose Photo.
- Select a photo category by pressing the navigation key up or down, and then select an image.
■ If you select Take New Picture, press MENU OK to take a picture, and then press OK (left softkey) to assign it.
Secret Contacts Entries
When you make an entry secret and hide it, that entry is not displayed in your Contacts. In History, a telephone number is displayed but the Contacts entry's name is not.
To make an entry secret:
From the Contacts list, highlight an entry and press OPTIONS (right softkey) > Set as Secret > On.
To hide or show secret entries:
- From the Contacts list, press OPTIONS (right softkey) > Settings > Hide Secret or Show Secret.
- Enter the four-digit lock code, and then press CONTINUE (left softkey).
Tip: If you can't recall your lock code, try using the last four digits of your wireless phone number. If this doesn't work, call Sprint Customer Service at 1-888-211-4727.
My Name Card
In My Name Card, you can edit your contact information to display when you need, as well as send or exchange it via Bluetooth.
To display your name card:
From standby mode, press CONTACTS (right softkey) > OPTIONS (right softkey) > Settings > My Name Card.
To edit your name card:
- From the My Name Card screen, press OPTIONS (right softkey) > Edit.
- Highlight each field you want to edit and press 📂
- Edit the information. When finished, press DONE (left softkey).
To send or exchange your name card via Bluetooth:
- Make a Bluetooth connection with another device. (See "2H. Bluetooth" on page 76.)
- From the My Name Card screen, select OPTIONS (right softkey) > Send Name Card or Exchange Name Cards.
- Highlight a device and press 📄OK
2D. Contacts 55
Dialing Sprint Services
Your Contacts list is preprogrammed with contact numbers for various Sprint services and other useful services.
To dial a service from your Contacts:
- From standby mode, press CONTACTS (right softkey) > OPTIONS (right softkey) > Settings > Services.
- Select an available service, such as Hear Minutes (Account Info.), Customer Solution (Service), Directory Assistance (Sprint 411), or Sprint Operator.
To dial a main service from standby mode using your keypad:
▶Dial the appropriate service number:
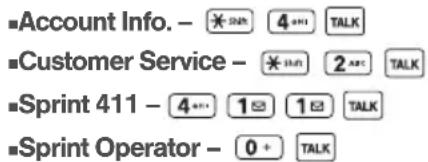
56 2D. Contacts
2E. Calendar & Tools
◆ Calendar (page 57)
◆ Alarm (page 60)
♦ Calculator (page 61)
◆ World Clock (page 61)
◆ Countdown Timer (page 61)
♦Stopwatch (page 62)
Calendar
Adding an Event to the Calendar
Your Calendar helps organize your time and reminds you of up to 100 important events.
-
Press MENU OK > Tools > Calendar.
-
Highlight a day to which you would like to add an event and press OPTIONS (right softkey) > Add Schedule.
- Enter a description and press MENU OK
- Select a category for the event (Appointment, Meeting, etc.) by highlighting the category field and pressing MENU OK.
- Select a priority for the event by highlighting the priority field and pressing MENU OK
- Select a start and end time for the event by highlighting the start and end time fields and pressing MENU OK.
7.Enter a location for the event and press . MENU OK - Select a ringer type for the alarm by highlighting the ringer field and pressing MENU OK
■ To download ringers, select Downloaded > Get New.
- Select an alarm time by highlighting the alarm time field and pressing OK
2E. Calendar & Tools 57
-
Select a repeat status for the alarm by highlighting the repeat field and pressing 📂
-
If you chose Specific Period, set a start and end date for the repeat and press OK
-
If you chose Weekly, select the check box for each day of week you wish to set and press DONE (left softkey).
-
Press SAVE (left softkey).
Tip: To change the calendar display views, press the left softkey repeatedly to toggle between MONTH and WEEK views.
On the weekly view, press the navigation key up or down to display the previous week or the next week, respectively.
Press OPTIONS (right softkey) > Settings > Holiday/Weekday to enter holidays and weekdays.
Adding a To Do List Item to the Calendar
Your phone can store and manage up to 40 To Do list items.
- Press MENU OK >Tools >Calendar.
- Highlight a day to which you would like to add a To Do list item and press OPTIONS (right softkey).
- Press the navigation key right and select Add To Do.
- Enter a description and press MENU OK
- Select a category for the item (Appointment, Meeting, etc.) by highlighting the category field and pressing 📂OK
- Select a priority for the item by highlighting the priority field and pressing MENU OK
- Select a time and date for the item by highlighting the time and date field and pressing 📋OK
- Select a status for the item by highlighting the status field and pressing ON When you add an item, set it to Needs Action.
- Press SAVE (left softkey).
Calendar Alerts
If you have an event on the Calendar, your phone alerts you by a ringing or vibrating alarm and displays a summary of the event.
To respond to the alarm:
- Press SNOOZE (left softkey) to stop the alarm and start snooze mode.
Tip: To change the alarm settings, press OPTIONS (right softkey) > Settings > Alarm to set the snooze options.
- Press DISMISS (right softkey) to clear the alarm.
- On the notification screen, the description you have entered for that event is displayed. If certain information (such as an email address, street address, phone number, or URL) is highlighted in the description, press 📞 display the related option menus. (See page 26.)
■If the description includes multiple items of information as described above, press the navigation key up or down to highlight a specific item.
Viewing Events
Tip: Days with scheduled events are indicated by small colored rectangles just below the date. A rectangle's color depends on the repeat status for an event.
- Press MENU OK > Tools > Calendar.
- Highlight the day for which you would like to view events and press 📋 the day's event list is displayed.
- or - Press OPTIONS (right softkey) > Schedule List or To Do List
- Highlight an event and press the event's details are displayed. You can edit the event on this screen.
Deleting Events
- Press MENU OK > Tools > Calendar.
- Highlight the day from which you would like to delete an event and press MENU OK
- or - Press OPTIONS (right softkey) > Schedule List or To Do List
- Highlight an event and press OPTIONS (right softkey) > Delete.
2E. Calendar & Tools 59
- Highlight an option and press MENU OK
■This to delete the highlighted event.
■Select to delete multiple events.
■ All on This List to delete all events on the list.
- All Completed Events to delete completed To Do List items.
- Press YES (left softkey).
To delete old or all events:
▶ Press MENU OK > Tools > Calendar > OPTIONS (right softkey) > Delete Memory > Delete Old (or Delete All) > YES (left softkey).
Alarm
Your phone comes with a built-in alarm that has multiple alarm capabilities.
- Press MENU OK > Tools > Alarm.
-
Highlight an alarm number and press 📋.OK
-
Turn the alarm on or off by highlighting the alarm field and pressing MENU OK
■ Highlight On or Off and press MENU OK.
- Enter a description for the alarm by highlighting the description field and pressing MENU OK
- Select a time for the alarm by highlighting the time field and pressing MENU OK
- Select a repeat status for the alarm by highlighting the repeat field and pressing 📋OK
- Select a ringer option for the alarm between Downloaded, Preloaded Ringers, and No Ringer by highlighting the ringer field and pressing MENU OK If you select Downloaded or Preloaded Ringers, highlight a ringer type and press MENU OK
- Select a volume level for the alarm by highlighting the volume field and pressing MENU OK
- Select a ringer length for the alarm by highlighting the ringer length field and pressing MENU OK
- Select a snooze interval for the alarm by highlighting the snooze interval field and pressing MENU OK.
- Select the number of times the snooze should repeat by highlighting the snooze time field and pressing MENU OK.
- Press SAVE (left softkey).
60 2E. Calendar & Tools
Tip: Press ON or OFF (left softkey) to toggle the alarm on and off.
In steps 5 and 9, use your keypad or navigation key (up or down to change value, left or right to move underscore) to set a time.
See "To respond to the alarm:" on page 59 for ways to stop, pause, or reset the alarm.
Calculator
Your phone comes with a built-in calculator.
- Press OK >Tools >Calculator.
- Enter numbers using your keypad.
■Press the appropriate key for an arithmetic option (+ - × ÷) .
■Press the left softkey to enter a decimal point.
■ Press CLEAR (right softkey) to clear all numbers.
- Press for the total.
World Clock
To view the time in different locations:
- Press MENU OK > Tools > World Clock.
- Press the navigation key left or right to scroll through different time zones.
Note: Press OPTIONS (right softkey) > Standard or Summer to change between standard and daylight saving time.
Countdown Timer
This feature allows you to use your phone as a countdown timer to alert you when a specified period of time has elapsed. You can set up to five timers for a maximum time of 59 minutes, 59 seconds each.
- Press MENU OK > Tools > Countdown.
- Highlight a countdown timer number and press MENU OK
-
Highlight a setting and press MENU .OK
-
Time to enter the length of the countdown as a four-digit number. (For example, to set the timer to 20 minutes, enter "2000" on your keypad.)
- Alarm to set the countdown alarm to on or off.
2E. Calendar & Tools 61
- Press SAVE (left softkey).
Tip: Press ON or OFF (left softkey) to toggle the countdown alarm on and off.
See "To respond to the alarm:" on page 59 for ways to stop, pause, or reset the alarm.
Stopwatch
- Press MENU OK > Tools > Stopwatch.
- Press MODE (left softkey) to select split timing or lap timing.
- Press START (right softkey) to start the stopwatch.
- Press SPLIT or LAP (left softkey) to record the time.
- Press STOP (right softkey) to stop timing.
- Press RESET (left softkey) to reset the stopwatch to zero.
62 2E. Calendar & Tools
2F. Voice Services
◆ Automatic Speech Recognition (ASR) (page 63)
◆ Managing Voice Memos (page 66)
Automatic Speech Recognition (ASR)
You can use your phone's built-in automatic speech recognition (ASR) software to dial a phone number or to launch phone functions. All you have to do is to talk into the phone, and ASR will recognize your voice and complete tasks by itself.
Activating ASR
▶Press and hold


The phone prompts you to say the name of the command you want to use. To complete your task, simply follow the voice prompts.
Available ASR commands include:
- Call
to call an entry in your Contacts list or a spoken phone number. (See the next article for details.) - Send Message
to send a message to an entry in your Contacts list or to a spoken phone number. (See page 64 for details.) - Lookup
to display the detail screen of an entry in your Contacts list. (See page 64 for details.) - Go To
- Check
- to check your phone's status. (See page 65 for details.)
Tip: Use ASR in a quiet environment so it can accurately recognize your commands.
During ASR operation, press HELP (left softkey) to get instructions for using the software.
Making a Voice Call Using ASR
- Press and hold


- When you hear "Say a command," say "Call."
2F. Voice Services 63
- When you hear "Say the name or number," say a name or a phone number.
- When you hear "Which location?," say a number type (for example, "Mobile").
Tip: You can skip steps 3 and 4 by saying a name and location after "Call" without pausing (for example, "Call John Jones mobile").
Note: If ASR does not recognize the name or number, it will find the most likely matches and display a list of up to three names or numbers. You will hear "Did you say Call..." followed by the name or number. You can confirm by saying "Yes." Say "No" to change the selection.
Sending a Message Using ASR
- Press and hold


- When you hear "Say a command," say "Send Message."
- When you hear "Say the name or number," say a name or a phone number.
- When you hear "Which location?," say a number type (for example, "Mobile"). The phone displays the text entry screen. (See page 87 for how to compose a message.)
64 2F. Voice Services
Displaying a Contacts Entry's Information Using ASR
- Press and hold


- When you hear "Say a command," say "Lookup."
- When you hear "Say the name," say a Contact entry's name. The phone displays the detail screen for that Contacts entry.
Opening Menus Using ASR
You can jump directly to many menu items or applications by saying "Go to" followed by a menu option.
- Press and hold


- When you hear "Say a command," say "Go To."
- When you hear "Which shortcut?", say an application name (for example, "Messaging").
- The phone opens the selected menu.
Tip: Say "More options" to display additional application names.
Checking Phone Status Using ASR
You can use ASR to obtain information about your phone:
● Status (all of the following except My Phone Number)
•Time
●Signal Strength
●Network
●Battery
●My Phone Number
- Press and hold


- When you hear "Say a command," say "Check."
- When you hear "Which status item?", say a command.
ASR Settings
To change ASR confirmation:
- Press and hold


- Press SETTINGS (right softkey) > Confirmation.
- Highlight an option and press MENU OK
■ Automatic to ask for confirmation only when the system is not sure what you said.
■ Always Confirm to always ask for confirmation.
■ Never Confirm to never ask for confirmation.
To adapt the system to your voice:
- Press and hold


- Press SETTINGS (right softkey) > Adaptation > Adapt Voice.
- Press START (left softkey) and repeat each word, phrase, or telephone number you hear.
To reset the adaptation:
- Press and hold


- Press SETTINGS (right softkey) > Adaptation > Reset Voice > YES (left softkey).
To change the ASR mode:
- Press and hold


- Press SETTINGS (right softkey) > Audio Modes.
- Highlight an option and press
- Expert Mode to sound a beep only.
■ Prompt Mode to prompt for required information.
- Readout Mode to prompt for required information and to read the text displayed on the main screen.
2F. Voice Services 65
To change the ASR dialing region:
- Press and hold
- Press SETTINGS (right softkey) > Dialing Region.
- Highlight an option and press MENU .OK
- North America to recognize only numbers valid in North America.
■Other to recognize any number regardless of location.

To display the ASR software version:
- Press and hold

- Press SETTINGS (right softkey) > About.
Managing Voice Memos
Use your phone's Voice Memo to record audio memos to remind you of important events, phone numbers, or grocery list items, and to record call memos of the other party's voice during a phone call.
Note: You can store up to 1900 memos on your phone. Maximum recording time depends on the available memory space on your phone.
66 2F. Voice Services
Recording Memos
To record an audio memo:
- Press MENU OK > Tools > Voice Services > Voice Memo > Record.
- Start recording after the beep.
To stop recording:
▶ Press BACK, END ^® , or STOP (right softkey).
To record a call memo:
- During a call, press OPTIONS (right softkey) > Voice Memo.
- Start recording after the beep.
To stop recording:
▶ Press BACK or STOP (right softkey). (Recording will also stop when the other party disconnects.)
Playing Recorded Memos
- Press MENU OK > Tools > Voice Services > Voice Memo > List.
- Highlight the memo you want to play and press MENU OK.
- or -
Press OPTIONS (right softkey) > Play > All to play all memos continuously.
To play multiple memos:
- Press 📂OK >Tools >Voice Services >Voice Memo >List.
- Press OPTIONS (right softkey) > Play > Multiple and select memos you want to play.
- Press PLAY (left softkey).
To select the playing mode (speed and direction) using the navigation key:
- Press the navigation key up or down to select the playing speed (1/2x, 2/3x, 1x, 1.5x, or 2x).
- Press the navigation key left or right to move up or down in the memo list and play the selected memo.
- Press and hold the navigation key right or left to fast-forward and fast-rewind.
Recorded Memos Options
Your phone offers several options for managing audio and call memos you have recorded.
- Press 📋>Tools>Voice Services>Voice Memo> List
- Highlight a memo and press OPTIONS (right softkey) to display available menu options:
■Play to play selected memos or all memos.
■ Speaker On or Speaker Off to activate or deactivate the speakerphone mode.
■ Edit Title to edit the title of a memo.
■ Properties to display information about a memo.
■ Type Filter to list memos by the type order as audio memo, call memo, or all memos. - Sort by to sort memos by the recorded time, file name or size in ascending or descending order.
- Go to Time to set the point from which the memo starts playing.
- Send Media to send a memo by attaching it to a message.
- Delete to delete either selected memos or all memos. Select from This, Multiple, or All.
2F. Voice Services 67
2G. Camera
♦ Taking Pictures (page 68)
♦ Storing Pictures (page 72)
◆ Sending Pictures From Your Phone (page 73)
◆ Printing Pictures From Your Phone (page 74)
Taking Pictures
Taking pictures with your phone's built-in camera is as simple as choosing a subject, pointing the lens, and pressing a button.
- Press MENU OK >Photos >Camera or press and hold to activate camera mode. (Additional camera options are available. See "Camera Mode Options" on page 69 for more information.)
Note: If Parental Controls is on and the camera is restricted, you cannot activate camera mode. (See page 41.)
- Using the phone's main screen as a viewfinder, aim the camera lens at your subject.
- Press 📄, 📋, or CAPTURE (left softkey) until the shutter sounds. The picture will automatically be saved in the My Photos folder. (See "Storing Pictures" on page 72.)
■To return to camera mode to take another picture, press 📷, BACK, CAMERA (left softkey).
-
Press OPTIONS (right softkey) for more options.
-
Send Message to send your picture in a message. (See “Sending Pictures Using the Messaging Feature” on page 73.)
- Assign to assign the picture. (See “Assigning Pictures” on page 69.)
- Delete to delete the picture you just took.
- Print to print the picture. You can choose whether to print using a PictBridge- or Bluetooth- enabled printer.
■ Review Media to go to the My Photos folder to review your saved pictures.
■ Details/Edit to edit or display details relating to your pictures.
Assigning Pictures
Assign a picture as a screen saver or as a picture ID.
-
Take a picture. (See steps 1–3 on page 68.)
-
With the picture displayed, press OPTIONS (right softkey) > Assign, and select an option.
- Picture ID to assign the picture to a Contacts entry as well as to unsaved phone numbers, or to private and unknown phone numbers. See “Selecting a Picture ID” on page 29.
■ Screensaver to assign the picture as a screen saver.
Tip: You can also assign pictures from the My Photos menu. See "My Photos Folder Options" on page 72.
You can view pictures assigned as picture IDs or screen savers by pressing OK > Tools > Assigned Media.
Camera Mode Options
Press OPTIONS (right softkey) in camera mode to display additional camera options:
● Picture Mode to select a picture mode from Normal, Beach/Snow, Scenery, Mirror Image, or Night/Dark.
- Zoom to zoom in and out on a subject. (See "Zoom" on page 70.)
- Self-Timer to activate the camera's timer. (See "Self-timer" on page 70.)
● Fun Tools to select an option from the following:
■ Multiple Shots to take multiple shots. (See "Multiple Shots" on page 70.)
- Fun Frames to select your favorite fun picture frame to decorate your picture (displayed only when the resolution setting is 0.3M or 0.1M).
- Color Tone to select from a wide variety of color tones for the picture.
- Image Controls to adjust settings for Brightness, White Balance, Sharpness, and Contrast.
- CameraSettings to adjust Resolution, Quality, and other settings. (See “Camera Settings” on page 71.)
- Review Media to go to the My Photos folder to review your saved pictures.
● Key Guidance to show keypad shortcuts in camera mode.
- User Settings to provide convenient access to your favorite settings. (See “Saving Your Settings” on page 71.)
2G. Camera 69
Self-timer
- From camera mode, press OPTIONS (right softkey) > Self-Timer.
- Highlight a delay time (5 Seconds or 10 Seconds) and press MENU OK
- Press 📄 or START (left softkey) when you are ready to start the timer. (A countdown is displayed in the middle of the screen and your phone will beep during the countdown.)
- Get ready for the picture. (When the timer is down to three seconds, the tone of the beep will change.)
To cancel the self-timer after it has started:
▶ Press CANCEL (right softkey) or BACK.
Multiple Shots
This feature allows you to take three, six, or nine shots in a continuous sequence. When you take multiple shots, the Moon will be displayed in the viewfinder.
- From camera mode, press OPTIONS (right softkey) > Fun Tools > Multiple Shots.
Note: When taking multiple shots, the resolution is temporarily set to 0.1M (240x320).
- Highlight an option (3 Shots, 6 Shots, or 9 Shots) and press OK
- Highlight the duration of the interval between shots (Normal or Fast) and press 📄OK.
- Press 📄, 📋, or CAPTURE (left softkey) to take the pictures. (The screen will display up to nine thumbnail pictures.)
Zoom
This feature allows you to zoom in on an object when you take a picture. You can adjust the zoom from 1x to 12x.
- From camera mode, press the navigation key right to zoom in or left to zoom out.
- Press 📷, MENU OK, or CAPTURE (left softkey) to take a picture.
Camera Settings
- From camera mode, press OPTIONS (right softkey) > CameraSettings.
- Highlight an option and press MENU OK
■ Resolution to select a picture's file size from 1.3M (960x1280), 0.3M (480x640), or 0.1M (240x320).
■ Quality to select the picture quality setting from Fine, Normal, or Economy.
- Shutter Sound to select a shutter sound from Default, "Say Cheese", "Ready", or Off.
- Status Bar to display or hide status indicators and softkeys. These can be displayed or hidden by pressing the navigation key up or down.
Saving Your Settings
You can save your favorite camera mode options as your preferred settings.
- Set your favorite camera mode options and press OPTIONS (right softkey) >User Settings.
- Highlight an unassigned number and press ⓂOK > YES (left softkey). (Default keeps the original settings.)
- Enter a title and press MENU OK
- Confirm the settings and press MENU OK
To retrieve your settings:
- From camera mode, press OPTIONS (right softkey) > User Settings.
- Highlight a customized settings group and press ⓄOK > YES (left softkey).
Note: To replace settings, highlight a customized settings group and press OPTIONS (right softkey) > Overwrite > YES (left softkey).
2G. Camera 71
Camera Icons
| Function | Icon | Details | |
| Picture Mode | Beach/Snow | Use this setting in bright light. | |
| Scenery | Use this setting for scenery at a distance. | ||
| Mirror Image | Use this setting to take a mirror image. | ||
| Night/Dark | Use this setting in low light. | ||
| Resolution | 1.3M | For 1.3-megapixel picture resolution. | |
| 0.3M | For 0.3-megapixel picture resolution. | ||
| 0.1M | For 0.1-megapixel picture resolution. | ||
| Self-Timer | 5 Seconds | Numeric countdown will appear when the self-timer has been started. | |
| 10 Seconds | |||
| Multiple Shots | Use this setting for multiple shots. | ||
Storing Pictures
My Photos Folder
Your phone's internal storage area is called the My Photos folder. From the My Photos folder, you can view all the pictures you have stored there, delete files, and access additional options.
72 2G. Camera
To review your stored pictures in the My Photos folder:
▶ Press MENU OK > Photos > My Photos.
My Photos Folder Options
When you are viewing the My Photos folder, press SEND MESSAGE (left softkey) to send your pictures (see "Sending Pictures Using the Messaging Feature" on page 73); or press OPTIONS (right softkey) to display the following options:
- Select Multiple to select multiple pictures.
- Slideshow to view your pictures in slideshow mode (only available when you save two or more pictures to the folder).
- Assign to assign the picture. (See “Assigning Pictures” on page 69.)
- Delete to delete pictures. Select This, Selected, or All.
Note: Deleting pictures will free up memory space in your phone to enable you to take more pictures.
- Print to print pictures. You can choose whether to print using a PictBridge- or Bluetooth-enabled printer.
● Details/Edit to edit or display details relating to your pictures.
■ Text Caption to edit the selected picture's caption.
■ Special Effects to select from Fun Frames, Color Tone, Fun Stamps, or Rotate.
- Resize to resize the selected picture.
Select 0.3M (480x640) or 0.1M (240x320).
- Trimming to crop the selected picture.
- Photo Info to display information such as the picture's caption, time/date, and size.
■ Full Screen to display the selected picture in full screen view.
Reviewing Pictures in Assigned Media Folder
The Assigned Media folder automatically stores copies of pictures assigned as picture IDs or screen savers on your phone. (See “Assigning Pictures” on page 69.)
- Press MENU OK >Tools >Assigned Media.
- Use your navigation key to view and scroll through the pictures. (To switch a picture from thumbnail view to expand view mode, highlight a picture and press MENU OK.)
Sending Pictures From Your Phone
Once you have taken a picture, you can use the messaging capabilities of your phone to instantly share it with family and friends as an attachment.
Sending Pictures Using the Messaging Feature
- Press MENU OK > Photos > My Photos.
- Highlight a picture to send and press SEND MESSAGE (left softkey).
- Press OPTIONS (right softkey) > Select Multiple to select multiple pictures.
-
Select the recipient from the list or from the following options:
-
Go to Contacts to select a recipient from your Contacts. (Qualifying Contacts entries must contain a wireless phone number or an email address.)
- MULTIPLE (left softkey) to select multiple recipients. Press CONTINUE (left softkey) when you have finished selecting recipients. (You may include up to 40 recipients per message.)
2G. Camera 73
- NEW ADDRESS (right softkey) to enter a recipient's wireless phone number or email address directly. Press CONTINUE (left softkey) to proceed.
- Compose a message.
- Confirm the recipients, message, and pictures. (You may also select additional options by pressing the right softkey. Follow the onscreen instructions to add available options.)
- Press SEND (left softkey) to send the pictures.
Printing Pictures From Your Phone
Your phone is PictBridge compatible, allowing you to print directly from your phone without connecting to a computer. You can also print your pictures using Bluetooth (see "Printing Pictures via Bluetooth" on page 80).
Note: Make sure your battery is fully charged before printing your pictures.
To print pictures directly from your phone:
- Press MENU OK > Photos > My Photos.
- Highlight a picture to print and press OPTIONS (right softkey) > Print > PictBridge.
742G. Camera
- Press OPTIONS (right softkey) > Select Multiple to select multiple pictures.
Note: You may not be able to print pictures that you cannot display on your phone.
- Connect your phone to the PictBridge-enabled printer using a compatible USB cable. When the printer has connected, press CONTINUE (left softkey) in the picture thumbnail screen.
-
To set the print settings, highlight each element and select a setting using your navigation key right or left.
-
Type: You can select the print mode from Default Printer, Standard Print, or Index Print.
- Copies: You can set the number of copies from Single, Doubles, or Manual. When you select Manual, set the number (up to 10 per picture) by pressing your navigation key right or left. The number of copies will be displayed in the field below.
■ Size: You can set the print size from Default Printer, 4"x6", 5"x7", 8"x10", or Letter. (Print sizes may vary according to the type of printer you have.) -
Date: You can imprint the date on your pictures. Select On or Off. (Date stamping may not be available depending on the type of printer you have.)
-
When you have finished selecting the print settings, press PRINT (left softkey).
Note: While you are connected to the printer, your phone's screen will display "Phone Off." You cannot make or receive calls during this time.
- When printing is finished, press

- Press YES (left softkey). Follow the instructions on the display to unplug the USB cable from the phone.
Note: PictBridge Error Messages –
From time to time you may encounter printing problems. Your phone will display any printer error messages informing you of the specific problems encountered. Please refer to the user's guide that came with your printer for descriptions, explanations, and possible resolutions for any error messages.
2G. Camera 75
2H. Bluetooth
◆ About Bluetooth (page 76)
♦ Turning Bluetooth On and Off (page 76)
◆ Making Your Phone Discoverable (page 76)
◆ Bluetooth Menu (page 77)
♦ Pairing Bluetooth Devices (page 78)
◆ Viewing the Trusted Devices List (page 78)
◆ Sending Data via Bluetooth (page 79)
◆ Printing Pictures via Bluetooth (page 80)
About Bluetooth
Bluetooth ^® is a short-range communications technology that allows you to connect wirelessly to a number of Bluetooth devices, such as headsets and hands-free car kits, and Bluetooth-enabled handhelds, computers, printers, and wireless phones. The Bluetooth communication range is usually up to approximately 30 feet.
76 2H. Bluetooth
Turning Bluetooth On and Off
By default, your phone's Bluetooth feature is turned off. Turning Bluetooth on enables your phone's Bluetooth functions.
- Press MENU OK >Tools >Bluetooth >On/Off.
- Press ON (left softkey) to enable Bluetooth. Press OFF (left softkey) to disable Bluetooth.
Making Your Phone Discoverable
To make your phone discoverable (allowing other Bluetooth devices to detect it), you must set your phone's visibility to other than Hidden.
- Press MENU OK > Tools > Bluetooth > Visibility.
Note: The first time you access the Visibility menu, you will be advised to enable Bluetooth by pressing ON (left softkey). On the next screen, you can customize the device name by overwriting it and pressing SAVE (left softkey).
- Select Visible for 3 min or Always visible. If you select Always visible, your phone will be discoverable by all in-range Bluetooth devices until you change the setting. If you select Visible for 3 min, your phone will return to hidden mode after three minutes.
Bluetooth Status Indicators
The following icons show your Bluetooth connection status at a glance:

- Bluetooth feature is on.

- Your phone is visible to other Bluetooth devices.

- Your phone is connected to a Bluetooth device.
The above icons will blink while your phone is communicating with a Bluetooth device.
Bluetooth Menu
The Bluetooth menu allows you to set up many of the characteristics of your phone's Bluetooth service, including:
- Setting your phone's visibility (or "discoverability") for other Bluetooth devices.
- Adding a new Bluetooth device to your phone.
●Displaying your Bluetooth trusted devices list.
- Displaying your phone's Bluetooth information.
To access the Bluetooth menu:
▶ Press 📂OK > Tools > Bluetooth to select from the following options:
- On/Off to turn Bluetooth functions on or off. When On is selected, your phone can receive requests from other Bluetooth devices. (See page 76.)
- Visibility to set your phone's visibility (or "discoverability") for other Bluetooth devices. (See page 76.)
- Add New to add a new Bluetooth device. (See page 78.)
- Trusted Devices to display a list of your trusted Bluetooth devices. (See page 78.)
- Select Add New to add a new Bluetooth device.
■ My Bluetooth Info to display the name, address, class, and supported profiles of your phone.
Pairing Bluetooth Devices
The Bluetooth pairing process allows you to establish trusted connections between your phone and another Bluetooth device. When devices are paired, a passkey (PIN) is shared between devices, allowing for fast, secure connections while bypassing the discovery and authentication process.
- From the Bluetooth menu, select Add New.
- Select the device you wish to pair with and press MENU OK.
- Enter the passkey and press MENU .OK
- (Optional) Edit the device name and press SAVE (left softkey).
Note: Due to different specifications and features of other Bluetooth compatible devices, display and operations may be different, and functions such as transfer or exchange may not be possible.
Viewing the Trusted Devices List
This list displays a list of devices which are paired with your device and set as trusted devices.
▶ From the Bluetooth menu, select Trusted Devices.
Trusted Devices List Menu
Once you have created trusted devices, several options are available from the Trusted Devices list.
Left Softkey Menus
▶From the Trusted Devices list, highlight a device, and press the left softkey menu item which appears depending on the type of device highlighted.
- CONNECT to connect to the selected Bluetooth device, if not connected (for headsets, hands-free and other devices, excluding computers, PDAs, phones, or printers).
- TRANSFER... to send data saved on your phone to the selected Bluetooth device (for computers, PDAs, or phones). (See page 79.)
■ PRINT to print data using the selected Bluetooth-enabled printer. (See page 80.)
Options Menu
▶From the Trusted Devices list, highlight a device, and press OPTIONS (right softkey) to display the following options:
- Add New to add a new Bluetooth device. (See page 78.)
■ Delete to delete the selected device from the list.
■ Delete All to delete all devices from the list.
■Auto-Accept to configure your phone's accessibility to other Bluetooth devices.
■ View/Edit Info to view or edit the information of the selected device.
■ Help to display the Trusted Devices list help.
Sending Data via Bluetooth
You can send Contacts data and Name Cards to or exchange Name Cards with another Bluetooth device, such as a computer, PDA, or phone.
Sending Contacts
-
From the Bluetooth menu, select Trusted Devices, and select a device (computer, PDA, or phone) from the list.
-
Press TRANSFER... (left softkey) > Send Contacts.
- Select an option:
- Send All Contacts to send all the entries in your Contacts.
- Select Contacts to send selected entries. After you have selected entries by checking the box next to each entry, press CONTINUE (left softkey).
- Read the message and press SEND (left softkey).
Sending or Exchanging Name Cards
(For more information about Name Cards, please see page 55.)
- From the Bluetooth menu, select Trusted Devices, and select a device (computer, PDA, or phone) from the list.
- Press TRANSFER... (left softkey) > Send Name Card or Exchange Name Cards.
- Press SEND (left softkey).
2H. Bluetooth 79
Printing Pictures via Bluetooth
You can print out your pictures stored on your phone. (Some Bluetooth-enabled printers may not support this feature.)
- From the Bluetooth menu, select Trusted Devices, and select a printer from the list.
- Press PRINT (left softkey).
- Select the check box for each picture you wish to print and press CONTINUE (left softkey).
- or -
- Press MENU OK > Photos > My Photos.
- Highlight a picture to print and press OPTIONS (right softkey) > Print > Bluetooth.
- Press OPTIONS (right softkey) > Select Multiple to select multiple pictures.
- Select a printer.
Note: You may not be able to print pictures that you cannot display on your phone.
- To set the print settings, highlight each element and select a setting using your navigation key right or left.
■ Type: You can select the print mode from Prints or Index.
- Copies: You can set the number of copies from Single, Doubles, or Manual. When you select Manual, set the number (up to 99 per picture) by pressing your navigation key right or left. The number of copies will be displayed in the field below.
- Size: You can set the print size from 4"x6", 5"x7", or Letter. (Print sizes may vary according to the type of printer you have.)
- Date: You can imprint the date on your pictures. Select On or Off. (Date stamping may not be available depending on the type of printer you have.)
- Border: You can choose whether to print the pictures with or without border. Select On or Off.
- Caption: You can choose whether to print the pictures with or without text captions such as the date captured (if available) and serial numbers. Select On or Off.

- When you have finished selecting the print settings, press PRINT (left softkey), and wait for the Bluetooth connection and printing.
- When printing is finished, press
Note: Before using the Bluetooth printing feature, make sure your phone's battery is fully charged.
2H. Bluetooth 81
Section 3
Sprint Service
Sprint

3A. Sprint Service: The Basics
◆ Voicemail (page 84)
♦ Messaging (page 86)
♦ Caller ID (page 89)
◆ Call Waiting (page 90)
◆ Making a 3-Way Call (page 90)
◆ Call Forwarding (page 91)
◆Roaming (page 91)
Voicemail
Setting Up Your Voicemail
Your phone automatically transfers all unanswered calls to your voicemail, even if your phone is in use or turned off. You should set up your Sprint Voicemail and personal greeting as soon as your phone is activated. Always use a password to protect against unauthorized access.
84 3A. Sprint Service: The Basics
- From standby mode, press and hold .1
- Follow the system prompts to:
■Create your password.
■Record your name announcement.
■Record your greeting.
Note: Voicemail Password
Sprint strongly recommends that you create a password when setting up your voicemail to protect against unauthorized access. Without a password, anyone who has access to your phone is able to access your voicemail messages.
If Parental Controls is on and Voice Calls are restricted, you cannot call Sprint Voicemail unless you have established your own number as an allowed Contacts entry. (See page 41.)
Voicemail Notification
There are several ways your phone alerts you to a new message:
●By displaying a message on the screen.
- By sounding the assigned ringer type.
- By displaying at the top of the screen.
New Voicemail Message Alerts
When you receive a new voicemail message, your phone alerts you and prompts you to call your voicemail.
To call your voicemail from the notification screen:
▶Press

Note: When you are roaming off the Nationwide Sprint Network, you may not receive notification of new voicemail messages. It is recommended that you periodically check your voicemail by dialing 1 + area code + your wireless phone number. When your voicemail answers, press and enter your password. You may be charged roaming rates when you access voicemail while roaming off the Nationwide Sprint Network.
Your phone accepts messages even when it is turned off, but you can receive voicemail message alerts only when your phone is turned on and you are in a Sprint service area.
Retrieving Your Voicemail Messages
You can review your messages directly from your wireless phone or from any other touch-tone phone. To dial from your wireless phone, either speed dial your voicemail or use the menu keys.
Using One-Touch Message Access
▶Press and hold. (Your phone will dial your voicemail box.)
Using the Menu Keys on Your Phone to Access Your Messages
- Press MENU OK > Messaging > Voicemail.
- Press to listen to your messages.
Note: You are charged for airtime minutes when you are accessing your voicemail from your wireless phone.
Using Another Phone to Access Messages
- Dial your wireless phone number.
- When your voicemail answers, press the star key (*).
- Enter your password.
Tip: When you call into voicemail, you first hear the header information (date, time, and sender information) for the message. To skip directly to the message, press 4... during the header.
Voicemail Key Guide
Here's a quick guide to your keypad functions while listening to voicemail messages.
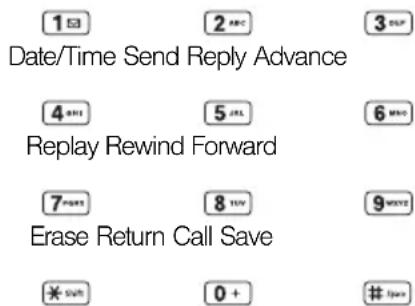
Cancel Help Skip
Messaging
With messaging, you can send and receive messages between your phone and another messaging-ready phone. When you receive a new message, it will automatically display on your phone's screen.
In addition, messaging includes a variety of preset messages, such as “The meeting has been cancelled,” that make composing messages fast and easy. Use your phone to customize your own preset messages (up to 50 characters).
There are two types of messaging, Text Messaging (SMS) and Multimedia Messaging (MMS).
Text messages can be composed of up to six segments of 160 characters each, for a total of 960 characters per text message. The current segment and total segment count is displayed at the top of each segment. For example, (5/6) at the top of a segment would indicate you are viewing segment five of a six-segment message.
Multimedia messages consist of both text and multimedia files, such as pictures or voice recordings. Outgoing multimedia messages can be up to 600 KB with up to 1000 text characters.
86 3A. Sprint Service: The Basics
Composing Messages
- From standby mode, press MESSAGING (left softkey) > Send Message.
-
Select a recipient from the list or from the following options:
-
Go to Contacts to select a recipient from your Contacts. (Qualifying Contacts entries must contain a phone number or an email address.)
■ MULTIPLE (left softkey) to select multiple recipients. Press CONTINUE (left softkey) when you have finished selecting recipients. (You may include up to 40 recipients per message.) -
NEW ADDRESS (right softkey) to enter a recipient's phone number or email address directly. Press CONTINUE (left softkey) to proceed.
-
Compose a message.
- Press OPTIONS (right softkey) to select additional options.
- To add attachments, select
, and select Picture or Audio.
■ If you select Picture, select Take New Picture or My Photos.
- If you select Audio, select Record New Audio or Recorded Data.
- Select files you would like to attach, and then press NEXT (left softkey). (If you have taken a new picture or recorded a new audio, skip this step.)
- Review your message and press SEND (left softkey).
Note: If Parental Controls is on and Messaging is restricted, messaging may be disabled; or messages may only be sent to allowed recipients. (See page 41.)
Accessing Messages
To read a message:
▶When you receive a message, your phone will display a notification message. Use your navigation key or select View to view the message.
■For CMAS alert messages (see page 35), press VIEW (left softkey).
To reply to a message:
- While the message is displayed, press REPLY (left softkey).
-
Select Reply to Sender, or select Reply All if you are replying to an MMS message with multiple recipients.
-
Compose a reply and press SEND (left softkey).
3A. Sprint Service: The Basics 87
Threaded Messaging
Threaded messaging lets you follow a chain of messages to and from a particular contact.
To display the thread list:
From standby mode, press MESSAGING (left softkey) > Messages.
You will see a thread list. Each thread has an entry's name (if saved in Contacts), a phone number, or an email address. You will also see the number of unread messages, if any, for each thread.
Viewing Messages
Highlight a thread and press ☐ display the messages sent to and received from a particular contact, in reverse chronological order. Failed, pending, and draft messages are also listed.
Highlight a message to see details for that message.
■Me – Message you sent.
- Me (Failed) – Message you did not send successfully.
- Me (Pending) – Message you have not sent yet because your phone has no network connection.
The message will be sent automatically when your phone reconnects to the network.
- Me (Draft) – Message you saved as a draft. Only one draft can be saved in each thread, and that draft appears at the top of the thread.
Message Details
Highlight a message and press 📄 display the message details and view the entire message.
You can select certain information from a message or email message and automatically save it or use it in a related application. See “Simple Data Exchange” on page 26.
Threaded Messaging Options
When you are viewing a messaging thread list, a message thread, or a message details screen, you can choose from among the following options. (Options will vary according to screen.)
▶Press or to make a call.
▶ Press SEND MESSAGE (left softkey) to send a message to the entry.
▶ Press REPLY (left softkey) to reply to a message.
▶ Press SEND (left softkey) to send a draft message.
▶ Press RESEND (left softkey) to resend a failed message.
▶ Select a message, press OPTIONS (right softkey), and select an option:
■Forward to forward the selected message.
- Lock to lock the selected message.
■Unlock to unlock the selected message.
■Unlock All to unlock all messages.
Note: Messages are automatically deleted starting with the oldest. To save messages, lock them.
■Delete to delete the selected message.
■Delete All to delete all messages.
- Call to dial the phone number appearing in the selected message.
■Launch to open the URL appearing in the selected message.
■Save Number to save the phone number appearing in the selected message.
■ Save Email to save the email address appearing in the selected message.
■ Manage Text Blocking to block text messages from specific phone numbers or email addresses.
■ Settings to display the Messaging Settings menu.
- More Information to display more information when receiving a CMAS alert message. (See "Setting CMAS Alerts" on page 35.)
Caller ID
Caller ID allows people to identify a caller before answering the phone by displaying the number of the incoming call. If you do not want your number displayed when you make a call, follow these steps.
- Press * 6 7
- Enter the number you want to call.
- Press TALK
To permanently block your number, call Sprint Customer Service.
Call Waiting
When you are on a call, Call Waiting alerts you to incoming calls by sounding two beeps. Your phone's screen informs you that another call is coming in and displays the caller's phone number (if available).
To respond to an incoming call while you're on a call:
▶Press . (This puts the first caller on hold and answers the second call.)
To switch back to the first caller:
▶Press TALK again.
Tip: For those calls where you don't want to be interrupted, you can temporarily disable Call Waiting by pressing 7 before placing your call. Call Waiting is automatically reactivated once you end the call.
Making a 3-Way Call
With 3-Way Calling, you can talk to two people at the same time. When using this feature, the normal airtime rates will be charged for each of the two calls.
- Enter a number and press TALK
- Once you have established the connection, press TALK. (This puts the first caller on hold.)
- Select Contacts, Recent History, or Enter Phone#.
- Select a number from your Contacts or Recent History, or enter a number directly, and then press TALK
- When you're connected to the second party, press TALK again JOIN(right softkey) to begin your 3-way call.
If one of the people you called hangs up during your call, you and the remaining caller stay connected. If you initiated the call and are the first to hang up, all callers are disconnected.
Call Forwarding
Call Forwarding lets you forward all your incoming calls to another phone number – even when your phone is turned off. You can continue to make calls from your phone when you have activated Call Forwarding.
To activate Call Forwarding:
- Press 7... 2...
- Enter the area code and phone number to which you want your calls forwarded.
- Press You will hear a tone to confirm the activation of Call Forwarding.)
To deactivate Call Forwarding:
- Press 7... 2... 0+.
- Press You will hear a tone to confirm the deactivation.)
Note: You are charged a higher rate for calls you have forwarded.
Roaming
Roaming Icon
Your phone's display screen always lets you know when you're off the Nationwide Sprint Network. Anytime you are roaming, the phone displays the roaming icon ( ).
Tip: Remember, when you are using your phone off the Nationwide Sprint Network, always dial numbers using 11 digits (1 + area code + number).
Roaming on Other Networks
When you're roaming on other networks, your call quality and security will be similar to the quality you receive when making calls on the Nationwide Sprint Network. However, you may not be able to access certain features, such as data services, depending on the available network.
Note: If you're on a call when you leave the Nationwide Sprint Network, your call is dropped. If your call is dropped in an area where you think Sprint service is available, turn your phone off and on again to reconnect to the network.
3A. Sprint Service: The Basics 91
Checking for Voicemail Messages While Roaming
When you are roaming off the Nationwide Sprint Network, you may not receive on-phone notification of new voicemail messages. Callers can still leave messages, but you will need to periodically check your voicemail for new messages if you are in a roaming service area for an extended period of time.
- Dial 1 + area code + your phone number.
- When you hear your voicemail greeting, press
- Enter your password at the prompt and follow the voice prompts.
When you return to the Nationwide Sprint Network, voicemail notification will resume as normal.
Setting Roam Mode
Your phone allows you to control your roaming capabilities. By using the Roaming menu option, you can determine which signals your phone accepts.
Choose from two different settings on your phone to control your roaming experience.
92 3A. Sprint Service: The Basics
- Press MENU OK > Settings > Others > Roaming > Set Mode.
- Select an option:
- Sprint Only to access only the Nationwide Sprint Network and prevent roaming on other networks.
■ Automatic to seek service on the Nationwide Sprint Network. When Sprint service is unavailable, the phone searches for an alternate service.
Call Guard
Your phone has two ways of alerting you when you are roaming off the Nationwide Sprint Network: the onscreen roaming icon and Call Guard. Call Guard makes it easy to manage your roaming by requiring an extra step before you can place or answer a roaming call. (This additional step is not required when you make or receive calls while on the Nationwide Sprint Network.)
To turn Call Guard on or off:
- Press MENU OK > Settings > Others > Roaming > Call Guard.
- Select On or Off.
Note: Call Guard is turned on by default on your phone.
Voice dialing and speed dialing are not available when you are roaming with Call Guard enabled.
To place roaming calls with Call Guard on:
- From standby mode, dial 1 + area code + the seven-digit number and press TALK
- Read the message and press 1
To answer incoming roaming calls with Call Guard on:
- Press TALK
- Read the message and press .1☐
Note: If the Call Guard feature is set to On, you need to take extra steps to make and receive roaming calls.
Data Roam Guard
Depending on service availability and roaming agreements, your phone may be able to access data services while roaming on certain other networks. You can set your phone to alert you when you are roaming off the Nationwide Sprint Network and try to use data services such as messaging.
To set your Data Roam Guard notification:
- Press MENU OK > Settings > Others > Roaming > Data Roam Guard.
-
Select On or Off.
-
On (default mode) turns your phone's Data Roam Guard feature on. You will see a prompt that will require you to respond anytime you access data services while roaming.
- Off turns your phone's Data Roam Guard feature off. Your phone will not notify you of your roaming status when you access data services.
To use data services when Data Roam Guard is active:
▶When a notification appears informing you that data roam charges may apply, pressROAM (left softkey) to connect.
3A. Sprint Service: The Basics 93
3B. Web and Data Services
◆ Getting Started With Data Services (page 94)
◆ Accessing Messages (page 97)
◆ Downloading Games, Ringers, and More (page 99)
♦ ScanLife (page 101)
◆ Browser Menu (page 102)
◆ Data Services FAQs (page 105)
Getting Started With Data Services
With your Sprint service, you are ready to start enjoying the advantages of data services. This section will help you learn the basics of using your data services, including managing your user name, launching a data connection, and navigating the Web with your phone.
94 3B. Web and Data Services
Your User Name
When you buy your phone and sign up for service, you're automatically assigned a user name, which is typically based on your name and a number, followed by "@sprintpcs.com." (For example, the third John Smith to sign up for data services might have jsmith003@sprintpcs.com as his user name.)
When you use data services, your user name is submitted to identify you to the Nationwide Sprint Network. Your user name will be automatically programmed into your phone. You don't have to enter it.
Finding Your User Name
If you are not sure what your user name is, you can easily find it on your phone.
▶ Press MENU OK > Settings > Phone Info > Phone#/User ID.
Updating Your User Name
If you choose to change your user name and select a new one online, you must then update the user name on your phone.
▶ Press 📋OK > Settings > Others > Data > Update Data Profile. (To cancel, press 📋before completing the update.)
Launching a Web Connection
▶ Press MEMOK >Web. (Your data connection starts and you see the SprintWeb ^SM home page.)
Note: If Net Guard is enabled and displayed (see page 44), press YES (left softkey) to continue and launch the Web.
If Parental Controls is on and the Web is restricted, you cannot launch a Web connection. (See page 41.)
While connecting, you may see an animation before the home page appears.
Tip: To change the default launch page to the last page you viewed, press TOOLBAR (right softkey) and select OPTIONS > Advanced > Startup page > The last page I viewed > DONE (left softkey).
Data Connection Status and Indicators
Your phone displays the current status of your data connection through indicators at the top of the screen. The following symbols are used:
You are connected to the Sprint 1xRTT data network. Data is being transferred (for example, when you are opening a Web page) and you cannot receive calls.
You are connected to the network but data is not currently being transferred (for example, when you are viewing a Web page that is completely open), and you can receive calls.
If you do not see an indicator, your phone does not have a current data connection. To launch a connection, see "Launching a Web Connection" on this page.
Navigating the Web
Navigating through menus and websites during a data session is easy once you've learned a few basics. Here are some tips for getting around.
Softkeys
During a data session, the bottom line of your phone's display screen contains one or more softkeys. These keys are shortcut controls for navigating around the Web, and they correspond to the softkeys directly below the phone's display screen.
Tip: Depending on which websites you visit, the labels on the softkeys may change to indicate their function.
To use softkeys:
▶ Press a softkey. (If an additional pop-up menu is displayed when you press the softkey, select the menu items using your keypad [if they're numbered], or by highlighting the option and pressing 📋OK.)
96 3B. Web and Data Services
Scrolling
As with other parts of your phone's menu, you'll have to scroll up and down to see everything on some websites.
To scroll line by line through websites:
▶Press the navigation key up or down.
Selecting
Once you've learned how to use softkeys and scroll, you can start navigating the Web.
To select onscreen items:
▶ Use the navigation key to highlight an item, and then press the left softkey (or press MENU OK)
Tip: You'll find that the left softkey is used primarily for selecting items. This softkey is often labeled "GO."
If the items on a page are numbered, you can use your keypad (number keys) to select an item.
Links, which are displayed as underlined text, allow you to jump to Web pages, select special functions, or even place phone calls.
To select links:
▶Highlight the link and press the appropriate softkey.
Going Back
To go back one page:
▶Press on your phone.
Note: You can also use for deleting text (like a BACKSPACE key) when you are entering text.
Going Home
To return to the home page from any other page:
▶Press and hold . BACK
- or -
Press TOOLBAR (right softkey) > MY HOMEPAGE.
Accessing Messages
You can send and receive email messages or instant messages and participate in Web-based chat rooms right from your phone. Messaging allows you to stay connected 24 hours a day anywhere on the Nationwide Sprint Network.
Accessing Email
Sprint provides you with access to popular email services, such as Yahoo!® Mail, AOL® Mail and AIM® Mail, and MSN® Hotmail to keep in touch, even while you're on the go.
- From the SprintWeb ^SM home page, select Messaging > Email.
- Select Yahoo! Mail, AOL & AIM Mail, or MSN Hotmail.
- Use your keypad to enter the required sign-in information for the selected provider, such as user name, email address, or password, and select Sign In. (Your mailbox for the selected provider will be displayed.)
Note: The information required to sign in will vary depending on the email provider you are accessing.
- Follow the onscreen instructions to read, reply to, compose, and send messages and manage your email account.
Accessing Sprint Instant Messaging
Sprint provides you with access to popular instant messaging (IM) clients, including AOL ^® Instant Messenger ^™ , MSN ^® Messenger, and Yahoo! Messenger.
- From the SprintWeb ^SM home page, select Messaging > Instant Messaging.
- Select an IM provider such as Yahoo! Messenger or MSN Messenger.
- Use your keypad to enter the required sign-in information for the selected provider, such as user name or password, and select Sign In. (You will see your IM screen for the selected provider.)
Note: The information required to sign in will vary depending on the instant messaging provider you are accessing.
- Follow the onscreen instructions to read, reply to, compose, and send messages and manage your IM account.
Accessing Wireless Chatrooms
Sprint gives you the ability to join wireless chatrooms from your phone.
- From the SprintWeb ^SM home page, select Messaging > Chat & Dating.
- Select a category and a chat provider and follow the onscreen instructions to sign up and begin chatting.
Note: Chat & Dating options change frequently, so check back often to see what's new.
Downloading Games, Ringers, and More
You have access to a dynamic variety of downloadable content, such as Games, Screen Savers, and other applications. (Additional charges may apply.) Follow the basic steps below to access and download these items.
Accessing the Download Menus
- Press MENU OK > My Stuff.
- Select a download category (Games, Ringers, Screen Savers, or Applications), and then select Get New. (The browser will start and take you to the corresponding download menu.)
To access the download menus from the Web browser:
- From the SprintWeb ^SM home page, select Downloads.
- Select a download category (Games, Ringers, Screen Savers, or Applications) to go to the corresponding download menu. (For more information on navigating the Web, see "Navigating the Web" on page 96.)
Selecting an Item to Download
You can search for available items to download in a number of ways:
- Featured displays a selection of featured items.
- Categories allows you to narrow your search to a general category. (There may be several pages of available content in a list. Select More... to view additional items.)
- Search allows you to use your keypad to enter search criteria to locate an item. You may enter an entire word or title or perform a partial-word search.
Downloading an Item
Once you've selected an item you wish to download, highlight it and press 📋 or press GO (left softkey). You will see a summary page for the item including its title, the vendor, the download details, the file size, and the cost. Links allow you to view the License Info page, which outlines the price, license type, and length of license for the download, and the Terms of Use page, which details the Premium Services Terms of Use and your responsibility for payment.
3B. Web and Data Services 99
To download a selected item:
- From the information page, select Buy. (The item will download automatically. When you see the New Download screen, you have successfully downloaded the item to your phone.)
Note: If you have not previously purchased an item, you will be prompted to create your purchasing profile.
-
Select an option to continue:
-
Select a menu such as Run/Open/Listen/View/Play to start the downloaded item. Your data session will end, and your phone will redirect you to the appropriate phone menu screen.
- Select Assign to assign a ringer or screen saver to a phone function.
- Select Settings to configure downloaded games or applications.
- Select Shop to browse for other items to download.
■Press to quit the browser and return to standby mode.
My Content Manager
Whether you purchase your content from your phone or from your online account management page at www.sprint.com, My Content Manager stores all of your purchases and you may download them to your phone from there.
My Content Manager is a storage area on the Nationwide Sprint Network that allows you to store all your purchased files. The files remain in My Content Manager until their license terms have expired – even after you have downloaded the content to your phone. This provides you with a convenient place to access information about your downloaded files without having to store the information in your phone's memory.
To access My Content Manager:
▶From the SprintWeb ^SM home page, select Downloads > My Content Manager. (You will see a list of your purchased items.)
To download purchased content from My Content Manager:
- From the My Content Manager display, highlight the item you wish to download, and press You will see the information page for the selected item.)
- Highlight Download and press 📂 OK. (The item will download automatically. When you see the New Download screen, you have successfully downloaded the item to your phone.)
-
Select an option to continue:
-
Select a menu such as Run/Open/Listen/View/Play to start the downloaded item. Your data session will end, and your phone will redirect you to the appropriate phone menu screen.
- Select Assign to assign a ringer or screen saver to a phone function.
- Select Settings to configure downloaded games or applications.
- Select Shop to browse for other items to download.
- Press to quit the browser and return to standby mode.
Tip: You can also access My Content Manager through the phone's main menu. Press OK > My Stuff > [Games, Ringers, Screen Savers, or Applications] > My Content Manager. The browser will open and take you to the corresponding content.
When an application is running in the background, press APP. MGR. (left softkey) to go to the application screen.
For complete information and instructions on downloading Games, Ringers, Screen Savers, and Applications, visit the Digital Lounge at www.sprint.com.
ScanLife
You can download a wide variety of applications in many different categories with your phone and data services (from OK > My Stuff > Applications > Get New). Your phone also comes with a preloaded barcode reader application called ScanLife.
To launch ScanLife:
- Press MENU OK > My Stuff > Applications > ScanLife. (The application will launch.)
- Accept the terms and conditions if asked.
- Press Menu (left softkey) to explore your options.
3B. Web and Data Services 101
Important Privacy Message – Sprint's policies often do not apply to third-party applications. Third-party applications may access your personal information or require Sprint to disclose your customer information to the third-party application provider. To find out how a third-party application will collect, access, use, or disclose your personal information, check the application provider's policies, which can usually be found on their website. If you aren't comfortable with the third-party application's policies, don't use the application.
Browser Menu
Although the home page offers a broad and convenient array of sites and services for you to browse, not all sites are represented, and certain functions, such as going directly to specific websites, are not available. For these and other functions, you will need to use the browser menu. The browser menu offers additional options to expand your use of the Web on your phone.
Opening the Browser Menu
You may open the browser menu anytime you have an active data session, from any page you are viewing.
To open the browser menu:
▶ Press TOOLBAR (right softkey). (You will see the browser menu.)
Options available under the browser menu include:
- MY HOMEPAGE to return the browser to the home page.
- MY PAGES to access and manage your favorites (bookmarks).
●SPRINT SEARCH to launch a Web search. -
OPTIONS to display additional options:
-
Set as Homepage to set the current page as your home page.
■ Font size to change the font size for the browser. - Send this page to... to send a URL using the phone's messaging feature.
- Clear private data to delete the browser's cache, cookies, etc.
- Help to show more detailed information about using the browser.
■Advanced
- Icon Row to display the icon row, the top area on the screen that displays the status icons, time, battery charge level, etc.
- Startup page to change the default launch page.
- Page info to display information about the current page.
- Images on/off to display images on the Web page.
- Reset browser to reset the browser to its default state.
- Turn on error logging / Turn off error logging to set whether to save error logs (text files useful for debugging browser errors).
■ View error log to display the error log. -
Send referrer to send HTTP URL referrer information.
-
Redirect prompt to display a prompt when your data is being redirected.
- Reset browser settings to reset all browser settings.
- About browser to display information about your browser.
- Java Scripting to enable or disable Java scripting.
Going to a Specific Website
To go to a particular website by entering a URL (Web address):
- From any Web page, press the navigation key up to highlight the address bar.
- Use your keypad to enter the URL of the website you wish to go to and press WBU OK
Note: Not all websites are viewable on your phone.
Creating a Favorite
Favorites (bookmarks) allow you to store the addresses of your favorite websites for easy access at a later time.
- From the Web page you wish to add, press TOOLBAR (right softkey) to open the browser menu.
- Select MY PAGES.
- Confirm that Add this page to favorites is highlighted and press MENU OK
- Press ADD (left softkey).
| Note: Saving a page as a favorite does not store the page contents, just its address. |
| Some pages cannot be saved as favorites, depending on how a particular page was created. |
Accessing a Favorite
- Press TOOLBAR (right softkey) to open the browser menu.
- Select MY PAGES.
- Highlight a favorite and press MENU OK
104 3B. Web and Data Services
Deleting a Favorite
- Press TOOLBAR (right softkey) to open the browser menu.
- Select MY PAGES.
- Highlight a favorite and press OPTIONS (right softkey).
- Select Delete this Favorite. (A confirmation will be displayed.)
Tip: Select Delete all Favorites to delete all favorites.
- Press REMOVE (left softkey) to delete the favorite(s).
Reloading a Web Page
▶Press while the Refresh icon () at the upper right corner of the browser is highlighted.
Data Services FAQs
How will I know when my phone is ready for data service?
Your User ID (for example, bsmith01@sprintpcs.com) will be displayed when you press MENOK > Settings >
Phone Info > Phone#/User ID.
How do I sign in for the first time?
You are automatically signed in to access data services when you turn on your phone.
How do I know when my phone is connected to data services?
Your phone automatically connects when data service is used or an incoming message arrives. You will also see the Indicator.
Can I make calls and use data services at the same time?
You cannot use voice call and data services simultaneously. You can place an outgoing call anytime, but it will interrupt any in-progress data session.
Note: If you receive a call during an active data session, your data session will resume after you have completed the call, ignored the call, or sent the call to voicemail.
When is my data connection active?
Your connection is active when data is being transferred. Both incoming and outgoing calls are allowed. When active, the 📁 is animated on the display screen.
When is my data connection dormant?
If your phone receives no data for 10 seconds, the connection goes dormant. When the connection is dormant, you can make and receive voice calls. (The connection may become active again quickly.) If no data is received for an extended period, the connection will terminate.
Can I sign out of data services?
You can sign out without turning off your phone; however, you will not be able to browse the Web or use other data services. While signed out, you can still place or receive phone calls, check voicemail, and use other voice services. You may sign in again at any time. To sign out, press MENU OK > Settings > Others > Data > Data On in your phone's menu.
3C. GPS Navigation
♦ GPS Services (page 106)
♦ Sprint Family Locator (page 107)
GPS Services
Your phone's built-in GPS capability gives you access to a number of location-based services, including Sprint Family Locator.
Activating Location Mode
Before using any of the location-based services, you must activate your phone's location feature.
To enable your phone's Location feature:
- Press [NEW OK] > Settings > Others > Location > On/Off. (You will see the Location disclaimer.)
- Read the disclaimer and press MENU OK
3. Select On.
When the Location feature is on, your phone's standby screen will display the icon. When Location is turned off, your phone will display the icon.
To send the GPS log to other devices:
-
Press MENU OK > Settings > Others > Location > NMEA Output.
-
Select Bluetooth or USB.
Note: Turning Location on will allow the network to detect your position using GPS technology, making some Sprint applications and services easier to use. Turning Location off will disable the GPS location function for all purposes except 911, but will not hide your general location based on the cell site serving your call. No application or service may use your location without your request or permission. GPS-enhanced 911 is not available in all areas.
Sprint Family Locator
Sprint Family Locator uses GPS technology to locate your child's phone and display the location on an interactive map.
Note: Sprint Family Locator service requires an additional monthly fee. Visit www.sprint.com/familylocator for complete details.
Signing Up for Sprint Family Locator
- Press MENU OK > Sprint Family Locator.
- Follow the onscreen instructions to enter and submit the required information.
Note: You can also sign up for Sprint Family Locator online at www.sprint.com/familylocator.
Using Sprint Family Locator
- Press MENU OK > Sprint Family Locator.
- Enter the parent phone number and password to sign in to your account.
- Select a phone to locate from the available child phone list.
- When you are finished, select Sign Out.
Note: Sprint Family Locator may also be used with any computer with an Internet connection. Visit www.sprint.com/familylocator for complete details.
Section 4
Safety and Warranty Information
Sprint

4A. Important Safety Information
♦ General Precautions (page 110)
♦ Maintaining Safe Use of and Access to Your Phone (page 111)
◆ Using Your Phone With a Hearing Aid Device (page 112)
◆ Caring for the Battery (page 114)
♦ Radio Frequency (RF) Energy (page 115)
♦ Owner's Record (page 117)
◆User Guide Proprietary Notice (page 117)
This phone guide contains important operational and safety information that will help you safely use your phone. Failure to read and follow the information provided in this phone guide may result in serious bodily injury, death, or property damage.
General Precautions
There are several simple guidelines to operating your phone properly and maintaining safe, satisfactory service.
- To maximize performance, do not touch the bottom portion of your phone where the internal antenna is located while using the phone.
●Speak directly into the mouthpiece.
●Avoid exposing your phone and accessories to rain or liquid spills. If your phone does get wet, immediately turn the power off and remove the battery. - Do not expose your phone to direct sunlight for extended periods of time (such as on the dashboard of a car).
- Although your phone is quite sturdy, it is a complex piece of equipment and can be broken. Avoid dropping, hitting, bending, or sitting on it.
●Any changes or modifications to your phone not expressly approved in this document could void your warranty for this equipment and void your authority to operate this equipment.
Note: For the best care of your phone, only Sprint-authorized personnel should service your phone and accessories. Failure to do so may be dangerous and void your warranty.
Maintaining Safe Use of and Access to Your Phone
Do Not Rely on Your Phone for Emergency Calls Mobile phones operate using radio signals, which cannot guarantee connection in all conditions. Therefore you should never rely solely upon any mobile phone for essential communication (e.g., medical emergencies). Emergency calls may not be possible on all cellular networks or when certain network services or mobile phone features are in use. Check with your local service provider for details.
Using Your Phone While Driving
Talking on your phone while driving (or operating the phone without a hands-free device) is prohibited in some jurisdictions. Laws vary as to specific restrictions. Remember that safety always comes first.
Tip: Purchase an optional hands-free accessory at your local Sprint Store, or call Sprint at 1-866-866-7509. You can also dial # 2 2 2 on your phone.
Following Safety Guidelines
To operate your phone safely and efficiently, always follow any special regulations in a given area. Turn your phone off in areas where use is forbidden or when it may cause interference or danger.
Using Your Phone Near Other Electronic Devices Most modern electronic equipment is shielded from radio frequency (RF) signals. However, RF signals from wireless phones may affect inadequately shielded electronic equipment.
RF signals may affect improperly installed or inadequately shielded electronic operating systems or entertainment systems in motor vehicles. Check with the manufacturer or their representative to determine if these systems are adequately shielded from external RF signals. Also check with the manufacturer regarding any equipment that has been added to your vehicle.
Consult the manufacturer of any personal medical devices, such as pacemakers and hearing aids, to determine if they are adequately shielded from external RF signals.
Note: Always turn off the phone in healthcare facilities, and request permission before using the phone near medical equipment.
Turning Off Your Phone Before Flying
Turn off your phone before boarding any aircraft. To prevent possible interference with aircraft systems, the U.S. Federal Aviation Administration (FAA) regulations require you to have permission from a crew member to use your phone while the plane is on the ground. To prevent any risk of interference, FCC regulations prohibit using your phone while the plane is in the air.
4A. Important Safety Information 111
Turning Off Your Phone in Dangerous Areas
To avoid interfering with blasting operations, turn your phone off when in a blasting area or in other areas with signs indicating two-way radios should be turned off. Construction crews often use remote-control RF devices to set off explosives.
Turn your phone off when you're in any area that has a potentially explosive atmosphere. Although it's rare, your phone and accessories could generate sparks. Sparks can cause an explosion or fire, resulting in bodily injury or even death. These areas are often, but not always, clearly marked. They include:
■Fueling areas such as gas stations.
■Below deck on boats.
■Fuel or chemical transfer or storage facilities.
■Areas where the air contains chemicals or particles such as grain, dust, or metal powders.
■Any other area where you would normally be advised to turn off your vehicle's engine.
Note: Never transport or store flammable gas, flammable liquids, or explosives in the compartment of your vehicle that contains your phone or accessories.
Restricting Children's Access to Your Phone
Your phone is not a toy. Do not allow children to play with it as they could hurt themselves and others, damage the phone or make calls that increase your Sprint invoice.
Using Your Phone With a Hearing Aid Device
A number of Sprint phones have been tested for hearing aid device compatibility. When some wireless phones are used with certain hearing devices (including hearing aids and cochlear implants), users may detect a noise which can interfere with the effectiveness of the hearing device.
Some hearing devices are more immune than others to this interference noise, and phones also vary in the amount of interference noise they may generate. ANSI standard C63.19 was developed to provide a standardized means of measuring both wireless phone and hearing devices to determine usability rating categories for both.
Ratings have been developed for mobile phones to assist hearing device users find phones that may be compatible with their hearing device. Not all phones have been rated for compatibility with hearing devices. Phones that have been rated have a label located on the box. Your Vero™ has an M4 and a T4 rating.
These ratings are not guarantees. Results will vary depending on the user's hearing device and individual type and degree of hearing loss. If a hearing device is particularly vulnerable to interference noise; even a phone with a higher rating may still cause unacceptable noise levels in the hearing device. Trying out the phone with your hearing device is the best way to evaluate it for your personal needs.
M-Ratings: Phones rated M3 or M4 meet FCC requirements for hearing aid compatibility and are likely to generate less interference to hearing devices than unrated phones. (M4 is the better/higher of the two ratings.)
T-Ratings: Phones rated T3 or T4 meet FCC requirements and are likely to be more usable with a hearing device's telecoil ("T Switch" or "Telephone Switch") than unrated phones. (T4 is the better/higher of the two ratings. Note that not all hearing devices have telecoils in them.)
Note: New Technologies, Including Wi-Fi
This phone has been tested and rated for use with hearing aids for some of the wireless technologies that it uses. However, there may be newer wireless technologies (including Wi-Fi) used in this phone that have not been tested for use with hearing aids.
Hearing aid devices may also be measured for immunity to interference noise from wireless phones and should have ratings similar to phones. Ask your hearing healthcare professional for the rating of your hearing aid. Add the rating of your hearing aid and your phone to determine probable usability:
●Any combined rating equal to or greater than six offers excellent use.
●Any combined rating equal to five is considered normal use.
● Any combined rating equal to four is considered usable.
Thus, if you pair an M3 hearing aid with an M3 phone, you will have a combined rating of six for “excellent use.” This is synonymous for T ratings.
Sprint further suggests you experiment with multiple phones (even those not labeled M3/T3 or M4/T4) while in the store to find the one that works best with your hearing aid device. Should you experience interference or find the quality of service unsatisfactory after purchasing your phone, promptly return it to the store within 30 days of purchase. (A restocking fee may be applied to exchanges. Visit www.sprint.com/returns for details.) More information about hearing aid compatibility may be found at: www.fcc.gov, www.fda.gov, and www.accesswireless.org.
Getting the Best Hearing Device Experience With Your Phone
To further minimize interference:
- Set the phone's main screen and keypad backlight settings to ensure the minimum time interval (see also page 29):
- Press MENOK > Settings > Display > Backlight > Backlight Dim or Backlight Off.
- Highlight the minimum time interval setting and press OK.
- Position the phone so the internal antenna is farthest from your hearing aid.
- Move the phone around to find the point with least interference.
4A. Important Safety Information 113
Caring for the Battery
Protecting Your Battery
The guidelines listed below help you get the most out of your battery's performance.
- Recently there have been some public reports of wireless phone batteries overheating, catching fire or exploding. It appears that many, if not all, of these reports involve counterfeit or inexpensive, aftermarket-brand batteries with unknown or questionable manufacturing standards. Sprint is not aware of similar problems with Sprint phones resulting from the proper use of batteries and accessories approved by Sprint or the manufacturer of your phone. Use only Sprint-approved or manufacturer-approved batteries and accessories found at Sprint Stores or through your phone's manufacturer, or call 1-866-866-7509 to order. They're also available at www.sprint.com — click Accessories. Buying the right batteries and accessories is the best way to ensure they're genuine and safe.
- Do not disassemble or open crush, bend or deform, puncture or shred the battery.
- Do not modify or remanufacture, attempt to insert foreign objects into the battery, immerse or expose to water or other liquids, expose to fire, explosion or other hazard.
- Avoid dropping the phone or battery. If the phone or battery is dropped, especially on a hard surface, and the user suspects damage, take it to a service center for inspection.
-
Improper battery use may result in a fire, explosion or other hazard.
-
Do not short circuit a battery or allow metallic conductive objects to contact battery terminals.
- Keep the metal contacts on top of the battery clean.
●Battery usage by children should be supervised.
Charging
●In order to avoid damage, charge the battery only in temperatures that range from 32^ F to 113^ F ( 0^ C to 45^ C).
- Don't use the battery charger in direct sunlight or in high humidity areas, such as the bathroom.
● The battery may need recharging if it has not been used for a long period of time.
- It's best to replace the battery when it no longer provides acceptable performance. It can be recharged hundreds of times before it needs replacing.
Storing
- Don't store the battery in high temperature areas for long periods of time. It's best to follow these storage rules:
■Less than one month:
-4° F to 140° F (-20° C to 60° C)
■More than one month:
-4° F to 113° F (-20° C to 45° C)
Disposal of Lithium Ion (Li-Ion) Batteries
-
Promptly dispose of used batteries in accordance with local regulations.
●Never dispose of the battery by incineration. -
Do not handle a damaged or leaking Li-Ion battery as you can be burned.
●For safe disposal options of your Li-Ion batteries, contact your nearest Sprint authorized service center.
Special Note: Be sure to dispose of your battery properly. In some areas, the disposal of batteries in household or business trash may be prohibited.
Radio Frequency (RF) Energy
Understanding How Your Phone Operates
Your phone is basically a radio transmitter and receiver. When it's turned on, it receives and transmits radio frequency (RF) signals. When you use your phone, the system handling your call controls the power level. This power can range from 0.006 watt to 0.2 watt in digital mode.
Knowing Radio Frequency Safety
The design of your phone complies with updated NCRP standards described below.
In 1991–92, the Institute of Electrical and Electronics Engineers (IEEE) and the American National Standards Institute (ANSI) joined in updating ANSI's 1982 standard for safety levels with respect to human exposure to RF signals. More than 120 scientists, engineers and physicians from universities, government health agencies and industries developed this updated standard after reviewing the available body of research. In 1993, the Federal Communications Commission (FCC) adopted this updated standard in a regulation. In August 1996, the FCC adopted hybrid standard consisting of the existing ANSI/IEEE standard and the guidelines published by the National Council of Radiation Protection and Measurements (NCRP).
Body-Worn Operation
To maintain compliance with FCC RF exposure guidelines, if you wear a handset on your body, use a Sprint-supplied or Sprint-approved carrying case, holster or other body-worn accessory. If you do not use a body-worn accessory, ensure the antenna is at least 0.866 inches (2.2 centimeters) from your body when transmitting. Use of non-Sprint-approved accessories may violate FCC RF exposure guidelines. Other accessories used with this device for body-worn operations must not contain any metallic components and must provide at least 0.866 inches (2.2 centimeters) separation distance including the antenna and the user's body.
For more information about RF exposure, visit the FCC website at www.fcc.gov.
Specific Absorption Rates (SAR) for Wireless Phones
The SAR is a value that corresponds to the relative amount of RF energy absorbed in the head of a user of a wireless handset.
The SAR value of a phone is the result of an extensive testing, measuring and calculation process. It does not represent how much RF the phone emits. All phone models are tested at their
4A. Important Safety Information 115
highest value in strict laboratory settings. But when in operation, the SAR of a phone can be substantially less than the level reported to the FCC. This is because of a variety of factors including its proximity to a base station antenna, phone design and other factors. What is important to remember is that each phone meets strict federal guidelines. Variations in SARs do not represent a variation in safety.
All phones must meet the federal standard, which incorporates a substantial margin of safety. As stated above, variations in SAR values between different model phones do not mean variations in safety. SAR values at or below the federal standard of 1.6 W/kg are considered safe for use by the public.
The highest reported SAR values of the Vero ^™ are:
Cellular CDMA mode (Part 22):
Head: 1.49 W/kg; Body-worn: 0.51 W/kg
PCS mode (Part 24):
Head: 0.88 W/kg; Body-worn: 0.64 W/kg
FCC Radio Frequency Emission
This phone meets the FCC Radio Frequency Emission Guidelines.
FCC ID number: V65SCP-3820.
More information on the phone's SAR can be found from the following FCC website: http://www.fcc.gov/oet/ea/.
FCC Notice
This device complies with Part 15 of the FCC Rules. Operation is subject to the following two conditions: (1) this device may not cause harmful interference, and (2) this device must accept any interference received, including interference that may cause undesired operation.
Changes or modifications not expressly approved by the party responsible for compliance could void the user's authority to operate the equipment.
Note: This equipment has been tested and found to comply with the limits for a Class B digital device, pursuant to Part 15 of the FCC Rules.
These limits are designed to provide reasonable protection against harmful interference in a residential installation. This equipment generates, uses and can radiate radio frequency energy and, if not installed and used in accordance with the instructions, may cause harmful interference to radio communications.
However, there is no guarantee that interference will not occur in a particular installation.
If this equipment does cause harmful interference to radio or television reception, which can be determined by turning the equipment off and on, the user is encouraged to try to correct the interference by one or more of the following measures:
●Reorient the direction of the internal antenna.
- Increase the separation between the equipment and receiver.
- Connect the equipment into an outlet on a circuit different from that to which the receiver is connected.
- Consult the dealer or an experienced radio/TV technician for help.
Owner's Record
The model number, regulatory number, and serial number are located on a nameplate inside the battery compartment. Record the serial number in the space provided below. This will be helpful if you need to contact us about your phone in the future.
Model: SANYO Vero™ by KYOCERA
Serial No.:
User Guide Proprietary Notice
T9 Text Input is licensed under one or more of: U.S. Pat. Nos. 5,818,437; 5,953,541; 6,011,554; 6,307,548; 6,286,064; 6,307,549 and other patents pending.
User Guide template version 10a (January 2010)
4A. Important Safety Information 117
4B. Manufacturer's Warranty
◆ Manufacturer's Warranty (page 118)
Your phone has been designed to provide you with reliable, worry-free service. If for any reason you have a problem with your equipment, please refer to the manufacturer's warranty in this section.
For information regarding the terms and conditions of service for your phone, please visit www.sprint.com or call Sprint Customer Service at 1-888-211-4727.
Note: In addition to the warranty provided by your phone's manufacturer, which is detailed on the following pages, Sprint offers a number of optional plans to cover your equipment for non-warranty claims. Sprint Total Equipment Protection provides the combined coverage of the Sprint Equipment Replacement Program and the Sprint Equipment Service and Repair Program, both of which are available separately. Each of these programs may be signed up for within 30 days of activating your phone. For more details, please visit your nearest Sprint Store or call Sprint at 1-800-584-3666.
Manufacturer's Warranty
Manufacturer's Warranty
Kyocera Communications, Inc. ("KCI") offers you, the original purchaser who has purchased the enclosed subscriber unit ("Product") only from an authorized dealer in the United States, a limited warranty that the Product, including accessories in the Product's package, will be free from defects in material or workmanship as follows:
A. ONE (1) YEAR LIMITED WARRANTY: For a period of one (1) year from the date of original purchase, KCI will, at its option, either repair or replace a defective Product (with new or rebuilt parts/replacements).
B. LIMITED WARRANTY ON REPAIRED/REPLACED PRODUCTS: For a period equal to the remainder of the limited warranty period on the original Product or, on warranty repairs which have been effected on Products for 90 days after the date of its repair or replacement, whichever is longer, KCI will repair or replace (with new or rebuilt parts/replacements) defective parts or Products used in the repair or replacement of the original Product under the Limited Warranty on it.
Proof that the Product is within the warranty period in the form of a bill of sale or warranty repair document that includes the date of purchase, Product serial number and the authorized dealer's name and address, must be presented to obtain warranty service. This limited warranty is not transferable to any
third party, including but not limited to any subsequent purchaser or owner of the Product. Transfer or resale of a Product will automatically terminate warranty coverage with respect to it.
This limited warranty covers batteries only if battery capacity falls below 80% of rated capacity or the battery leaks. Also this limited warranty does not cover any battery if (i) the battery has been charged by a battery charger not specified or approved by KCI for charging the battery, (ii) any of the seals on the battery are broken or show evidence of tampering, or (iii) the battery has been used in equipment other than the SANYO brand mobile phone for which it is specified.
This limited warranty covers the Product only as originally supplied and does not cover and is void with respect to the following: (i) Products which have been improperly installed, repaired, maintained or modified (including the antenna); (ii) Products which have been subjected to misuse (including Products used in conjunction with hardware electrically or mechanically incompatible or Products used with software, accessories, goods or ancillary or peripheral equipment not supplied or expressly authorized by KCI for use), abuse, accident, physical damage, abnormal use or operation, improper handling or storage, neglect, exposure to fire, water or excessive moisture or dampness or extreme changes in climate or temperature; (iii) Products operated outside published maximum ratings; (iv) cosmetic damage; (v) Products on which warranty stickers or Product serial numbers have been removed, altered, or rendered illegible; (vi) customer instruction; (vii) cost of installation, set up, removal or reinstallation; (viii) signal reception problems (unless caused by defect in material or workmanship); (ix) damage the result of fire, flood, acts of God or other acts which are not the fault of KCI and which the Product is not specified to tolerate, including damage caused by mishandling and blown fuses; (x) consumables (such as memory cards, fuses, etc.); (xi) third party software or applications, data and equipment not originally supplied with the Product; (xii) any Product in which the software has not been updated to the current version; (xiii) any Product in which the operating system has been unlocked (allowing installation of a third party operating system); or (xiv) any Products which have been opened, repaired, modified or altered by anyone other than KCI or a KCI authorized service center. Before returning any Product for service, be sure to back up data and remove any confidential, proprietary, or personal information from the Product. KCI is not responsible for damage to or loss of any software, applications, data or removable storage media.
This warranty is valid only in the United States.
REPAIR OR REPLACEMENT, AS HERE IN ABOVE PROVIDED, IS YOUR SOLE AND EXCLUSIVE REMEDY FOR BREACH OF THE LIMITED WARRANTY. KCI SHALL HAVE NO LIABILITY FOR ANY INCIDENTAL OR CONSEQUENTIAL DAMAGES, INCLUDING, BUT NOT LIMITED TO LOSS OF PROFITS, LOST SALES, LOSS OF DATA, LOSS OF USE OF THE PRODUCT, OR ANTICIPATED PROFITS ARISING OUT OF USE OR
4B. Manufacturer's Warranty 119
INABILITY TO USE ANY PRODUCT (FOR EXAMPLE, WASTED AIRTIME CHARGES DUE TO THE MALFUNCTION OF A PRODUCT OR LOST APPLICATIONS). THIS WARRANTY DOES NOT COVER PRODUCTS SOLD "AS IS" OR "WITH ALL FAULTS". KCI MAKES NO OTHER EXPRESS WARRANTY WITH RESPECT TO THE PRODUCTS. THE DURATION OF IMPLIED WARRANTIES, INCLUDING IMPLIED WARRANTIES OF MERCHANTABILITY AND FITNESS FOR A PARTICULAR PURPOSE IS LIMITED TO THE DURATION OF THIS EXPRESS WARRANTY.
Some States do not allow the exclusion or limitation of incidental or consequential damages, or allow limitations on how long an implied warranty lasts, so the above limitations or exclusions may not apply to you.
This limited warranty gives you specific legal rights, and you may have other rights which vary from State to State.
To obtain warranty service, contact
Kyocera Communications, Inc.
Attention : Customer Services for Wireless Products
120 4B. Manufacturer's Warranty
4C. End User License Agreement
◆ End User License Agreement (page 121)
End User License Agreement
Kyocera Communications, Inc. ("Kyocera") End User License Agreement
CAREFULLY READ THE FOLLOWING TERMS AND CONDITIONS (“AGREEMENT”) BEFORE USING OR OTHERWISE ACCESSING THE SOFTWARE OR SERVICES PROVIDED WITH YOUR KYOCERA DEVICE. THE SOFTWARE AND SERVICES PROVIDED WITH YOUR KYOCERA DEVICE ARE SOLELY FOR PERSONAL USE BY YOU, THE ORIGINAL END USER, AS SET FORTH BELOW.
BY ACTIVATING, USING, DOWNLOADING OR INSTALLING THIS KYOCERA DEVICE AND/OR THE SOFTWARE PROVIDED WITH IT, YOU ARE AGREEING
TO BE BOUND BY THE TERMS OF THIS LICENSE AGREEMENT. IF YOU DO NOT AGREE TO THE TERMS AND CONDITIONS OF THIS AGREEMENT, DO NOT USE, DOWNLOAD OR OTHERWISE ACCESS THE SOFTWARE OR SERVICES AND (I) PROMPTLY RETURN THE SOFTWARE OR SERVICE TO KYOCERA OR DELETE IT; OR (II) IF YOU HAVE PURCHASED THE KYOCERA DEVICE ON WHICH THE SOFTWARE OR SERVICE IS PRE-INSTALLED, PROMPTLY RETURN THE DEVICE AND THE ACCOMPANYING SOFTWARE (INCLUDING DOCUMENTATION AND PACKAGING) TO KYOCERA OR THE KYOCERA AUTHORIZED DISTRIBUTOR FROM WHICH YOU PURCHASED THE KYOCERA DEVICE.
License: Subject to the terms and conditions of this Agreement and any other terms that may be incorporated by reference or otherwise presented to you prior to your use of the Software, Kyocera grants you a limited, non-exclusive, license to use Kyocera and third party proprietary software and services found on your Kyocera device and/or packaged with your Kyocera device, including any updates to such material by whatever means provided, and any related documentation (“Software”). You may use the Software only as expressly authorized by this Agreement.
4C. End User License Agreement 121
Limitations: This Software is licensed for use only on the single Kyocera device you originally purchased. You acknowledge and agree that ownership of the Software and all other rights associated with the Software not expressly granted in this Agreement are retained by Kyocera or its suppliers or licensors. You are not permitted to, in any way, distribute the Software or make it available over a network for use on more than the single Kyocera device for which it was originally supplied. The Software may be copied only as permitted by applicable law and as necessary for backup purposes. You may not remove any proprietary notices or labels on the Software or any copies thereof. You may not in any way, modify, reverse engineer, decompile, disassemble or create derivative works based on the Software (except to the extent that this restriction is expressly prohibited by law). You agree that you will not attempt to circumvent, disable or modify any security technology associated with the Software. You may use the Software only in a manner that complies with all applicable laws in the jurisdictions in which you use it, including, but not limited to, applicable restrictions concerning copyright and other intellectual property rights and/or the export control regulations.
Some of the Software packaged with your Kyocera device may be provided by third parties ("Third Party Software"). Third Party Software may also be available from third party content distributors such as application stores. Third Party content may be subject to different or additional terms and conditions as determined by the Third Party Software provider.THIRD
PARTY SOFTWARE IS NOT A KYOCERA PRODUCT. KYOCERA IS NOT RESPONSIBLE FOR AND HAS NO LIABILITY WITH REGARD TO THIRD PARTY SOFTWARE.
Open Source Software: The Software contains certain open source software which may be subject to the GNU General Public License ("GPL"), GNU Library/Lesser General Public License ("LGPL") and/or other copyright licenses, disclaimers and notices ("Open Source License Terms"). The applicable Open Source License Terms for the corresponding Open Source Software are reproduced and available at http://www.opensource.org/licenses. Please refer to the Open Source License Terms regarding your rights under such licenses to the Open Source Software. To the extent any such agreement requires that Kyocera provide you the rights to copy, modify, distribute or otherwise use any Open Source Software that are inconsistent with the limited rights granted to you in this Agreement, then such rights in the applicable Open Source License shall take precedence over the rights and restrictions granted in this Agreement, but solely with respect to such Open Source Software.
Disclaimer of Warranty and Liability: THE SOFTWARE IS PROVIDED "AS IS" WITHOUT WARRANTY OF ANY KIND. KYOCERA FURTHER DISCLAIMS ALL WARRANTIES, INCLUDING WITHOUT LIMITATION ANY IMPLIED WARRANTIES OF MERCHANTABILITY, FITNESS FOR A PARTICULAR PURPOSE, NONINFRINGEMENT, TITLE,
ACCURACY, CORRESPONDENCE WITH DESCRIPTION AND SATISFACTORY QUALITY. TO THE MAXIMUM EXTENT PERMISSIBLE BY LAW, THE ENTIRE RISK ARISING OUT OF THE USE OR PERFORMANCE OF THE SOFTWARE REMAINS WITH YOU. IN NO EVENT WILL KYOCERA, ITS EMPLOYEES, OFFICERS, SHAREHOLDERS, LICENSORS, SUPPLIERS, CARRIER OR DISTRIBUTOR CUSTOMERS OR AFFILIATES BE HELD LIABLE FOR ANY CONSEQUENTIAL, INCIDENTAL, INDIRECT, SPECIAL, PUNITIVE, OR OTHER DAMAGES WHATSOEVER (INCLUDING, WITHOUT LIMITATION, DAMAGES FOR LOSS OF BUSINESS PROFITS, BUSINESS INTERRUPTION, LOSS OF BUSINESS INFORMATION, OR OTHER PECUNIARY LOSS) ARISING OUT OF THIS AGREEMENT OR THE USE OF OR INABILITY TO USE THE SOFTWARE, WHETHER BASED IN CONTRACT, TORT (INCLUDING NEGLIGENCE), STRICT PRODUCT LIABILITY OR ANY OTHER THEORY, EVEN IF KYOCERA HAS BEEN ADVISED OF THE POSSIBILITY OF SUCH DAMAGES AND EVEN IF ANY LIMITED REMEDY IS DEEMED TO HAVE FAILED ITS ESSENTIAL PURPOSE. KYOCERA'S TOTAL LIABILITY FOR ANY DAMAGES UNDER THIS AGREEMENT SHALL
NEVER EXCEED THE PURCHASE PRICE YOU PAID FOR THE KYOCERA DEVICE.
No software is fault free. The Software is designed for use in systems that do not require fail-safe performance. You may not use the software in any device or system in which a malfunction of the software would result in foreseeable risk of loss, injury or death to any person. This includes operation of nuclear or infrastructure facilities, medical equipment, aircraft navigation or communication systems or use in risky or dangerous situations or environments.
Consent to Use of Data: You agree that Kyocera, its affiliates and its designated agents may collect and use technical and related information, gathered in any manner, as part of its product support services. Kyocera, its affiliates and designated agents may use this information solely to improve its products or to provide customized services or technologies to you. Kyocera will collect and use this information in accordance with its privacy policy and accordance with applicable data protection laws. Kyocera, its affiliates and designated agents may disclose this information to others, but not in a form that personally identifies you.
Modification of Software and Terms of Use: Kyocera reserves the right to from time to time modify any portion of the Software. Kyocera may be required to take these actions due to restrictions from third party licensors or due to safety or security concerns or government restrictions or court orders.
4C. End User License Agreement 123
Kyocera reserves the right to modify the terms of this Agreement at its sole discretion. Any such modification will be effective upon Kyocera or a Kyocera affiliate or agent sending notice to you by email, text message, other electronic communication or postal mail. Your continued use of the Software after such notice will constitute your binding acceptance of the Agreement as revised. Additionally, some Software may be subject to different or additional terms presented to you through a separate click-through or other type of agreement or notice prior to your use of such Software.
Termination: This License Agreement will automatically terminate without notice from or action by Kyocera if you fail to comply with any term hereof.
Governing Law: This Agreement is governed by the laws of State of California except any conflict of law provisions. The U.N. Convention on Contracts for the International Sales of Goods is hereby excluded in its entirety from this Agreement.
Severability: If any provision of this Agreement is found to be invalid, illegal or unenforceable, the validity, legality or enforceability of the remaining provisions will not in any way be impacted or impaired.
Entire Agreement: By using or otherwise accessing the Software, you agree that this Agreement sets forth the entire agreement between you and Kyocera with regard to the Software and supersedes all prior agreements, notwithstanding the terms of any such agreements.
124 4C. End User License Agreement
©2010 Sprint. SPRINT and the logo are trademarks of Sprint. Other marks are the property of their respective owners. "SANYO" is a registered trademark of SANYO Electric Co., Ltd. and is used under license. KYOCERA is a registered trademark of Kyocera Corporation. Kyocera manufactures and markets the SANYO line of wireless products.
This product contains NetFront Browser of ACCESS CO., LTD. ACCESS and NetFront are trademarks or registered trademarks of ACCESS CO., LTD. in Japan and other countries. This software is based in part on the work of the Independent JPEG Group.
The Bluetooth word mark and logos are owned by the Bluetooth SIG, Inc. and any use of such marks by Kyocera Corporation is under license. Other trademarks and trade names are those of their respective owners.
T9 ^4 is a registered trademark of Nuance Communications, Inc. and its affiliates in the United States and other countries.
Kyocera Communications, Inc. is a wholly-owned subsidiary of Kyocera International Inc.
Index
Numerics
3-Way Call 90
A
Abbreviated Dialing 23
Activation 3
Airplane Mode 36
Alarm 60
Alert Notification 39
Answering Calls 17
Applications
Downloading 99
ScanLife 101
Auto-Answer Mode 39
Automatic Speech
Recognition (ASR) 63
B
Backlight 29
Battery
Capacity 14
Charging 15
Disposal 114
Installing 2
Removing 14
Bluetooth 76–81
Printing Pictures 80
Sending Data 79
Browser Menu 102
C
Calculator 61
Calendar 57
Call
Answering 17
Ending 18
Forwarding 91
Making 16
Recording 66
Call Answer Mode 39
Call Guard 92
Call Waiting 90
Callback Number 34
Caller ID 89
Camera 68–75
Chat 98
Clock
Display 30
World Clock 61
Commercial Mobile Alert
System (CMAS) Alerts 35
Contacts 49
Adding an Entry 50
Assigning a Picture 54
Assigning a Speed Dial 53
Deleting an Entry 52
Dialing From 22
Editing an Entry 50
Finding Entries 52
Secret Entries 55
Countdown Timer 61
D
Data Roam Guard 93
Data Services 94–105
see also Web
Enabling/Disabling 43
FAQs 105
Launching 95
Password 4
Security Features 43
User Name 94
Deleting
Contacts 52
Events 59
History 48
Phone Content 42
Dialing
From Contacts 22
With Pauses 21
Display Settings 28
Download
Games 99
Ringers 32, 99
E
Email 97
Emergency Call 18
End User License
Agreement 121
Entering Text 23
Preset Messages 35
F
Favorite 104
FCC Notice 116
Finding
Contacts 52
Phone Number 21
Font Size 30
G
Games
Downloading 99
GPS 106
Greeting 30
Group
Adding Members to 51
Creating 51
Making From History 47
Removing Members
From 52
H
Headset Mode 39
Hearing Aid Device
Compatibility (HAC) Mode 38
History 45
Saving a Number From 47
Viewing From Contacts 49
|
Icon indication 10, 45, 72, 77
Instant Messaging 98
K
Key Functions 9
L
Language
Display 31
Preset Messages 35
Location 106
Lock Code 40
Locking
Phone 40
M
Making Calls 16
From Contacts 22
From History 47
Using ASR 63
Menu i
Messaging 86, 97
Settings 34
Thread 88
Missed Call 18
Multiple Shots 70
Muting
Ringer 18
Voice 20
My Content Manager 100
My Name Card 55
N
Net Guard 44
O
Owner's Record 117
P
Parental Controls 41
Phone (illus.) 8
Phone Number
Displaying 16
Finding 21
Saving 20
With Pauses 21
PictBridge 74
Pictures
Assigning 69
Sending 73
Storing 72
Taking 68
Plus (+) Code Dialing 22
Power Save Mode 30
Preset Messages 35
R
Resetting 43
Ringers
Assigning 32
Downloading 32, 99
Roaming 91
S
Safety Information 110–117
Saving
Phone Number 20
Phone Number From
History 47
Screen Saver
Assigning Pictures 69
Changing 28
Downloading 99
Security 40
Self-timer 70
Signature 34
Silence All 31
Speed Dialing 22
Assigning Numbers 53
Sprint Family Locator 107
Sprint Service
Account Passwords 4
Dialing 56
Operator Services 6
Sprint 411 5
Stopwatch 62
T
To Do 58
TTY Use 36
Turning Your Phone On and
Off 13
U
Unlocking Your Phone 40
User Name 94
V
Vibration 33
Voice Guide 33
Voice Memos 66
Voicemail
Setting Up 4, 84
While Roaming 92
Volume 31
W
Warranty 118
Web 94-105
see also Data Services
World Clock 61
Z
Zoom 70
- Table of Contents
- Introduction
- Your Phone's Menu
- 1A. Setting Up Service
- Setting Up Your Phone
- 1A. Setting Up Service
- Activating Your Phone
- Setting Up Your Voicemail
- Sprint Account Passwords
- Account User Name and Password
- Voicemail Password
- 1A. Setting Up Service
- Data Services Password
- Getting Help
- Managing Your Account
- Online: www.sprint.com
- From Your Sprint Phone
- From Any Other Phone
- Sprint 411
- Sprint Operator Services
- 2A. Phone Basics
- Key Functions
- Viewing the Display Screen
- 2A. Phone Basics
- 2A. Phone Basics
- Turning Your Phone On and Off
- Turning Your Phone On
- Turning Your Phone Off
- Battery and Charger
- Battery Capacity
- Installing the Battery
- Removing the Battery
- Charging the Battery
- Navigating Through the Menus
- Selecting Menu Items
- Backing Up Within a Menu
- Displaying Your Phone Number
- Making and Answering Calls
- Making Calls
- Dialing Options
- Answering Calls
- Answering a Roam Call With Call Guard Enabled
- 2A. Phone Basics
- Ending a Call
- Missed Call Notification
- Calling Emergency Numbers
- Enhanced 911 (E911) Information
- In-Call Options
- End-of-Call Options
- 2A. Phone Basics
- Saving a Phone Number
- Finding a Phone Number
- Dialing and Saving Phone Numbers With Pauses
- Dialing From the Contacts List
- Plus (+) Code Dialing
- 2A. Phone Basics
- Speed Dialing
- Abbreviated Dialing
- Entering Text
- Selecting a Text Input Mode
- Select one of the following options:
- 2A. Phone Basics
- Setting Text Entry Options
- ABC Mode
- T9 Text Input
- Adding a Word to the T9 Database
- Simple Data Exchange
- Email Address Options
- Street Address Options
- Phone Number Options
- Web Address (URL) Options
- 2B. Settings
- Display Settings
- Changing the Screen Saver
- Changing the Brightness
- Changing the Backlight Time Length
- Setting the Notification Pop-up
- Selecting a Picture ID
- Power Save Mode
- Changing the Clock/Calendar Display
- Setting a Custom Greeting
- Changing the Phone's Menu Style
- Changing the Font Size
- Display Language
- Volume Settings
- Adjusting the Phone's Volume Settings
- Silence All
- Ringer Settings
- Ringer Types
- Selecting Ringer Types for Incoming Calls and Messages
- Selecting Ringer Types for Voicemail, Calendar, and Power Up/Down
- Getting New Ringers
- Setting Up Voice Guide
- Selecting Vibration Patterns
- Messaging Settings
- Setting Reset Envelope
- Setting a Callback Number
- Adding a Customized Signature
- Managing Preset Messages
- Setting CMAS Alerts
- Airplane Mode
- TTY Use With Sprint Service
- WARNING: 911 Emergency Calling
- Using the Hearing Aid Device Compatibility Function
- Phone Setup Options
- Navigation Key Shortcuts
- Alert Notification
- Call Answer Mode
- Auto-Answer Mode
- Headset Mode
- Security Settings
- Accessing the Lock Phone Menu
- Your Phone's Lock Feature
- Locking Your Phone
- Unlocking Your Phone
- Changing the Lock Code
- Parental Controls
- Activating Parental Controls
- Changing the Parental Control Code
- Restricting Voice Calls and Messages
- Restricting Web, Camera, and Location Mode
- 2B. Settings
- Deleting Phone Content
- Resetting Your Phone and Phone Content
- Security Features for Data Services
- Enabling Data Services
- Disabling Data Services
- Net Guard
- 2B. Settings
- 2C. History
- Viewing History
- History Icons
- History Thread
- History Details
- History Options
- Making a Call From History
- Saving a Number From History
- Making a New Group Entry From History
- Deleting History
- 2D. Contacts
- About Contacts
- Displaying Contacts Entries
- Viewing History From Contacts
- Displaying Contacts Details
- Adding a New Contacts Entry
- Editing a Contacts Entry
- Adding a Number to a Contacts Entry
- Creating a Group
- Editing Groups
- Adding Members to a Group
- Removing Members From a Group
- Deleting a Contacts Entry or Group
- 2D. Contacts
- Finding Contacts Entries
- Using Contacts Information in Other Applications
- Assigning Speed Dial Numbers
- Selecting a Ringer Type for an Entry
- Assigning a Picture to an Entry
- Secret Contacts Entries
- My Name Card
- Dialing Sprint Services
- 2E. Calendar & Tools
- Calendar
- Adding an Event to the Calendar
- Adding a To Do List Item to the Calendar
- Calendar Alerts
- Viewing Events
- Deleting Events
- Alarm
- Calculator
- World Clock
- Countdown Timer
- Stopwatch
- 2F. Voice Services
- Automatic Speech Recognition (ASR)
- Activating ASR
- Making a Voice Call Using ASR
- Sending a Message Using ASR
- 2F. Voice Services
- Displaying a Contacts Entry's Information Using ASR
- Opening Menus Using ASR
- Checking Phone Status Using ASR
- ASR Settings
- Managing Voice Memos
- Recording Memos
- Playing Recorded Memos
- Recorded Memos Options
- 2G. Camera
- Taking Pictures
- Assigning Pictures
- Camera Mode Options
- Self-timer
- Multiple Shots
- Zoom
- Camera Settings
- Saving Your Settings
- Storing Pictures
- My Photos Folder
- My Photos Folder Options
- Reviewing Pictures in Assigned Media Folder
- Sending Pictures From Your Phone
- Sending Pictures Using the Messaging Feature
- Printing Pictures From Your Phone
- 2H. Bluetooth
- About Bluetooth
- Turning Bluetooth On and Off
- Making Your Phone Discoverable
- Bluetooth Status Indicators
- Bluetooth Menu
- Pairing Bluetooth Devices
- Viewing the Trusted Devices List
- Trusted Devices List Menu
- Left Softkey Menus
- Options Menu
- Sending Data via Bluetooth
- Sending Contacts
- Sending or Exchanging Name Cards
- Printing Pictures via Bluetooth
- 3A. Sprint Service: The Basics
- Voicemail
- Note: Voicemail Password
- Voicemail Notification
- New Voicemail Message Alerts
- Retrieving Your Voicemail Messages
- Using One-Touch Message Access
- Using the Menu Keys on Your Phone to Access Your Messages
- Using Another Phone to Access Messages
- Voicemail Key Guide
- Save
- Messaging
- Composing Messages
- Accessing Messages
- Threaded Messaging
- Viewing Messages
- Message Details
- Threaded Messaging Options
- Caller ID
- Call Waiting
- Making a 3-Way Call
- Call Forwarding
- Roaming
- Roaming Icon
- Roaming on Other Networks
- Checking for Voicemail Messages While Roaming
- Setting Roam Mode
- Call Guard
- Data Roam Guard
- 3B. Web and Data Services
- Getting Started With Data Services
- Your User Name
- Finding Your User Name
- Updating Your User Name
- Launching a Web Connection
- Data Connection Status and Indicators
- Navigating the Web
- Softkeys
- To use softkeys:
- 3B. Web and Data Services
- Scrolling
- Selecting
- Going Back
- Going Home
- Accessing Email
- Accessing Sprint Instant Messaging
- Accessing Wireless Chatrooms
- Downloading Games, Ringers, and More
- Accessing the Download Menus
- Selecting an Item to Download
- Downloading an Item
- To download a selected item:
- My Content Manager
- ScanLife
- Browser Menu
- Opening the Browser Menu
- ■Advanced
- Going to a Specific Website
- Creating a Favorite
- Accessing a Favorite
- Deleting a Favorite
- Reloading a Web Page
- Data Services FAQs
- 3C. GPS Navigation
- GPS Services
- Activating Location Mode
- Select On.
- Sprint Family Locator
- Signing Up for Sprint Family Locator
- Using Sprint Family Locator
- Safety and Warranty Information
- 4A. Important Safety Information
- General Precautions
- Maintaining Safe Use of and Access to Your Phone
- Using Your Phone While Driving
- Following Safety Guidelines
- Turning Off Your Phone Before Flying
- Turning Off Your Phone in Dangerous Areas
- Restricting Children's Access to Your Phone
- Using Your Phone With a Hearing Aid Device
- Note: New Technologies, Including Wi-Fi
- Getting the Best Hearing Device Experience With Your Phone
- Caring for the Battery
- Protecting Your Battery
- Charging
- Storing
- Disposal of Lithium Ion (Li-Ion) Batteries
- Radio Frequency (RF) Energy
- Understanding How Your Phone Operates
- Knowing Radio Frequency Safety
- Body-Worn Operation
- Specific Absorption Rates (SAR) for Wireless Phones
- Cellular CDMA mode (Part 22):
- PCS mode (Part 24):
- FCC Radio Frequency Emission
- FCC Notice
- Owner's Record
- User Guide Proprietary Notice
- 4B. Manufacturer's Warranty
- Manufacturer's Warranty
- 4C. End User License Agreement
- End User License Agreement
- NEVER EXCEED THE PURCHASE PRICE YOU PAID FOR THE KYOCERA DEVICE.
- Index
- D
- E
- F
- G
- H
- |
- K
Brand : SANYO
Model : Vero
Category : Smartphone