
XMP-3450 - Media player MITSUBISHI - Free user manual and instructions
Find the device manual for free XMP-3450 MITSUBISHI in PDF.


| Product Type | Media Player |
| Brand | Mitsubishi |
| Model | XMP-3450 |
| Dimensions (W x H x D) | 200 mm x 150 mm x 35 mm |
| Weight | 0.4 kg |
| Power Supply | 5V DC, 1A via USB |
| Power Consumption | 5 W |
| Supported Video Formats | MP4, AVI, MKV, MOV |
| Supported Audio Formats | MP3, WMA, AAC |
| Supported Image Formats | JPEG, PNG, BMP |
| Connectivity | USB 2.0, HDMI, AV Out |
| Storage Media | USB flash drive, SD card (up to 32 GB) |
| Main Functions | Video playback, music player, photo viewer, file browser |
| Display Screen | None (requires external display) |
| Maintenance | Clean with a soft, dry cloth; avoid liquids |
| Safety Precautions | Do not expose to moisture; keep away from heat sources |
| Spare Parts & Repairability | Contact Mitsubishi authorized service centers |
| General Information | Portable media player for home entertainment |
Frequently Asked Questions - XMP-3450 MITSUBISHI
User questions about XMP-3450 MITSUBISHI
0 question about this device. Answer the ones you know or ask your own.
Ask a new question about this device
Download the instructions for your Media player in PDF format for free! Find your manual XMP-3450 - MITSUBISHI and take your electronic device back in hand. On this page are published all the documents necessary for the use of your device. XMP-3450 by MITSUBISHI.
USER MANUAL XMP-3450 MITSUBISHI
XMP-3450 User's Manual

Contents
XMP-3450 User's Manual
0
1. Introduction 1
1.1. Features 1 1.2. Package contents 1 1.3. Mounting options 1 1.4. Physical view 2
2. Configuring the XMP-3450 Media Player 3
2.1. System connections 3 2.2. USB keyboard configuration menus 3 2.3. Connect the XMP-3450 to your network 4 2.4. Video output settings 5 2.5. Clock and calendar settings 5 2.6. Setting a password 5 2.7. Factory reset 6 2.8. Applying firmware upgrades 6 2.9. Video input 6
3. Content Management 7
4. Authoring in HTML5 7
5. Working with SMIL 7
5.1. Introduction 7 5.2. www.a-smil.org for developers 7
6. Technical Data 8
6.1. Specifications 8
7. Appendix: FAQ 9
1. Introduction
This document describes the hardware and software operations of the XMP-3450, system setup, and frequently asked questions.
1.1. Features
The XMP-3450 is a Full-HD 1080p high definition digital signage player featuring industrial grade mechanical design and versatile open-standard SMIL programmability.
• AV in for custom live content display • Full-HD 1080p hardware decoding of MPEG, H.264, and VC-1 media formats • 4GB on-board flash local storage with CF card slot • Integrated audio and video output via HDMI • Supports full POPAI Screen Media Formats Standards profiles S1 to S12, and E1 to E9 - Multiple 3rd party software solution compatibility • Industry leading W3C SMIL support for developers • Built-in wireless b/g/n network
1.2. Package contents
Media Player Unit
AC Adapter and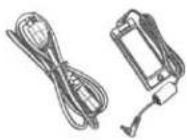
Ethernet cable
Standard 3.5mm to RCA AV adapter
Quick Start
Documentation CD (select SKUs)
Software set up guide (select SKUs)
Wi-Fi Antenna
CF card cover/remover (pre-installed on unit)
RS-232 adapter
NOT INCLUDED: A USB keyboard is required for system setup
1.3. Mounting options
The player can be attached to mounting posts on the back of screens or inside cabinetry with the built-in VESA MIS-D100 (100mm x 100mm) compatible mounting flange.
Attach the wireless antenna as shown. Screw the antenna clockwise onto the post.


Bottom view
1.4. Physical view
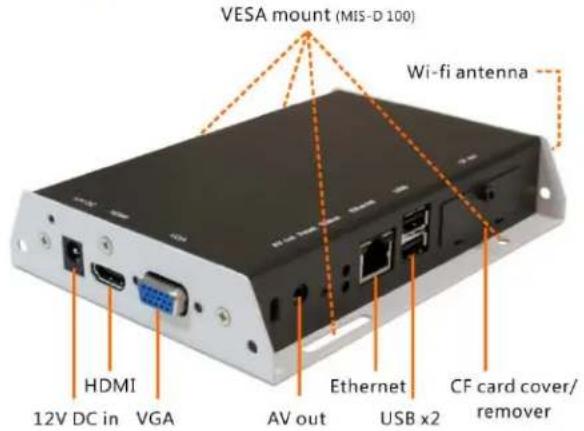

Physical features (left to right in above illustration):
• 12V DC for power adapter • HDMI 1.3a connector for digital video and audio combined outputs, or digital video via optional DVI adapter • VGA port for analog video output • 3.5mm composite AV output • S/W Reset button to perform factory reset • Ethernet port for network content update • USB ports for USB content update and configuration • CF card slot cover with integrated CF card removing tool • RS-232 port • 3.5mm composite AV input
2. Configuring the XMP-3450 Media Player
2.1. System connections
1. Attach a video cable (either VGA or HDMI) to your monitor.
When using the VGA connection, your monitor should support XGA (1024x768) resolution or greater. For audio output, you will also need to connect a stereo RCA cable from the XMP-3450 to your monitor.
When using an HDMI connection, audio is sent along with video over the HDMI cable, so no additional cables are required.
Reminder: If you do not see anything on screen, check your monitor's video input mode.
2 Attach the AC power adapter to power on the unit. Shortly afterwards, the following progress bar will be displayed on your monitor:
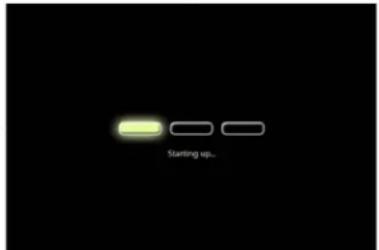
~ 90 seconds

3 Player boot process takes approximately 90 seconds to complete. The player will indicate that it is ready for content sync via the USB port or, if content has been loaded, begin playback immediately.
Troubleshooting Tips
1 The operation indicators light up, but no video is displayed on screen.
- Ensure that your video cable (VGA or HDMI) is securely connected. When using an HDMI connection, choose high quality, certified HDMI cables or try using shorter length cables.
- Check if your monitor is turned-on and switched to the corresponding video input source.
2 No sound is heard.
• If using VGA connection, you also need to connect RCA audio cables. - Check volume (mute) settings on monitor.
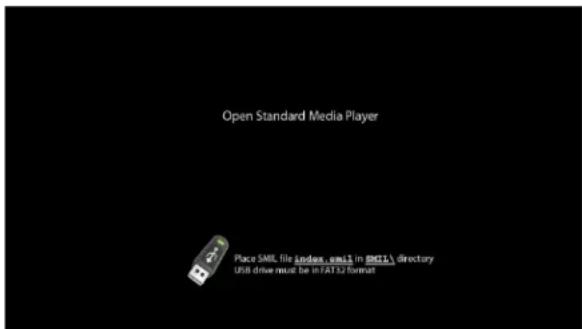
After performing the initial setup as outlined above, the player will boot into the "Open Standard Media Player" screen. Plug in a USB keyboard to enter configuration menus.
If you have already loaded media contents into the player, contents will play back immediately after boot up, and the "Open Standard Media Player" screen will not be shown. You can still plug in a USB keyboard at any time during playback to enter the menu system.
2.2. USB keyboard configuration menus
You must attach a USB keyboard to the XMP-3450 to configure settings. With the player booted up and ready, it takes approximately 30 seconds after you plug in the keyboard for the following menu to be displayed:

Navigating the menus
Navigate the menus using arrow keys, space bar, enter key, and numeral keys on your USB keyboard. Use the keyboard arrow keys to highlight menu items, press the space bar to move the star (cursor), and then press enter to confirm ( ) or reject ( ) any changes.
2.3. Connect the XMP-3450 to your network
Enter Network setting in the menu to set up a network connection method.
Wireless connection
The player will scan for wireless signals nearby during boot up. If the network requires authentication, you will be asked to provide the password for access.
Wired connection
To use the wired Ethernet connection, connect an Ethernet cable and the Wi-Fi will be disabled.
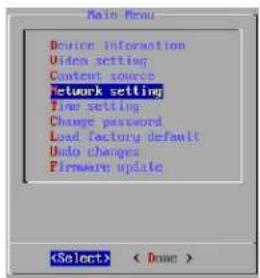
Player IP address
You will also need an IP address for the player on your network. This could be set automatically (DHCP) or manually (static IP):

DHCP - automatically assign network IP address
DHCP is enabled by default. You do not need to change the settings unless setting a static IP.
Static IP - manually assign network IP address
Highlight "IP configuration" and press "Enter" on keyboard to
Move the highlight to "Static IP" below, press "Space bar" on the keyboard to fill in the star (*) at the Static IP brackets, and press "Enter" on the keyboard to select .
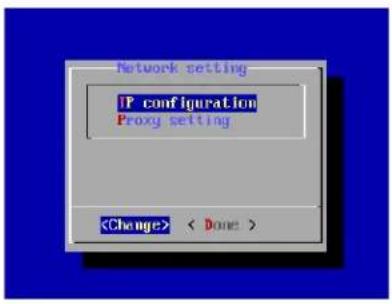
Proceed to configure an available static IP address. Select Wireless configuration or IP configuration as determined by your connection. Please consult your network administrator for assistance if necessary.
2.4. Video output settings
For best quality, set the output resolution to match your display's native resolution to avoid image scaling and blur.
If you are connecting to an LCD TV, the resolution setting is most likely 1366x768, 1280x720, or 1920x1080. If you are connecting a LCD computer monitor, projector, or plasma display, refer to the device specifications for the best matching setting.
Press the space bar to fill in the star (*) before pressing the enter key for .

2.5. Clock and calendar settings
![Time setting Set local time [2009-01-20T86:48:57] Set time zone [(GMT+00:00) Universal Coordinated Time] (Change) < Done >](/content/2026/05/1000696/images/0b0db8d041c19798ebe895d7cd1a5ca84d2f6e93abc5ff1a532abf88ab997694.jpg)
Set the correct time zone, time, and date. Daylight Saving (DST) rules can be configured in Set time zone.
2.6. Setting a password
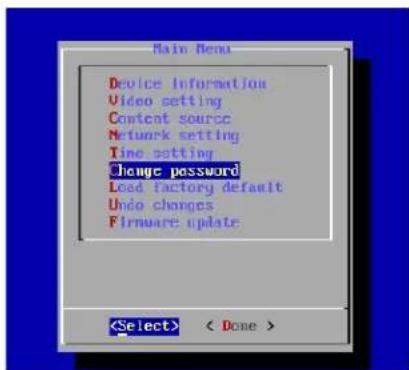
To prevent unauthorized modification of player settings, set a player password to hide the menu.
From the top level menu, select "Change password" to set a password.
IMPORTANT: Once a password is set, you can only access the menus by connecting a USB keyboard and pressing CTRL + ALT + DELETE (3-key combination) simultaneously. You may connect the keyboard at any stage of player operation or before/ during boot-up.
If you forget the password, you will need to reset the device. See Factory reset.
2.7. Factory reset
If you forget a system password you have set, you must reset the system to regain access to the player.
Using the reset button
1 PRESS and HOLD the reset button with a pin 2 RE-CONNECT the power cord 3 WAIT about 8 seconds or until the status LED flashes 4 RELEASE reset button and wait for system to initialize

Using a USB keyboard
System reset will re-initialize the system, clear passwords, and return settings to their default values. Perform the following:
1. Connect a USB keyboard. 2. Reboot the player and look for the reset instructions on the top left corner of the screen. When it appears, press the Delete key on your keyboard.
If you missed the reset window, unplug power and try again.
3. You should see a menu with a reset confirmation dialogue box. Select Yes to confirm. 4. Wait while the system reboots to complete the reset.
2.8. Applying firmware upgrades
Firmware updates can be performed using a USB flash drive. Please read the release notes carefully regarding the changes that will be made to your player before applying the upgrade.
1. Download the latest firmware and copy it to the root directory of a USB drive from www.digisignage.com. 2. Plug the power cord into the device. 3. Plug a USB keyboard to the device to enter the menu system. 4. Follow on-screen instructions and select the firmware upgrade option in the menu. 5. When instructed, plug in the USB drive to begin the firmware upgrade.
2.9. Video input
The AV in port lets you attach TV tuners, live video camera signals, pre-recorded videos, and more via the 3.5mm composite video/audio cable.
NTSC/PAL mode is selected automatically.
Also refer to your software documentation to enable display.

3. Content Management
The XMP-3450 is designed to work with third-party management solutions. Please refer to the printed guide for related setup instructions.
4. Authoring in HTML5
HTML
A major advancement in the XMP-3250/3350 media appliance is the ability to playback HTML5 content which can contain dynamic information.
To find out more about using HTML5 for digital signage, visit http://widget.iadea.com.
5. Working with SMIL
The XMP-3450 uses open communications protocols for content presentation and playback control. SMIL-compliance means predictable results across multiple devices, and SMIL's non-proprietary nature means that your investments are never obsolete.
5.1. Introduction

Using SMIL (pronounced “smile”), the language created by W3C for multimedia communications, the media player understands the language “spoken” by professional tools from companies such as Adobe, Apple, Microsoft, and Real Networks. What this means is quicker, easier, and better integration of your players into your digital signage networks, opening up avenues of software controls and realizing the full potential of your player hardware down the road.
5.2. www.a-smil.org for developers
The media player operating system utilizes W3C SMIL as the underlying scripting language, which lends well to customization to your project management needs. For resources, downloads, and community support, please visit www.a-smil.org.
6. Technical Data
6.1. Specifications
| XMP-3450 | |
| Video format support | POPAI Screen Media StandardsS6 (MPEG-1 SIF, 3Mbps CBR)S7 (MPEG-1 480p, 10Mbps CBR)S8 (MPEG-1 720p, 15Mbps CBR)S9 (MPEG-2 480p, 6Mbps CBR)S10 (MPEG-2 720p, 12Mbps CBR)S11 (MPEG-4 AVC, 480p, 6Mbps CBR)S12 (MPEG-4 AVC, 720p, 10Mbps CBR)E4 (VC-1/WMV9, MP@ML, 720p)E5 (VC-1/WMV9, MP@HL, 1080p)E6 (MPEG-2, 1080p, 20Mbps CBR)E7 (MPEG-4 ASP, 480p, 10Mbps CBR)E8 (MPEG-4 AVC, 1080p, 20Mbps CBR) |
| Image format support | POPAI Screen Media StandardsS1 (JPEG 480p baseline)S2 (JPEG 720p baseline)S3 (JPEG 1080p baseline)E1 (PNG 24bpp+alpha, 480p)E2 (PNG 24bpp+alpha, 720p)E3 (PNG 24bpp+alpha, 1080p) |
| Audio codec support | POPAI Screen Media StandardsS4 (MPEG L2 audio)S5 (MP3 audio, 320Kbps) |
| Playback control | W3C SMIL 3.0 instructions (sub-set) |
| Content management | 3rd party solution |
| Physical I/O connectors | HDMI 1.3VGA3.5mm AV out3.5mm AV inRJ45 EthernetUSB 2.0WLAN antenna portRS-232 port |
| Local storage | 4GB on-board flash memory (up to 1.8 hrs of 5 Mbps high def. video)CF card expansion slot |
| Accessories | 3.5mm-RCA AV cableEthernet cableWLAN antennaRS-232 adapter |
| Power requirement | 12V 1.5A DC |
| Power consumption* | 8 watts max (when playing 1080P full resolution video) |
| Environmental | Operating temperature: 0 – 40°C / 32 – 104° FHumidity: 5 – 85% @ 40°C / 32 – 104°F non-condensing |
| Dimensions | 211x153x 43mm (8.3 X 6 X 1.7 inches) |
| Weight | 1.4kg3 lbs. |
| Safety | UL-approved AC adapters |
| Certifications | CE/FCC/RoHS |
| Warranty | One-year limited parts & labor |
7. Appendix: FAQ
What video format can I play?
Video files encoded in MPEG-4 ASP up to 720x400 resolutions and 2Mbps bitrates should play perfectly. If a certain video is not played as scheduled, or if it plays poorly, please search the support site for "transcode" instructions.
The signboard is placed near my Wi-Fi access point, yet the connection is unreliable.
Wi-Fi appliances in general should be placed 10 feet (3 meters) from the Wi-Fi access point for reliable operation. Try relocating the access point further away from the signboards to improve connection.
What can I do about the gap between videos?
Video gaps (blank screen) occur before and after each video is played. To minimize the gap, avoid back-to-back video programming by scheduling an image between each video.
If both Ethernet & WiFi are connected, which one will take precedence?
When Ethernet is not available or disconnected, the system will try to use the WiFi connection. If both connections are available, Ethernet will be used.
What is the maximum file size for a single video file?
The maximum video file size for the XMP-3450 is 2GB. We recommend reserving a safety margin to avoid exceeding the limit (i.e., limiting files to 1850MB).
What should I do if I forgot my password?
In this case, please perform a factory reset.
Use the S/W RESET button located at the back of the media player to restore factory settings. This will also clear the player's password.
Performing a factory reset
Warning: This procedure will restore all menu settings to factory default and format the internal storage to factory conditions (all contents will be removed).
To restore factory settings and format the drive:
- Disconnect the power cable from the player unit.
- Press and hold the S/W RESET button.
- Connect the power cable while holding the S/W RESET button until the status light flashes (about 15 seconds).
- Please wait while the system drive is being formatted
How do I restore the device back to factory defaults?
The S/W RESET button located at the back of the media player can be used to restore factory settings.
To restore factory settings:
- Disconnect power cable from the player unit
- Press and hold the S/W RESET button
- Connect the power cable while holding the S/W RESET button until status light flashes (approx. 15 seconds)
How do I manage the playback of contents?
The media appliance is designed to be interoperable with leading third-party management software solutions or via SMIL open standard commands.
Could the player display Flash or Microsoft PowerPoint presentations?
The player features limited PowerPoint support, but not Flash support.
While PCs can play many formats with varying degrees of success, RISC-based media players are designed to reliably play specific video formats (Please see spec for details). While Microsoft PowerPoint native files could not play directly on a RISC-based player, the file is converted through other software (i.e. Adfotain Manager Express) into an image format to be played as an image slideshow.
How do I manage the playback of contents?
The media appliance is designed to be interoperable with leading third-party management software solutions or via SMIL open standard commands.
Why won't some media files play properly?
The video data bit-rate used may have exceeded the recommended bit rate.
The video data bit-rate is the amount of video or audio data used per second to store or play the contents, usually expressed in Mbps (mega-bits per second). Video encoded with excessive bit-rates will not playback smoothly in the media player, likely due to storage i/o bottleneck.
Visit www.digisignage.com for compatible media format presets.
The media playback looks different on a PC compared to the media player's screen. (Wrong aspect ratio)
There are 2 major aspect ratios (width-to-height ratios) for video content, but many kinds of displays. If you play 4:3 video on a 16:9 display (or vice versa), a circle becomes oval, and the picture takes on a squeezed or stretched look. To avoid this distorted look, adding black bars are a common technique.
The Network Media Player can be configured to automatically add black bars for certain types of displays. You can set the output resolution in XMP-3450's configuration menu to match the native resolution of your display.
Some JPEG images cannot be played in the media player.
Progressive JPEG are not supported. Please convert to baseline JPEG for maximum compatibility.
JPEG images can be either of 2 types: baseline or progressive compression. Baseline JPEG offers greatest compatibility, while progressive JPEGs are suitable for web site images. Progressive images are downloaded and displayed “progressively,” being rendered more clearly as more data is received over the internet. Progressive images are primarily supported on PCs. For media appliances, make sure to save images as baseline JPEG in your photo editor, or resave them as baseline JPEGs using free tools such as IrfanView (http://www.irfanview.com/).
Does the media player support video streaming?
No. IAdea media players play files from local storage and do not support real-time video streaming over the network. This delivers an optimum viewing experience free of playback quality issues such as stuttering, blocking, or blue-screens.
However, XMP series players support dynamic content delivery to push individual files quickly over the network using the SOAP API. This method is a compromise between live streaming with its high bandwidth demands and entire playlist content updates which necessitate longer update cycles.
The media player is not playing. What should I do?
Check the player's messages on the display (OSD, or on screen display) for status information.
Play list errors and scheduling issues are two major causes of playback problems. To determine if the problem is caused by a bad play list, just delete the play list and restart player. The player should loop through all media files, indicating a fault with the play list.
If the playback is scheduled to play at a specific time, check to see if the device is set to the right time zone on the world clock. When nothing seems wrong, the time zone setting is often the reason the program is not played.
IAdea Limited Warranty
For Media Player Devices
Applicable to IAdea product models:
• XMP-300/305 • XMP-320/330/340 • XMP-3250/3350/3450 • XMP-120/130 • HMP-505S/500S NMP-200U
- IAdea provides, unless extended through optional service programs, one (1) year of limited warranty on its applicable product models listed above. The applicable product must be purchased through an authorized IAdea reseller. Subject to the conditions of this warranty, IAdea will perform necessary service on the product without charge for parts or labor if, in the opinion of IAdea, the product is found to be faulty within the warranty period. IAdea's sole warranty and obligation will be to repair or replace (at its sole discretion) such products that require warranty during the applicable warranty period in accordance with these conditions. If the product is found to be in correct working order, then IAdea reserves the right to charge you for its time and materials costs.
- This warranty only applies if the product has been under normal use and reasonable care (in the opinion of IAdea). The warranty covers normal usage for which the unit was originally supplied and does not cover damage, malfunction or failure resulting from use of incorrect voltages, unauthorized installation, accident, misuse, neglect, build-up of dirt or dust, abuse, power surge problems, thunderstorm activity, tampering or repair by unauthorized persons (including unauthorized alterations), unauthorized maintenance, exposure to abnormally corrosive conditions or any foreign object or matter having entered the product.
- If warranty service is required you should contact IAdea at support@IAdea.com. You will be required to fill out an RMA form and provide proof for your original date of purchase.
- You will be responsible for shipping the product to designated IAdea service locations. You are required to pre-pay for the shipping and custom charges, if any, required for the shipment of the product to IAdea. The warranties hereby conferred do not extend to any costs associated with the delivery, handling, freighting or transportation of the product and do not extend to any damage or loss occurring during, or associated with, transit.
IAdea currently provides warranty service locations in Taipei, Taiwan and Newark, California, USA.
For questions or further information, please contact support@IAdea.com.
- XMP-3450 USER'S MANUAL
- CONTENTS
- INTRODUCTION 1
- CONFIGURING THE XMP-3450 MEDIA PLAYER 3
- CONTENT MANAGEMENT 7
- AUTHORING IN HTML5 7
- WORKING WITH SMIL 7
- TECHNICAL DATA 8
- APPENDIX: FAQ 9
- INTRODUCTION
- FEATURES
- PACKAGE CONTENTS
- MOUNTING OPTIONS
- PHYSICAL VIEW
- PHYSICAL FEATURES (LEFT TO RIGHT IN ABOVE ILLUSTRATION)
- CONFIGURING THE XMP-3450 MEDIA PLAYER
- SYSTEM CONNECTIONS
- TROUBLESHOOTING TIPS
- USB KEYBOARD CONFIGURATION MENUS
- NAVIGATING THE MENUS
- CONNECT THE XMP-3450 TO YOUR NETWORK
- WIRELESS CONNECTION
- WIRED CONNECTION
- PLAYER IP ADDRESS
- DHCP - AUTOMATICALLY ASSIGN NETWORK IP ADDRESS
- STATIC IP - MANUALLY ASSIGN NETWORK IP ADDRESS
- VIDEO OUTPUT SETTINGS
- CLOCK AND CALENDAR SETTINGS
- SETTING A PASSWORD
- FACTORY RESET
- USING THE RESET BUTTON
- USING A USB KEYBOARD
- APPLYING FIRMWARE UPGRADES
- VIDEO INPUT
- CONTENT MANAGEMENT
- AUTHORING IN HTML5
- WORKING WITH SMIL
- WWW.A-SMIL.ORG FOR DEVELOPERS
- TECHNICAL DATA
- SPECIFICATIONS
- APPENDIX: FAQ
- WHAT VIDEO FORMAT CAN I PLAY
- THE SIGNBOARD IS PLACED NEAR MY WI-FI ACCESS POINT, YET THE CONNECTION IS UNRELIABLE
- WHAT CAN I DO ABOUT THE GAP BETWEEN VIDEOS
- IF BOTH ETHERNET & WIFI ARE CONNECTED, WHICH ONE WILL TAKE PRECEDENCE
- WHAT IS THE MAXIMUM FILE SIZE FOR A SINGLE VIDEO FILE
- WHAT SHOULD I DO IF I FORGOT MY PASSWORD
- PERFORMING A FACTORY RESET
- HOW DO I RESTORE THE DEVICE BACK TO FACTORY DEFAULTS
- HOW DO I MANAGE THE PLAYBACK OF CONTENTS
- COULD THE PLAYER DISPLAY FLASH OR MICROSOFT POWERPOINT PRESENTATIONS
- WHY WON'T SOME MEDIA FILES PLAY PROPERLY
- THE MEDIA PLAYBACK LOOKS DIFFERENT ON A PC COMPARED TO THE MEDIA PLAYER'S SCREEN. (WRONG ASPECT RATIO)
- SOME JPEG IMAGES CANNOT BE PLAYED IN THE MEDIA PLAYER
- DOES THE MEDIA PLAYER SUPPORT VIDEO STREAMING
- THE MEDIA PLAYER IS NOT PLAYING. WHAT SHOULD I DO
- IADEA LIMITED WARRANTY
- FOR MEDIA PLAYER DEVICES
Brand : MITSUBISHI
Model : XMP-3450
Category : Media player