
MWC348BE - Wine cellar MATSUI - Free user manual and instructions
Find the device manual for free MWC348BE MATSUI in PDF.


| Product Type | Wine Cellar |
| Brand | Matsui |
| Model | MWC348BE |
| Dimensions (H x W x D) | 84 x 58 x 57 cm |
| Weight | 30 kg |
| Capacity | 48 bottles |
| Temperature Range | 5°C to 18°C |
| Power Supply | 220-240 V, 50 Hz |
| Energy Efficiency Class | F |
| Noise Level | 39 dB |
| Refrigerant | R600a |
| Climate Class | N/ST |
| Defrost Type | Manual |
| Adjustable Shelves | Yes |
| Interior Lighting | LED |
| Lockable Door | Yes |
| Interior Fan | Yes |
| Anti-Vibration | Yes |
| Maintenance | Clean interior with a damp cloth; defrost when ice thickness exceeds 5 mm |
| Safety | Do not use extension cords; ensure proper ventilation; keep away from heat sources |
| Spare Parts Availability | Contact Matsui support for replacement parts |
Frequently Asked Questions - MWC348BE MATSUI
User questions about MWC348BE MATSUI
0 question about this device. Answer the ones you know or ask your own.
Ask a new question about this device
Download the instructions for your Wine cellar in PDF format for free! Find your manual MWC348BE - MATSUI and take your electronic device back in hand. On this page are published all the documents necessary for the use of your device. MWC348BE by MATSUI.
USER MANUAL MWC348BE MATSUI
Glass Fronted Wine Cooler
MODEL MWC348BE
Instruction Book

natural_image
Line drawing of a single refrigerator with lid and front panel (no text or symbols)GETTING TO KNOW YOUR WINE COOLER
INSTALLATION
Before use
Please read these instructions carefully before using your new Matsui Wine Cooler. The Wine Cooler is for indoor and domestic use only.

Location
When selecting a position for your Wine Cooler you should make sure the floor is flat and firm, and the room is well ventilated Wine an average room temperature of between 16°C and 32°C. Avoid locating your Wine Cooler near a heat source, eg.cooker.boiler or radiator. Also avoid direct sunlight in lean-to's or sun lounges. If you are placing your Wine Cooler in an out-building such as a garage or annex ensure that the Wine Cooler is placed above the damp course, otherwise condensation will occur on the Wine Cooler cabinet. Never place the Wine Cooler in a wall recess or into fitted cabinets or furniture.
When your Wine Cooler is working, the grille at the back and sides may become warm. It must therefore be installed so that there is 2cm (3/4") of free space at the sides. There is a built in air flow grille at the back of the Wine Cooler lid to ensure the correct distance from the real wall. The Wine Cooler door can either open to the right or the left, depending on the location which suits you. The Wine Cooler door can either open to the right or the left. If you want to have the door swing reserved, contact the Matsui Service Centre. Do not attempt to do it yourself.
Levelling the Wine Cooler
Once the Wine Cooler is in its final location, make sure it is level. To do this use the two levelling feet at the front of the Wine Cooler. If the Wine Cooler is not level, the doors and magnetic seal alignments will be covering.

Cleaning before use
Wipe the inside of the Wine Cooler with a weak solution of bicarbonate soda. Then rinse with warm water using a 'wrung-out' sponge or cloth. Wipe completely dry before replacing the shelves and baskets. You could clean the refrigerator externally with a damp cloth. If you require more information refer to CLEANING on page 4.
Before plugging in YOU MUST
Check that you have a socket which is compatible with the plug supplied with the Wine Cooler. If not, see the section called ELECTRICAL CONNECTING on the back cover.
Before switching on!
DO NOT SWITCH ON UNTIL TWO HOURS AFTER MOVING THE Wine Cooler. The coolant fluid needs time to settle.
Before using your Wine Cooler
Before placing any food in your Wine Cooler, turn the Wine Cooler on and wait for 24 hours, to make sure it is working properly and to allow the to fall to the correct temperature. Your Wine Cooler should not be over filled.
USING YOUR WINE COOLER (Note:This appliance is for Wine storage only.)
Operating instructions
Switching on your Refrigerator

1 The internal temperature of your Wine Cooler is controlled by a thermostat. There are four setting MIN, NORMAL, MAX, and SUPER.
2 Before connecting the Wine Cooler to the mains supply makes sure that the Thermostat Control Dial, located at the rear of the Wine Cooler on the right hand side, is set to MAX.
3 After 20 minutes, adjust the Thermostat Control Dial to NORMAL. This is the recommended setting for the Wine Cooler when operating at normal room temperature (between 16°C and 32°C
4 The Wine Cooler may not operate at the correct temperature if it is in a particularly hot or a particularly cold room, or if you open the Wine Cooler door often.
5 If you are concerned that your Wine Cooler is not being kept cold enough and wish to check the temperature you will need a special fridge thermometer. These are available from most supermarkets and hardware shops. Place the thermometer on the middle shelf of the Cooler, where it can be read easily. Leave overnight, the

temperature in the Wine Cooler should be between 6°C and 20°C depending on the type of wine.
6 In the OFF position the Drinks Cooler will not operate, but the power supply remains connected. This can be checked as the internal light will still work.
Adjusting the shelves
The shelf system has been designed so that a range of shelf heights can be selected. All the shelves can be adjusted. There is also a bottle rack at the bottom of the Wine Cooler which is suited for storing wines.
The Internal Light
• The Wine Cooler has an Internal Light which can be left on while the glass door is shut. Press the switch ON (I) and OFF (O) as desired.
• The temperature inside the Wine Cooler will be higher if the Internal Light is left on.

Noises inside the Wine Cooler!
If you have not owned a Wine Cooler before, you may notice that it makes some rather unusual noises. Most of these are perfectly normal, but you should be aware of them!
GURGLING, WHOOSHING
These noises are caused by the circulation of the refrigerant liquid in the cooling system. It has become more pronounced since the introduction of CFC free gases. This is not a fault and will not affect the performance of your Wine Cooler.
HUMMING, PURRING OR PULSATING
This is the compressor motor working, as it pumps the refrigerant around the system.
Storing wine in your Wine Cooler
One benefit of your new Wine Cooler is that you can simulate the conditions of a wine cellar. By using a fridge thermometer you can ensure a constant temperature of around 7-15°C, which is ideal for storing wine. Make sure the bottles are lying on their sides. This ensures the wine inside is in contact with the cork, which stops the cork drying out, shrinking, letting air in and spoiling the wine. After a bottle has been opened, the wine comes into contact with air which will start to oxidise the wine. This generally occurs on the wine's contact surface, leaving the remaining wine in good condition. By leaving your bottle standing, you minimise the surface area of the wine in contact with air.
If you're serving white, rose or sparkling wine, chill it lightly for at least two hours in the Wine Cooler before serving. Most red should be served at room temperature, or in the case of lighter reds like Beaujolais, very slightly chilled.
Opened wine will remain in good condition for up to two days (for delicate whites) or three days (for rich reds) as long as the bottle is resealed and stored in your Wine Cooler. Special stoppers that keep sparkling wine and Champagne bubbling for one or two days after opening can be bought at most good wine shops.
When storing leftover wine, attempt to minimise the oxidation process of the wine. You can use a 'vacuum' which pumps out the air in the bottle leaving a semi-vacuum. The wine should last for about two weeks.
However, if it is a good quality wine and you intend to finish it within one week, all you'll need to do is to replace the cork and leave it standing in your Wine Cooler.
Different wines are best kept at different temperatures. To choose the temperature at which to store your wines please consult the table below.
| Serving Temperatures | ||
| Wine Type | °F | °C |
| Rose Wine | 48-54 | 9-12 |
| White Wine | 48-58 | 9-14 |
| Sherry (Light) | 48-58 | 9-14 |
| Red Wine | 57-68 | 13-20 |
| Fortified Wine | 57-68 | 13-20 |
| Sherry (Dark) | 57-68 | 13-20 |
Storing wine in your Wine Cooler
Filling your Wine Cooler
When fillin· your Wine Cooler the greater the amount of cans and bottles placed inside the Wine Cooler from room temperature, the longer it will take to cool them to the desired temperature. You may wish to temporarily turn the Thermostat Control Dial to a higher setting to speed up the cooling process. If you do this remember to return it to the previous setting once the Wine have reached the required temperature in order to conserve energy.
Leave space around Wine containers
Space should be left around bottles and cans this will allow cold air to circulate around the Wine Cooler and improve the efficiency of the cooling process.
Shut the door!
To prevent cold air escaping, limit the number of times you open the door.
REVERSING THE DOOR SWING
The wine cooler glass door can be opened from left to right and vice versa. Should you desire to change the opening direction, please follow these instructions:

FIGURE 1(Position prior to door reversal)
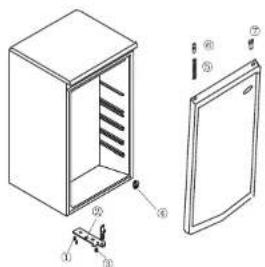
FIGURE 2(Position prior to door reversal)
①-Door Hinge Screws
⑤-Door Frame Spring
②-Lower Door Hinge
⑥-Door Frame Pin
③ -Front Levelling Legs
⑦ -Hinge PLug(Door Frame)Left Side
④ -Left Front Leg
Note: All parts removed must be saved to do the reinstallation of the door.
- Remove the two screws(1) that hold the lower hinge(2)(right side) to the frame. Also, remove the screw-type levelling front leg(3).
- Remove the left front leg(4) and transfer it to the right side.
- Lift the door and place it on a padded surface to prevent scratching it. Make sure to remove the spring(5) located inside the upper right hole of the door and the upper right side pin (6).
- Remove the plug button(7) from the upper left hole of the door and transfer it to the uncovered hole at the right side. Be sure to press the button firmly into the hole.
- Insert the upper pin(6) previously removed from the right side (step 3) and transfer it to the hole at the left side of the top frame.
- Insert the spring(5) previously removed(step 3) inside the upper left side hole of the door.
- Set the door in its place making sure the pin(6) enters the bushing at the lower upper frame section(hole).
- While holding the door in the closed position, secure the left hinge(2) previously removed(step 1).
- Insert the two screws(1) previously removed(step 1) and tighten them.
CLEANING
MAINTENANCE
Cleaning inside the Wine Cooler
There is usually no need to defrost the Wine Cooler as any ice that is deposited on the back wall is defrosted automatically.
1 Before cleaning the Wine Cooler always switch off and disconnect the electrical supply.
2 Remove all the shelves and detachable accessories and wash in warm soapy water, rinse and dry thoroughly.
3 If any ice has been deposited on the rear wall, leave the door open and wait until it begins to thaw. As the solid frost loosens, prize it away with a plastic
scraper and remove. Never use metal or sharp instrument. See TROUBLESHOOTING.
4 You should clean the Wine Cooler internally with a weak solution of bicarbonate of soda.
5 Check that the drain outlet at the rear wall of the Wine Cooler compartment is clear of
debris as this will affect the automatic defrosting.
6 Rinse with warm water using a clean 'wrung-out' sponge or cloth Wipe the Wine Cooler dry before replacing the shelves and accessories.
7 Plug in and switch on the mains supply.
Cleaning the outside of the Wine Cooler
- Use a damp cloth to clean the Wine Cooler exterior and a glass cleaner on the door. Make sure that the door is closed, to prevent polish getting on the magnetic door seal or inside.
- The grille of the condenser at the back of the Wine Cooler and the adjacent components can be vacuumed using a soft brush attachment.
Cleaning tips
• Defrost and clean when Wine stocks are low.
Moving your Wine Cooler
Care when handling
Hold the Wine Cooler around its sides or base when moving it. Under no circumstances should it be lifted by holding the edges of the top surface.
Location
Do not locate your Wine Cooler near a heat source, eg. Cooker, boiler or radiator. Also avoid direct sunlight in lean-to's or sun lounges.
Levelling the Wine Cooler
Make sure that the Wine Cooler is level. Use the rotating levelling feet at the front. If the Wine Cooler is not level, the doors and magnetic seal alignments will be affected.
Do Not Turn on the Wine Cooler for 2 Hours
After the Wine Cooler is in place it needs to be left for 2 hours. The coolant fluid needs time to settle.
Installation
Don't cover or block the vents or grilles of your appliance.
Servicing
This product should be serviced by an authorised engineer and only genuine spare parts should be used.
Under no circumstances should you attempt to repair the appliance yourself. Repairs carried out by inexperienced persons may cause injury or serious malfunctioning. Contact your Customer Service Department.
When the appliance is not in use for long periods, disconnect from the electricity supply, empty all foods and clean the appliance, leaving the door ajar to prevent unpleasant smells.
Changing the internal light
1 Before carrying out the bulb replacement always press the Internal
Light switch and the Thermostat Control Dial to OFF.
Then, disconnect the mains supply.
2 Undo the screw holding the light bulb cover in place.
3 Remove the plastic light bulb cover.
4 Remove the old bulb by unscrewing
in an anti-clockwise direction.
5 Replace with a new bulb (10W SES)
making sure that it is secure in the bulb cover.
6 Refit the translucent light cover and re-connect your to the mains supply and switch on.
SAFETY/TROUBLESHOOTING
SAFETY
WARNINGS
Disposal
Old appliances still have some residual value. An environmentally friendly method of disposal will ensure that valuable raw materials can be recovered and used again. The refrigerant used in your appliance and insulation materials require special disposal procedures. Ensure that none of the pipes on the back of the appliance are damaged prior to disposal. Up to date information concerning options for disposing of your old appliance and packaging from the new one can be obtained from your local council office.
Locks
If your Wine Cooler is fitted with a lock, to prevent children being entrapped keep the key out of reach and not in the vicinity of the appliance.
If disposing of an old Refrigerator break off any old locks or latches as a safeguard.
Troubleshooting
The Wine Cooler is not working
Check it is plugged in and switched on. Plug in another appliance, such as a lamp, to see if the socket is working.
Condensation appears on the outside of the Wine Cooler
This may be due to a change in the room temperature. Wipe off any residue of moisture. If the problem continues call the Customer Service Department.
Noises
You may hear some unusual noises from time to time. See 'Noises inside the Wine Cooler on page 3.
If you are not able to identify and eliminate the faults according to the above recommendations, contact the Customer Service Department, advising of model number of the appliance which is shown on the back of the rating plate.
Do not attempt to repair your Refrigerator yourself as it might endanger you and others.

natural_image
Warning symbol with lightning bolt inside a triangle (no text or numbers)WARNING IT IS HAZARDOUS FOR ANYONE OTHER THAN AUTHORISED SERVICE PERSONNEL TO CARRY OUT SERVICING OR REPAIRS WHICH INVOLVE THE REMOVAL OF COVERS.
TO AVOID THE RISK OF AN ELECTRICAL SHOCK DO NOT ATTEMPT REPAIRS YOURSELF.

natural_image
Warning symbol with exclamation mark inside a triangle (no text or numbers)1 Keep ventilation openings, in the appliance enclosure or in the build-in structure, clear of obstruction.
2 Do not use mechanical devices or other means to accelerate the defrosting process, other than those recommended by the manufacturer.
3 Do not use electrical appliances inside the food storage compartments of the appliance, unless they are of the type recommended by the manufacturer.
4 If the supply cord is damaged, it must be replaced by the manufacturer of its service agent or a similarly qualified person in order to avoid a hazard.
5 Be cautious to cause fire when maintaining the refrigerators as the refrigerant and vesicant are burnable. Useless and old refrigerators should be recycled and disposed by professional companies.
6 Do not discard useless and old refrigerators at will in order to avoid environment pollution. Thank you for your cooperation.
7 Young children should be supervised to ensure that they do not play with the appliance.
8 Do not damage the refrigerant circuit(applicable only for appliances with refrigeration circuits which are accessible to the user.)
9 The freezer must be maneuvered by a minimum of 2 persons.
10 This unit is for storing liquids only. Do not store food in this appliance.
TECHNICAL SPECIFICATIONS
| Model | MWC348BE |
| Rated Voltage (V) | 230 |
| Rated Frequency (Hz) | 50 |
| Gross Volume (Litres) (Cubic Feet) | 140 4.94 |
| Weight (kg) | 29 |
| Product Dimension h/w/d (mm) | 845 x 504 x 514 |
| Sound Decibel Rating (dB[A]) | 40 |
| Refrigerant | R600a |
The policy of Matsui is one of continuously seeking new ways of improving its products. Therefore the Company reserves the right to change the specification of items illustrated and described, at any time.

This symbol on the product or in the instructions means that your electrical and electronic equipment should be disposed at the end of its life separately from your household waste. There are separate collection systems for recycling in the EU. For more information, please contact the local authority or your retailer where you purchased the product.

Partmaster co.uk
Visit Partmaster.co.uk today for the easiest way to buy electrical spares and accessories.
With over 1 million spares and accessories available we can deliver direct to your door the very next day.
Visit www.partmaster.co.uk
or call
0870 6001 338
(UK customers only)
Calls charged at National Rate.
- Glass Fronted Wine Cooler
- MODEL MWC348BE
- GETTING TO KNOW YOUR WINE COOLER
- INSTALLATION
- Before use
- Location
- Levelling the Wine Cooler
- Cleaning before use
- Before plugging in YOU MUST
- Before switching on!
- Before using your Wine Cooler
- USING YOUR WINE COOLER (Note:This appliance is for Wine storage only.)
- Operating instructions
- Switching on your Refrigerator
- Adjusting the shelves
- The Internal Light
- Noises inside the Wine Cooler!
- GURGLING, WHOOSHING
- HUMMING, PURRING OR PULSATING
- Storing wine in your Wine Cooler
- Leave space around Wine containers
- Shut the door!
- REVERSING THE DOOR SWING
- CLEANING
- MAINTENANCE
- Cleaning inside the Wine Cooler
- Cleaning the outside of the Wine Cooler
- Cleaning tips
- Moving your Wine Cooler
- Care when handling
- Servicing
- Changing the internal light
- SAFETY/TROUBLESHOOTING
- SAFETY
- WARNINGS
- Disposal
- Locks
- Troubleshooting
- Noises
- Partmaster co.uk
Brand : MATSUI
Model : MWC348BE
Category : Wine cellar