ST H2H BHIT601 - Cooker STOVES - Free user manual and instructions
Find the device manual for free ST H2H BHIT601 STOVES in PDF.


| Product Type | Freestanding Cooker |
| Brand | Stoves |
| Model | ST H2H BHIT601 |
| Width | 90 cm |
| Depth | 60 cm |
| Height | 85-95 cm |
| Weight | Approximately 65 kg |
| Power Supply | Gas hob (natural gas or LPG), electric oven: 230V ~ 50Hz |
| Hob Type | Gas hob with 5 burners |
| Oven Type | Electric fan oven |
| Oven Capacity | Approx. 100 liters |
| Main Functions | Gas hob cooking, oven baking, grilling, defrosting |
| Cleaning | Enamel interior, wipe-clean surface; removable oven door for cleaning |
| Safety Features | Flame failure device on gas burners, cool-touch oven door, child lock |
| Control Panel | Rotary knobs for hob and oven functions |
| Accessories | Oven grill pan, baking tray, oven rack (2 shelves) |
| Spare Parts & Repairability | Oven door seal, burner caps, thermostat, heating elements, knobs (available from manufacturer or authorized service) |
| General Information | Designed for domestic use; installation must comply with local gas and electrical regulations; user manual includes troubleshooting tips |
Frequently Asked Questions - ST H2H BHIT601 STOVES
User questions about ST H2H BHIT601 STOVES
0 question about this device. Answer the ones you know or ask your own.
Ask a new question about this device
Download the instructions for your Cooker in PDF format for free! Find your manual ST H2H BHIT601 - STOVES and take your electronic device back in hand. On this page are published all the documents necessary for the use of your device. ST H2H BHIT601 by STOVES.
USER MANUAL ST H2H BHIT601 STOVES
User's Guide & Installation Handbook

Make a statement

Stoves
H2H BHIT601
Part No 083714600 Date 28/02/2018
CONTENTS
- SAFETY • USING THE PRODUCT
- CLEANING • INSTALLATION INSTRUCTIONS
- TECHNICAL DATA CUSTOMER CARE
INTRODUCTION
Thank you for buying this high quality hob from Stoves.
This guide book is designed to help you through each step of owning your new appliance, from installation to use. Please read it carefully before you start using your product, as we have endeavored to answer as many questions as possible, and provide you with as much support as we can.
If, however, you should find something missing, or not covered, please contact our Customer Care team. Their number is located on the back page of this book.
For customers outside the UK and Northern Ireland, please contact your local supplier.
When you dial this number you will hear a recorded message and be given a number of options. This indicates that your call has been accepted and is being held in a queue. Calls are answered in strict rotation as our Customer care representatives become available.
Alternatively, general information, spares and service information is available from our website. The address is located on the back page of this book.
WARRANTY
Your new appliance comes with a manufacturer's guarantee, protecting you against electrical and mechanical breakdown. To register, please complete the registration form included, register online or by phone.
For full terms & conditions of the manufacturer's guarantee, refer to the website on the back of this book.
European Directives

As a producer and a supplier of cooking appliances we are committed to the protection of the environment and are in compliance with the WEEE directive. All our electric products are labelled accordingly with the crossed out wheeled bin symbol. This indicates, for disposal purposes at end of life, that these products must be taken to recognised collection points, such as local authority sites/local recycling centres.
This appliance Complies with European Community Directives (CE) for household and similar electrical appliances and Gas appliances where applicable.
Hereby, Glen Dimplex Home Appliances Ltd. declares that the radio equipment type ST H2H BHIT601 is in compliance with Directive 2014/53/EU. The full text of the EU declaration of conformity is available at the following internet address, in the online version of this handbook: www.stoves.co.uk
This appliance conforms to European Directive 2009/125/ regarding Eco design requirements for energy-related products.
Our policy is one of constant development and improvement, therefore we cannot guarantee the strict accuracy of all of our illustrations and specifications - changes
may have been made subsequent to publishing.
WARRANTY EXCLUSIONS
Damage or calls resulting from transportation, improper use or the replacement of removable parts.
Costs incurred for calls to put right an appliance which is improperly installed. Appliances found to be in use within a commercial environment, plus those which are subject to rental agreements.
Before using the hob
Make sure that you have removed all packaging, wrappings, stickers and films from the hob surface.
It is recommended that you clean and wash the hob surface before using for the first time.
Apply a thin coat of ceramic hob cleaner to the hob to help maintain and protect it.
See the customer care section for details of how to obtain all the available cleaning products.
WARNING
- If the hob surface is cracked, broken or shattered, switch off the appliance to avoid the possibility of electric shock and call for a service engineer's visit.
- The appliance and its accessible parts become hot during use. Care should be taken to avoid touching heating elements. Children less than 8 years of age shall be kept away unless continuously supervised. This appliance can be used by children aged from 8 years and above and persons with reduced physical sensory or mental capabilities or lack of experience and knowledge if they have been given supervision or instruction concerning the use of the appliance in a safe way and understand the hazards involved. Children shall not play with the appliance. Cleaning and user maintenance shall not be made by children without supervision.
- Do not use a steam cleaner on any cooking range, hob or oven appliance.
- Metallic objects such as knives, forks, spoons and lids should not be placed on the hob surface since they can get hot.
• After use, switch off the hob element by its control and do not rely on the pan detector.
- The appliance is not intended to be operated by means of an external timer or separate control system.
- Unattended cooking on a hob with fat or oil can be dangerous and may result in fire.
- NEVER try to extinguish a fire with water, but switch off the appliance and then cover the flame with a lid or damp cloth.
• Danger of fire: Do not store items on the cooking surfaces.
- Only use hob guards designed by the manufacturer of the cooking appliance or indicated by the manufacturer of the appliance in the instructions for use as suitable or hob guards incorporated in the appliance. The use of inappropriate hob guards can cause accidents.
- This induction hob complies with the applicable EMC and EMF standards. Therefore, it should not interfere with other electronic units. Persons fitted with a pacemaker or any other electrical
implant should clarify with their doctor or the producer of the implant whether their implant is adequate and fail-safe. Please place pans centrally on the cooking zones. The British Heart Foundation provides additional advice regarding using induction hobs when a pacemaker is fitted.
- During use, the appliance becomes hot. Care should be taken to avoid touching heating elements.
- Do not modify this appliance.
- Do not place articles on or against the appliance. Servicing should be carried out only by authorized personnel.
- Means for disconnection must be incorporated in the fixed wiring in accordance with the wiring rules.
- It is necessary to allow disconnection of the appliance from the supply after installation. The disconnection may be achieved by having the plug accessible or by incorporating a switch in the fixed wiring in accordance with the wiring rules.
- If the supply cord is damaged, it must be replaced by a special cord or assembly available from the manufacturer or its service agent.
CAUTION
- The cooking process has to be supervised. A short-term cooking process has to be supervised continuously.
- This appliance must not be installed behind a decorative door in order to avoid overheating.
- Fire Safety Advice
If you do have a fire in the kitchen, don't take any risks - get everyone out of your home and call the Fire Brigade.
If you have an electrical fire in the kitchen:
- Pull the plug out, or switch off the power at the fuse box - this may be enough to stop the fire immediately.
- Smother the fire with a fire blanket, or use a dry powder or carbon dioxide extinguisher.
- Remember: never use water on an electrical or cooking oil fire.
• Other Safety Advice
- There is a risk of electric shock, so always make sure you have turned off and unplugged your appliance before starting to clean it. • This appliance must be earthed.
- The appliance must never be disconnected from the mains supply during use, as this will seriously affect the safety and performance, particularly in relation to surface temperatures becoming hot and parts not working efficiently.
Before using your hob
It is recommended that you clean and wash the hob surface before using for the first time. Apply a thin coat of ceramic hob cleaner to the hob to maintain and protect it. See the customer care section for details of how to obtain all the available cleaning products.
TOUCH CONTROLS
The touch controls for your induction hob have been designed to provide you with fingertip control of your hob, providing accurate and repeatable power settings for cooking and an easy clean surface that can be easily wiped over. When a cook zone is activated the power setting is displayed for each zone individually.
Using the Touch Controls.
Use the flat of your finger, not the tip. The controls respond to touch, so you don't need to apply any pressure.
Always ensure the control area is clean, dry and free from any objects (e.g. utensils, tea towels and cloths). Spillages and water may make the controls difficult to operate.


BASIC CONTROLS
Child Lock "Lo" 88
This feature is to help prevent accidental switching on of the hob zone, especially by young children.
Note: A brief touch of the child lock key will activate the child lock function. A longer three second touch of the child lock key will deactivate the child lock function.
To activate the child lock:
1) Touch the On/Off key. 2) Touch the Lock key. 4) Switch off the hob.
When you now switch on the hob, "Lo" will appear in the timer display. The child lock feature will be permanently activated. To deactivate, follow the procedure below.
To deactivate the child lock:
1) Touch the On/Off key. ("Lo" will be displayed on the timer display). 2) Touch and hold the Lock key for at least 3 seconds until the timer display no longer shows "Lo". 4) Now the hob can be used normally.
Central On/Off switch ⏻
The central on/off switch enables all of the cooking zones to be switched off simultaneously at the touch of a key.
To switch on the hob
The hob is switched on by touching the On/Off key.
The cook zone displays light up.
If no zone is selected, the hob will turn off automatically after a few seconds.
To switch off the hob
The hob is switched off by touching the
On/Off key.
All the heating zones are switched off.
Switching on a hob cook zone
To switch on a cook zone it is necessary to activate each cooking zone by means of two operations:
1) Touch the required cook zone key and the cook zone display starts to flash. 2) Touch the power level bar to select the required power level for the cooking zone. The off position, 0, is on the far left while the highest power level, 9, is on the far right.
Switching off an individual hob cook zone
Once the cook zone is selected, it can be switched off by sliding on the power level bar to the very left until the corresponding display shows "0".
Power Boost B 8
Boost the power to a cook zone. All cook zones can be boosted.
The cooking zone returns to the setting it was set before the boost was activated after 5 minutes.
If the cooking zone was set to level 0 before the boost was activated, then the cooking zone will switch to level 9 after 5 minutes.
Due to power limitations: If the boost function of one cooking zone is activated, a 2nd cooking zone on the same side (left or right) is limited to a maximum power level of 2 automatically.
For example: If the boost function of the front left cooking zone is activated, the rear left cooking zone is limited to a maximum power level of 2 automatically.
To active the boost function
1) Touch the required cook zone key and the cook zone display starts to flash. 2) Touch the boost key.
To deactivate the boost function
1) Touch the required cook zone key and the cook zone display starts to flash. 2) Touch the power level bar to select a different power setting.
Keep Warm 8
To activate the Keep Warm setting
1) Touch the required cook zone key and the cook zone display starts to flash. 2) Touch the keep warm key.
To deactivate the Keep Warm setting
1) Touch the required cook zone key and the cook zone display starts to flash. 2) Touch the power level bar to select a different power setting.
Flexible Cooking Area
The left 2 cooking zones and the right 2 cooking zones can be connected to make a larger flexible cooking area.
This area can be used as a single zone or as two different zones, according to the cooking needs at anytime.
The flexible cooking area is made of two independent inductors that can be controlled separately. When working as a single zone, the part that is not covered by cookware is automatically switched off after one minute.
To grant a correct pan detection and an even heat distribution, the cookware should be correctly placed.
Using a single flexible area
1) To activate the flexible area as a single large zone touch the flexible area key B. 2) Select the power level bar to set your zone.
Using two individual cooking zones
1) To use the flexible cooking area as two individual zones with different power settings touch the rear cook zone key 8 or front cook zone key 8 respectively. 2) Touch the power level bar to select the required power level for the cooking zone. The off position, 0, is on the far left while the highest power level, 9, is on the far right.
Pause ⑪ 8
To pause cooking
1) While at least one cooking zone is active, touch the pause key.
All displays will show the pause indicator 8.
Note: In the paused state, only the on/off key and the pause key can be operated.
To resume cooking
1) While cooking is paused, touch the pause key.
All cooking zones will return to their previous state.
TIMER CONTROLS
Using the timer as a Minute Minder
To set the minute minder
1) Turn on the hob using the on/off key. 2) Touch the timer key. The timer display will show "10" and the "0" flashes, meaning the time defaults to 10 minutes. When setting the time, you must set the right-hand side
digit before you can set the left-hand side digit.
3) Set the right digit of the timer by touching the power level bar. 4) Touch the timer key again to switch to the left digit. 5) Set the left digit of the timer by touching the power level bar.
When the time is up
When the set time finishes, the buzzer will beep and the timer display will show “- -”.
Using the timer to control cooking
The timer can be set to automatically turn off a cooking zone. All four cooking zones can be simultaneously timed to turn off automatically.
Cook zones can be set for a maximum time of 99 minutes.
Warning: Never leave the hob unattended when in use, even when you have set the timer to turn off the cook zone.
To set auto timer on 1 zone
1) Select the cook zone to be timed, ensuring power level is already set before selecting timer. 2) Touch timer key. The timer display will show "10" and the "0" flashes.
Note: Please be aware that the right digit has to be set before the left digit can be set.
3) Set the right digit of the timer by touching the power level bar. 4) Touch timer key again to switch to the left digit. 5) Set the left digit of the timer by touching the power level bar.
When the time is set, it will begin to count down immediately. The display will show the remaining time and the timer indicator flashes for 5 seconds.
A dot beside the cook zone display of the next zone to finish will flash.
When the time is up
The programmed cooking zone will automatically turn off.
Note: All other cooking zones will keep operating if they are turned on.
To set auto timers on multiple zones
To set automatic timers on multiple zones, follow the instructions under "To set auto timer on 1 zone" on multiple zones after each other.
A dot beside the cook zone display of the next zone to finish will flash.
The timer display shows the minutes left for the cooking zone with the least time remaining.
WIRELESS HOOD CONNECTION

This hob can be wirelessly connected to a compatible range hood.
Please contact Customer Care to find a compatible hood.
If the hob is connected to the hood, it will automatically control the hood's lighting when the hob is switched on/off and the power level of the hood.
The power level of the hood will be adapted to the highest set power level on the hob. See hood power levels in table below.
| Highest cooking zone power level on hob | Power level for cooker hood |
| Keep Warm 1 | |
| 1, 2, 3 1 | |
| 4, 5, 6 2 | |
| 7, 8 3 | |
| 9, Boost Boost | |
| Pause/Off | 3 mins of air cleaning |
To pair a hob wirelessly
1) Touch and hold the wireless connection key on the hob for at least 3 seconds until the indicator LED starts flashing.
2) Touch and hold the wireless connection key on the hood for at least 3 seconds until the indicator LED starts flashing.
3) Once the hob and the cooker hood are paired successfully, the wireless indicators will be lit continuously on both appliances. If pairing fails, the wireless indicator will switch off after 60s.
A hob and hood need to be paired only 1 time. Once they are paired, the hood can be connected and disconnected by touching the wireless connector on the hood.
Note: If the hob is being switched off, the connected cooker hood will shut down automatically after 3 minutes. During these 3 minutes the hood will extract at low rate to clean the air in the kitchen.
OTHER CONTROLS
Pan Detection

As soon as you lift the pan off the zone, the power is automatically reduced, helping to save energy.
The above 'U' symbol appears when a zone has been activated but no pan has been placed on the cook zone.
If the 'U' symbol does not disappear when a pan is placed on the zone, it indicates that the pan is not suitable for induction cooking.
Note
This means the hob only uses power when a suitable pan is placed on the zone. This reduces the energy used during the cooking process, i.e., when you take your pan off the zone, the hob automatically reduces the power, and only switches back on when you replace the pan.
PANS AND COOKWARE FOR INDUCTION HOBS
Pans and cookware for induction cooking zones must be made of ferrous material such as cast iron and have magnetic properties. The base must also be of the correct diameter.
It's important that good quality flat-bottomed pans are used.
If a pan creates a large air gap over the middle of the cooking zone, the accuracy of the temperature sensing can be affected.
Always ensure that pan bases are dry before using them on the hob.
Get a magnet. If the magnet doesn't stick to the base of the pan across the entire diameter of the base, then the pan is not suitable for use on the induction hob.
Beware: Not all induction pans are of the same quality due to their construction. Pans that use enamelled/laminated/encapsulated bases can be difficult to detect, especially small pans (e.g., milk pans). We recommend that you buy pans that are marked/advertised as being suitable for induction.
This problem is not with the induction hob but with the pan type. They can have bases which are magnetic but are not thick enough! If you experience problems with small pans, we recommend that you
try a larger pan or a pan of a different construction. Solid cast iron pans give the best performance.
| Induction Cook Zone | Smallest Recommended Diameter (mm) |
| LHF 140 | |
| LHR 140 | |
| RHR 140 | |
| RHF 140 |
Cookware made of enamelled steel or with aluminium or copper bottoms can leave discolorations on the ceramic glass surface which are difficult or impossible to remove.
Pans unsuitable for Induction:
Pans made of copper, stainless steel, aluminium, oven proof glass, wood, ceramic and terra-cotta.
Overheat Pan Protection
The hob is equipped with additional safety systems that help to prevent cookware from overheating, providing an additional level of safety not available on conventional hobs such as gas and ceramic hobs.
Helps reduce the risk of fire through misuse of the hob.
If there is an overheat situation the hob will display the appropriate code detailed in the "Appliance Errors" table.
Note:
The safety temperature control of the pans is only possible with quality flat bottomed pans suitable for induction cooking. Poor quality pans can create air gaps between the glass and the pan, which affects the accuracy of the temperature control.
Residual Heat Indicators 8
If the glass surface is too hot to touch
safely when the cook zone is switched off an "H" will be displayed in the cook zone display until the glass surface drops to an acceptable temperature.
This feature not only warns you against hot surfaces, but also indicates that there is residual heat which can be used as a temporary warming zone.
Note:
The cook zone itself does not heat up, but the ceramic glass does get hot because of the hot pan conducting heat back onto the hob glass.
Auto Stand by
The hob will automatically switch off if left (with a pan on it) for an extended period of time. See the automatic switch-off times in the table below.
| Power Level | Maximum Operation Time hours |
| Keep Warm 8 | |
| 1, 2, 3 8 | |
| 4, 5, 6 4 | |
| 7, 8, 9 2 |
ELECTRIC HOB
Ceramic glass hobs
- It is recommended that you clean and wash the hob surface before using it for the first time. Apply a thin coat of ceramic hob cleaner to the hob to help maintain and protect it.
- The ceramic hob top can be cleaned using a clean, damp cloth or kitchen paper. Do not use a used dishcloth or sponge as they can leave a film of detergent on the surface, which can lead to discoloration. Please ensure that the elements are cooled fully to avoid steam burns.
You can use a specialist ceramic cleaner to restore the surface, but use it sparingly to avoid coating the hob top too thickly. Too much cream cleaner will lead to discolouration. Use a dry, clean cloth to polish the surface.
For stubborn marks, a specialist hob scraper or cleaner can be used.
Do not use steam cleaners or high-pressure cleaning equipment.
Regular cleaning will prevent any salts or minerals from accumulating on your hob and discolouring the glass.
Wipe any spillage as soon as possible.
Clean the hob top as regularly as possible; this will prevent any build-up of grease, which may be a fire hazard.
Notes:
- The edge of the ceramic glass will always appear to be a different colour than the top surface due to the ground safety edge.
- Scratches or dark stains on the ceramic glass that cannot be removed do not affect the function of the appliance.
Safety when Cleaning
- For cleaning, the appliance must be switched off and cooled down.
WARNING! Risk of burns from residual heat.
General information
Installation should only be carried out by a qualified installer or engineer.
Please keep to the following points most carefully:
Although every care has been taken to ensure this appliance has no burrs, or sharp edges, we recommend that you wear protective gloves when installing and moving this appliance. This will prevent injury.
The minimum distances to other appliances and units are to be observed.
Wall surfaces above the work surface and in the immediate vicinity of the cooking hob must be heat resistant.
Laminated surfaces and the adhesive used for fixing them must be heat resistant in order to avoid any damage.
The space for air circulation, located underneath and at the back of the hob improves its reliability by ensuring that it will cool down, efficiently.
Installations should be carried out in line with the National Regulations applicable with this product type.
Note: Avoid installing the appliance next to doors and under windows. This will avoid the potential for hot cookware being knocked off the hob when doors and windows are opened (Risk of burns).
Built-in appliances may only be used after they have been built-into suitable built-in units and surfaces that meet the required standards.
Do Not
Do not expose this product to contamination by dust, building debris, sawdust, etc. It is recommended that this product is stored in a clean environment until ready to install.
Before installation, any dust, building debris, sawdust, etc. should be vacuumed away to ensure no contamination will enter the unit. Failure to follow this advice can cause the product to fail or reduce the life of the product.
CHOOSING YOUR INSTALLATION METHOD
Make sure that the air inlets through the ventilator grids underneath the hob are never blocked.
We recommend that you install this appliance in a worktop which has a minimum depth of 38mm.
The hob can be fitted into a worktop less than 38mm deep, but the 50mm gap between the hob base and any appliance below it must be maintained.
Installation above an oven
Refer to the oven manufacturer's instructions.
We recommend a 50mm gap between the bottom of the hob and the oven.
An air outlet of 5mm underneath the work surface is required.
Installation above a unit with a drawer or door
An air outlet of 5mm underneath the work surface is required. If necessary, remove the front crosspiece of the unit.
The base of the appliance must be protected from damage. For example, drawers may only be installed providing a partition panel is fitted to the required dimensions underneath the appliance. Suitable protection to prevent obstruction of the air inlet to the fans must be provided.
In the case of a pyrolytic oven
If installing the hob above a pyrolytic oven, additional provision for air circulation / ventilation may be required.
Due to the excessive temperatures attained during pyrolysis, using the hob at the same time may cause the thermal safety device within the hob to operate.

Clearances and dimension – requirements
No shelf or overhang of combustible material should be closer than 650mm above the hob.
There must be a minimum clearance of 50mm between the edges of the hob and any side walls; this clearance must be maintained up to 420mm above the work top.
There must be a minimum clearance of 50mm between the rear edge of the hob and the rear wall. This clearance must be maintained up to 650mm above the work top.
When installing an extractor hood above the hob, refer to the hood manufacturer's instructions.
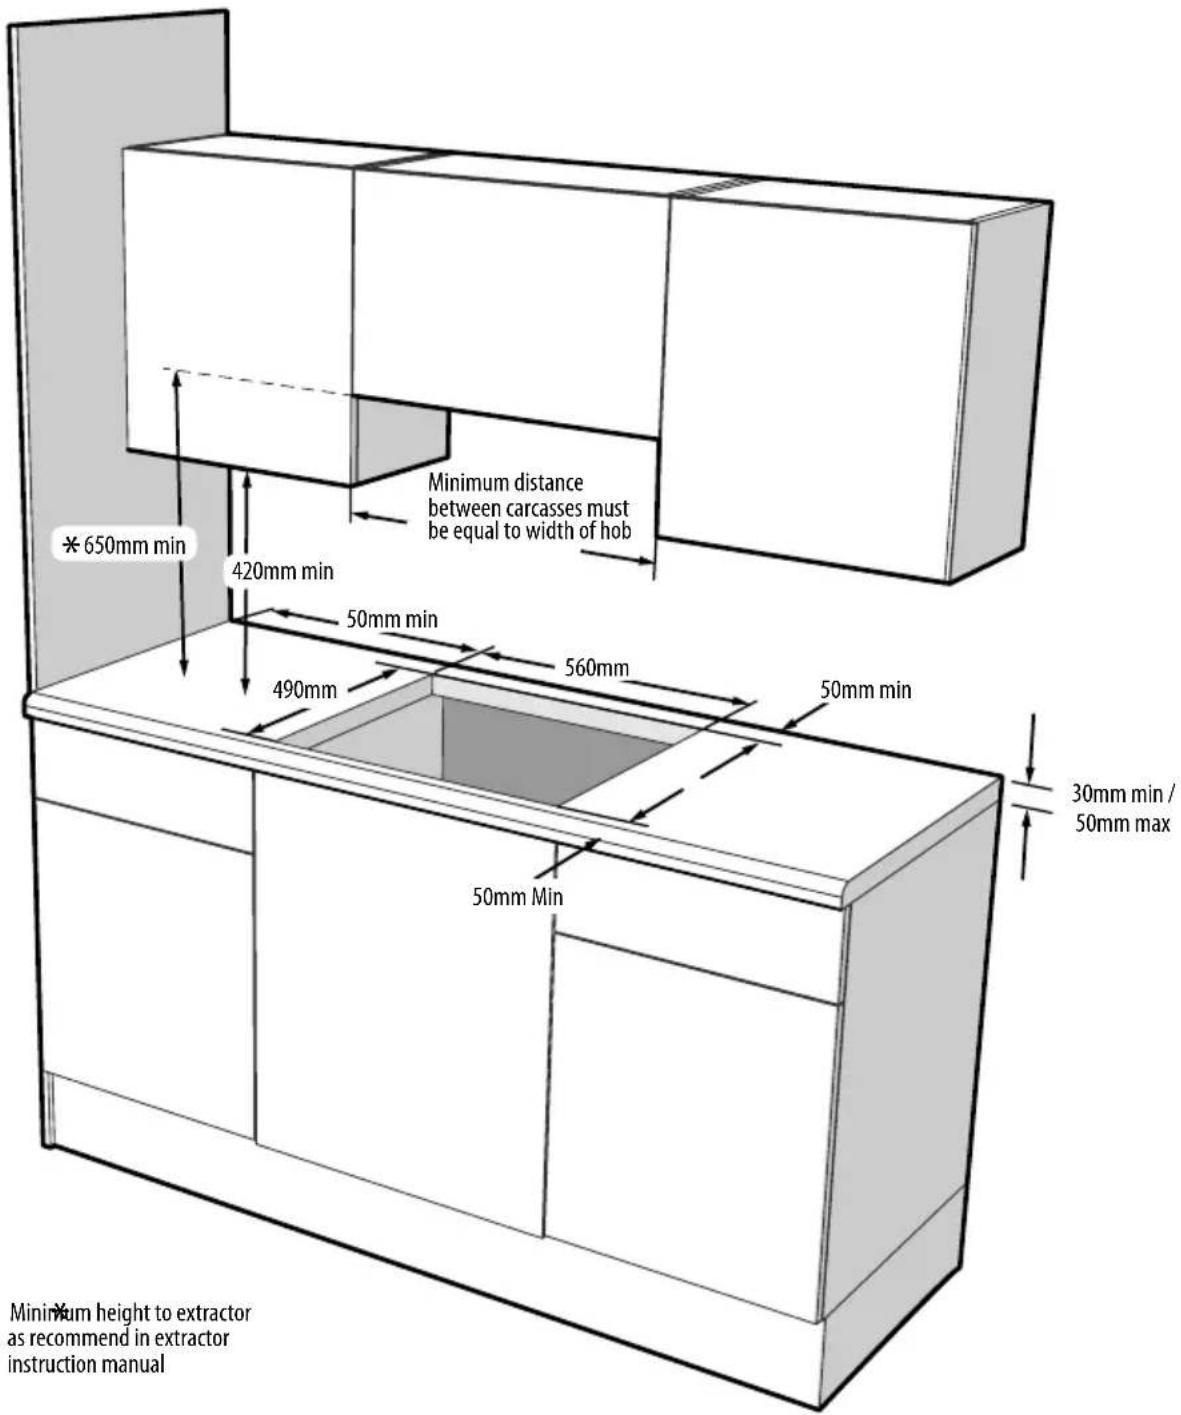
Minimum height to extractor as recommended in extractor instruction manual
Fitting into work top
Cut a hole in the work surface to the required size.
A clearance of at least 50mm should be maintained between the cutout and any rear or side wall.
The work top must be of heat-resistant material or covered with heat-resistant material.
Protecting the cut-out
The types of chipboard used for work surfaces swell relatively quickly in contact with humidity.
Apply a suitable sealant to the cut edge to protect it from moisture ingress.
This hob can be installed conventionally (glass above the work top) or recessed into the work top for a flush fit.
Self adhesive seal
Apply the self adhesive seal to the underside edges of the hob glass. For best results, the seal should be adhered along each side in turn, as close to the edge as possible, and trimmed at each corner, taking care to ensure a neat join.
Conventional Installation
Place the hob in the aperture, checking the hob glass is covering the work top along all four sides.
Set the front edge of the appliance parallel with the front of the work top.
Locate and attach the securing clamps as required. Tighten the screws so that the hob is pulled down firmly against the work top, thus ensuring a good seal.

DO NOT USE POWER TOOLS TO TIGHTEN BRACKET OR TERMINAL BLOCK SCREWS - OVER-TIGHTENING COULD RESULT IN DAMAGE TO THE HOB
Recessed Method
Recess the work top to the appropriate depth (approx. 5mm) and shape to fit the hob (add 1mm to overall glass size). Insert the hob into the recess, ensuring that the foam seal is sitting correctly. Locate and attach the securing clamps as required. Tighten the screws so that the hob is pulled down firmly against the work top, thus ensuring a good seal.
DO NOT fit silicone sealant under the glass hob instead of the self adhesive seal.

1 SELF ADHESIVE SEAL

1 SELF ADHESIVE SEAL 2 SILICONE SEALANT
Fixing Bracket Advice
Dealing with sides, cross-rails and back-panels in the cabinet.
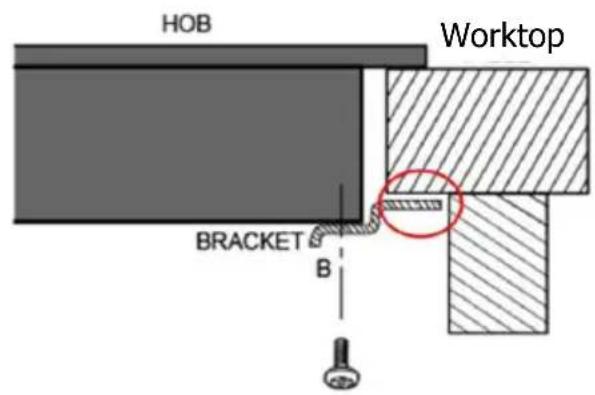
Depending on the cabinets, the work-top thickness and the hob positioning, it is possible for the hob base and/or the clamp brackets to interfere with parts of the cabinet.
Cut away cabinet and use appropriate fixing brackets for your installation.
Note: Attach the clamps and 4 x self tapping screws in the fixing bracket locations as shown in the diagram.
The brackets must not touch the inner surfaces of the worktop after installation (see pictures below).


Connect to the electricity supply
Warning: Ensure that the power rating of the appliance is compatible with a 25Amp supply before connecting to the electricity supply. Check with an electrician whether the domestic wiring system is suitable without alterations.
Any alterations must only be made by a qualified electrician.
Warning: This appliance must be earthed.
The power supply cable must not touch any hot parts and must be positioned so that its temperature will not exceed 75°C at any point.
Should the mains lead of the appliance ever require replacing, we recommend that this is carried out by a qualified electrician who will replace it with a lead of the same size and temperature rating.
Important: - ensure that you route all mains and electrical cables and flexible tubing well clear of any adjacent heat source.
Under no circumstances should the mains electric cable be allowed to come into contact with hot oven flues or similar surfaces and keep well clear of any moving parts that may be in the vicinity of the installation, such as cooling fans on adjacent appliances.


| SINGLE PHASE SUPPLY: 220 -240V ~ 50Hz 7.2kW | |
| Individual Cook Zone Power Ratings | |
| Cook Zone | Normal Power/BoostPower Rating kW |
| LHF 1.8/3 | |
| LHR 1.8/3 | |
| RHR 1.8/3 | |
| RHF 1.8/3 | |
CUSTOMER CARE WEB SHOP
Having purchased a superior cooker, hob or hood from us, you'll naturally want to keep it looking great. And who better to help you care for it than the manufacturer?
We offer an extensive range of accessories, components and cleaning products which will instantly give your cooker a good as new look.
In addition to the list of our most popular products below, we also have an exciting
range of Bake ware and Cookware essentials including Roasting Pans, Cake Tins and Non-Stick Cooking Liners.
For all enquiries, please visit our Web Shop at www.gdhaonline.co.uk or call the Spares Sales Team. For countries outside the UK, please contact your local service agent.
| Product Description | Where used Purpose | |
| Ceramic Hob Cleaner | All Ceramic glass hobs including Induction | Enables easier cleaning of your ceramic hob. Prevents build up of mineral deposits. Best used with Ceramic Hob Scraper Kit. 300ml bottle. |
| Ceramic Hob Scraper kit | All Ceramic glass hobs including Induction | Ideal for removing cooked on marks from ceramic glass hobs Best used with Ceramic Hob Cleaner |
| Sealed Hotplate Conditioner | All sealed/solid plate hobs | Restores the sleek matt black finish to solid hotplates |
| Multipurpose Kitchen Cleaner | General kitchen cleaner | Excellent multipurpose cleaner, For use around the kitchen. 500ml bottle. |
| Oven Cleaner | All cooking appliances. | Cuts through grease & burnt on grime. 500ml bottle |
| Restor-A-Cloth | All cooking appliances. | Chemical free cleaning cloth Ideal for cleaning & polishing glass & stainless steel |
| Stainless Steel Cleaner | All stainless steel parts | Oil based cleaner. Perfect for removing stubborn & greasy marks. 300ml bottle. |
| Rectangular carbon filters | Cooker Hoods | New filters, help to maintain efficient cooker hood operation and keep your Kitchen odour free |
| Round Carbon Filters | Cooker Hoods | New filters, help to maintain efficient cooker hood operation and keep your Kitchen odour free |
Please keep this handbook for future reference, or for anyone else who may use the appliance.
Please keep this handbook for future reference, or for anyone else who may use the appliance.
Please keep this handbook for future reference, or for anyone else who may use the appliance.
To contact Stoves about your appliance, please call
Warranty Registration 0800 952 1065
to register your appliance
Customer Care Helpline 0344 815 3740
in case of difficulty within the UK
Spares Sales Team 0344 815 3745
Alternatively general, spares and service information is available from our website at www.stoves.co.uk
Please ensure that you have the product's model no and serial no available when you call. These can be found on the silver data label on your product which is located:
Ovens: Open the door; adjacent to the oven cavity High-level grill products: Inside the base compartment Hobs: On the underside of the product
Enter appliance numbers here for future reference:
Model No
Serial No
SERVICE RECORD
| Date of purchase Installed by Installation Date | |
| Place of purchase: |
| Date Part(s) replaced Engineer's name | |
For customers outside the UK and Northern Ireland, please contact your local supplier.
Glen Dimplex Home Appliances, Stoney Lane, Prescot, Merseyside, L35 2XW
EU Declaration of Conformity
We Glen Dimplex Home Appliances
Of Stoney Lane, Prescot, Merseyside, L35 2XW, UK
In accordance with the following Directive(s):
2014/53/EU Radio Equipment Regulations
2014/35/EU The Low Voltage Directive
2014/30/EU The Electromagnetic Compatibility Directive
2011/65/EU Restriction of the use of certain Hazardous Substances in electrical and electronic equipment
Hereby declare that: ST H2H BHIT601
is in conformity with the applicable requirements of the following documents
| Ref No. | Title | Edion/ date |
| EN 301 489-1 | ElectroMagnec Compatibility (EMC) standard for radio equipment and services;Part 1: Common technical requirements; Harmonised Standard covering the essenal requirements of arcle 3.1(b) of Direcve 2014/53/EU and the essenal requirements of arcle 6 of Direcve 2014/30/EU | V2.1.1 |
| EN 301 489-17 | ElectroMagnec Compatibility (EMC) standard for radio equipment and services;Part 17: Specific conditions for Broadband Data Transmission Systems; Harmonised Standard covering the essenal requirements of arcle 3.1(b) of Direcve 2014/53/EU | V3.1.1 |
| EN 300 328 | Wideband transmission systems; Data transmission equipment operang in the 2,4 GHz ISM band and using wide band modulaon techniques; Harmonised Standard covering the essenal requirements of arcle 3.2 of Direcve 2014/53/EU | V2.1.1 |
| EN 62479 | Assessment of the compliance of low power electronic and electrical equipment with the basic restricons related to human exposure to electromagnec elds (10 MHz to 300 GHz) | 2010 |
| EN55014-1 | Electromagnetic compatibility — Requirements for household appliances, electric tools and similar apparatus — Part 1: Emission | 2006+A2:2011 |
| EN55014-2 | Electromagnetic compatibility — Requirements for household appliances, electric tools and similar apparatus — Part 1: Immunity | 2015 |
| EN 61000-3-2 | Electromagnetic compatibility (EMC). Limits. Limits for harmonic current emissions (equipment input current ≤ 16A per phase) | 2014 |
| EN 61000-3-3 | Electromagnec compatibility (EMC). Limits. Limitaon of voltage changes, voltage actuaons and icker in public low-voltage supply systems, for equipment with a rated current ≤ 16A per phase and not subject to condional conncon | 2013 |
| EN 60335-1 | Household and similar electrical appliances. Safety. General requirements | 2012+A11:2014 |
| EN 60335-2-6 | Household and similar electrical appliances. Safety. Parcular requirements for stationary cooking ranges, hobs, ovens and similar appliances | 2015 |
| EN 62233 | Measurement methods for electromagnec elds of household appliances and similar apparatus with regard to human exposure. | 2008 |
| EN 50581 | Technical documentaon for the assessment of electrical and electronic products with respect to the restricon of hazardous substances | 2012 |
I hereby declare that the equipment named above has been designed to comply with the relevant sections of the above referenced specifications. The unit complies with all applicable Essential Requirements of the Directives.
Signed:
Paul Mulven
Name: Paul Mulvenna
Position: Product Approval Manager
Location: Glen Dimplex Home Appliances, Prescot
On: 17
th April 2018
Issue 1
CE
Document Reference No.
RED Hobs
- USER'S GUIDE & INSTALLATION HANDBOOK
- CONTENTS
- INTRODUCTION
- THANK YOU FOR BUYING THIS HIGH QUALITY HOB FROM STOVES
- WARRANTY
- EUROPEAN DIRECTIVES
- WARRANTY EXCLUSIONS
- BEFORE USING THE HOB
- WARNING
- CAUTION
- FIRE SAFETY ADVICE
- IF YOU HAVE AN ELECTRICAL FIRE IN THE KITCHEN
- OTHER SAFETY ADVICE
- BEFORE USING YOUR HOB
- TOUCH CONTROLS
- USING THE TOUCH CONTROLS
- BASIC CONTROLS
- CHILD LOCK "LO
- TO ACTIVATE THE CHILD LOCK
- TO DEACTIVATE THE CHILD LOCK
- CENTRAL ON/OFF SWITCH ⏻
- TO SWITCH ON THE HOB
- TO SWITCH OFF THE HOB
- SWITCHING ON A HOB COOK ZONE
- SWITCHING OFF AN INDIVIDUAL HOB COOK ZONE
- POWER BOOST B
- TO ACTIVE THE BOOST FUNCTION
- TO DEACTIVATE THE BOOST FUNCTION
- TO ACTIVATE THE KEEP WARM SETTING
- TO DEACTIVATE THE KEEP WARM SETTING
- FLEXIBLE COOKING AREA
- USING A SINGLE FLEXIBLE AREA
- USING TWO INDIVIDUAL COOKING ZONES
- TO PAUSE COOKING
- TO RESUME COOKING
- TIMER CONTROLS
- USING THE TIMER AS A MINUTE MINDER
- TO SET THE MINUTE MINDER
- WHEN THE TIME IS UP
- USING THE TIMER TO CONTROL COOKING
- TO SET AUTO TIMER ON 1 ZONE
- TO SET AUTO TIMERS ON MULTIPLE ZONES
- WIRELESS HOOD CONNECTION
- TO PAIR A HOB WIRELESSLY
- OTHER CONTROLS
- PAN DETECTION
- NOTE
- PANS AND COOKWARE FOR INDUCTION HOBS
- PANS UNSUITABLE FOR INDUCTION
- OVERHEAT PAN PROTECTION
- RESIDUAL HEAT INDICATORS
- AUTO STAND BY
- ELECTRIC HOB
- CERAMIC GLASS HOBS
- NOTES
- SAFETY WHEN CLEANING
- GENERAL INFORMATION
- DO NOT
- CHOOSING YOUR INSTALLATION METHOD
- INSTALLATION ABOVE AN OVEN
- INSTALLATION ABOVE A UNIT WITH A DRAWER OR DOOR
- IN THE CASE OF A PYROLYTIC OVEN
- CLEARANCES AND DIMENSION – REQUIREMENTS
- FITTING INTO WORK TOP
- PROTECTING THE CUT-OUT
- SELF ADHESIVE SEAL
- CONVENTIONAL INSTALLATION
- RECESSED METHOD
- FIXING BRACKET ADVICE
- DEALING WITH SIDES, CROSS-RAILS AND BACK-PANELS IN THE CABINET
- CONNECT TO THE ELECTRICITY SUPPLY
- CUSTOMER CARE WEB SHOP
- WARRANTY REGISTRATION
- CUSTOMER CARE HELPLINE
- SPARES SALES TEAM
- EU DECLARATION OF CONFORMITY
Brand : STOVES
Model : ST H2H BHIT601
Category : Cooker