SBS666-HCF-041EI - Nicht kategorisiert Exquisit - Kostenlose Bedienungsanleitung
Finden Sie kostenlos die Bedienungsanleitung des Geräts SBS666-HCF-041EI Exquisit als PDF.


| Produkttyp | Side-by-Side Kühl-Gefrierkombination |
| Modell | SBS666-HCF-041EI |
| Marke | Exquisit |
| Abmessungen (H x B x T) | 1770 x 900 x 660 mm |
| Gewicht | ca. 110 kg |
| Spannung | 220-240 V ~ 50 Hz |
| Klimaklasse | SN, N, ST, T (10°C bis 43°C) |
| Kühlmittel | R600a (Isobutan) |
| Eiswürfelbereiter | Ja, automatisch (ca. 1,2 kg/Tag) |
| Wasserspender | Ja, mit Kühlung |
| Wasserfilter | Ja, wechselbar (alle 6 Monate) |
| Kompressor | Inverter |
| Türschließalarm | Ja |
| Kindersicherung | Ja |
| SuperKühlen | Ja (2,5 Stunden) |
| SuperGefrieren | Ja (50 Stunden) |
| Smart-Modus | Ja |
| ECO-Modus | Ja |
| LED-Beleuchtung | Ja |
| Ablagen Gefrierfach | 3 |
| Schubladen Gefrierfach | 2 |
| Ablagen Kühlschrank | 3 |
| Gemüseschubladen | 2 |
| Höhenverstellbare Füße | Ja |
| Garantie | Siehe Garantiebedingungen (QR-Code) |
Häufig gestellte Fragen - SBS666-HCF-041EI Exquisit
Benutzerfragen zu SBS666-HCF-041EI Exquisit
0 Frage zu diesem Gerät. Beantworten Sie die, die Sie kennen, oder stellen Sie Ihre eigene.
Eine neue Frage zu diesem Gerät stellen
Laden Sie die Anleitung für Ihr Nicht kategorisiert kostenlos im PDF-Format! Finden Sie Ihr Handbuch SBS666-HCF-041EI - Exquisit und nehmen Sie Ihr elektronisches Gerät wieder in die Hand. Auf dieser Seite sind alle Dokumente veröffentlicht, die für die Verwendung Ihres Geräts notwendig sind. SBS666-HCF-041EI von der Marke Exquisit.
BEDIENUNGSANLEITUNG SBS666-HCF-041EI Exquisit
| A | 1 | 2 | 3 | 4 | ||||||||
| 重要度 | [B] | |||||||||||
| 技术要求1.颜色要求:封面:黑白印刷内页:黑白印刷;批量时要求统一,不能有明显色差,2.版面内容:封二保留空白,图案与文字应印刷清晰、规范,不能有印刷缺陷;3.页面印刷:双面印刷;4.成型方式:骑马钉;5.成品尺寸:A5(140X210),尺寸公差按GB/T 1804-c;6.批量生产前须送样确认。 | ||||||||||||
| B | ||||||||||||
| C | ||||||||||||
| D | ||||||||||||
| 80g双胶 | 广东奥马冰箱有限公司 | |||||||||||
| 借(通)用件登记 | 说明书 | |||||||||||
| 标志 | 处数 | 更改文件号 | 签名 | 日期 | 重量 | 比例 | ||||||
| 出图审查 | 设计 | 会签 | ||||||||||
| 制图 | 梁嘉莉 | 标准化 | 刘金利 | 共1张第1张 | CKEQ-=23 | |||||||
| 日期 | 审核 | 陈勉环 | 批准 | 李梅方 | 视角符号 | |||||||
| 工艺 | 日期 | 2024-09-03 | ||||||||||
| 1 | 2 | 3 | 4 | |||||||||
GEBRUIKSAANWIJZING
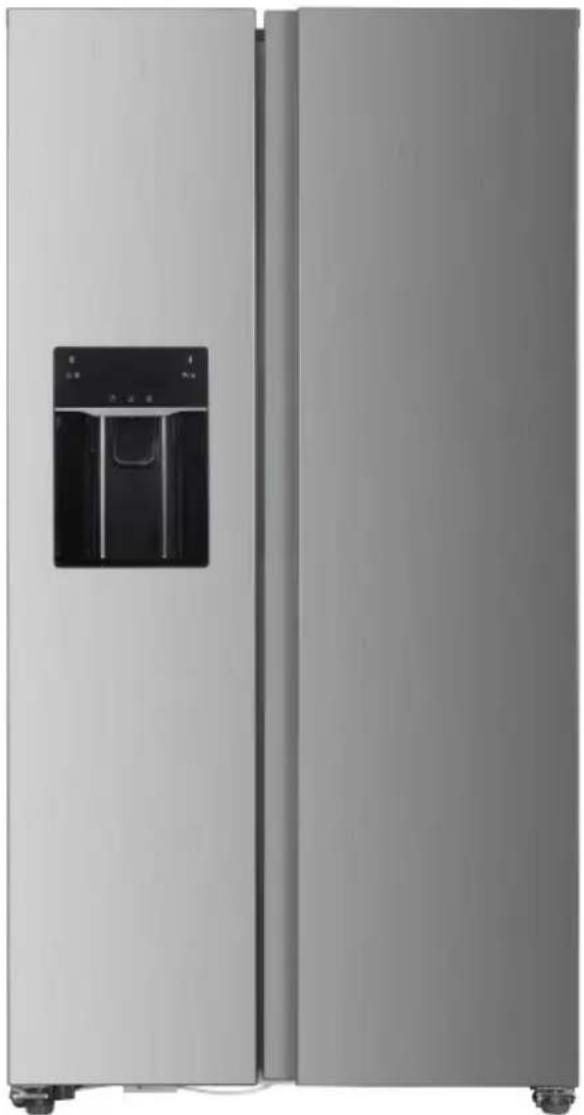
Side by Side koel-vriescombinatie
6%6 □□□+ & ) □□□( ,□□
natural_image
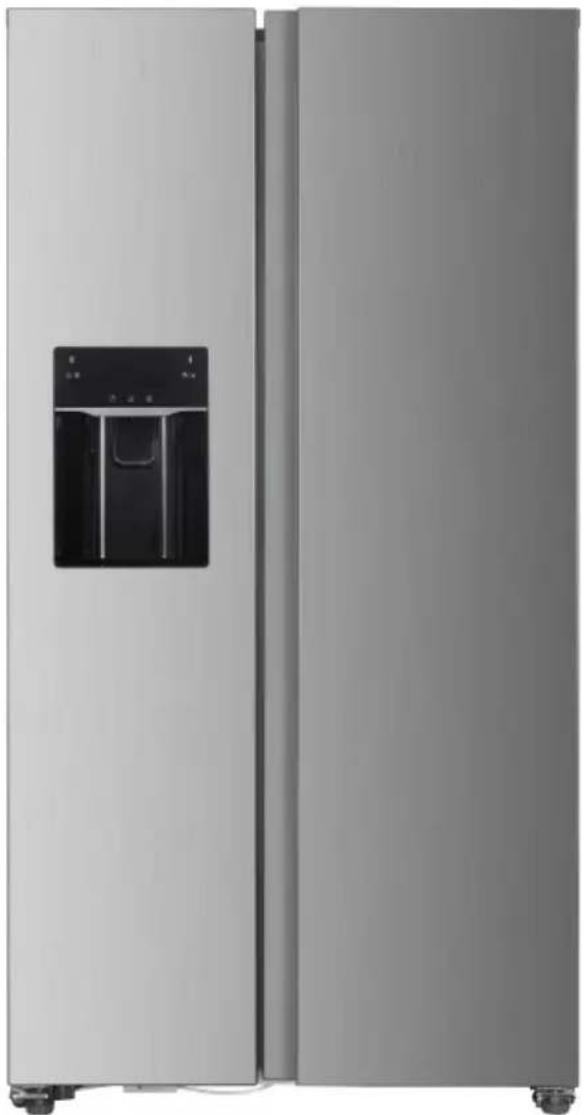
Exterior view of a modern stainless steel refrigerator with front panel and side wheels (no visible text or symbols)| Inhoud | |
| 1. Veiligheidsvoorschriften | Pagina 1 |
| 2. Omschrijving apparaat | Pagina 15 |
| 3. Installatie | Pagina 17 |
| 4. Dagelijks gebruik | Pagina 22 |
| 5. Garantie en Servicebepalingen | Pagina 36 |
Leest u de gebruiksaanwijzing aandachtig door, inclusief de aandachtspunten en waarschuwingen, voordat u het apparaat in gebruik neemt. Dit is in het belang van uw veiligheid en voor een correct gebruik. Om onnodige misverstanden en ongelukken te voorkomen is het van belang dat iedereen die het apparaat gebruikt goed bekend is met de gebruiksvoorschriften en veiligheidsmaatregelen. Bewaar de gebruiksaanwijzing en zorg ervoor dat deze bij het apparaat blijft als het wordt verplaatst of verkocht, zodat iedereen die het apparaat gedurende haar levensduur gebruikt naar behoren is geïnformeerd over de veiligheid en het gebruik van het apparaat. De fabrikant aanvaardt geen verantwoordelijkheid voor schade aan levens en eigendommen die zouden voortkomen uit het niet opvolgen van de door ons aangegeven instructies.
Veiligheid van kinderen en kwetsbare mensen
- Dit apparaat kan worden gebruikt door kinderen van 8 jaar en ouder en door personen met verminderde lichamelijke, zintuiglijke of geestelijke vermogens of gebrek aan ervaring en/of gebrek aan kennis als ze onder toezicht staan of worden geïinstrueerd over het gebruik van het apparaat en begrijpen wat de mogelijke gevaren zijn.

Veiligheidsrichtlijnen

- Kinderen van 3 tot 8 jaar mogen dit apparaat in- en uitruimen
- Kinderen moeten onder toezicht zijn om ervoor te zorgen dat zij niet met het apparaat gaan spelen.
- Reinigings- en onderhoudswerkzaamheden mogen alleen worden uitgevoerd door kinderen van 8 jaar en ouder als ze onder toezicht staan.
- Hou verpakkingsmateriaal uit de buurt van babies en kinderen. Er bestaat verstikkingsgevaar.
- Als u het apparaat afdankt trek dan de stekker uit het stopcontact, snij de voedingskabel door (zo dicht mogelijk bij het apparaat) en verwijder de deurom te voorkomen dat kinderen zich in het apparaat kunnen opsluiten (verstikkingsgevaar) of een elektrische schok krijgen.
- Houd kinderen weg van de compressor aan de achterzijde van het apparaat. Zij kunnen zich hieraan verbranden.
- Laat kinderen niet met apparaat spelen, erop zitten,aan de deur(en) hangen, lades in/uithalen etc.
⚠️ Veiligheidsrichtlijnen
- Indien een apparaat met een magnetische deursluiting een ouder exemplaar met een klinkslot vervangt, dient u het klinkslot onbruikbaar te maken voordat u het apparaat afvoert. Hierdoor voorkomt u dat kinderen zich in het apparaat kunnen opsluiten en in een levensgevaarlijke situatie terecht komen.
Algemene veiligheidsrichtlijnen
⚠ WAARSCHUWING! Houd ventilatieopeningen, in het apparaat of in de ombouw, vrij van obstakels.
⚠ WAARSCHUWING! Gebruik geen mechanische apparaten of andere middelen om het ontdooiproces te versnellen dan wat door de fabrikant is aanbevolen.
! WAARSCHUWING! Beschadig het koelcircuit niet.
⚠ WAARSCHUWING! Gebruik geen elektrische apparaten (zoals een ijsmachine) in het koelapparaat die niet door de fabrikant zijn toegestaan.
⚠ WAARSCHUWING! Raak het lampje niet aan als het een lange tijd aan is geweest, omdat het erg warm kan zijn. 1)
⚠ WAARSCHUWING! Om gevaarlijke situaties als gevolg van instabiliteit van het apparaat te voorkomen, fixeert u het apparaat volgens de aangegeven richtlijnen!
1) Als er verlichting in het koelcompartiment/apparaat zit.

⚠ WAARSCHUWING! Let er bij het plaatsen van het apparaat op dat het netsnoer niet bekneld of beschadigd is en/of kan worden.
⚠ WAARSCHUWING! Plaats niet meerdere (niet geaarde) contactdozen en/of verlengkabels al dan niet met stopcontacten, aan de achterkant van het apparaat. Dit veroorzaakt overbelasting en mogelijk brand. Steek de stekker direct in een enkelvoudig geaard wandstopcontact met de correcte elektrische vereisten volgens het typeplaatje.
- Bewaar geen explosieve stoffen zoals bv. spuitbussen met brandbaar drijfgas (butaan, propaan) in het apparaat.
- Het apparaat bevat in het koelcircuit de koelvloeistof Isobutan (R600a); een natuurlijk gas met een hoge milieuvriendelijkheid, wat echter wel brandbaar is.
- Let erop dat bij het transport en bij de installatie van het apparaat geen delen van het koelcircuit worden beschadigd.
- Open vuur (bv kaars) en ontstekingsbronnen vermijden.
- De ruimte, waarin het apparaat staat, goed ventileren.
- Het is gevaarlijk om de specificaties te wijzigen of het product aan te passen. Eventuele schade aan het stroomsnoer kan kortsluiting, brand en/of een elektrische schok veroorzaken.

Dit symbool geeft aan dat het koelmiddel en isolatiegas in het apparaat brandbaar zijn.

Veiligheidsrichtlijnen
Dit apparaat is geschikt voor huishoudelijk gebruik en voor soortgelijke situaties als in:
- keukens voor personeel van winkels, kantoren en andere werkomgevingen;
- boerenbedrijven en bij klanten van hotels, Motels en andere residentiële omgevingen;
- Bed and Breakfasts;
- Catering en verdere toepassingen (geen detailhandel).
WAARSCHUWING! Elektrische onderdelen (stroomsnoer,

stekker, compressor) dienen door de Servicedienst of gekwalificeerd personeel te worden vervangen.
WAARSCHUWING! De met dit apparaat meegeleverde

gloeilamp is een "lamp voor speciaal gebruik" en kan alleen worden gebruikt in het meegeleverde apparaat.
Deze speciale gloeilamp is niet geschikt als normale huishoudelijke verlichting. ^1)
Gebruik het apparaat niet zonder geplaatste lamp in de fitting en alleen wanneer de afdekkap correct over de lamp is geplaatst.
Kijk niet rechtstreeks in het licht afgegeven door de (LED) lamp in het apparaat. Mocht de lamp knipperen of defect zijn, raadpleeg dan onze Servicedienst, een erkend electrician of , alleen indien beschreven in de handleiding, vervang de lamp.
1) Als er verlichting in het koelcompartiment/apparaat zit.

Veiligheidsrichtlijnen
- Stroomsnoer niet verlengen.
- Zorg ervoor dat de stekker niet wordt geplet of beschadigd door de achterkant van het apparaat. Een geplette of beschadigde stekker kan oververhit raken en brand veroorzaken.
- Zorg ervoor dat u bij de stekker van het apparaat kunt komen.
- Stroomsnoer aan de stekker uit het stopcontact trekken, niet aan het snoer zelf.
- Als het stopcontact los zit, de stekker er niet insteken. Gevaar voor een elektrische schok of brand.
- U mag het apparaat niet gebruiken zonder de lamp.
- Dit apparaat is zwaar. Houd hier rekening mee als het wordt verplaatst. Til en/of trek niet aan de deur!
- Geen zaken in het vriesvak aanraken of verwijderen met vochtige of natte handen, di kan verbrandingsverschijnselen opleveren of gevaar voor vriesbrand.
- Voorkom langdurige blootstelling van het apparaat aan direct zonlicht.
- Dit apparaat wordt geleverd met een stekker overeenkomstig de geldende elektriciteitsnormen, geschikt voor wisselstroom 220-240V/50Hz. Indien het voltage op locatie hoger is dan 240 V, neem dan contact op met onze Servicedienst voor advies over een automatische spanningsregelaar.
- Is de stekker niet geschikt voor het stroomnetwerk in uw huis? Neem contact op met onze Servicedienst.
Dagelijks gebruik
- Plaats geen hete voorwerpen tegen kunststof onderdelen van het apparaat.
- Plaats geen voedsel direct tegen de achterwand.
- Nadat het voedsel is ontdooid het niet meer opnieuw invriezen. ^1)
- Bewaar voorverpakte diepvriesproducten volgens de richtlijnen van de producent/fabrikant. ^1) (Zie de desbetreffende richtlijnen.)
- De opslagrichtlijnen van de producent/fabrikant dienen strict te worden opgevolgd.
- Sla geen koolzuurhoudende/schuimende dranken op in het vriesvak omdat dan druk op de houder ontstaat. Explosiegevaar! Dit kan leiden tot beschadiging van het apparaat. 1)
- Waterijs dat direct wordt geconsumeerd als het uit de vriezer komt, kan leiden tot vriesbrand van de huid. ^1)
- Plaats voedingsmiddelen altijd goed verpakt in het apparaat, vloeistoffen in goed afgesloten flessen of diepvriesbakken. In geval van lekkage zijn sommige productonderdelen lastig om te reinigen.
Volg de onderstaande instructies om besmetting van voedsel te voorkomen:
- Als u de deur gedurende lange tijd opent, kan de temperatuur in de compartimenten van het apparaat aanzienlijk stijgen.
- Reinig regelmatig oppervlakken die in contact kunnen komen met voedsel en toegankelijke drainagesystemen.
- Maak watertanks schoon als ze 48 uur niet zijn gebruikt; spoel het watersysteem dat is aangesloten op een watertoevoer door als er gedurende 5 dagen geen water is doorgevoerd.
- Bewaar rauw vlees en vis in geschikte containers in de koelkast, zodat het niet in contact komt met of druppelt op ander voedsel.
- Twee-sterren diepvriesvakken (als ze in het apparaat aanwezig zijn) zijn geschikt voor het bewaren van voorgevroren voedsel, het bewaren of het maken van ijs en het maken van ijsblokjes.
- Een-, twee- en drie-sterren compartimenten (indien aanwezig in het apparaat) zijn niet geschikt voor het invriezen van vers voedsel.
- Als het apparaat lange tijd leeg is schakelt u het uit, ontdooit u het, maakt u het schoon en laat u het drogen en laat u de deur open om schimmelvorming in het apparaat te voorkomen.
- Wanneer u het apparaat gaat transporteren, verplaatsen of reinigen, schakel dan eerst het apparaat uit en trek de stekker uit het stopcontact.
Reiniging en onderhoud
- Voor het reinigen of verrichten van onderhoud apparaat uitzetten en de stekker uit het stopcontact halen.
- Reinig het apparaat niet met metalen voorwerpen.
- Gebruik geen scherpe voorwerpen om ijs van het apparaat te verwijderen. Gebruik hiervoor een kunststof schraper. ^1)
Controleer regelmatig het dooiwater afvoergaatje. Indien nodig het afvoergaatje reinigen. Als het afvoergaatje verstopt is, Blijft er water onderin het apparaat staan. ^2)
Installatie
Belangrijk! Voor het aansluiten op het elektriciteit- netwerk volgt u de instructies in deze gebruiksaanwijzing.
- Haal het apparaat uit de verpakking en controleer of het is beschadigd. Sluit het apparaat niet aan als het is beschadigd.
Geef de schade direct door aan de leverancier waar u het apparaat heeft gekocht. In dat geval de verpakking bewaren.

Veiligheidsrichtlijnen
- Het wordt geadviseerd minstens 4 uur te wachten voordat u het apparaat aansluit zodat de olie kan teruglopen in de compressor. Er dient voldoende luchtcirculatie te zijn rondom het apparaat om oververhitting te voorkomen. Om voldoende ventilatie te krijgen de installatie instructies volgen.
- Indien mogelijk dient het apparaat (met de afstandhouders) dicht tegen een muur te worden geplaatst om ervoor te zorgen dat de warme onderdelen niet worden aangeraakt (compressor, condensor) om verbrandingsletsel te voorkomen. Houd wel rekening met de aangeven benodigde ventilatieruimte!
- Het apparaat dient niet dicht bij radiatoren of fornuizen te worden geplaatst.
- Zorg ervoor dat de stekker bereikbaar blijft na installatie van het apparaat.
Service
- Elektrisch (reparatie)werk zoals onderhoud aan het apparaat dient te worden uitgevoerd door gekwalificeerde monteurs.
- Dit product dient te worden onderhouden door de geautoriseerde Servicedienst en er dienen alleen originele onderdelen te worden gebruikt.
Energiebesparing
- Plaats geen warm voedsel in het apparaat.
- Plaats het voedsel zodanig dat er luchtcirculatie omheen kan plaatsvinden.
- Plaats geen voedsel direct tegen de achterwand van het apparaat.
- Houd de deur(en) gesloten als de elektriciteit uitvalt.
- Open de deur(en) niet te vaak.
- Laat de deur(en) niet gedurende een lange tijd open staan.
- Stel de temperatuur niet kouder in dan noodzakelijk is.
- Laat alle accessoires zoals lades, plateaus en/of deurvakken in het apparaat op de juiste plaats om zo een lager energieverbruik te realiseren.
- Sla geen medicijnen, bloedplasma, laboratoriumpreparaten etc. (overeenkomstig de richtlijnen medische (hulp)middelen 2007/47/EG) in het apparaat op.
- Bij een noodgeval onmiddellijk de stekker uittrekken! Zorg voor voldoende luchtcirculatie rondom het apparaat en in de installatieruimte volgens de richtlijnen in de handleiding!
Milieubescherming

Dit apparaat bevat geen gassen die de ozonlaag kunnen beschadigen; niet in het koelcircuit en evenmin in de isolatiematerialen. Het apparaat mag niet worden weggegooid bij het normale huishoudelijke afval. Het isolatieschuim bevat ontvlambare gassen: het apparaat dient te worden verwijderd volgens de plaatselijk geldende voorschriften.
Neem voor meer gedetailleerde informatie over de recycling van dit product contact op met uw eigen gemeentedienst en uw lokale afvalbedrijf.
Voorkom beschadiging van het koelcircuit, vooral van de warmtewisselaar. De materialen in dit apparaat die voorzien zijn van het symbool ⚙ zijn recyclebaar.
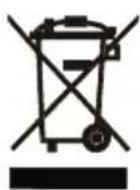
Het symbool van de afvalbak op het product of de begeleidende documenten geeft aan dat dit apparaat niet mag worden
behandeld als huishoudelijk afval. In plaats hiervan dient het te worden aangeleverd bij de verzamelplaats voor recycling van elektrische en elektronische apparaten.

WAARSCHUWING!
Let tijdens het gebruik, onderhoud en het afvoeren van het apparaat op het symbool zoals hierboven is weergegeven, wat aan de achterkant van het apparaat is bevestigd (achterpaneel of compressor).
Het is een waarschuwingssymbool voor een brandrisico. Er bevinden zich brandbare materialen in de koelmiddelleidingen en de compressor. Blijf ver uit de buurt van een vuurbron tijdens het gebruik, onderhoud en het afvoeren van het apparaat.
(beeld wanneer u het metalen afdekkap van de compressorruimte weghaalt)
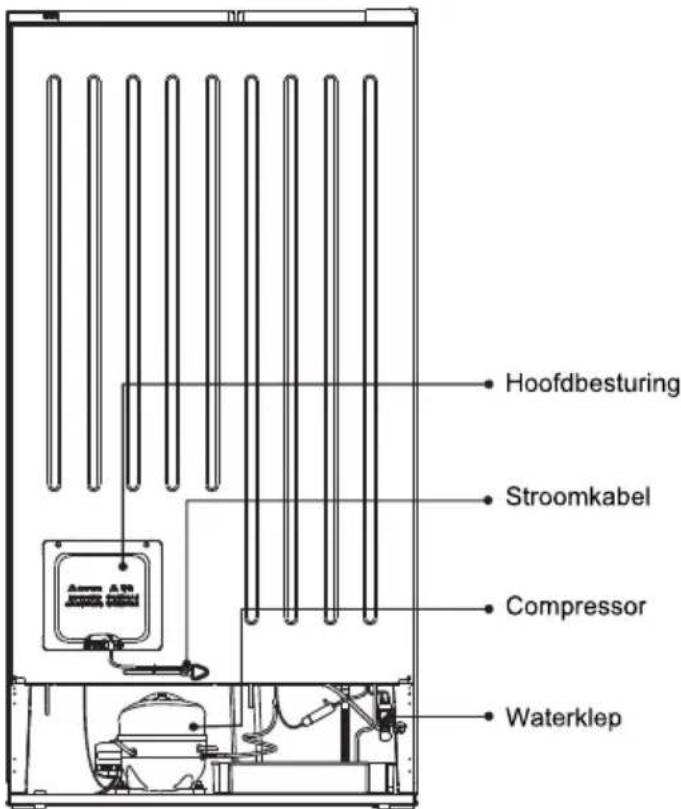
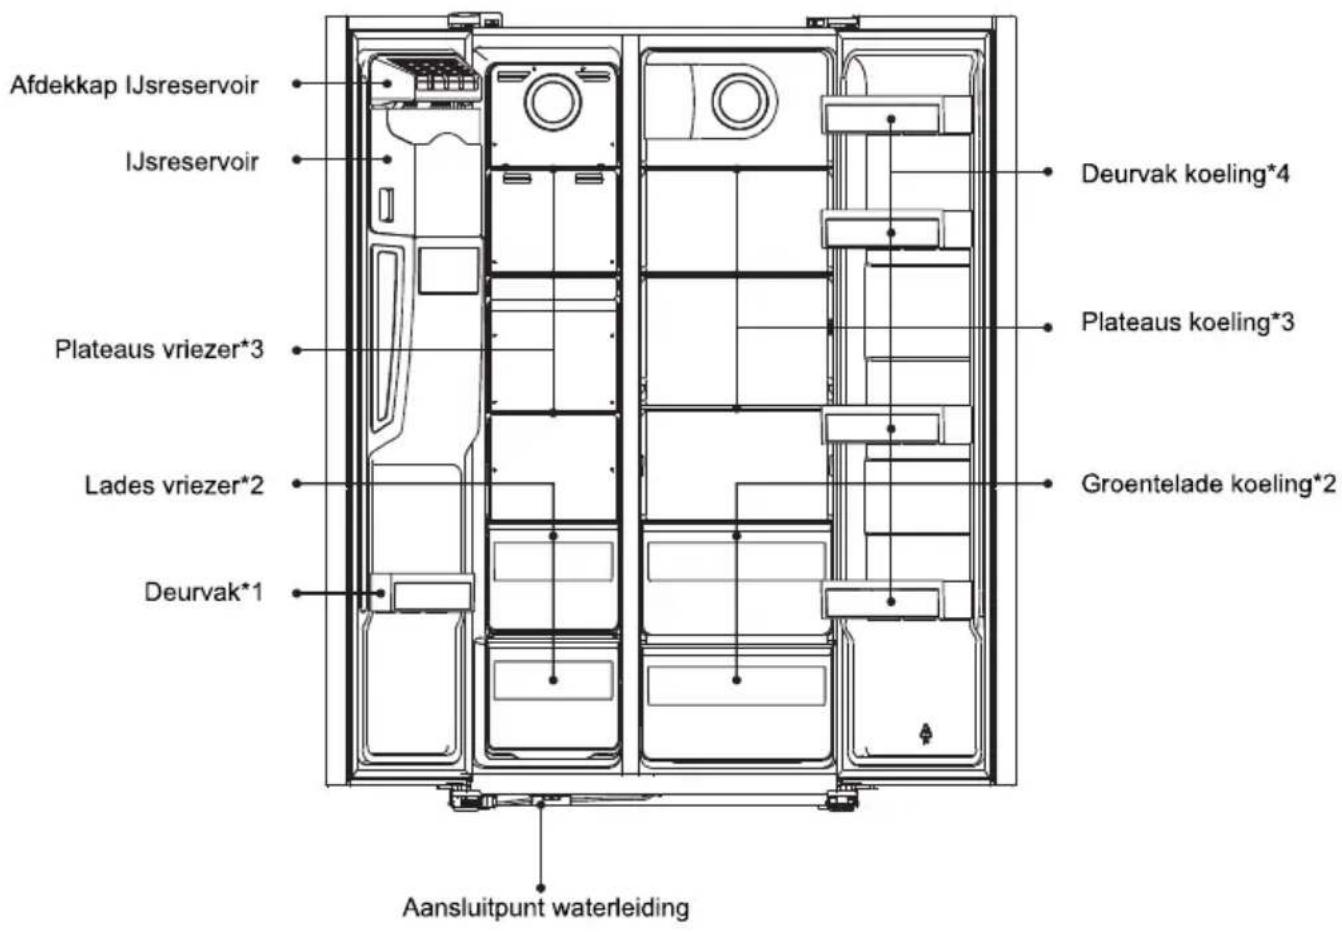
Let op: bovenstaande afbeelding is alleen ter referentie.
Accessoires
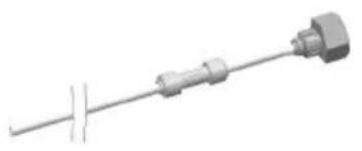
natural_image
Pure electrical circuit lines without any symbolsOnderdelen waterleiding*1
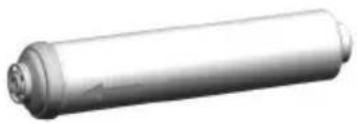
natural_image
3D rendering of a cylindrical mechanical component with flanged ends and central bore (no text or symbols visible)Waterfilter*1
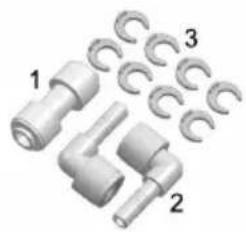
natural_image
3D rendered mechanical parts including bolts, clips, and a bent pipe fitting (no text or symbols)1.Aansluitmateriaal waterleiding*1
2.Aansluitmateriaal waterfilter*2
3.Leidingklemmen*8
natural_image
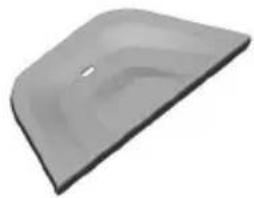
Gray plastic object with a curved surface and a small hole, resembling a lid or cover (no text or symbols visible)Wateropvangbak dispenser*1
Handleiding*1
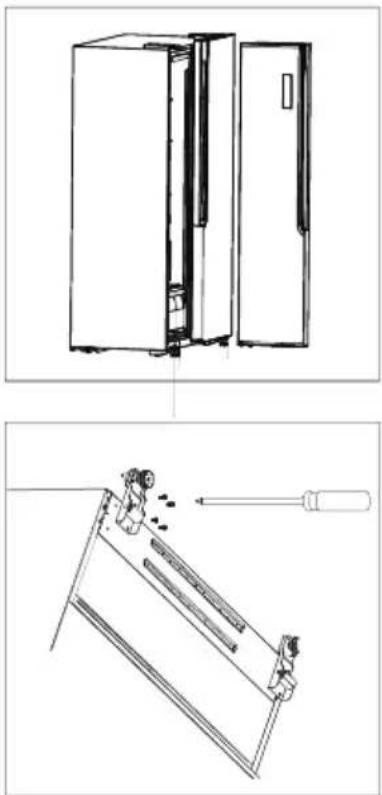
Deuren verwijderen
Benodigd gereedschap: kruiskopschroevendraaier, platte schroevendraaier.
- Zorg ervoor dat de stekker uit het stopcontact is en het apparaat leeg is.
- Om de deur te kunnen verwijderen moet u het apparaat iets naar achteren laten kantelen. U moet de deur op iets stevigs laten rusten zodat het niet wegglijdt tijdens het verwijderen van de deur.
- Alle verwijderde onderdelen dienen te worden bewaard voor de herinstallatie van de deur.
- Leg het apparaat niet plat neer; dit kan het koelsysteem beschadigen.
-
Deze installatiewerkzaamheden kunt u het beste met twee personen uitvoeren.
-
Schroef het scharnierkapje los met de kruiskopschroevendraaier.
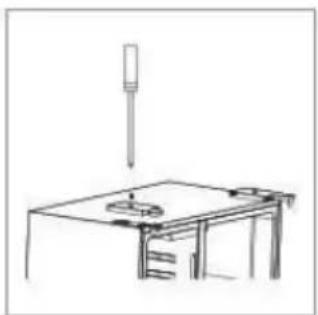
natural_image
Simple line drawing of a mechanical setup with a pipette above a table (no text or symbols)- Maak de kabelboom los.
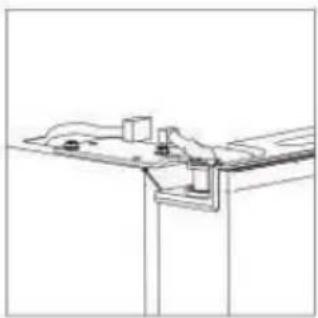
natural_image
Pure technical line drawing of a mechanical assembly or bracket (no text or symbols)3 Schroef het bovenscharnier los.
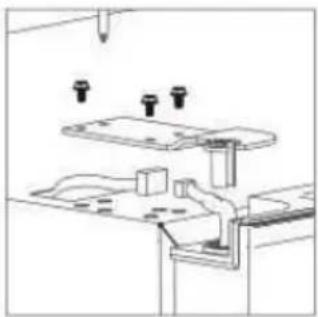
natural_image
Technical line drawing of a mechanical assembly with mounting holes and structural components (no text or symbols)- Er bevindt zich een aansluitpunt voor water onderaan het apparaat. Haal deze uit de beschermkap en haal deze los van de waterleiding. Denk eraan om de waterleiding uit het onderscharnier te trekken.
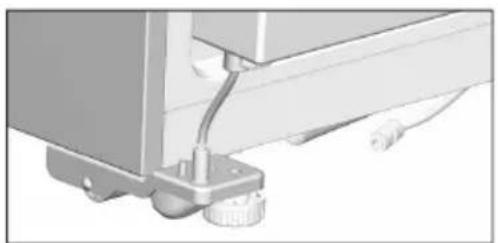
natural_image
Close-up of a mechanical component with a curved base and attached cable (no visible text or symbols)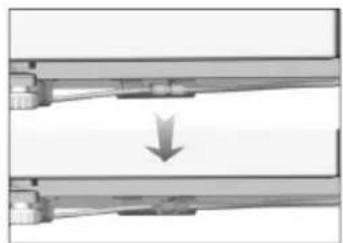
natural_image
Diagram showing a mechanical assembly with two parallel rods and a downward arrow indicating a process or motion (no text or symbols present)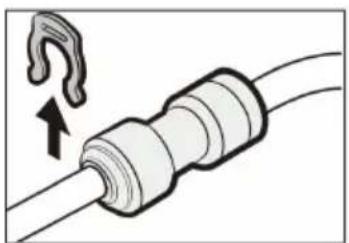
natural_image
Diagram of a cable with a hook insertion, showing internal components and a directional arrow (no text or symbols)Installatie
-
Til de deur op en plaats het op een zachte ondergrond. Verwijder vervolgens de andere deur volgens dezelfde wijze.
-
Schroef de onderscharnieren los.
natural_image
Technical line drawing showing a refrigerator and its ladder setup with a tool (no text or symbols)- Nadat het apparaat is geplaatst, installeert u de deuren weer door het hierboven uitgevoerde proces in de omgekeerde volgorde uit te voeren.
Benodigde ruimte
Zorg voldoende draairuimte voor de deur.
Zorg voor 5 cm vrije ruimte aan de zij- en achterkant van het apparaat.
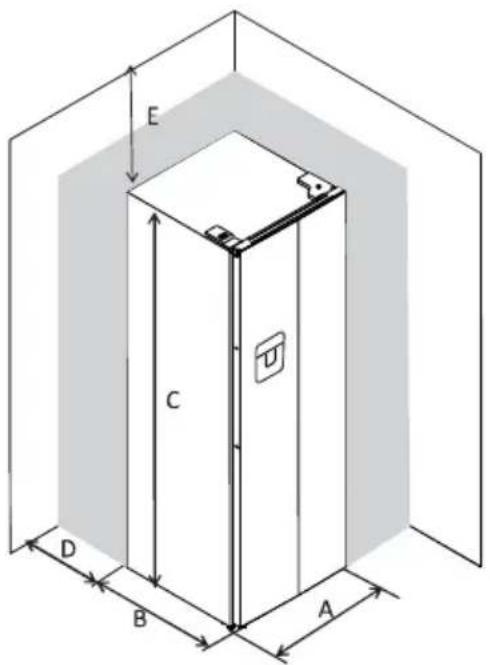
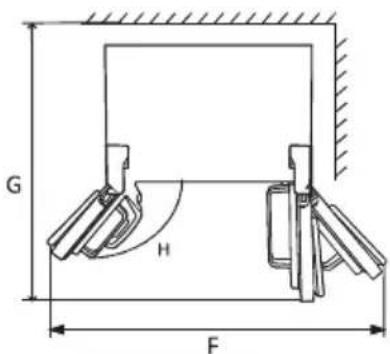
| A | 900 |
| B | 660 |
| C | 1770 |
| D | min=50 |
| E | min=50 |
| F | 1800 |
| G | 1560 |
| H | 135° |
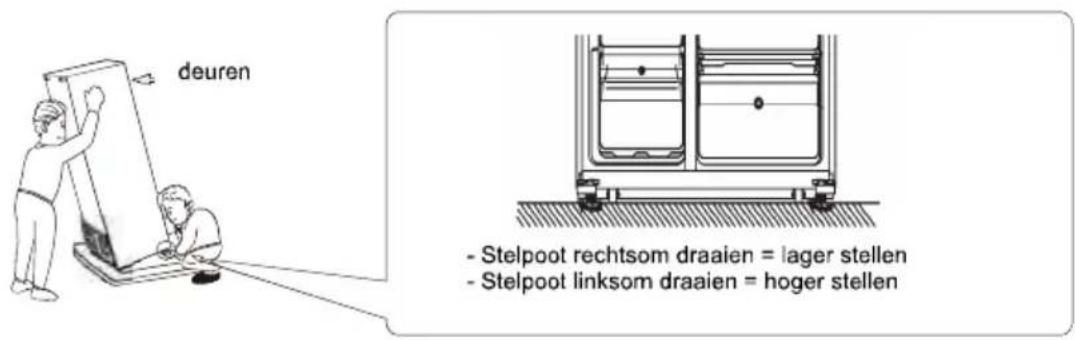
Apparaat waterpas zetten
Installatie
Positie
Installeer het apparaal op een plaats waar de omgevingstemperatuur overeenkoml met de klimaatklasse zoals die is weergegeven op het typeplaatje van het apparaat.
| Klimaatklasse | Omgevingstemperatuur |
| SN(subnormaal) | +10°C to +32°C |
| N (normaal) | +16°C to +32°C |
| ST (subtropisch) | +16°C to +38°C |
| T (tropisch) | +16°C to +43°C |
Plaats
Plaats het apparaat buiten het bereik van warmtebronnen als radiatoren, kachels, direct zonlicht etc. Zorg ervoor dat er voldoende ventilatie kan circuleren rond de achterkant van het apparaat. Voor een optimale prestatie dient er een minimale afstand te zijn tussen de bovenkant van het apparaat en een eventueel erboven hangende wandkast van 50 mm. Het is echter beter als er geen wandkast boven het apparaat hangt. Het apparaat kan waterpas worden gesteld door middel van de steipoten aan de onderkant van het apparaat. Dit apparaat is geen inbouwmodel!

Waarschuwing! Het moet mogelijk zijn om het apparaat los te koppelen van het elektriciteitsnetwerk; de stekker moet dus ook na de installatie eenvoudig bereikbaar zijn.
Elektrische aansluiting
Controleer, voordat u het apparaat aansluit, of het voltage en de frequentie zoals vermeld op het typeplaatje overeenkomen met de stroomtoevoer in uw huis. Het apparaat moet geaard zijn. De stekker is voorzien van een aardecontactpunt. Als het stopcontact niet geaard is, sluit u het apparaat aan op een aparte aarde in overeenstemming met de geldende regels. Raadpleeg hiervoor een gekwalificeerde elektricien. De fabrikant is niet aansprakelijk voor schade aan het apparaat of persoonlijk letsel als de bovenstaande veiligheidsmaatregelen niet in acht worden genomen. Dit apparaat voldoet aan de E.E.G.-richtlijnen.
Belangrijk!
Hoe installeer je het waterfilter en de waterleiding
- Voor installatie dient het filter 5 min. met water of met 5 liter water te worden gespoeld om ervoor te zorgen dat evt. fabricagevervuiling in het filter goed weggespoeld is.
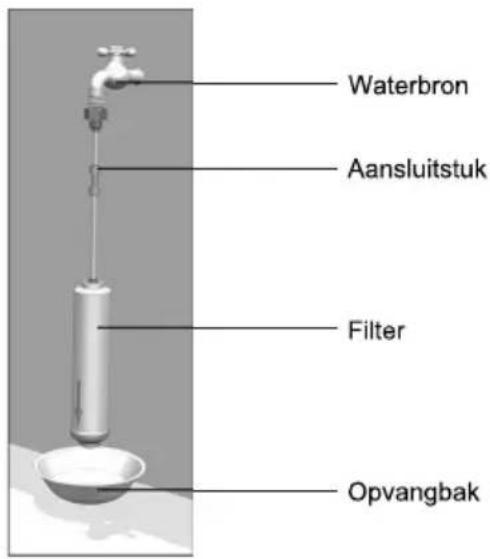
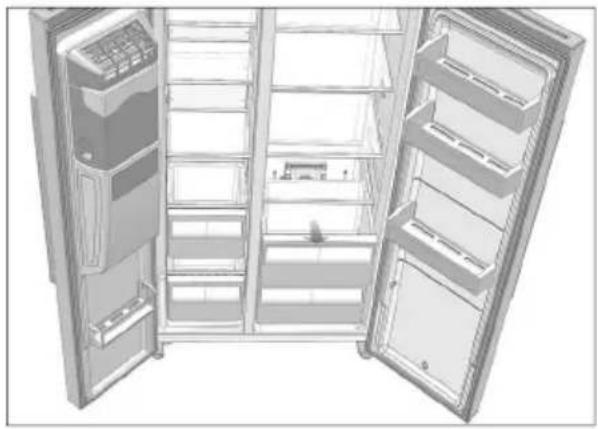
- Open de deur van de koeling en haal de Groentelades eruit.
natural_image
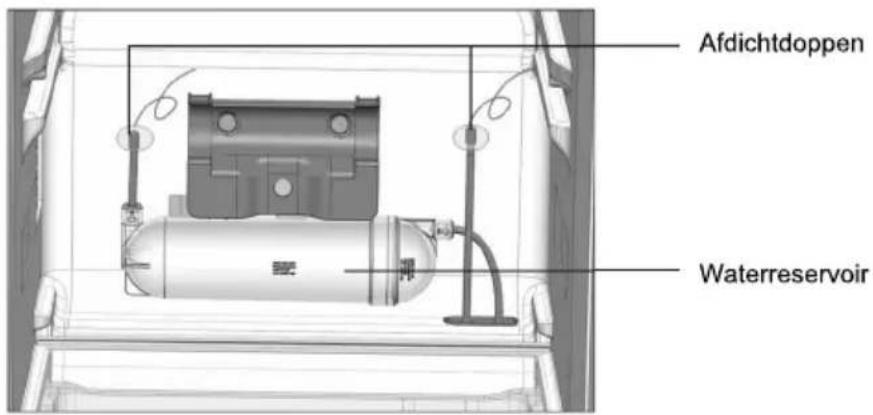
3D rendering of an open refrigerator with multiple doors and shelves (no text or symbols visible)- Haal de 2 rubberen afdichtingsdoppen aan beide zijden van het waterreservoir eraf.
Dagelijks gebruik
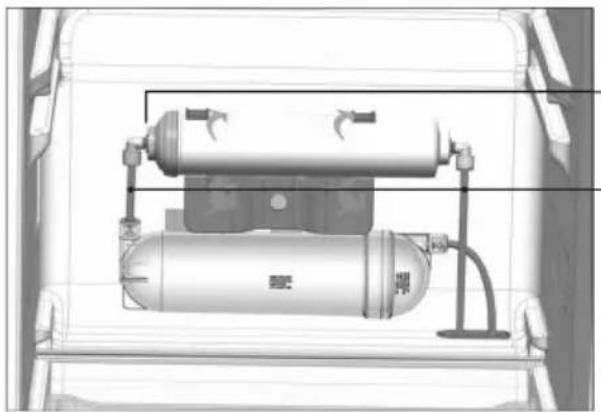
- Haal het waterfilter uit het accessoirezakje, duw de aansluitstukken aan beide zijden van het filter in de opening, Houd de filter met de pijl zoals hieronder afgebeeld en sluit nu de waterleiding aan en daarna plaatst u de leidingklemmen.
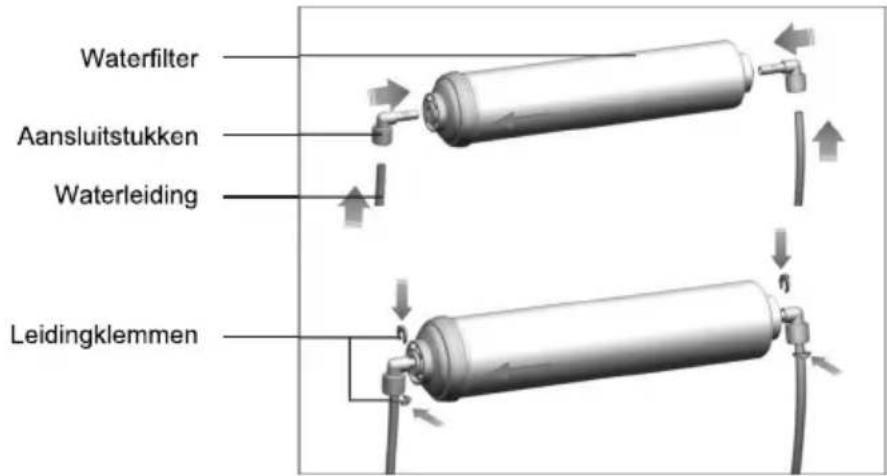
- Houd de nu samengesteld waterfilter boven het waterreservoir en sluit de waterleidingen van het waterreservoir aan op het waterfilter.
natural_image
Technical diagram of a mechanical device with two cylindrical tanks and piping (no text or symbols)Plaats de waterfilter aansluitstukken
Sluit de waterleidingen van het waterreservoir aan op het waterfilter
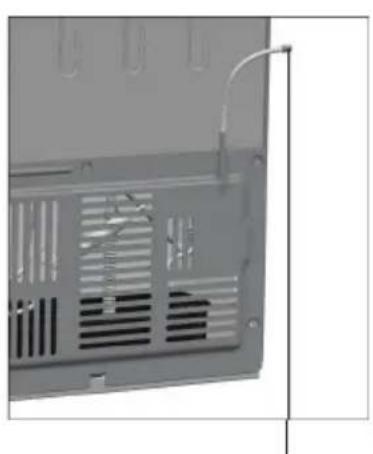
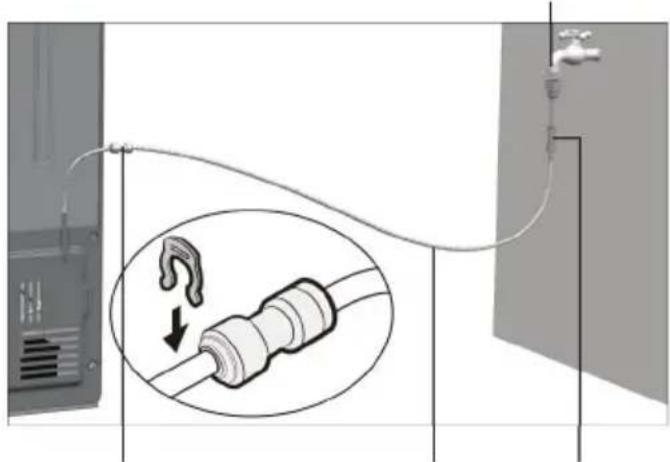
- Haal de rubberen afdichtdop eraf. Sluit de waterleiding aan op de wateraansluiting, die zich op de afdekkap van de compressor bevindt, met het verloopstuk. Vergeet niet de leidingklemmen te plaatsen! Sluit nu de andere kant van de waterleiding aan op de waterkraan m.b.v. de moer.
natural_image
Exterior view of a gray industrial ventilation panel with ventilation grilles and a pipe fitting (no text or symbols visible)Haal de rubberen afdichtdop eraf.
natural_image
Diagram showing a cable being inserted into a pipe with a hook insertion, connected to a wall-mounted device (no text or symbols present)Waterleiding
Sluit nu het uiteinde van de waterleiding m.b.v. een moer aan op de waterkraan
Dagelijks gebruik
Let op!
* Om een goede werking te waarborgen, dient de watervoorziening (waterkraan) schoon te zijn en de waterdruk dient tussen 1.5 en 7 bar te liggen.
* Controleer of er zich vuil of andere (losse) dingen in het aansluitmateriaal van de waterleiding, in de ijsmaker of ijsreservoir bevinden. Verwijder/reinig indien nodig.
* Na het aansluiten op de waterkraan, de kraan opendraaien en controleer of er geen lekkage is bij de aansluiting of waterslangverbindingen.
* Selecteer de waterfunctie, neem een grote kom om tegen de pal van de dispenser te drukken. Laat het water 5 min. stromen totdat het water helder is en vloeiend eruit stroomt. Let op! Drink dit water NIET!!!
* Selecteer nu de IJs(crush)functie neem een grote kom om tegen de pal van de dispenser te duwen, en controleer/luister of de motor correct werkt.
* Wacht 3 min. en controleer of de watertoevoerklep van de koeling, alle aangebrachte verbindingen in de waterleiding en aan het waterfilter niet lekken.
Gebruik van het bedieningspaneel
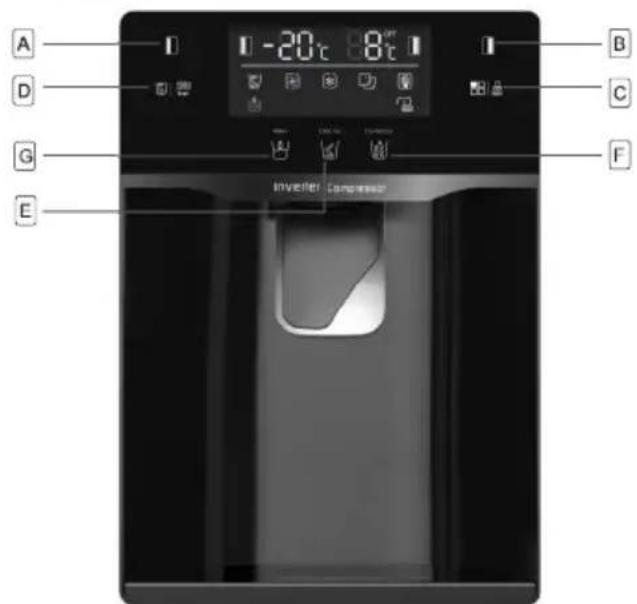
Knoppen
A) Druk hierop om de temperatuur van het vriesgedeelte (links) aan te passen van -14°C tot -22°C.
B Druk hierop om de temperatuur van het koelgedeelte (rechts) aan te passen van 2°C tot 8°C.en UIT te schakelen. Indien UIT wordt geselecteerd, wordt het koelgedeelte uitgeschakeld.
C Druk hierop om de reeks instellingen te kiezen van SLIMME STAND ECO SUPER KOELEN, SUPER INVRIEZEN en GEBRUIKER'S INSTELLING (geen symbool op het display).
Druk op de 3 SEC. knop en hou deze 3 seconden ingedrukt om de andere drie knoppen te vergrendelen. Druk op de knop en hou de knop 1 seconde ingedrukt om de andere drie knoppen te ontgrendelen.
Druk op de IJs UIT knop om de ijsmaker te bedienen. Wanneer u de IJsmaker niet wenst te gebruiken, druk weer op deze knop. Het maken van ijs wordt gestopt totdat u weer op de knop drukt.

"Het waterfilter vervangen"
Over het algemeen dient het waterfilter elke 6 maanden te worden vervangen om de goede waterkwaliteit te waarborgen.
Na 6 maanden zal het symbool oplichten om u eraan te herinneren dat het waterfilter moet worden vervangen. U kunt deze aanschaffen bij uw verkooppunt of via onze Servicedienst. Nadat u het nieuwe filter heeft geplaatst, moet u de knop 3 sec. ingedrukt houden, het symbool gaat uit en het waterfilter wordt gereset.
E Druk op deze knop om ijsblokjes te krijgen. U kunt op deze knop drukken om het type ijs dat moet worden afgegeven te selecteren.
F Druk op deze knop om crushed ijs te krijgen. U kunt op deze knop drukken om het type ijs dat moet worden afgegeven te selecteren.
G Druk op deze knop om gekoeld water te krijgen. U kunt op deze knop drukken om het type ijs dat moet worden afgegeven te selecteren.
LET OP!
* Wanneer de deur van de vriezer open staat of de functie Kinderslot is geactiveerd, dan werkt de dispenser niet. Wanneer u ijsblokjes, crushed ijs of gekoeld water wenst, dient u de deur te sluiten en/of de functie Kinderslot te deactiveren.
* Wanneer u geen ijs nodig heeft, deactiveer dan deze functie als energiebesparing. (zie IJs UIT hierboven)
* Wanneer er geen water of langzaam stromend water uit de dispenser komt, is het tijd om het waterfilter te vervangen. Deze zit mogelijk verstopt.
* In sommige gebieden is het de hardheid (kalkgehalte) van het water erg hoog, hierdoor zal het waterfilter sneller verstoppen.
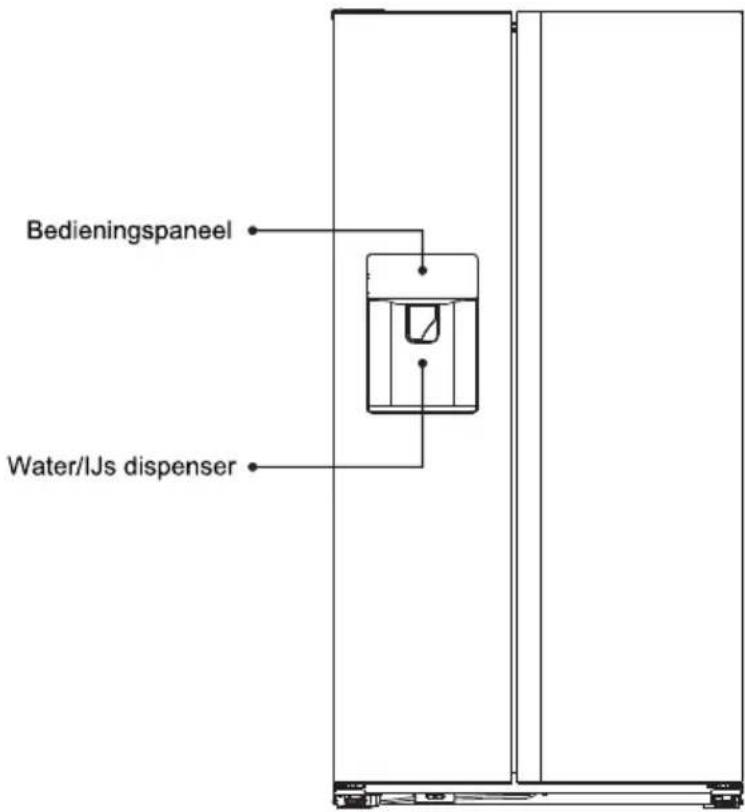
Bedieningspaneel
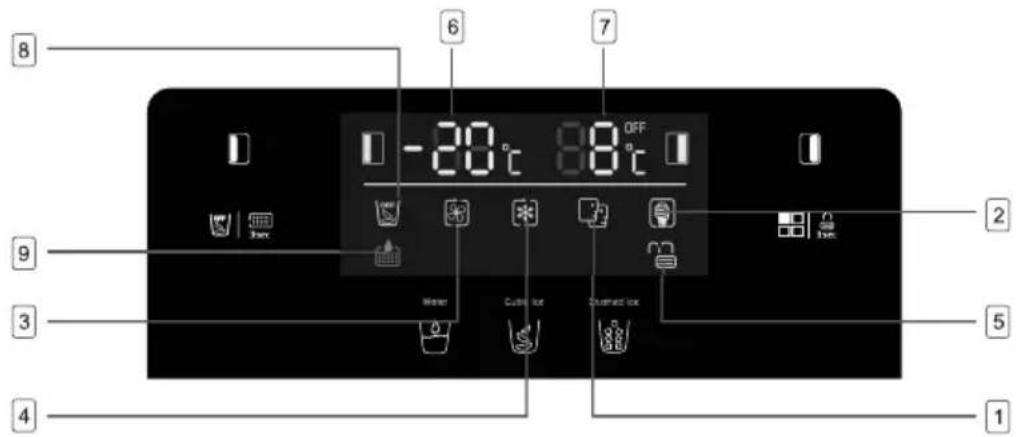
1 SMART modus, de koeling stelt de temperatuur van de beide compartimenten automatisch in gebaseerd op de binnentemperatuur en de omgevingstemperatuur.
2 ECO modus, het apparaat werkt op de meest energiezuinige instelling.
3 SUPER COOLING koelt de koeling gedurende 2,5 uur tot de laagst mogelijke temperatuur. Daarna gaat de temperatuurinstelling terug naar de oorspronkelijke instelling ervoor.
4 SUPER FREEZING koelt de vriezer gedurende 50 uur naar de laagst mogelijke temperatuur. Daarna gaat de temperatuurinstelling terug naar de oorspronkelijke instelling ervoor.
5 LOCK, Dit symbool licht op wanneer de toetsen zijn vergrendeld.
6 Geeft de ingestelde temperatuur weer van de vriezer.
7 G eeft de ingestelde temperatuur weer van de koeling.
8 ICE OFF modus, dit symbool licht op wanneer u de toets ☐ aanraakt om de IJsmaker te stoppen. Dit betekent dat het apparaat geen ijs meer zal maken.
9 REMIND CHANGING WATER FILTER modus, dit symbool licht op wanneer het waterfilter 6 maanden in gebruik is. Dit is een reminder dat de waterfilter moet worden vervangen. Deze blijft oplichten totdat het filter is vervangen en u 3 sec. de D toets heeft ingedrukt. Dan zal het symbool weer uitgaan.
| Instelling | Indicatielampje | Vriezer temperatuurweergave | Koelkast temperatuurweergave | |
| Slimme stand |  | De temperatuurweergave van de vriezer en koelkast zal wijzigen op basis van de omgevingstemperatuur (zie tabel hieronder). | ||
| ECO |  | -15°C | +8°C | |
| Super koelen |  | Geen verandering | +2°C | |
| Super invriezen |  | -25°C | Geen verandering | |
Dagelijks gebruik
Opmerkingen:
ECO instelling: Kies deze instelling als u energie wilt besparen.
Super koelen instelling: met deze instelling kunt u voedsel snel afkoelen en nadat het 2,5 uur heeft gewerkt wordt het automatisch uitgeschakeld.
Super invriezen instelling: met deze instelling kunt u voedsel snel invriezen en nadat het 50uur heeft gewerkt wordt het automatisch uitgeschakeld.
Alarmsignaal open deur
Als een deur van het apparaat open staat of niet volledig is gesloten gedurende ongeveer 60 seconden, laat het apparaat een alarmsignaal klinken. Sluit de deur van het apparaat en het alarmsignaal zal ophouden.
Wanneer de deur niet goed gesloten is, dan zal het alarm 5 keer elke 30 sec. afgaan totdat de deur correct wordt gesloten. Wanneer de deur(en) 10 min. of langer worden open gelaten, dan gaar de binnenverlichting automatisch uit.
Kinderslot
Deze functie is bedoeld om te voorkomen dat kinderen het apparaat bedienen.
- Om de functie te activeren de LOCK 3s knop indrukken en gedurende 3 sec. ingedrukt houden. Het kinderslot indicatielampje gaat branden wat aangeeft dat de veiligheidsblokkering is geactiveerd.
- Om de functie weer uit te zetten de knop ☐ LOCK 3s weer indrukken en gedurende 1 sec. ingedrukt houden. Het indicatielampje van het ontgrendelde kinderslot ☐ gaat branden
Ingebruikname
Reiniging van de binnenkant
Voordat u het apparaat voor de eerste keer gebruikt de binnenkant en de interne accessoires reinigen met lauwwarm water en een beetje neutrale zeep om de typische geur van een nieuw product te verwijderen, daarna goed afdrogen.
Belangrijk! Gebruik geen reinigingsmiddelen of schurende schoonmaakmiddelen, omdat die de lak beschadigen.
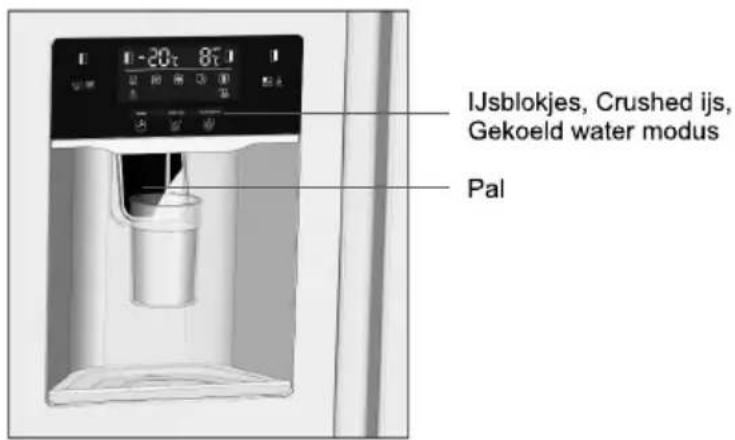
U kunt ijsblokjes, crushed ijs en gekoeld water verkrijgen door de pal in te drukken. Welke keus u wenst kunt u op het display aangeven;
Let op! Wanneer de pal langer dan 3 min. wordt ingedrukt, zal de dispenser zijn werking stoppen om de elektronische onderdelen niet te overbelasten. Wanneer u nog meer ijs of gekoeld water wenst, kunt u de pal even loslaten en vervolgens weer indrukken om weer ijs of gekoeld water te krijgen.
Gekoeld water tappen
Kies de Gekoeld water modus , houd het glas middenvoor de pal, duw nu tegen de pal om gekoeld water te tappen; Heeft u genoeg water stop dan met het drukken tegen de pal, het waterafgifte wordt automatisch onderbroken.
Opmerking:
* Wacht 2 sec. voordat u het glas onder de tap vandaan haalt om te voorkomen dat het water eruit klotst.
* Als u nog kouder water wenst, vul dan het glas eerst met ijs.
* Wanneer er meer dan 800 ml water in 1 keer wordt getapt, kan het zijn dat het water een hogere temperatuur heeft. In dat geval is het raadzaam een half uur te wachten voordat u weer gekoeld water.
IJs tappen
Kies de IJsblokjes modus of Crushed IJs modus om het gewenste ijs te tappen.
Plaats het glas middenvoor de pal, duw nu tegen de pal om het ijs in het glas te tappen; Heeft u genoeg ijs stop dan met drukken tegen de pal, de ijsafgifte wordt automatisch gestopt.
Opmerking:
* Wacht 2 sec. voordat u het glas onder de tap vandaan haalt om te voorkomen dat het ijs eruit klotst.
* Om ervoor te zorgen dat het ijs er niet naast valt, houd het glas zo dicht mogelijk tegen het afgiftepunt.
* Wanneer u ijs tapt zal de interne motor draaien om het ijs roeren en te pletten, dit kan wat geluid veroorzaken.
* Wanneer u ijs heeft getapt, gebruik dit dan zo snel mogelijk voordat het smelt.
Belangrijk!
In dit hoofdstuk vindt u informatie hoe u de meeste problemen met het apparaat kunt voorkomen. Wij adviseren u de onderstaande tips door te nemen voordat u het apparaat gaat gebruiken.
- Wanneer u voor de 1e keer water pakt, of pas na een lange tijd, dan graag de 1e 2 liters water niet drinken.
2.Wanneer u de 1e keer de ijsmaker gebruikt, of na langere tijd, dan graag de 1e lichting ijs uit het 1e reservoir niet gebruiken.
3.Het wordt aanbevolen een kop of glas te gebruiken voor het tappen met een diameter die groter is dan 70 mm. - Gebruik geen zachte, breekbare of kwetsbare bekers/glazen/kommen om ijsblokjes te tappen om zo beschadigingen te voorkomen.
- Stop geen handen, vingers, gereedschappen of andere objecten in het afgiftepunt om zo letsel aan u en/of beschadigingen aan het interne mechanisme te voorkomen.
6.Trek niet aan/duw niet te hard op de pal om een storing aan de pal(schakelaar) te voorkomen. - De ijsmaker maakt automatisch ijs zonder dat daar iemand handmatig iets voor hoeft te doen. Wanneer het ijsreservoir volledig gevuld is met ijs (± 1.6 kg) stopt de ijsmaker automatisch met ijs maken.
- In de Slimme modus is de dagelijkse ijsproductie ± 1.2 kg.
9.Wanneer de vriezerdeur geopend is, is de dispenser geblokkeerd en kan geen water of ijs afgeven. - Wanneer de vriezerdeur geopend wordt en de ijsmaker zit in het productieproces van ijs maken, dan zal er mogelijk ijs in het ijsreservoir vallen.
- Wanneer het ijs niet goed/stroef wordt afgegeven, controleer dan of het afgiftepunt niet geblokkeerd is door het ijs. Is dit het geval, dan het ijs verwijderen en weggooien.
- Wanneer de koeling voor de 1e keer wordt in gebruik genomen, de ijsmaker inschakelen. Deze zal na 10 uur starten met ijs maken.
- Tijdens het gebruik van het apparaat kunt u de geluiden van een waterklep, stromend water en vallend ijs horen. Dit zijn normale geluiden voor dit apparaat.
- Wanneer op vakantie gaat of langere tijd geen ijsblokjes nodig heeft, dan de ijsmaker functie uitschakelen en leeg het ijsblokjesreservoir om te voorkomen dat de ijsblokjes aan elkaar vastvriezen en het afgiftepunt hierdoor gaan blokkeren.
- Haal bij een stroomstoring op tijd de koeling, vriezer en het ijsreservoir leeg, om smelten te voorkomen.
16.Nuttig de ijsblokjes niet wanneer er een geur aan zit. Controleer of/wanneer het filter moet vervangen worden, of dat er zich (onverpakte) voedingsmiddelen met een sterke/ penetrante geur in de koeling of vriezer bevinden.
Werkwijze om de dispenser te reinigen?
Reinig de dispenser met een zachte doek en vergeet niet eerst de stekker uit het stopcontact te trekken voordat u begint. Gebruik schoon water en nooit middelen met benzeen, oplosmiddelen, natriumhypochloriet, schurende stoffen, bleekmiddel en/of andere chemische (reinigings)middelen. Spuit geen reinigingsmiddelen direct op het display, de gedrukte tekst op het display zal mogelijk loskomen.
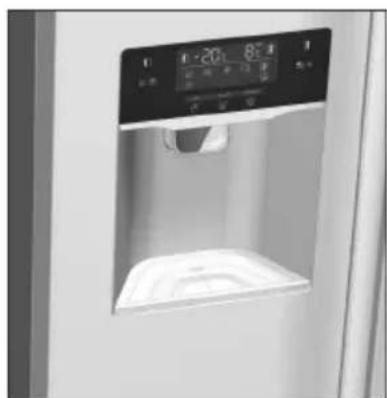
1) Haal regelmatig het waterreservoir los, leeg en spoel deze, daarna reinigen met een doek en droogmaken.
natural_image
Close-up of a refrigerator with digital display and front panel (no visible text or symbols)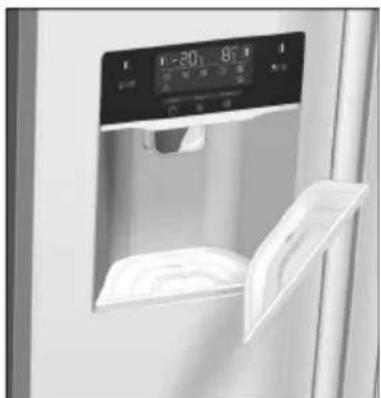
natural_image
Close-up of a refrigerator with digital display and open storage compartments (no visible text or symbols)
2) Reinig het ijsreservoir regelmatig.
Wanneer het ijs voor langere tijd niet wordt gebruikt of de vriezerdeur wordt vaak geopend, dan zal ijs in het reservoir mogelijk aan elkaar vast smelten waardoor het afgiftepunt wordt geblokkeerd. Het ijs in het reservoir moet handmatig worden verwijderd.
Voordat u de ijsmaker gaat reinigen, dient u eerst de ijsmaker functie uit te schakelen om te voorkomen dat het ijs in de koeling of op de grond zal vallen.
3) Werkwijze het ijsreservoir (de)monteren
Pak het ijsreservoir met beide handen goed vast bij de hiervoor bestemde grepen. (zie afb.) til het reservoir ongeveer 10 mm op en trek het reservoir uit de beugel.
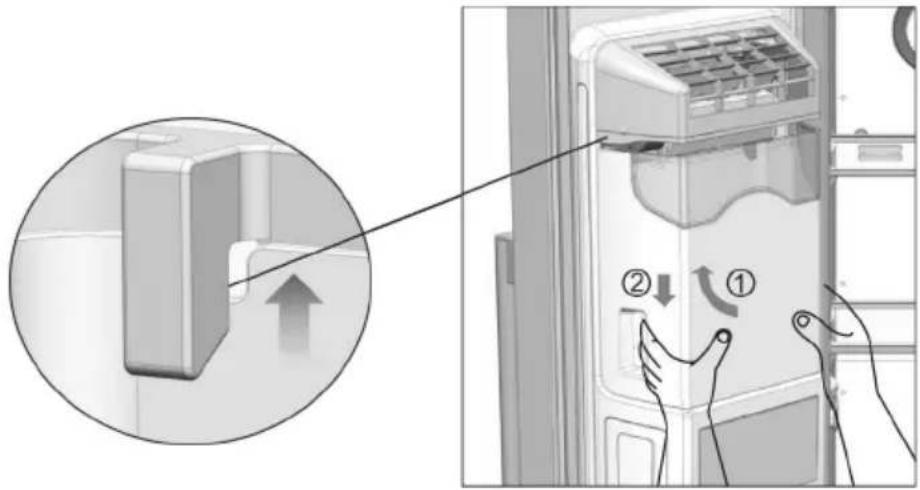
Nadat u dit heeft gedaan, haalt u het ijs met beleid met uw handen uit het reservoir. Reinig nu het reservoir met schoon water.
Let op!
* Gebruik geen zuurhoudende middelen, chemische oplosmiddelen, (alcohol, vaatwasmiddel) of schuurmiddelen/ schurende materialen.
* Na het reinigen en voor het terugplaatsen in het apparaat is het nodig om het reservoir grondig te drogen om vastvriezen te voorkomen.
* Reinig het afgiftepunt met beleid met een schone doek. Duw niet te hard tegen het binnenwerk om het beschadigen van het mechanisme te voorkomen.
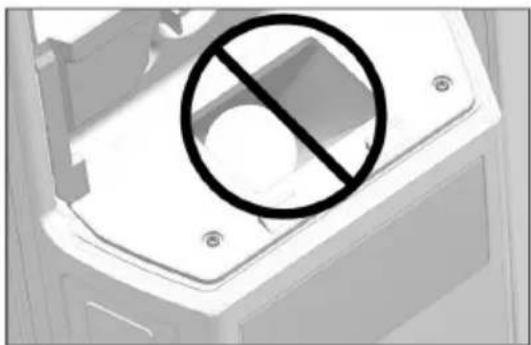
* Plaats niets anders in de dispenser uitsparing of tegen het afgiftepunt om het blokkeren van het afgiftepunt te voorkomen.
* Laat kinderen niet op het apparaat klimmen, deze kan voorover vallen en letsel veroorzaken.
* Stop geen handen, vingers of enigerlei objecten de ijssleuf, ijsemmer of afgiftepunt. Dit kan letsel of beschadigingen veroorzaken.
natural_image
Exterior view of a computer monitor with a prohibition symbol (no text or labels)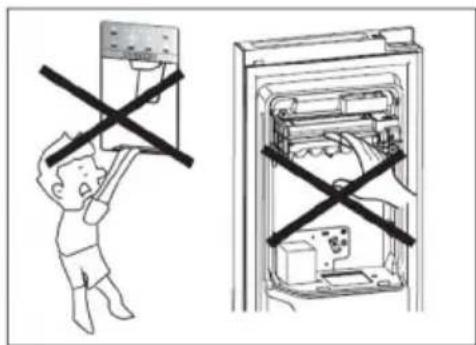
Ontdooien
Diepvries voedsel of bevroren voedsel kan voor gebruik worden ontdooid in het koelgedeelte of bij kamertemperatuur, afhankelijk van de hoeveelheid tijd die hiervoor beschikbaar is. Kleine stukken kunnen ook rechtstreeks uit de vriezer bevroren worden gekookt. In dat geval duurt het kookproces wel langer.
IJsblokjes
Dit apparaat kan zijn voorzien van één of meer bakjes om ijsblokjes te maken.
Accessoires
Verplaatsbare legplanken
De wanden van het koelgedeelte zijn voorzien van een aantal richels waardoor de legplanken op een bepaalde positie kunnen worden geplaatst, zoals u het wenst.
Het plaatsen van de deurvakken
Om de opslag van de voedselpakketjes van verschillende afmetingen mogelijk te maken, kunnen de deurvakken op verschillende hoogtes worden geplaatst. Voor deze aanpassingen gaat u als volgt te werk: trek het deurvak geleidelijk in de richting van de pijlen totdat het los komt en herplaats het waar u dat wenst.
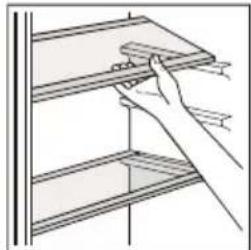
natural_image
Line drawing of a hand using a tool to lift or install a shelf (no text or symbols)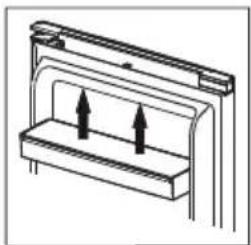
natural_image
Pure technical diagram of a mechanical assembly with two upward arrows, no text or symbols present| Aanbevolen temperatuurinstellingen | |
| Omgevingstemperatuur | Temperatuurinstelling |
| Zomer | Koeling ingesteld op 4°C |
| Vriezer ingesteld op -18°C | |
| Normaal | Koeling ingesteld op 4°C |
| Vriezer ingesteld op -18°C | |
| Winter | Koeling ingesteld op 4°C |
| Vriezer ingesteld op -18°C | |
Bovenstaande informatie zijn de gebruikersadviezen.
Dagelijks gebruik
Plaats de diverse voedingsmiddelen in de desbetreffende compartimenten zoals hieronder aangegeven.
| deur of deurvakken van koelkastgedeelte | Voedsel met natuurlijke conserveringsmiddelen zoals jam, sap, specerijen.Bewaar geen bederflijke voedingsmiddelen hier. |
| Groente-/Fruitlade | Fruit, kruiden en groenten moeten apart worden bewaard in de groente-/fruitlade.Plaats geen bananen, uien, aardappelen of knoflook in de koelkast. |
| Koelkastplateau - midden | Zuivelproducten, eieren. |
| Koelkastplateau - bovenin | Voedingsmiddelen die niet worden bereid zoals: kant-en-klare voedingsmiddelen, vleeswaren, restjes |
| Vriezerladen/-plateaus | Voedingsmiddelen voor langdurige bewaring.Onderste plateau/lade: rauw vlees, gevogelte, vis.Middelste plateau/lade: diepvriesgroenten, friet.Bovenste plateau/lade: consumptie ijs, diepvriesfruit, bevroren bakkerijproducten. |
Factoren die de opslagperiode beïnvloeden:
Bij de aanbevolen temperatuurinstelling, is de aanbevolen opslagperiode in de koeling niet langer dan 3 dagen.
Bij de aanbevolen temperatuurinstelling, is de aanbevolen opslagperiode in de vriezer niet langer dan 1 maand.
De aanbevolen opslagperiode kan worden beinvloed/verkort door andere instellingen.
Nuttige aanwijzingen en tips
Om u te helpen optimaal gebruik te maken van het vriesproces volgen hieronder een aantal belangrijke aanwijzingen:
- de maximale hoeveelheid voedsel die in 24 uur kan worden ingevroren staat op het typeplaatje vermeld;
- het invriesproces duurt 24 uur. Gedurende deze periode geen ander voedsel invriezen;
- alleen vers voedsel van topkwaliteit invriezen wat goed is gewassen;
- bereid voedsel in kleine porties om ervoor te zorgen dat het in zijn geheel en snel kan worden ingevroren en om daarna de juiste portie weer te kunnen ontdooien;
- verpak het voedsel in aluminiumfolie of plasticfolie en zorg ervoor dat de pakketjes luchtdicht zijn;
- laat recent ingevroren voedsel niet in aanraking komen met eerder ingevroren voedsel, zodat het al ingevroren voedsel niet wordt opgewarmd;
- mager voedsel is langer op te slaan dan vet voedsel, zout reduceert de bewaarperiode;
- waterijs wat direct geconsumeerd wordt als het uit het vriesgedeelte komt kan mogelijk leiden tot vriesbrand van de huid;
- het wordt aanbevolen om een datum te zetten op elk opgeslagen pakketje voedsel om een overzicht te houden van de opslagtijden.
Tips voor opslag van bevroren voedsel
Om het beste resultaat te behalen:
- check dat het bevoren voedsel correct was opgeslagen in de winkel:
- zorg ervoor dat het bevroren voedsel in de kortst mogelijke tijd wordt vervoerd van de winkel naar uw vriezer.
- maak de deur niet onnodig vaak open en laat hem niet te lang open staan.
- eenmaal ontdooid bederft voedsel snel en kan het niet opnieuw worden ingevroren.
- de bewaartijd van bevoren voedsel, zoals is aangegeven door de fabrikant, niet overschrijden.
Tips voor het koelen van vers voedsel
Voor het beste resultaat:
- Bewaar geen warm voedsel of verdampende vloeistoffen in de koelkast.
- Bedek of verpak het voedsel, vooral als het een sterke smaak heeft.
- Vers te bereiden voedsel (alle soorten): verpak het in plastic zakjes en plaats het op de glasplaten boven de groentelade.
- Bewaar het, voor de veiligheid, maximaal één of twee dagen.
- Gekookt voedsel, koude schotels etc.: deze dienen te worden afgedekt en kunnen op elke willekeurige legplank worden geplaatst.
- Groenten en fruit: deze dienen zorgvuldig te worden gereinigd en in de speciaal hiervoor bestemde lade te worden geplaatst.
- Boter en kaas: deze dienen in speciale luchtdichte verpakkingen te worden geplaatst of te worden ingepakt in aluminium folie of plastic zakken om zoveel mogelijk lucht uit te sluiten.
- Melkflessen: deze dienen te zijn voorzien van een dop en moeten worden opgeslagen in de deurvakken.
- Bananen, aardappelen, uien en knoflook. Indien onverpakt dienen ze niet in de koelkast te worden bewaard.
Reiniging
Om hygiënische redenen dienen de binnenkant van het apparaat en de zich hierin bevindende accessoires regelmatig te worden schoongemaakt.

Waarschuwing! Het apparaat mag tijdens de reiniging niet zijn aangesloten aan het elektriciteitsnet. Gevaar voor een elektrische schok! Voor schoonmaakwerkzaamheden het apparaat uitschakelen en de stekker uit het stopcontact halen of de zekering uitschakelen of eruit draaien. Het apparaat nooit met een stoomreiniger schoonmaken. Er zou vocht bij elektrische onderdelen terecht kunnen komen, gevaar voor een elektrische schok! Hete damp kan schade veroorzaken aan kunststof onderdelen.
Het apparaat moet droog zijn voordat u het weer in werking zet.
Belangrijk! Etherische oliën en organische oplosmiddelen kunnen kunststofdelen aantasten, bijvoorbeeld het sap van citroen- of sinaasappelschillen, boterzuur of reinigingsmiddelen die azijnzuur bevatten.
- Dergelijke stoffen niet in aanraking laten komen met onderdelen van het apparaat.
- Gebruik geen schurende schoonmaakmiddelen.
- Verwijder het voedsel uit het vriesgedeelte voordat u het apparaat reinigt. Bewaar het voedsel op een koude plaats en dek het goed af.
- Schakel het apparaat uit en haal de stekker uit het stopcontact of de zekering uitschakelen of eruit draaien.
- Reinig het apparaat en haar accessoires met een doek met lauwwarm water. Aansluitend met schoon water navegen en droog wrijven.
- Als het apparaat weer droog is, kunt u het apparaat weer in werking zetten.
Problemen en oplossingen

Let opl Voordat u het probleem aanpakt eerst de stekker uit het stopcontact halen. Alleen een elektricien of een gekwalificeerde persoon mag problemen oplossen die niet in de gebruiksaanwijzing aan de orde komen.
Belangrijk! Er zijn bepaalde geluiden tijdens de normale werking van het apparaat (compressor, koelcircuit).
| Probleem | Mogelijke oorzaak | Oplossing |
| Apparaat werkt niet | Stekker zit niet in stopcontact of apparaat staat niet aan. | Stekker in stopcontact steken en apparaat aanzetten. |
| Zekering doorgebrand of defect. | Controleer de zekering, vervangen indien noodzakelijk. | |
| Stopcontact is defect. | Problemen met de netspanning laten repareren door een elektricien. | |
| Apparaat koelt te sterk | Temperatuur is te koud ingesteld of de temperatuur staat op MAX ingesteld. | Draai de temperatuurinstelling tijdelijk op een warmere instelling. |
| Het voedsel is niet goed ingevroren | Temperatuur is niet goed ingesteld. | Kijk naar de oorspronkelijk ingestelde temperatuurinstelling. |
| Deur was gedurende een lange tijd open. | Open de deur niet langer dan noodzakelijk is. | |
| Een grote hoeveelheid warm voedsel is in het apparaat opgeslagen in de afgelopen 24 uur. | Draai de temperatuurregeling tijdelijk op een koudere instelling. | |
| Het apparaat staat in de buurt van een warmtebron. | Kijk in het hoofdstuk "Plaats". | |
| Zware opbouw van vorst op de deurafdichting | Deurafdichting is niet luchtdicht. | Verwarm het niet luchtdichte gedeelte van de afdichting met een haardroger (koude stand). Tegelijk met de hand de afdichting in de juiste vorm brengen zodat het weer sluit. |
| Vreemde geluiden | Apparaat staat niet waterpas. | Pootjes opnieuw instellen. |
| Apparaat raakt de muur of andere voorwerpen. | Apparaat licht verschuiven. | |
| Een onderdeel aan de achterzijde van het apparaat, bijv. een pijp, raakt een ander onderdeel van het apparaat of de muur. | Indien nodig, het onderdeel licht iets verbuigen. | |
| Zijpanelen zijn warm | Dit is normaal, de warmte uitwisseling vindt plaats in de zijpanelen. | Draag handschoenen wanneer het aanraken van de zijpanelen echt nodig is. |
| Dispenser krijgt geen gekoeld water | Storing watertoevoer of open de waterklep | Controleer of watertoevoer en/of waterklep open staan |
| Filter niet correct geinstalleerd | Controleer of de filter niet verkeerdom in is geplaatst | |
| Waterklep of de verbindingsstukken niet correct geinstalleerd | Controleer of de verbindingsstukken en/of de waterklep niet verkeerd om zijn geinstalleerd. | |
| Water niet koel genoeg | Koelkasttemperatuur te hoog ingesteld | Koelkasttemperatuur lager instellen |
| Teveel water in 1 x afgenomen (1L) | Wacht totdat het water verder afkoelt | |
| Te vaak water afgenomen | Wacht totdat het water verder afkoelt | |
| Dispenser krijgt geen ijs | Geen ijs in het reservoir | Wacht totdat de ijsmaker stopt met ijs maken (de 1e keer moet de koelkast volledig gekoeld zijn, dan pas satrt de ijsmaker met ijs maken. |
| Storing in watertoevoer of waterklep | Controleer of de watertoevoer en de waterklep open staan | |
| De IJs Uit Modus is actief, er wordt geen ijs gemaakt | Schakel de IJs Uit Modus, uit. | |
| De waterdruk is te laag | Controleer of de waterdruk 1.5 - 7 bar is | |
| De waterklep of de verbindingsstukken zijn niet correct geinstalleerd | Controleer of de waterklep en de verbindingsstukken niet verkeerd om zijn geinstalleerd | |
| Het filter is niet correct geinstalleerd | Controleer of het filter niet verkeerd om is geinstalleerd | |
| De ijsblokjes zijn aan elkaar vast gevroren in het reservoir en blokkeren het afgiftepunt | Verwijder de ijsblokjes | |
| Er is een hard object in het reservoir dat het kopen van de motor verhindert | Verwijder de blokkade voor het afgiftepunt | |
| De deur is niet goed gesloten, koude lucht ontsnapt | Zorg dat de deur goed gesloten is | |
| Hoeveelheid ijsblokjes/ gekoeld water te klein | De druk van de watertoevoer is te laag | Controleer of de waterduk tussen 1.5 - 7 bar ligt |
| De waterfilter is verstopt door te lang gebruik | Vervang het waterfilter | |
| Storing in het water doseersysteem | Neem contact op met de Servicedienst |
Als de storing opnieuw voorkomt dient u contact op te nemen met de servicedienst.
Om u snel en correct te kunnen helpen zijn de gegevens nodig die vermeld zijn op het typeplaatje. Schrijf de gegevens van het typeplaatje hier op, zodat u ze altijd snel bij de hand heeft.
Dit product bevat een LED-lichtbron van energie-efficiëntieklasse G.
Garantie voorwaarden
Beste gebruiker,
Voor onze garantievoorwaarden kunt u onderstaande QR-code scannen of de link die eronder staat gebruiken. Onderaan in de voettekst vind u onze garantievoorwaarden.
https://www.exquisitbenelux.nl
Voor vragen betreffende verkoop kunt u mailen naar: verkoop@domest.nl
Voor vragen betreffende service kunt u mailen naar: service@domest.nl
Voor overige vragen kunt u mailen naar: info@domest.nl
Telefonisch zijn wij ook te bereiken: +31(0)314 362244
DOMEST
domestic and professional appliances

MULTIBRAND SALES & SERVICES
DOMEST
domestic and professional appliances
MULTIBRAND SALES & SERVICES
INSTRUCTION MANUAL
Side by Side
REFRIGERATOR-FREEZER
6%6 □□□+ & ) □□□( ,□□
natural_image
Exterior view of a modern stainless steel refrigerator with front panel and side door (no visible text or symbols)| Content | |
| 1. Safety Information | Page 1~10 |
| 2. Overview | Page 11~12 |
| 3. Installation | Page 13~16 |
| 4. Daily Use | Page 17~30 |
| 5. Warranty & Service | Page 31 |

Safety information
In the interest of your safety and to ensure the correct use, before installing and first using the appliance, read this user manual carefully, including its hints and warnings. To avoid unnecessary mistakes and accidents, it is important to ensure that all people using the appliance are thoroughly familiar with its operation and safety features. Save these instructions and make sure that they remain with the appliance if it is moved or sold, so that everyone using it through its life will be properly informed on appliance use and safety.
For the safety of life and property keep the precautions of these user's instructions as the manufacturer is not responsible for damages caused by omission.
Children and vulnerable people safety
- This appliance can be used by children aged from 8 years and above and persons with reduced physical, sensory or mental capabilities or lack of experience and knowledge if they have been given super vision or instruction concerning use of the appliance in a safe way and understand the hazards involved.
• Children aged from 3 to 8 years are allowed to load and unload this appliance.
• Children should be supervised to ensure that they do not play with the appliance. - Cleaning and user maintenance shall not be made by children unless they are aged from 8 years and above and supervised.

Safety information
- Keep all packaging well away from children. There is risk of suffocation.
- If you are discarding the appliance pull the plug out of the socket, cut the connection cable (as close to the appliance as you can) and remove the door to prevent playing children to suffer electric shock or to close themselves into it.
- If this appliance featuring magnetic door seals is to replace an older appliance having a spring lock (latch) on the door or lid, be sure to make that spring lack unusable before you discard the old appliance. This will prevent it from becoming a death trap for a child.
General safety
⚠ WARNING! Keep ventilation openings, in the appliance enclosure or in the built-in structure, clear of obstruction.
⚠ WARNING! Do not use mechanical devices or other means to accelerate the defrosting process, other than those recommended by the manufacturer.
⚠ WARNING! Do not damage the refrigerant circuit.
WARNING! Do not use other electrical appliances (such as ice cream makers) inside of refrigerating appliances, unless they are approved for this purpose by the manufacture.
⚠ WARNING! Do not touch the light bulb if it has been on for a long period of time because it could be very hot. ^1)
1) If there is a light in the compartment.

Safety information

WARNING! When positioning the appliance, ensure the supply cord is not trapped or damaged.

WARNING! Do not locate multiple portable socket-outlets or portable power suppliers at the rear of the appliance.
- Do not store explosive substances such as aerosol cans with a flammable propellant in this appliance.
- The refrigerant isobutane (R-600a) is contained within the refrigerant circuit of the appliance, a natural gas with a high level of environmental compatibility, which is nevertheless flammable.
- During transportation and installation of the appliance, be certain that none of the components of the refrigerant circuit become damaged.
- avoid open flames and sources of ignition;
- thoroughly ventilate the room in which the appliance is situated.
- It is dangerous to alter the specifications or modify this product in any way. Any damage to the cord may cause a short circuit, fire and/or electric shock.
• This appliance is intended to be used in household and similar applications such as - staff kitchen areas in shops, offices and other working environments;
- farm houses and by clients in hotels, motels and other residential type environments;
- bed and breakfast type environments;
- catering and similar non-retail applications.

Safety information
⚠ WARNING! Any electrical components (plug, power cord, compressor and etc.) must be replaced by a certified service agent or qualified service personnel.
WARNING! The light bulb supplied with this appliance is a “special use lamp bulb” usable only with the appliance supplied. This “special use lamp” is not usable for domestic lighting. ^1)
• Power cord must not be lengthened.
- Make sure that the power plug is not squashed or damaged by the back of the appliance. A squashed or damaged power plug may overheat and cause a fire.
• Make sure that you can come to the mains plug of the appliance.
- Do not pull the mains cable.
- If the power plug socket is loose, do not insert the power plug. There is a risk of electric shock or fire.
- You must not operate the appliance without the lamp.
- This appliance is heavy. Care should be taken when moving it.
- Do not remove nor touch items from the freezer compartment if you hands are damp/wet, as this could cause skin abrasions or frost/freezer burns.
- Avoid prolonged exposure of the appliance to direct sunlight.
Daily use
- Do not put hot on the plastic parts in the appliance.

Safety information
- Do not place food products directly against the rear wall.
- Frozen food must not be re-frozen once it has been thawed out. ^1)
- Store pre-packed frozen food in accordance with the frozen food manufacture's instructions. ^1)
- Appliance's manufactures storage recommendations should be strictly adhered to. Refer to relevant instructions.
- Do not place carbonated of fizzy drinks in the freezer compartment as it creates pressure on the container, which may cause it to explode, resulting in damage to the appliance. ^1)
- Ice lollies can cause frost burns if consumed straight from the appliance. ^1)
- To avoid contamination of food, please respect the following instructions.
- Opening the door for long periods can cause a significant increase of the temperature in the compartments of the appliance.
- Clean regularly surfaces that can come in contact with food and accessible drainage systems.
- Clean water tanks if they have not been used for 48h; flush the water system connected to a water supply if water has not been drawn for 5 days.
- Store raw meat and fish in suitable containers in the refrigerator, so that it is not in contact with or drip onto other food.
- Two-star frozen-food compartments (if they are presented in the appliance) are suitable for storing pre-frozen food, storing or making ice-cream and making ice cubes.
1) If there is a freezer compartment. 2) If there is a fresh-food storage compartment.

Safety information
- One-, two- and three -star compartments (if they are presented in the appliance) are not suitable for the freezing of fresh food.
- If the appliance is left empty for long periods, switch off, defrost, clean, dry and leave the door open to prevent mount developing within the appliance.
Care and cleaning
- Before maintenance, switch off the appliance and disconnect the mains plug from the mains socket.
- Do not clean the appliance with metal objects.
- Do not use sharp objects to remove frost from the appliance. Use a plastic scraper. ^1)
- Regularly examine the drain in the refrigerator for defrosted water. If necessary, clean the drain. If the drain is blocked, water will collect in the bottom of the appliance. ^2)
Caution!
- When using the ice making and cooling function, make sure the water source and filter are connected.
- Before using the product, the filter should be rinsed with water for 5 minutes or 5L of water to ensure that the toner in the filter is rinsed clean.
• After the refrigerator is connected to the water source, exhaust treatment shall be carried out according to the installation instructions. After waiting 5 minutes, check the waterway for leaks.

Safety information
- Ensure that the water pressure is within the required specifications. Too high water pressure is easy to cause water leakage, too low water pressure can not support the product function.
- Do not touch the ice maker with hands or tools in the process of use to prevent damage to personnel or the ice maker.
- During using the product, please ensure that the ice making machine and the ice storage box are clean to avoid a large amount of dust, solid debris and other pollutants falling into them.
- Do not allow children to take out the ice box to prevent it from falling off and hurting.
- There are metal knives inside the ice box. Children are not allowed to play with them to avoid being hurt.
Installation
Important! For electrical connection carefully follow the instructions given in specific paragraphs.
- Unpack the appliance and check if there are damages on it. Do not connect the appliance if it is damaged. Report possible damages immediately to the place you bought it. In that case retain packing.

Safety information
- It is advisable to wait at least four hours before connecting the appliance to allow the oil to flow back in the compressor.
- Adequate air circulation should be around the appliance, lacking this leads to overheating. To achieve sufficient ventilation follow the instructions relevant to installation.
- Wherever possible the spacers of the product should be against a wall to avoid touching or catching warm parts (compressor, con-denser) to prevent possible burn.
• The appliance must not be located close to radiators or cookers.
• Make sure that the mains plug is accessible after the installation of the appliance.
Service
- Any electrical work required to do the servicing of the appliance should be carried out by a qualified electrician or competent person.
- This product must be serviced by an authorized Service Center, and only genuine spare parts must be used.
Energy saving
- Don't put hot food in the appliance;
- Don't pack food close together as this prevents air circulating;
- Make sure food don't touch the back of the compartment(s);

Safety information
- If electricity goes off, don't open the door(s);
- Don't open the door(s) frequently;
- Don't keep the door(s) open for too long time;
- Don't set the thermostat on exceeding cold temperatures;
- All accessories, such as drawers, shelves balconies, should be kept there for lower energy consumption.
Environment Protection
This appliance does not contain gasses which could damage the ozone layer, in either its refrigerant circuit or insulation materials. The appliance shall not be discarded together with the urban refuse and rubbish. The insulation foam contains flammable gases: the appliance shall be disposed according to the appliance regulations to obtain from your local authorities. Avoid damaging the cooling unit, especially the heat exchanger. The materials used on this appliance marked by the symbol are recyclable.
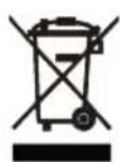
The symbol on the product or on its packaging indicates that this product may not be treated as household waste. Instead it should be taken to the appropriate collection point for the recycling of electrical and electronic equipment. By ensuring this product is disposed of correctly, you will help prevent potential negative consequences for the environment and human health, which could otherwise be caused by inappropriate waste handling of this product.

Safety information
For more detailed information about recycling of this product, please contact your local council, your household waste disposal service or the shop where you purchased the product.
Packaging materials
The materials with the symbol are recyclable. Dispose the packaging in a suitable collection containers to recycle it.
Disposal of the appliance
- Disconnect the mains plug from the mains socket.
- Cut off the mains cable and discard it.
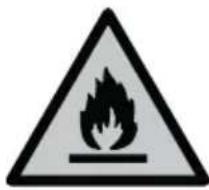
⚠ WARNING! During using, service and disposal the appliance, please pay attention to symbol similar as left side, which is located on rear of appliance (rear panel or compressor) and with yellow or orange color.
It's risk of fire warning symbol. There are flammable materials in refrigerant pipes and compressor.
Please be far away fire source during using, service and disposal.
(Remove away the metal compressor room cover)
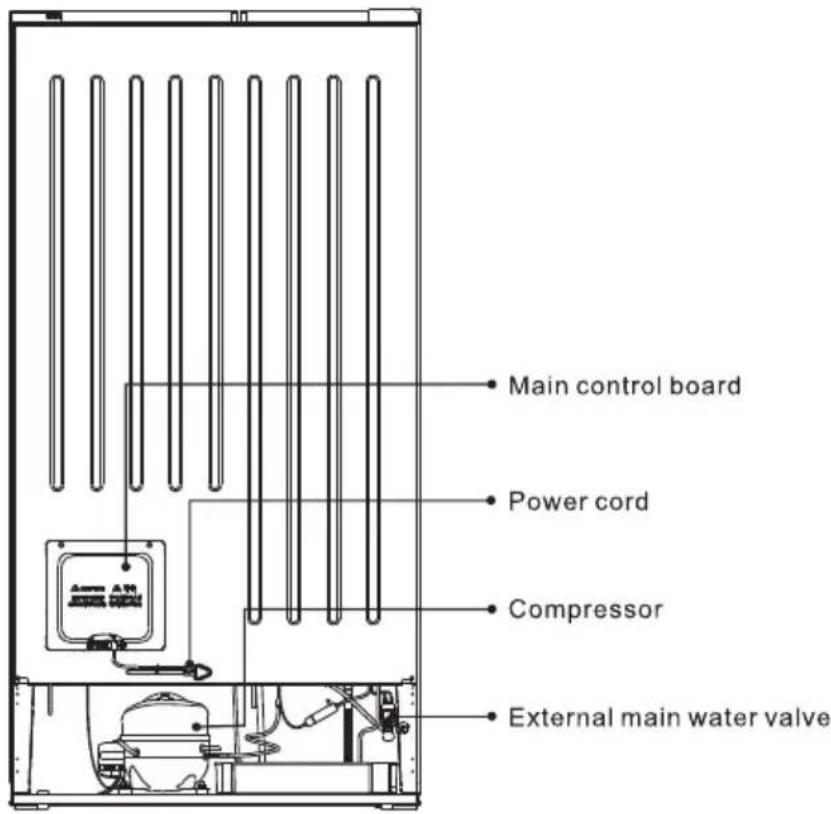
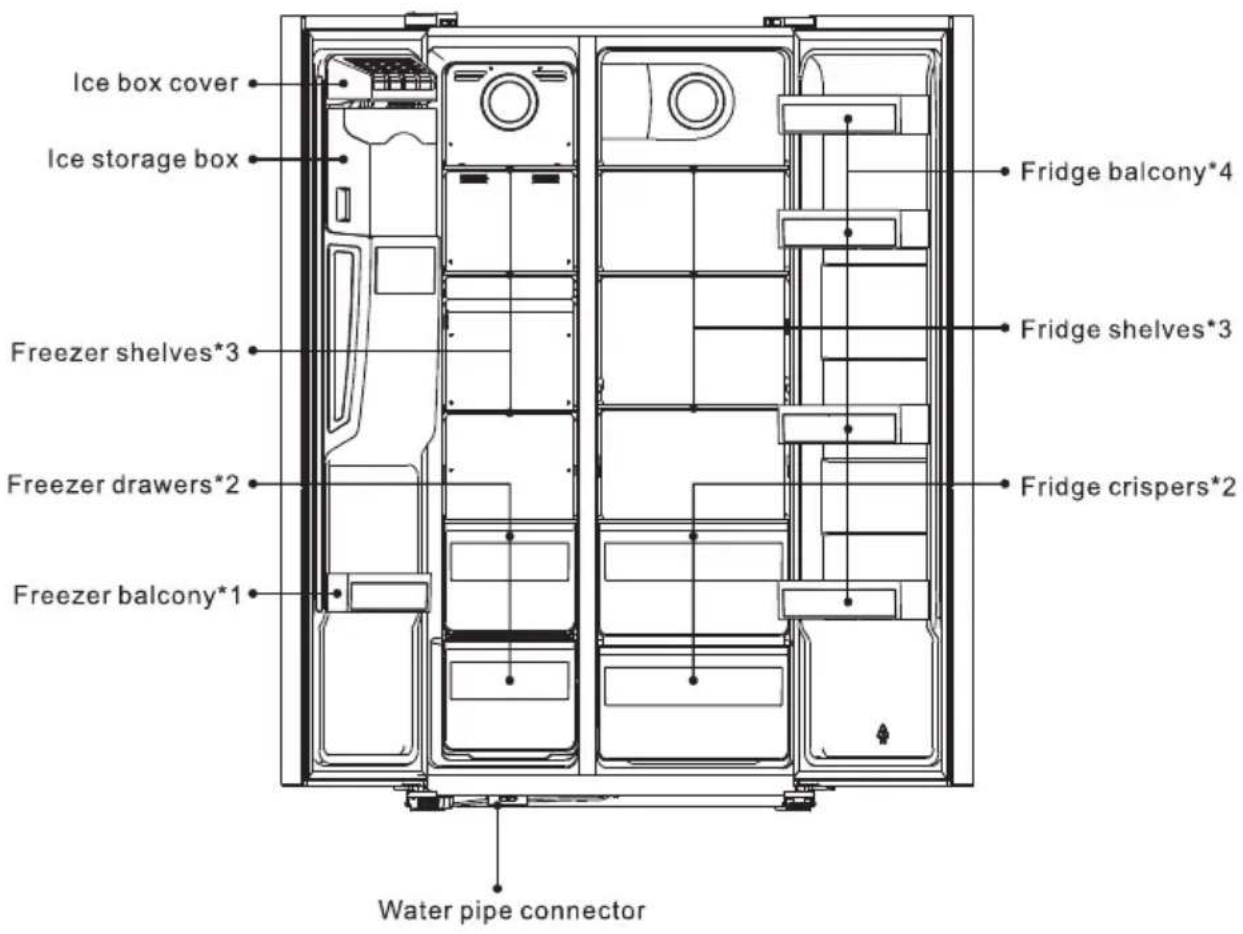
This illustration is only for hinting, the detail please check your appliance.
Product accessories
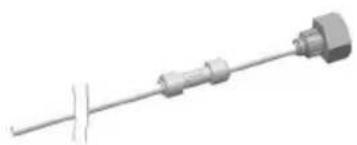
natural_image
Pure mechanical component diagram without any text, numbers, or symbolsWater pipe parts * 1
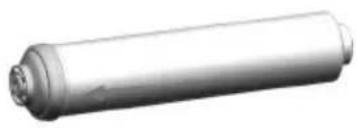
natural_image
3D rendering of a cylindrical mechanical component with flanged ends and a central hub (no text or symbols visible)Water filter * 1
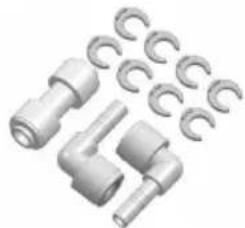
natural_image
Collection of metallic mechanical components including bolts, clips, and a bent pipe (no text or symbols visible)Water pipe connector*1 Water filter connector*2 Anti-slip clips *8
natural_image
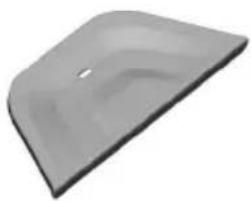
Gray plastic object with a curved top surface and a small hole, resembling a tray or cover (no text or symbols visible)Dispenser water tray * 1
User manual * 1
Remove the doors
Tool required: Philips screwdriver, Flat bladed screwdriver.
- Ensure the unit is unplugged and empty.
- To take the door off, it is necessary to tilt the unit backwards. You should rest the unit on something solid so that it will not slip during the door removing process.
- All parts removed must be saved to do the reinstallation of the door.
- Do not lay the unit flat as this may damage the coolant system.
-
It's better that 2 people handle the unit during assembly.
-
Unscrew hinge cover by Philips screwdriver.
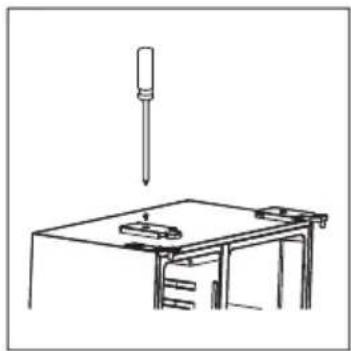
natural_image
Simple line drawing of a mechanical setup with a pipette above a workbench (no text or symbols)- Disconnect the harness.
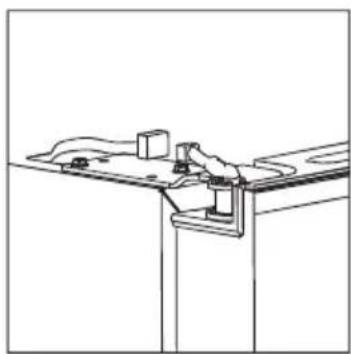
natural_image
Pure technical line drawing of a mechanical assembly or bracket (no text or symbols)- Unscrew top hinge.
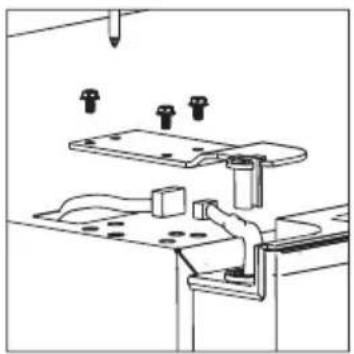
natural_image
Technical line drawing of a mechanical assembly with no visible text or symbols- There is a water pipe connector at the bottom of the refrigerator freezer. Remove it from the protective cover and disconnect from the water pipe, and remember to pull the water pipe out of the lower hinge.
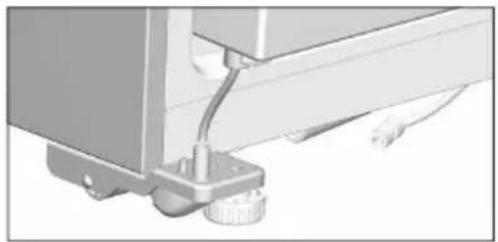
natural_image
Close-up of a mechanical component with a knob and cable (no visible text or symbols)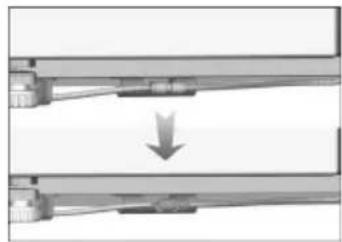
natural_image
Diagram showing a mechanical assembly with two parallel rods and a downward arrow indicating a process or movement (no text or symbols present)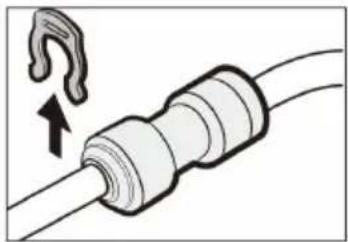
natural_image
Diagram of a cable with a hook insertion, showing internal components and a directional arrow (no text or symbols)-
Lift the door and place it on a soft pad. Then remove another door as same process.
-
Unscrew bottom hinges.
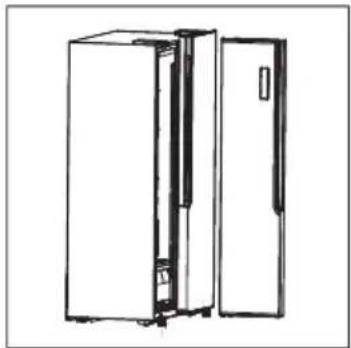
natural_image
Line drawing of a refrigerator with front and back doors (no text or symbols)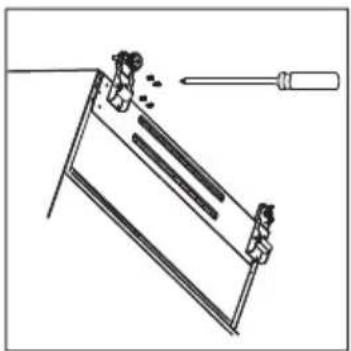
natural_image
Simple line drawing of a ladder with a pointer and a screwdriver above it (no text or symbols)- After the appliance is positioned, install the doors as reversed process.
Space Requirement
- Keep enough space of door open.
- Keep at least 50mm gap at two sides and back.
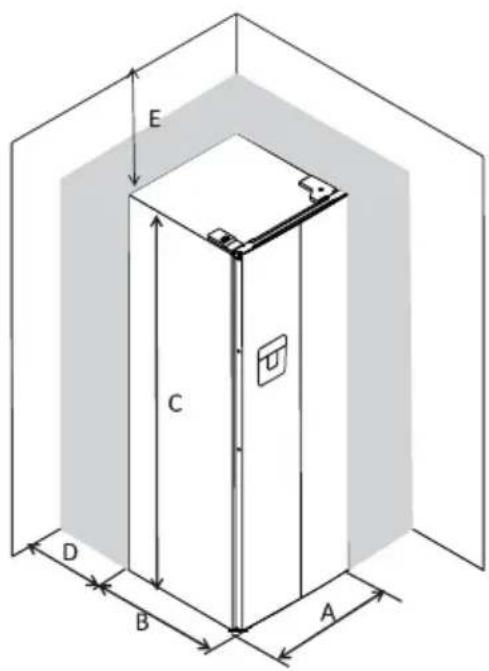
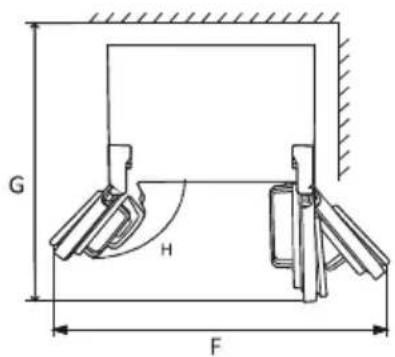
| A | 900 |
| B | 660 |
| C | 1770 |
| D | min=50 |
| E | min=50 |
| F | 1800 |
| G | 1560 |
| H | 135° |
Levelling the refrigerator
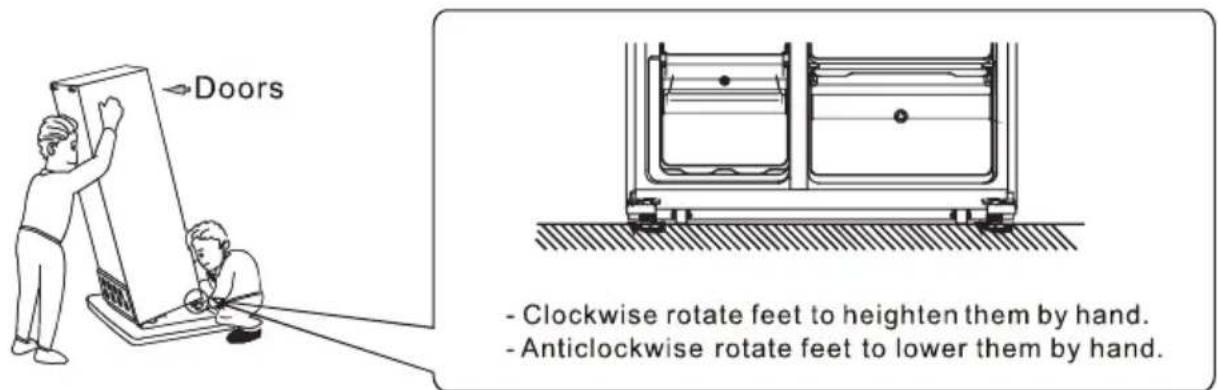
Positioning
Install this appliance at a location where the ambient temperature corresponds to the climate class indicated on the rating plate of the appliance:
for refrigerating appliances with climate class:
- extended temperate: this refrigerating appliance is intended to be used at ambient temperatures ranging from 10°C to 32°C; (SN)
- temperate: this refrigerating appliance is intended to be used at ambient temperatures ranging from 16°C to 32°C; (N)
- subtropical: this refrigerating appliance is intended to be used at ambient temperatures ranging from 16°C to 38°C; (ST)
- tropical: this refrigerating appliance is intended to be used at ambient temperatures ranging from 16°C to 43°C; (T)
Location
The appliance should be installed well away from sources of heat such as radiators, boilers, direct sunlight etc. Ensure that air can circulate freely around the back of the cabinet. To ensure best performance, if the appliance is positioned below an overhanging wall unit, the minimum distance between the top of the cabi-net and the wall unit must be at least 100 mm. Ideally, however, the appliance should not be positioned below overhanging wall units. Accurate leveling is ensured by one or more adjustable feet at the base of the cabinet.
This refrigerating appliance is not intended to be used as a built-in appliance;

Warning! It must be possible to disconnect the appliance from the mains power supply; the plug must therefore be easily accessible after installation.
Electrical connection
Before plugging in, ensure that the voltage and frequency shown on the rating plate correspond to your domestic power supply. The appliance must be earthed. The power supply cable plug is provided with a contact for this purpose.
Important!
How to install the water filter and water pipe
- Before installing, the filter should be rinsing with water for 5 minutes or 5L of water to ensure that the toner in the filter is rinsed clean.
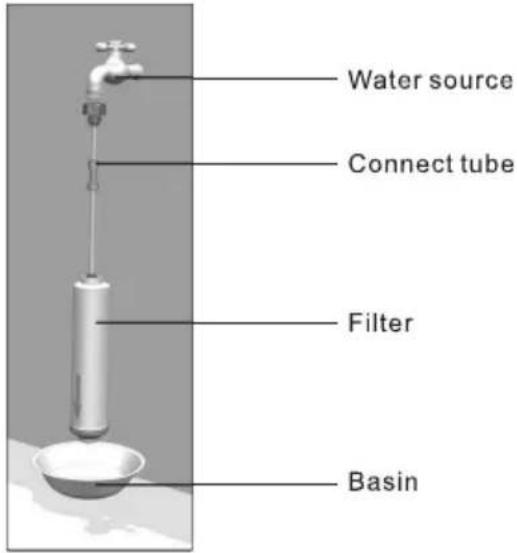
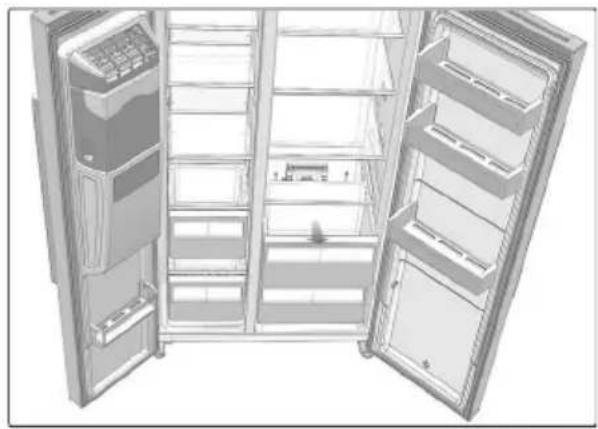
- Open the refrigerator door and take out the crispers.
natural_image
3D rendering of an open refrigerator with multiple doors and shelves (no text or symbols visible)- Take out the rubber plugs on both sides of the water box.
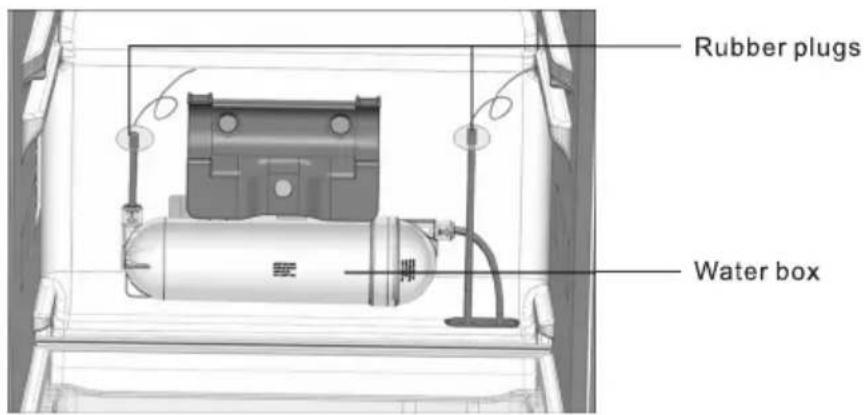
- Take out the water filter from the accessory bag, insert the connectors on both sides of the filter, then connect the water pipe and clamp into the anti-slip clips (pay attention to the direction of the filter arrow)
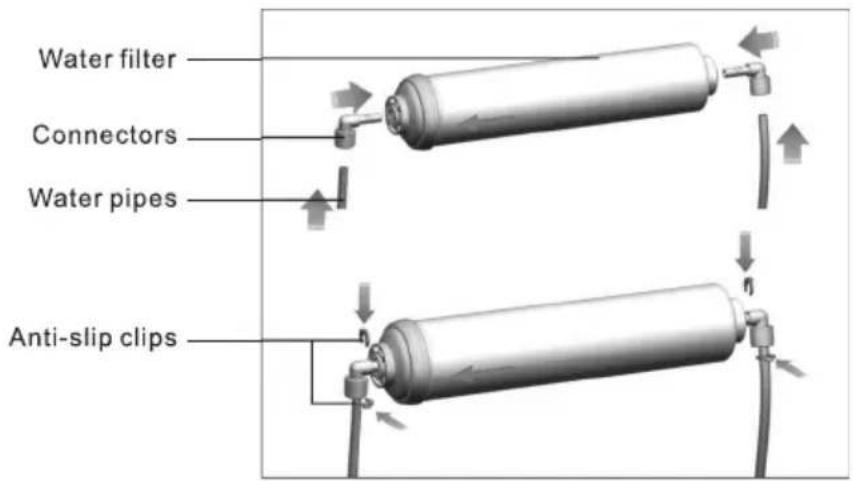
- Assemble the water filter parts with retaining bracket above the water box, and connect the water pipes of water box with water filter.
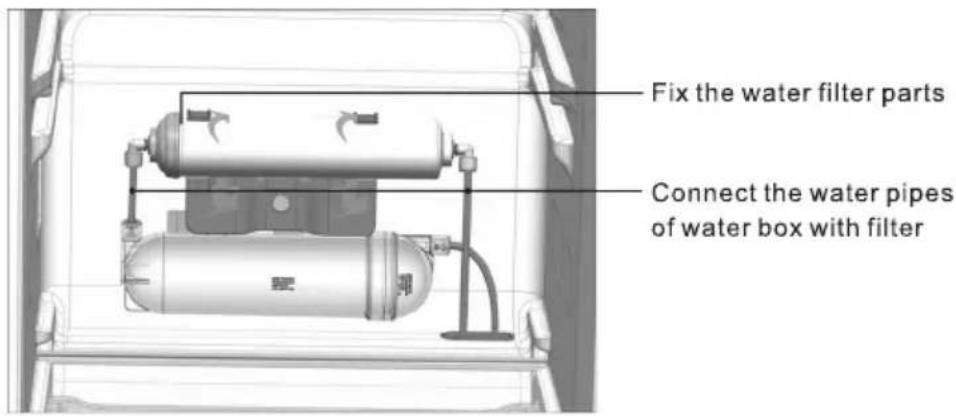
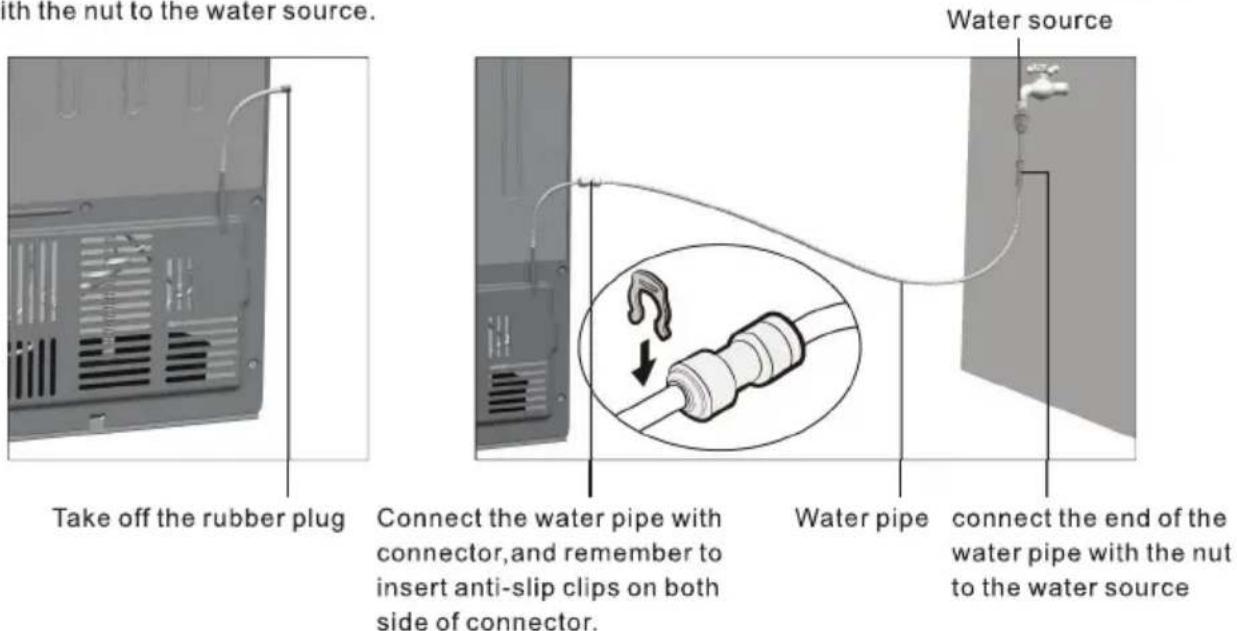
- Take off the rubber plug. Connect the water pipe part to the main valve on the compressor cover with connector, and remember to insert the anti-slip clips, then connect the end of the water pipe with the nut to the water source. Water source
Caution!
- The external water source must be clean and the water pressure should be 1.5\~7 bar to guarantee proper working.
- Check the water pipe connection, check whether there are any other things inside the ice making machine and ice storage box.
• After connecting the water source, open the faucet and check whether there is leakage between the faucet and the connecting pipe. If there is leakage, check the connection of the pipe. - Select the water function, use a large cup to press the dispenser, keep the water flowing for 5 minutes until the water is clean and smooth, during the process the water taken out is not drinkable.
- Select the function of taking ice and breaking ice, use a large cup to press the dispenser, and check the normal operation of the internal motor through the sound judgment.
- Wait for 3 minutes and check whether the water inlet valve of the refrigerator, the water pipe connectors and water filter are leaking or not.
How to Use Dispenser
When using the refrigerator for the first time or when not using it for an extended period of time:
- Please dispense several cups of water to flush the lines before use.
- Discard the ice that the ice maker has produced for approximately one day.
The following sounds are generated during normal operation:
- Sounds of ice cubes falling from ice maker to ice storage box.....issued around every two hours (click).
- Sounds of motor running when taking ice/breaking ice..... (hoot)
- Sounds of knife pushing out/breaking ice when taking it/breaking it.....(kerchikerchi)
To get cold water:
- The dispensed water is cool, not icy cold. If you want colder water, dispense ice before dispensing water.
- Frequent intake of water will increase the temperature of water.
Warning!
- Do not put hands or any other things into ice storage box since the blade inside could hurt you.
- Do not use fragile or thin glass cup to take ice in case the cup break up and hurt you.
- Do not block the dispenser outlet with your hands or other things.
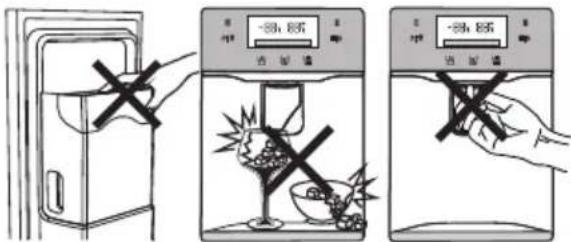
To get ice:
The cup/container must be close to the dispenser outlet to prevent ice from scattering.
How to remove the ice storage box :
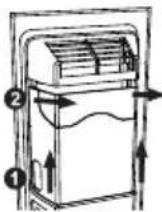
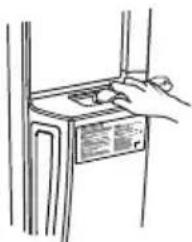
- Lift up the ice storage box with both hands.
- Pull the ice storage box out slowly as show in the figure.
When the ice dispenser does not operate properly:
- If you do not dispense ice for a long time, ice may clump in ice storage box; In this case, please remove the ice storage box and discard the ice inside.*
- If ice does not come out, some ice may get stuck in the chute, please check and remove it. You should regularly check the chute and clear the obstacles.*
* FIRST TURN OFF ICE MAKER FUNCTION!
natural_image
Simple line drawing of a hand placing an object on a cabinet (no text or symbols)Using the Control Panel
Buttons
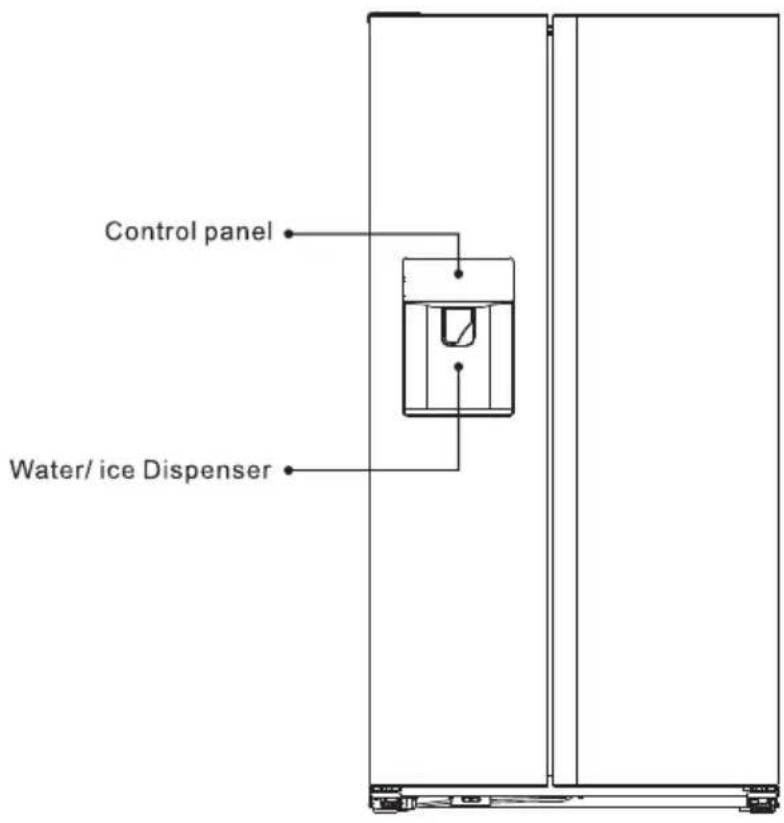
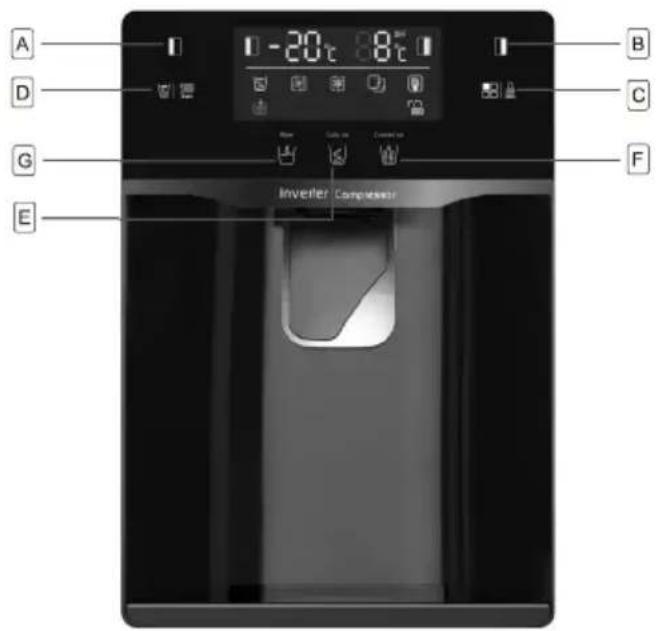
A Press to adjust temperature of freezer compartment (left side) from -14°C to -22°C.
B Press to adjust temperature of fridge compartment (right side) from 2°C to 8°C and "OFF". If select "OFF", fridge compartment will be turned off.
Press to select running mode from SUPER COOLING 📄, SUPER FREEZER 📋, SMART 📋, ECO 📋 and USER'S SETTING (no symbol in display).
Press 3 SEC. button and hold for 3 seconds to lock other bottoms.
Press it and hold for 3 second to unlock other bottoms.
Press the ice off button to control the ice maker. If you want to close the ice maker, press this button, then the product will stop making ice until you press this button again.
"change your water filter".
In general, you should need the water filter every 6 months to ensure the highest water quality. After half a year, the display icon 🎨 will be lit up for reminding you should replace a new water filter. You can purchase a new water filter from the retailer where you buy the refrigerator or the after-sales system. After you finish replacing a new water filter inside the refrigerator, you should Press this 📁 button and hold for 3s, the display icon 🎨 will be extinguished, and the water filter will be reset.
E Press this button to receive cubed ice. You can press this button to choose the type of ice to be dispensed.
F Press this button to receive crush ice. You can press this button to choose the type of ice to be dispensed.
G Press this button to receive cooling water. You can press this button to choose cooling water to be dispensed.
Note!
- When the freezer door is opened or child lock is on, the dispenser will not work. you need to close the door or unlock the child lock to receive the cubed ice, crushed ice, cooling water you want.
- You don't need ice, turn the function off to save energy.(see ice off above)
- If water is not dispensed or dispensed slowly, you need to replace the water filter because it may become clogged.
- Some areas have large amounts of lime in the water, which causes the water filter to clog more quickly.
Display
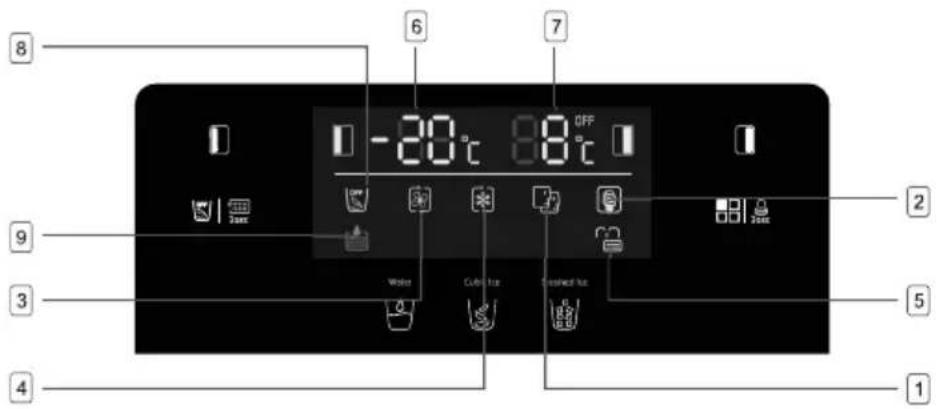
1 SMART mode, the refrigerator sets the temperature of two compartments automatically according to internal temperature and ambient temperature.
2 ECO mode, the refrigerator runs in lowest energy consumption setting.
③ SUPER COOLING cools the fridge compartment to the lowest temperature for approx. 2.5 hours. Then the temperature set before super mode is automatically restored.
4 SUPER FREEZING cools the freezer compartment to the lowest temperature for approx.50 hours. Then the temperature set before super mode is automatically restored.
5 LOCK, the symbol will light on if buttons are locked.
6 Display the setting temperature of freezer compartment.
7 Display the setting temperature of fridge compartment.
8 ICE OFF mode, the symbol will light on when you touch the D button to close the ice maker, it means the refrigerator will stop making ice any more.
9 REMIND CHANGING WATER FILTER mode, the symbol will light on when the water filter has been used for 6 months to remind you replace a new water filter in time. Until you replace a new filter and keep press the D button for 3s, the symbol will be extinguished.
| Mode | Indicator light | Freezer temperature display | Fridge temperature display |
| Smart |  | The temperature display for freezer and fridge will change based on ambient temperature (see the table below). | |
| ECO |  | -15°C | +8°C |
| Super cooling |  | No change | +2°C |
| Super freezing | [5KSZ] | -25°C | No change |
NOTES:
ECO mode: Select this mode when you want to save power.
Super cooling mode: This mode allows you to cool foods quickly and will be automatically deactivated after 2,5 hours of operation.
Super freezing mode: This mode allows you to freeze foods quickly and will be automatically deactivated after 50 hours of operation.
Door open alarm
When any door is left open or not closed completely for about 60 seconds, the appliance will sound an alarm. Close the fridge door then the alarm will stop.
If the door is not well closed, then the alarm will sound 5 times every 30 seconds until the doors are well closed.
If doors are open for 10 continuous minutes without closing, the internal LED light would be turned off automatically.
Child safety lock
This function is designed to prevent children from operating the appliance.
- To activate the function, press and hold LOCK 3s for about 3 seconds. The lock indicator light will illuminate indicating the safety lock function is activated.
- To deactivate the function, press and hold LOCK 3s for about 3 seconds. The unlock indicator light will illuminate indicating the safety lock function is deactivated.
First use
Cleaning the interior
Before using the appliance for the first time, wash the interior and all internal accessories with lukewarm water and some neutral soap so as to remove the typical smell of a brand new product, then dry thoroughly.
Important! Do not use detergents or abrasive powders, as these will damage the finish.
How to use the dispenser?
You can get cubed ice, crushed ice and cooling water by pressing the paddle switch, which is selected by displaying the operation panel;
Note! If the paddle switch is pressed continuously for more than 3 minutes, the dispenser will stop working to protect the electrical components. If you need more cooling water or ice, you can release the paddle switch and press it again to get more water or ice as you want.
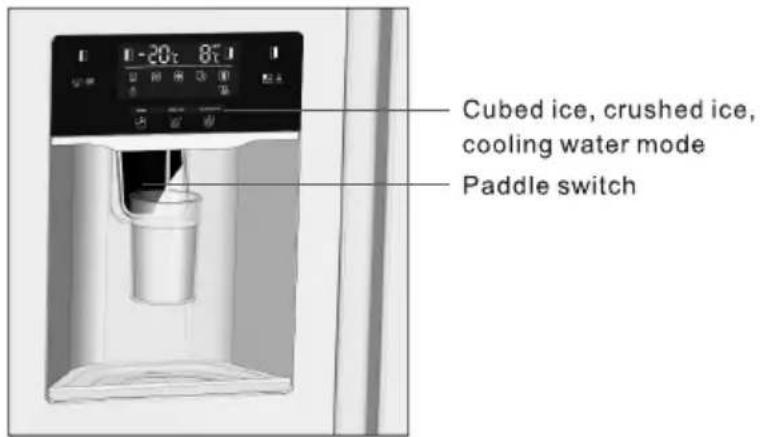
Get cooling water
Select the cooling water mode 📁, place the cup in the middle of the paddle switch, press the paddle switch to receive water, and stop pressing the paddle switch after taking an appropriate amount of water, and the water will stop flowing automatically.
Note!
- Wait for 2 seconds before taking the cup away to avoid the water splash out.
- If cooler water is needed, fill the glass with ice before taking;
- If more than 800ml of water is taken at one time, water with high temperature may be taken out. In this case, it is recommended to wait half an hour for a cold drink;
Get ice
Select the cube ice mode 📁 or crushed ice mode 📁 to get ice type as you want.
Place the cup in the middle of the paddle switch, press the paddle switch to receive ice, and stop pressing the paddle switch after taking an appropriate amount of ice, and the ice will stop flowing automatically.
Note!
- Wait for 2 seconds before taking the cup away to avoid the ice splash out.
• To prevent ice from falling out of the cup, place the cup as close to the dispenser outlet as possible. - When taking ice, the internal motor runs to churn ice and break ice, which may produce some noise.
• After taking ice, please use it as soon as possible to avoid melting ice.
Important!
This section tells you how to avoid most issues you would happen. We recommend that you read through them carefully before using the appliance.
- When taking water for the first time or not taking water for a long time, please take out 1\~2L of water and pour it away;
- When using the ice maker for the first time or not using it for a long time, the first box of ice cubes should not be used;
- It is recommended to use a cup with a diameter of more than 70mm to take water and ice;
- Do not use fragile containers to take ice cubes, so as to avoid damage caused by broken containers;
- Do not put your hands or tools into the opening part of the distributor, so as to avoid causing failure to the internal mechanism;
- Do not pull the paddle switch too much force, so as to avoid the failure of the paddle switch;
- The ice maker automatically makes ice without manual operation. When the ice storage box is filled with ice (about 1.6kg), the ice maker automatically stops making ice;
- In the smart mode, the daily ice production capacity of the refrigerator is about 1.2kg;
- When the freezer door is open, the ice water distributor is locked and cannot carry out water or ice;
- When the freezer door is open, if the ice maker is performing the making ice procedure, some ice will fall into the ice storage box.
- If the ice is not discharged smoothly, please check whether the ice outlet of the distributor is blocked by ice. If so, clean up the ice before taking it;
- After the refrigerator is powered on in the first time, turn on the ice maker, the ice maker will start making ice about 10 hours later;
- During the process of using, you may hear the sound of water valve opening, water flowing and ice falling, which is normal;
- If you are on vacation or do not need ice cubes for a long time, please turn off the ice making function and take out the ice cubes in the ice box to avoid the ice cubes become frozen together to block the outlet.
- In case of power failure, please clean the food in the refrigerator in time, and clean the ice in the ice storage box to avoid ice melting.
- Do not eat the ice cubes when they have odor. Check if the filter has expired or if there are unsealed foods with pungent odor in the refrigerator.
How to clean and care the dispenser?
Use a soft towel to clean the refrigerator and ensure to disconnect the power supply before cleaning it. Please use clean water when cleaning, do not use benzene, diluent, sodium hypochlorite, abrasive, bleach and other chemical reagents. Do not spray detergent directly on the display screen, otherwise the printed text on the display screen may fall off.
1) Take down the water box of the distributor regularly and pour out the water inside, and wipe it clean.
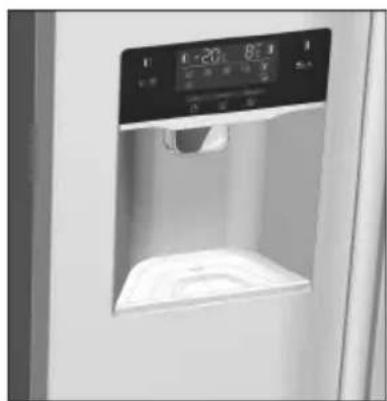
natural_image
Close-up of a refrigerator with a digital display showing temperature and volume (no visible text or symbols)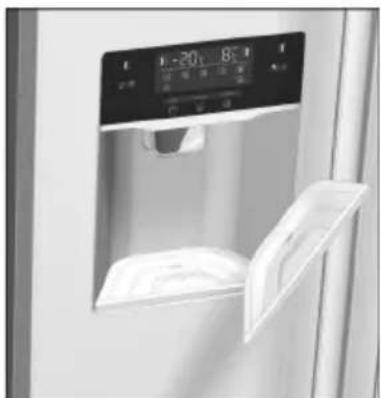
natural_image
Close-up of a refrigerator with a digital display showing temperature and volume (no visible text or symbols)
2) Clean the ice storage box regularly
If the ice is not used for a long time or the freezer door is frequently opened, the ice in the ice storage box may melt and became frozen together, which makes the distributor outlet blocked. The ice in the ice storage box needs to be removed manually.
When cleaning the ice storage box, it is necessary to turn off the ice maker function to avoid the ice falling into the refrigerator or the floor.
3) How to assemble and disassemble the ice storage box
Grasp the ice storage box with both hands on the buckle, lift the ice storage box up about 10mm with a little force, and then drag the ice storage box out of the fixed buckle;
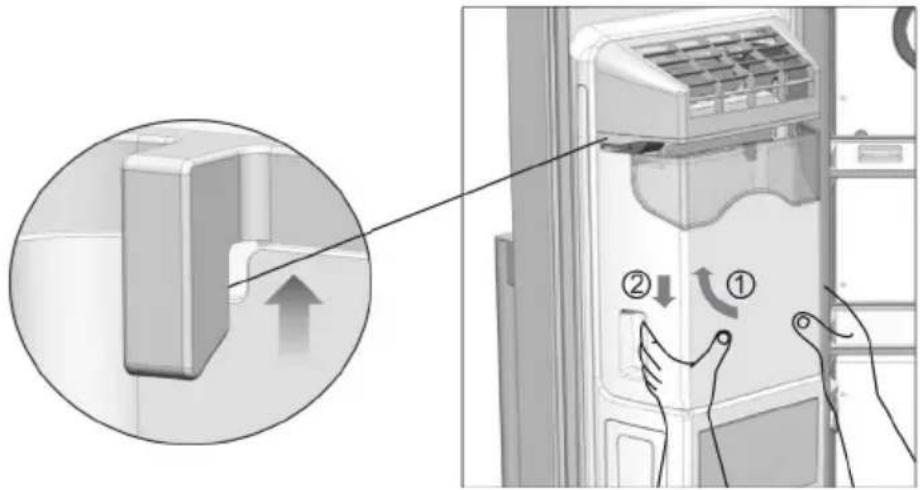
After taking out the ice storage box, take out the internal ice manually and carefully, and then clean with clean water.
After cleaning the ice storage box, install it as reversed process.
Note!
- Do not use acid, chemical solvents (alcohol, dishwashing liquid) and other scrubbing;
- After cleaning, it is necessary to dry the ice box thoroughly before installing in the refrigerator to avoid ice freezing;
- Use a clean towel to clean the ice outlet, do not press the internal structure with too much force to avoid damaging the internal mechanism;
- Do not place anything else in the ice outlet to avoid blocking the ice outlet;
- Do not allow child to climb on the refrigerator, or it may fall down to hurt people.
- Do not put your fingers, hands, or any other unsuitable objects in the ice chute or ice bucket. This can cause personal injury or material damage.
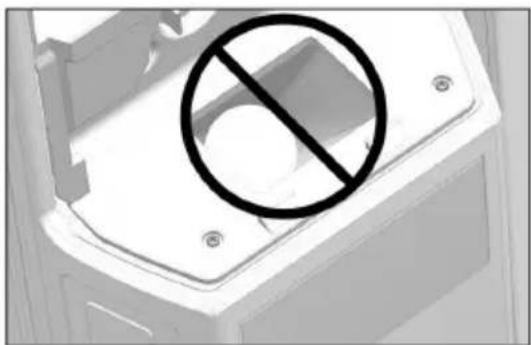
natural_image
Exterior view of a mechanical component with a black prohibition symbol (no text or labels)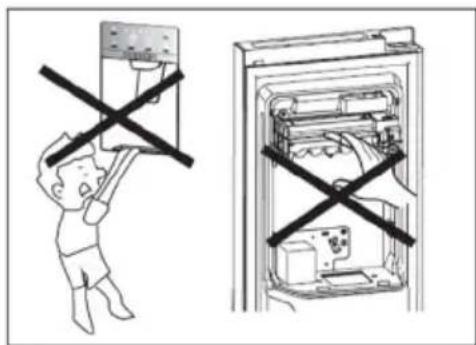
Thawing
Deep-frozen or frozen food, prior to be used, can be thawed in the freezer compartment or at room temperature, depending on the time available for this operation.
Small pieces may even be cooked still frozen, directly from the freezer. In this case, cooking will take longer.
Ice-cube
This appliance may be equipped with one or more ice-cube to produce ice.
Accessories
Movable shelves
The walls of the refrigerator are equipped with a series of runners so that the shelves can be positioned as desired.
Positioning the door balconies
To permit storage of food packages of various sizes, the door balconies can be placed at different heights. To make these adjustments proceed as follows: gradually pull the balcony in the direction of the arrows until it comes free, then reposition as required.
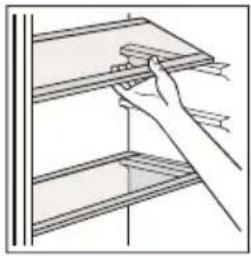
natural_image
Line drawing of a hand using a tool to clean or store shelves (no text or symbols)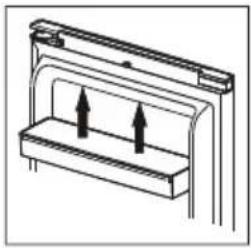
natural_image
Pure technical diagram of a mechanical assembly with two upward arrows indicating motion or force (no text or symbols)Temperature setting recommendation
| Temperature Setting Recommendation | |
| Environment Temperature | Temperature Setting |
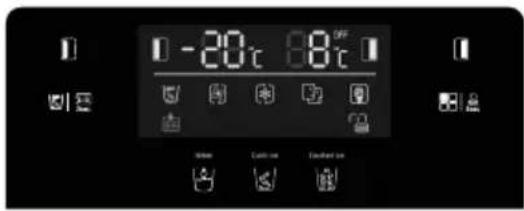 | |
| Summer | Fridge set on 4°C |
| Freezer set on -18°C | |
| Normal | Fridge set on 4°C |
| Freezer set on -18°C | |
| Winter | Fridge set on 4°C |
| Freezer set on -18°C | |
• Information above give users recommendation of temperature setting.
Daily use
Position different food in different compartments according to be below table
| Refrigerator compartments | Type of food |
| Door or balconies of fridge compartment | ·Foods with natural preservatives, such as jams, juices, drinks, condiments.·Do not store perishable foods. |
| Crisper drawer (salad drawer) | ·Fruits, herbs and vegetables should be placed separately in the crisper bin.·Do not store bananas, onions, potatoes, garlic in the refrigerator. |
| Fridge shelf – middle | ·Dairy products, eggs |
| Fridge shelf – top | ·Foods that do not need cooking, such as ready-to-eat foods, deli meats, leftovers. |
| Freezer drawer(s)/shelf | ·Foods for long-term storage.·Bottom drawer/shelf for raw meat, poultry, fish.·Middle drawer/shelf for frozen vegetables, chips.·Top drawer/shelf for ice cream, frozen fruit, frozen baked goods. |
Impact on Food Storage
• Under Recommended setting, the best storage time of fridge is no more than 3 days.
• Under Recommended setting, the best storage time of freezer is no more than 1 month.
• The best storage time may reduce under other settings.
Helpful hints and tips
Hints for freezing
To help you make the most of the freezing process, here are some important hints:
- the maximum quantity of food which can be frozen in 24 hrs. is shown on the rating plate;
- the freezing process takes 24 hours. No further food to be frozen should be added during this period;
- only freeze top quality, fresh and thoroughly cleaned, foodstuffs;
- prepare food in small portions to enable it to be rapidly and completely frozen and to make it possible subsequently to thaw only the quantity required;
- wrap up the food in aluminium foil or polythene and make sure that the packages are airtight;
- do not allow fresh, unfrozen food to touch food which is already frozen, thus avoiding a rise in temperature of the latter;
- lean foods store better and longer than fatty ones; salt reduces the storage life of food;
- water ices, if consumed immediately after removal from the freezer compartment, can possibly cause the skin to be freeze burnt;
- it is advisable to show the freezing in date on each individual pack to enable you removal from the freezer compartment, can possibly cause the skin to be freeze burnt;
- it is advisable to show the freezing in date on each individual pack to enable you to keep tab of the storage time.
Hints for storage of frozen food
To obtain the best performance from this appliance, you should:
• Make sure that the commercially frozen foodstuffs were adequately stored by the retailer;
- Be sure that frozen foodstuffs are transferred from the food store to the freezer in the shortest possible time;
- Do not open the door frequently or leave it open longer than absolutely necessary;
- Once defrosted, food deteriorates rapidly and cannot be refrozen;
- Do not exceed the storage period indicated by the food manufacture.
Hints for fresh food refrigeration
To obtain the best performance:
- Do not store warm food or evaporating liquids in the refrigerator;
- Do cover or wrap the food, particularly if it has a strong flavour.
Hints for refrigeration
Useful hints:
- Make (all types): wrap in polythene bags and place on the glass shelves above the vegetable drawer.
- For safety, store in this way only one or two days at the most.
• Cooked foods, cold dishes, etc...: these should be covered and may be placed on any shelf. - Fruit and vegetables: these should be thoroughly cleaned and placed in the special drawer(s) provided.
- butter and cheese: these should be placed in special airtight containers or wrapped in aluminum foil or polythene bags to exclude as much air as possible.
- Milk bottle: these should have a cap and should be stored in the balconies on the door.
- Bananas, potatoes, onions and garlic, if not packed, must not be kept in the fridge.
Cleaning
For hygienic reasons the appliance interior, including interior accessories, should be cleaned regularly.

Caution! The appliance may not be connected to the mains during cleaning. Danger of electrical shock! Before cleaning switch the appliance off and remove the plug from the mains, or switch off or turn out the circuit breaker or fuse. Never clean the appliance with a steam cleaner. Moisture could accumulate in electrical components, danger of electrical shock! Hot vapors can lead to the damage of plastic parts. The appliance must be dry before it is placed back into service.
Important! Ethereal oils and organic solvents can attack plastic parts, e.g. lemon juice or the juice form orange peel, butyric acid, cleanser that contain acetic acid.
- Do not allow such substances to come into contact the appliance parts.
- Do not use any abrasive cleaners.
- Remove the food from the freezer. Store them in a cool place, well covered.
- Switch the appliance off and remove the plug from the mains, or switch off or turn out the circuit breaker of fuse.
- Clean the appliance and the interior accessories with a cloth and lukewarm water. After cleaning wipe with fresh water and rub dry.
• After everything is dry place appliance back into service.
Troubleshooting
If you experience a problem with your appliance or are concerned that the appliance is not functioning properly, you could follow below tips to check the appliance before calling for service.

Caution! Before troubleshooting, disconnect the power supply. Only a qualified electrician of competent person must do the troubleshooting that is not in this manual.
Important! There are some sounds during normal use (compressor, refrigerant circulation).
| Problem | Possible cause | Solution |
| Appliance dose not work | Mains plug is not plugged in or is loose | Insert mains plug. |
| Fuse has blown or is defective | Check fuse, replace if necessary. | |
| Socket is defective | Mains malfunctions are to be corrected by an electrician. | |
| Appliance freezes or cools too much | Temperature is set too cold or the appliance runs at SUPER modes. | Turn the temperature regulator to a warmer setting temporarily. |
| The food is not frozen enough. | Temperature is not properly adjusted. | Please look in the initial Temperature Setting section. |
| Door was open for an extended period. | Open the door only as long as necessary. | |
| A large quantity of warm food was placed in the appliance within the last 24 hours. | Turn the temperature regulation to a colder setting temporarily. | |
| The appliance is near a heat source. | Please look in the installation location section. | |
| Heavy build up of frost on the door seal. | Door seal is not air tight. | Carefully warm the leaking sections of the door seal with a hair dryer (on a cool setting). At the same time shape the warmed door seal by hand such that it sits correctly. |
| Unusual noises | Appliance is not level. | Re-adjust the feet. |
| The appliance is touching the wall or other objects. | Move the appliance slightly. | |
| A component, e.g. a pipe, on the rear of the appliance is touching another part of the appliance or the wall. | If necessary, carefully bend the component out of the way. | |
| Side panels are hot | It's normal. Heat exchange is in the side panels | Take gloves to touch side panels if need. |
| Dispenser couldn't get cooling water | Failing to access the water source or open the water valve | Make sure the water source and the valve is open |
| The filter is not installed correctly | Check whether the filter direction is reversed | |
| The water valve or connectors are not installed correctly | Check whether water valve or connectors are reversed | |
| The water is not cooled enough | The fridge temperature is set too high | Set the fridge temperature lower |
| Take too much water in one time (1L) | Wait for the water cool down | |
| Take the water so often | Wait for the water cool down | |
| Dispenser couldn't get ice | No ice inside the storage box | Wait for the ice maker to finish making ice (the first time on the refrigerator needs to be fully cooled, the ice maker will start making ice); |
| Failing to access the water source or open the water valve | Make sure the water source and the valve is open | |
| The "ice off" mode is working, it will stop making ice | Turn off the "ice off" mode | |
| The pressure of water source is not enough | Ensure the source water pressure is 1.5 ~ 7 bar | |
| The water valve or connectors are not installed correctly | Check whether water valve or connectors are reversed | |
| The filter is not installed correctly | Check whether the filter direction is reversed | |
| The ice cubes are frozen together in the storage box to block the ice outlet | Remove the frozen ice cubes | |
| There is something hard in the storage box, which prevents the motor from running | Remove the thing which blocks the outlet | |
| The doors is not closed totally which will make the cold air leak out | Ensure the doors is closed totally | |
| The cubed ice or water is too small | The pressure of water source is not enough | Ensure the source water pressure is 1.5 ~ 7 bar |
| The water filter is blocked, because it has been used too long time | Replace a new water filter | |
| The water flow meter is fault | Contact maintenance personnel |
If the malfunction shows again, contact the Service Center.
These data are necessary to help you quickly and correctly. Write the necessary data here, refer to the rating plate.
This product contains a LED light source of energy efficiency class G.
Warranty conditions
Dear user,
For our warranty conditions, please scan the QR code below or use the link underneath. At the bottom in the footer you will find our warranty conditions.
https://www.exquisitbenelux.nl
For questions regarding sales you can email to: verkoop@domest.nl
For questions regarding service you can email to: service@domest.nl
For other questions you can email to: info@domest.nl
We can also be reached by phone : +31(0)314 362244
DOMEST
domestic and professional appliances

MULTIBRAND SALES & SERVICES
DOMEST
domestic and professional appliances
MULTIBRAND SALES & SERVICES
- GEBRUIKSAANWIJZING
- Side by Side koel-vriescombinatie
- Veiligheid van kinderen en kwetsbare mensen
- Veiligheidsrichtlijnen
- ⚠️ Veiligheidsrichtlijnen
- Algemene veiligheidsrichtlijnen
- Dagelijks gebruik
- Volg de onderstaande instructies om besmetting van voedsel te voorkomen:
- Reiniging en onderhoud
- Installatie
- Service
- Energiebesparing
- Milieubescherming
- WAARSCHUWING!
- Accessoires
- Deuren verwijderen
- Benodigde ruimte
- Positie
- Plaats
- Elektrische aansluiting
- Belangrijk!
- Let op!
- Gebruik van het bedieningspaneel
- Knoppen
- Bedieningspaneel
- Opmerkingen:
- Alarmsignaal open deur
- Kinderslot
- Ingebruikname
- Reiniging van de binnenkant
- Gekoeld water tappen
- Opmerking:
- IJs tappen
- Werkwijze om de dispenser te reinigen?
- Ontdooien
- IJsblokjes
- Verplaatsbare legplanken
- Het plaatsen van de deurvakken
- Factoren die de opslagperiode beïnvloeden:
- Nuttige aanwijzingen en tips
- Tips voor opslag van bevroren voedsel
- Tips voor het koelen van vers voedsel
- Reiniging
- Problemen en oplossingen
- Garantie voorwaarden
- DOMEST
- MULTIBRAND SALES & SERVICES
- INSTRUCTION MANUAL
- Side by Side
- REFRIGERATOR-FREEZER
- Safety information
- Children and vulnerable people safety
- General safety
- Daily use
- Care and cleaning
- Caution!
- Installation
- Energy saving
- Environment Protection
- Packaging materials
- Disposal of the appliance
- Product accessories
- Remove the doors
- Space Requirement
- Levelling the refrigerator
- Positioning
- Location
- Electrical connection
- Important!
- How to Use Dispenser
- When using the refrigerator for the first time or when not using it for an extended period of time:
- The following sounds are generated during normal operation:
- To get cold water:
- Warning!
- To get ice:
- How to remove the ice storage box :
- When the ice dispenser does not operate properly:
- Using the Control Panel
- Buttons
- Note!
- Display
- NOTES:
- Door open alarm
- Child safety lock
- First use
- Cleaning the interior
- How to use the dispenser?
- Get cooling water
- Get ice
- How to clean and care the dispenser?
- Thawing
- Ice-cube
- Accessories
- Movable shelves
- Positioning the door balconies
- Temperature setting recommendation
- Impact on Food Storage
- Helpful hints and tips
- Hints for freezing
- Hints for storage of frozen food
- Hints for fresh food refrigeration
- Hints for refrigeration
- Cleaning
- Troubleshooting
- Warranty conditions
Marke : Exquisit
Modell : SBS666-HCF-041EI
Kategorie : Nicht kategorisiert