
WA333 - Nicht kategorisiert SHURE - Kostenlose Bedienungsanleitung
Finden Sie kostenlos die Bedienungsanleitung des Geräts WA333 SHURE als PDF.


| Produkttyp | Kabel mit TA4F-Stecker |
| Marke | Shure |
| Modell | WA333 |
| Anschlusstyp | TA4F (4-polig) |
| Kabelmaterial | Kupferabschirmung, PVC-Ummantelung |
| Abschirmung | Kupfergeflecht |
| Kompatibilität | MX-Modelle mit Inline-Vorverstärker |
| Verwendung | Kabelverkürzung für Mikrofone |
| Werkzeuge für Montage | .038-Inch-Sechskantschlüssel, .128-Inch-Crimpzange |
| Ersatzteil Ferrrule | Teilenummer 31A2135 |
| Länge | Anpassbar durch Kürzen |
| Gewicht | ca. 50 g |
| Lieferumfang | Kabel mit TA4F-Stecker |
| Montagehinweise | Schritte in der Bedienungsanleitung befolgen |
| Wartung | Regelmäßige Überprüfung der Anschlüsse |
| Reinigung | Mit trockenem Tuch abwischen |
| Reparatur | Möglich durch Austausch des Steckers |
| Kategorie | Nicht kategorisiert |
Häufig gestellte Fragen - WA333 SHURE
Benutzerfragen zu WA333 SHURE
0 Frage zu diesem Gerät. Beantworten Sie die, die Sie kennen, oder stellen Sie Ihre eigene.
Eine neue Frage zu diesem Gerät stellen
Laden Sie die Anleitung für Ihr Nicht kategorisiert kostenlos im PDF-Format! Finden Sie Ihr Handbuch WA333 - SHURE und nehmen Sie Ihr elektronisches Gerät wieder in die Hand. Auf dieser Seite sind alle Dokumente veröffentlicht, die für die Verwendung Ihres Geräts notwendig sind. WA333 von der Marke SHURE.
BEDIENUNGSANLEITUNG WA333 SHURE
Shortening the Cable: With all new MX models being connected to the in-line preamp with a TA4F connector, it is now more difficult for an installer to shorten the cable length. In order to change the cable length, the existing TA4F adapter must be removed, cable must be shortened, and a new TA4F adapter must be reattached. Most TA4F parts can be reused. Installer will need to purchase a new ferrule (P/N 31A2135) in order to successfully reattach adapter with ensured immunity.
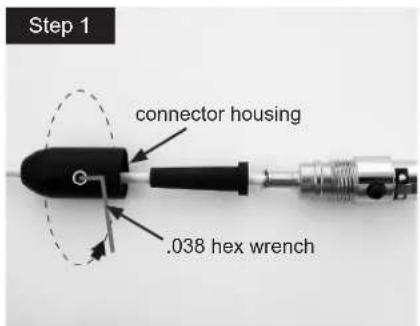
Step 1: Loosen the hex set screw using a .038 hex wrench and remove the existing TA4F connector housing.
Step 2: Shorten cable to desired length. Carefully strip cable, removing the sheath.
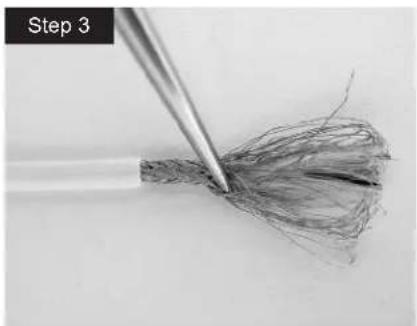
Step 3: Loosen the copper shield/GND. Using a pointed tip, carefully unbraid strands and comb copper so it is straight.
Step 4: Comb the unbraided copper strands back against the cable and make sure copper is evenly distributed around the cable. Strip and tin the +/- connections.
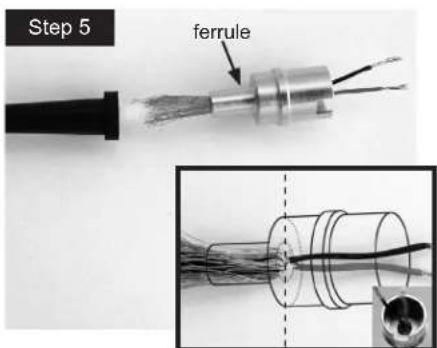
Step 5: Insert the ferrule over the copper cable, small side down. Slide the ferrule over the cable up to the bottom edge of the cup.

ORTANT: Make sure copper does not come into the cup. Do not twist the ferrule.
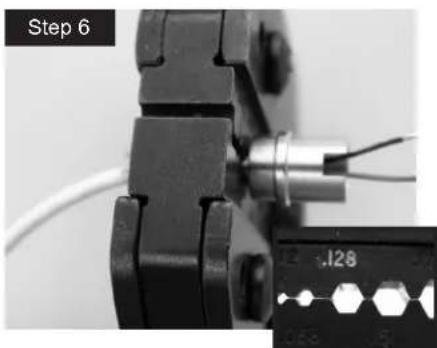
Step 6: Using a hexagonal .128 crimping tool, crimp the ferrule onto the cable. Make sure not to over crimp.
Step 7: Trim excess copper.
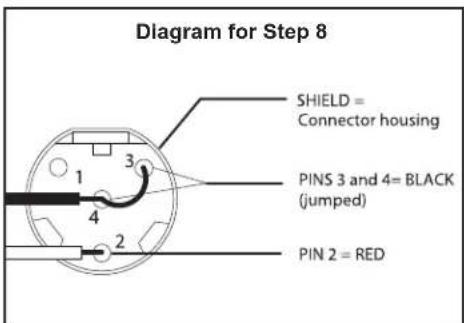
Step 8: Insert TA4F spacer and solder audio wires to TA4F.
Step 9: Twist TA4F receptacle to tighten slack.
Step 10: Reattach TA4F connector housing and tighten the hex set screw.
![Step 2 Shield Note 2 0.575 ± 0.031 [14.60 ± 0.79] 0.725 ± 0.031 [18.42 ± 0.79]](/content/2026/05/910958/images/31a3e5b0e1bd3ea9c8bab589de741e2d5b536dd2bf9f64b6b2347f7502adc60a.jpg)
natural_image
Close-up of a thin, fibrous material being held by tweezers, labeled 'Step 3' in the top-left corner (no other text or symbols)![Step 4 0.150 [3.8] 0.100 [2.5]](/content/2026/05/910958/images/ed34229ee9c8270066dc789b906d32c219d98792ee3759ca78db01cb4900fa27.jpg)
natural_image
Close-up of a mechanical clamp or connector with wires and a labeled section '128' (no readable text or symbols beyond label)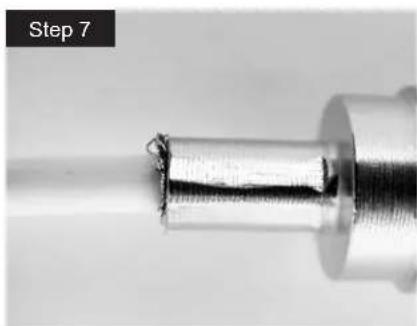
natural_image
Close-up of a metallic cylindrical object with a visible crack or defect, labeled 'Step 7' in the top-left corner (no other text or symbols)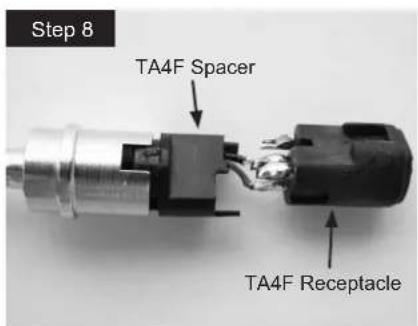
27A11874 (Rev. 1) Printed in U.S.A. ©2007, Shure Incorporated

Marke : SHURE
Modell : WA333
Kategorie : Nicht kategorisiert